light SKODA YETI 2010 1.G / 5L Repair Manual
[x] Cancel search | Manufacturer: SKODA, Model Year: 2010, Model line: YETI, Model: SKODA YETI 2010 1.G / 5LPages: 271, PDF Size: 14.71 MB
Page 91 of 271
Seats and Stowage
90
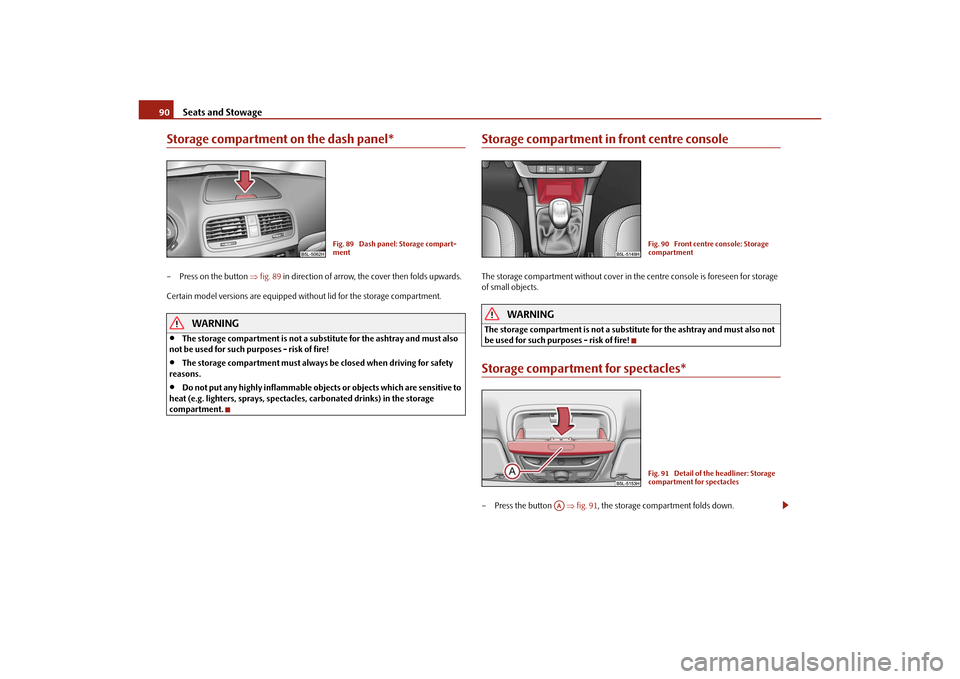
Storage compartment on the dash panel*– Press on the button fig. 89 in direction of arrow, the cover then folds upwards.
Certain model versions are equipped without lid for the storage compartment.
WARNING
The storage compartment is not a substi tute for the ashtray and must also
not be used for such purposes - risk of fire!
The storage compartment must always be closed when driving for safety
reasons.
Do not put any highly inflammable obje cts or objects which are sensitive to
heat (e.g. lighters, spra ys, spectacles, carbonated drinks) in the storage
compartment.
Storage compartment in front centre consoleThe storage compartment without cover in th e centre console is foreseen for storage
of small objects.
WARNING
The storage compartment is not a substitute for the ashtray and must also not
be used for such purposes - risk of fire!Storage compartment for spectacles*– Press the button fig. 91 , the storage compartment folds down.
Fig. 89 Dash panel: Storage compart-
ment
Fig. 90 Front centre console: Storage
compartmentFig. 91 Detail of the headliner: Storage
compartment for spectacles
AA
s2ug.6.book Page 90 Friday, April 9, 2010 2:24 PM
Page 94 of 271
Seats and Stowage93
Using the system
Safety
Driving Tips
General Maintenance
Breakdown assistance
Technical Data
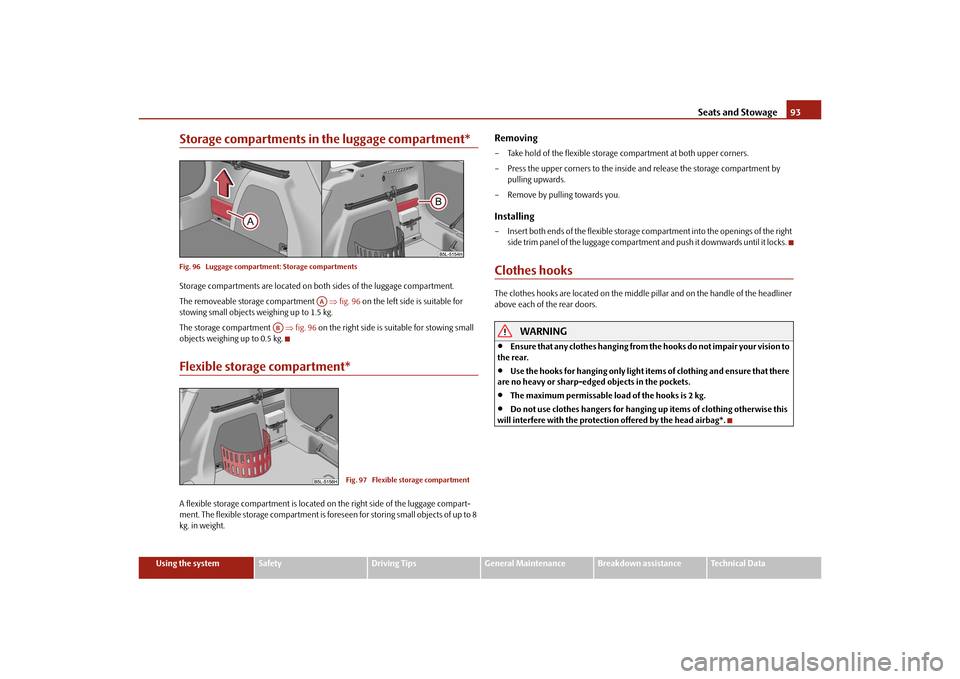
Storage compartments in the luggage compartment*Fig. 96 Luggage compartment: Storage compartmentsStorage compartments are located on bo th sides of the luggage compartment.
The removeable storage compartment fig. 96 on the left side is suitable for
stowing small objects weighing up to 1.5 kg.
The storage compartment fig. 96 on the right side is suitable for stowing small
objects weighing up to 0.5 kg.Flexible storage compartment*A flexible storage compartment is located on the right side of the luggage compart-
ment. The flexible storage compartment is foreseen for storing small objects of up to 8
kg. in weight.
Removing– Take hold of the flexible storage compartment at both upper corners.
– Press the upper corners to the inside and release the storage compartment by
pulling upwards.
– Remove by pulling towards you.Installing– Insert both ends of the flexible storage compartment into the openings of the right side trim panel of the luggage compartmen t and push it downwards until it locks.Clothes hooksThe clothes hooks are located on the middle pi llar and on the handle of the headliner
above each of the rear doors.
WARNING
Ensure that any clothes hanging from the hooks do not impair your vision to
the rear.
Use the hooks for hanging only light item s of clothing and ensure that there
are no heavy or sharp-edged objects in the pockets.
The maximum permissable load of the hooks is 2 kg.
Do not use clothes hangers for hanging up items of clothing otherwise this
will interfere with the protection offered by the head airbag*.
AA
AB
Fig. 97 Flexible storage compartment
s2ug.6.book Page 93 Friday, April 9, 2010 2:24 PM
Page 96 of 271

Heating and air conditioning system95
Using the system
Safety
Driving Tips
General Maintenance
Breakdown assistance
Technical Data
Heating and air conditioning systemIntroductionDescription and informationIf the cooling system is switched on, the temperature and air humidity drops in the
vehicle. The wellbeing of the occupants of the car is enhanced as a result of this partic-
ularly at high outside temperatures and a high air humidity. The system prevents the
windows misting up during th e cold season of the year.
The heating effect is dependent upon the c oolant temperature, thus full heat output
only occurs when the engine has reached its operating temperature.
It is possible to briefly activate recirculat ed air mode in order to enhance the cooling
effect - heating page 99, Climatic page 99, Climatronic page 102.
The air inlet in front of the windscreen must be free of ice, snow or leaves in order to
ensure that the heating and cooling systems operate properly.
After switching on the cooling Condensation from the evaporator of the air condi-
tioning may drip down and form a puddle be low the vehicle. This is quite normal and
not an indication of a leak!
WARNING
For your own safety and that of other road users, ensure that all the
windows are free of ice, snow and mistin g. Please familiarize yourself about
how to correctly operate th e heating and ventilation systems, how to demist
and defrost the windows, as well as with the cooling mode.
You should not leave recirculated air mode on over a longer period of time,
as “stale” air may result in fatigue in the driver and occupants, divert your
attention and also cause the windows to mist up. The risk of having an accident
increases. Switch recirculated air mode off as soon as the windows begin
misting up.
Note
The used air streams out through the air removal openings in the luggage compart-
ment.
If the cooling system has not been switched on for a lengthy period, odours may
be produced at the evaporator because of deposits. Switch the cooling system on at
least once a month for approximately 5 minu tes at the highest blower stage - also
during the cold season of the year - in order to avoid such odours. Also open a window
for a short time.
We recommend that you do not smoke in the vehicle when the recirculating air
mode is operating since the smoke which is drawn at the evaporator from the interior
of the vehicle forms deposits in the evapor ator of the air conditioning system. This
produces a permanent odour when the air conditioning system is operating which can
only be eliminated through considerable effort and expense (replacement of
compressor).
Please refer to the information regarding the recirculated air mode for heating
page 99 and/or for Climatic page 99 or Climatronic page 102.
Using the air conditioning system economicallyThe compressor on the air conditioning syst em uses power from the engine when in
cooling mode which will effect the fuel consumption.
It recommended to open the windows or the doors of a vehicle for which the interior
has been strongly heated through the effect of direct sunlight in order to allow the
heated air to escape.
The cooling system should not be switched on while travelling when the window is
open.
The desired interior temperature can also be achieved without switching in the cooling
system just by switching to fresh air mode.
For the sake of the environment
When you economize on fuel, you also reduce pollutant emissions.
s2ug.6.book Page 95 Friday, April 9, 2010 2:24 PM
Page 100 of 271
Heating and air conditioning system99
Using the system
Safety
Driving Tips
General Maintenance
Breakdown assistance
Technical Data
Recirculated air mode
In recirculated air mode air is sucked out of the interior of the vehicle
and then fed back into the interior.Recirculated air mode prevents polluted air outside the vehicle from getting into the
vehicle, for example when driving through a tunnel or when standi ng in a traffic jam.Switching recirculated air mode on– Press the button - the warning light lights up in the button page 97, fig. 101 .Switching recirculated air mode off– Press again the button - the warning light in the button goes out.
The recirculated air mode is switched off automatically if the air distribution control
is in position
page 97, fig. 101. You can also switch recirculated air mode on
again from this setting by repeatedly pressing button .
WARNING
You should not leave recirculated air mode on over a longer period of time, as
“stale” air may result in fatigue in the driver and occupants, divert your atten-
tion and also cause the windows to mist up. The risk of having an accident
increases. Switch recirculated air mode off as soon as the windows begin
misting up.Climatic* (semi-automatic air conditioning system)Description
The Climatic is a combined coolin g and heating system. It makes it
possible to optimally control the air temperature at any season of the
year.Description of the Climatic
It is important for your safety and for your driving comfort that the Climatic is operating
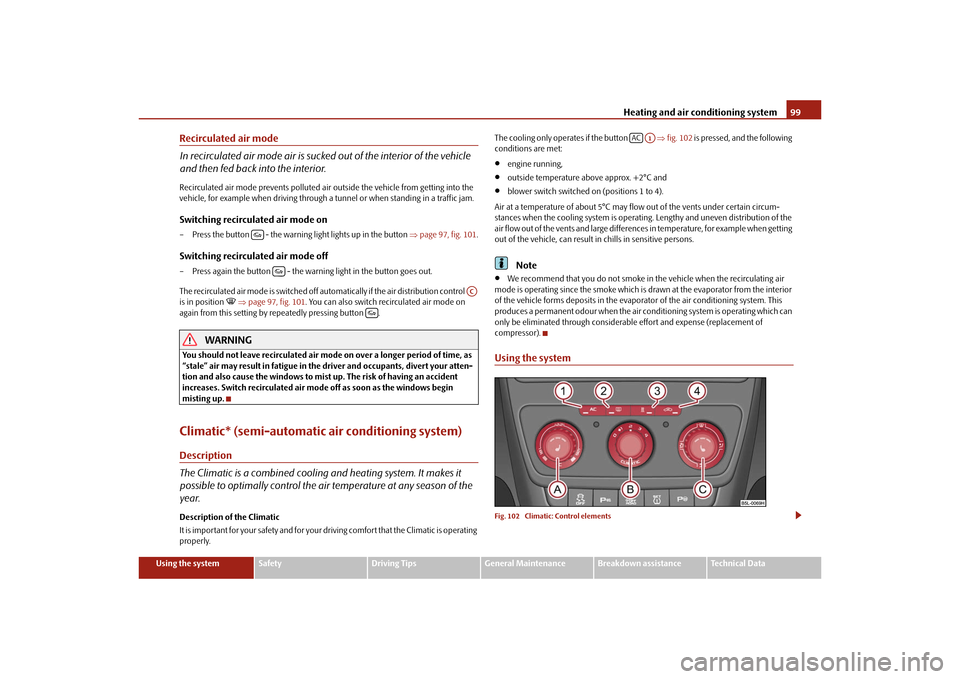
properly. The cooling only operat
es if the button fig. 102 is pressed, and the following
conditions are met:
engine running,
outside temperature above approx. +2°C and
blower switch switched on (positions 1 to 4).
Air at a temperature of about 5°C may flow out of the vents under certain circum-
stances when the cooling system is operating. Lengthy and uneven distribution of the
air flow out of the vents and large differences in temperature, for example when getting
out of the vehicle, can result in chills in sensitive persons.Note
We recommend that you do not smoke in the vehicle when the recirculating air
mode is operating since the smoke which is drawn at the evaporator from the interior
of the vehicle forms deposits in the evapor ator of the air conditioning system. This
produces a permanent odour when the air conditioning system is operating which can
only be eliminated through considerable effort and expense (replacement of
compressor).
Using the systemFig. 102 Climatic: Control elements
AC
AC
A1
s2ug.6.book Page 99 Friday, April 9, 2010 2:24 PM
Page 101 of 271
Heating and air conditioning system
100
Setting temperature
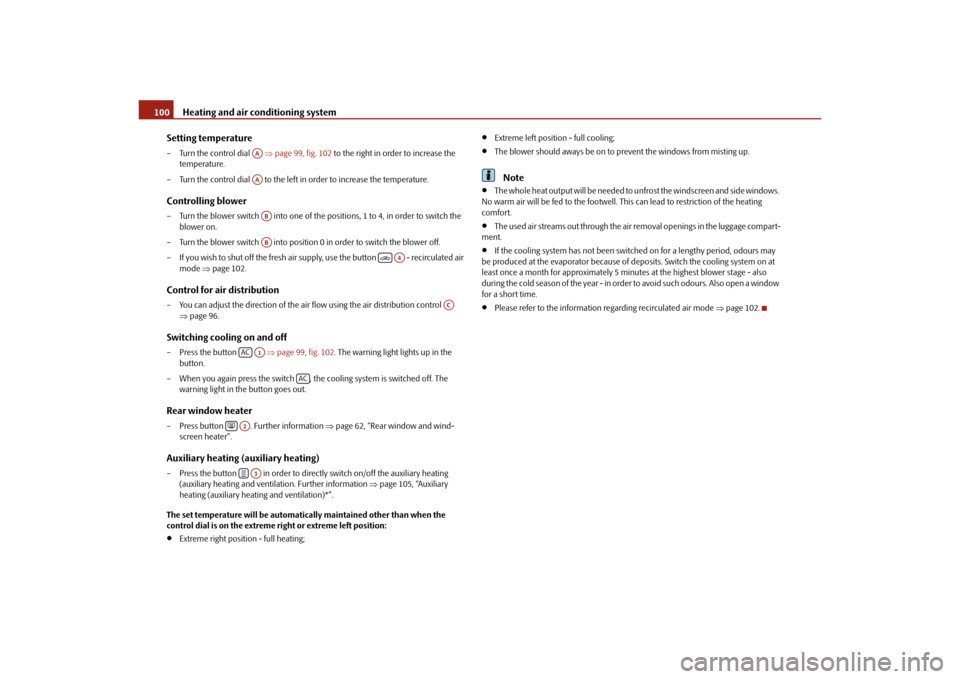
– Turn the control dial page 99, fig. 102 to the right in order to increase the
temperature.
– Turn the control dial to the left in order to increase the temperature.Controlling blower– Turn the blower switch into one of the po sitions, 1 to 4, in order to switch the
blower on.
– Turn the blower switch into position 0 in order to switch the blower off.
– If you wish to shut off the fresh air supp ly, use the button - recirculated air
mode page 102.Control for air distribution– You can adjust the direction of the air flow using the air distribution control
page 96.Switching cooling on and off– Press the button page 99, fig. 102 . The warning light lights up in the
button.
– When you again press the switch , the cooling system is switched off. The warning light in the button goes out.Rear window heater– Press button . Further information page 62, “Rear window and wind-
screen heater”.Auxiliary heating (auxiliary heating)– Press the button in order to directly switch on/off the auxiliary heating
(auxiliary heating and ventil ation. Further information page 105, “Auxiliary
heating (auxiliary heat ing and ventilation)*”.
The set temperature will be automatically maintained other than when the
control dial is on the extreme right or extreme left position:
Extreme right position - full heating;
Extreme left position - full cooling;
The blower should aways be on to prevent the windows from misting up.Note
The whole heat output will be needed to unfrost the windscreen and side windows.
No warm air will be fed to the footwell. Th is can lead to restriction of the heating
comfort.
The used air streams out through the air removal openings in the luggage compart-
ment.
If the cooling system has not been switched on for a lengthy period, odours may
be produced at the evaporator because of deposits. Switch the cooling system on at
least once a month for approximately 5 minutes at the highest blower stage - also
during the cold season of the year - in order to avoid such odours. Also open a window
for a short time.
Please refer to the information regarding recirculated air mode page 102.
AAAAABAB
A4
AC
AC
A1
AC
A2A3
s2ug.6.book Page 100 Friday, April 9, 2010 2:24 PM
Page 103 of 271
Heating and air conditioning system
102
Recirculated air mode
In recirculated air mode air is sucked out of the interior of the vehicle
and then fed back into the interior.Recirculated air mode prevents polluted air outside the vehicle from getting into the
vehicle, for example when driving through a tunnel or when standi ng in a traffic jam.Switching recirculated air mode on– Press the button page 99, fig. 102 the warning light lights up in the
button.Switching recirculated air mode off– Press again the button - the warning light in the button goes out.
The recirculated air mode is switched off automatically if the air distribution control
is in position
page 99, fig. 102. You can also switch recirculated air mode on
again from this setting by repeatedly pressing button .
WARNING
You should not leave recirculated air mode on over a longer period of time,
as “stale” air may result in fatigue in the driver and occupants, divert your
attention and also cause the windows to mist up. The risk of having an accident
increases. Switch recirculated air mode off as soon as the windows begin
misting up.
Climatronic* (automatic air conditioning)Description
The Climatronic system is a combination of an automatic heating, fresh
air and cooling system which provides optimal comfort for the occu-
pants of the car.The Climatronic maintains fu lly automatically a convenience temperature. This is
achieved by automatically varying the temper ature of the outflowing air, the blower stages and the air distribution. The system also takes into account sunlight which elim-
inates the need to alter the settings manually. The
automatic mode page 103
ensures maximum wellbeing of the occupants at all times of the year.
Description of Climatronic system
The cooling operates only if the following conditions are met:
engine running,
outside temperature above approx. +2°C,
switched on.
The AC compressor is switched off at a high coolant temperature in order to provide
cooling at a high load of the engine.
Recommended setting for all periods of the year:
Set the desired temperature, we recommend 22°C.
Press the button fig. 103 .
Move the air outlet vents 3 and 4 page 96, fig. 99 , so that the air flow is directed
slightly upwards.Note
On vehicles equipped with a factory-fitted radio* or navigation*, the information
of the Climatronic is also shown on the display. This function can be switched off, see
operating instructions of the radio* or the navigation system*.
A4
AC
AC
AUTO
s2ug.6.book Page 102 Friday, April 9, 2010 2:24 PM
Page 104 of 271
Heating and air conditioning system103
Using the system
Safety
Driving Tips
General Maintenance
Breakdown assistance
Technical Data
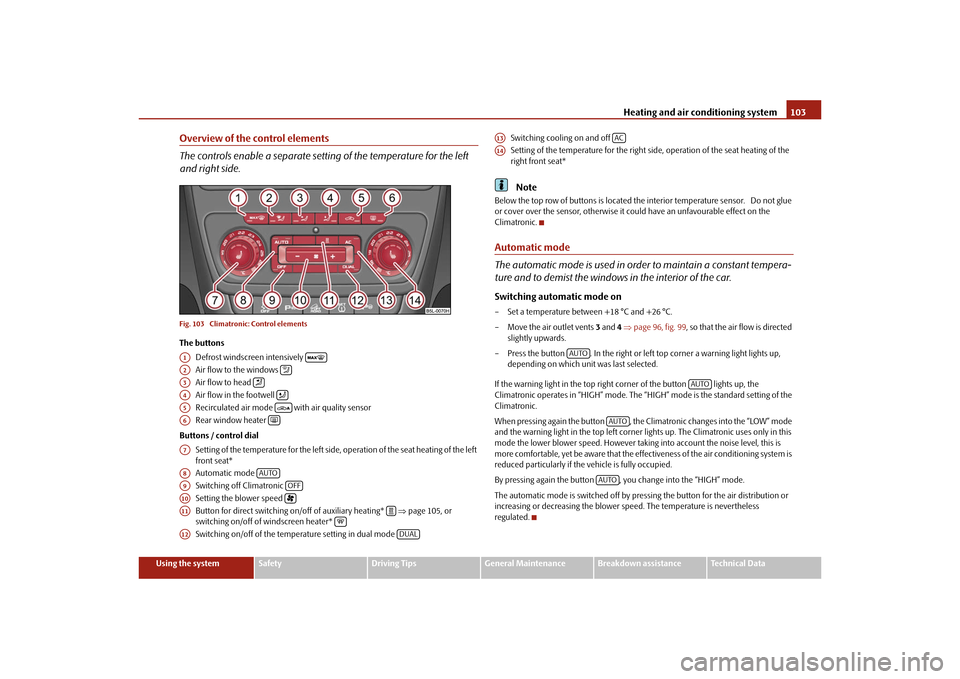
Overview of the control elements
The controls enable a separate setting of the temperature for the left
and right side.Fig. 103 Climatronic: Control elementsThe buttons
Defrost windscreen intensively
Air flow to the windows
Air flow to head
Air flow in the footwell
Recirculated air mode with air quality sensor
Rear window heater
Buttons / control dial Setting of the temperature for the left side, operation of the seat heating of the left
front seat*
Automatic mode
Switching off Climatronic
Setting the blower speed
Button for direct switching on/off of auxiliary heating* page 105, or
switching on/off of windscreen heater*
Switching on/off of the temperature setting in dual mode Switching cooling on and off
Setting of the temperature for the right side, operation of the seat heating of the
right front seat*
Note
Below the top row of buttons is located the interior temperature sensor. Do not glue
or cover over the sensor, otherwise it co
uld have an unfavourable effect on the
Climatronic.Automatic mode
The automatic mode is used in orde r to maintain a constant tempera-
ture and to demist the windows in the interior of the car.Switching automatic mode on– Set a temperature between +18 °C and +26 °C.
– Move the air outlet vents 3 and 4 page 96, fig. 99 , so that the air flow is directed
slightly upwards.
– Press the button . In the right or left top corner a warning light lights up, depending on which unit was last selected.
If the warning light in the top right corner of the button lights up, the
Climatronic operates in “HIGH” mode. The “HIGH” mode is the standard setting of the
Climatronic.
When pressing again the button , the Climatronic changes into the “LOW” mode
and the warning light in the top left corner lights up. The Climatronic uses only in this
mode the lower blower speed. However taking into account the noise level, this is
more comfortable, yet be aware that the effectiveness of the air conditioning system is
reduced particularly if th e vehicle is fully occupied.
By pressing again the button , yo u change into the “HIGH” mode.
The automatic mode is switched off by pres sing the button for the air distribution or
increasing or decreasing the blower speed. The temperature is nevertheless
regulated.
A1
A2
A3
A4
A5
A6
A7A8
AUTO
A9
OFF
A10
A11
A12
DUAL
A13
AC
A14
AUTO
AUTO
AUTOAUTO
s2ug.6.book Page 103 Friday, April 9, 2010 2:24 PM
Page 105 of 271
Heating and air conditioning system
104
Switching cooling on and offSwitching cooling on and off–Press the button page 103, fig. 103 . The warning light lights up in the button.
– When you again press the switch , the cooling system is switched off. The warning light in the button goes out. Only the function of the ventilation remains
active when no lower temperature than the outside temperature can be reached.Setting temperatureYou can separate the interior temperature for the left and right side separately.
– You can set the temperature for both sides after switching on the ignition with the
control dial .
– If you wish to set the temperature for the right side, turn the control dial . The warning light in the button lights up, this indicates that differing tempera-
tures for the left and right side can be set.
If the warning light in the button lights up, the temperature for both sides
cannot be set with the control dial . You can reinitiate this function by pressing the
button . The warning light in the button which indicates the possibility to set
differing temperatures for the left and right side, goes out.
You can set the interior temperature between +18°C and +26°C. The interior temper-
ature is regulated automatically within this range. If you chose a temperature lower
than +18°C, a blue symbol lights up at the start of the numerical scale. If you chose a
temperature higher than +26°C, a red symbol lights up at the end of the numerical
scale. In both limit positions the Climatroni c operates at maximum cooling or heating
capacity, respectively. The temperatur e is not controlled in this case.
Lengthy and uneven distri bution of the air flow out of the vents (in particular at the leg
area) and large differences in temperature, for example when getting out of the vehicle,
can result in chills in sensitive persons.
Recirculated air mode
In recirculated air mode air is sucked out of the interior of the vehicle
and then fed back into the interior. When the automatic air distribution
control is switched on, an air quality sensor measures the concentration
of pollutants in the drawn-in air.Recirculated air mode prevents polluted air outside the vehicle from getting into the
vehicle, for example when driving through a tunn el or when standing in a traffic jam. If
a considerable increase in concentration of pollutants is recognized by the air quality
sensor, when the automatic air distribution co ntrol is switched on, the air distribution
control will temporarily be switched off. If the concentration of pollutants decreases to
the normal level, the air distribution control is automatically switched off so that fresh
air can be guided into the vehicle interior.Switching recirculated air mode on– Press the button repeatedly until the warning light on the left side of the
button lights up.Switch on automatic air distribution control– Press the button repeatedly until the warning light on the right side of the
button lights up.Switch off automatic air distribution control temporarily– If the air quality sensor does not switch on the air distribution control automatically
when there is a nauseating smell, you can switch it on yourself by pressing the
button *. The warning light lights up in the button on the left side.Switching recirculated air mode off– Press the button or press the button repetitively, until the warning
lights in the button go out.
WARNING
You should not leave recirculated air mode on over a longer period of time, as
“stale” air may result in fatigue in the driver and occupants, divert your atten-
AC
AC
A7
A14
DUALDUALA7
DUAL
AUTO
s2ug.6.book Page 104 Friday, April 9, 2010 2:24 PM
Page 106 of 271
Heating and air conditioning system105
Using the system
Safety
Driving Tips
General Maintenance
Breakdown assistance
Technical Data
tion and also cause the windows to mist up. The risk of having an accident
increases. Switch recirculated air mode off as soon as the windows begin
misting up.
Note
If the windscreen mists up, press the button
page 103, fig. 103 . After
the windscreen has been demisted, press the button .
The automatic air distribution control operates only if the outside temperature is
higher than approx. 2°C.
Controlling blower
There are a total of seven blower stages available.The Climatronic system controls the blower st ages automatically in line with the inte-
rior temperature. You can also , however, a dapt the bl ower stages ma nua lly to suit y our
particular needs.
– Press again the button on the left side (reduce blower speed) or on the right side (increase blower speed).
If you switch off the blower, the Climatronic is switched off.
The set blower speed is displayed above the button when the respective number
of warning lights come on.
WARNING
“Stale air” may result in fatigue in the driver and occupants, reduce atten-
tion levels and also cause the windows to mist up. The risk of having an accident
increases.
Do not switch the Climatronic system off for longer than necessary.
Switch the Climatronic system on as soon as the windows mist up.
Defrosting windscreenDefrosting windscreen - switching on– Press the button page 103, fig. 103 .Defrosting windscreen - switching off– Once again press the button or the button .
The temperature control is controlled automatically. More air flows out of the air outlet
vents 1 and 2.Auxiliary heating (auxiliary heating and ventilation)*Description and important information
The auxiliary heating (auxiliary he ating and ventilation) heats or
supplies the interior of the vehicl e with fresh air independent of the
engine.Auxiliary heating (auxiliary heating)
The auxiliary heating (auxiliary heating) functions in connection with the Climatic or
Climatronic.
It can be used when stationary, when engi ne is switched off for preheating of the
vehicle as well as while driving (only during the heating phase of the engine).
The engine is also preheated when the vehicle is stationary and the engine is switched
off, if the auxiliary heating is switched on.
The auxiliary heating (auxiliary heating) wa rms up the coolant during the combustion
of fuel from the vehicle tank. The coolant warms up the air, which (if the blower speed
is not set to zero) flows into the occupant compartment.
Auxiliary ventilation
The auxiliary ventilation enables fresh air to flow into the vehicle interior by switching
off the engine, whereby the interior temperature is effectively decreased (e.g. with the
vehicle parked in the sun).
WARNING (continued)
A1AUTO
AUTO
s2ug.6.book Page 105 Friday, April 9, 2010 2:24 PM
Page 108 of 271
Heating and air conditioning system107
Using the system
Safety
Driving Tips
General Maintenance
Breakdown assistance
Technical Data
Using the system
So that the auxiliary heating (auxiliary heating and ventilation) func-
tions according to your expectations, it is necessary to carry out the
basic setting before its programming.Basic setting– On the information display, select in the Main menu the menu point
Aux. heating .
– In the menu Aux. heating select the menu point Weekday and set the current day.
– By selecting the menu point Back, you will reach in the menu Aux. heating.
– In the menu Aux. heating select the menu point Running time and set the desired
running time in steps of 5 minutes. The running time can be 10 to 60 minutes.
– By selecting the menu point Back, you will reach in the menu Aux. heating.
– In the menu Aux. heating select the menu point Mode.
– In the menu Mode select the desired mode Heating for or Ventilation for .ProgrammingFor the programming of the auxiliary heating (auxiliary heating and ventilation) in the
menu Aux. heating (Aux. heating) there are three pre-set times:
Pre-set time 1
Pre-set time 2
Pre-set time 3
In each pre-set time, the day and the time (hour and minute) can be set for switching
on the auxiliary heating and/or ventilation.
An empty position can be fo und between Sunday and Monday when selecting the day.
If this empty position is selected, the activation is performed without taking into
account the day.
If you leave the pre-set menu by selecting the menu Back or do not make changes on
the display for longer than 10 seconds, the set values are stored, but the pre-set time
is not active. Both other pre-set times can be prog
rammed and stored in the same way.
If you select the menu Activate after setting the desired values, appears in the display
Pre-set time (weekday, hours, minute) activated. and the set pre-set time is active.
Only one programmed pre-set time can be active.
The last programmed pre-set time remains active.
After the auxiliary heating activates at the set time, it is necessary to pre-set a time
again.
Changing the active pre-set time is carried out after selecting the menu point Activate
in the menu Aux. heating (auxiliary heating) by selecting a pre-set time.
The prerequisite for the correct switching on of the auxiliary heating (auxiliary heating
and ventilation) according to the programmed pre-set time is the correct setting of the
current time and the weekday page 107.
If the system is running, a warning light in th e button for direct switching on/off of the
auxiliary heating lights up.
The running system deactivates after expiration of the operating period or is deacti-
vated earlier by pressing the button for direct switching on/off of the auxiliary heating
page 106.
A random pre-set time can be deac tivated by selecting the menu point Deactivate in
the menu Activate.
After selecting the menu Fac to r y s e tt ing in the menu Aux. heating , it is possible to
return to the factory setting.
s2ug.6.book Page 107 Friday, April 9, 2010 2:24 PM