radio SKODA YETI 2010 5L Columbus Navigation System Manual
[x] Cancel search | Manufacturer: SKODA, Model Year: 2010, Model line: YETI, Model: SKODA YETI 2010 5LPages: 71, PDF Size: 3.65 MB
Page 18 of 71
Range selector key RADIO
16Range selector key RADIORadio modeSelect radio stationAll radio stations with strong reception are au
tomatically stored in
the list of stations.
The list of stations is automatically updated on a regular basis.Call up main menu RADIO and choose frequency range– Press the range selector key to call up the
RADIO
main menu. The currently
heard radio station is indicated at the top of the touch-screen.
– Press the range selector key to change the frequency range. Alternatively,
press on the function key in the main menu
RADIO
and on or in the
pop-up window. The current frequency range is indicated on the top left on the display.
Changing radio station– When pressing the arrow keys
on the unit or the arrow keys on the touch-screen
of the main menu
RADIO
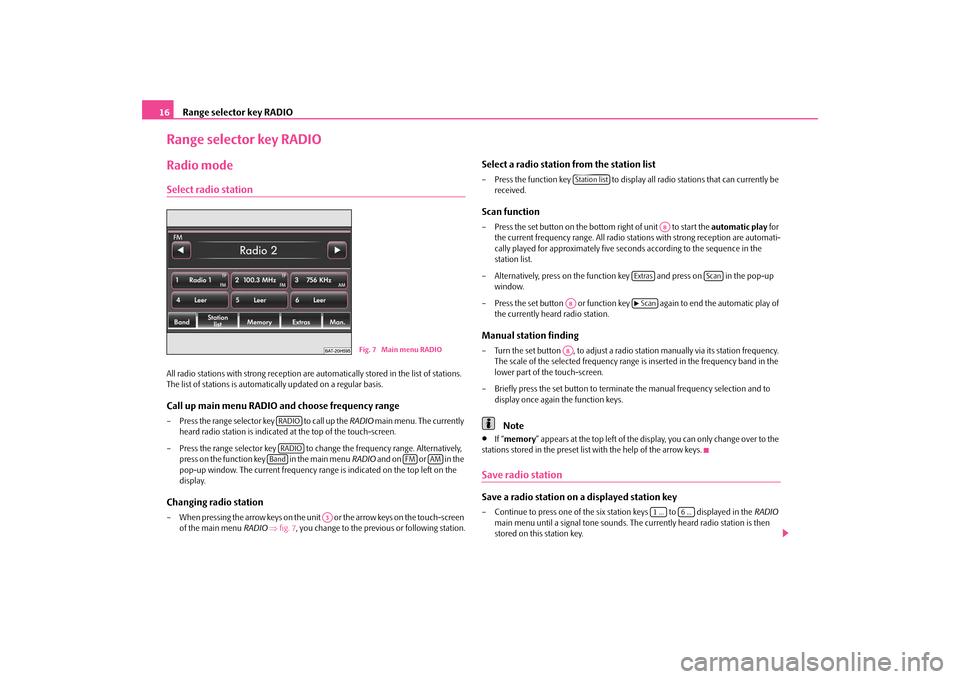
⇒fig. 7
, you change to the previous or following station.
Select a radio station from the station list– Press the function key to display all radio stations that can currently be
received.
Scan function– Press the set button on the bottom right of unit to start the
automatic play
for
the current frequency range. All radio stat
ions with strong reception are automati-
cally played for approximat
ely five seconds according to the sequence in the
station list.
– Alternatively, press on the function key and press on in the pop-up
window.
– Press the set button or function key again to end the automatic play of
the currently heard radio station.
Manual station finding– Turn the set button , to adjust a radio st
ation manually via it
s station frequency.
The scale of the selected frequency range is inserted in the frequency band in the lower part of the touch-screen.
– Briefly press the set button to terminat
e the manual frequency selection and to
display once again the function keys.Note
•
If “ memory
” appears at the top left of the displa
y, you can only change over to the
stations stored in the preset list with the help of the arrow keys.Save radio stationSave a radio station on a displayed station key– Continue to press one of the six station keys to displayed in the
RADIO
main menu until a signal tone sounds. The currently heard radio station is then stored on this station key.
Fig. 7 Main menu RADIO
RADIORADIOBand
FM
AM
A3
Station list
A8
Extras
Scan
A8
�b Scan
A8
1 ...
6 ...
s32k.a.book Page 16 Friday, September 18, 2009 1:54 PM
Page 19 of 71
Range selector key RADIO
17
Save radio station– Press on the function key
while in the main menu
Radio
⇒page 16, fig. 7
.
A pop-up window with a range of
memory space groups is opened.
– When you select a memory space group,
a menu for saving six radio stations is
opened.
– Select a memory space and save the stat
ion by pressing on the memory space.
– If a memory space is selected, which already holds a radio station, it will be
overwritten.
Calling up a saved radio stationIf the currently heard radio station is already saved in the preset list, the memory space number is displayed behi
nd the description of the frequency range (
FM
or AM
).
Calling up a station via the station keys– Briefly press on one of the six station keys to displayed in the main menu
RADIO
until a signal tone sounds.
Select stations from the preset list– In the pop-up window, select the station
keys to be displayed in the main menu
RADIO
.
– Press the display of the desired station in the preset list.RDS functionRDS (“
Radio
Data
System”) serves to transmit progra
m identification and additional
services therefore also enabling automatic tracking of stations. In the event of sufficiently satisfactory reception, the suitable RDS radio stations will display the station name instead of the station frequency. If a radio station sends additional informat
ion via the RDS function while a station is
being stored, it can occur that the name of
the radio station is later displayed incor-
rectly in the preset list.
Change station name You can manually adap
t the station name.
Choose the stored radio station and wait until the correct name is displayed on the touch-screen. Continue to press on the disp
lay of the station name between the arrow
keys until “
Station name stored
” is displayed.
Traffic programme function TPSwitching traffic programme TP (TMC Program) on or off– Press the range selector key to call up the
RADIO
main menu.
– Press the function key . – Briefly press on in the opening pop-up
window to switch the traffic programme
function on or off.
The display “
TP” in combination with a station name (e.g. in the station or preset list),
indicates a traffic programme station. Irrespective of which radio station is heard,
an additional receiver part in the unit
ensures that a traffic programme station can al
ways be received as
long as the traffic
programme function is switched on. The functionality of the tr
affic programme function “
TP” is displayed at the top right on
the touch-screen. If no traffic programme station can be rece
ived because, for example, radio reception
is interrupted in general, “
No TP
” will be displayed instead of “
TP”. Remember that car
parks, tunnels, high building
s or mountains can interrupt
the radio signal up to the
total loss of reception. Incoming traffic announcement If you wish to interrupt the transmission
of the traffic announcement, press on the
function key in the pop-up window
Traffic announcement
. The traffic
programme function remains available and
a following traffic announcement is made
again while the audio mode is in oper
ation. Pressing the function key
will switch off the traffic programme function permanently.
memory
1 ...
6 ...
RADIO
Extras
TP
Cancel
TP deactivated
s32k.a.book Page 17 Friday, September 18, 2009 1:54 PM
Page 20 of 71

Range selector key RADIO
18Display offDisplay off– Pressing the function key makes it possible to set the touch-
screen to energy save mode, the display
is black and the current information about
the audio source is only displayed in the lower part.
– The display can be switched on again by
touching the touch-screen or by pressing
any button, except the control button.
Switch off display
s32k.a.book Page 18 Friday, September 18, 2009 1:54 PM
Page 21 of 71
Range selector key TRAFFIC (TMC)
19
Range selector key TRAFFIC (TMC)Displaying traffic reports TRAFFIC (TMC)TMC traffic reports are used
during route guidance, depend
ing on the set-up for the
automatic optimization of the route,
to report possible traffic problems.
– Press on the range selector key to display the current traffic reports in a list.– Press on the display of a traffic repo
rt to show it in a detailed display.
– You can browse through all the traffic information received in the detailed display,
also in sequence by using the arrow keys.
From which TMC station the reports are to
be announced can be determined in the
Setup Radio
.
During route guidance all set-up dependin
g TMC traffic reports are displayed in the
surrounding area of the location or only th
ose specified on the calculated route list.
Traffic problems are illustrated in the de
tailed display and in the map by a corre-
sponding symbol. The direction, in which a tr
affic problem is found in the map will be
displayed by an arrow in the symbol. In the event of a traffic problem an alternat
ive route can also be
calculated manually.
Note
•
The unit has a continuous background of
TMC traffic reports providing a TMC
station at the current location can be receiv
ed. The station you are listening to does not
have to be a TMC station.•
TMC traffic reports can only be evaluated
and displayed by the
unit if the naviga-
tion data for the currently driven area is stored in the unit memory or can be called up via an inserted navigation DVD.•
The quality of the dynamic route guidan
ce depends on the transmitted traffic
announcements. The radio stations broadcasti
ng this information are responsible for
the content.•
TMC traffic reports are necessar
y for the dynamic navigation.
•
There may not be any advantage in avoiding the traffic jam if, as a result of the TMC
traffic reports, the diversio
n is also heavily congested.
TMC
s32k.a.book Page 19 Friday, September 18, 2009 1:54 PM
Page 23 of 71
Range selector key MEDIA
21
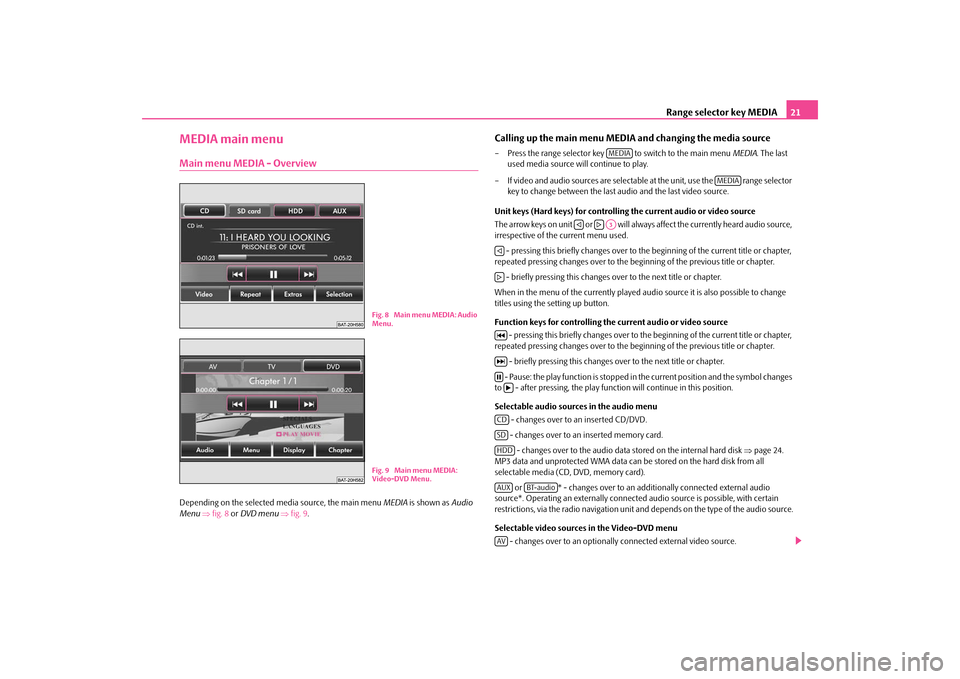
MEDIA main menuMain menu MEDIA - OverviewDepending on the selected
media source, the main menu
MEDIA
is shown as
Audio
Menu
⇒fig. 8
or DVD menu
⇒fig. 9
.
Calling up the main menu MEDI
A and changing the media source
– Press the range selector key to switch to the main menu
MEDIA
. The last
used media source will continue to play.
– If video and audio sources are selectable at the unit, use the range selector
key to change between the last audio and the last video source.
Unit keys (Hard keys) for controlling the current audio or video source The arrow keys on unit or will always affect the currently heard audio source, irrespective of the current menu used. - pressing this briefly changes over to th
e beginning of the current title or chapter,
repeated pressing changes over to the be
ginning of the previous title or chapter.
- briefly pressing this changes over to the next title or chapter.When in the menu of the currently played audi
o source it is also possible to change
titles using the setting up button. Function keys for controlling the current audio or video source
- pressing this briefly changes over to th
e beginning of the current title or chapter,
repeated pressing changes over to the be
ginning of the previous title or chapter.
- briefly pressing this changes ov
er to the next title or chapter.
- Pause: the play function is stopped in
the current position and the symbol changes
to - after pressing, the play functi
on will continue in this position.
Selectable audio sources in the audio menu
- changes over to an inserted CD/DVD. - changes over to an inserted memory card. - changes over to the audio data stored on the internal hard disk
⇒page 24.
MP3 data and unprotected WMA data can be
stored on the hard disk from all
selectable media (CD, DVD, memory card).
or * - changes over to an additionally connected external audio
source*. Operating an externally connected
audio source is possible, with certain
restrictions, via the radio navi
gation unit and depends on the type of the audio source.
Selectable video sources in the Video-DVD menu
- changes over to an optionally connected external video source.
Fig. 8 Main menu MEDIA: Audio
Menu.Fig. 9 Main menu MEDIA: Video-DVD Menu.
MEDIA
MEDIA
�ƒ
�„A3
�ƒ�„�M�L�N�bCDSDHDDAUX
BT-audio
AV
s32k.a.book Page 21 Friday, September 18, 2009 1:54 PM
Page 27 of 71
Range selector key MEDIA
25
Notes for the care of the CDs If a CD is soiled, please never clean the CD in the direction of a circle but rather from inside to outside with a soft
lint-free cloth. In case of severe layers of dirt we recom-
mend to clean the CD with a commercially avai
lable CD cleaner. Also in this case do
not clean the CD in the direction of a circle
but rather from inside to outside and then
let it dry off.
WARNING
•
The CD player is a 1st class laser product. There is a definite risk of injury
from invisible laser beams if it is opened.•
The CD player contains no parts that ha
ve to be serviced or repaired. Please
contact your specialist garage
if a mechanical defect o
ccurs or the CD player has
to be repaired.
Caution
•
Never use liquids such as gasoline, paint thinner or disk cleaner, otherwise the
surface of the CD could get damaged!•
Never expose the CD to direct sun rays!
•
Only write on the CD/DVD with appropriate writing tools.
•
Do not affix anything to the CD!Note
Dirt or damage of a CD can
lead to difficulties when “reading” the information. The
difficulty in reading the error depends on the
dirt or on the severity of the mechanical
damage. Severe scratches cause reading errors which can make the CD jump or “get stuck”. All CDs must be treated carefully an
d always be stored in a protective case.
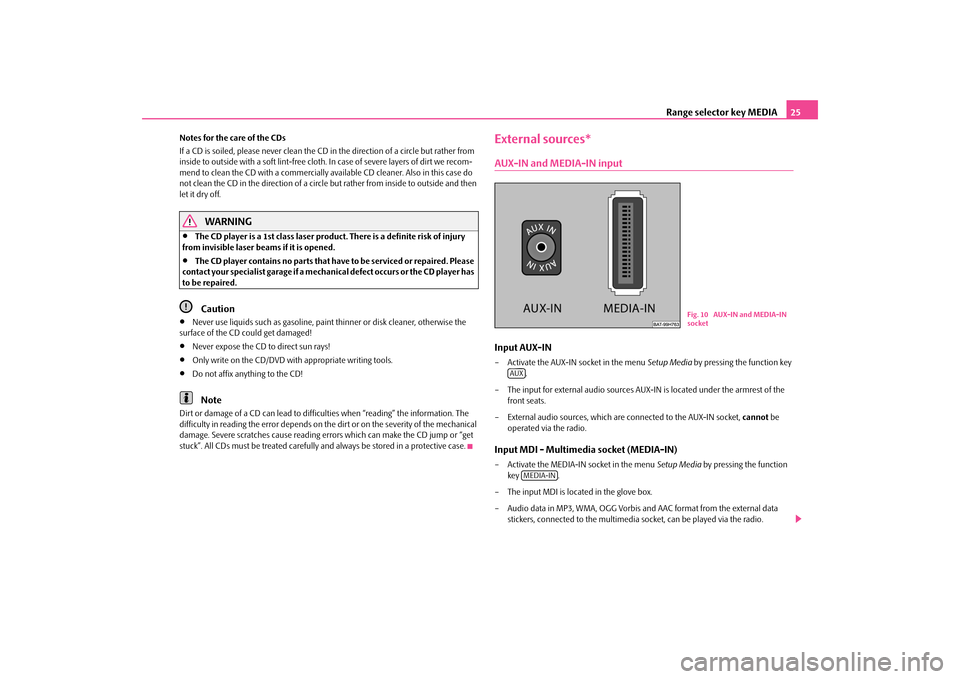
External sources*AUX-IN and MEDIA-IN inputInput AUX-IN– Activate the AUX-IN socket in the menu
Setup Media
by pressing the function key
.
– The input for external audio sources AUX-IN is located under the armrest of the
front seats.
– External audio sources, which are connected to the AUX-IN socket,
cannot
be
operated via the radio.
Input MDI - Multimedia socket (MEDIA-IN)– Activate the MEDIA-IN socket in the menu
Setup Media
by pressing the function
key .
– The input MDI is located in the glove box. – Audio data in MP3, WMA, OGG Vorbis
and AAC format from the external data
stickers, connected to the multimedia
socket, can be played via the radio.
Fig. 10 AUX-IN and MEDIA-IN socket
AUX
MEDIA-IN
s32k.a.book Page 25 Friday, September 18, 2009 1:54 PM
Page 28 of 71
Range selector key MEDIA
26– External audio sources, which are
connected to the MEDIA-IN socket,
can
be oper-
ated via the radio
⇒page 21.
It is possible to play back external audio
sources via the loudspea
kers of the radio in
the vehicle. You can select another audio source on the ra
dio at any time. As long as the external
audio source is not switched off, it remains always active in the background. Please refer to the Owner's manual of the respective manufacturer for the operation of the external audio source. If a MEDIA-IN socket is additionally
installed, the button is displayed
instead of the function key in the
Audio menu
. Please note that an audio source
connected to the AUX-IN socket can only be
replayed, if there is currently no data
carrier connected to the MDI input. Use the standard jack plug 3.5 mm for the AUX-IN socket. If the external audio source does not have this jack plug, you must use an adapter. Adjust the play function volume of the external audio source The play function volume of the external
audio source can be changed via the volume
control on the radio. Depending on the connected audio source, the output volume on the external audio source can be changed. You can also change the input sensitivity of the external audio source, in order for the play function volume of the external audio
source to adapt to other audio sources or
to avoid distortions of the play function volume. Adapter A special adapter is required to connect audio sources via the input MDI. We recommend that you purchase an adap
ter for connecting the USB devices, the
devices with Mini USB output or an iPod, at a Škoda Service Partner. Conditions for proper connection•
Only USB devices with the spec
ification 2.0 can be connected.
•
The version of the file allocation table FA
T (File Allocation Tabl
e) of the connected
device must be FAT16 (< 2 GB) or FAT32 (> 2 GB).
•
In order to replay from a unit with a hard
disk (HDD) which includes a large data
volume, it can lead to a time delay when reading in the overview of the music data.•
In order to replay from a unit, which includ
es a complicated folder structure, it can
lead to a time delay when reading
in the overview of the music data.
•
The folder structure in the connected unit
must not exceed a depth of 8 levels. One
folder must not contain more than 1000°data.•
A USB extension cable or USB distributor
(HUB) must not be used to connect the
unit.
WARNING
•
On no account place an external audio source on the dash panel. You could
make sudden manoeuvres in the passen
ger compartment and injure the occu-
pants.•
On no account place an ex
ternal audio source close to the airbags. You could
be thrown back in the passenger comp
artment by the airbags being deployed
and injure the occupants.•
You must not hold the external audio
source in the hand or on the knees
while driving. You could make sudden
manoeuvres in the passenger compart-
ment and injure the occupants.•
Always guide the connection cable of
the external audio source in such a
way that is does not re
strict you when driving.
Caution
The AUX-IN socket must only be used for audio sources!
Note
•
The external audio source, which is connected via AUX-IN, can only be used if no
unit is connected via MD
I at the same time.
•
If an external audio source is connecte
d via AUX-IN, which is equipped with an
adapter for external power supply, it can occur
that the audio signal is interrupted. This
depends on the quality of the adapter which is used.•
The loudspeakers in the vehicle are matched to a power output of the radio of
30°W.
MEDIA-IN
AUX
s32k.a.book Page 26 Friday, September 18, 2009 1:54 PM
Page 32 of 71
Range selector key MEDIA
30TV mode*Explanation of the technical terms“Terrestrial television” or DVB-T (Digital Video Broadcasting-Terrestric) With DVB-T, digital television signals are transmitted terrestrially (earthbound) and can also be received via an aerial. DVB-T theref
ore offers mobile reception of high quality
without the need of a fixed aerial connection. DVB-T is therefore described as “
Terres-
trial television
”.
Advantages of DVB-T In addition to a significant gain in quality, the transmitter capacity of a television channel can be realised more effectively th
rough digital transmitter technology rather
than analog signals. The greater data rate
enables several programs of one television
channel to be transmitted bundled in one data
flow (so called “Multiplex”). Part of the
transmitter capacity can also be used for a
dditional services, e.g. electronic program
guides or radio. “Hybrid tuner” for analog
and digital reception
The supply of DVB-T has up to now been re
stricted to densely populated regions, so
that an analog television receiver in the vehicle is still a prerequisite. It is for this reason that a
Hybrid tuner
was developed for the unit, which consists of a common analog
TV receiver and a DVB-T receiver. Display of analog an
d digital TV stations
The TV stations, which can be received, are indicated in the display of the combination instrument and when switching over and calling up the
TV menu on the touch-screen.
Analog and digital TV stations are displayed differently and are marked on the touch- screen with “
Analog
” or “
DVB-T
” ⇒page 31, “Displays in TV mode”.
OverviewThe TV picture will only be displayed when
the vehicle is stationary. The touch-screen
is switched off while driving, but the sound can still be heard.Starting TV mode– Press the range selector key to switch to the main menu
MEDIA
. The last
used media source will continue to play.
– Touch the touch-screen in the menu
DVD
in order to call up the Video-DVD mode.
– Press the function key to start the TV
mode. The last set TV channel will be
displayed in the pre-set aspect ratio in full picture mode.
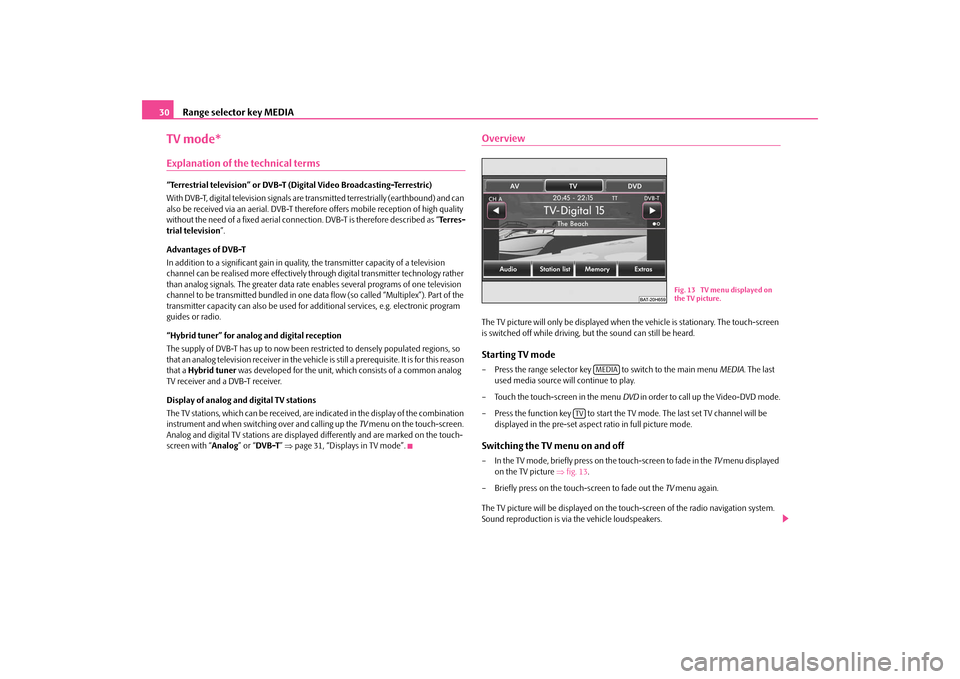
Switching the TV menu on and off– In the TV mode, briefly press on the touch-screen to fade in the
TV menu displayed
on the TV picture
⇒fig. 13
.
– Briefly press on the touch-screen to fade out the
TV menu again.
The TV picture will be displayed on the to
uch-screen of the radio navigation system.
Sound reproduction is via the vehicle loudspeakers.
Fig. 13 TV menu displayed on the TV picture.
MEDIA
TV
s32k.a.book Page 30 Friday, September 18, 2009 1:54 PM
Page 33 of 71
Range selector key MEDIA
31
Unit keys (Hard keys) in TV mode or - change to the next TV stations on the station list. Set button
- turn to manually adjust a TV channel or a digital TV station.
Function keys in the TV menu or - change to the next TV stations on
the station list, analog to the arrow keys at
the unit.
- changes to the
Audio menu
and plays the last selected audio source.
- opens the station list of the presently receivable analog TV stations as well
as the digital TV and radio stations.
- opens the preset list of the manually
receivable analog TV stations as well
as the digital TV and radio stations.
- opens a pop-up window for calling up further functions.
Pop-up window
- opens the video text page of the currently received station if video text is avail-
able for the received TV station.
- fades in the menu for changing the display set-ups. - opens the overview of the electronic
program guide (Electronic Program Guide)
if digital TV stations can be re
ceived at the location via DVB-T.
- changes to manual set-up of a TV ch
annel via the arrow keys on the unit or
in the touch-screen of the TV main menu. Selectable video sources in the Video-DVD menu
- changes over to a connected external video source*. - changes to the TV mode*. - changes over to a Video-DVD inserted into the internal CD/DVD drive
⇒ page 28. Displays in TV mode Some television stations offe
r bilingual programs in “dual
channel tone”. In this case
you can use the
Setup Video
to choose which language channel as well as which
language is to be disp
layed. In this case “
Channel A
” or “
Channel B
” will be displayed
at the top left on the touch-screen.
A program in stereo will also be indicated by the symbol “
�e” on the right on the
touch-screen under the function key . A program in dual channel tone will be indi- cated by the symbol “
�²
” ⇒page 30, fig. 13
. You can choose the audio channel in the
TV set-ups. If a TV station also transmits
Video text
, “VT” will be displayed at the top right on the
touch-screen. If video text is
not available for the current station, the video text func-
tion “
�f” will be indicated after call up.
If the set digital TV station supports the electronical program guide it will be indicated accordingly by “
EPG
” (Electronic Program Guide) at the top right in the touch-screen.
If EPG is not generally available at the location, only “
�g” will be displayed after call-up
of the EPG function via the function key .Choosing a TV stationTV station “relay” – You change to the previous or following
TV station by pressing the arrow keys on
the unit or .
– When changing the station, the
TV menu will fade in together with information of
the currently selected station.
–In the
TV menu, you can also change the TV station by pressing the arrow keys on
the touch-screen or .
Choosing a TV station from the station list– Press on the function key in the
TV menu to display all TV stations that
can currently be received. The list “skips”
directly to the display of the currently
tuned in TV stations. This is highlighted in the list.
Adjusting the TV station manually via the set button– Turning the set button when in the
TV mode will displa
y the TV channels
according to the sequence of the frequency band, whether they are assigned or not.
– Briefly press the set button to te
rminate the manual fr
equency selection.
�ƒ
�„
�‚
�b
AudioStation listMemoryExtras
Extras
V-TXTDisplayEPGManualAVTVDVD
�bExtras
�ƒ
�„
�‚
�bStation list
A8
s32k.a.book Page 31 Friday, September 18, 2009 1:54 PM
Page 36 of 71
Range selector key NAV (Navigation)
34Range selector key NAV (Navigation)OverviewSafety information regarding the use of the navigation systemThe route is recalculated each time if yo
u ignore driving recommendations or change
the route. This process takes only a few
seconds. Driving recommendations can only
then be re-transmitted. Incomplete navigation data The navigation system cannot receive any data from GPS satellites if you drive for longer periods under thick forest canopy or
when your vehicle is
in a garage, under-
pass or tunnel. In this case, the navigation system orientates itself solely with the help of the vehicle sensors. In regions not at all or only partially digitalised and stored as such on the navigation DVD, the navigation system will try to provide guidance to the destination. Please note that under these circumstances the guidance
to the destination may not be completely
correct if, for example, one-way streets and
road categories (motorway, country road
etc.) are not at all or only partially
included in the navi
gation data used.
WARNING
Always concentrate fully on your driving. Inattention by the driver can lead to accidents and injuries.•
Do not allow yourself to be distracted or loose your concentration, pay
attention to the traffic situation and do not carry out settings or use the radio navigation system.•
Only use the radio navigation system if road, weather and traffic situations
permit this and you are not distracted.•
The various volume settings must be selected in such a way that audible
signals from the outside, such as e.g. a
Martins horn from police cars and fire
brigade, can be heard at all times.
WARNING
Please observe the legal requirements for road traffic when following the driving recommendations provided by your radio navigation system.•
The driving recommendations provided may vary from current situations,
e.g. due to road works or out of date
navigation data. In such a case, always
observe the traffic regulations and
ignore the driving recommendations.
•
Traffic signs and traffice regulations always have priority over the driving
recommendations provided by the navigation system.•
Route guidance is subject to constant
changes, particularly to information
relating to one-way streets, pedestrian
zones etc. stored on the navigation
DVD. Information on traffic lights, stop and right of way signs, parking and stopping restrictions as well as lane constrictions and speed restrictions is not included in the radi
o navigation system.
•
Adjust your speed to suit weather, road and traffic conditions. Do not allow,
for example, the radio navigation system
to make you drive faster in fog - risk
of accident!Navigation data and the navigation DVDStore navigation data in the unit– Push the navigation DVD with
the written side facing up as far as possible into the
CD/DVD case until it is automatically dr
awn in. The unit will compare the data on
the navigation DVD with the data in th
e navigation system memory. No message
will appear if the data in the navigation
system memory of the unit is identical to
the data on the navigation DVD.
– Press the function key , to find ou
t that the storing process has been
completed.
– If the corresponding messag
e appears, press the button or press on the func-
tion key and take out the navigation DVD. Active route guidance is inter- rupted and must be restarted.
Notify
�š
Eject
s32k.a.book Page 34 Friday, September 18, 2009 1:54 PM