change time SKODA YETI 2012 1.G / 5L Amundsen Navigation System Manual
[x] Cancel search | Manufacturer: SKODA, Model Year: 2012, Model line: YETI, Model: SKODA YETI 2012 1.G / 5LPages: 31, PDF Size: 2.89 MB
Page 8 of 31
Return to the previous menu level with the button 13.C
Set value
›
Pressing the button
C
opens an additional screen in which it is possible to set
the required value by turning the menu knob
15
, e.g. treble.
D
“Pop-up window”
›
Pressing the function key
D
opens a so-called “Pop-up window” with addition-
al menu points.
›
Briefly press one of the available menu points. The pop-up window will disap-
pear and the newly selected menu point is displayed in the function key.
If none of the available menu points is chosen, the “pop-up window” will disap-
pear after around 5 seconds.
A DAB ensemble appears in the list of DAB stations after pressing this function
key » page 10 , Digital radio DAB .
E
“Checkbox”
Some functions can only be switched on or off. There is a so-called “Check box” in front of a function which can only be switched on or off:
- Function is switched on.
- Function is switched off.
›
To switch a function on or off, briefly press the corresponding function once.
F
Variable function keys
The key function is context-dependent. The function currently being offered can
be selected by pressing the appropriate function key
F
(or using button
17
).
Sample menu in the Instruction Manual
Press the keys ABC
→ DEF - these keys must be pressed one after the other.
■ XYZ
- Description of a function key in the first menu level
■ XYZ - Description of a function key in the second menu level
■ XYZ - Description of a function key in the second menu level
■ XYZ - Description of a function key in the first menu level
Ð
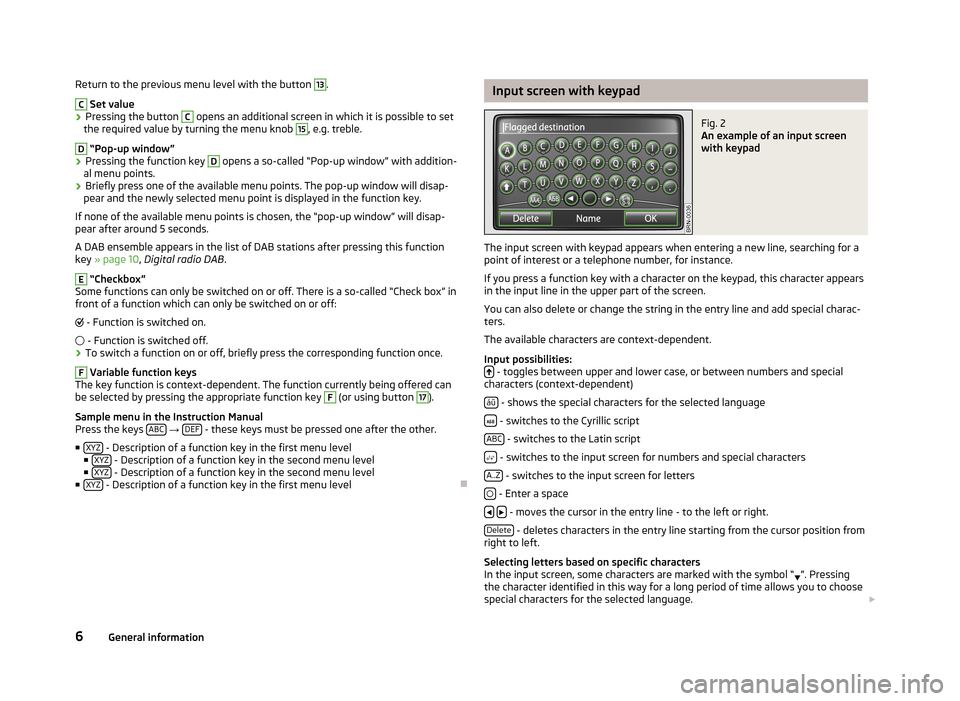
Input screen with keypadFig. 2
An example of an input screen
with keypad
The input screen with keypad appears when entering a new line, searching for a
point of interest or a telephone number, for instance.
If you press a function key with a character on the keypad, this character appears
in the input line in the upper part of the screen.
You can also delete or change the string in the entry line and add special charac-ters.
The available characters are context-dependent.
Input possibilities:
- toggles between upper and lower case, or between numbers and special
characters (context-dependent)
áü
- shows the special characters for the selected language
- switches to the Cyrillic script
ABC
- switches to the Latin script
- switches to the input screen for numbers and special characters
A..Z
- switches to the input screen for letters
- Enter a space
- moves the cursor in the entry line - to the left or right.
Delete
- deletes characters in the entry line starting from the cursor position from
right to left.
Selecting letters based on specific characters
In the input screen, some characters are marked with the symbol “ ”. Pressing
the character identified in this way for a long period of time allows you to choose
special characters for the selected language.
6General information
Page 10 of 31
Basic settings
System and sound settings
System settingsPress the button SETUP → System.
■Language - Menu language for the displays and the language messages■Adaptive - auto-detection of menu language, depends on the setting in the in-formation display■or direct selection of the required language from the list■Keypad layout - Keypad layout for text entry■ABC - keys arranged alphabetically■QWERTY - QWERTY keypad layout■Air con. displays - adjust the display duration for the Climatronic control■Screen - screen setting■Brightness - adjust the screen brightness■Day/night - changes between day and night design. Automatic display dependson switching the low beam on or off.■Confirmation tone - switches confirmation tone on/off by pressing a functionbutton■Factory settings - restores unit to factory settings■Remove SD card - Removing the SD card■Clock display - switches time display in the display on/off when the radio naviga-tion system is switched off.
Sound settingsPress the button SETUP → Sound.
■Volume - volume setting■Max. switch-on volume - setting the volume when turning on■Traffic program (TP) - setting the volume for the Traffic program (TP)■Navigation volume - Setting the volume of the navigation announcements■PDW vol. reductn. - Setting the reduction of the volume when the park distancecontrol is active■SDVA - Speed dependent volume adaptation■Treble - Treble setting■Mid-range - Mid-range setting■Bass - Bass setting■Balance - Setting of the balance between the left and right side■Fader - Setting the balance between the front and the rear
■EQ settings - Setting the equalizer (linear, voice, rock, classical, dance)■Surround - Setting of the surround tone.
Ð
8Basic settings
Page 13 of 31
MEDIA mode
Main menu MEDIA
Press the button MEDIA.
Selectable audio sources in the menu MEDIA CD - changes over to an inserted CD
CD 1-6 - changes over to a connected external CD changer
SD card - changes over to an inserted memory card
AUX, MDI or changes over to a connected external audio source. Operating anexternally connected audio source is possible, with certain restrictions, via the ra-dio navigation unit and depends primarily on the type of the connected unit.
Buttons for operating current audio sourcesPress - to start current track
Briefly press twice - to start the previous track
Press and hold - “back to start” - fast rewind
Press - to start next track
Press and hold -fast forward
Setting the time or track displayPress the button - to switch between the display of playback time or track titleor track info.
Ð
Settings in MEDIA mode
Press the button MEDIA → SETUP.
Function keys in the menu Setup – Media■Traffic program (TP) - switches traffic programme on/off■Scan/mix/repeat inc. - switches on/off the track play function in the “Scan”, “Mix”and “Repeat” modes including sub-directories » page 11, Playback options■AUX volume1) - Input volume for an external audio source at the multimedia sock-et AUX-IN
■MDI volume1 ) - Input volume for iPod™ or iPhone™ units at the multimedia socketMDI or an external audio source AUX at the multimedia socket MDI■Bluetooth settings - Settings for the Bluetooth® - function » page 17, Settings inPHONE mode■Activate AUX 2 input – Activates the external audio source AUX via the inputMDI. » page 13, AUX and MDI input■BT volume1 ) - Input volume for an external Bluetooth audio source®
Ð
Playback options
Open selection menu for the available audio sourcesPress the button MEDIA and select one of the available audio sources.
■Select - Display the title list for the audio source currently being played. The cur-rently played track is shown as highlighted.■Up - opens the higher-level folder (press again to switch up to the root direc-tory)■Play - Plays the selected track
Playback modesPress the button MEDIA → Extras – additional functions will be displayed.
■Scan - All the tracks of the current media source are played for approximately 10seconds■in “Scan” mode Scan - return to normal playback■Mix folder - all tracks in the current folder are played in random order■in the “Mix folder” mode Mix folder - return to normal playback■Mix all - all tracks in the current audio source are played in random order■in the “Mix all” mode Mix all - return to normal playback■Repeat track - repeats the track currently being played■In “Repeat track” mode Repeat trk. - returns to normal playback■Repeat folder - all tracks in the current folder are repeated■in “Repeat folder” mode Repeat - returns to the normal playback
Ð1)
Used to adjust the playback volume with the other audio sources.
11MEDIA mode
Page 15 of 31
Memory card empty or data not readableIf a memory card is inserted, on which no data or no legible data has been stored,it will not be switched over into the memory card mode after the loading proce-dure.
Ð
External sources
AUX and MDI input
AUX inputPress the button MEDIA → AUX.
The input for an external audio source AUX is located on the front of the unit
14
.
External audio sources connected to the AUX socket cannot be operated via theradio navigation system. Only the volume can be controlled from the radio naviga-tion system.
Use the standard jack plug 3.5 mm for the AUX jack. If the external audio sourcedoes not have this jack plug, you must use an adapter .
MDI inputPress the button MEDIA → MDI.
Audio files in MP3, WMA, OGG Vorbis and AAC format from the external data stick-ers, connected to the MDI input, can be played via the radio navigation sys-tem » page 14, Requirements for media sources and audio files.
External audio sources connected to the MDI socket can be operated via the radionavigation system.
You can select another audio source on the radio at any time. As long as the ex-ternal audio source is not switched off, it remains always active in the back-ground.
See the owner's manual of the specific manufacturer for operating the externalaudio source.
To connect external audio sources via the MDI input, a special adapter is to beused.
iPodIf an iPod is connected to the MDI input, a menu opens in which you can selectthe folders of the iPod (playlists, artists, albums, titles, etc.).
Connecting an external audio source via Bluetooth®
In Bluetooth audio mode, audio files can be played from an external audio source(e.g. a mobile phone) connected via Bluetooth®.
To activate this function it is necessary for the external audio source to be con-nected to the radio navigation system » page 15, Pairing mobile phone or Blue-tooth® device with radio navigation system.
Adjust the play function volume of the external audio sourceThe play volume of the external audio source can be adjusted via the volume con-trol on the radio navigation system
1
.
Depending on the connected audio source, the output volume on the external au-dio source can be changed.
You can also change the input sensitivity of the external audio source, in order toadapt the play volume of the external audio source to that of the other audiosources or to avoid distortions » page 11, Settings in MEDIA mode.
Conditions for proper connection›Only USB devices with the specification 2.0 can be connected.›The version of the file allocation table FAT (File Allocation Table) of the connec-ted device must be FAT16 (< 2 GB) or FAT32 (> 2 GB).›In order to replay from a unit with a hard disk (HDD) which includes a large datavolume, it can lead to a time delay when reading in the overview of the musicdata.›In order to replay from a unit, which includes a complicated folder structure, itcan lead to a time delay when scanning the audio files.›The folder structure in the connected unit must not exceed a depth of 8 levels.One folder must not contain more than 1000°data.›A USB extension cable or USB distributor (HUB) must not be used to connectthe unit.
WARNING■On no account place an external audio source on the dash panel. It could bethrown into the passenger compartment during sudden driving manoeuvres,injuring the occupants.
■
On no account place an external audio source close to the airbags. It couldbe thrown into the passenger compartment when the airbags are deployed,injuring the occupants.
13MEDIA mode
Page 18 of 31
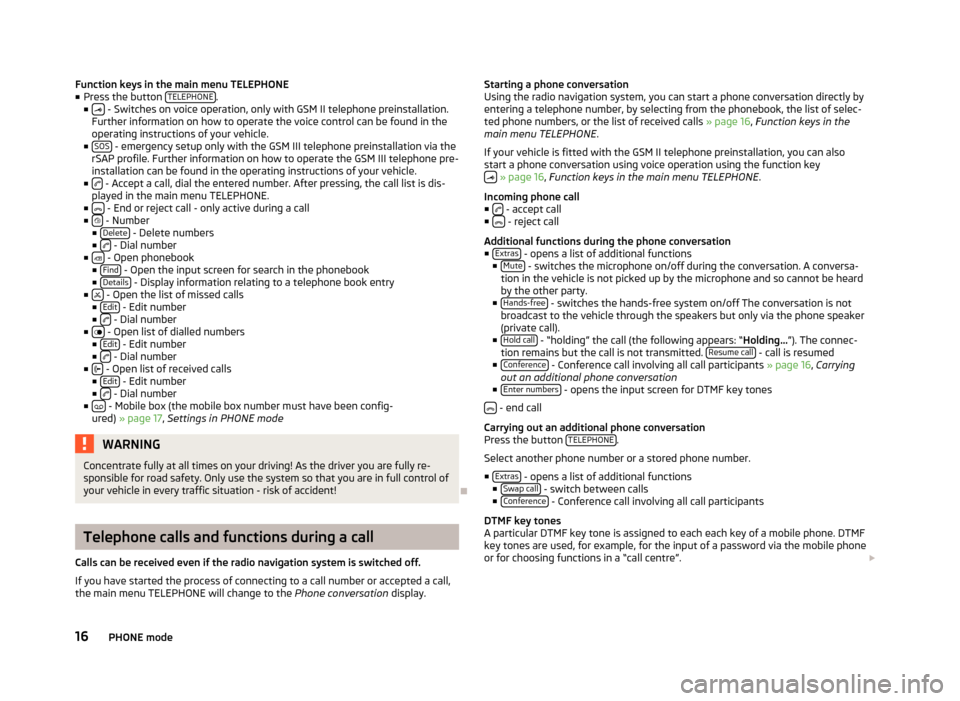
Function keys in the main menu TELEPHONE
■ Press the button TELEPHONE.
■ - Switches on voice operation, only with GSM II telephone preinstallation.
Further information on how to operate the voice control can be found in the
operating instructions of your vehicle.
■ SOS
- emergency setup only with the GSM III telephone preinstallation via the
rSAP profile. Further information on how to operate the GSM III telephone pre-
installation can be found in the operating instructions of your vehicle.
■
- Accept a call, dial the entered number. After pressing, the call list is dis-
played in the main menu TELEPHONE.
■
- End or reject call - only active during a call
■ - Number
■ Delete - Delete numbers
■ - Dial number
■ - Open phonebook
■ Find - Open the input screen for search in the phonebook
■ Details - Display information relating to a telephone book entry
■ - Open the list of missed calls
■ Edit - Edit number
■ - Dial number
■ - Open list of dialled numbers
■ Edit - Edit number
■ - Dial number
■ - Open list of received calls
■ Edit - Edit number
■ - Dial number
■ - Mobile box (the mobile box number must have been config-
ured) » page 17 , Settings in PHONE mode
WARNINGConcentrate fully at all times on your driving! As the driver you are fully re-
sponsible for road safety. Only use the system so that you are in full control of
your vehicle in every traffic situation - risk of accident!
Ð
Telephone calls and functions during a call
Calls can be received even if the radio navigation system is switched off. If you have started the process of connecting to a call number or accepted a call,
the main menu TELEPHONE will change to the Phone conversation display.
Starting a phone conversation
Using the radio navigation system, you can start a phone conversation directly by
entering a telephone number, by selecting from the phonebook, the list of selec- ted phone numbers, or the list of received calls » page 16, Function keys in the
main menu TELEPHONE .
If your vehicle is fitted with the GSM II telephone preinstallation, you can also
start a phone conversation using voice operation using the function key
» page 16 , Function keys in the main menu TELEPHONE .
Incoming phone call
■
- accept call
■ - reject call
Additional functions during the phone conversation
■ Extras
- opens a list of additional functions
■ Mute - switches the microphone on/off during the conversation. A conversa-
tion in the vehicle is not picked up by the microphone and so cannot be heard by the other party.
■ Hands-free
- switches the hands-free system on/off The conversation is not
broadcast to the vehicle through the speakers but only via the phone speaker
(private call).
■ Hold call
- “holding” the call (the following appears: “ Holding...”). The connec-
tion remains but the call is not transmitted. Resume call - call is resumed
■ Conference - Conference call involving all call participants » page 16, Carrying
out an additional phone conversation
■ Enter numbers
- opens the input screen for DTMF key tones
- end call
Carrying out an additional phone conversation
Press the button TELEPHONE
.
Select another phone number or a stored phone number.
■ Extras
- opens a list of additional functions
■ Swap call - switch between calls
■ Conference - Conference call involving all call participants
DTMF key tones
A particular DTMF key tone is assigned to each each key of a mobile phone. DTMF
key tones are used, for example, for the input of a password via the mobile phone or for choosing functions in a “call centre”.
16PHONE mode
Page 20 of 31
NAV mode (Navigation)
Introductory information
The route is recalculated each time if you ignore driving recommendations orchange the route. This process takes only a few seconds. Driving recommenda-tions can only then be re-transmitted.
In regions that are not or only partially digitalised and stored on the navigationDVD, the radio navigation system will continue to try to provide guidance to thedestination. Please note that under these circumstances the guidance to the des-tination may not be completely correct if, for example, one-way streets and roadcategories (motorway, country road, etc.) are not or only partially included in thenavigation data used.
When entering an address (city, street), only those letters or symbols which makeup a logical entry will be presented. A list of possible names will be shown. Do notforget to enter the blank space in names made up of more than one word, suchas High Wycombe.
The last voice output can be repeated by pressing the button or the menu button
15
. The volume of a navigation recommendation can be changed whilst it is beingmade.
The GPS satellites will not be able to reach the aerial if you are in a tunnel or un-derground garage. In these cases, the unit uses only the vehicle's sensors and aninternal gyroscope for navigation.
WARNING■Please concentrate fully at all times on your driving! Driver inattention canlead to accidents and injuries. As the driver you are fully responsible for roadsafety. Only use the functions of the radio navigation system in such a waythat you are always in full control of your vehicle in all traffic situations!
■
The following must always have priority over the driving recommendations:
■the road traffic legislation, even if the driving recommendations contradictthe StVO,■the actual acknowledgement of traffic signs, light signals or signs placedby the police at the relevant location,■the facts and circumstances prevailing at the relevant location.
WARNING (Continued)■Please observe the respective traffic regulations when driving.■Traffic signs and traffic regulations always have priority over the driving rec-ommendations provided by the navigation system.
■
Route guidance is subject to constant changes, particularly to informationrelating to one-way streets, pedestrian zones etc. stored in the navigation da-ta. Information on traffic lights, stop and right of way signs, parking and stop-ping restrictions as well as lane constrictions and speed restrictions is not in-cluded in the radio navigation system.
■
Adjust your speed to suit weather, road and traffic conditions. No not letyourself be tempted by the radio navigation system, for example, to drive toofast in the fog – risk of accident!
■
Only if the traffic situation allows it should you operate the radio navigationsystem with its wide range of possibilities.
■
The driving recommendations provided may vary from current situations,e.g. due to road works or out of date navigation data. In such a case, alwaysobserve the traffic regulations and ignore the driving recommendations.
■
Adjust the volume to ensure that acoustic signals from outside, e.g. sirensfrom vehicles which have the right of way, such as police, ambulance and firebrigade vehicles, can be heard at all time.
Note
■It is not necessary to enter the destinations (country, city, road, point of interestnames) including all country-specific (or language-specific for points of interest)special characters.
■
Depending on the country, some functions of the radio navigation system canno longer be selected on the screen at certain speeds. This is not a malfunction,but corresponds to the legal requirements of the particular country.
Ð
Navigation data and the memory card
The navigation data are already available after the memory of the radio naviga-tion system is switched on first and can be used directly for navigation.
Update navigation data
›
Remove the mechanical copy protection from the memory card.
›
Insert a memory card » page 12, Memory card
18NAV mode (Navigation)
Page 22 of 31
Home add. - Starting a route guidance to a stored Home address. During routeguidance, the function key Stop appears here.
SD destinationsBy using a web application that can be found on ŠKODA's web site, it is possibleto create destinations as visiting cards or pictures. These destinations can theneasily be imported via the SD card into the radio navigation system.
Ð
Settings in the (NAV) Navigation mode
Press the button NAV → SETUP.
Function keys in the menu°-°Navigation■Route options - setting for route options■Route criteria - specify the criteria for calculating the route■Fast - calculates the fastest route to the destination, even if a detour is nec-essary.■Economical - calculates the quickest route possible over the shortest route■Short - shortest route to the destination even if a longer driving time is re-quired. The route guidance may include unusual sections, such as dirt roads.■Dynamic route - switches on/off the usage of TMC traffic notifications for routeguidance » page 23, Dynamic route guidance with TMC use■Avoid motorways - switches on/off the use of motorways in the route calcula-tion■Avoid toll roads - switches on/off the use of toll roads in the route calculation■Avoid ferries - switches on/off the use of ferries in the route calculation If noother route is available (e.g. an island can only reached by a ferry), this routetype is included in the route calculation despite being excluded before.■Avoid toll Avoid toll sticker routes - opens a list of countries where toll stickers aremandatory. A check means that all streets in the selected country for which atoll sticker is mandatory are excluded.■Announcement volume - Setting the volume of the navigation announcements.■Day/Night - switches between the day/night and auto map display modes. Auto-matic display depends on switching the low beam on or off.■POIs on map -shows points of interest in the map view (car parks, petrol stations,and Škoda workshops only)■Autozoom - changes the map scale automatically depending on the speed andthe driven route (Motorway trip: small map scale - City centre: large map scale)■Traffic sign display - switches on/off the speed restrictions in the current routesection (top left on the screen)
■Time display - switches between the following information during route guidance■ETA - displays the expected time to destination■Travel time - displays the expected remaining trip time to the destination■Time display to - switch to the arrival time at:■destination - displays the expected arrival time at the final destination■stopover - displays the expected arrival time at the stopover destina-tion » page 21, Entering a stopover destination■Enter home address - Enter home address■Position - saves the current position as a home address■Address - enter or change an address as your home address■Demo mode - switches on/off the demo mode. If the demo mode is selected, youcan specify at the start of route guidance whether route guidance should becarried out in normal mode (“real” route guidance) or in Demo mode (virtualroute guidance). For the route guidance in the Demo mode, you only travelalong the route virtually. Virtual route guidance will be repeated after reachingthe fictitious travel destination.■Demo mode starting point - Entering a fictive (invented) starting point in the demomode.■Delete destination memory - Deleting the destination memory or the list of the lastdestinations.■All - deletes all destinations from the memory■Last destins. - deletes all destinations from the list of last destinations■Navigation data basis - displays information about the navigation data stored inthe radio navigation system or on the memory card or when using navigationdata directly from the memory card » page 18, Navigation data and the memorycard.
Ð
Destinations
Entering and saving destinations
Manually entering and saving destinationsPress the button NAV → .
When entering the address, first choose the country, then the city or the postalcode. Afterwards it is possible to specify the address in more detail by enteringthe street and house number or an intersection. This address information isspecified in the following input screens.
If the entries are sufficient for the route guidance, the function key Status will ap-pear. You can now begin route guidance or you can enter additional details forthe destination.
20NAV mode (Navigation)
Page 24 of 31
›Position;›latitude and longitude;›height above seal level (if at least 4 satellites are available);›GPS status (GPS_FIX - the position can be determined, GPS_FIX_3D - the heightcan be determined);›The number of available and tracked satellites (the number of available satel-lites determines the GPS status).
If route guidance is active, a pop-up of the destination appears.
■Flagged destination - saves the current position as a “Flagged destination”.
Ð
Route guidance
Starting route guidance
Press the button NAV → Map - to open the map view.
Guidance is started by pressing the function key Start.
The route guidance can also be started from other menu points » page 20, Enter-ing and saving destinations
Ð
Orientation in the map during route guidance
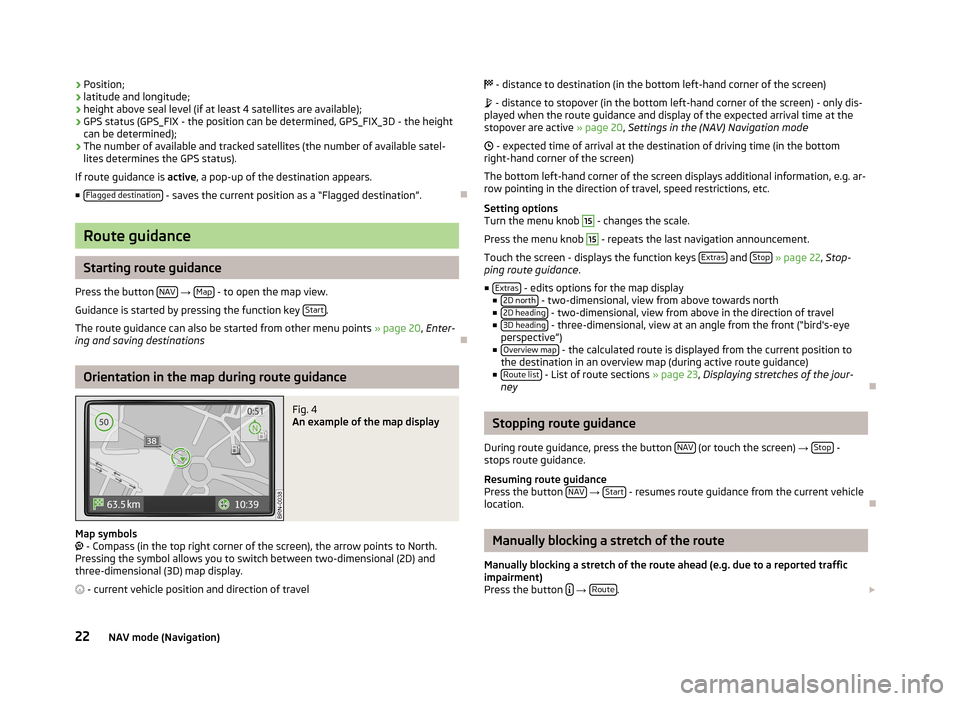
Fig. 4
An example of the map display
Map symbols - Compass (in the top right corner of the screen), the arrow points to North.Pressing the symbol allows you to switch between two-dimensional (2D) andthree-dimensional (3D) map display.
- current vehicle position and direction of travel
- distance to destination (in the bottom left-hand corner of the screen)
- distance to stopover (in the bottom left-hand corner of the screen) - only dis-played when the route guidance and display of the expected arrival time at thestopover are active » page 20, Settings in the (NAV) Navigation mode
- expected time of arrival at the destination of driving time (in the bottomright-hand corner of the screen)
The bottom left-hand corner of the screen displays additional information, e.g. ar-row pointing in the direction of travel, speed restrictions, etc.
Setting optionsTurn the menu knob
15
- changes the scale.
Press the menu knob
15
- repeats the last navigation announcement.
Touch the screen - displays the function keys Extras and Stop » page 22, Stop-ping route guidance.
■Extras - edits options for the map display■2D north - two-dimensional, view from above towards north■2D heading - two-dimensional, view from above in the direction of travel■3D heading - three-dimensional, view at an angle from the front (“bird's-eyeperspective”)■Overview map - the calculated route is displayed from the current position tothe destination in an overview map (during active route guidance)■Route list - List of route sections » page 23, Displaying stretches of the jour-ney
Ð
Stopping route guidance
During route guidance, press the button NAV (or touch the screen) → Stop -stops route guidance.
Resuming route guidancePress the button NAV → Start - resumes route guidance from the current vehiclelocation.
Ð
Manually blocking a stretch of the route
Manually blocking a stretch of the route ahead (e.g. due to a reported trafficimpairment)Press the button → Route.
22NAV mode (Navigation)
Page 30 of 31
ŠKODA pursues a policy of constant product and model development. We trust
that you will understand that changes to models in terms of shape, equipment
and engineering, may be introduced at any time. The information about scope of
delivery, appearance, performances, dimensions, weight, fuel consumption,
standards and functions of the vehicle is only correct at the time of publication.
Certain items of equipment might only be installed later on (information provided
by your local authorised ŠKODA Service Partner) and only envisaged for particular
markets. It is therefore not possible for legal claims to be made based on the da-
ta, illustrations and descriptions contained in this Owner's Manual.Reprinting, reproduction or translation, either in whole or in part, is not permitted without the written consent of ŠKODA.
ŠKODA expressly reserves all rights relating to copyright laws.
We reserve the right to make changes to this document. Issued by: ŠKODA AUTO a.s.
© ŠKODA AUTO a.s. 2012