change time SKODA YETI 2012 1.G / 5L Columbus Navigation System Manual
[x] Cancel search | Manufacturer: SKODA, Model Year: 2012, Model line: YETI, Model: SKODA YETI 2012 1.G / 5LPages: 44, PDF Size: 1.42 MB
Page 6 of 44
After a four-digit order has been entered, the group of digits will turn grey (inac-
tive) and no further digits can be accepted in the entry line.
› To delete the digits in the entry line from right to left, press the function key
on the screen.
› When the correct code is displayed in the entry line, press the function key
OK .
Incorrect code number
If an incorrect code is confirmed after entry of the code, the procedure can be re-
peated once again . The number of attempts is shown in the bottom screen line.
If the code is entered incorrectly a second time, the unit will be blocked for ap-
prox. one hour. It is possible to enter again the safety code after one hour has ex-
pired, when the unit and the ignition have been switched on.
If two invalid attempts are then made again, the radio navigation system will be
blocked again for one hour. Note
The code is normally saved in the instrument cluster memory. This ensures that it
is automatically decoded (convenience coding). Manual input of the code is nor-
mally not necessary. ÐScreen display
The screen of the unit displays information such as from the Climatronic, the vehi-
cle distance to an obstacle if the
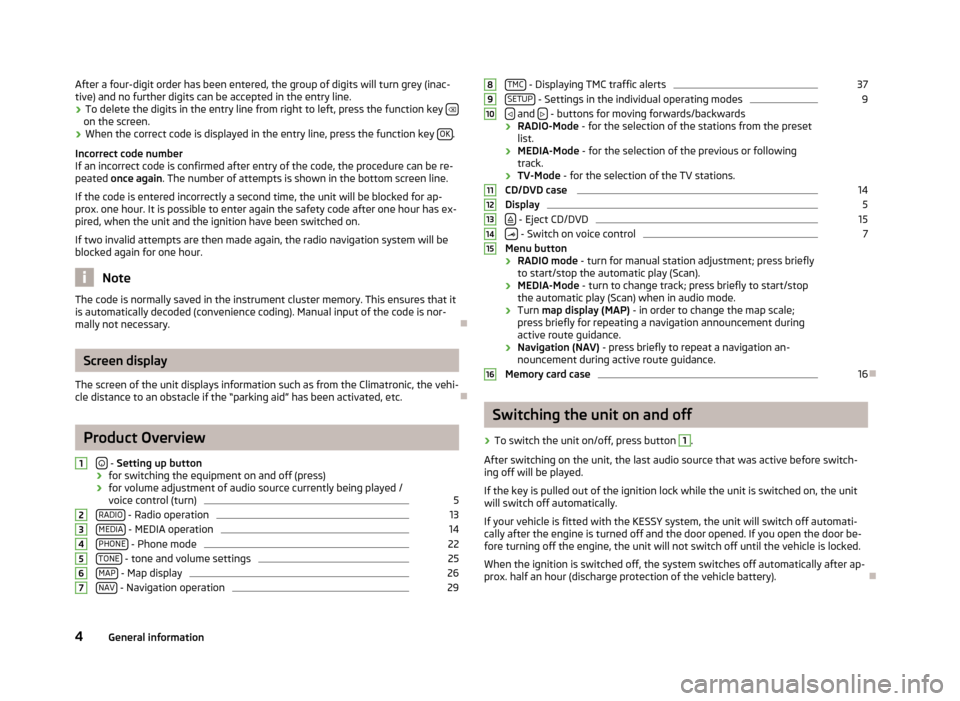
“parking aid” has been activated, etc. ÐProduct Overview
-
Setting up button
› for switching the equipment on and off (press)
› for volume adjustment of audio source currently being played /
voice control (turn) 5
RADIO - Radio operation 13
MEDIA - MEDIA operation 14
PHONE - Phone mode 22
TONE - tone and volume settings 25
MAP - Map display 26
NAV - Navigation operation 291
2
3
4
5
6
7 TMC
- Displaying TMC traffic alerts 37
SETUP - Settings in the individual operating modes 9
and
- buttons for moving forwards/backwards
› RADIO-Mode
- for the selection of the stations from the preset
list.
› MEDIA-Mode - for the selection of the previous or following
track.
› TV-Mode
- for the selection of the TV stations.
CD/DVD case 14
Display 5
- Eject CD/DVD 15
- Switch on voice control 7
Menu button
› RADIO mode
- turn for manual station adjustment; press briefly
to start/stop the automatic play (Scan).
› MEDIA-Mode - turn to change track; press briefly to start/stop
the automatic play (Scan) when in audio mode.
› Turn map display (MAP)
- in order to change the map scale;
press briefly for repeating a navigation announcement during
active route guidance.
› Navigation (NAV) - press briefly to repeat a navigation an-
nouncement during active route guidance.
Memory card case 16
Ð Switching the unit on and off
› To switch the unit on/off, press button 1
.
After switching on the unit, the last audio source that was active before switch-
ing off will be played.
If the key is pulled out of the ignition lock while the unit is switched on, the unit
will switch off automatically.
If your vehicle is fitted with the KESSY system, the unit will switch off automati-
cally after the engine is turned off and the door opened. If you open the door be-
fore turning off the engine, the unit will not switch off until the vehicle is locked.
When the ignition is switched off, the system switches off automatically after ap-
prox. half an hour (discharge protection of the vehicle battery). Ð 8
9
10
11
12
13
14
15
16
4
General information
Page 8 of 44
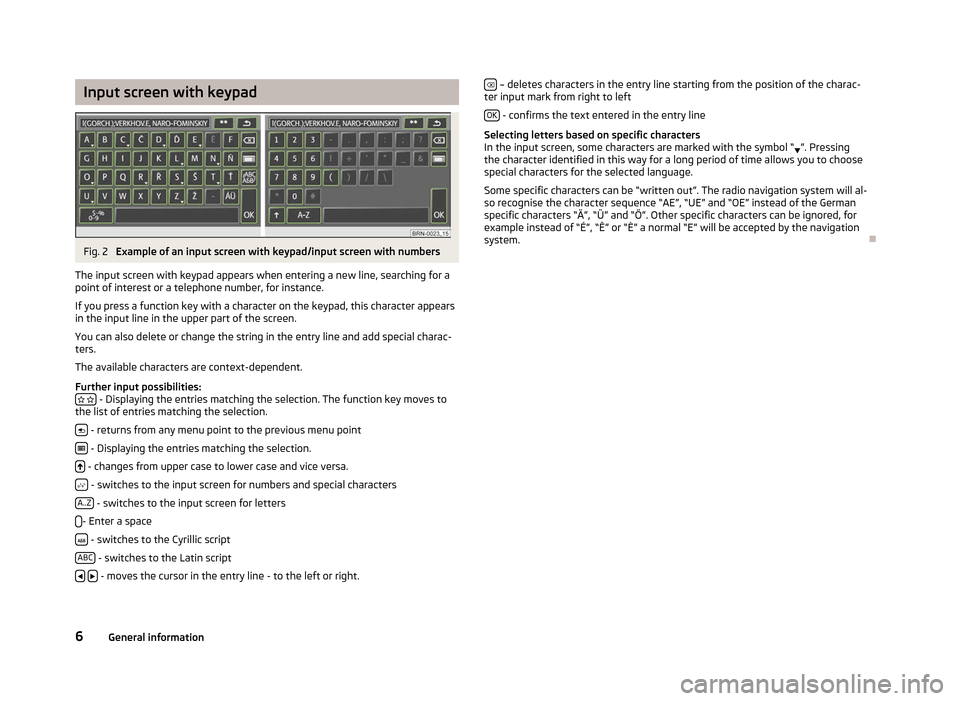
Input screen with keypad
Fig. 2
Example of an input screen with keypad/input screen with numbers
The input screen with keypad appears when entering a new line, searching for a
point of interest or a telephone number, for instance.
If you press a function key with a character on the keypad, this character appears
in the input line in the upper part of the screen.
You can also delete or change the string in the entry line and add special charac-
ters.
The available characters are context-dependent.
Further input possibilities: - Displaying the entries matching the selection. The function key moves to
the list of entries matching the selection.
- returns from any menu point to the previous menu point
- Displaying the entries matching the selection.
- changes from upper case to lower case and vice versa.
- switches to the input screen for numbers and special characters
A..Z - switches to the input screen for letters
- Enter a space
- switches to the Cyrillic script
ABC - switches to the Latin script
- moves the cursor in the entry line - to the left or right. – deletes characters in the entry line starting from the position of the charac-
ter input mark from right to left
OK - confirms the text entered in the entry line
Selecting letters based on specific characters
In the input screen, some characters are marked with the symbol
“ ”. Pressing
the character identified in this way for a long period of time allows you to choose
special characters for the selected language.
Some specific characters can be “written out”. The radio navigation system will al-
so recognise the character sequence “AE”, “UE” and “OE” instead of the German
specific characters “Ä”, “Ü” and “Ö”. Other specific characters can be ignored, for
example instead of “É”, “Ê” or “È” a normal “E” will be accepted by the navigation
system. Ð6
General information
Page 9 of 44
Voice control of the radio navigation system
Introductory information
The voice control is only possible in the following languages: Czech, English, German, French, Spanish, Portuguese, Dutch, Italian .
You can use the voice control in the operating modes RADIO, MEDIA, PHONE, MAP
and NAV .
Switch on voice control (dialogue)
› Press the button
.
Dialogue
› The long or short dialogue can be selected by pressing the key
on the unit
and by speaking the voice command “Long dialogue ”
(the system outputs the
message completely without shortening it) or “Short dialogue ” (the system
shortens some messages or substitute them with an acoustic signal (gong),
which accelerates the control) or in manual mode SETUP» page 11, Setup
Voice control .
Interrupt messages › The message just given can be finished by pressing the button
on the unit.
This allows you to speak another voice command earlier.
Switch off voice control (dialogue)
› After executing the voice command, voice control switches off automatically.
› By pressing one of the buttons which are located on the side of the touch-
screen of the unit or by touching the touch-screen (unless the function key Hide help is not pressed in the help display).
› By speaking the voice command “Cancel
”
.
› If the system does not receive a voice command or does not recognise the voice
command, although dialogue is switched on, it responds with the question “Par-
don? ” and allows you to speak another voice command. If the system does not
receive a voice command even the second time, you will be offered help. If the
system does not receive a voice command even the third time, you receive the
message “Cancel ” and the voice control switches off.
Optimum understanding of the voice commands depends on several factors:
› Speak with a normal tone of voice without intonation and excessive pauses.
› Avoid a bad pronunciation.
› Do not use abbreviations – always speak the whole voice command. ›
Do not speak when the system makes an announcement. As long as the system
has not finished the announcement, it will not react to an additional voice com-
mand.
› Close the doors, windows and sliding roof, in order to avoid disturbing influen-
ces of the environment on the understanding of the voice commands.
› During the dialogue, limit additional noise in the vehicle, e.g. simultaneously
talking occupants.
› The microphone for voice control is directed to the driver as well as to the front
passenger. Therefore the driver and the front passenger can operate the unit. Ð Voice commands
The system only recognises 30
000 entries (i.e, it will only recognise 30 000 of
the largest cities for the selected country, for example, in the operating mode
NAV . If the desired city is not included in the 30 000 entries, it cannot be spoken
normally, but it must be entered by spelling it out.
Call up the general information for the voice control by briefly pressing the button on the unit and by speaking the command “Instructions
”
. Then you hear a
message that the instructions are divided into seven parts. If you want more de-
tailed information about individual parts of the instructions, then, for example,
speak the voice command “Tutorial Part 2 ”.
Call up the general help for individual operating modes by briefly pressing the
button on the unit and by speaking the command “Help Quick Commands”.
Voice command
“Help”
Help can be called up by speaking the command “ Help”. Depending on the operat-
ing mode in which you are, the help given will offer different possibilities. If the
options offered are not sufficient, speak the voice command “Further options”.
Changing between the operating modes
If you wish to change between the operating modes after switching on the voice
control, always speak the name of the operating mode to which you wish to
change. This means, if you are in the operating mode RADIO and you wish to
change into the operating mode MEDIA, speak the voice command “Media”. Al-
ways speak the names of the operating modes PHONE, MAP, NAV as “telephone,
map, navigation ”.
In each operating mode, you can also use the voice commands for other operating
modes - the unit automatically switches between the different operating modes.
7
Voice control of the radio navigation system
Page 12 of 44
■
Update telephone book - loads the phonebook from the mobile phone to the mem-
ory of the radio navigation system. This procedure can take a few minutes.
■ Delete call lists - deletes saved call lists
■ Delete text message - deletes text messages (SMS)
■ Speed dial - edits speed dial keys
■ Deactivate telephone - deactivates the phone
■ Restore factory settings - resets device to factory settings- deletes user profiles
■ Change order of call lists - changes the order in the call list from the oldest to the
most recent calls ÐSetup System
Press the button SETUP →
System .
■ Language - Menu language for the displays and the language messages
■ Automatic - auto-detection of menu language, depends on the setting in the
information display
■ or direct selection of the required language from a list
■ Date format - sets up the date format
■ Time display - displays current time on the touch screen in the operating modes
RADIO, MEDIA and MAP ■ Off - switches off
■ On - switches on
■ Date - Sets up date
■ Factory settings - restores factory settings
■ Select setting to be restored
■ Reset - resets device to factory settings- deletes user profiles
ÐSetup Display
Press the button SETUP →
Display .
■ Brightness - adjust the screen brightness
■ Brightest - brightest level
■ Brighter - brighter level
■ Medium - medium level
■ Darker - darker level
■ Darkest - darkest level ■
Day/Night - switches between the day/night and auto map display modes.
■ Automatic - controlled using the available vehicle sensors
■ Day - Setting for daytime running
■ Night - Setting for nightime running
■ Acoustic feedback - switches acoustic feedback on/off by pressing a button on the
touch-screen
■ On - switches on
■ Off - switches off
■ Switch off display - it is possible to switch the display to energy saving mode; the
current information about the audio source is shown in the bottom row. The
display can be switched on again by touching the screen or any key other than
the operating knob. Ð Setup Map
Press the button SETUP →
Map .
■ Split-screen - Position of the split-screen in the map view
■ Left - left
■ Right - right
■ Dest. guidan. symbol - displays the navigation instructions and compass in the
split-screen in the 2D and 3D view
■ Destination display - displays information about the destination » page 26, Func-
tion keys and symbols during route guidance
■ Destination - destination
■ Next stopover destination - next stopover
■ POI selection - selects points of interest displayed on the map using symbols
■ Show VIP destination symbols - displays destinations saved as favourites in the
map with the symbol from the selected favourite category
■
Show speed limitation - the current speed limitation for the current road section
is displayed in the screen Ð Setup Navigation
Press the button SETUP →
Navigation .
10 SETUP mode
Page 16 of 44
MEDIA mode
Main menu MEDIA
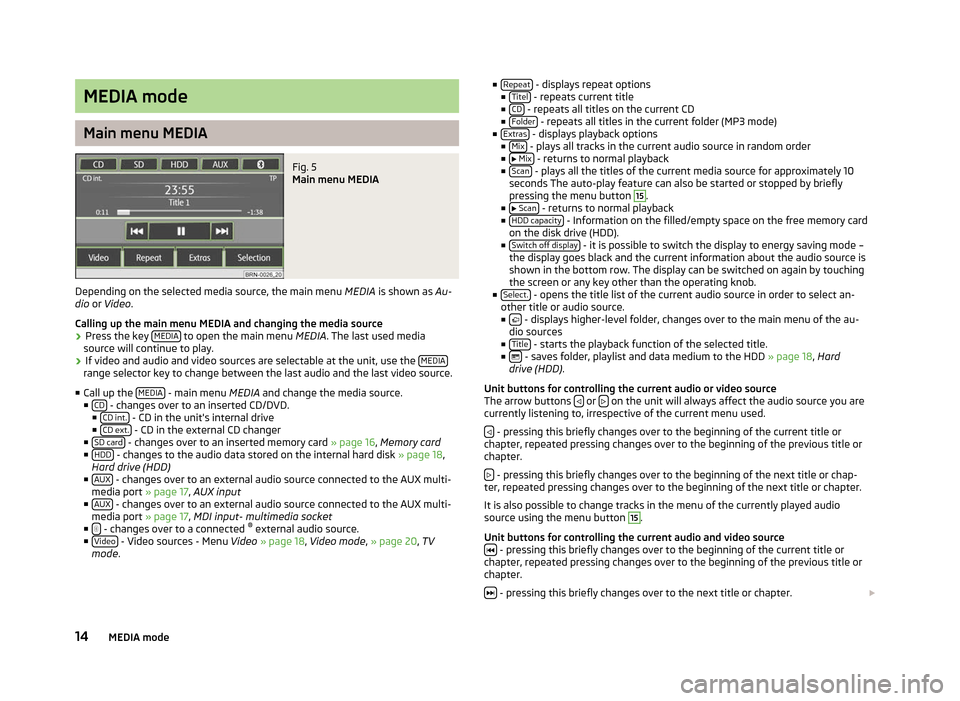
Fig. 5
Main menu MEDIA
Depending on the selected media source, the main menu MEDIA is shown as Au-
dio or Video .
Calling up the main menu MEDIA and changing the media source
› Press the key
MEDIA to open the main menu
MEDIA. The last used media
source will continue to play.
› If video and audio and video sources are selectable at the unit, use the
MEDIArange selector key to change between the last audio and the last video source.
■ Call up the MEDIA - main menu MEDIA and change the media source.
■ CD - changes over to an inserted CD/DVD.
■ CD int. - CD in the unit's internal drive
■ CD ext. - CD in the external CD changer
■ SD card - changes over to an inserted memory card
» page 16, Memory card
■ HDD - changes to the audio data stored on the internal hard disk
» page 18,
Hard drive (HDD)
■ AUX - changes over to an external audio source connected to the AUX multi-
media port » page 17 , AUX input
■ AUX - changes over to an external audio source connected to the AUX multi-
media port » page 17 , MDI input- multimedia socket
■ - changes over to a connected
®
external audio source.
■ Video - Video sources - Menu
Video » page 18, Video mode , » page 20, TV
mode . ■
Repeat - displays repeat options
■ Titel - repeats current title
■ CD - repeats all titles on the current CD
■ Folder - repeats all titles in the current folder (MP3 mode)
■ Extras - displays playback options
■ Mix - plays all tracks in the current audio source in random order
■ Mix - returns to normal playback
■ Scan - plays all the titles of the current media source for approximately 10
seconds The auto-play feature can also be started or stopped by briefly
pressing the menu button 15
.
■ Scan - returns to normal playback
■ HDD capacity - Information on the filled/empty space on the free memory card
on the disk drive (HDD).
■ Switch off display - it is possible to switch the display to energy saving mode –
the display goes black and the current information about the audio source is
shown in the bottom row. The display can be switched on again by touching
the screen or any key other than the operating knob.
■ Select. - opens the title list of the current audio source in order to select an-
other title or audio source.
■ - displays higher-level folder, changes over to the main menu of the au-
dio sources
■ Title - starts the playback function of the selected title.
■ - saves folder, playlist and data medium to the HDD
» page 18, Hard
drive (HDD) .
Unit buttons for controlling the current audio or video source
The arrow buttons or
on the unit will always affect the audio source you are
currently listening to, irrespective of the current menu used.
- pressing this briefly changes over to the beginning of the current title or
chapter, repeated pressing changes over to the beginning of the previous title or
chapter.
- pressing this briefly changes over to the beginning of the next title or chap-
ter, repeated pressing changes over to the beginning of the next title or chapter.
It is also possible to change tracks in the menu of the currently played audio
source using the menu button 15
.
Unit buttons for controlling the current audio and video source - pressing this briefly changes over to the beginning of the current title or
chapter, repeated pressing changes over to the beginning of the previous title or
chapter.
- pressing this briefly changes over to the next title or chapter.
14 MEDIA mode
Page 17 of 44
- Pause: the play function is stopped in the current position and the symbol
changes to - after pressing, the play function will continue in this position.
Note
If the volume is reduced to 0 during playback from a CD, the hard drive or another
audio source, the symbol changes to
and playback is interrupted.
ÐIntroductory information about CD/DVD mode
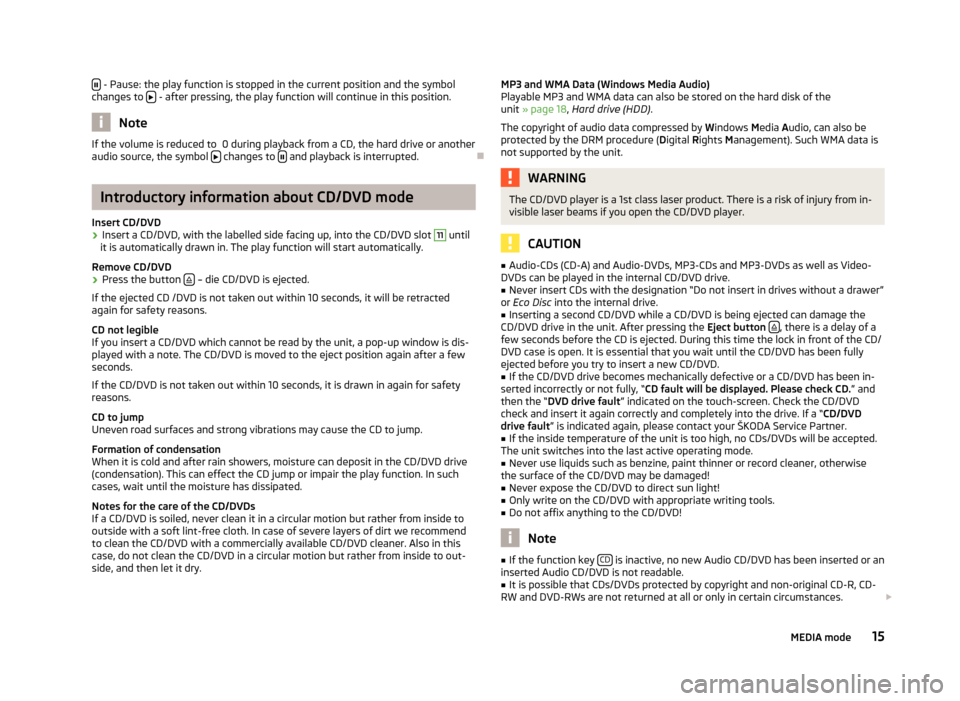
Insert CD/DVD
› Insert a CD/DVD, with the labelled side facing up, into the CD/DVD slot 11
until
it is automatically drawn in. The play function will start automatically.
Remove CD/DVD
› Press the button
– die CD/DVD is ejected.
If the ejected CD /DVD is not taken out within 10 seconds, it will be retracted
again for safety reasons.
CD not legible
If you insert a CD/DVD which cannot be read by the unit, a pop-up window is dis-
played with a note. The CD/DVD is moved to the eject position again after a few
seconds.
If the CD/DVD is not taken out within 10 seconds, it is drawn in again for safety
reasons.
CD to jump
Uneven road surfaces and strong vibrations may cause the CD to jump.
Formation of condensation
When it is cold and after rain showers, moisture can deposit in the CD/DVD drive
(condensation). This can effect the CD jump or impair the play function. In such
cases, wait until the moisture has dissipated.
Notes for the care of the CD/DVDs
If a CD/DVD is soiled, never clean it in a circular motion but rather from inside to
outside with a soft lint-free cloth. In case of severe layers of dirt we recommend
to clean the CD/DVD with a commercially available CD/DVD cleaner. Also in this
case, do not clean the CD/DVD in a circular motion but rather from inside to out-
side, and then let it dry. MP3 and WMA Data (Windows Media Audio)
Playable MP3 and WMA data can also be stored on the hard disk of the
unit
» page 18, Hard drive (HDD) .
The copyright of audio data compressed by Windows Media Audio, can also be
protected by the DRM procedure ( Digital Rights Management). Such WMA data is
not supported by the unit. WARNING
The CD/DVD player is a 1st class laser product. There is a risk of injury from in-
visible laser beams if you open the CD/DVD player. CAUTION
■ Audio-CDs (CD-A) and Audio-DVDs, MP3-CDs and MP3-DVDs as well as Video-
DVDs can be played in the internal CD/DVD drive.
■ Never insert CDs with the designation “Do not insert in drives without a drawer”
or Eco Disc into the internal drive.
■ Inserting a second CD/DVD while a CD/DVD is being ejected can damage the
CD/DVD drive in the unit. After pressing the Eject button , there is a delay of a
few seconds before the CD is ejected. During this time the lock in front of the CD/
DVD case is open. It is essential that you wait until the CD/DVD has been fully
ejected before you try to insert a new CD/DVD. ■ If the CD/DVD drive becomes mechanically defective or a CD/DVD has been in-
serted incorrectly or not fully, “CD fault will be displayed. Please check CD. ” and
then the “DVD drive fault ” indicated on the touch-screen. Check the CD/DVD
check and insert it again correctly and completely into the drive. If a “CD/DVD
drive fault ” is indicated again, please contact your ŠKODA Service Partner.
■ If the inside temperature of the unit is too high, no CDs/DVDs will be accepted.
The unit switches into the last active operating mode.
■ Never use liquids such as benzine, paint thinner or record cleaner, otherwise
the surface of the CD/DVD may be damaged!
■ Never expose the CD/DVD to direct sun light!
■ Only write on the CD/DVD with appropriate writing tools.
■ Do not affix anything to the CD/DVD! Note
■ If the function key CD is inactive, no new Audio CD/DVD has been inserted or an
inserted Audio CD/DVD is not readable. ■ It is possible that CDs/DVDs protected by copyright and non-original CD-R, CD-
RW and DVD-RWs are not returned at all or only in certain circumstances.
15
MEDIA mode
Page 19 of 44
External sources
AUX and MDI input
AUX input
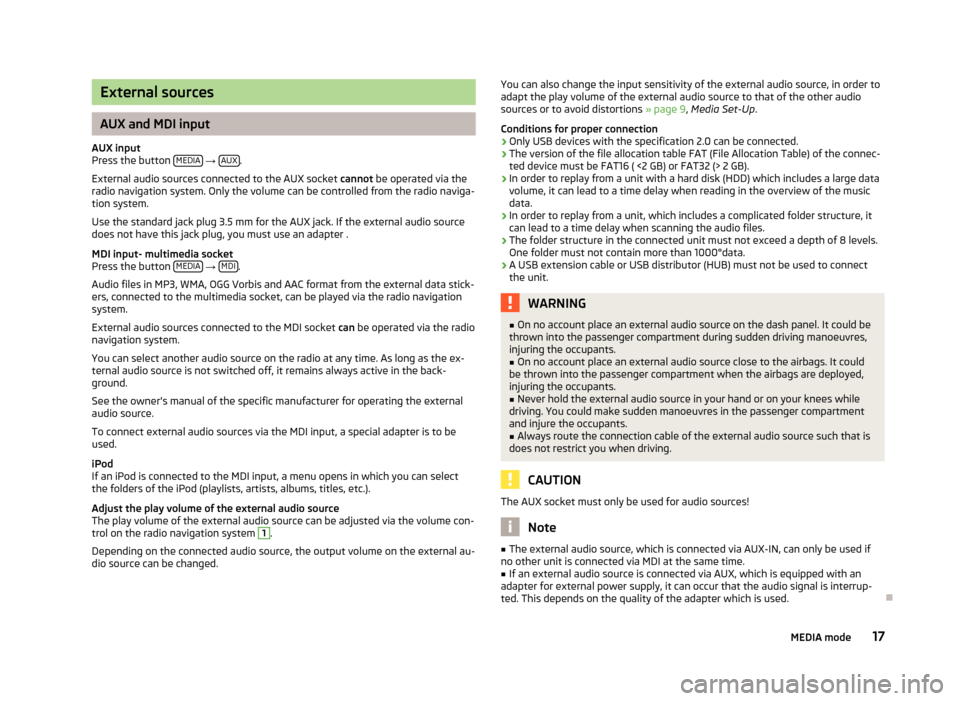
Press the button MEDIA →
AUX .
External audio sources connected to the AUX socket cannot be operated via the
radio navigation system. Only the volume can be controlled from the radio naviga-
tion system.
Use the standard jack plug 3.5
mm for the AUX jack. If the external audio source
does not have this jack plug, you must use an adapter .
MDI input- multimedia socket
Press the button MEDIA →
MDI .
Audio files in MP3, WMA, OGG Vorbis and AAC format from the external data stick-
ers, connected to the multimedia socket, can be played via the radio navigation
system.
External audio sources connected to the MDI socket can
be operated via the radio
navigation system.
You can select another audio source on the radio at any time. As long as the ex-
ternal audio source is not switched off, it remains always active in the back-
ground.
See the owner's manual of the specific manufacturer for operating the external
audio source.
To connect external audio sources via the MDI input, a special adapter is to be
used.
iPod
If an iPod is connected to the MDI input, a menu opens in which you can select
the folders of the iPod (playlists, artists, albums, titles, etc.).
Adjust the play volume of the external audio source
The play volume of the external audio source can be adjusted via the volume con-
trol on the radio navigation system 1
.
Depending on the connected audio source, the output volume on the external au-
dio source can be changed. You can also change the input sensitivity of the external audio source, in order to
adapt the play volume of the external audio source to that of the other audio
sources or to avoid distortions
» page 9, Media Set-Up.
Conditions for proper connection › Only USB devices with the specification 2.0 can be connected.
› The version of the file allocation table FAT (File Allocation Table) of the connec-
ted device must be FAT16 ( <2
GB) or FAT32 (> 2 GB).
› In order to replay from a unit with a hard disk (HDD) which includes a large data
volume, it can lead to a time delay when reading in the overview of the music
data.
› In order to replay from a unit, which includes a complicated folder structure, it
can lead to a time delay when scanning the audio files.
› The folder structure in the connected unit must not exceed a depth of 8 levels.
One folder must not contain more than 1000°data.
› A USB extension cable or USB distributor (HUB) must not be used to connect
the unit. WARNING
■ On no account place an external audio source on the dash panel. It could be
thrown into the passenger compartment during sudden driving manoeuvres,
injuring the occupants.
■ On no account place an external audio source close to the airbags. It could
be thrown into the passenger compartment when the airbags are deployed,
injuring the occupants.
■ Never hold the external audio source in your hand or on your knees while
driving. You could make sudden manoeuvres in the passenger compartment
and injure the occupants.
■ Always route the connection cable of the external audio source such that is
does not restrict you when driving. CAUTION
The AUX socket must only be used for audio sources! Note
■ The external audio source, which is connected via AUX-IN, can only be used if
no other unit is connected via MDI at the same time. ■ If an external audio source is connected via AUX, which is equipped with an
adapter for external power supply, it can occur that the audio signal is interrup-
ted. This depends on the quality of the adapter which is used. Ð
17
MEDIA mode
Page 20 of 44
Hard drive (HDD)
Store MP3 and WMA data on the hard disk (HDD)
If the unit is switched off during the saving process, the saving process will be
terminated with the last fully saved title.
Select, save and edit title name and folder
On the memory card, choose the title or folder you want to save on the hard drive.
You can also select the complete contents of an installed data carrier in the selec-
tion window of the available audio sources for storing on the hard disk . ■ Press the button MEDIA →
Selection .
■ - open menu for the folder editing
■ Play - automatic playback
■ Copy - saves title or folder to the hard drive
■ Insert file/folder here - saves directly to the current folder of the hard drive
■ New folder - creates a new folder
■ cancel). - cancels save
■ Rename - opens input display for changing the title or folder name
■ Delete - deletes the selected title or folder
A folder can have a max. of 7 sub-folders. Press on the function key to open
the corresponding parent folder.
You can continue listening to this or another audio source while storing other au-
dio data. Note
Saving 100 music titles of average length of time (3 - 5 minutes) will take approxi-
mately 40 minutes. Ð Video mode
Insert Video-DVD and start
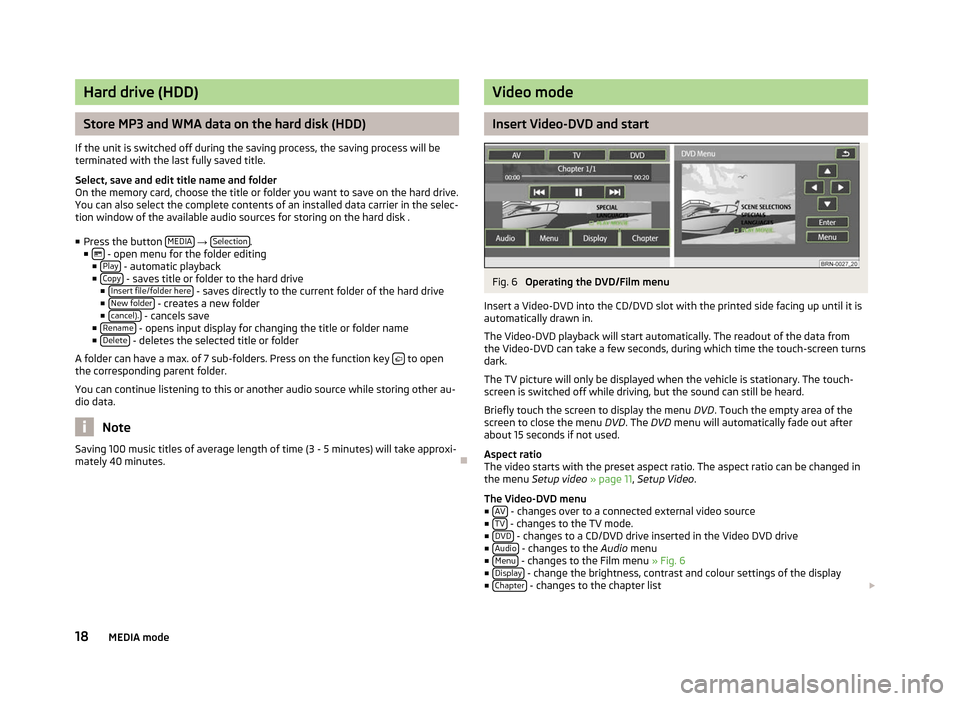
Fig. 6
Operating the DVD/Film menu
Insert a Video-DVD into the CD/DVD slot with the printed side facing up until it is
automatically drawn in.
The Video-DVD playback will start automatically. The readout of the data from
the Video-DVD can take a few seconds, during which time the touch-screen turns
dark.
The TV picture will only be displayed when the vehicle is stationary. The touch-
screen is switched off while driving, but the sound can still be heard.
Briefly touch the screen to display the menu DVD. Touch the empty area of the
screen to close the menu DVD. The DVD menu will automatically fade out after
about 15 seconds if not used.
Aspect ratio
The video starts with the preset aspect ratio. The aspect ratio can be changed in
the menu Setup video » page 11, Setup Video.
The Video-DVD menu ■ AV - changes over to a connected external video source
■ TV - changes to the TV mode.
■ DVD - changes to a CD/DVD drive inserted in the Video DVD drive
■ Audio - changes to the
Audio menu
■ Menu - changes to the Film menu
» Fig. 6
■ Display - change the brightness, contrast and colour settings of the display
■ Chapter - changes to the chapter list
18 MEDIA mode
Page 24 of 44
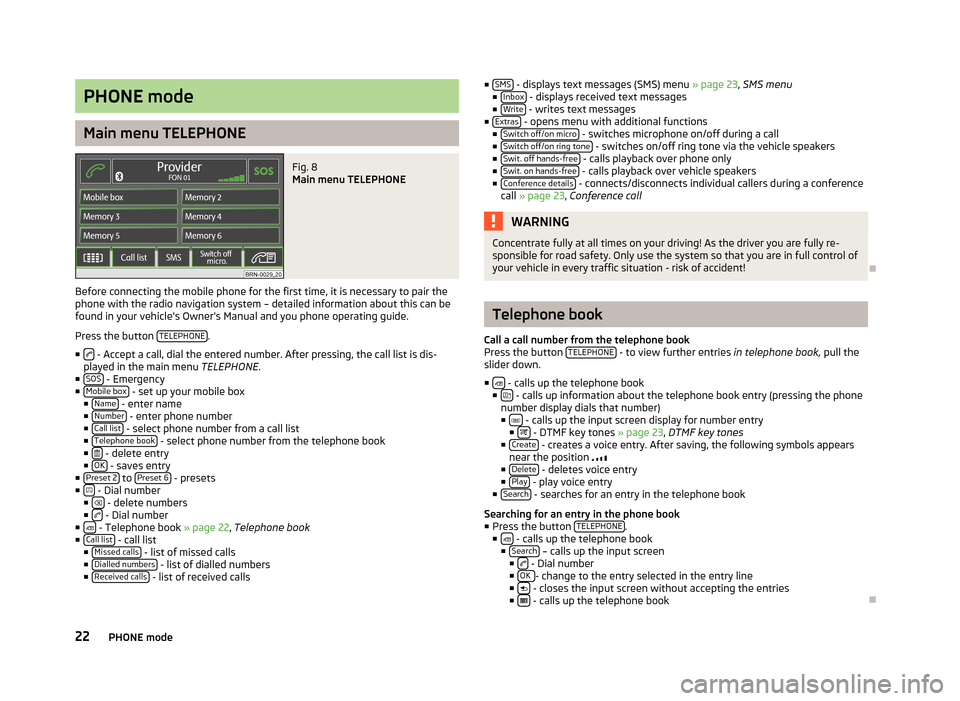
PHONE mode
Main menu TELEPHONE
Fig. 8
Main menu TELEPHONE
Before connecting the mobile phone for the first time, it is necessary to pair the
phone with the radio navigation system – detailed information about this can be
found in your vehicle's Owner's Manual and you phone operating guide.
Press the button TELEPHONE .
■ - Accept a call, dial the entered number. After pressing, the call list is dis-
played in the main menu TELEPHONE.
■ SOS - Emergency
■ Mobile box - set up your mobile box
■ Name - enter name
■ Number - enter phone number
■ Call list - select phone number from a call list
■ Telephone book - select phone number from the telephone book
■ - delete entry
■ OK - saves entry
■ Preset 2 to
Preset 6 - presets
■ - Dial number
■ - delete numbers
■ - Dial number
■ - Telephone book » page 22, Telephone book
■ Call list - call list
■ Missed calls - list of missed calls
■ Dialled numbers - list of dialled numbers
■ Received calls - list of received calls ■
SMS - displays text messages (SMS) menu
» page 23, SMS menu
■ Inbox - displays received text messages
■ Write - writes text messages
■ Extras - opens menu with additional functions
■ Switch off/on micro - switches microphone on/off during a call
■ Switch off/on ring tone - switches on/off ring tone via the vehicle speakers
■ Swit. off hands-free - calls playback over phone only
■ Swit. on hands-free - calls playback over vehicle speakers
■ Conference details - connects/disconnects individual callers during a conference
call » page 23, Conference call WARNING
Concentrate fully at all times on your driving! As the driver you are fully re-
sponsible for road safety. Only use the system so that you are in full control of
your vehicle in every traffic situation - risk of accident! Ð Telephone book
Call a call number from the telephone book
Press the button TELEPHONE - to view further entries
in telephone book,
pull the
slider down.
■ - calls up the telephone book
■ - calls up information about the telephone book entry (pressing the phone
number display dials that number)
■ - calls up the input screen display for number entry
■ - DTMF key tones » page 23
, DTMF key tones
■ Create - creates a voice entry. After saving, the following symbols appears
near the position
■ Delete - deletes voice entry
■ Play - play voice entry
■ Search - searches for an entry in the telephone book
Searching for an entry in the phone book
■ Press the button TELEPHONE .
■ - calls up the telephone book
■ Search – calls up the input screen
■ - Dial number
■ OK - change to the entry selected in the entry line
■ - closes the input screen without accepting the entries
■ - calls up the telephone book
Ð
22 PHONE mode
Page 28 of 44
MAP mode
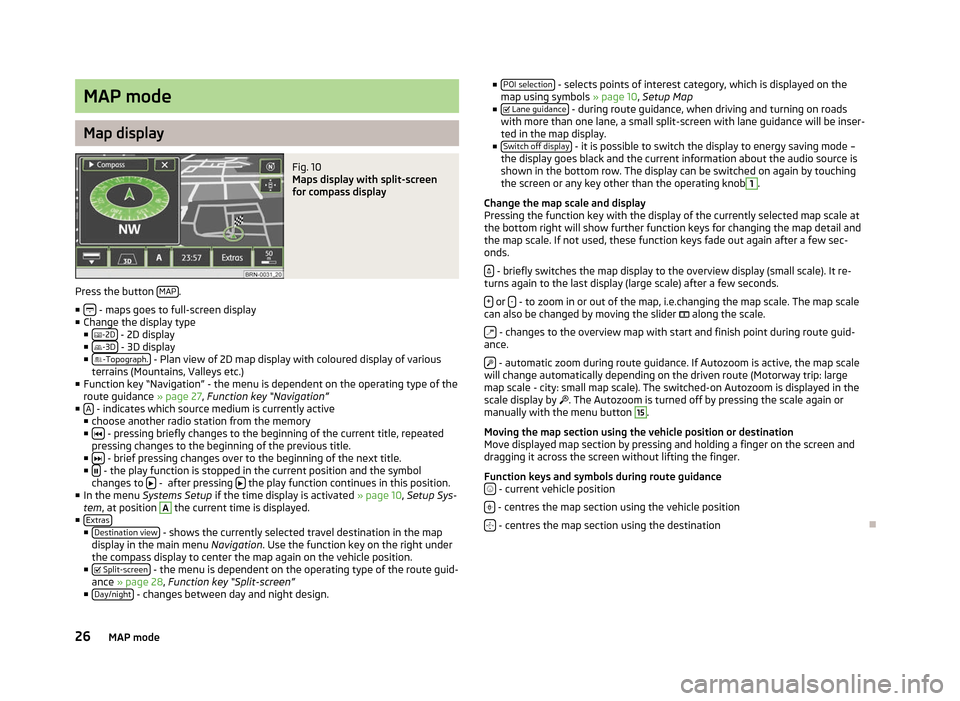
Map display
Fig. 10
Maps display with split-screen
for compass display
Press the button MAP .
■ - maps goes to full-screen display
■ Change the display type
■ -2D - 2D display
■ -3D - 3D display
■ -Topograph. - Plan view of 2D map display with coloured display of various
terrains (Mountains, Valleys etc.)
■ Function key
“Navigation” - the menu is dependent on the operating type of the
route guidance » page 27, Function key “Navigation”
■ A - indicates which source medium is currently active
■ choose another radio station from the memory
■ - pressing briefly changes to the beginning of the current title, repeated
pressing changes to the beginning of the previous title.
■ - brief pressing changes over to the beginning of the next title.
■ - the play function is stopped in the current position and the symbol
changes to - after pressing
the play function continues in this position.
■ In the menu Systems Setup if the time display is activated » page 10, Setup Sys-
tem , at position A
the current time is displayed.
■ Extras ■
Destination view - shows the currently selected travel destination in the map
display in the main menu Navigation. Use the function key on the right under
the compass display to center the map again on the vehicle position.
■ Split-screen - the menu is dependent on the operating type of the route guid-
ance » page 28, Function key “
Split-screen”
■ Day/night - changes between day and night design. ■
POI selection - selects points of interest category, which is displayed on the
map using symbols » page 10, Setup Map
■ Lane guidance - during route guidance, when driving and turning on roads
with more than one lane, a small split-screen with lane guidance will be inser-
ted in the map display.
■ Switch off display - it is possible to switch the display to energy saving mode –
the display goes black and the current information about the audio source is
shown in the bottom row. The display can be switched on again by touching
the screen or any key other than the operating knob 1
.
Change the map scale and display
Pressing the function key with the display of the currently selected map scale at
the bottom right will show further function keys for changing the map detail and
the map scale. If not used, these function keys fade out again after a few sec-
onds.
- briefly switches the map display to the overview display (small scale). It re-
turns again to the last display (large scale) after a few seconds.
+ or
- - to zoom in or out of the map, i.e.changing the map scale. The map scale
can also be changed by moving the slider along the scale.
- changes to the overview map with start and finish point during route guid-
ance.
- automatic zoom during route guidance. If Autozoom is active, the map scale
will change automatically depending on the driven route (Motorway trip: large
map scale - city: small map scale). The switched-on Autozoom is displayed in the
scale display by . The Autozoom is turned off by pressing the scale again or
manually with the menu button 15
.
Moving the map section using the vehicle position or destination
Move displayed map section by pressing and holding a finger on the screen and
dragging it across the screen without lifting the finger.
Function keys and symbols during route guidance - current vehicle position
- centres the map section using the vehicle position
- centres the map section using the destination
Ð
26 MAP mode