sat nav SKODA YETI 2013 1.G / 5L Amundsen Navigation System Manual
[x] Cancel search | Manufacturer: SKODA, Model Year: 2013, Model line: YETI, Model: SKODA YETI 2013 1.G / 5LPages: 30, PDF Size: 2.46 MB
Page 5 of 30

system can be used again. The code number can only be retrieved “online” via theŠKODA system, as this guarantees even more effective anti-theft protection. Visita specialist garage 1)
if necessary.
Enter code
If a keypad appears after switching on with the command to enter the code, the unit must be unlocked by entering the correct four-digit code.›
Enter the four-digit code using the function keys 0 to 9. The digit is accepted
in the entry line.
After a four-digit order has been entered, the group of digits will turn grey (inac- tive) and no further digits can be accepted in the entry line.
›
To delete the digits in the entry line from right to left, press the function key Delete.
›
When the correct code is displayed in the entry line, press the function key OK.
Incorrect code number
If an incorrect code is confirmed after entry of the code, the procedure can be re- peated twice. The number of attempts is shown in the bottom screen line.
If the code is entered incorrectly for the third time, the unit will be blocked for ap-
prox. one hour. It is not possible to enter the safety code again until after one
hour, while the unit and the ignition were switched on.
If three invalid attempts are then made again, the radio navigation system will be
blocked again for an hour.
Note
The code is normally saved in the instrument cluster memory. This ensures that
the device is automatically decoded (convenience decoding). Manual input of the
code is normally not necessary.
Screen display
The screen of the unit displays information such as information from the Clima-
tronic, the vehicle distance to an obstacle if the “parking aid” has been activated, etc.
Personalisation
Your vehicle can be equipped with up to four keys. Individual settings of the de-
vice are always assigned to the key currently in use. Up to 4 different setting var-
iants can be stored for the device. When using the key for the first time, the fac- tory setting for the device is valid.1)
Explanation of terms » Owner's Manual , chapter Foreword .
3General information
Page 18 of 30

If a DTMF key tone has to be entered during a conversation, open the keypadfield by pressing the function key Extras
→ Enter numbers and follow the instruc-
tions (for example: “For a private conversation with one of our co-workers, please
press 3
”).
Settings in PHONE mode
Press the button PHONE
→ SETUP.
■ Bluetooth settings
1)
- Settings for the Bluetooth ®
- function
■ Paired device list
- opens a list of all connected devices
■ Search for devices - Search for external devices with an activated Bluetooth ®
function
■ Set Bluetooth visibility
- Activates visibility of the device on other devices with
the Bluetooth ®
function
■ Enter passkey
- Change the 4 digit code for connecting devices
■ Enter mobile box number - Enter the mobile box number for the mobile phone
■ Delete call lists2)
- Deletes all call lists from the memory of the phone unit
■ Switch off telephone2)3)
- switches off the phone unit (the mobile phone remains
paired)
■ Load telephone book
- loads the phonebook from the mobile phone to the memory
of the radio navigation system. This procedure can take a few minutes.
■ Factory settings
- resets device to factory settings- deletes user profiles
1)
This feature is not available if the mobile phone is connected by means of the GSM III telephone pre-
installation. Bluetooth ®
settings for the GSM III telephone preinstallation can be found in your vehi-
cle's Owners manual.
2)
This feature is not available if the mobile phone is connected by means of the GSM III telephone pre-
installation.
3)
This function is not active if the mobile phone is connected using the GSM III telephone preinstalla-
tion via the HFP profile.
16PHONE mode
Page 19 of 30

NAV mode (Navigation)
Introductory information
The route is recalculated each time if you ignore driving recommendations or
change the route. This process takes only a few seconds. Driving recommenda-
tions can only then be re-transmitted.
In regions that are not or only partially digitised and are therefore not included in the navigation data, the device will continue to try to provide guidance to the
destination. It should be noted that under these circumstances the guidance to
the destination may not be completely correct if, for example, one-way streets
and road categories (motorway, country road, etc.) are not or only partially inclu-
ded in the navigation data used.
When entering an address (city, street), only those letters or symbols which make up a logical entry will be presented. A list of possible names will be shown. Do not
forget to enter the blank space in names made up of more than one word, such
as High Wycombe.
The last voice output can be repeated by pressing the menu button
15
. The vol-
ume can be changed while you listen to the travel recommendation.
The GPS satellites will not be able to reach the aerial once you are in a tunnel or
underground garage. In these cases, the unit uses only the vehicle's sensors and
an internal gyroscope for navigation.
WARNING■ Please concentrate fully at all times on your driving! Driver inattention can
lead to accidents and injuries. As the driver you are fully responsible for road
safety. Only use the functions of the device in such a way that you are always
in full control of your vehicle in all traffic situations!■
The following must always have priority over the driving recommendations: ■ the road traffic legislation, even if the driving recommendations contradict
the StVO,
■ the actual acknowledgement of traffic signs, light signals or signs placed
by the police at the relevant location,
■ the facts and circumstances prevailing at the relevant location.
■
Please observe the respective traffic regulations when driving.
WARNING (Continued)■Traffic signs and traffic regulations always have priority over the driving rec-
ommendations provided by the navigation system.■
Route guidance is subject to constant changes, particularly to information
relating to one-way streets, pedestrian zones etc. stored in the navigation da-
ta. Information on traffic lights, stop and right of way signs, parking and stop-
ping restrictions as well as lane constrictions and speed restrictions is not tak-
en into account by the device.
■
Always adjust the driving speed to the road, traffic and weather conditions.
Do not let the device to tempt you to drive too fast in the fog, for example –
risk of accident!
■
The device and its various functions should only be used when traffic condi-
tions permit safe use.
■
The driving recommendations provided may vary from current situations,
e.g. due to road works or out of date navigation data. In such a case, always
observe the traffic regulations and ignore the driving recommendations.
■
Adjust the volume to ensure that acoustic signals from outside the vehicle,
e.g. sirens from vehicles to give way to, such as the police, ambulance and fire
brigade, can be heard at all times.
Note
■ It is not necessary to enter the destinations (country, city, road, point of interest
names) including all country-specific (or language-specific for points of interest)
special characters.■
Depending on the country, some functions of the device can no longer be selec-
ted on the screen at certain speeds. This is not a malfunction, but corresponds to
the legal requirements of the particular country.
Navigation data and the SD memory card
The navigation data is already available in the device memory when the device is switched on for the first time, and can be used immediately for navigation.
Update navigation data
›
Remove the mechanical copy protection from the SD memory card.
›
Insert the SD memory card » page 11, SD memory card .
The following appears automatically after you insert the SD memory card: Assign
-
assigns the SD memory card to the device. For licensing reasons, the SD memory
card is assigned to your device and cannot be used with a different device.
17NAV mode (Navigation)
Page 23 of 30

›Position;
› latitude and longitude;
› height above seal level (if at least 4 satellites are available);
› GPS status (GPS_FIX - the position can be determined, GPS_FIX_3D - the height
can be determined);
› The number of available and tracked satellites (the number of available satel-
lites determines the GPS status).
If route guidance is active, a pop-up of the destination appears.
■ Flagged destination
- saves the current position as a “Flagged destination”.
Route guidance
Starting route guidance
Press the button NAV
→ Map - to open the map view.
Guidance is started by pressing the function key Start
.
The route guidance can also be started from other menu points » page 19, Enter-
ing and saving destinations
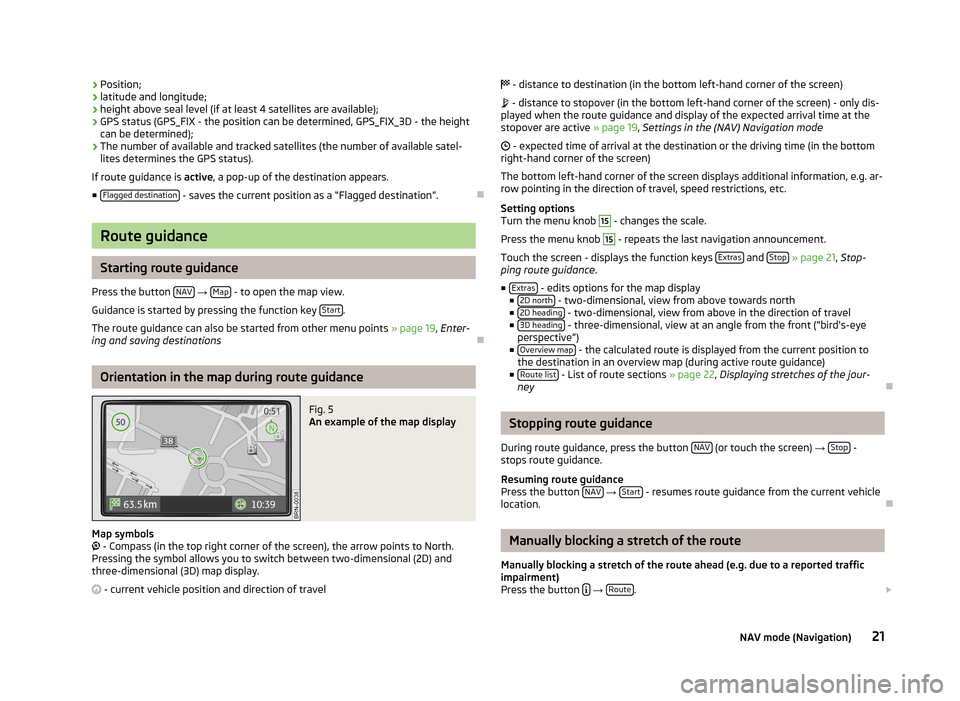
Orientation in the map during route guidance
Fig. 5
An example of the map display
Map symbols
- Compass (in the top right corner of the screen), the arrow points to North.
Pressing the symbol allows you to switch between two-dimensional (2D) and three-dimensional (3D) map display.
- current vehicle position and direction of travel
- distance to destination (in the bottom left-hand corner of the screen)
- distance to stopover (in the bottom left-hand corner of the screen) - only dis-
played when the route guidance and display of the expected arrival time at the
stopover are active » page 19, Settings in the (NAV) Navigation mode
- expected time of arrival at the destination or the driving time (in the bottom
right-hand corner of the screen)
The bottom left-hand corner of the screen displays additional information, e.g. ar- row pointing in the direction of travel, speed restrictions, etc.
Setting options
Turn the menu knob 15
- changes the scale.
Press the menu knob
15
- repeats the last navigation announcement.
Touch the screen - displays the function keys Extras
and Stop
» page 21 , Stop-
ping route guidance .
■ Extras
- edits options for the map display
■ 2D north - two-dimensional, view from above towards north
■ 2D heading - two-dimensional, view from above in the direction of travel
■ 3D heading - three-dimensional, view at an angle from the front (“bird's-eye
perspective”)
■ Overview map
- the calculated route is displayed from the current position to
the destination in an overview map (during active route guidance)
■ Route list
- List of route sections » page 22, Displaying stretches of the jour-
ney
Stopping route guidance
During route guidance, press the button NAV
(or touch the screen)
→ Stop -
stops route guidance.
Resuming route guidance
Press the button NAV
→ Start - resumes route guidance from the current vehicle
location.
Manually blocking a stretch of the route
Manually blocking a stretch of the route ahead (e.g. due to a reported traffic
impairment)
Press the button
→ Route.
21NAV mode (Navigation)