buttons SKODA YETI 2013 1.G / 5L User Guide
[x] Cancel search | Manufacturer: SKODA, Model Year: 2013, Model line: YETI, Model: SKODA YETI 2013 1.G / 5LPages: 266, PDF Size: 26.71 MB
Page 99 of 266

The interior temperature can be set between +18 °C and +26 ℃. The interior tem-
perature is regulated automatically within this range.
If a temperature lower than +18 °C is selected, a blue symbol lights up at the start
of the numerical scale.
If a temperature higher than +26 °C is selected, a red symbol lights up at the start
of the numerical scale.
At both end positions, Climatronic runs at maximum cooling/heating output and
the temperature is automatically not regulated.
Controlling blower
The Climatronic system controls the blower stages automatically in line with the
interior temperature. However, the blower stages can be manually adapted to
suit your particular needs.
Automatic mode
The automatic mode is used in order to maintain a constant temperature and to
demist the windows in the interior of the car.
If the warning light in the top right corner of the button
lights up, the Clima-
tronic operates in “HIGH”-mode. The “HIGH” mode is the standard setting of the
Climatronic.
Upon pressing the
button again, the Climatronic switches to “LOW”-mode
and the indicator light in the top left corner lights up. The Climatronic uses only in this mode the lower blower speed. However taking into account the noise level,
this is more comfortable, yet be aware that the effectiveness of the air condition-
ing system is reduced particularly if the vehicle is fully occupied.
By pressing the button
again, it is changed to “HIGH”-mode.
Automatic mode is switched off by pressing one of the buttons for the air distri- bution or by increasing/decreasing the blower speed. The temperature is never-
theless regulated.WARNING■ Do not switch off the Climatronic system for longer than necessary.■Switch on the Climatronic system as soon as the windows mist up.Note■Do not stick anything onto or cover the interior temperature sensor B » Fig. 95
as this could impair the functioning of the Climatronic.■
On vehicles equipped with a factory-fitted radio or radio navigation system, the
Climatronic information is also shown on their displays. This function can be
switched off, see » operating instructions for the radio or navigation system .
Note
If the windscreen mists up, press the symbol button . Press the button
once the windscreen has demisted.
Using the air conditioning system economically
First read and observe the introductory information and safety warn-ings
on page 91.
The air conditioning system compressor uses power from the engine when in
cooling mode, which will affect the fuel consumption.
It recommended to open the windows or the doors of a vehicle for which the inte-rior has been strongly heated through the effect of direct sunlight in order to al-
low the heated air to escape.
The cooling system should not be on if the windows are open.
If the desired interior temperature can be achieved without switching the cooling
system on, then we do not recommend turning this on.
For the sake of the environment
Pollutant emissions are also reduced when fuel is saved » page 130, Economical
driving and environmental sustainability .
96Using the system
Page 104 of 266

Note■We recommend that the installation of mobile phones and two-way radio sys-
tems in a vehicle be carried out by a specialist garage.■
Not all mobile phones that enable Bluetooth ®
communication are compatible
with the universal telephone preinstallation GSM II or GSM III. Ask a ŠKODA Part-
ner whether your phone is compatible with the universal telephone preparation
GSM II or GSM III.
■
The range of the Bluetooth ®
connection to the hands-free system is restricted
to the vehicle interior. The range is dependent on local factors, e.g. obstacles be- tween the devices and mutual interferences with other devices. If your mobile phone is in a jacket pocket, for example, this can lead to difficulties when estab-
lishing a connection with the hands-free-system or transferring data.
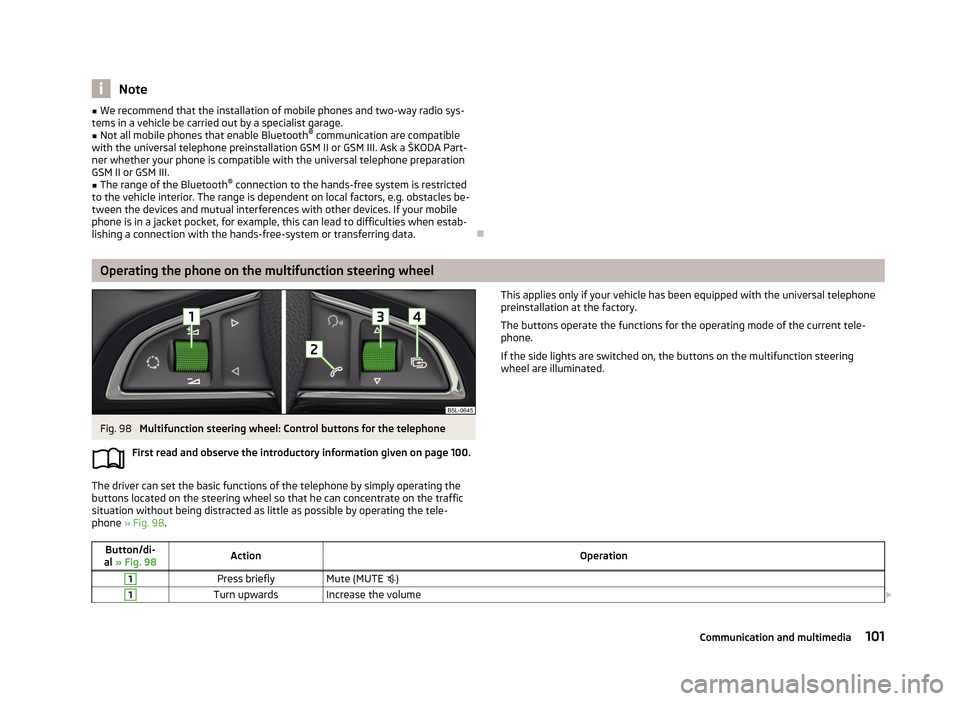
Operating the phone on the multifunction steering wheel
Fig. 98
Multifunction steering wheel: Control buttons for the telephone
First read and observe the introductory information given on page 100.
The driver can set the basic functions of the telephone by simply operating the
buttons located on the steering wheel so that he can concentrate on the traffic
situation without being distracted as little as possible by operating the tele-
phone » Fig. 98 .
This applies only if your vehicle has been equipped with the universal telephone
preinstallation at the factory.
The buttons operate the functions for the operating mode of the current tele-
phone.
If the side lights are switched on, the buttons on the multifunction steering
wheel are illuminated.Button/di-
al » Fig. 98ActionOperation1Press brieflyMute (MUTE )1Turn upwardsIncrease the volume 101Communication and multimedia
Page 116 of 266

If the system does not recognise the command, it repeats the first part of thehelp thus enabling a new entry to be completed. After the 2nd error the systemrepeats the second part of the aid. After the 3rd failed attempt, the answer “ Can-
celled. ” is given and the dialogue is ended.
Storing voice recording for a contact
If automatic name recognition does not work reliably for some contacts, you can
choose to save your own voice tag for the contact in the Phone book - Voice tag -
Record menu item.
Your own voice tag can also be saved using the voice control in the FURTHER OP-
TIONS menu.
Multimedia
Introduction
This chapter contains information on the following subjects:
Music playback via Bluetooth ®
113
Operating the radio and navigation system on the multifunction steering
wheel
113
AUX- and MDIinputs
115CD change115DVD-preinstallation116
Music playback via Bluetooth ®
First read and observe the introductory information given on page 113.
The universal telephone preinstallation makes it possible to play back music via
Bluetooth ®
from devices such as MP3 players, mobile phones or notebooks.
To ensure that music can be played via Bluetooth ®
, you must first pair the device
with the hands-free system in the Phone - Bluetooth - Media player menu.
The music playback process is performed on the connected device.
The universal telephone preinstallation GSM II ensures that the music played back
via the hands-free system can be controlled with the remote control » page 112,
Voice commands - GSM II .
Note
The device being connected must support the Bluetooth ®
A2DP profile; refer to
the operating instructions for the relevant device being connected.
Operating the radio and navigation system on the multifunction steering wheel
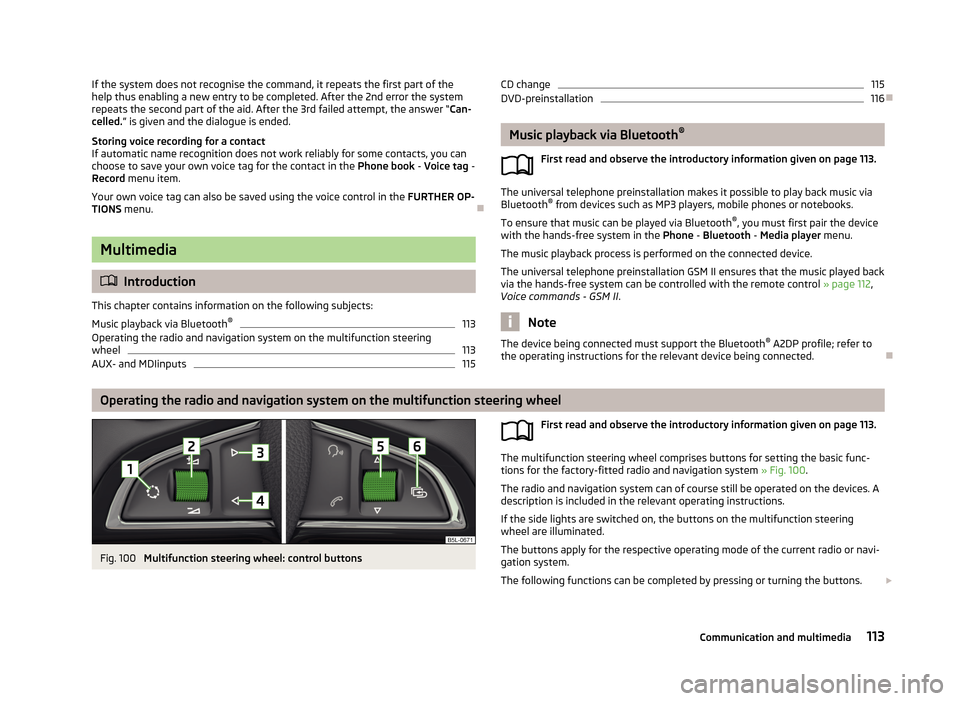
Fig. 100
Multifunction steering wheel: control buttons
First read and observe the introductory information given on page 113.
The multifunction steering wheel comprises buttons for setting the basic func-
tions for the factory-fitted radio and navigation system » Fig. 100.
The radio and navigation system can of course still be operated on the devices. A
description is included in the relevant operating instructions.
If the side lights are switched on, the buttons on the multifunction steeringwheel are illuminated.
The buttons apply for the respective operating mode of the current radio or navi- gation system.
The following functions can be completed by pressing or turning the buttons.
113Communication and multimedia
Page 118 of 266

AUX- and MDIinputsFirst read and observe the introductory information given on page 113.
The AUX and MDI inputs are used to connect external audio sources (e.g. iPod ormp3 player) and to play back music from these devices via the factory-fitted radio
or navigation system.
The AUX input for external audio sources is located below the armrest of the
front seats and is marked with the 1)
symbol.
The MDI input is above the storage compartment in the front center console and
has the identifier
» page 72 characterized.
For a description of use, refer to the operating instructions for the relevant radio or navigation system.
CD change
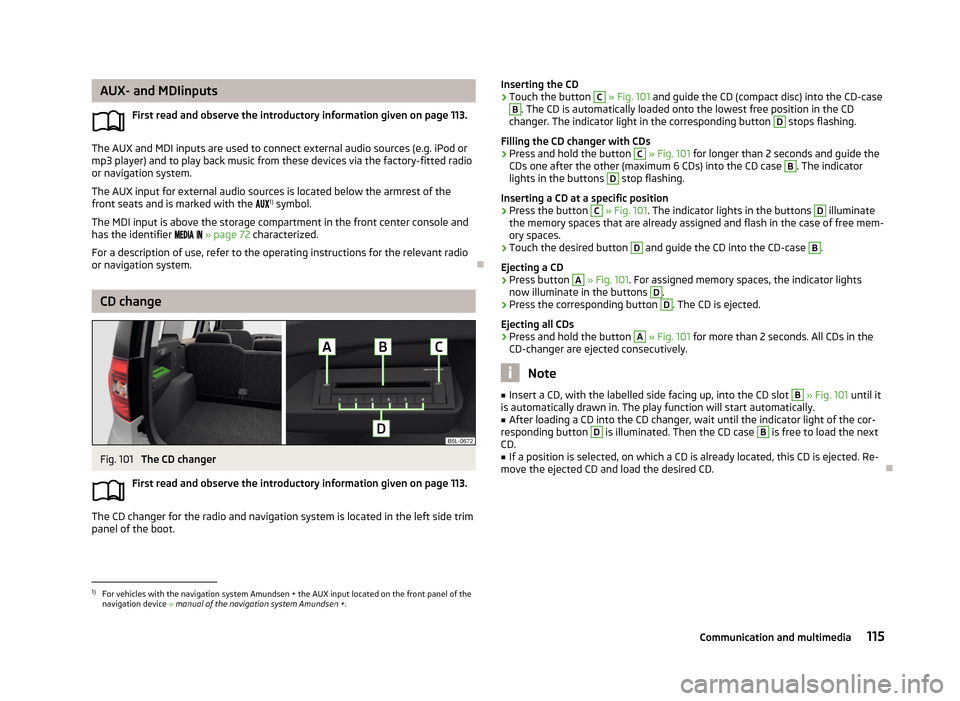
Fig. 101
The CD changer
First read and observe the introductory information given on page 113.
The CD changer for the radio and navigation system is located in the left side trim panel of the boot.
Inserting the CD›Touch the button C » Fig. 101 and guide the CD (compact disc) into the CD-caseB
. The CD is automatically loaded onto the lowest free position in the CD
changer. The indicator light in the corresponding button
D
stops flashing.
Filling the CD changer with CDs
›
Press and hold the button
C
» Fig. 101 for longer than 2 seconds and guide the
CDs one after the other (maximum 6 CDs) into the CD case
B
. The indicator
lights in the buttons
D
stop flashing.
Inserting a CD at a specific position
›
Press the button
C
» Fig. 101 . The indicator lights in the buttons
D
illuminate
the memory spaces that are already assigned and flash in the case of free mem-
ory spaces.
›
Touch the desired button
D
and guide the CD into the CD-case
B
.
Ejecting a CD
›
Press button
A
» Fig. 101 . For assigned memory spaces, the indicator lights
now illuminate in the buttons
D
.
›
Press the corresponding button
D
. The CD is ejected.
Ejecting all CDs
›
Press and hold the button
A
» Fig. 101 for more than 2 seconds. All CDs in the
CD-changer are ejected consecutively.
Note
■ Insert a CD, with the labelled side facing up, into the CD slot B » Fig. 101 until it
is automatically drawn in. The play function will start automatically.■
After loading a CD into the CD changer, wait until the indicator light of the cor-
responding button
D
is illuminated. Then the CD case
B
is free to load the next
CD.
■
If a position is selected, on which a CD is already located, this CD is ejected. Re-
move the ejected CD and load the desired CD.
1)
For vehicles with the navigation system Amundsen + the AUX input located on the front panel of the
navigation device » manual of the navigation system Amundsen + .
115Communication and multimedia