check engine SKODA YETI 2013 1.G / 5L User Guide
[x] Cancel search | Manufacturer: SKODA, Model Year: 2013, Model line: YETI, Model: SKODA YETI 2013 1.G / 5LPages: 266, PDF Size: 26.71 MB
Page 126 of 266
CAUTION■If the engine does not start up after a second attempt, one of the following
fuses may be defective. ■Petrol engine - fuse for the fuel pump.
■ Diesel engine - fuse for the glow plug control unit or fuel pump.■
Check the fuse and replace if necessary » page 236, or seek assistance from a
specialist garage.
Switching off the ignition
First read and observe the introductory information and safety warn-ings
on page 120.
›
Press the starter button » Fig. 106 on page 121 briefly.
The ignition is switched off.
The ignition can be switched off up to a speed of 2 km/h.
On vehicles fitted with a manual gearbox, the clutch pedal must not be de-
pressed after switching off the ignition, otherwise the system would try to start.
For automatic transmission vehicles, the brake pedal must not be depressed,
otherwise the system will try to start.
If the driver's door is opened while the ignition is on, an audible signal sounds and
the following message appears in the instrument cluster display.
Ignition on!
IGNITION SWITCHED ON
When leaving the vehicle always switch off the ignition.
Switching off the engine
First read and observe the introductory information and safety warn-ings
on page 120.
›
Stop the vehicle.
›
Press the starter button » Fig. 106 on page 121.
The engine and the ignition are switched off simultaneously.
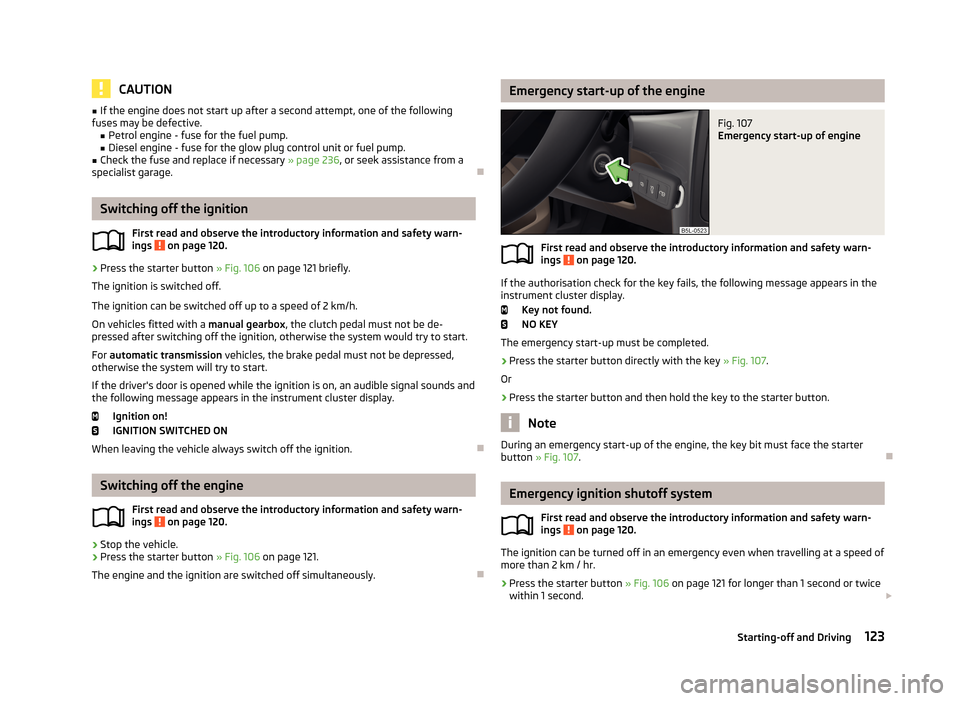
Emergency start-up of the engineFig. 107
Emergency start-up of engine
First read and observe the introductory information and safety warn- ings on page 120.
If the authorisation check for the key fails, the following message appears in the
instrument cluster display.
Key not found.
NO KEY
The emergency start-up must be completed.
› Press the starter button directly with the key
» Fig. 107.
Or
› Press the starter button and then hold the key to the starter button.
Note
During an emergency start-up of the engine, the key bit must face the starter
button » Fig. 107 .
Emergency ignition shutoff system
First read and observe the introductory information and safety warn-
ings
on page 120.
The ignition can be turned off in an emergency even when travelling at a speed of
more than 2 km / hr.
›
Press the starter button » Fig. 106 on page 121 for longer than 1 second or twice
within 1 second.
123Starting-off and Driving
Page 127 of 266
After emergency stop of the ignition, the steering is unlocked.
Brakes
Introduction
This chapter contains information on the following subjects:
Information on braking
124
Handbrake
125WARNING■ Greater physical effort is required for braking when the engine is switched
off – risk of accident!■
During the braking procedure on a vehicle with manual transmission, when
the vehicle is in gear and at low revs, press the clutch pedal. Otherwise, the
function of the brake booster may be impaired – risk of accident!
■
Never leave children unattended in the vehicle. The children might, for ex-
ample, release the handbrake or take the vehicle out of gear. The vehicle could then start to move – risk of accident!
WARNINGIn the event of damage occurring to the standard fitted front spoiler or the
retrofitting of another front spoiler, wheel hubs etc. » page 184, Service work,
adjustments and technical alterations , It must be ensured that the air supply
to the front brakes is not impaired. The front brakes may overheat which can
have a negative impact on the functioning of the braking system – risk of acci- dent!
CAUTION
■ Observe the recommendations on the new brake pads » page 130.■Never let the brakes slip with light pressure on the pedal if braking is not neces-
sary. This causes the brakes to overheat and can also result in a longer braking distance and excessive wear.
Information on braking
First read and observe the introductory information and safety warn-
ings
on page 124.
If the brakes are applied in full and the control unit for the braking system consid-
ers the situation to be dangerous for the following traffic, the brake light flashes
automatically.
After the speed was reduced below around 10 km/h or the vehicle was stopped,
the brake light stops flashing and the hazard warning light system switches on.
The hazard warning light system is switched off automatically after accelerating
or driving off again.
Before driving a long distance at a steep incline, reduce speed and shift into the
next lowest gear. As a result, the braking effect of the engine will be used, reduc- ing the load on the brakes. Any additional braking should be completed intermit-tently, not continuously.
Wear-and-tear
The wear of the brake pads is dependent on the operating conditions and driving style.
The brake pads wear more quickly if a lot of journeys are completed in towns and over short distances or if a very sporty style of driving is adopted.
If operated under severe conditions , the thickness of the brake pads must be
checked by a specialist garage between service appointments as well.
Wet roads or road salt
The performance of the brakes can be delayed as the brake discs and brake pads may be moist or have a coating of ice or layer of salt on them in winter. The
brakes are cleaned and dried by applying the brakes several times.
Corrosion
Corrosion on the brake discs and dirt on the bake pads occur if the vehicle has
been parked for a long period and if you do not make much use of the braking
system. The brakes are cleaned and dried by applying the brakes several times.
Faults in the brake surface
If it is found that the braking distance has suddenly become longer and that the
brake pedal can be depressed further, the brake system may be faulty.
Visit a specialist garage immediately and adjust your style of driving appropriate-ly, as you will not know the exact extent of the damage.
124Driving
Page 133 of 266
New brake padsFirst read and observe the introductory information given on page 129.
New brake pads do not initially provide optimal braking performance. They first
need to be “run in”. Therefore, drive especially carefully for the first 200 km or so.
Economical driving and environmental sustainability
Introduction
This chapter contains information on the following subjects:
Looking ahead
130
Economical gear changing
131
Avoiding full throttle
131
Reducing idling
131
Avoiding short distances
132
Checking tyre inflation pressure
132
Avoiding unnecessary ballast
132
Regular maintenance
132
Saving electrical energy
133
Environmental compatibility
133
The technical requirements for low fuel usage and economic efficiency of the ve-
hicle have already been built into the vehicle at the works. ŠKODA places a partic-
ular emphasis on minimising negative effects on the environment.
It is necessary to take note of the guidelines given in this chapter in order tomake best use of these characteristics and to maintain their effectiveness.
Fuel consumption, environmental pollution and the wear to the engine, brakes
and tyres depend essentially on the following three factors:
› your personal driving style
› operating conditions
› technical requirements
The fuel economy by can be improved by 10 -15 % by always looking ahead and
driving in an economical way.
Fuel consumption is also be influenced by external factors which are beyond the
driver's control. Consumption increases during the winter or under difficult condi-
tions, on poor roads, etc.
Fuel consumption can vary considerably from the manufacturer's data, as a result
of outside temperatures, the weather and driving style.
The optimal engine speed should be obtained when accelerating, in order to
avoid a high fuel consumption and resonance of the vehicle.
CAUTION
All the speed and engine revolution figures apply only when the engine is at its
normal operating temperature.
Looking ahead
First read and observe the introductory information and safety warn-
ings
on page 130.
A vehicle's highest fuel consumption occurs when accelerating, therefore unnec-
essary accelerating and braking should be avoided. If looking ahead when driving, less braking and consequently less accelerating are required.
If possible, let your vehicle coast to a stop, or use the engine brake, if you can see that the next set of traffic lights is on red, for example.
130Driving
Page 135 of 266
If an engine is only idling it takes much longer for it to reach its normal operating
temperature. Wear-and-tear and pollutant emissions, though, are particularly
high in the warming-up phase. Therefore, start driving as soon as the engine has
started, though high engine speeds should be avoided.
Avoiding short distances
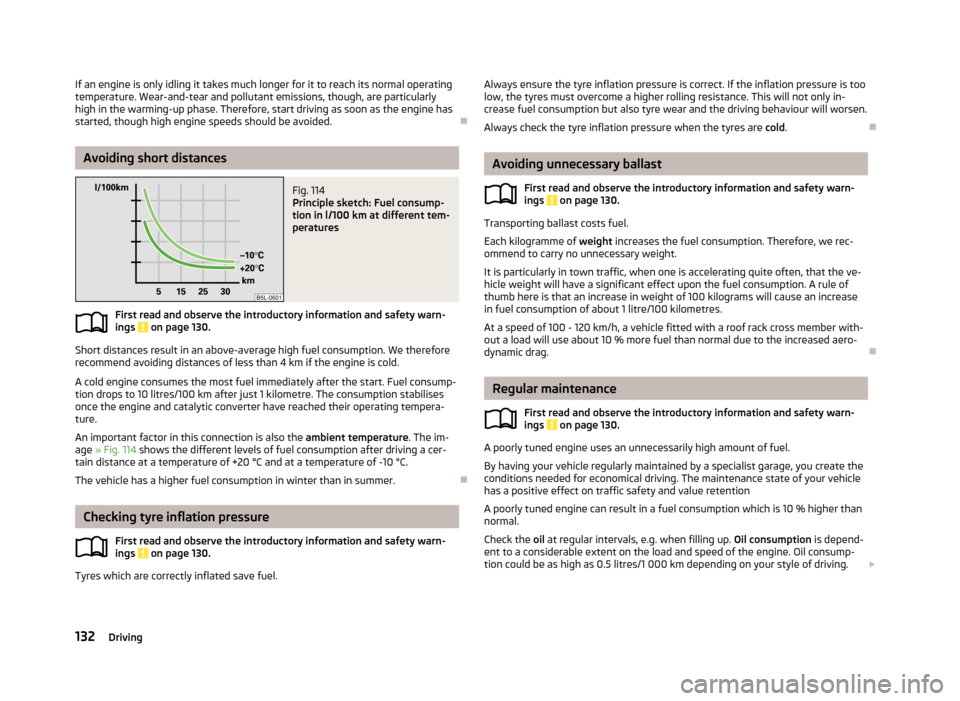
Fig. 114
Principle sketch: Fuel consump-
tion in l/100 km at different tem-
peratures
First read and observe the introductory information and safety warn- ings on page 130.
Short distances result in an above-average high fuel consumption. We therefore recommend avoiding distances of less than 4 km if the engine is cold.
A cold engine consumes the most fuel immediately after the start. Fuel consump-tion drops to 10 litres/100 km after just 1 kilometre. The consumption stabilises once the engine and catalytic converter have reached their operating tempera-
ture.
An important factor in this connection is also the ambient temperature. The im-
age » Fig. 114 shows the different levels of fuel consumption after driving a cer-
tain distance at a temperature of +20 °C and at a temperature of -10 °C.
The vehicle has a higher fuel consumption in winter than in summer.
Checking tyre inflation pressure
First read and observe the introductory information and safety warn-ings
on page 130.
Tyres which are correctly inflated save fuel.
Always ensure the tyre inflation pressure is correct. If the inflation pressure is too
low, the tyres must overcome a higher rolling resistance. This will not only in- crease fuel consumption but also tyre wear and the driving behaviour will worsen.
Always check the tyre inflation pressure when the tyres are cold.
Avoiding unnecessary ballast
First read and observe the introductory information and safety warn-
ings
on page 130.
Transporting ballast costs fuel.
Each kilogramme of weight increases the fuel consumption. Therefore, we rec-
ommend to carry no unnecessary weight.
It is particularly in town traffic, when one is accelerating quite often, that the ve-
hicle weight will have a significant effect upon the fuel consumption. A rule of
thumb here is that an increase in weight of 100 kilograms will cause an increase in fuel consumption of about 1 litre/100 kilometres.
At a speed of 100 - 120 km/h, a vehicle fitted with a roof rack cross member with-
out a load will use about 10 % more fuel than normal due to the increased aero- dynamic drag.
Regular maintenance
First read and observe the introductory information and safety warn-
ings
on page 130.
A poorly tuned engine uses an unnecessarily high amount of fuel.
By having your vehicle regularly maintained by a specialist garage, you create the conditions needed for economical driving. The maintenance state of your vehicle has a positive effect on traffic safety and value retention
A poorly tuned engine can result in a fuel consumption which is 10 % higher than normal.
Check the oil at regular intervals, e.g. when filling up. Oil consumption is depend-
ent to a considerable extent on the load and speed of the engine. Oil consump-
tion could be as high as 0.5 litres/1 000 km depending on your style of driving.
132Driving
Page 136 of 266
It is quite normal that a new engine has a higher oil consumption at first, and rea-ches its lowest level only after a certain running in time. The oil consumption of a
new vehicle can therefore only be correctly assessed after driving about 5 000 km.
For the sake of the environment
■ Additional improvements to the fuel economy can be made by using synthetic
high-lubricity oils.■
Regularly check the ground under the vehicle. Have your vehicle inspected by a
specialist garage if you find any stains caused by oil or other fluids on the ground.
Note
We recommend that your vehicle be serviced on a regular basis by a ŠKODA serv- ice partner.
Saving electrical energy
First read and observe the introductory information and safety warn-ings
on page 130.
When the engine is running, the alternator generates and supplies electrical pow-
er. If more electrical components of the electrical system are switched on, more
fuel is needed to operate the alternator. We therefore recommend switching off
electrical components if these are no longer required.
Environmental compatibility
First read and observe the introductory information and safety warn-ings
on page 130.
Environmental protection has played a major role in the design, material selection
and production of your new ŠKODA. Particular emphasis has been placed on the
following points.
Design measures › Joints designed to be easily detached.
› Simplified disassembly due to the modular structure system.
›
Improved purity of different classes of materials.
› Identification of all plastic parts in accordance with VDA Recommendation 260.
› Reduced fuel consumption and exhaust emission CO
2.
› Minimum fuel leakage during accidents.
› Reduced noise.
Choice of materials › Extensive use of recyclable material.
› Air conditioning filled with CFC-free refrigerant.
› No cadmium.
› No asbestos.
› Reduction in the “vaporisation” of plastics.
Manufacture › Solvent-free cavity protection.
› Solvent-free protection of the vehicle for transportation from the production
plant to the customer.
› The use of solvent-free adhesives.
› No CFCs used in the production process.
› Without use of mercury.
› Use of water-soluble paints.
Trade-in and recycling of old cars
ŠKODA meets the requirements of the brand and its products with regard to pro-
tecting the environment and the preserving resources. All new ŠKODA vehicles
can be utilized up to 95 % and always 1)
be returned.
In a lot of countries sufficient trade-in networks have been created, where you can trade-in your vehicle. After you trade-in your vehicle, you will receive a confir- mation stating the recycling in accordance with environmental regulations.
Note
You can find more detailed information about the trade-in and recycling of old
cars from a specialist garage.1)
Subject to fulfilment of the national legal requirements.
133Starting-off and Driving
Page 137 of 266
Water crossing and drive outside paved roads
Introduction
This chapter contains information on the following subjects:
Fording
134
Off-road driving
135WARNING■ Driving through water, mud, sludge etc. can reduce the braking power and
extend the braking distance – risk of accident!■
Avoid abrupt and sudden braking immediately after water crossings.
■
After driving through bodies of water, the brakes must be cleaned and dried
as soon as possible by intermittent braking.
■
Only apply the brakes for the purpose of drying and cleaning the brake discs
if the traffic conditions permit this. Do not place any other road users in jeop- ardy.
WARNING■ Drive particularly aware and pro-actively outside paved roads.■Always adjust your driving to the current terrain and weather conditions. Ex-
cessive speed or incorrect driving manoeuvres can cause damage to the vehi-
cle and lead to serious injuries.■
Objects trapped under the floor of the vehicle can damage the fuel lines, the
brake system, the seals and other parts of the chassis. Check the underside of
the vehicle and remove the trapped objects.
■
Combustible objects such as dry leaves or twigs caught under the base of
the vehicle could ignite on hot vehicle parts - risk of fire!
CAUTION
■ When driving through water, some parts of the vehicle such as the engine,
gearbox, chassis or electrics can be severely damaged.■
Oncoming vehicles can generate water waves which can exceed the permissible
water level for your vehicle.
■ Potholes, mud or rocks can be hidden under the water making it difficult or im-
possible to drive through the body of water.■
Do not drive through salt water. The salt can lead to corrosion. Any vehicle parts
that have come into contact with salt water must be rinsed immediately with
fresh water.
CAUTION
■ Pay attention to the ground clearance of the vehicle! When driving over objects
which are larger than the ground clearance, the chassis and its components can
get damaged.■
Drive slowly in unknown terrain and watch out for unexpected obstacles, such
as potholes, rocks, stumps, etc.
■
Check up on confusing sections of unpaved roads before travelling on them and
consider whether such travelling is possible without risk.
Fording
Fig. 115
Driving through water
First read and observe the introductory information and safety warn- ings on page 134.
The following must be observed to avoid damage to the vehicle when driving
through bodies of water (e.g. flooded roads).
›
Therefore determine the depth of the water before driving through bodies of water.
The water level must not reach above the bar on the lower beam » Fig. 115.
›
Do not drive any faster than at a walking speed.
134Driving
Page 153 of 266
The automatic start procedure takes place again. The warning symbol goes
out.
Further information on automatic transmission Engine shut down takes place when the selector lever is in positions P, D , S and N
and in Tiptronic mode.
When the selector lever is in position P the engine remains shut down after you
release the brake pedal. Start the engine by pressing the gas pedal or by moving
the selector lever into a different mode and releasing the brake pedal.
If the selector lever is moved into position R during the STOP phase , the engine
will re-start.
No automatic engine shutdown takes place when the vehicle is moving at low
speed (e.g. during a traffic jam or when tuning) and remains stationary after pressing the brake pedal lightly. Automatic engine shutdown takes place if you
press the brake pedal down with more force.
Operating conditions of the system
First read and observe the introductory information and safety warn-ings
on page 149.
The START-STOP system is very complex. Some of the procedures are hard to check without servicing.
No engine shut down is carried out
Before each STOP phase, the system checks whether certain conditions have
been met. No engine shut down takes place in the following situations.
› The engine has not reached the minimum temperature for START STOP mode.
› The temperature inside the vehicle has not reached the desired temperature
set in the air-conditioning system/heating.
› The external temperature is very low/high.
› The intensive windscreen heater (Climatronic) or windscreen heater/ventilation
is switched on with the maximum air temperature setting (manual air condition-
ing system).
› The parking aid/Park Assist is switched on.
› The charge state of the vehicle battery is too low.
› The stationary vehicle is on a steep slope or a steep downhill section.
› The idling speed is too high.
› The steering angle is too large (manoeuvring).
› The selector lever position
R is selected (e.g. when parking).
The warning symbol appears in the instrument cluster display.
The automatic start procedure takes place again
During the STOP phase, the engine fires up without any active driver intervention, e.g. in the following situations.
› The vehicle begins to roll, e.g. on a slope.
› The difference between the temperature setting of the air-conditioning sys-
tem/heating and the temperature of the interior is too large.
› The intensive windscreen heater (Climatronic) or windscreen heater/ventilation
is switched on with the maximum air temperature setting (manual air condition-
ing system).
› The brake pedal was pressed several times (the pressure in the braking system
is too low).
› The charge state of the vehicle battery is too low.
› The current consumption is too high.
Manually activating/deactivating the system
Fig. 125
Button for the START-STOP sys-
tem
First read and observe the introductory information and safety warn-
ings on page 149.
Activation/deactivation
›
Press the symbol button
» Fig. 125 .
When start-stop mode is deactivated, the indicator light in the button lights up.
Note
If the system is deactivated during the STOP phase, the automatic start proce-
dure takes place.
150Driving
Page 155 of 266
Towing a trailer
Towing device
Introduction
This chapter contains information on the following subjects:
Description
152
Setting the ready position
153
Installing the ball rod
154
Check proper fitting
155
Removing the ball rod
155
Use and care
156
If your vehicle has already been factory-fitted with a towing device or is fitted
with a towing device from ŠKODA Original Accessories, then it meets all of the
technical requirements and national legal regulations for towing a trailer.
Your vehicle is fitted with a 13-pin power socket for the electrical connection be-
tween the vehicle and trailer. If the trailer that is to be towed has a 7-pin connec-
tor , you can use a suitable adapter from ŠKODA Original Accessories.
The maximum trailer nose weight is 80 kg and 85 kg 1)
.
WARNING■ Check that the tow bar is seated correctly and is secured in the mounting
recess before the start of every journey.■
Do not use the tow bar if it is not correctly inserted and secured in the
mounting recess.
■
Do not use the towing device if it is damaged or if there are parts missing.
■
Do not modify or adapt the towing device in any way.
■
Never release the tow bar while the trailer is still coupled.
CAUTIONTake care when handling the tow bar so as to avoid damaging the paintwork on
the bumper.
Description
Fig. 126
Carrier for the towing device/tow bar
First read and observe the introductory information and safety warn-
ings
on page 152.
Explanation of graphic » Fig. 126
13-pin power socket
Mounting recess
Safety eyelet
Cover for the mounting recess
Dust cap
Locking ball
Green marking on the handwheel
Handwheel
Key
Lock cap
Red marking on the handwheel
12345678910111)
Applies to vehicles 4x4 with the 2.0 l/103 kW TDI CR and 2.0 L/125 kW TDI CR engine. Applies in multi-
purpose vehicles (AF) for vehicles with the 2.0 l/125 kW TDI CR engine and automatic transmission.
152Driving
Page 161 of 266
Adjust the headlights using the headlight beam control » page 48, Headlight
beam control 1)
.
Driving speed
For safety reasons, do not drive faster than 80 km/h when towing a trailer.
Immediately reduce your speed as soon as even the slightest swaying of the trail-
er is detected. Never attempt to stop the trailer from “swaying” by accelerating.
Brakes
Apply the brakes in good time! If the trailer is fitted with a trailer brake, apply the
brakes gently at first, then brake firmly. This will avoid brake jolts resulting from
the trailer wheels locking.
On downhill sections shift down a gear in good time to also use the engine as a
brake.
Engine overheating
If the needle for the coolant temperature gauge moves into the right-hand area
or the red area of the scale, the speed must be reduced immediately.
Stop and switch off the engine if the indicator light
in the instrument cluster
starts to flash. Wait a few minutes and check the level of coolant » page 205,
Checking the coolant level .
The following guidelines must be observed » page 16,
Coolant .
The coolant temperature can be reduced by switching on the heating.WARNING■ Never use the safety eyelet for towing!■Adapt your speed to the conditions of the road surface and to the traffic sit-
uation.■
Improper or incorrectly connected electric cables can energise the trailer and
cause functional faults to the vehicle's entire electrical system as well as acci-
dents and severe injuries.
■
Work on the electrical system must only be carried out by specialist garages.
■
Never directly connect the trailer's electrical system with the electrical con-
nections for the tail lights or other current sources.
Note■ After coupling the trailer and connecting the power socket, check that the rear
lights on the trailer are working correctly.■
If there is an error in the trailer lighting, check the fuses in the fuse box in the
dash panel » page 236.
■
Contact between the breakaway cable and the safety eyelet can result in me-
chanical wear on the surface protection of the eyelet. Such wear does not impair
the functioning of the safety eyelet and does not constitute a fault. It is excluded from the warranty coverage.
■
If you tow a trailer frequently, you should also have your vehicle inspected be-
tween service intervals.
■
The handbrake on the towing vehicle must be applied when coupling and un-
coupling the trailer.
Trailer stabilisation (TSA)
First read and observe the introductory information and safety warn-
ings
on page 156.
The trailer stabilisation is an extension of the stabilisation control that works in
conjunction with the counter-steering assistance to reduce the amount the trail-
er "sways".
After turning on the ignition, the ESC indicator light
in the instrument cluster
lights up for about 2 seconds longer than the ABS indicator light.
Function requirements for trailer stabilisation. The trailer was shipped from the factory or purchased from the ŠKODA genu-
ine accessories range.
The ESC system is active (in the instrument cluster, the warning lights illumi-
nates
or
) » page 18 does not .
The trailer is electrically connected to the towing vehicle via the trailer sock-
et.
The speed is higher than approx. 60 km/h.
The trailer has a rigid drawbar.
1)
Applies to vehicles with bi-xenon headlights.
158Driving
Page 185 of 266
General Maintenance
Vehicle care
Service intervals
Introduction
This chapter contains information on the following subjects:
Overview of service intervals
182
Fixed service intervals QI1 - QI4
183
Variable service interval QI6
183
Information about the ŠKODA service
183
The service interval display in the instrument cluster will remind you to carry out
every service stipulated by the manufacturer at the right time in order to prevent you from forgetting any.
Timely and proper performance of servicing works is one of the requirements for the settlement of potential warranty claims.
The completion of services can be verified by the validated service certificate andthe corresponding receipts.
The specified service intervals are tailored to normal operating conditions.
In the case of difficult operating conditions, it is necessary to have some service
work performed before the date of the next service or between the specified
service intervals. This applies mainly to the cleaning or the replacement of the air
filter insert in regions with heavy dust pollution as well as checking and replacing
the toothed belt, but also to vehicles with diesel particle filters, which can put
greater strain on the engine oil.
Difficult operating conditions
› Sulphur-containing diesel fuel.
› Frequent short trips.
› Longer periods of engine idling (e.g. taxis).
› Operation in areas with heavy dust pollution.
› Frequent trailer operation.
›
Predominantly stop-and-go traffic as is often the case in city driving, for exam-
ple.
› Operation predominantly during winter.
A service consultant at the specialist garage will tell you whether the operating conditions of your vehicle may make it necessary for service work to be carried
out between the normal service intervals.
Different service charges may apply from the particular scope of work required,
depending on the vehicle type and equipment and the status of your vehicle.
Note
■ The customer is responsible for covering the cost of all services including
changing or replenishing the oil, even during the warranty period, unless stated otherwise in the ŠKODA AUTO a.s. warranty terms or other agreements.■
You will be informed about the current service scopes for the particular service
work by the specialist garage.
Overview of service intervals
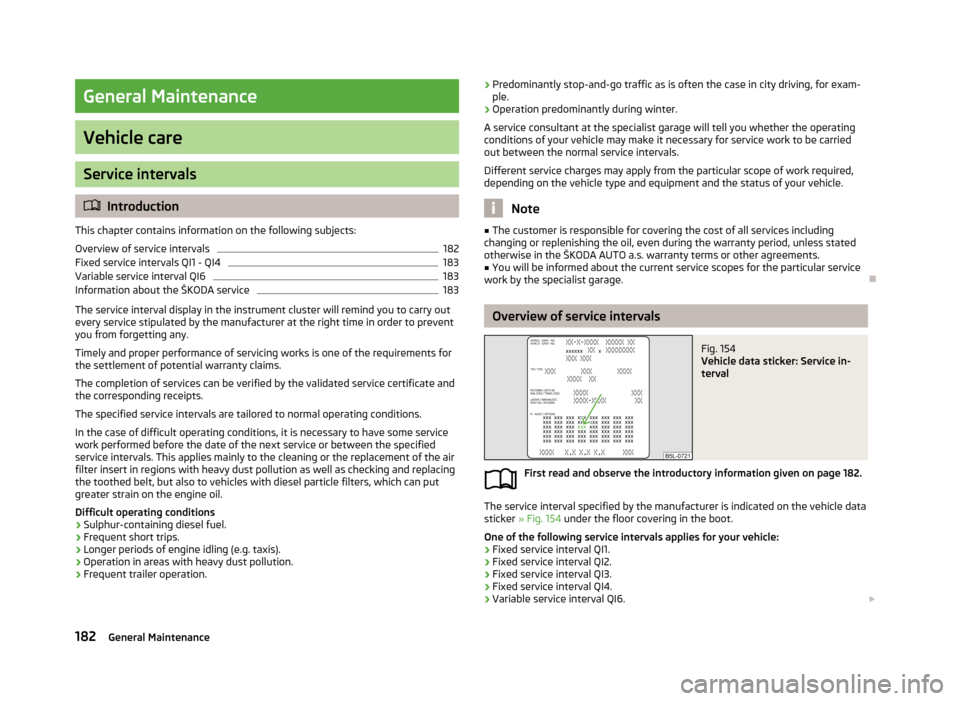
Fig. 154
Vehicle data sticker: Service in-
terval
First read and observe the introductory information given on page 182.
The service interval specified by the manufacturer is indicated on the vehicle data
sticker » Fig. 154 under the floor covering in the boot.
One of the following service intervals applies for your vehicle:
› Fixed service interval QI1.
› Fixed service interval QI2.
› Fixed service interval QI3.
› Fixed service interval QI4.
› Variable service interval QI6.
182General Maintenance