seats SKODA YETI 2013 1.G / 5L User Guide
[x] Cancel search | Manufacturer: SKODA, Model Year: 2013, Model line: YETI, Model: SKODA YETI 2013 1.G / 5LPages: 266, PDF Size: 26.71 MB
Page 71 of 266
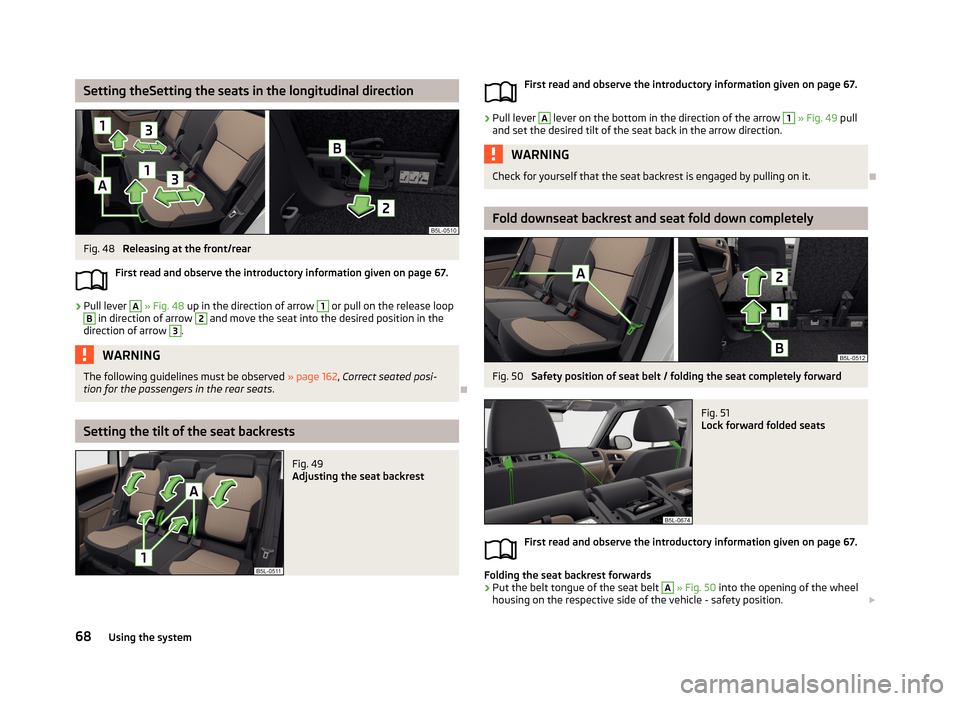
Setting theSetting the seats in the longitudinal directionFig. 48
Releasing at the front/rear
First read and observe the introductory information given on page 67.
›
Pull lever
A
» Fig. 48 up in the direction of arrow
1
or pull on the release loop
B
in direction of arrow
2
and move the seat into the desired position in the
direction of arrow
3
.
WARNINGThe following guidelines must be observed » page 162, Correct seated posi-
tion for the passengers in the rear seats .
Setting the tilt of the seat backrests
Fig. 49
Adjusting the seat backrestFirst read and observe the introductory information given on page 67.›
Pull lever
A
lever on the bottom in the direction of the arrow
1
» Fig. 49 pull
and set the desired tilt of the seat back in the arrow direction.
WARNINGCheck for yourself that the seat backrest is engaged by pulling on it.
Fold downseat backrest and seat fold down completely
Fig. 50
Safety position of seat belt / folding the seat completely forward
Fig. 51
Lock forward folded seats
First read and observe the introductory information given on page 67.
Folding the seat backrest forwards
›
Put the belt tongue of the seat belt
A
» Fig. 50 into the opening of the wheel
housing on the respective side of the vehicle - safety position.
68Using the system
Page 72 of 266
›Remove the head restraint from the rear middle seat
» page 67.›Push the outer rear seats towards the rear as far as they will go » page 68, Set-
ting theSetting the seats in the longitudinal direction .›
Pull the lever
A
» Fig. 49 on page 68 and fold the seat backrests of the outer
rear seats onto the seat cushion as far as the stop.
›
Fold the middle rear seat backrest forwards in the same way, then pull once more on the lever
A
» Fig. 49 on page 68 and press the seat backrest down-
wards until it is heard to lock into a lower position.
Folding seats fully forwards and locking them
›
If the outer rear seat is fully folded forward, push it towards the rear as far as it
can go.
›
Pull the lever
B
» Fig. 50 in the direction of the arrow
1
and push the seat
completely forward in the direction of arrow
2
.
›
Secure the folded forward seat with the aid of the fixing belt B to a guide rod of
the head restraint in the front seat » Fig. 51.
WARNING■
Immediately lock the folded forward seat to a guide rod on the front head
restraint using the fixing belt - risk of injury.■
The following guidelines must be observed » page 162, Correct seated posi-
tion for the driver .
CAUTION
■
Before folding the rear middle seat forward, make sure that the storage com-
partment, the ashtray and the cup holder in the rear part of the centre console
are closed - risk of damage.■
Only keep the seats in the folded forward position for as long as necessary to
transport cargo - there is a risk of damaging the front seat backrests. The seats must be folded back once the cargo has been transported.
■
If the outer seat is not in the rear end position when folding forward, damage
can occur to the locking bolts when unlocking the seat.
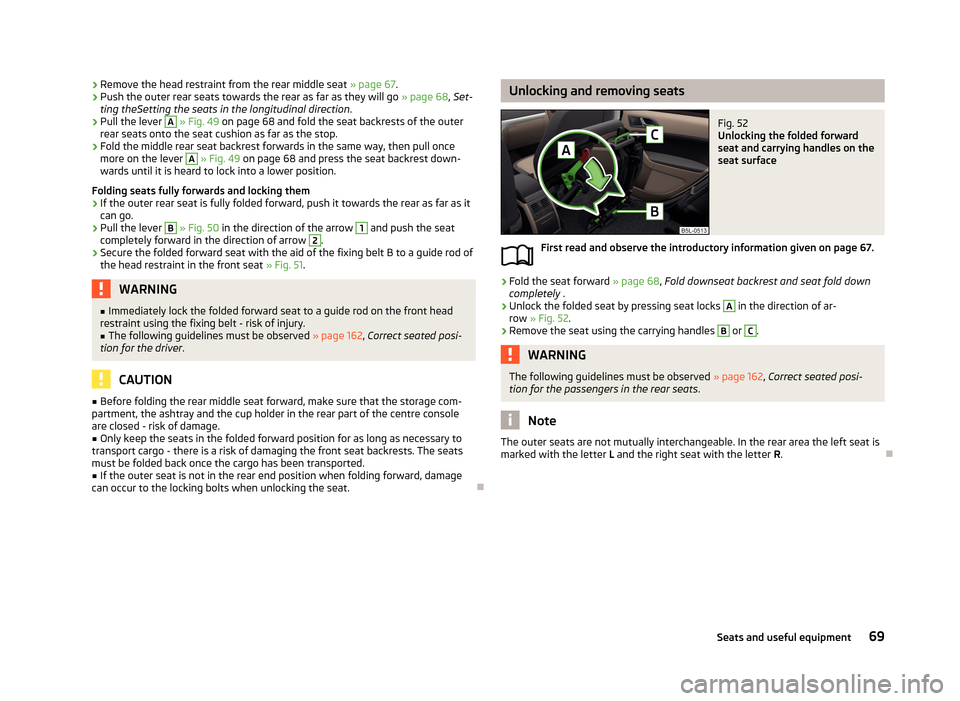
Unlocking and removing seatsFig. 52
Unlocking the folded forward
seat and carrying handles on the
seat surface
First read and observe the introductory information given on page 67.
›
Fold the seat forward » page 68, Fold downseat backrest and seat fold down
completely .
›
Unlock the folded seat by pressing seat locks
A
in the direction of ar-
row » Fig. 52 .
›
Remove the seat using the carrying handles
B
or
C
.
WARNINGThe following guidelines must be observed » page 162, Correct seated posi-
tion for the passengers in the rear seats .
Note
The outer seats are not mutually interchangeable. In the rear area the left seat is
marked with the letter L and the right seat with the letter R.
69Seats and useful equipment
Page 73 of 266
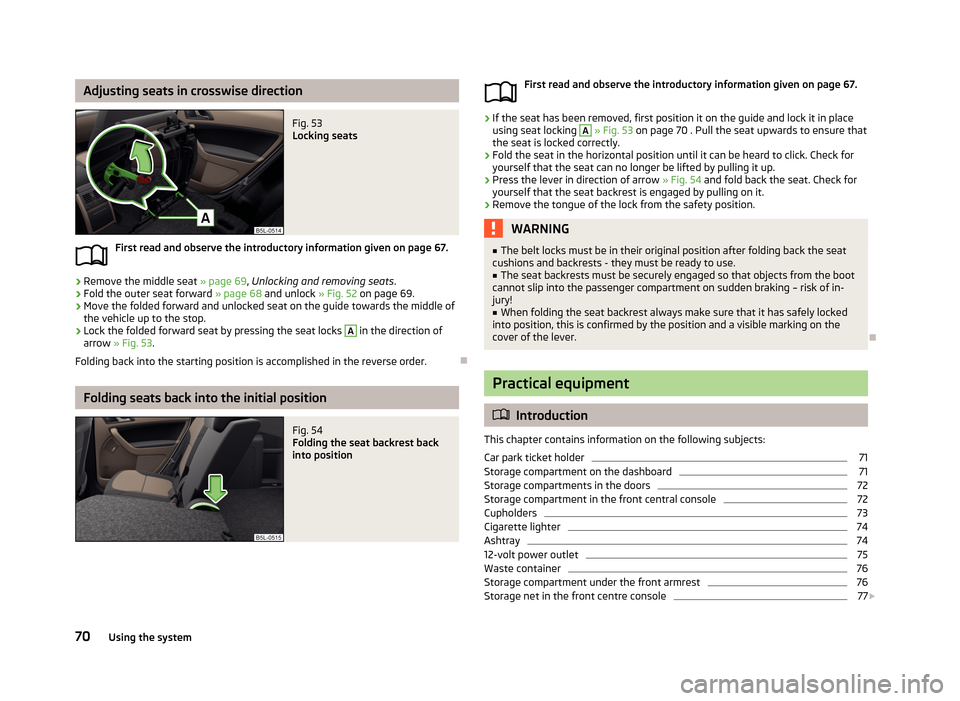
Adjusting seats in crosswise directionFig. 53
Locking seats
First read and observe the introductory information given on page 67.
›
Remove the middle seat » page 69, Unlocking and removing seats .
›
Fold the outer seat forward » page 68 and unlock » Fig. 52 on page 69.
›
Move the folded forward and unlocked seat on the guide towards the middle of
the vehicle up to the stop.
›
Lock the folded forward seat by pressing the seat locks
A
in the direction of
arrow » Fig. 53 .
Folding back into the starting position is accomplished in the reverse order.
Folding seats back into the initial position
Fig. 54
Folding the seat backrest back
into positionFirst read and observe the introductory information given on page 67.›
If the seat has been removed, first position it on the guide and lock it in place using seat locking
A
» Fig. 53 on page 70 . Pull the seat upwards to ensure that
the seat is locked correctly.
›
Fold the seat in the horizontal position until it can be heard to click. Check for yourself that the seat can no longer be lifted by pulling it up.
›
Press the lever in direction of arrow » Fig. 54 and fold back the seat. Check for
yourself that the seat backrest is engaged by pulling on it.
›
Remove the tongue of the lock from the safety position.
WARNING■ The belt locks must be in their original position after folding back the seat
cushions and backrests - they must be ready to use.■
The seat backrests must be securely engaged so that objects from the boot
cannot slip into the passenger compartment on sudden braking – risk of in- jury!
■
When folding the seat backrest always make sure that it has safely locked
into position, this is confirmed by the position and a visible marking on the cover of the lever.
Practical equipment
Introduction
This chapter contains information on the following subjects:
Car park ticket holder
71
Storage compartment on the dashboard
71
Storage compartments in the doors
72
Storage compartment in the front central console
72
Cupholders
73
Cigarette lighter
74
Ashtray
74
12-volt power outlet
75
Waste container
76
Storage compartment under the front armrest
76
Storage net in the front centre console
77
70Using the system
Page 74 of 266
Compartment for glasses77Storage compartment on the passenger side78
Storage compartment under the passenger seat
78
Clothes hook
79
Storage pockwets on the front seats
79
Storage compartment in the rear central console
79
Folding table on front seat backrest
80
Folding table at the center backrest
80
Removable ski bag
81WARNING■Do not place anything on the dash panel. These objects might slide or fall
down when driving (when accelerating or cornering) and may distract you
from concentrating on the traffic – risk of accident!■
When driving, ensure that no objects from the centre console or from other
storage compartments can get into the driver's footwell. You would then no
longer be able to apply the brakes or operate the clutch or accelerator pedal –
risk of accident!
■
No objects should be placed in the storage compartments nor in the drinks
holders; the vehicle occupants could be endangered if there is sudden braking
or the vehicle collides with something.
■
Ash and cigarette or cigar stubs must only be discarded in ashtrays!
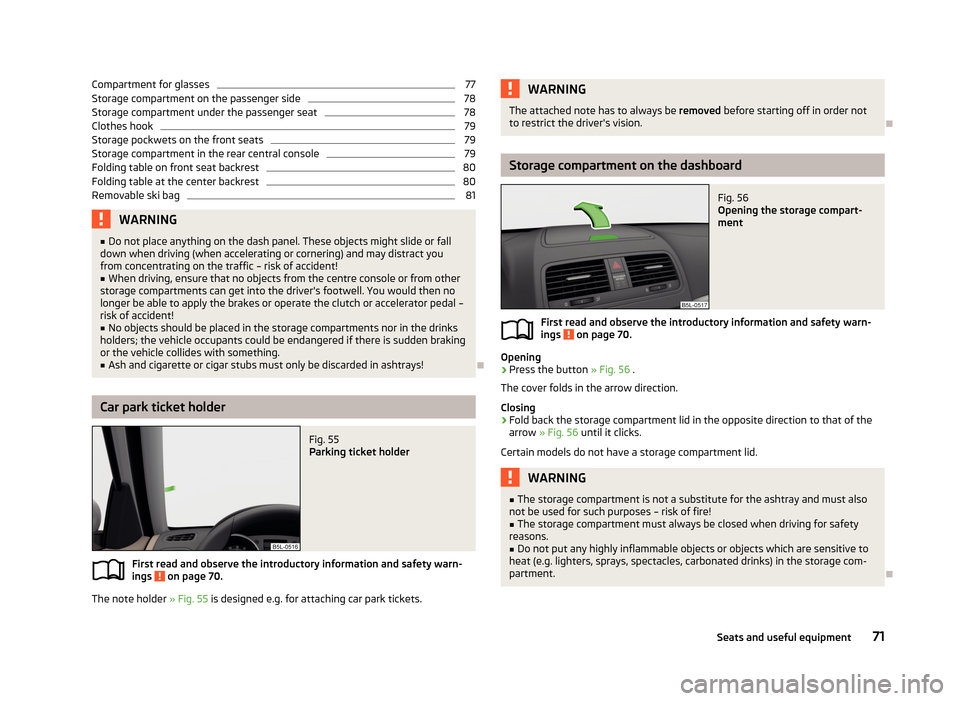
Car park ticket holder
Fig. 55
Parking ticket holder
First read and observe the introductory information and safety warn-
ings on page 70.
The note holder » Fig. 55 is designed e.g. for attaching car park tickets.
WARNINGThe attached note has to always be removed before starting off in order not
to restrict the driver's vision.
Storage compartment on the dashboard
Fig. 56
Opening the storage compart-
ment
First read and observe the introductory information and safety warn-
ings on page 70.
Opening
›
Press the button » Fig. 56 .
The cover folds in the arrow direction.
Closing
›
Fold back the storage compartment lid in the opposite direction to that of the arrow » Fig. 56 until it clicks.
Certain models do not have a storage compartment lid.
WARNING■ The storage compartment is not a substitute for the ashtray and must also
not be used for such purposes – risk of fire!■
The storage compartment must always be closed when driving for safety
reasons.
■
Do not put any highly inflammable objects or objects which are sensitive to
heat (e.g. lighters, sprays, spectacles, carbonated drinks) in the storage com-
partment.
71Seats and useful equipment
Page 76 of 266
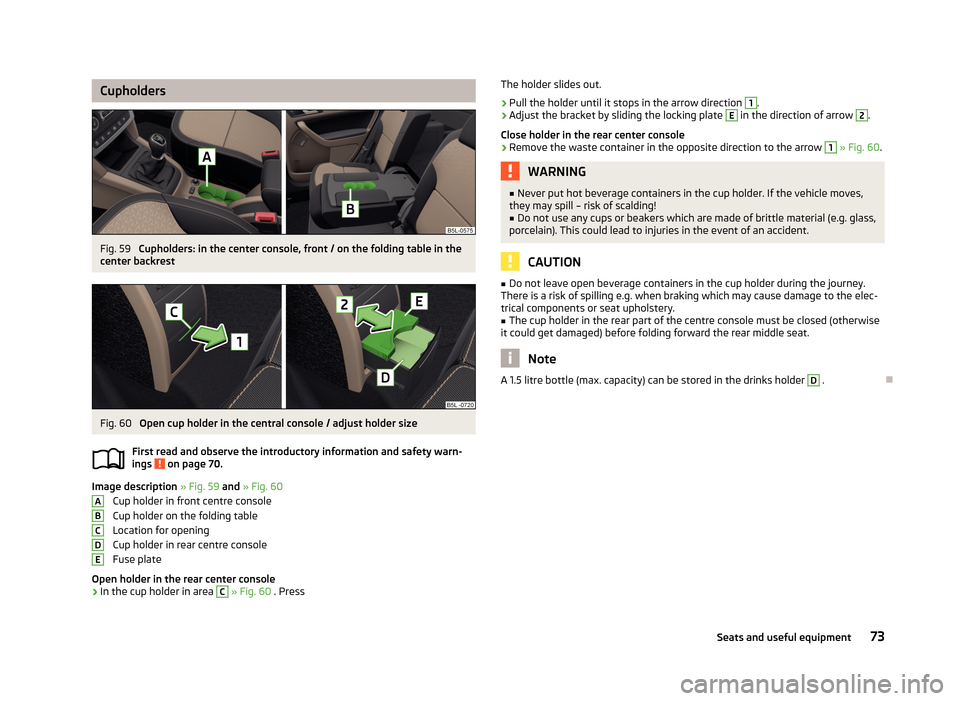
CupholdersFig. 59
Cupholders: in the center console, front / on the folding table in the
center backrest
Fig. 60
Open cup holder in the central console / adjust holder size
First read and observe the introductory information and safety warn-
ings
on page 70.
Image description » Fig. 59 and » Fig. 60
Cup holder in front centre console
Cup holder on the folding table
Location for opening
Cup holder in rear centre console
Fuse plate
Open holder in the rear center console
›
In the cup holder in area
C
» Fig. 60 . Press
ABCDEThe holder slides out.›
Pull the holder until it stops in the arrow direction
1
.
›
Adjust the bracket by sliding the locking plate
E
in the direction of arrow
2
.
Close holder in the rear center console
›
Remove the waste container in the opposite direction to the arrow
1
» Fig. 60 .
WARNING■
Never put hot beverage containers in the cup holder. If the vehicle moves,
they may spill – risk of scalding!■
Do not use any cups or beakers which are made of brittle material (e.g. glass,
porcelain). This could lead to injuries in the event of an accident.
CAUTION
■ Do not leave open beverage containers in the cup holder during the journey.
There is a risk of spilling e.g. when braking which may cause damage to the elec- trical components or seat upholstery.■
The cup holder in the rear part of the centre console must be closed (otherwise
it could get damaged) before folding forward the rear middle seat.
Note
A 1.5 litre bottle (max. capacity) can be stored in the drinks holder D .
73Seats and useful equipment
Page 78 of 266
Removing the ashtray from the low centre console›Place the ashtray insert into the console and press it in.
Opening the ashtray on the high centre console›
Press on the top part of the ashtray cover in area
C
» Fig. 63 .
Removing the ashtray from the high centre console
›
Carefully push the ashtray cover downwards as far as the stop.
›
Grasp the ashtray insert in the area of the arrows » Fig. 63 and remove.
Inserting the ashtray into the high centre console
›
Place the ashtray insert in the mount and press it in.
WARNINGNever place flammable objects in the ashtray – risk of fire!
CAUTION
■ When removing the ash tray, do not hold it on the cover on the front – risk of
breakage.■
The ashtray in the rear part of the central console must be closed (otherwise it
could get damaged) before folding forward the rear middle seat.
12-volt power outlet
Fig. 64
12 -volt socket in the front central console/ in the luggage compart-
ment
First read and observe the introductory information and safety warn- ings on page 70.
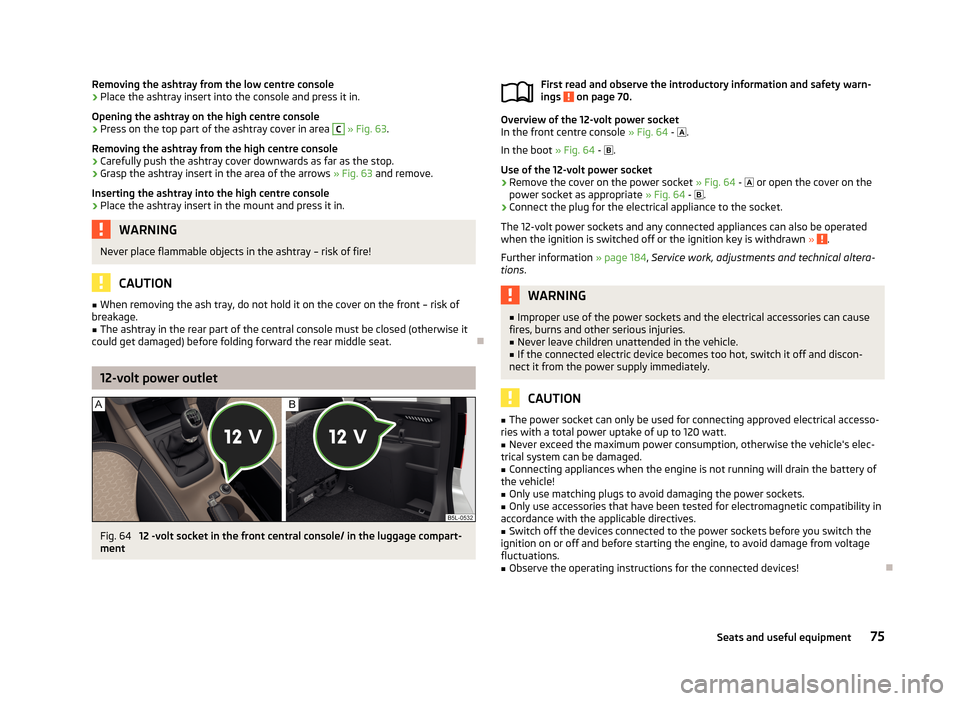
Overview of the 12-volt power socket
In the front centre console » Fig. 64 - .
In the boot » Fig. 64 - .
Use of the 12-volt power socket
›
Remove the cover on the power socket » Fig. 64 - or open the cover on the
power socket as appropriate » Fig. 64 - .
›
Connect the plug for the electrical appliance to the socket.
The 12-volt power sockets and any connected appliances can also be operated when the ignition is switched off or the ignition key is withdrawn »
.
Further information » page 184, Service work, adjustments and technical altera-
tions .
WARNING■
Improper use of the power sockets and the electrical accessories can cause
fires, burns and other serious injuries.■
Never leave children unattended in the vehicle.
■
If the connected electric device becomes too hot, switch it off and discon-
nect it from the power supply immediately.
CAUTION
■ The power socket can only be used for connecting approved electrical accesso-
ries with a total power uptake of up to 120 watt.■
Never exceed the maximum power consumption, otherwise the vehicle's elec-
trical system can be damaged.
■
Connecting appliances when the engine is not running will drain the battery of
the vehicle!
■
Only use matching plugs to avoid damaging the power sockets.
■
Only use accessories that have been tested for electromagnetic compatibility in
accordance with the applicable directives.
■
Switch off the devices connected to the power sockets before you switch the
ignition on or off and before starting the engine, to avoid damage from voltage
fluctuations.
■
Observe the operating instructions for the connected devices!
75Seats and useful equipment
Page 80 of 266
Closing storage compartment›Open the cover to the stop, only then can it be folded downwards and againstthe direction of the arrow 1
» Fig. 44 on page 65.
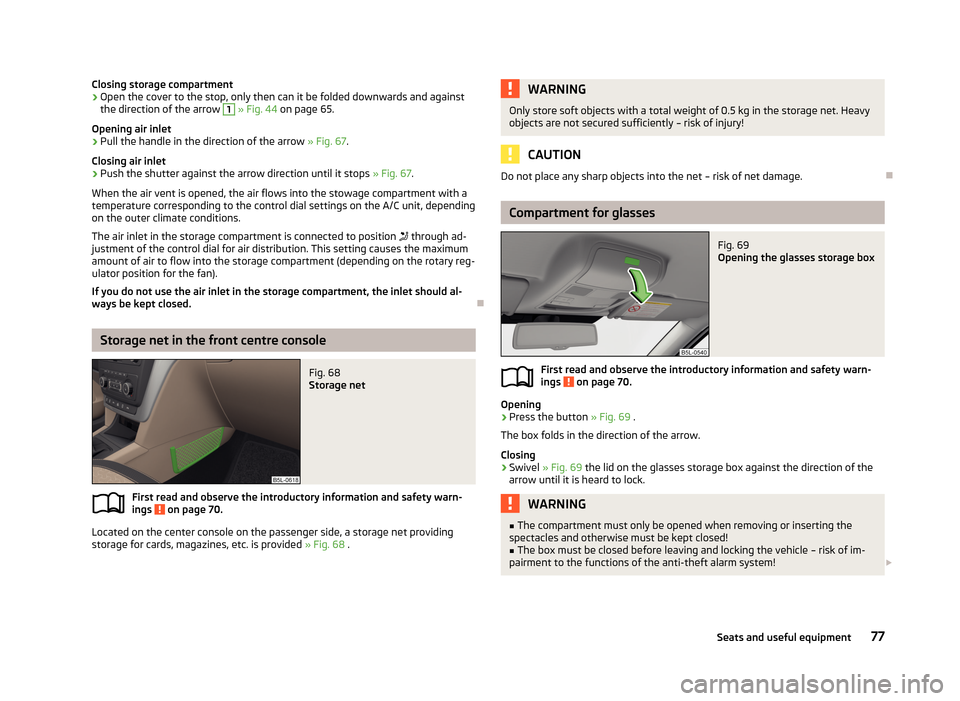
Opening air inlet
›
Pull the handle in the direction of the arrow » Fig. 67.
Closing air inlet
›
Push the shutter against the arrow direction until it stops » Fig. 67.
When the air vent is opened, the air flows into the stowage compartment with a
temperature corresponding to the control dial settings on the A/C unit, depending on the outer climate conditions.
The air inlet in the storage compartment is connected to position
through ad-
justment of the control dial for air distribution. This setting causes the maximum
amount of air to flow into the storage compartment (depending on the rotary reg-
ulator position for the fan).
If you do not use the air inlet in the storage compartment, the inlet should al-
ways be kept closed.
Storage net in the front centre console
Fig. 68
Storage net
First read and observe the introductory information and safety warn-
ings on page 70.
Located on the center console on the passenger side, a storage net providing storage for cards, magazines, etc. is provided » Fig. 68 .
WARNINGOnly store soft objects with a total weight of 0.5 kg in the storage net. Heavy
objects are not secured sufficiently – risk of injury!
CAUTION
Do not place any sharp objects into the net – risk of net damage.
Compartment for glasses
Fig. 69
Opening the glasses storage box
First read and observe the introductory information and safety warn-
ings on page 70.
Opening
›
Press the button » Fig. 69 .
The box folds in the direction of the arrow.
Closing
›
Swivel » Fig. 69 the lid on the glasses storage box against the direction of the
arrow until it is heard to lock.
WARNING■ The compartment must only be opened when removing or inserting the
spectacles and otherwise must be kept closed!■
The box must be closed before leaving and locking the vehicle – risk of im-
pairment to the functions of the anti-theft alarm system! 77Seats and useful equipment
Page 82 of 266
Clothes hookFirst read and observe the introductory information and safety warn-ings
on page 70.
The clothes hooks are located on the middle door pillars of the vehicle and on the
handle of the headliner above each of the rear doors.
WARNING■ Only hang light items of clothing on the hooks. Never leave any heavy or
sharp-edged objects in the pockets of the items of clothing.■
Do not use clothes hangers for hanging up items of clothing otherwise this
may reduce the effectiveness of head airbags.
■
Ensure that any clothes hanging from the hooks do not impair your vision to
the rear.
CAUTION
The maximum permissible load of the hooks is 2 kg.
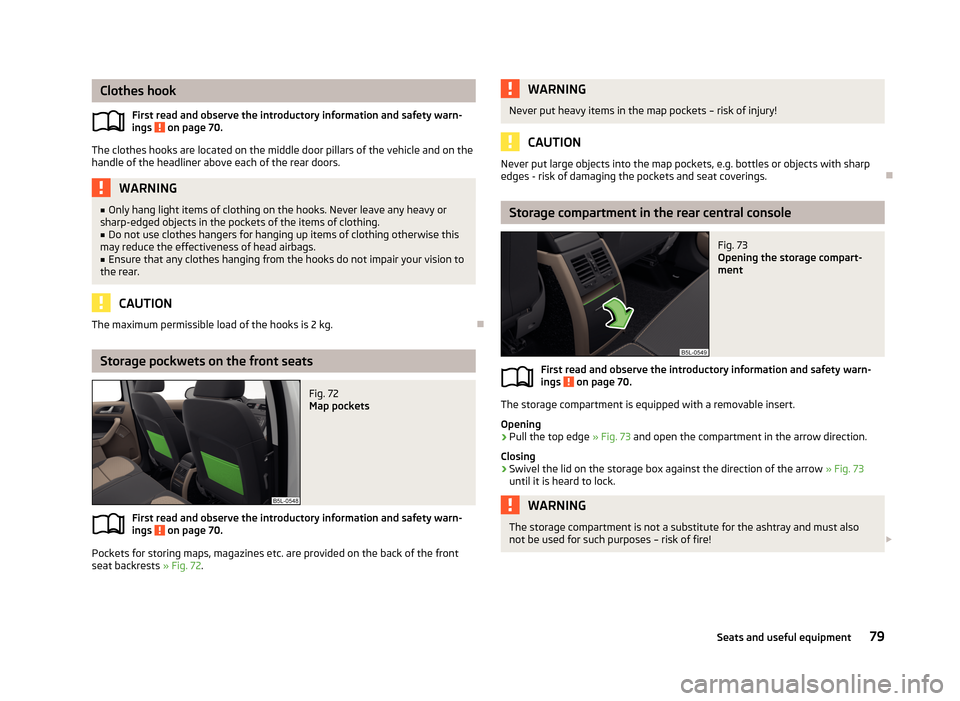
Storage pockwets on the front seats
Fig. 72
Map pockets
First read and observe the introductory information and safety warn-
ings on page 70.
Pockets for storing maps, magazines etc. are provided on the back of the front seat backrests » Fig. 72.
WARNINGNever put heavy items in the map pockets – risk of injury!
CAUTION
Never put large objects into the map pockets, e.g. bottles or objects with sharp
edges - risk of damaging the pockets and seat coverings.
Storage compartment in the rear central console
Fig. 73
Opening the storage compart-
ment
First read and observe the introductory information and safety warn-
ings on page 70.
The storage compartment is equipped with a removable insert.
Opening
›
Pull the top edge » Fig. 73 and open the compartment in the arrow direction.
Closing
›
Swivel the lid on the storage box against the direction of the arrow » Fig. 73
until it is heard to lock.
WARNINGThe storage compartment is not a substitute for the ashtray and must also
not be used for such purposes – risk of fire! 79Seats and useful equipment
Page 83 of 266
CAUTIONBefore folding forward, the rear center seat storage compartment must be closed- there is a risk of damage to the storage compartment.
Folding table on front seat backrest
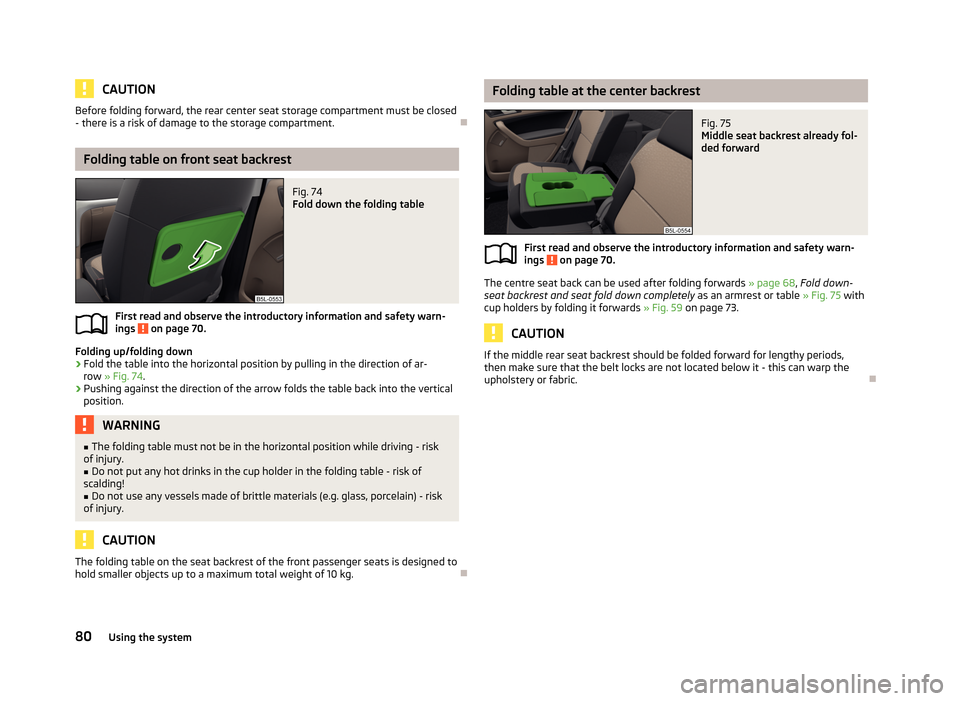
Fig. 74
Fold down the folding table
First read and observe the introductory information and safety warn-
ings on page 70.
Folding up/folding down
›
Fold the table into the horizontal position by pulling in the direction of ar- row » Fig. 74 .
›
Pushing against the direction of the arrow folds the table back into the vertical
position.
WARNING■ The folding table must not be in the horizontal position while driving - risk
of injury.■
Do not put any hot drinks in the cup holder in the folding table - risk of
scalding!
■
Do not use any vessels made of brittle materials (e.g. glass, porcelain) - risk
of injury.
CAUTION
The folding table on the seat backrest of the front passenger seats is designed to
hold smaller objects up to a maximum total weight of 10 kg.
Folding table at the center backrestFig. 75
Middle seat backrest already fol-
ded forward
First read and observe the introductory information and safety warn-
ings on page 70.
The centre seat back can be used after folding forwards » page 68, Fold down-
seat backrest and seat fold down completely as an armrest or table » Fig. 75 with
cup holders by folding it forwards » Fig. 59 on page 73.
CAUTION
If the middle rear seat backrest should be folded forward for lengthy periods,
then make sure that the belt locks are not located below it - this can warp the
upholstery or fabric.
80Using the system
Page 84 of 266
Removable ski bagFig. 76
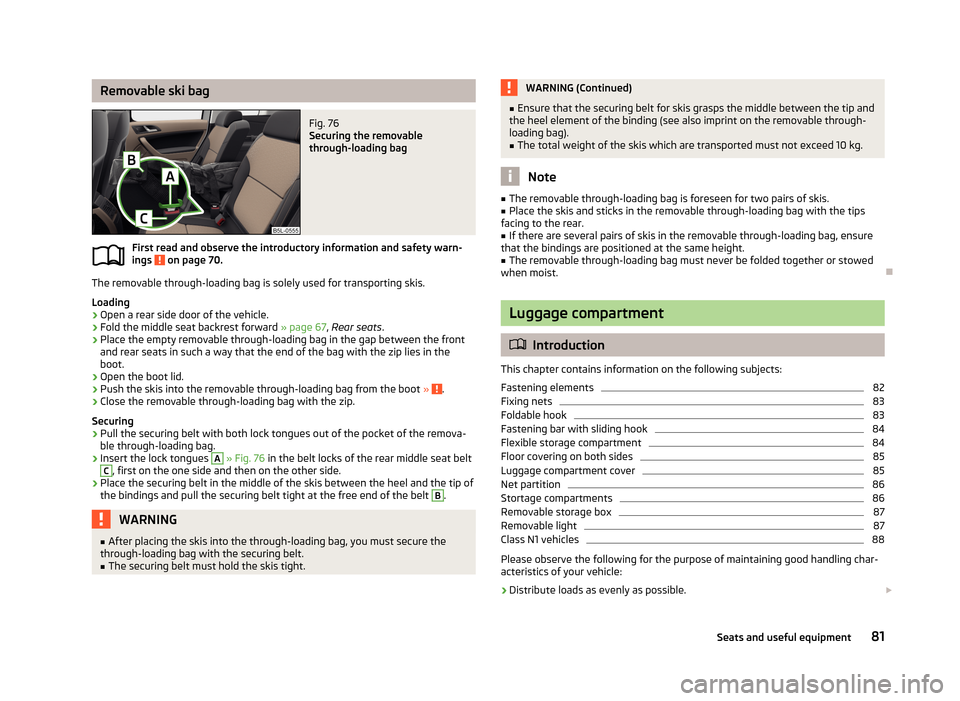
Securing the removable
through-loading bag
First read and observe the introductory information and safety warn-
ings on page 70.
The removable through-loading bag is solely used for transporting skis.
Loading
›
Open a rear side door of the vehicle.
›
Fold the middle seat backrest forward » page 67, Rear seats .
›
Place the empty removable through-loading bag in the gap between the front
and rear seats in such a way that the end of the bag with the zip lies in the
boot.
›
Open the boot lid.
›
Push the skis into the removable through-loading bag from the boot » .
›
Close the removable through-loading bag with the zip.
Securing
›
Pull the securing belt with both lock tongues out of the pocket of the remova- ble through-loading bag.
›
Insert the lock tongues
A
» Fig. 76 in the belt locks of the rear middle seat belt
C
, first on the one side and then on the other side.
›
Place the securing belt in the middle of the skis between the heel and the tip of
the bindings and pull the securing belt tight at the free end of the belt
B
.
WARNING■ After placing the skis into the through-loading bag, you must secure the
through-loading bag with the securing belt.■
The securing belt must hold the skis tight.WARNING (Continued)■ Ensure that the securing belt for skis grasps the middle between the tip and
the heel element of the binding (see also imprint on the removable through-
loading bag).■
The total weight of the skis which are transported must not exceed 10 kg.
Note
■ The removable through-loading bag is foreseen for two pairs of skis.■Place the skis and sticks in the removable through-loading bag with the tips
facing to the rear.■
If there are several pairs of skis in the removable through-loading bag, ensure
that the bindings are positioned at the same height.
■
The removable through-loading bag must never be folded together or stowed
when moist.
Luggage compartment
Introduction
This chapter contains information on the following subjects:
Fastening elements
82
Fixing nets
83
Foldable hook
83
Fastening bar with sliding hook
84
Flexible storage compartment
84
Floor covering on both sides
85
Luggage compartment cover
85
Net partition
86
Stortage compartments
86
Removable storage box
87
Removable light
87
Class N1 vehicles
88
Please observe the following for the purpose of maintaining good handling char-
acteristics of your vehicle:
›
Distribute loads as evenly as possible.
81Seats and useful equipment