ECU SKODA YETI 2013 1.G / 5L Owner's Guide
[x] Cancel search | Manufacturer: SKODA, Model Year: 2013, Model line: YETI, Model: SKODA YETI 2013 1.G / 5LPages: 266, PDF Size: 26.71 MB
Page 157 of 266
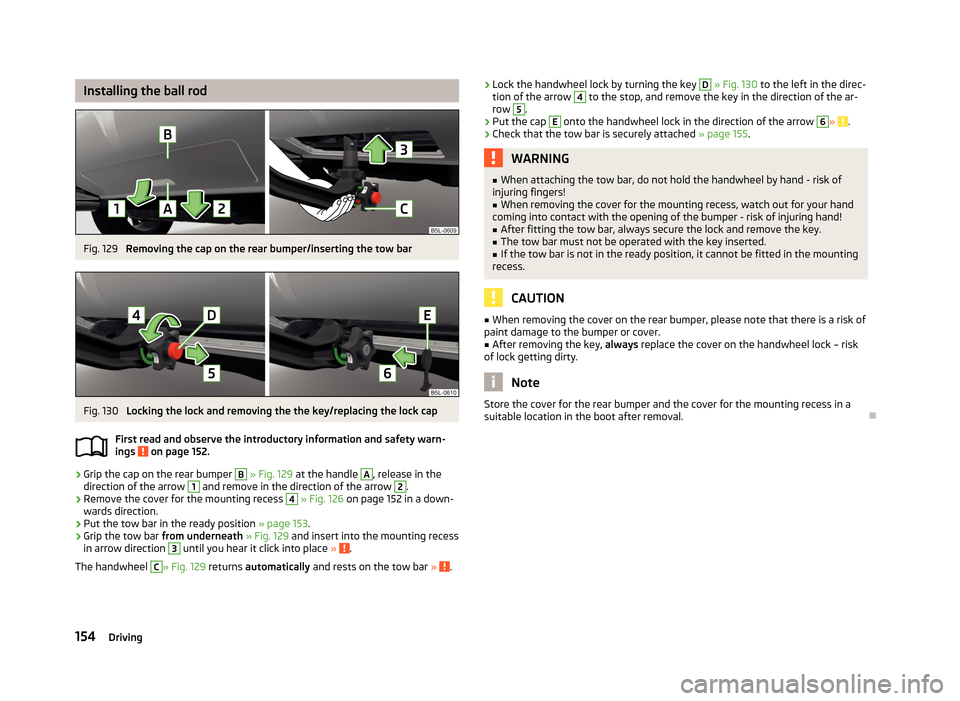
Installing the ball rodFig. 129
Removing the cap on the rear bumper/inserting the tow bar
Fig. 130
Locking the lock and removing the the key/replacing the lock cap
First read and observe the introductory information and safety warn-
ings
on page 152.
›
Grip the cap on the rear bumper
B
» Fig. 129 at the handle
A
, release in the
direction of the arrow
1
and remove in the direction of the arrow
2
.
›
Remove the cover for the mounting recess
4
» Fig. 126 on page 152 in a down-
wards direction.
›
Put the tow bar in the ready position » page 153.
›
Grip the tow bar from underneath » Fig. 129 and insert into the mounting recess
in arrow direction
3
until you hear it click into place » .
The handwheel
C
» Fig. 129 returns automatically and rests on the tow bar » .
›Lock the handwheel lock by turning the key D
» Fig. 130 to the left in the direc-
tion of the arrow 4 to the stop, and remove the key in the direction of the ar-
row 5
.
›
Put the cap
E
onto the handwheel lock in the direction of the arrow
6
» .
›
Check that the tow bar is securely attached » page 155.
WARNING■
When attaching the tow bar, do not hold the handwheel by hand - risk of
injuring fingers!■
When removing the cover for the mounting recess, watch out for your hand
coming into contact with the opening of the bumper - risk of injuring hand!
■
After fitting the tow bar, always secure the lock and remove the key.
■
The tow bar must not be operated with the key inserted.
■
If the tow bar is not in the ready position, it cannot be fitted in the mounting
recess.
CAUTION
■ When removing the cover on the rear bumper, please note that there is a risk of
paint damage to the bumper or cover.■
After removing the key, always replace the cover on the handwheel lock – risk
of lock getting dirty.
Note
Store the cover for the rear bumper and the cover for the mounting recess in a
suitable location in the boot after removal.
154Driving
Page 159 of 266
At the same time, the tow bar latches into the ready position and is therefore
ready to be re-inserted into the mounting recess » .›
Attach the cover for the mounting recess
4
» Fig. 126 on page 152 » .
›
Grip the cover on the rear bumper
E
» Fig. 133 at the handle
D
and position in
the direction of the arrow
6
on the checkmark underneath the upper edge of
the bumper.
›
Push this cover onto the lower edge and onto the two sides in the direction of the arrow
7
.
WARNING■ Never allow the tow bar to remain unsecured in the boot. This could cause
damage on sudden braking, and could put the safety of the occupants at risk.■
Never remove the tow bar while the trailer is still coupled.
CAUTION
■ If the handwheel is not turned all the way to the stop, then it will return to its
initial position when the tow bar is removed, and will rest on the tow bar and not
engage into the ready position. The tow bar will then need to be brought into this position before the next time it is fitted.■
The mounting recess must be closed with the cover following removal. This pre-
vents foreign bodies from getting into the mounting recess.
■
Clean any dirt from the tow bar before stowing it away in the box with the vehi-
cle tool kit.
Note
We recommend putting the protective cover onto the ball head before removing
the tow bar.
Use and care
First read and observe the introductory information and safety warn-
ings
on page 152.
Close the mounting recess with the cover to prevent any dirt from getting in.
Always check the tow bar before hitching a trailer. Apply suitable grease where
necessary.
Use the protective cover when stowing away the tow bar, in order to stop the boot from getting dirty.
In the event of dirt, clean the surfaces of the mounting recess and treat with a
suitable preservative.
CAUTION
Apply grease to the upper part of the mounting recess. Make sure you do not re-
move any grease.
Trailer
Introduction
This chapter contains information on the following subjects:
Loading a trailer
156
Driving with a trailer
157
Trailer stabilisation (TSA)
158
Anti-theft alarm system
159WARNINGAlways drive particularly carefully with the trailer.
Loading a trailer
First read and observe the introductory information and safety warn-
ings
on page 156.
The vehicle/trailer combination must be balanced, whereby the maximum permis-
sible drawbar load must be utilised. If the drawbar load is too low, it jeopardises
the performance of the vehicle/trailer combination.
Distribution of the load
Distribute the load in the trailer in such a way that heavy items are located as close to the axle as possible. Secure the items from slipping.
156Driving
Page 163 of 266
Safety
Passive Safety
General information
Introduction
This chapter contains information on the following subjects:
Safety equipment
160
Before setting off
160
What influences driving safety?
161
In this section you will find important information, tips and notes on the subject
of passive safety in your vehicle.
We have combined everything here which you should be familiar with, for exam- ple, regarding seat belts, airbags, child seats and safety of children.
WARNING■ This chapter contains important information on how to use the vehicle for
the driver and his occupants.■
You can find further information on safety concerning you and those travel-
ling with you in the following chapters of this owner's manual.
■
The complete on-board literature should always be in the vehicle. This ap-
plies in particular, if you rent out or sell the vehicle.
Safety equipment
First read and observe the introductory information and safety warn-ings
on page 160.
The following list contains only part of the safety equipment in your vehicle.
› Three-point seat belts for all the seats.
› Belt force limiters for the front seats.
› Belt tensioners for the front seats.
› Seat belt height adjusters for the front seats.
›
Front airbag for the driver and the front passenger.
› Driver’s knee airbag.
› Front side airbags.
› Rear side airbags.
› Head airbags.
› Anchoring points for child seats using the ISOFIX system.
› Anchoring points for child seats using the TOP TETHER system.
› Head restraints adjustable for height.
› Adjustable steering column.
The specified safety equipment works together, in order to optimally protect you
and those travelling with you in accident situations.
The safety equipment does not protect you or the people travelling with you, if
you or your occupants adopt an incorrect seated position or the equipment is not correctly adjusted or used.
If the seat belt is not fastened properly, this may result in injuries if an airbag is
activated in the event of an accident.
Before setting off
First read and observe the introductory information and safety warn-
ings
on page 160.
For your own safety and the safety of the people travelling with you, please pay
attention to the following points before setting off.
› Ensure that the lighting and the turn signal system are functioning properly.
› Check the tyre inflation pressure.
› Ensure that all of the windows offer good visibility to the outside.
› Secure all items of luggage
» page 81, Luggage compartment .
› Ensure that no objects can obstruct the pedals.
› Adjust the mirrors, the front seat and head restraint to your body size.
› Advise your passengers to adjust the head restraints to their body size.
› Protect children in suitable child seats with correctly fastened seat
belts » page 177 , Transporting children safely .
› Adopt the correct seated position
» page 161, Correct seated position . Tell your
passengers to assume the correct seated position.
› Correctly fasten the seat belt. Also inform passengers to fasten the seat belt
correctly » page 164 , Using seat belts .
160Safety
Page 168 of 266
WARNINGInformation on the proper use of safety belts■Never use one seat belt to secure two persons (including children). The
seatbelt must not be placed over a child who is sitting on the lap of another
passenger.■
The lock tongue should only be inserted into the lock which is the correct
one for your seat. Wrong use of the safety belt will reduce its capacity to pro-
tect and the risk of injury increases.
■
The slot of the belt tongue must not be blocked, otherwise the belt tongue
will not lock in place properly.
■
Many layers of clothing and loose clothing (e. g. a winter coat over a jacket)
do not allow you to be correctly seated and impairs proper operation of the
seat belts.
■
It is prohibited to use clamps or other objects to adjust seat belts (e. g. for
shortening the belts for smaller persons).
■
The seat belts for the rear seats can only fulfil their function reliably when
the seat backrests are correctly locked into position » page 68.
WARNINGInformation on the care and maintenance of safety belts■The belt webbing must always be kept clean. Soiled belt webbing may im-
pair proper operation of the inertia reel » page 195, Seat belts .■
The seat belts must not be removed or changed in any way. Do not attempt
to repair the seat belts yourself.
■
Check the condition of all the seat belts on a regular basis. If any damage to
the seat belts, seat belt connections, inertia reel or the lock is detected, the
relevant seat belt must be replaced by a specialist garage.
■
Damaged seat belts which have been subjected to stress in an accident and
were therefore stretched, must be replaced – this is best done by a specialist
garage. The anchorage points of the belts must also be inspected. The an-
chorage points for the belts should also be checked.
Note
The national legal requirements must be observed when using seat belts.
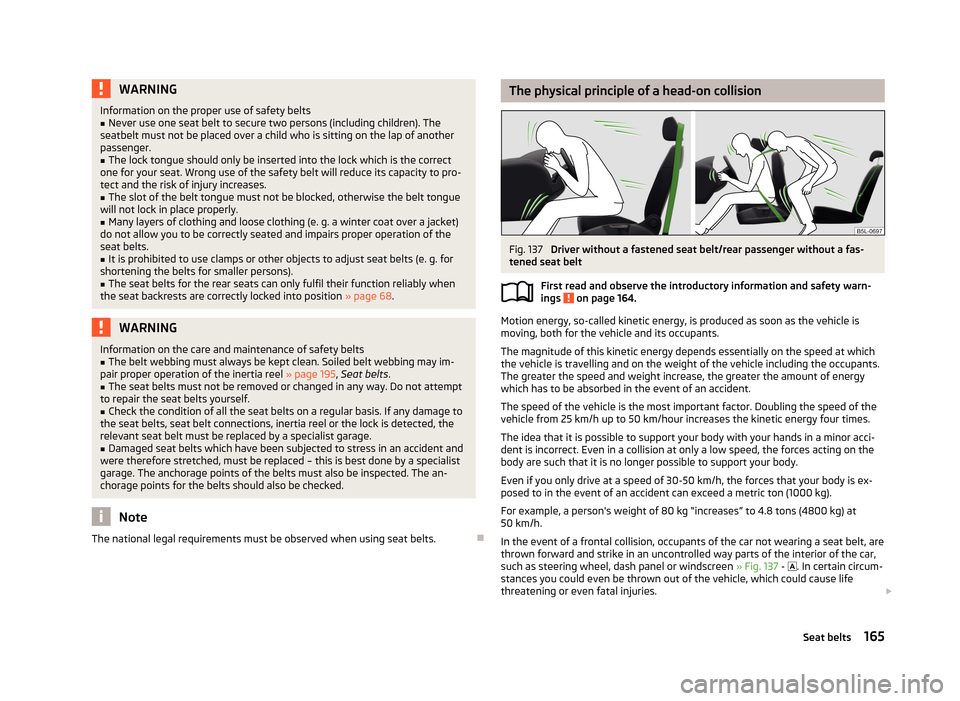
The physical principle of a head-on collisionFig. 137
Driver without a fastened seat belt/rear passenger without a fas-
tened seat belt
First read and observe the introductory information and safety warn-ings
on page 164.
Motion energy, so-called kinetic energy, is produced as soon as the vehicle is
moving, both for the vehicle and its occupants.
The magnitude of this kinetic energy depends essentially on the speed at which
the vehicle is travelling and on the weight of the vehicle including the occupants. The greater the speed and weight increase, the greater the amount of energy
which has to be absorbed in the event of an accident.
The speed of the vehicle is the most important factor. Doubling the speed of the
vehicle from 25 km/h up to 50 km/hour increases the kinetic energy four times.
The idea that it is possible to support your body with your hands in a minor acci- dent is incorrect. Even in a collision at only a low speed, the forces acting on the
body are such that it is no longer possible to support your body.
Even if you only drive at a speed of 30-50 km/h, the forces that your body is ex-
posed to in the event of an accident can exceed a metric ton (1000 kg).
For example, a person's weight of 80 kg “increases” to 4.8 tons (4800 kg) at
50 km/h.
In the event of a frontal collision, occupants of the car not wearing a seat belt, are thrown forward and strike in an uncontrolled way parts of the interior of the car,
such as steering wheel, dash panel or windscreen » Fig. 137 -
. In certain circum-
stances you could even be thrown out of the vehicle, which could cause life threatening or even fatal injuries.
165Seat belts
Page 170 of 266
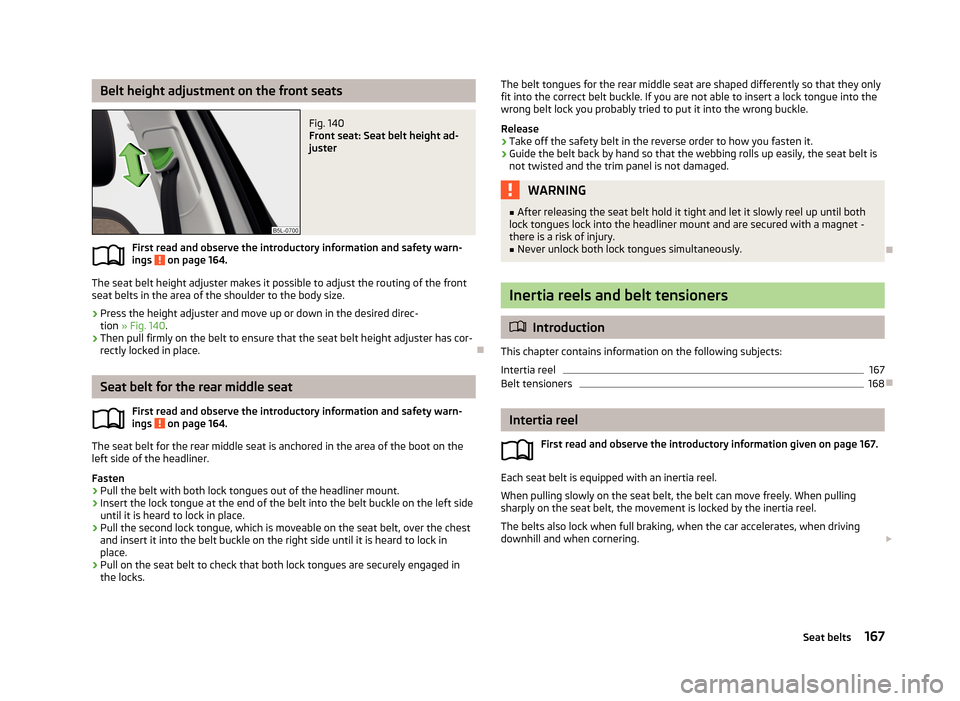
Belt height adjustment on the front seatsFig. 140
Front seat: Seat belt height ad-
juster
First read and observe the introductory information and safety warn-
ings on page 164.
The seat belt height adjuster makes it possible to adjust the routing of the front
seat belts in the area of the shoulder to the body size.
›
Press the height adjuster and move up or down in the desired direc- tion » Fig. 140 .
›
Then pull firmly on the belt to ensure that the seat belt height adjuster has cor-
rectly locked in place.
Seat belt for the rear middle seat
First read and observe the introductory information and safety warn-
ings
on page 164.
The seat belt for the rear middle seat is anchored in the area of the boot on the
left side of the headliner.
Fasten
›
Pull the belt with both lock tongues out of the headliner mount.
›
Insert the lock tongue at the end of the belt into the belt buckle on the left side
until it is heard to lock in place.
›
Pull the second lock tongue, which is moveable on the seat belt, over the chest
and insert it into the belt buckle on the right side until it is heard to lock in place.
›
Pull on the seat belt to check that both lock tongues are securely engaged inthe locks.
The belt tongues for the rear middle seat are shaped differently so that they only
fit into the correct belt buckle. If you are not able to insert a lock tongue into the
wrong belt lock you probably tried to put it into the wrong buckle.
Release›
Take off the safety belt in the reverse order to how you fasten it.
›
Guide the belt back by hand so that the webbing rolls up easily, the seat belt is not twisted and the trim panel is not damaged.
WARNING■ After releasing the seat belt hold it tight and let it slowly reel up until both
lock tongues lock into the headliner mount and are secured with a magnet -
there is a risk of injury.■
Never unlock both lock tongues simultaneously.
Inertia reels and belt tensioners
Introduction
This chapter contains information on the following subjects: Intertia reel
167
Belt tensioners
168
Intertia reel
First read and observe the introductory information given on page 167.
Each seat belt is equipped with an inertia reel.When pulling slowly on the seat belt, the belt can move freely. When pullingsharply on the seat belt, the movement is locked by the inertia reel.
The belts also lock when full braking, when the car accelerates, when driving
downhill and when cornering.
167Seat belts
Page 180 of 266
Transporting children safely
Child seat
Introduction
This chapter contains information on the following subjects:
Use of a child seat on the front passenger seat
178
Child safety and side airbag
179
Classification of child seats
179
Use of child seats fastened with a seat belt
179
Children are generally safer on the rear seats than on the front passenger seat.
In contrast to adults, the muscles and bone structure of children are not yet fully developed. Thus children are exposed to increased risk of injury.
Children should be transported in accordance with the relevant statutory provi-sions.
Child seats complying with the ECE-R 44 standard must be used. ECE-R stands
for: Economic Commission for Europe - Regulation.
Child seats that comply with the ECE-R 44 standard are identified with a test
mark that cannot be removed: a large E within a circle with the test number be-
low.
WARNING■ The national legal requirements must be observed when using child seats.■One should never carry children, and also not babies! - on one's lap.■
Never leave children unattended in the vehicle. Certain outside climatic con-
ditions can cause life-threatening temperatures in the vehicle.
■
The child must be secured in the vehicle during the entire journey! Other-
wise, the child would be thrown through the vehicle in the event of an acci-
dent, causing fatal injuries to both the child and other occupants.
WARNING (Continued)■ Children are exposed to an increased risk of injury in the event of an acci-
dent if they lean forward or adopt an incorrect seated position when the vehi-
cle is moving. This particularly applies to children who are transported on the
front passenger seat as they can suffer severe, or even fatal injuries if the air-
bag system is deployed!■
Pay particular attention to the information provided by the manufacturer of
the child safety seat regarding the correct routing of the belt. Seat belts which are not correctly adjusted can themselves cause injuries even in minor
accidents.
■
Safety belts must be checked to ensure that they are running properly. One
should also ensure that the belt is not damaged by sharp-edged fittings.
■
The front passenger airbag must be deactivated if using a rear-facing child
seat on the front passenger seat. Further information » page 178, Use of a
child seat on the front passenger seat .
CAUTION
■
When installing a child seat in which the child faces forward, adjust the head re-
straints so that they are as high as possible.■
If the head restraints still prevent the child seat from being installed, even in
the highest position, you will need to remove them » page 67. After removing the
child seat, re-install the head restraints.
Note
We recommend that you use child seats from ŠKODA Original Accessories. These child seats were developed and also tested for use in ŠKODA vehicles. They meet
the ECE-R 44 standard.
177Transporting children safely
Page 181 of 266
Use of a child seat on the front passenger seat
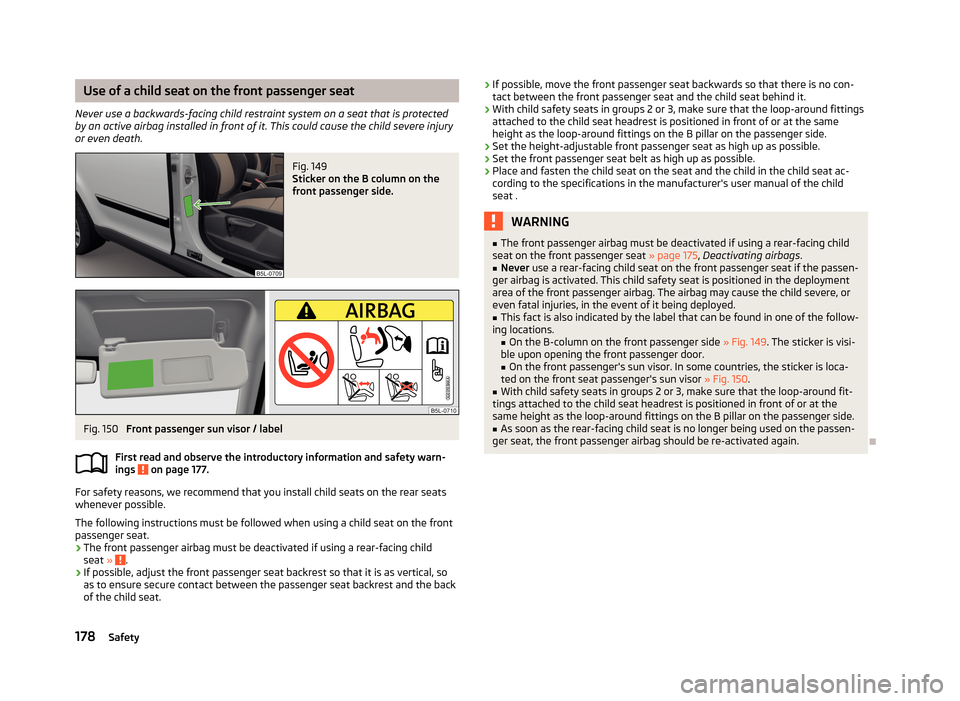
Never use a backwards-facing child restraint system on a seat that is protected by an active airbag installed in front of it. This could cause the child severe injury
or even death.Fig. 149
Sticker on the B column on the
front passenger side.
Fig. 150
Front passenger sun visor / label
First read and observe the introductory information and safety warn-
ings
on page 177.
For safety reasons, we recommend that you install child seats on the rear seats
whenever possible.
The following instructions must be followed when using a child seat on the front passenger seat.
› The front passenger airbag must be deactivated if using a rear-facing child
seat »
.
› If possible, adjust the front passenger seat backrest so that it is as vertical, so
as to ensure secure contact between the passenger seat backrest and the back of the child seat.
› If possible, move the front passenger seat backwards so that there is no con-
tact between the front passenger seat and the child seat behind it.
› With child safety seats in groups 2 or 3, make sure that the loop-around fittings
attached to the child seat headrest is positioned in front of or at the same
height as the loop-around fittings on the B pillar on the passenger side.
› Set the height-adjustable front passenger seat as high up as possible.
› Set the front passenger seat belt as high up as possible.
› Place and fasten the child seat on the seat and the child in the child seat ac-
cording to the specifications in the manufacturer's user manual of the child seat .WARNING■ The front passenger airbag must be deactivated if using a rear-facing child
seat on the front passenger seat » page 175, Deactivating airbags .■
Never use a rear-facing child seat on the front passenger seat if the passen-
ger airbag is activated. This child safety seat is positioned in the deployment
area of the front passenger airbag. The airbag may cause the child severe, or
even fatal injuries, in the event of it being deployed.
■
This fact is also indicated by the label that can be found in one of the follow-
ing locations. ■On the B-column on the front passenger side » Fig. 149. The sticker is visi-
ble upon opening the front passenger door.
■ On the front passenger's sun visor. In some countries, the sticker is loca-
ted on the front seat passenger's sun visor » Fig. 150.
■
With child safety seats in groups 2 or 3, make sure that the loop-around fit-
tings attached to the child seat headrest is positioned in front of or at the
same height as the loop-around fittings on the B pillar on the passenger side.
■
As soon as the rear-facing child seat is no longer being used on the passen-
ger seat, the front passenger airbag should be re-activated again.
178Safety
Page 182 of 266
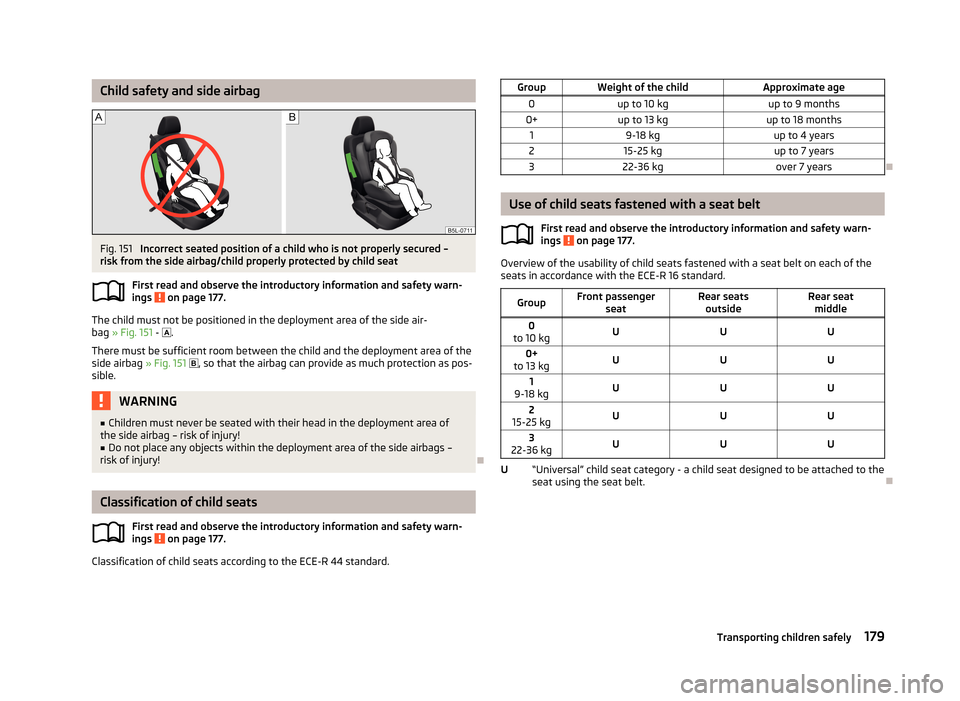
Child safety and side airbagFig. 151
Incorrect seated position of a child who is not properly secured –
risk from the side airbag/child properly protected by child seat
First read and observe the introductory information and safety warn-
ings
on page 177.
The child must not be positioned in the deployment area of the side air-
bag » Fig. 151 -
.
There must be sufficient room between the child and the deployment area of the
side airbag » Fig. 151
, so that the airbag can provide as much protection as pos-
sible.
WARNING■ Children must never be seated with their head in the deployment area of
the side airbag – risk of injury!■
Do not place any objects within the deployment area of the side airbags –
risk of injury!
Classification of child seats
First read and observe the introductory information and safety warn-
ings
on page 177.
Classification of child seats according to the ECE-R 44 standard.
GroupWeight of the childApproximate age0up to 10 kgup to 9 months0+up to 13 kgup to 18 months19-18 kgup to 4 years215-25 kgup to 7 years322-36 kgover 7 years
Use of child seats fastened with a seat belt
First read and observe the introductory information and safety warn-ings
on page 177.
Overview of the usability of child seats fastened with a seat belt on each of the
seats in accordance with the ECE-R 16 standard.
GroupFront passenger seatRear seatsoutsideRear seatmiddle0
to 10 kgUUU0+
to 13 kgUUU1
9-18 kgUUU2
15-25 kgUUU3
22-36 kgUUU
“Universal” child seat category - a child seat designed to be attached to the
seat using the seat belt.
U179Transporting children safely
Page 199 of 266
Inspecting and replenishing
Fuel
Introduction
This chapter contains information on the following subjects:
Refuelling
196
Unleaded petrol
197
Diesel fuel
198
The correct grades of fuel for your vehicle are stated on a sticker affixed to the
inside of the fuel filler flap » Fig. 155 on page 196 -
.
WARNINGThe national legal requirements must be observed if carrying a spare canister
in the vehicle. We do not recommend carrying any fuel canisters in your vehi-
cle for safety reasons. in the event of an accident, these canisters can become
damaged and fuel may escape – risk of fire!
CAUTION
■ Never drive until the fuel tank is completely empty! The irregular supply of fuel
can cause misfiring, which can result in considerable damage to parts of the en-
gine and the exhaust system.■
Immediately remove any fuel that has spilled onto the vehicle's paintwork – risk
of paint damage!
■
If the vehicle was not purchased in the country where it was intended to be op-
erated, you should check whether the fuel specified by the manufacturer is of-
fered in the country where the vehicle will be operated. You should also perhaps
check whether the manufacturer has recommended a different fuel for operation
of the vehicle in the corresponding country. Is this not the case, then you must
check whether it is permitted by the manufacturer to operate the vehicle with an-
other fuel type.
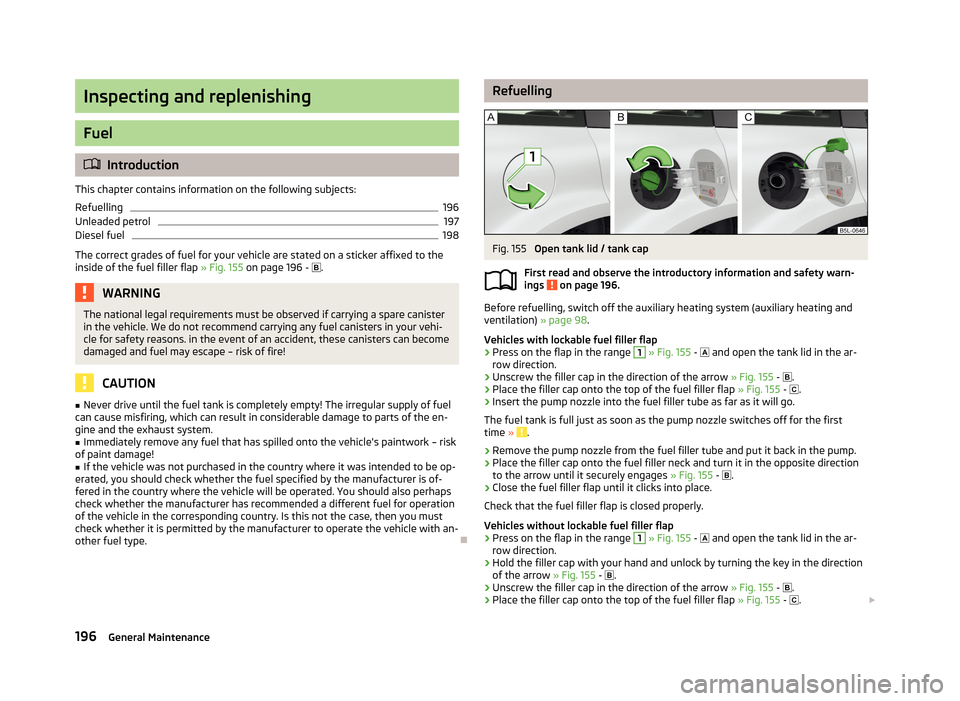
RefuellingFig. 155
Open tank lid / tank cap
First read and observe the introductory information and safety warn-
ings
on page 196.
Before refuelling, switch off the auxiliary heating system (auxiliary heating and ventilation) » page 98.
Vehicles with lockable fuel filler flap
›
Press on the flap in the range
1
» Fig. 155 -
and open the tank lid in the ar-
row direction.
›
Unscrew the filler cap in the direction of the arrow » Fig. 155 -
.
›
Place the filler cap onto the top of the fuel filler flap » Fig. 155 -
.
›
Insert the pump nozzle into the fuel filler tube as far as it will go.
The fuel tank is full just as soon as the pump nozzle switches off for the first time »
.
›
Remove the pump nozzle from the fuel filler tube and put it back in the pump.
›
Place the filler cap onto the fuel filler neck and turn it in the opposite direction
to the arrow until it securely engages » Fig. 155 -
.
›
Close the fuel filler flap until it clicks into place.
Check that the fuel filler flap is closed properly.
Vehicles without lockable fuel filler flap
›
Press on the flap in the range
1
» Fig. 155 -
and open the tank lid in the ar-
row direction.
›
Hold the filler cap with your hand and unlock by turning the key in the direction
of the arrow » Fig. 155 -
.
›
Unscrew the filler cap in the direction of the arrow » Fig. 155 -
.
›
Place the filler cap onto the top of the fuel filler flap
» Fig. 155 -
.
196General Maintenance
Page 201 of 266
CAUTION■In no case may fuel additives with metal components be used, especially not
with manganese and iron content. LRP(lead replacement petrol) fuels with metal-
lic components may not be used. There is a risk of causing considerable damage
to parts of the engine or exhaust system!■
Fuels with metallic content may not be used. There is a risk of causing consider-
able damage to parts of the engine or exhaust system!
Note
■ Unleaded petrol that has a higher octane number than that required by the en-
gine can be used without limitations.■
On vehicles with prescribed unleaded petrol 95/91, 92 or 93 RON, the use of
petrol with a higher octane number than 95 RON does not result in a noticeable
power increase or a lower fuel consumption.
■
On vehicles using prescribed unleaded petrol of min. 95 RON, the use of petrol
with a higher octane number than 95 RON can increase the power and reduce
fuel consumption.
Diesel fuel
First read and observe the introductory information and safety warn-ings
on page 196.
The vehicle can only be operated with diesel fuel that meets the EN 5901)
stand-
ard.
All diesel engines can be operated using diesel fuel with at most 7% biodiesel
(B7) 2)
.
On the Indian market, your vehicle will only be able to run on diesel fuel compli-
ant with standard IS 1460/Bharat IV. If diesel fuel which complies with this stand-
ard is not available, you can refuel with diesel fuel according to standard IS 1460/
Bharat III in case of emergency.
Operation in winter - Winter-grade diesel fuel
In the cold season, only use “winter-grade diesel fuel” which will still operate properly even at a temperature of -20 °C.
It is often the case in countries with different climatic conditions that diesel fuels
available have a different temperature characteristic. ŠKODA Partners and filling
stations in the relevant country will be able to provide you with information re-
garding the diesel fuels available.
Preheating fuel
The vehicle is fitted with a fuel filter preheating system. This secures operation of
a vehicle using diesel fuel down to an environmental temperature of -25 °C.
Diesel fuel additives
Additives, so-called “flow improvers ” (petrol and similar agents) should not be mixed with the diesel fuel. This can cause serious damage to engine or exhaust
system parts.
CAUTION
■ Just filling the tank once with diesel fuel that does not comply with the stand-
ard, can cause severe damage to parts of the engine, the fuel and exhaust sys-
tem!■
If a different fuel other than diesel fuel, which complies to the above mentioned
standards (e.g. petrol) is used by mistake do not start the engine or switch on the
ignition! Extensive damage to engine parts can occur! We recommend that you
have the fuel system cleaned by a specialist garage.
■
Water which has collected in the fuel filter can cause engine faults.
CAUTION
■ The vehicle cannot be operated with biofuel RME, therefore this fuel must not
be refuelled and driven. The use of biofuel RME can cause considerable damage
to parts of the engine or fuel system.■
Do not mix any fuel additives, so-called “flow improvers” (petrol and similar
agents) into the diesel. This can result in considerable damage to parts of the en-
gine or the exhaust system!
1)
In Germany also DIN 51628, in Austria ÖNORM C 1590, in Russia GOST R 52368-2005 / EN 590:2004.
2)
In Germany according to the DIN 52638 standard, in Austria ÖNORM C 1590, in France EN 590.
198General Maintenance