window SKODA YETI 2013 1.G / 5L Owner's Guide
[x] Cancel search | Manufacturer: SKODA, Model Year: 2013, Model line: YETI, Model: SKODA YETI 2013 1.G / 5LPages: 266, PDF Size: 26.71 MB
Page 85 of 266
›Place heavy objects as far forward as possible.›Attach the items of luggage to the lashing eyes or using the nets
» page 82.
In the event of an accident, even small and light objects gain so much kinetic en-
ergy that they can cause severe injuries.
The magnitude of the kinetic energy is dependent on the speed at which the ve-
hicle is travelling and the weight of the object.
Example: In the event of a frontal collision at a speed of 50 km/h, an object with a
weight of 4.5 kg produces an energy, which corresponds to 20 times its own
weight. This means that it results in a weight of approx. 90 kg “ ”.WARNING■ Store the objects in the boot and attach them to the lashing eyes.■Loose objects can be thrown forward during a sudden manoeuvre or in case
of an accident and can injure the occupants or other road users.■
Loose objects could hit a deployed airbag and injure occupants – danger of
death!
■
Please note that transporting heavy objects alters the handling properties
of the vehicle due to the displacement of the centre of gravity – risk of acci-
dent! The speed and style of driving must be adjusted accordingly.
■
If the items of luggage or objects are attached to the lashing eyes with un-
suitable or damaged lashing straps, injuries can occur in the event of braking manoeuvres or accidents. To prevent items of luggage from moving around,
always use suitable lashing straps which must be firmly attached to the lash-
ing eyes.
■
The transported items must be stowed in such a way that no objects are
able to slip forward on sudden driving or braking manoeuvres – risk of injury!
■
When transporting objects in the luggage compartment that has been en-
larged by folding the rear seats forward, ensure the safety of the passengers transported on the other rear seats » page 162, Correct seated position for
the passengers in the rear seats .
■
If the rear seat next to the folded forward seat is occupied, ensure maxi-
mum safety, e.g. by placing the goods to be transported in such a way that the
seat is prevented from folding back in case of a rear collision.
■
Do not drive with the luggage compartment lid fully opened or slightly ajar
otherwise exhaust gases may get into the interior of the vehicle – risk of poi-
soning!
■
Do not exceed the permissible axle loads and permissible gross weight of
the vehicle – risk of accident!
■
Do not transport people in the boot!
CAUTIONPlease ensure that the heating elements for the rear window heater are not dam-
aged as a result of abrasive objects.
Note
Tyre pressure must be adjusted to the load » page 213, Service life of tyres .
Fastening elements
Fig. 77
Fasteners: Version 1/version 2
First read and observe the introductory information and safety warn- ings
on page 81.
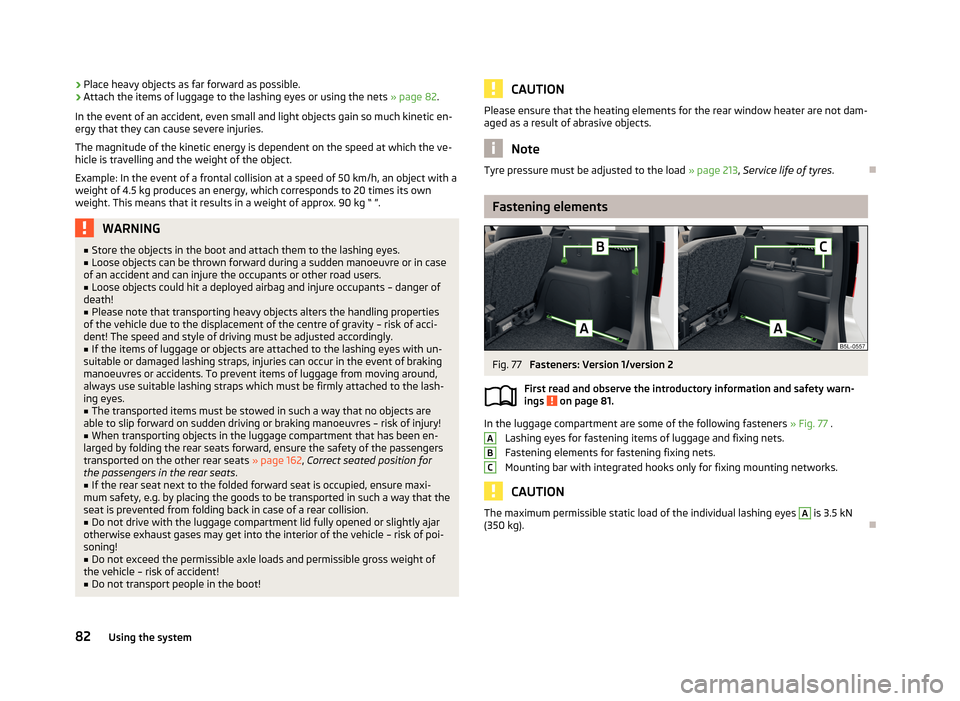
In the luggage compartment are some of the following fasteners » Fig. 77 .
Lashing eyes for fastening items of luggage and fixing nets.
Fastening elements for fastening fixing nets.
Mounting bar with integrated hooks only for fixing mounting networks.
CAUTION
The maximum permissible static load of the individual lashing eyes A is 3.5 kN
(350 kg).
ABC82Using the system
Page 88 of 266
Floor covering on both sidesFirst read and observe the introductory information and safety warn-
ings
on page 81.
You can fit a double-sided floor covering in the luggage compartment.
One side of the double-sided floor covering is made of fabric, the other side is
washable (easy to maintain).
The washable side is used to transport wet or dirty items.
Note
For easier turning of the covering, use the loop attached.
Luggage compartment cover
Fig. 82
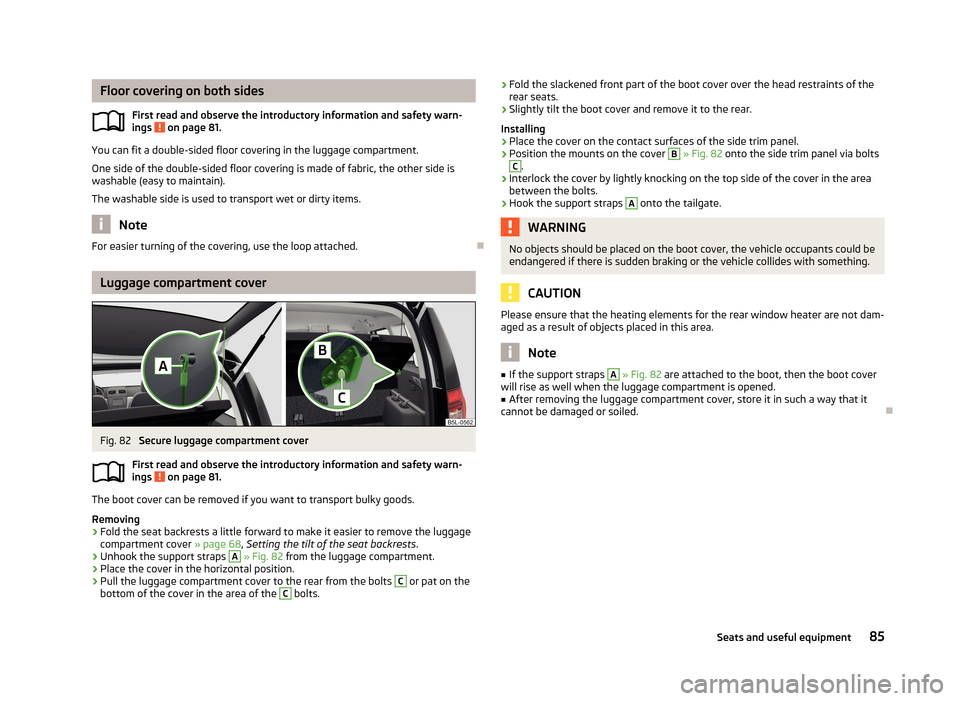
Secure luggage compartment cover
First read and observe the introductory information and safety warn- ings
on page 81.
The boot cover can be removed if you want to transport bulky goods.
Removing
›
Fold the seat backrests a little forward to make it easier to remove the luggage
compartment cover » page 68, Setting the tilt of the seat backrests .
›
Unhook the support straps
A
» Fig. 82 from the luggage compartment.
›
Place the cover in the horizontal position.
›
Pull the luggage compartment cover to the rear from the bolts
C
or pat on the
bottom of the cover in the area of the
C
bolts.
› Fold the slackened front part of the boot cover over the head restraints of the
rear seats.›
Slightly tilt the boot cover and remove it to the rear.
Installing
›
Place the cover on the contact surfaces of the side trim panel.
›
Position the mounts on the cover
B
» Fig. 82 onto the side trim panel via bolts
C
.
›
Interlock the cover by lightly knocking on the top side of the cover in the area
between the bolts.
›
Hook the support straps
A
onto the tailgate.
WARNINGNo objects should be placed on the boot cover, the vehicle occupants could be
endangered if there is sudden braking or the vehicle collides with something.
CAUTION
Please ensure that the heating elements for the rear window heater are not dam-
aged as a result of objects placed in this area.
Note
■ If the support straps A » Fig. 82 are attached to the boot, then the boot cover
will rise as well when the luggage compartment is opened.■
After removing the luggage compartment cover, store it in such a way that it
cannot be damaged or soiled.
85Seats and useful equipment
Page 94 of 266
Heating and air-conditioning
Heating, ventilation, cooling
Introduction
This chapter contains information on the following subjects:
Air outlets
92
Recirculation
93
Heating
94
Air conditioning (manual air conditioning)
94
Climatronic (automatic air conditioning)
95
Using the air conditioning system economically
96
Operational problems
97
The heating effect is dependent upon the coolant temperature, thus full heat
output only occurs when the engine has reached its operating temperature.
The cooling system only operates if the following conditions are met: The cooling system is switched on.The engine is running.
The outside temperature is above approx. +2 °C.
The blower is switched on.
If the cooling system is switched on, the temperature and air humidity drops in
the vehicle. The cooling system prevents the windows from misting up during the
cold season of the year.
It is possible to briefly activate recirculated air mode to enhance the cooling ef- fect » page 93 .
WARNING■
For your own safety and that of other road users, ensure that all the win-
dows are free of ice, snow and misting.■
Sensitive individuals may experience colds for the following reasons.
■ Long-term and non-uniform distribution of the air flow from the air outlet
nozzles (especially in the foot area).
■ Large temperature differences, such as when exiting the vehicle.
■
Under certain circumstances, air at a temperature of about 5 °C can flow out
of the vents when the cooling system is switched on.
■
The blower should always be on to prevent the windows from misting up.
CAUTION
■ The air inlet in front of the windscreen must be free of e.g. ice, snow or leaves
to ensure that the heating and cooling system operates properly.■
After switching on the cooling Condensation from the evaporator of the air con-
ditioning may drip down and form a puddle below the vehicle. This is not a leak!
■
If the coolant temperature is too high, the cooling system is switched off to en-
sure that the engine cools down.
Note
■ The exhaust air streams out through vents at the rear of the luggage compart-
ment.■
We recommend that you have Climatronic cleaned by a specialist garage once
every year.
91Heating and air-conditioning
Page 96 of 266
Note■Do not cover the air outlet vents with any objects, of any kind.■The air outlet vents 6 » Fig. 92 are only fitted on vehicles with the higher centre
console.
Recirculation
First read and observe the introductory information and safety warn-ings
on page 91.
Recirculated air mode prevents polluted air outside the vehicle from getting into
the vehicle, e.g. when driving through a tunnel or in a traffic jam.
In recirculated air mode air is sucked out of the interior of the vehicle and thenfed back into the interior.
Heating and air conditioning (manual air conditioning)
To turn the recirculation mode on or off, press the Symbol key
.
The air recirculation mode is automatically turned off by turning the air distribu-
tion control
C
to position
» Fig. 93 on page 94 or » Fig. 94 on page 94 .
Recirculated air mode can be switched on again from this position by repeatedly
pressing the symbol button
.
Climatronic (automatic air conditioning)
To turn the recirculation mode on, press the Symbol key
repeatedly until the
indicator light is lit on the left side of the button.
To activate the automatic recirculation mode, press the Symbol key
repeat-
edly until the indicator light is lit on the right side of the button.
Climatronic has an air quality sensor for the detection of the pollutant concentra-
tion in the sucked-in air.
If a considerable increase in concentration of pollutants is recognised by the air
quality sensor, recirculated air mode will temporarily be switched on.
If the concentration of pollutants decreases to the normal level, the air distribu-tion control is automatically switched off so that fresh air can be guided into the
vehicle interior.
If the air quality sensor does not automatically switch on the recirculated air
mode in the event of an unpleasant odour, you can switch it on yourself by press-
ing the button . The indicator light lights up in the button on the left side.
To
turn off the air recirculation or to deactivate the automatic air recirculations ,
press the button of press the symbol button repeatedly until the warning
lights in the button go out.WARNINGNever leave recirculated air mode switched on over a longer period of time, as
“stale air” can cause driver and passenger fatigue, reduce attention levels and
also cause the windows to mist up. The risk of having an accident increases.
Switch off recirculated air mode as soon as the windows start to mist up.
CAUTION
We recommend not smoking in the vehicle when the recirculating air operation is switched on. The smoke sucked from inside the vehicle is deposited on the evap-orator of the air conditioner. This produces a permanent odour when the air con-
ditioning system is operating which can only be eliminated through considerable effort and expense (replacement of compressor).
Note
The automatic air distribution control operates only if the outside temperature is
higher than approx. 2 °C.
93Heating and air-conditioning
Page 97 of 266
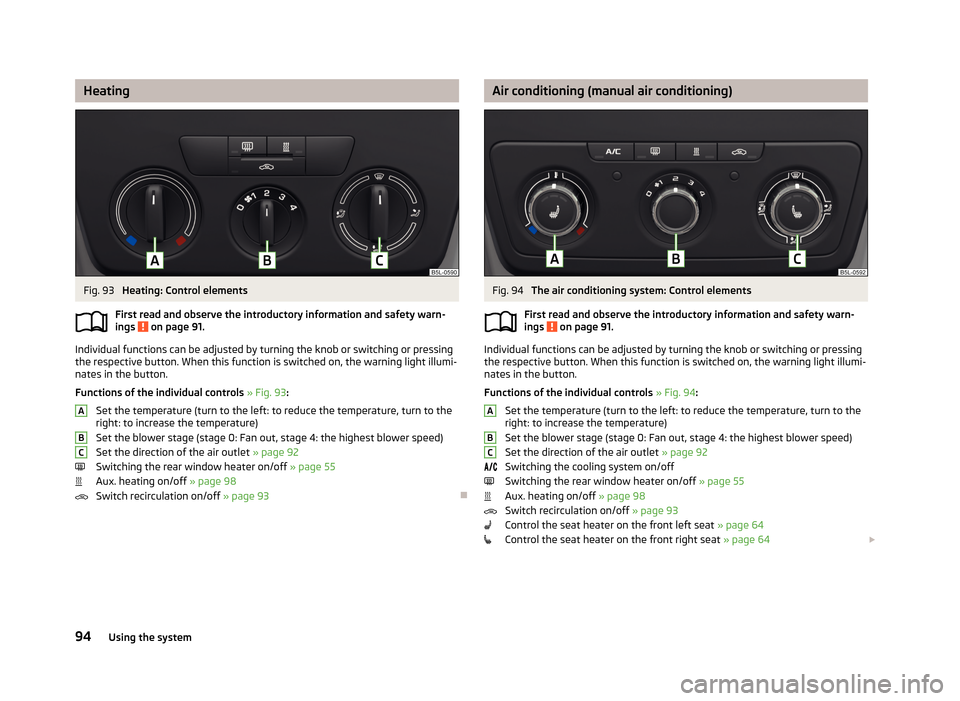
HeatingFig. 93
Heating: Control elements
First read and observe the introductory information and safety warn- ings
on page 91.
Individual functions can be adjusted by turning the knob or switching or pressingthe respective button. When this function is switched on, the warning light illumi-
nates in the button.
Functions of the individual controls » Fig. 93 :
Set the temperature (turn to the left: to reduce the temperature, turn to the
right: to increase the temperature)
Set the blower stage (stage 0: Fan out, stage 4: the highest blower speed) Set the direction of the air outlet » page 92
Switching the rear window heater on/off » page 55
Aux. heating on/off » page 98
Switch recirculation on/off » page 93
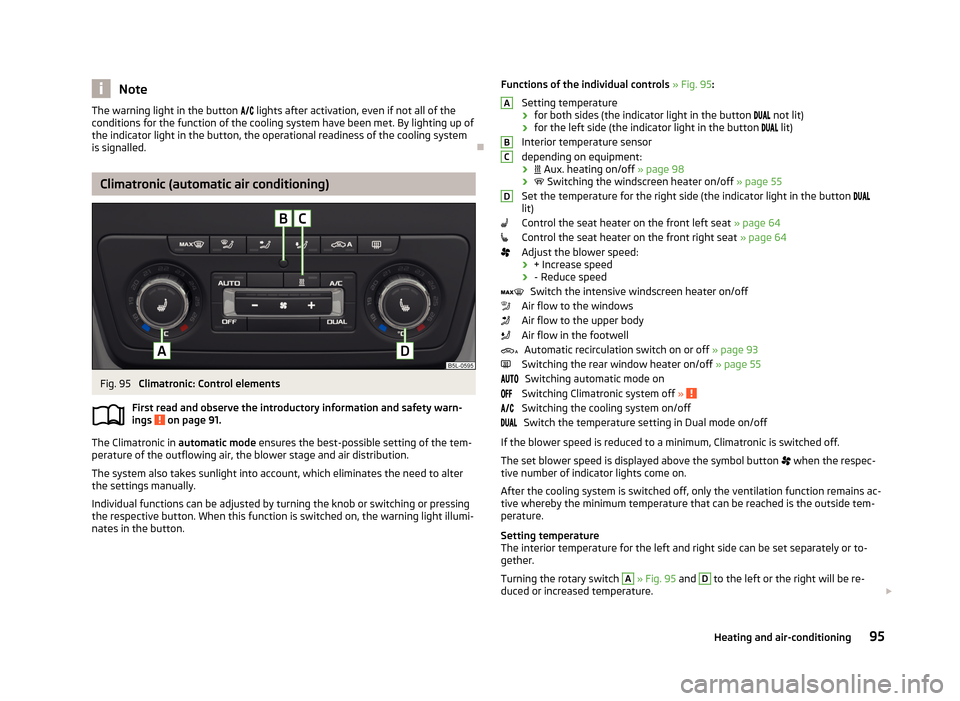
ABCAir conditioning (manual air conditioning)Fig. 94
The air conditioning system: Control elements
First read and observe the introductory information and safety warn- ings
on page 91.
Individual functions can be adjusted by turning the knob or switching or pressing the respective button. When this function is switched on, the warning light illumi-
nates in the button.
Functions of the individual controls » Fig. 94 :
Set the temperature (turn to the left: to reduce the temperature, turn to the
right: to increase the temperature)
Set the blower stage (stage 0: Fan out, stage 4: the highest blower speed) Set the direction of the air outlet » page 92
Switching the cooling system on/off Switching the rear window heater on/off » page 55
Aux. heating on/off » page 98
Switch recirculation on/off » page 93
Control the seat heater on the front left seat » page 64
Control the seat heater on the front right seat » page 64
ABC94Using the system
Page 98 of 266
NoteThe warning light in the button lights after activation, even if not all of the
conditions for the function of the cooling system have been met. By lighting up of the indicator light in the button, the operational readiness of the cooling system
is signalled.
Climatronic (automatic air conditioning)
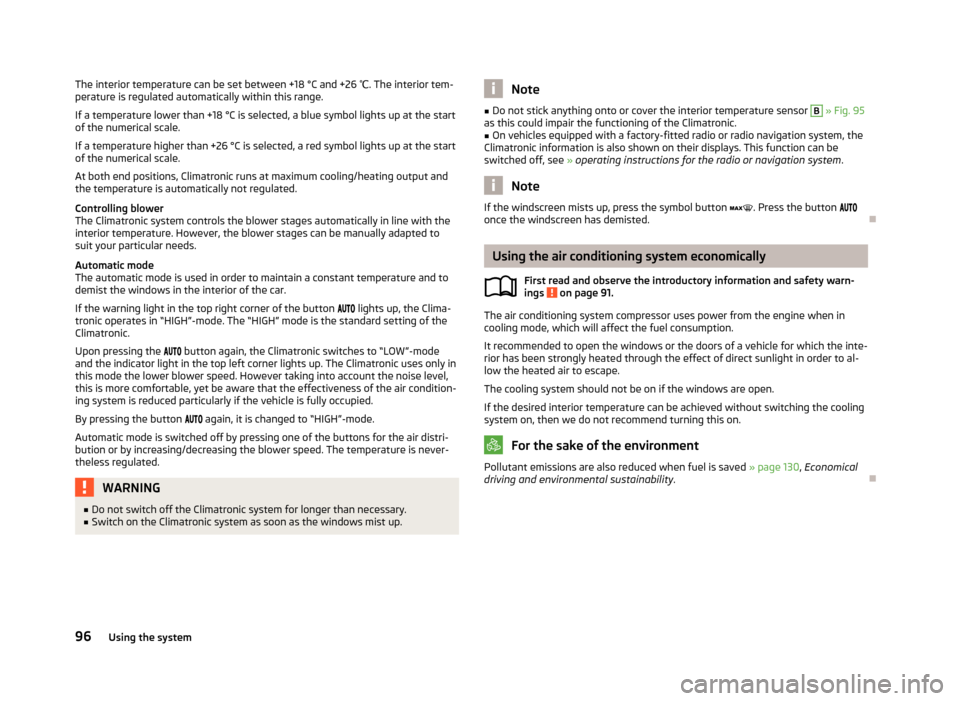
Fig. 95
Climatronic: Control elements
First read and observe the introductory information and safety warn- ings
on page 91.
The Climatronic in automatic mode ensures the best-possible setting of the tem-
perature of the outflowing air, the blower stage and air distribution.
The system also takes sunlight into account, which eliminates the need to alterthe settings manually.
Individual functions can be adjusted by turning the knob or switching or pressing the respective button. When this function is switched on, the warning light illumi-
nates in the button.
Functions of the individual controls » Fig. 95 :
Setting temperature
› for both sides (the indicator light in the button
not lit)
› for the left side (the indicator light in the button
lit)
Interior temperature sensor
depending on equipment:
›
Aux. heating on/off » page 98
›
Switching the windscreen heater on/off » page 55
Set the temperature for the right side (the indicator light in the button
lit)
Control the seat heater on the front left seat » page 64
Control the seat heater on the front right seat » page 64
Adjust the blower speed:
› + Increase speed
› - Reduce speed
Switch the intensive windscreen heater on/off
Air flow to the windows
Air flow to the upper body
Air flow in the footwell
Automatic recirculation switch on or off » page 93
Switching the rear window heater on/off » page 55
Switching automatic mode on
Switching Climatronic system off »
Switching the cooling system on/off
Switch the temperature setting in Dual mode on/off
If the blower speed is reduced to a minimum, Climatronic is switched off. The set blower speed is displayed above the symbol button
when the respec-
tive number of indicator lights come on.
After the cooling system is switched off, only the ventilation function remains ac-tive whereby the minimum temperature that can be reached is the outside tem-
perature.
Setting temperature
The interior temperature for the left and right side can be set separately or to-
gether.
Turning the rotary switch
A
» Fig. 95 and
D
to the left or the right will be re-
duced or increased temperature.
ABCD95Heating and air-conditioning
Page 99 of 266
The interior temperature can be set between +18 °C and +26 ℃. The interior tem-
perature is regulated automatically within this range.
If a temperature lower than +18 °C is selected, a blue symbol lights up at the start
of the numerical scale.
If a temperature higher than +26 °C is selected, a red symbol lights up at the start
of the numerical scale.
At both end positions, Climatronic runs at maximum cooling/heating output and
the temperature is automatically not regulated.
Controlling blower
The Climatronic system controls the blower stages automatically in line with the
interior temperature. However, the blower stages can be manually adapted to
suit your particular needs.
Automatic mode
The automatic mode is used in order to maintain a constant temperature and to
demist the windows in the interior of the car.
If the warning light in the top right corner of the button
lights up, the Clima-
tronic operates in “HIGH”-mode. The “HIGH” mode is the standard setting of the
Climatronic.
Upon pressing the
button again, the Climatronic switches to “LOW”-mode
and the indicator light in the top left corner lights up. The Climatronic uses only in this mode the lower blower speed. However taking into account the noise level,
this is more comfortable, yet be aware that the effectiveness of the air condition-
ing system is reduced particularly if the vehicle is fully occupied.
By pressing the button
again, it is changed to “HIGH”-mode.
Automatic mode is switched off by pressing one of the buttons for the air distri- bution or by increasing/decreasing the blower speed. The temperature is never-
theless regulated.WARNING■ Do not switch off the Climatronic system for longer than necessary.■Switch on the Climatronic system as soon as the windows mist up.Note■Do not stick anything onto or cover the interior temperature sensor B » Fig. 95
as this could impair the functioning of the Climatronic.■
On vehicles equipped with a factory-fitted radio or radio navigation system, the
Climatronic information is also shown on their displays. This function can be
switched off, see » operating instructions for the radio or navigation system .
Note
If the windscreen mists up, press the symbol button . Press the button
once the windscreen has demisted.
Using the air conditioning system economically
First read and observe the introductory information and safety warn-ings
on page 91.
The air conditioning system compressor uses power from the engine when in
cooling mode, which will affect the fuel consumption.
It recommended to open the windows or the doors of a vehicle for which the inte-rior has been strongly heated through the effect of direct sunlight in order to al-
low the heated air to escape.
The cooling system should not be on if the windows are open.
If the desired interior temperature can be achieved without switching the cooling
system on, then we do not recommend turning this on.
For the sake of the environment
Pollutant emissions are also reduced when fuel is saved » page 130, Economical
driving and environmental sustainability .
96Using the system
Page 114 of 266
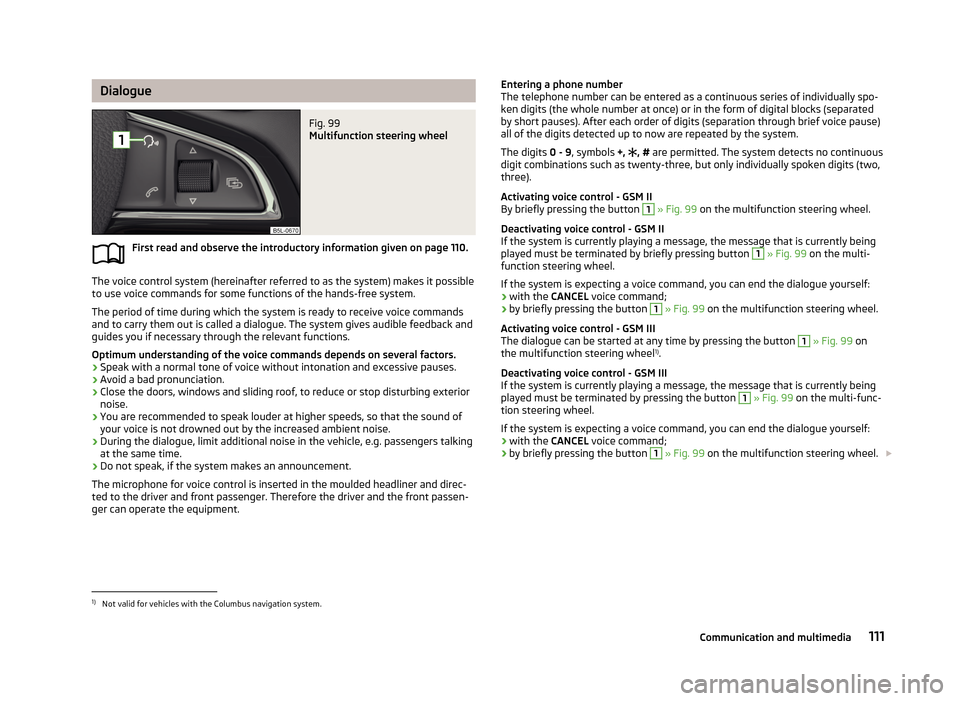
DialogueFig. 99
Multifunction steering wheel
First read and observe the introductory information given on page 110.
The voice control system (hereinafter referred to as the system) makes it possibleto use voice commands for some functions of the hands-free system.
The period of time during which the system is ready to receive voice commandsand to carry them out is called a dialogue. The system gives audible feedback and guides you if necessary through the relevant functions.
Optimum understanding of the voice commands depends on several factors. › Speak with a normal tone of voice without intonation and excessive pauses.
› Avoid a bad pronunciation.
› Close the doors, windows and sliding roof, to reduce or stop disturbing exterior
noise.
› You are recommended to speak louder at higher speeds, so that the sound of
your voice is not drowned out by the increased ambient noise.
› During the dialogue, limit additional noise in the vehicle, e.g. passengers talking
at the same time.
› Do not speak, if the system makes an announcement.
The microphone for voice control is inserted in the moulded headliner and direc- ted to the driver and front passenger. Therefore the driver and the front passen-ger can operate the equipment.
Entering a phone number
The telephone number can be entered as a continuous series of individually spo- ken digits (the whole number at once) or in the form of digital blocks (separated
by short pauses). After each order of digits (separation through brief voice pause)
all of the digits detected up to now are repeated by the system.
The digits 0 - 9, symbols +, , # are permitted. The system detects no continuous
digit combinations such as twenty-three, but only individually spoken digits (two,
three).
Activating voice control - GSM II
By briefly pressing the button 1
» Fig. 99 on the multifunction steering wheel.
Deactivating voice control - GSM II If the system is currently playing a message, the message that is currently being played must be terminated by briefly pressing button
1
» Fig. 99 on the multi-
function steering wheel.
If the system is expecting a voice command, you can end the dialogue yourself:
› with the
CANCEL voice command;
› by briefly pressing the button
1
» Fig. 99 on the multifunction steering wheel.
Activating voice control - GSM III The dialogue can be started at any time by pressing the button
1
» Fig. 99 on
the multifunction steering wheel 1)
.
Deactivating voice control - GSM III
If the system is currently playing a message, the message that is currently being
played must be terminated by pressing the button
1
» Fig. 99 on the multi-func-
tion steering wheel.
If the system is expecting a voice command, you can end the dialogue yourself:
› with the
CANCEL voice command;
› by briefly pressing the button
1
» Fig. 99 on the multifunction steering wheel.
1)
Not valid for vehicles with the Columbus navigation system.
111Communication and multimedia
Page 163 of 266
Safety
Passive Safety
General information
Introduction
This chapter contains information on the following subjects:
Safety equipment
160
Before setting off
160
What influences driving safety?
161
In this section you will find important information, tips and notes on the subject
of passive safety in your vehicle.
We have combined everything here which you should be familiar with, for exam- ple, regarding seat belts, airbags, child seats and safety of children.
WARNING■ This chapter contains important information on how to use the vehicle for
the driver and his occupants.■
You can find further information on safety concerning you and those travel-
ling with you in the following chapters of this owner's manual.
■
The complete on-board literature should always be in the vehicle. This ap-
plies in particular, if you rent out or sell the vehicle.
Safety equipment
First read and observe the introductory information and safety warn-ings
on page 160.
The following list contains only part of the safety equipment in your vehicle.
› Three-point seat belts for all the seats.
› Belt force limiters for the front seats.
› Belt tensioners for the front seats.
› Seat belt height adjusters for the front seats.
›
Front airbag for the driver and the front passenger.
› Driver’s knee airbag.
› Front side airbags.
› Rear side airbags.
› Head airbags.
› Anchoring points for child seats using the ISOFIX system.
› Anchoring points for child seats using the TOP TETHER system.
› Head restraints adjustable for height.
› Adjustable steering column.
The specified safety equipment works together, in order to optimally protect you
and those travelling with you in accident situations.
The safety equipment does not protect you or the people travelling with you, if
you or your occupants adopt an incorrect seated position or the equipment is not correctly adjusted or used.
If the seat belt is not fastened properly, this may result in injuries if an airbag is
activated in the event of an accident.
Before setting off
First read and observe the introductory information and safety warn-
ings
on page 160.
For your own safety and the safety of the people travelling with you, please pay
attention to the following points before setting off.
› Ensure that the lighting and the turn signal system are functioning properly.
› Check the tyre inflation pressure.
› Ensure that all of the windows offer good visibility to the outside.
› Secure all items of luggage
» page 81, Luggage compartment .
› Ensure that no objects can obstruct the pedals.
› Adjust the mirrors, the front seat and head restraint to your body size.
› Advise your passengers to adjust the head restraints to their body size.
› Protect children in suitable child seats with correctly fastened seat
belts » page 177 , Transporting children safely .
› Adopt the correct seated position
» page 161, Correct seated position . Tell your
passengers to assume the correct seated position.
› Correctly fasten the seat belt. Also inform passengers to fasten the seat belt
correctly » page 164 , Using seat belts .
160Safety
Page 164 of 266
What influences driving safety?First read and observe the introductory information and safety warn-
ings
on page 160.
The driver is fully responsible for himself and his occupants. If your driving safety is effected, you place yourself and the oncoming traffic at risk.
The following guidelines must therefore be observed. › Do not become distracted from concentrating on the traffic situation, e.g. by
your passengers or mobile phone calls.
› Never drive when your driving ability is impaired, e.g. due to medication, alcohol
or drugs.
› Keep to the traffic regulations and the permissible speed limit.
› Always adjust the driving speed to the road, traffic and weather conditions.
› Take regular breaks on long journeys – at least every two hours.
Correct seated position
Introduction
This chapter contains information on the following subjects:
Correct seated position for the driver
162
Correct seated position for the front passenger
162
Correct seated position for the passengers in the rear seats
162
Examples of an incorrect seating position
162WARNINGGeneral information■The front seats and head restraints must be adjusted to match the body
size at all times and the seat belt must always be fastened properly to provide the most effective levels of protection to the passengers.■
If the occupant adopts an incorrect seated position, he is exposed to life-
threatening injuries, in case he is hit by a deployed airbag.
■
If the occupants on the rear seats are not sitting upright, the risk of injury is
increased due to incorrect routing of the seat belt.
■
The seat backrests must not be tilted too far back when driving, as this will
impair the function of the seat belts and of the airbag system – risk of injury!
WARNINGInformation for the driver■Always assume the correct seated position before setting off and do not
change this position while driving. Also advise your passengers to adopt the
correct seated position and not to change this position while the car is mov-
ing.■
Maintain a distance of at least 25 cm from the steering wheel, and a dis-
tance of at least 10 cm between the legs and the dash panel at the height of
the knee airbag. Not maintaining this minimum distance will mean that the airbag system will not be able to properly protect you - hazard!
■
When driving, hold the steering wheel with both hands firmly on the outer
edge in the 9 o'clock and 3 o'clock position. Never hold the steering wheel in
the 12 o'clock position or in any other way (e.g. in the middle or inner edge of the steering wheel). In such cases, you could severely injure the arms, hands
and head when the driver airbag is deployed.
■
Ensure that there are no objects in the driver's footwell, as these may get
caught in the pedal apparatus when driving or braking. You would then no
longer be able to operate the clutch, brake or acceleration pedals.
WARNINGInformation for the front passenger■Maintain a distance of at least 25 cm to the dash panel. Not maintaining this
minimum distance will mean that the airbag system will not be able to proper-
ly protect you – hazard!■
Always keep your feet in the footwell when the car is being driven – never
place your feet on the instrument panel, out of the window or on the surfaces of the seats. You will be exposed to increased risk of injury if it becomes nec-
essary to apply the brake or in the event of an accident. If an airbag is de-
ployed, you may suffer fatal injuries when adopting an incorrect seated posi- tion!
161Passive Safety