start stop button SKODA YETI 2013 1.G / 5L Owner's Manual
[x] Cancel search | Manufacturer: SKODA, Model Year: 2013, Model line: YETI, Model: SKODA YETI 2013 1.G / 5LPages: 266, PDF Size: 26.71 MB
Page 12 of 266
Using the system
Cockpit
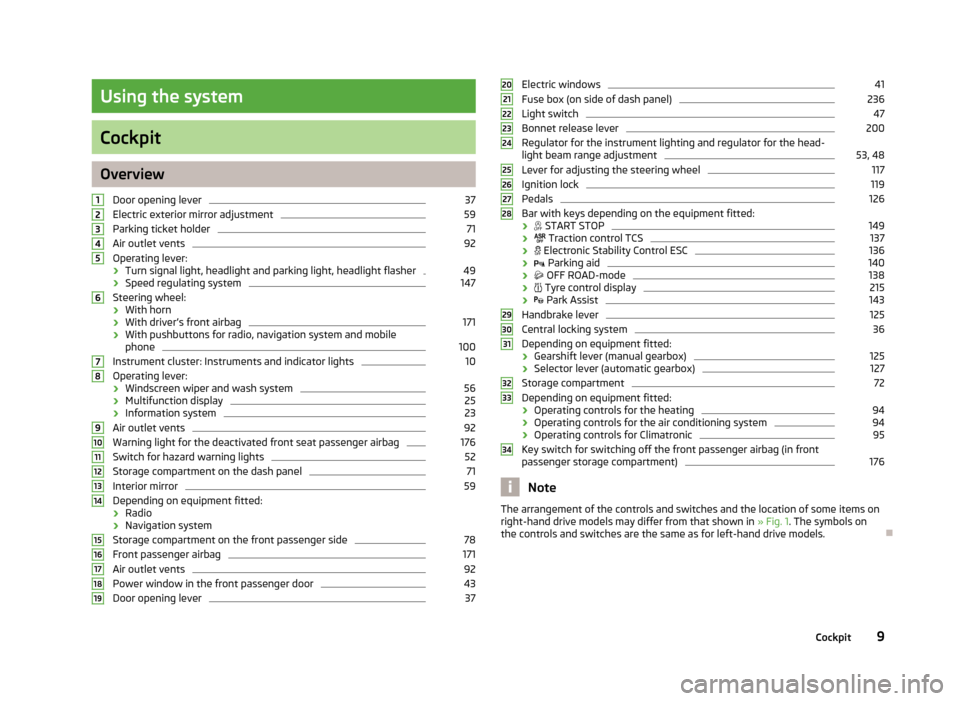
OverviewDoor opening lever
37
Electric exterior mirror adjustment
59
Parking ticket holder
71
Air outlet vents
92
Operating lever:
› Turn signal light, headlight and parking light, headlight flasher
49
›Speed regulating system
147
Steering wheel:
› With horn
› With driver’s front airbag
171
›With pushbuttons for radio, navigation system and mobile
phone
100
Instrument cluster: Instruments and indicator lights
10
Operating lever:
› Windscreen wiper and wash system
56
›Multifunction display
25
›Information system
23
Air outlet vents
92
Warning light for the deactivated front seat passenger airbag
176
Switch for hazard warning lights
52
Storage compartment on the dash panel
71
Interior mirror
59
Depending on equipment fitted:
› Radio
› Navigation system
Storage compartment on the front passenger side
78
Front passenger airbag
171
Air outlet vents
92
Power window in the front passenger door
43
Door opening lever
3712345678910111213141516171819Electric windows41Fuse box (on side of dash panel)236
Light switch
47
Bonnet release lever
200
Regulator for the instrument lighting and regulator for the head- light beam range adjustment
53, 48
Lever for adjusting the steering wheel
117
Ignition lock
119
Pedals
126
Bar with keys depending on the equipment fitted:
›
START STOP
149
›
Traction control TCS
137
›
Electronic Stability Control ESC
136
›
Parking aid
140
›
OFF ROAD-mode
138
›
Tyre control display
215
›
Park Assist
143
Handbrake lever
125
Central locking system
36
Depending on equipment fitted:
› Gearshift lever (manual gearbox)
125
›
Selector lever (automatic gearbox)
127
Storage compartment
72
Depending on equipment fitted:
› Operating controls for the heating
94
›Operating controls for the air conditioning system
94
›
Operating controls for Climatronic
95
Key switch for switching off the front passenger airbag (in front
passenger storage compartment)
176
Note
The arrangement of the controls and switches and the location of some items on
right-hand drive models may differ from that shown in » Fig. 1. The symbols on
the controls and switches are the same as for left-hand drive models.2021222324252627282930313233349Cockpit
Page 43 of 266
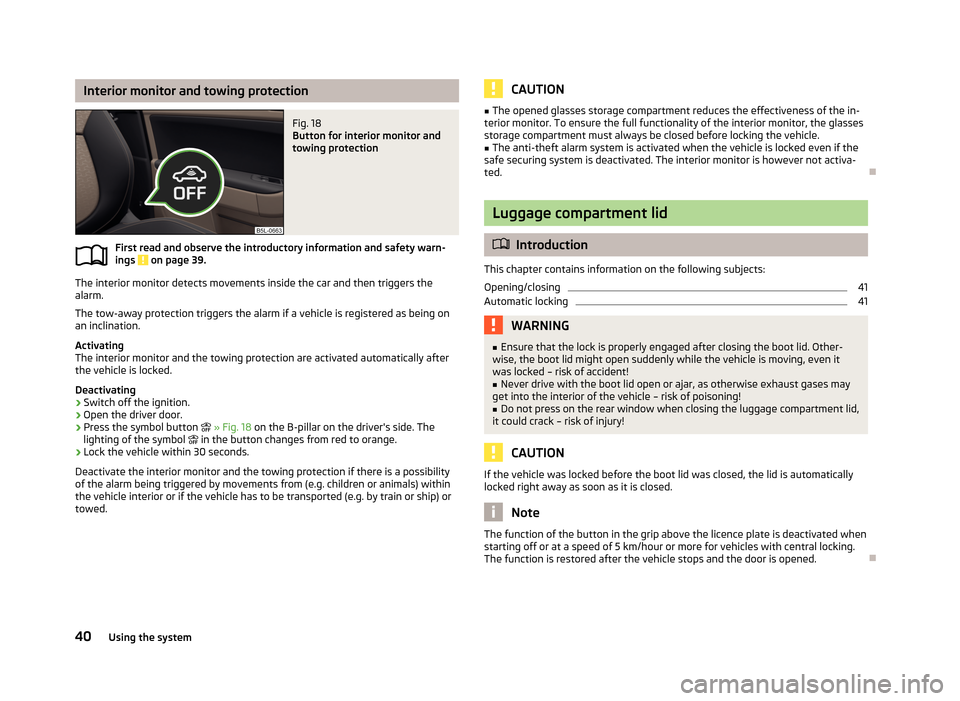
Interior monitor and towing protectionFig. 18
Button for interior monitor and
towing protection
First read and observe the introductory information and safety warn-
ings on page 39.
The interior monitor detects movements inside the car and then triggers the alarm.
The tow-away protection triggers the alarm if a vehicle is registered as being on
an inclination.
Activating
The interior monitor and the towing protection are activated automatically after
the vehicle is locked.
Deactivating
›
Switch off the ignition.
›
Open the driver door.
›
Press the symbol button
» Fig. 18 on the B-pillar on the driver's side. The
lighting of the symbol
in the button changes from red to orange.
›
Lock the vehicle within 30 seconds.
Deactivate the interior monitor and the towing protection if there is a possibility
of the alarm being triggered by movements from (e.g. children or animals) within
the vehicle interior or if the vehicle has to be transported (e.g. by train or ship) or towed.
CAUTION■ The opened glasses storage compartment reduces the effectiveness of the in-
terior monitor. To ensure the full functionality of the interior monitor, the glasses storage compartment must always be closed before locking the vehicle.■
The anti-theft alarm system is activated when the vehicle is locked even if the
safe securing system is deactivated. The interior monitor is however not activa-
ted.
Luggage compartment lid
Introduction
This chapter contains information on the following subjects:
Opening/closing
41
Automatic locking
41WARNING■ Ensure that the lock is properly engaged after closing the boot lid. Other-
wise, the boot lid might open suddenly while the vehicle is moving, even it
was locked – risk of accident!■
Never drive with the boot lid open or ajar, as otherwise exhaust gases may
get into the interior of the vehicle – risk of poisoning!
■
Do not press on the rear window when closing the luggage compartment lid,
it could crack – risk of injury!
CAUTION
If the vehicle was locked before the boot lid was closed, the lid is automatically
locked right away as soon as it is closed.
Note
The function of the button in the grip above the licence plate is deactivated when
starting off or at a speed of 5 km/hour or more for vehicles with central locking.
The function is restored after the vehicle stops and the door is opened.
40Using the system
Page 114 of 266
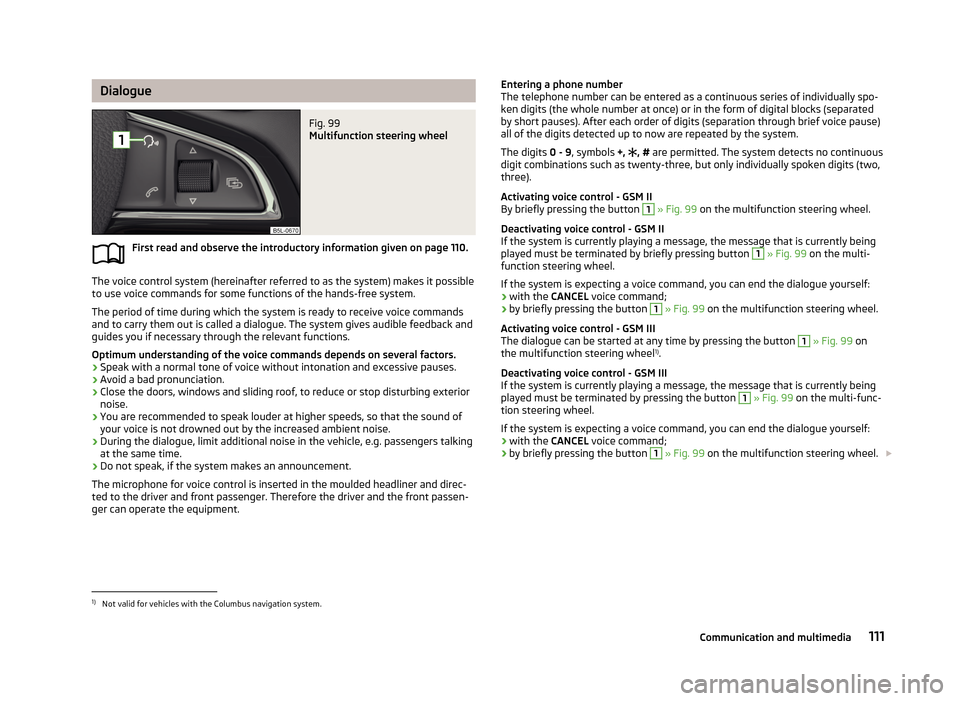
DialogueFig. 99
Multifunction steering wheel
First read and observe the introductory information given on page 110.
The voice control system (hereinafter referred to as the system) makes it possibleto use voice commands for some functions of the hands-free system.
The period of time during which the system is ready to receive voice commandsand to carry them out is called a dialogue. The system gives audible feedback and guides you if necessary through the relevant functions.
Optimum understanding of the voice commands depends on several factors. › Speak with a normal tone of voice without intonation and excessive pauses.
› Avoid a bad pronunciation.
› Close the doors, windows and sliding roof, to reduce or stop disturbing exterior
noise.
› You are recommended to speak louder at higher speeds, so that the sound of
your voice is not drowned out by the increased ambient noise.
› During the dialogue, limit additional noise in the vehicle, e.g. passengers talking
at the same time.
› Do not speak, if the system makes an announcement.
The microphone for voice control is inserted in the moulded headliner and direc- ted to the driver and front passenger. Therefore the driver and the front passen-ger can operate the equipment.
Entering a phone number
The telephone number can be entered as a continuous series of individually spo- ken digits (the whole number at once) or in the form of digital blocks (separated
by short pauses). After each order of digits (separation through brief voice pause)
all of the digits detected up to now are repeated by the system.
The digits 0 - 9, symbols +, , # are permitted. The system detects no continuous
digit combinations such as twenty-three, but only individually spoken digits (two,
three).
Activating voice control - GSM II
By briefly pressing the button 1
» Fig. 99 on the multifunction steering wheel.
Deactivating voice control - GSM II If the system is currently playing a message, the message that is currently being played must be terminated by briefly pressing button
1
» Fig. 99 on the multi-
function steering wheel.
If the system is expecting a voice command, you can end the dialogue yourself:
› with the
CANCEL voice command;
› by briefly pressing the button
1
» Fig. 99 on the multifunction steering wheel.
Activating voice control - GSM III The dialogue can be started at any time by pressing the button
1
» Fig. 99 on
the multifunction steering wheel 1)
.
Deactivating voice control - GSM III
If the system is currently playing a message, the message that is currently being
played must be terminated by pressing the button
1
» Fig. 99 on the multi-func-
tion steering wheel.
If the system is expecting a voice command, you can end the dialogue yourself:
› with the
CANCEL voice command;
› by briefly pressing the button
1
» Fig. 99 on the multifunction steering wheel.
1)
Not valid for vehicles with the Columbus navigation system.
111Communication and multimedia
Page 117 of 266
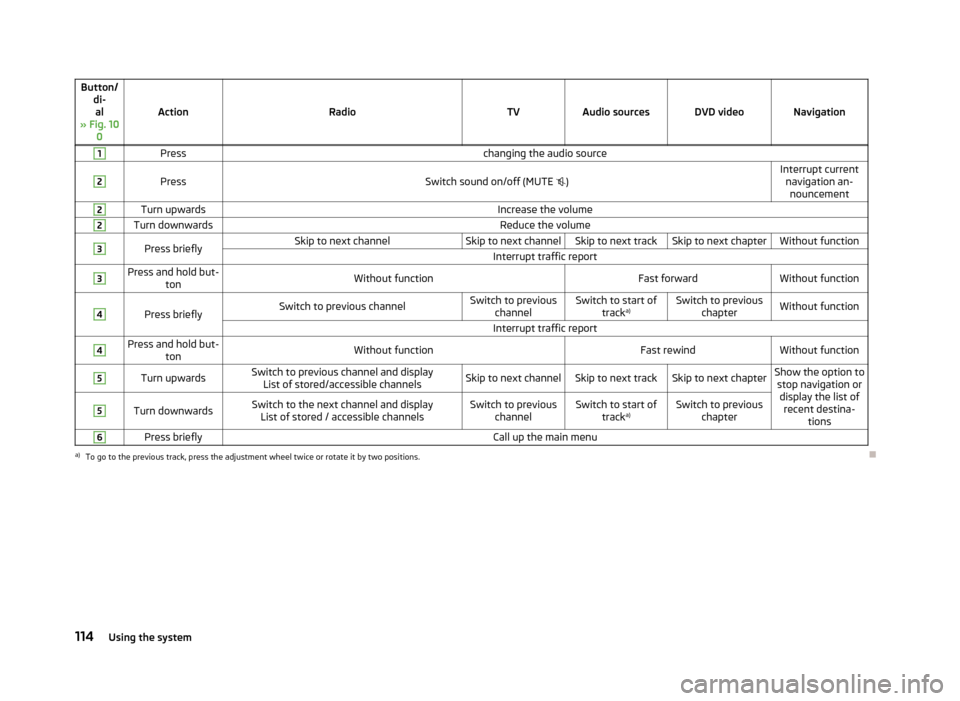
Button/di-al
» Fig. 10 0
ActionRadioTVAudio sourcesDVD videoNavigation
1Presschanging the audio source2
PressSwitch sound on/off (MUTE )Interrupt current
navigation an-nouncement2Turn upwardsIncrease the volume2Turn downwardsReduce the volume3Press brieflySkip to next channelSkip to next channelSkip to next trackSkip to next chapterWithout functionInterrupt traffic report3Press and hold but- tonWithout functionFast forwardWithout function4
Press brieflySwitch to previous channelSwitch to previouschannelSwitch to start of tracka)Switch to previous
chapterWithout functionInterrupt traffic report4Press and hold but- tonWithout functionFast rewindWithout function5Turn upwardsSwitch to previous channel and displayList of stored/accessible channelsSkip to next channelSkip to next trackSkip to next chapterShow the option tostop navigation ordisplay the list of recent destina- tions5Turn downwardsSwitch to the next channel and displayList of stored / accessible channelsSwitch to previous channelSwitch to start of tracka)Switch to previous
chapter6Press brieflyCall up the main menua)
To go to the previous track, press the adjustment wheel twice or rotate it by two positions.
114Using the system
Page 118 of 266
AUX- and MDIinputsFirst read and observe the introductory information given on page 113.
The AUX and MDI inputs are used to connect external audio sources (e.g. iPod ormp3 player) and to play back music from these devices via the factory-fitted radio
or navigation system.
The AUX input for external audio sources is located below the armrest of the
front seats and is marked with the 1)
symbol.
The MDI input is above the storage compartment in the front center console and
has the identifier
» page 72 characterized.
For a description of use, refer to the operating instructions for the relevant radio or navigation system.
CD change
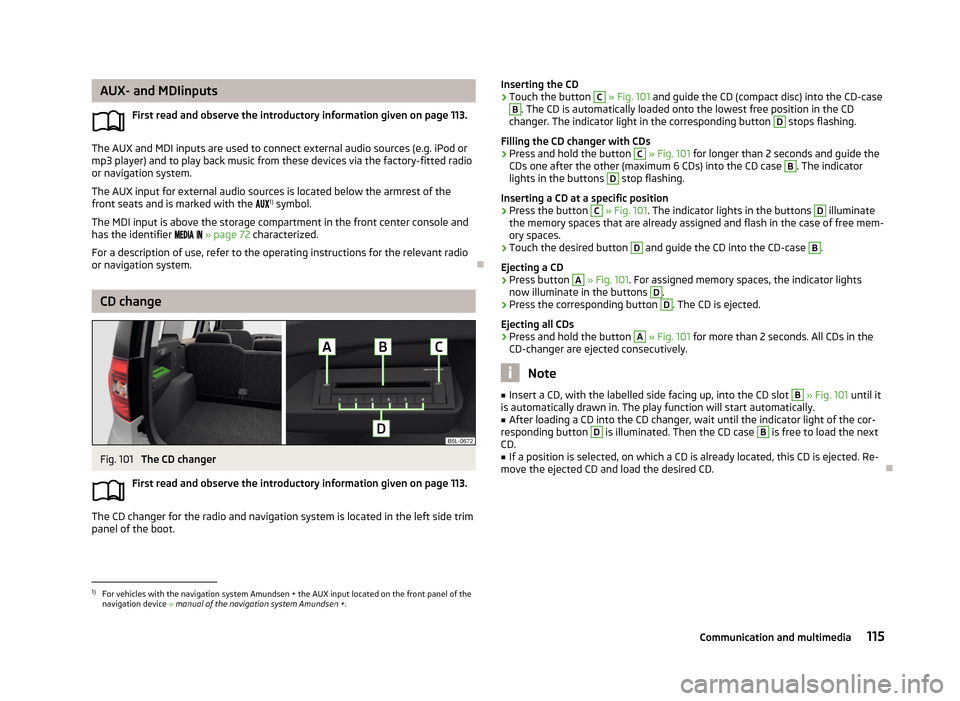
Fig. 101
The CD changer
First read and observe the introductory information given on page 113.
The CD changer for the radio and navigation system is located in the left side trim panel of the boot.
Inserting the CD›Touch the button C » Fig. 101 and guide the CD (compact disc) into the CD-caseB
. The CD is automatically loaded onto the lowest free position in the CD
changer. The indicator light in the corresponding button
D
stops flashing.
Filling the CD changer with CDs
›
Press and hold the button
C
» Fig. 101 for longer than 2 seconds and guide the
CDs one after the other (maximum 6 CDs) into the CD case
B
. The indicator
lights in the buttons
D
stop flashing.
Inserting a CD at a specific position
›
Press the button
C
» Fig. 101 . The indicator lights in the buttons
D
illuminate
the memory spaces that are already assigned and flash in the case of free mem-
ory spaces.
›
Touch the desired button
D
and guide the CD into the CD-case
B
.
Ejecting a CD
›
Press button
A
» Fig. 101 . For assigned memory spaces, the indicator lights
now illuminate in the buttons
D
.
›
Press the corresponding button
D
. The CD is ejected.
Ejecting all CDs
›
Press and hold the button
A
» Fig. 101 for more than 2 seconds. All CDs in the
CD-changer are ejected consecutively.
Note
■ Insert a CD, with the labelled side facing up, into the CD slot B » Fig. 101 until it
is automatically drawn in. The play function will start automatically.■
After loading a CD into the CD changer, wait until the indicator light of the cor-
responding button
D
is illuminated. Then the CD case
B
is free to load the next
CD.
■
If a position is selected, on which a CD is already located, this CD is ejected. Re-
move the ejected CD and load the desired CD.
1)
For vehicles with the navigation system Amundsen + the AUX input located on the front panel of the
navigation device » manual of the navigation system Amundsen + .
115Communication and multimedia
Page 124 of 266
WARNING■Never leave the key in the vehicle when you exit the vehicle. This is particu-
larly important if children are left in the vehicle. Otherwise the children could,
for example, start the engine – risk of accident or injury!■
Never leave the vehicle unattended with the engine running.
■
Never switch off the engine before the vehicle is stationary – risk of acci-
dent!
WARNING■ Never leave the engine running in unventilated or closed rooms. The ex-
haust gases from the engine contain substances such as odourless and col-
ourless carbon monoxide (a poisonous gas) – risk to life! ■ Carbon monoxide can cause unconsciousness and death.
CAUTION
■The system can recognize the valid key, even if it has been forgotten, for exam-
ple, in the front of the vehicle roof D » Fig. 14 on page 35 - There is danger of
loss or damage to the key! It is therefore not always necessary to know where
the key is.■
The starter must only be operated when the engine is not running and the vehi-
cle is at a standstill. The starter or engine may be damaged if the starter is activa- ted when the engine is running.
■
Do not tow start the engine – there is a risk of damaging the engine and the
catalytic converter. The battery from another vehicle can be used as a jump-start
aid » page 226 , Jump-starting .
CAUTION
■
Avoid high engine revolutions, full throttle and high engine loads before the en-
gine has reached its operating temperature – risk of damaging the engine!■
Do not switch the engine off immediately at the end of your journey after the
engine has been operated over a prolonged period at high loads but leave it to
run at an idling speed for about 1 minute. This prevents any possible accumulation
of heat when the engine is switched off.
For the sake of the environmentDo not warm up the engine while the vehicle is stationary. If possible, start your
journey as soon as the engine has started. Through this the engine reaches its operating temperature more rapidly and the pollutant emissions are lower.
Note
■ The system is protected against inadvertently switching off the engine while
driving, this means that the engine can only be switched off in an emergen- cy » page 123 .■
After switching off the ignition, the radiator fan may intermittently continue to
operate for approx. 10 minutes.
■
Under certain circumstances (e.g. after switching off the ignition and opening
the driver's door), the steering is enabled only when the ignition is switched on or the engine is started.
Steering lock / unlock
Fig. 106
Starter button
First read and observe the introductory information and safety warn-
ings on page 120.
The steering lock (steering lock) deters attempted theft of your vehicle.
Locking
›
Stop the vehicle.
›
Switch off the engine or the ignition by pressing the starter button » Fig. 106.
›
Open the driver door.
The steering is locked automatically.
121Starting-off and Driving
Page 125 of 266
If the driver's door is opened and the ignition is switched off afterwards, the
steering is only locked after the vehicle is locked.
Unlocking›
Open the driver's door and get into the vehicle.
›
Close the driver's door.
The steering is unlocked within 2 seconds.
If the system does not unlock the steering at the first time (for example when the
front wheels are in contact with an obstacle), then two more unlocking attempts
are performed automatically.
If the steering is still not unlocked, then the following message is displayed on
the display of the instrument cluster.
Move steering wheel!
MOVE STEERING
Slightly move the steering wheel and the system will make up to 3 more attempts
to unlock after 2 seconds. At the same time, the indicator light
flashes.
If the steering is still not unlocked, to try to eliminate the possible cause and then
repeat the unlocking attempt.
Switching on the ignition
First read and observe the introductory information and safety warn-
ings
on page 120.
›
Press the starter button » Fig. 106 on page 121 briefly.
The ignition is switched on.
Note
The ignition is switched on when indicated by the lighting up of certain indicator
lamps in the instrument cluster.Starting the engine
First read and observe the introductory information and safety warn-
ings
on page 120.
Vehicles with a diesel engine are equipped with a glow plug system. The glow
plug warning light illuminates after the ignition has been switched on. Start
the engine after the warning light has gone out.
You should not switch on any major electrical components during the heating pe- riod otherwise the vehicle battery will be drained unnecessarily.
Procedure for starting the engine
›
Firmly apply the handbrake.
›
Move the gearshift lever into neutral or move the selector lever into position P
or N.
›
Depress and hold the clutch pedal (vehicles with a manual gearbox) or brake
pedal (vehicles with an automatic gearbox) until the engine starts.
›
» Fig. 106 on page 121Press and hold 1)
the starter button until the engine starts.
›
Release the handbrake.
Vehicles with manual transmission
The engine will not start if the clutch pedal is not depressed.
The following message is shown in the information cluster display.
Depress clutch to start!
CLUTCH
Vehicles with automatic transmission The engine will not start if the brake pedal is not depressed.
The warning light
lights up in the instrument cluster and the following mes-
sage appears in the display.
Depress brake to start!
BRAKE
1)
On vehicles with the START-STOP system, it is sufficient to press the starter button briefly. The mo-
tor will then automatically start.
122Driving
Page 126 of 266
CAUTION■If the engine does not start up after a second attempt, one of the following
fuses may be defective. ■Petrol engine - fuse for the fuel pump.
■ Diesel engine - fuse for the glow plug control unit or fuel pump.■
Check the fuse and replace if necessary » page 236, or seek assistance from a
specialist garage.
Switching off the ignition
First read and observe the introductory information and safety warn-ings
on page 120.
›
Press the starter button » Fig. 106 on page 121 briefly.
The ignition is switched off.
The ignition can be switched off up to a speed of 2 km/h.
On vehicles fitted with a manual gearbox, the clutch pedal must not be de-
pressed after switching off the ignition, otherwise the system would try to start.
For automatic transmission vehicles, the brake pedal must not be depressed,
otherwise the system will try to start.
If the driver's door is opened while the ignition is on, an audible signal sounds and
the following message appears in the instrument cluster display.
Ignition on!
IGNITION SWITCHED ON
When leaving the vehicle always switch off the ignition.
Switching off the engine
First read and observe the introductory information and safety warn-ings
on page 120.
›
Stop the vehicle.
›
Press the starter button » Fig. 106 on page 121.
The engine and the ignition are switched off simultaneously.
Emergency start-up of the engineFig. 107
Emergency start-up of engine
First read and observe the introductory information and safety warn- ings on page 120.
If the authorisation check for the key fails, the following message appears in the
instrument cluster display.
Key not found.
NO KEY
The emergency start-up must be completed.
› Press the starter button directly with the key
» Fig. 107.
Or
› Press the starter button and then hold the key to the starter button.
Note
During an emergency start-up of the engine, the key bit must face the starter
button » Fig. 107 .
Emergency ignition shutoff system
First read and observe the introductory information and safety warn-
ings
on page 120.
The ignition can be turned off in an emergency even when travelling at a speed of
more than 2 km / hr.
›
Press the starter button » Fig. 106 on page 121 for longer than 1 second or twice
within 1 second.
123Starting-off and Driving
Page 130 of 266
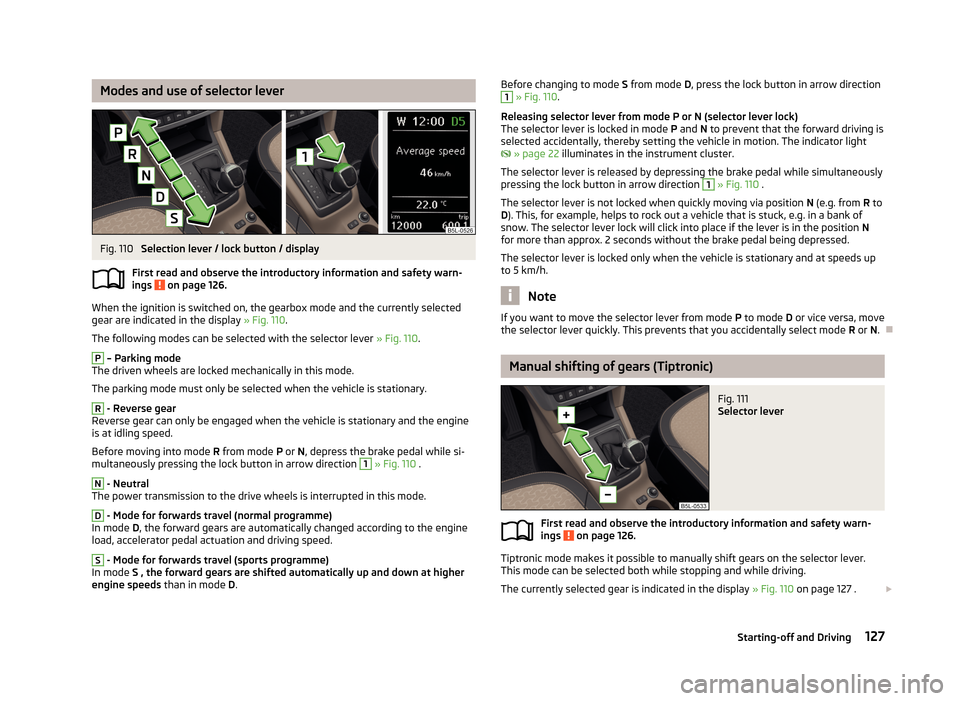
Modes and use of selector leverFig. 110
Selection lever / lock button / display
First read and observe the introductory information and safety warn- ings
on page 126.
When the ignition is switched on, the gearbox mode and the currently selected
gear are indicated in the display » Fig. 110.
The following modes can be selected with the selector lever » Fig. 110.
P
– Parking mode
The driven wheels are locked mechanically in this mode.
The parking mode must only be selected when the vehicle is stationary.
R
- Reverse gear
Reverse gear can only be engaged when the vehicle is stationary and the engine
is at idling speed.
Before moving into mode R from mode P or N, depress the brake pedal while si-
multaneously pressing the lock button in arrow direction
1
» Fig. 110 .
N
- Neutral
The power transmission to the drive wheels is interrupted in this mode.
D
- Mode for forwards travel (normal programme)
In mode D, the forward gears are automatically changed according to the engine
load, accelerator pedal actuation and driving speed.
S
- Mode for forwards travel (sports programme)
In mode S , the forward gears are shifted automatically up and down at higher
engine speeds than in mode D.
Before changing to mode S from mode D, press the lock button in arrow direction1 » Fig. 110 .
Releasing selector lever from mode P or N (selector lever lock)
The selector lever is locked in mode P and N to prevent that the forward driving is
selected accidentally, thereby setting the vehicle in motion. The indicator light
» page 22 illuminates in the instrument cluster.
The selector lever is released by depressing the brake pedal while simultaneously
pressing the lock button in arrow direction 1
» Fig. 110 .
The selector lever is not locked when quickly moving via position N (e.g. from R to
D ). This, for example, helps to rock out a vehicle that is stuck, e.g. in a bank of
snow. The selector lever lock will click into place if the lever is in the position N
for more than approx. 2 seconds without the brake pedal being depressed.
The selector lever is locked only when the vehicle is stationary and at speeds up
to 5 km/h.
Note
If you want to move the selector lever from mode P to mode D or vice versa, move
the selector lever quickly. This prevents that you accidentally select mode R or N.
Manual shifting of gears (Tiptronic)
Fig. 111
Selector lever
First read and observe the introductory information and safety warn-
ings on page 126.
Tiptronic mode makes it possible to manually shift gears on the selector lever.
This mode can be selected both while stopping and while driving.
The currently selected gear is indicated in the display » Fig. 110 on page 127 .
127Starting-off and Driving
Page 131 of 266
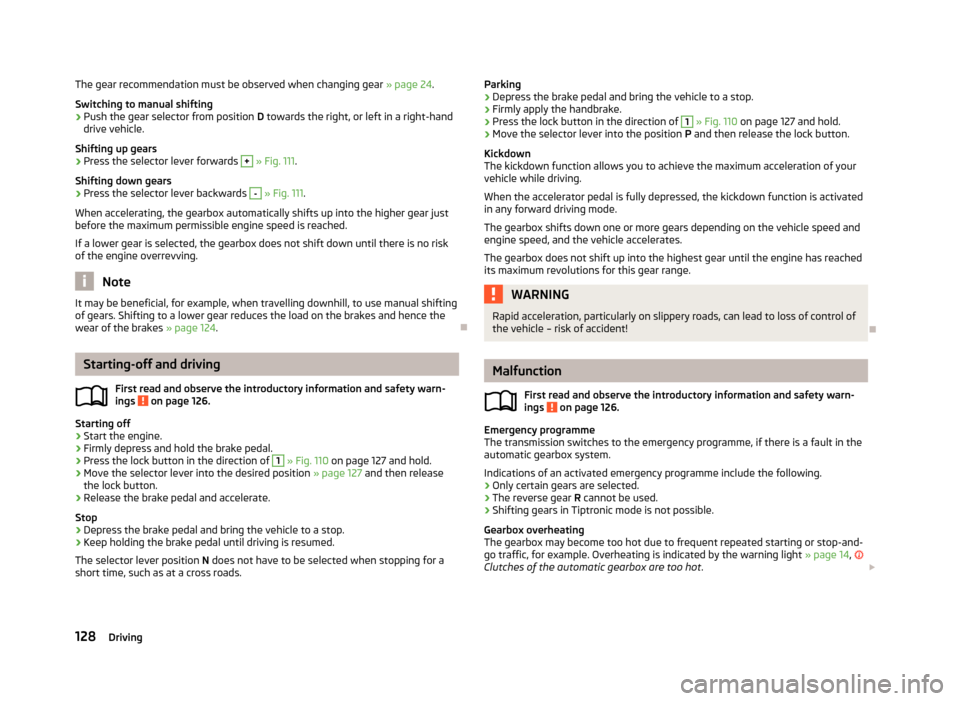
The gear recommendation must be observed when changing gear » page 24.
Switching to manual shifting›
Push the gear selector from position D towards the right, or left in a right-hand
drive vehicle.
Shifting up gears
›
Press the selector lever forwards
+
» Fig. 111 .
Shifting down gears
›
Press the selector lever backwards
-
» Fig. 111 .
When accelerating, the gearbox automatically shifts up into the higher gear just
before the maximum permissible engine speed is reached.
If a lower gear is selected, the gearbox does not shift down until there is no riskof the engine overrevving.
Note
It may be beneficial, for example, when travelling downhill, to use manual shifting
of gears. Shifting to a lower gear reduces the load on the brakes and hence the
wear of the brakes » page 124.
Starting-off and driving
First read and observe the introductory information and safety warn-
ings
on page 126.
Starting off
›
Start the engine.
›
Firmly depress and hold the brake pedal.
›
Press the lock button in the direction of
1
» Fig. 110 on page 127 and hold.
›
Move the selector lever into the desired position » page 127
and then release
the lock button.
›
Release the brake pedal and accelerate.
Stop
›
Depress the brake pedal and bring the vehicle to a stop.
›
Keep holding the brake pedal until driving is resumed.
The selector lever position N does not have to be selected when stopping for a
short time, such as at a cross roads.
Parking›Depress the brake pedal and bring the vehicle to a stop.›
Firmly apply the handbrake.
›
Press the lock button in the direction of
1
» Fig. 110 on page 127 and hold.
›
Move the selector lever into the position P and then release the lock button.
Kickdown
The kickdown function allows you to achieve the maximum acceleration of your
vehicle while driving.
When the accelerator pedal is fully depressed, the kickdown function is activated
in any forward driving mode.
The gearbox shifts down one or more gears depending on the vehicle speed and engine speed, and the vehicle accelerates.
The gearbox does not shift up into the highest gear until the engine has reached
its maximum revolutions for this gear range.
WARNINGRapid acceleration, particularly on slippery roads, can lead to loss of control of
the vehicle – risk of accident!
Malfunction
First read and observe the introductory information and safety warn-
ings
on page 126.
Emergency programme
The transmission switches to the emergency programme, if there is a fault in the automatic gearbox system.
Indications of an activated emergency programme include the following.
› Only certain gears are selected.
› The reverse gear
R cannot be used.
› Shifting gears in Tiptronic mode is not possible.
Gearbox overheating
The gearbox may become too hot due to frequent repeated starting or stop-and-
go traffic, for example. Overheating is indicated by the warning light » page 14,
Clutches of the automatic gearbox are too hot .
128Driving