wiper blades SKODA YETI 2013 1.G / 5L Owner's Manual
[x] Cancel search | Manufacturer: SKODA, Model Year: 2013, Model line: YETI, Model: SKODA YETI 2013 1.G / 5LPages: 266, PDF Size: 26.71 MB
Page 7 of 266
Taking care of your vehicle exterior189Taking care of the interior192
Inspecting and replenishing
196
Fuel
196
Engine compartment
199
Engine oil
202
Coolant
204
Brake fluid
206
Vehicle battery
207
Wheels
212
Tyres and wheel rims
212
Winter operation
217
Do-it-yourself
Emergency equipment and self-help
219
Emergency equipment
219
Changing a wheel
221
Tyre repair
224
Jump-starting
226
Towing the vehicle
228
Remote control and removable light
230
Emergency unlocking/locking
232
Emergency operation of the sliding/tilting roof
234
Replacing windscreen wiper blades
234
Fuses and light bulbs
236
Fuses
236
Bulbs
238
Technical data
Technical data
244
Vehicle data
244
Index
4Table of Contents
Page 59 of 266
WARNINGThe sun visors must not be swivelled towards the side windows in the deploy-
ment area of the head airbags if any objects, such as ball-point pens, etc. are attached to them. This might result in injuries to the occupants if the head air-
bag is deployed.
Windscreen wipers and washers
Introduction
This chapter contains information on the following subjects:
Windscreen wipers and washers
57
Alternative park position of the rear window wiper
58
Headlight cleaning system
58
The windscreen wipers and the wash system only operate if the ignition is
switched on and the bonnet is closed 1)
.
If the intermittent wipe is switched on, the intervals are also controlled depend-
ing on speed.
When automatic wiping in rain is active, the wiper intervals are regulated based
on the intensity of the rain.
The rear window is wiped once automatically if the windscreen wipers are on
when reverse gear is selected.
Top up with windscreen wiper fluid » page 206.
WARNING■
Properly maintained windscreen wiper blades are essential for clear visibility
and safe driving » page 235.■
Replace the windscreen wiper blades once or twice a year for safety rea-
sons. These can be purchased from a ŠKODA Partner.
WARNING (Continued)■ Do not use the windscreen washer system at low temperatures, without
heating the windscreen beforehand. Otherwise the window cleaner could
freeze on the windscreen and restrict the view to the front.■
Automatic wiping in rain only operates as a support. The driver is not re-
leased from the responsibility to set the function of the windscreen wipers
manually depending on the visibility conditions.
CAUTION
■ If the ignition is switched off while the windscreen wipers are switched on, the
windscreen wipers will continue wiping in the same mode after the ignition is
turned back on. The windscreen wipers could freeze up in cold temperatures be-
tween the time the ignition was turned off and when it was turned back on again.■
In cold temperatures and during the winter, check before the journey or before
switching on the ignition that the wiper blades are not frozen to the windscreen.
If the windscreen wipers are switched on when the blades are frozen to the windscreen, this may damage both the blades and windscreen wiper motor!
■
Carefully peel frozen wiper blades off the pane.
■
Remove snow and ice from the windscreen wipers before driving.
■
Do not switch on the ignition if the front wiper arms are retracted. The wiper
blades would move back into their rest position and while doing so damage the
paintwork of the bonnet.
■
If there is an obstacle on the windscreen, the wiper will try to push away the
obstacle. The wiper stops automatically after 5 attempts to eliminate the obsta- cle, in order to avoid a damage to the wiper. Remove the the obstacle and switch
the wiper on again.
Note
■ Each time the ignition switches off for the third time, the position of the wind-
screen wipers changes. This counteracts an early fatigue of the wiper rubbers.■
The rear window wiper only operates if the boot lid is closed.
■
The wiper blades should be cleaned on a regular basis with a windscreen clean-
er to avoid any smears. The wiper blades should be cleaned with a sponge or
cloth if they are heavily soiled by insect residues, for example.
1)
On vehicles which do not have a contact switch for the bonnet, the windshield wiper and wash sys-
tem operates also when the bonnet is opened.
56Using the system
Page 60 of 266
■Keep the wiper blades clean. They may become soiled, e.g., with wax residues
after washing in automatic car wash systems » page 188.■
The windscreen washer nozzles for the windscreen are heated when the en-
gine is running and the outside temperature is less than approx. +10 °C.
Windscreen wipers and washers
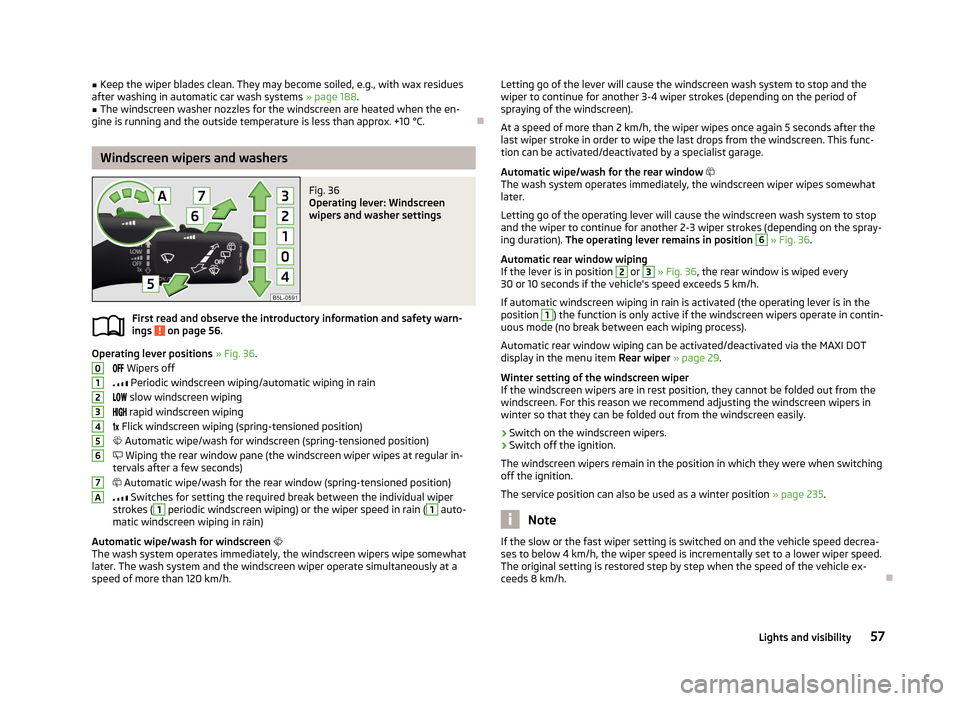
Fig. 36
Operating lever: Windscreen
wipers and washer settings
First read and observe the introductory information and safety warn-
ings on page 56.
Operating lever positions » Fig. 36 .
Wipers off
Periodic windscreen wiping/automatic wiping in rain
slow windscreen wiping
rapid windscreen wiping
Flick windscreen wiping (spring-tensioned position)
Automatic wipe/wash for windscreen (spring-tensioned position)
Wiping the rear window pane (the windscreen wiper wipes at regular in-
tervals after a few seconds)
Automatic wipe/wash for the rear window (spring-tensioned position)
Switches for setting the required break between the individual wiper
strokes (
1
periodic windscreen wiping) or the wiper speed in rain (
1
auto-
matic windscreen wiping in rain)
Automatic wipe/wash for windscreen
The wash system operates immediately, the windscreen wipers wipe somewhat later. The wash system and the windscreen wiper operate simultaneously at a
speed of more than 120 km/h.
01234567ALetting go of the lever will cause the windscreen wash system to stop and the
wiper to continue for another 3-4 wiper strokes (depending on the period of
spraying of the windscreen).
At a speed of more than 2 km/h, the wiper wipes once again 5 seconds after the
last wiper stroke in order to wipe the last drops from the windscreen. This func-
tion can be activated/deactivated by a specialist garage.
Automatic wipe/wash for the rear window
The wash system operates immediately, the windscreen wiper wipes somewhat
later.
Letting go of the operating lever will cause the windscreen wash system to stop and the wiper to continue for another 2-3 wiper strokes (depending on the spray-
ing duration). The operating lever remains in position 6
» Fig. 36 .
Automatic rear window wiping
If the lever is in position
2
or
3
» Fig. 36 , the rear window is wiped every
30 or 10 seconds if the vehicle's speed exceeds 5 km/h.
If automatic windscreen wiping in rain is activated (the operating lever is in the
position
1
) the function is only active if the windscreen wipers operate in contin-
uous mode (no break between each wiping process).
Automatic rear window wiping can be activated/deactivated via the MAXI DOT
display in the menu item Rear wiper » page 29 .
Winter setting of the windscreen wiper If the windscreen wipers are in rest position, they cannot be folded out from thewindscreen. For this reason we recommend adjusting the windscreen wipers in
winter so that they can be folded out from the windscreen easily.
› Switch on the windscreen wipers.
› Switch off the ignition.
The windscreen wipers remain in the position in which they were when switching
off the ignition.
The service position can also be used as a winter position » page 235.
Note
If the slow or the fast wiper setting is switched on and the vehicle speed decrea-
ses to below 4 km/h, the wiper speed is incrementally set to a lower wiper speed.
The original setting is restored step by step when the speed of the vehicle ex-
ceeds 8 km/h.
57Lights and visibility
Page 189 of 266
ŠKODA Genuine AccessoriesFirst read and observe the introductory information and safety warn-ings
on page 184.
If you wish to fit accessories to your vehicle, you should remember the following:
We recommend that you use ŠKODA Genuine Accessories in your vehicle. ŠKODA
AUTO a.s. has selected these accessories to ensure that they are reliable, safe
and suitable for your particular vehicle. Although we constantly monitor the mar- ket, we are not able to assess or vouch for other products even though in some
instances such parts may have operational approval or may have been approved
by a nationally recognised testing laboratory.
All accessory products are subjected to a challenging process in the areas of tech-
nical development (technical testing) and quality inspection (customer testing), and the product only becomes a ŠKODA Genuine Accessory if all tests are passed.
Our ŠKODA Genuine Accessories service also includes expert advice and profes-
sional fitting if required by the customer.
ŠKODA Service Partners are liable for any defects of ŠKODA Genuine Accessories
for a period of 2 years after installation or delivery in accordance with the materi-
als defect liability, unless agreed otherwise in the purchase agreement or any
other agreements. You should keep the approved warranty certificate and the in-
voices for these accessories for this period of time, so that the commencement of
the term can be verified.
ŠKODA Service Partners also stock a range of suitable car care products and all
parts that are subject to natural wear-and-tear, such as tyres, batteries, bulbs
and wiper blades.
Note
The accessories authorized by the company ŠKODA AUTO a.s. will be offered by
the ŠKODA Partners in all countries where the company ŠKODA AUTO a.s. has a
sales and after-sales service network. This will usually be in the form of a printed
catalogue of ŠKODA Genuine Accessories, in the form of separate printed bro-
chures or in the form of ŠKODA Genuine Accessories on the ŠKODA Partner web-
sites.
Spoiler
First read and observe the introductory information and safety warn-ings
on page 184.
If your new vehicle is fitted with a spoiler on the front bumper in combination
with the spoiler on the luggage compartment lid, the following instructions must
be adhered to.
› For safety reasons, the vehicle must only be fitted with a spoiler on the front
bumper in combination with the associated spoiler on the luggage compart-
ment lid.
› This kind of spoiler cannot be left on the front bumper either on its own, in
combination with another spoiler not on the luggage compartment lid or in combination with an unsuitable spoiler on the luggage compartment lid.
› We recommend that you consult the ŠKODA Service Partner for any repairs to or
replacement, addition or removal of spoilers.
WARNINGIf work on your vehicle's spoilers is not carried out properly, this can lead to
operational faults - risk of accident and serious injuries.
Airbags
First read and observe the introductory information and safety warn-
ings
on page 184.
The system components of the airbag system can be situated in the front bump-
er, doors, front seats, roof lining or body.
WARNINGAny work on the airbag system including the installation and removal of sys-
tem components due to other repair work (e.g. removal of the steering wheel) must only be carried out by a specialist garage.■
Modifications, repairs and technical alterations that have been carried out
unprofessionally can cause damage and operational faults, and can also seri-
ously impair the effectiveness of the airbag system – risk of accident and fatal
injury!
■
The airbag system will then have to be replaced if the airbag is deployed.
Airbag modules cannot be repaired.
186General Maintenance
Page 237 of 266
Emergency operation of the sliding/tilting roof
Introduction
This chapter contains information on the following subjects:
Operation
234
Activation after unclamping and re-clamping the battery
234
Operation
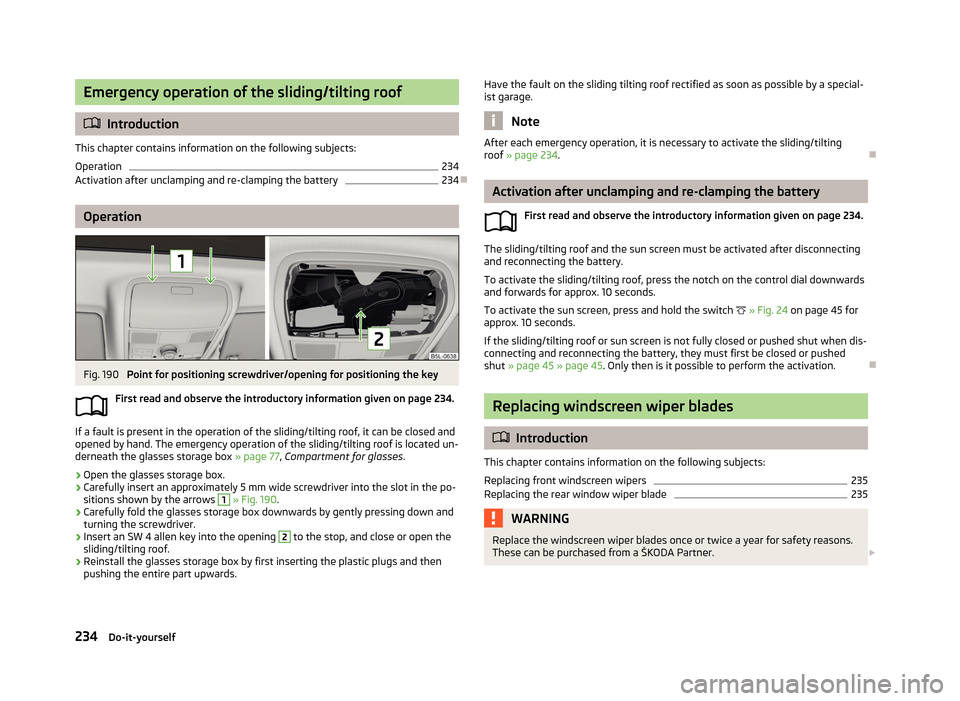
Fig. 190
Point for positioning screwdriver/opening for positioning the key
First read and observe the introductory information given on page 234.
If a fault is present in the operation of the sliding/tilting roof, it can be closed and
opened by hand. The emergency operation of the sliding/tilting roof is located un-
derneath the glasses storage box » page 77, Compartment for glasses .
›
Open the glasses storage box.
›
Carefully insert an approximately 5 mm wide screwdriver into the slot in the po-
sitions shown by the arrows
1
» Fig. 190 .
›
Carefully fold the glasses storage box downwards by gently pressing down and
turning the screwdriver.
›
Insert an SW 4 allen key into the opening
2
to the stop, and close or open the
sliding/tilting roof.
›
Reinstall the glasses storage box by first inserting the plastic plugs and then pushing the entire part upwards.
Have the fault on the sliding tilting roof rectified as soon as possible by a special-
ist garage.
Note
After each emergency operation, it is necessary to activate the sliding/tilting
roof » page 234 .
Activation after unclamping and re-clamping the battery
First read and observe the introductory information given on page 234.
The sliding/tilting roof and the sun screen must be activated after disconnecting
and reconnecting the battery.
To activate the sliding/tilting roof, press the notch on the control dial downwards and forwards for approx. 10 seconds.
To activate the sun screen, press and hold the switch
» Fig. 24 on page 45 for
approx. 10 seconds.
If the sliding/tilting roof or sun screen is not fully closed or pushed shut when dis- connecting and reconnecting the battery, they must first be closed or pushed
shut » page 45 » page 45 . Only then is it possible to perform the activation.
Replacing windscreen wiper blades
Introduction
This chapter contains information on the following subjects:
Replacing front windscreen wipers
235
Replacing the rear window wiper blade
235WARNINGReplace the windscreen wiper blades once or twice a year for safety reasons.
These can be purchased from a ŠKODA Partner. 234Do-it-yourself
Page 238 of 266
CAUTIONIf the windscreen wipers are handled carelessly, there is a risk of damage to the
windscreen.
Replacing front windscreen wipers
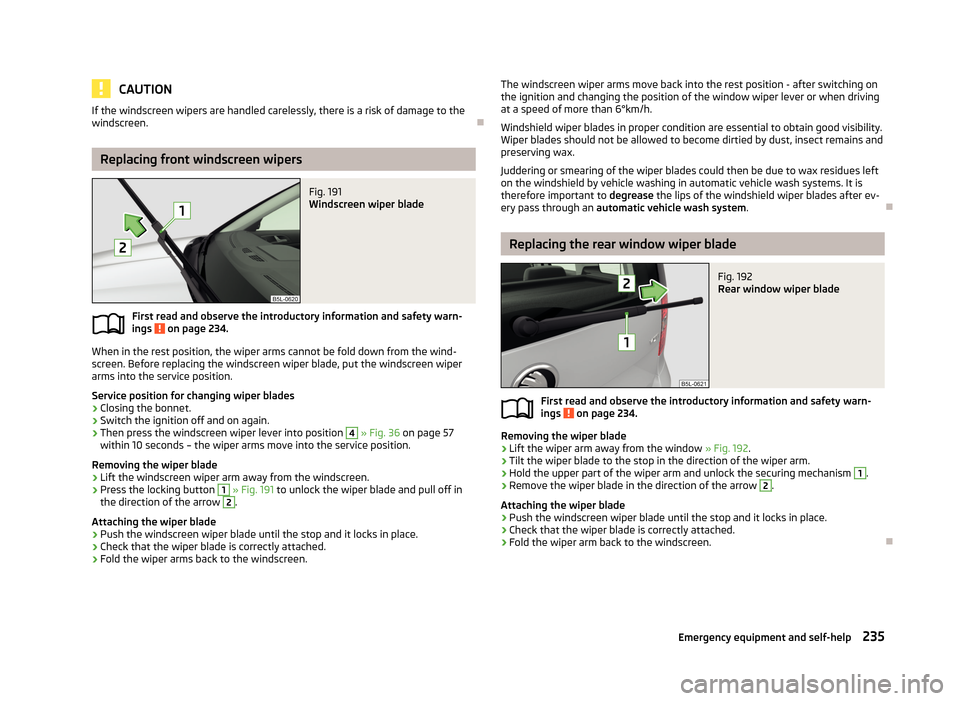
Fig. 191
Windscreen wiper blade
First read and observe the introductory information and safety warn-
ings on page 234.
When in the rest position, the wiper arms cannot be fold down from the wind- screen. Before replacing the windscreen wiper blade, put the windscreen wiper
arms into the service position.
Service position for changing wiper blades
›
Closing the bonnet.
›
Switch the ignition off and on again.
›
Then press the windscreen wiper lever into position
4
» Fig. 36 on page 57
within 10 seconds – the wiper arms move into the service position.
Removing the wiper blade
›
Lift the windscreen wiper arm away from the windscreen.
›
Press the locking button
1
» Fig. 191 to unlock the wiper blade and pull off in
the direction of the arrow
2
.
Attaching the wiper blade
›
Push the windscreen wiper blade until the stop and it locks in place.
›
Check that the wiper blade is correctly attached.
›
Fold the wiper arms back to the windscreen.
The windscreen wiper arms move back into the rest position - after switching on
the ignition and changing the position of the window wiper lever or when driving
at a speed of more than 6°km/h.
Windshield wiper blades in proper condition are essential to obtain good visibility.
Wiper blades should not be allowed to become dirtied by dust, insect remains and
preserving wax.
Juddering or smearing of the wiper blades could then be due to wax residues left
on the windshield by vehicle washing in automatic vehicle wash systems. It is
therefore important to degrease the lips of the windshield wiper blades after ev-
ery pass through an automatic vehicle wash system .
Replacing the rear window wiper blade
Fig. 192
Rear window wiper blade
First read and observe the introductory information and safety warn-
ings on page 234.
Removing the wiper blade
›
Lift the wiper arm away from the window » Fig. 192.
›
Tilt the wiper blade to the stop in the direction of the wiper arm.
›
Hold the upper part of the wiper arm and unlock the securing mechanism
1
.
›
Remove the wiper blade in the direction of the arrow
2
.
Attaching the wiper blade
›
Push the windscreen wiper blade until the stop and it locks in place.
›
Check that the wiper blade is correctly attached.
›
Fold the wiper arm back to the windscreen.
235Emergency equipment and self-help
Page 260 of 266
Practical features70
Compartment for glasses77
Folding table in the middle seat backrest80
Folding table on front seat backrest80
Storage compartment in the front central con- sole
72
Storage compartments in the doors72
Storage net in the front centre console77
Waste container76
Practical Features Storage compartment on the dashboard
71
R
Radiator fan
201
Radio reception See windows
191
Radio remote control Auxiliary heating
99
Raise vehicle223
Rear-view mirror Exterior mirrors
59
Fold in passenger mirror60
Rear-view mirrors Synchronous adjustment of the rear-view mirrors 59
Rear fog light
51
Warning light19
Rear head restraints in the centre
67
Rear interior light54
Rear mirror58
Interior mirror59
rear seats in the longitudinal direction
68
Rear seats67
Setting the tilt of the seat backrests68
Rear window - heater55
Recirculation93
Refuelling196
Fuel196
Remote control Locking34
Replacing the battery231
Synchronisation process34
Unlocking34
Remote control key Replacing the battery
231
Removable light Removing light
87
replace batteries of the lights232
Removable ski bag81
Removing the variable loading floor
88
Repairs and technical alterations184
Replace the battery in the auxiliary heating (auxiliary
heating) in the remote control
231
replace - batteries of the lights232
Replacing bulb for fog lights
241
Bulb for the licence plate light242
Bulb in rear light243
Fuses236
Fuses in the dash panel236
Fuses in the engine compartment237
Vehicle battery210
windscreen wiper blades235
Replacing windscreen wiper blades234
Replenishing Coolant
206
Engine oil204
Windscreen washer fluid201
reversing assistant orientation lines and monitored area
142
Revolutions counter11
Roof rack system90
Roof load90
Running-in the first 1500 km
129
Running inBrake pads130
Engine129
Tyres129
S
SAFE See Safe securing system
35
SAFELOCK See Safe securing system
35
Safe securing system35
Safety160
Child safety177
Child safety seats177
Correct seated position161
Head restraints66
ISOFIX180
TOP TETHER181
Safety belts rear middle seat
167
Saving electrical energy130
Seals Taking care of your vehicle
190
Seat belt warning light
15
Seat belts164
Belt tensioners168
Cleaning195
fastening and unfastening166
Height adjustment167
Seatbelts Inertia reels
167
Seat belts The physical principle of a head-on collision
165
Seat functions64
Seats Electric adjustment
62
Folding front passenger seat66
Front armrest65
Head restraints66
257Index