heating SKODA YETI 2015 1.G / 5L Owner's Manual
[x] Cancel search | Manufacturer: SKODA, Model Year: 2015, Model line: YETI, Model: SKODA YETI 2015 1.G / 5LPages: 232, PDF Size: 30.84 MB
Page 4 of 232
Table of Contents
Board literature4
Notes
5
Structure and more information about the
Owner's Manual
6
Abbreviations
Safety
Passive Safety
8
General information
8
Correct and safe seated position
8
Seat belts
11
Using seat belts
11
Inertia reels and belt tensioners
14
Airbag system
15
Description of the airbag system
15
Airbag overview
16
Deactivating airbags
19
Transporting children safely
21
Child seat
21
Fastening systems
23
Using the system
Cockpit
27
Overview
26
Instruments and Indicator Lights
28
Instrument cluster
28
Warning lights
32
Information system
39
Driver information system
39
Multifunction display (MFD)
41
MAXI DOT display
43Service interval display48SmartGate49
Unlocking and opening
52
Unlocking and locking
52
Anti-theft alarm system
56
Luggage compartment lid
57
Window operations
58
Panorama sliding/tilting roof
61
Lights and visibility
64
Lights
64
Interior lights
69
Visibility
70
Windscreen wipers and washers
71
Rear mirror
73
Seats and head restraints
75
Front seat
75
Front seat functions
78
Head restraints
79
Rear seats
80
Transporting and practical equipment
83
Useful equipment
83
Multimedia holder
95
Luggage compartment and transport of
cargo
96
Variable loading floor in the luggage
compartment (Estate)
102
Roof rack
103
Heating and ventilation
104
Heating, manual air conditioning system,
Climatronic
104
Auxiliary heating (auxiliary heating and
ventilation)
109Driving
Starting-off and Driving113
Starting and stopping the engine using the
key
113
Starting and stopping the engine at the push
of the button
115
START-STOPsystem
117
Brakes and parking
119
Manual gear changing and pedals
121
Automatic transmission
122
Running-in and economical driving
124
Avoiding damage to your vehicle
125
Assist systems
127
General information
127
Braking and stabilisation systems
127
OFF ROAD-mode
129
Parking assistance (ParkPilot)
131
Rear View Camera
133
Park Assist
135
Speed control system
138
Fatigue detection
139
Tyre pressure monitoring
140
Hitch and trailer
141
Hitch
141
Trailer
146
General Maintenance
Care and maintenance
149
Service work, adjustments and technical
alterations
149
Washing vehicle
152
Cleaning vehicle exterior
153
Interior care
1572Table of Contents
Page 29 of 232
Using the system
Cockpit
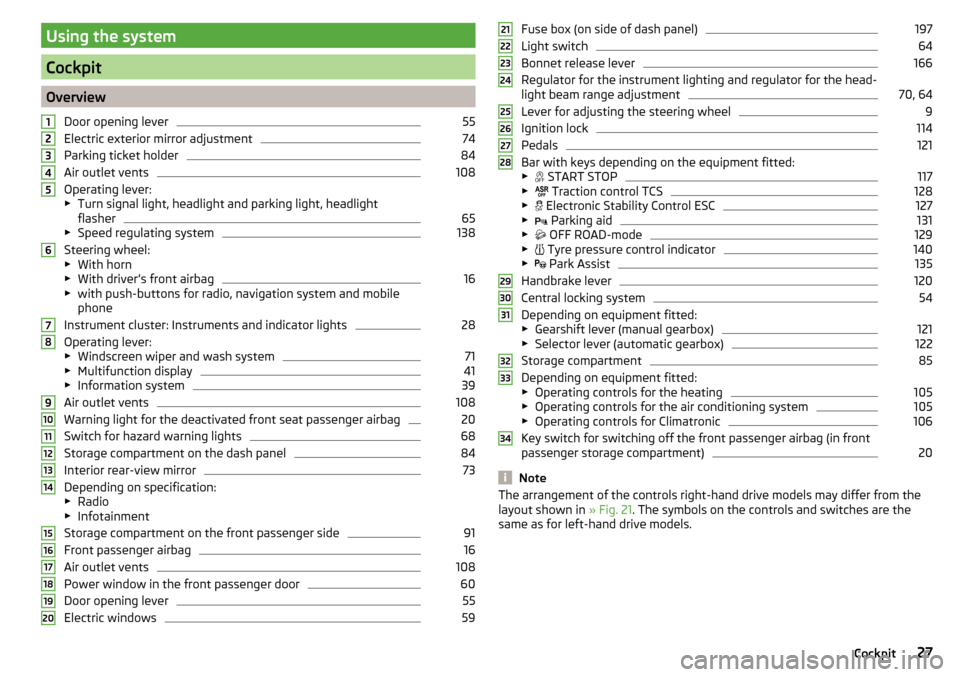
OverviewDoor opening lever
55
Electric exterior mirror adjustment
74
Parking ticket holder
84
Air outlet vents
108
Operating lever:
▶ Turn signal light, headlight and parking light, headlight
flasher
65
▶ Speed regulating system
138
Steering wheel:
▶ With horn
▶ With driver’s front airbag
16
▶with push-buttons for radio, navigation system and mobile
phone
Instrument cluster: Instruments and indicator lights
28
Operating lever:
▶ Windscreen wiper and wash system
71
▶Multifunction display
41
▶Information system
39
Air outlet vents
108
Warning light for the deactivated front seat passenger airbag
20
Switch for hazard warning lights
68
Storage compartment on the dash panel
84
Interior rear-view mirror
73
Depending on specification:
▶ Radio
▶ Infotainment
Storage compartment on the front passenger side
91
Front passenger airbag
16
Air outlet vents
108
Power window in the front passenger door
60
Door opening lever
55
Electric windows
591234567891011121314151617181920Fuse box (on side of dash panel)197
Light switch
64
Bonnet release lever
166
Regulator for the instrument lighting and regulator for the head-
light beam range adjustment
70, 64
Lever for adjusting the steering wheel
9
Ignition lock
114
Pedals
121
Bar with keys depending on the equipment fitted:
▶ START STOP
117
▶
Traction control TCS
128
▶
Electronic Stability Control ESC
127
▶
Parking aid
131
▶
OFF ROAD-mode
129
▶
Tyre pressure control indicator
140
▶
Park Assist
135
Handbrake lever
120
Central locking system
54
Depending on equipment fitted:
▶ Gearshift lever (manual gearbox)
121
▶Selector lever (automatic gearbox)
122
Storage compartment
85
Depending on equipment fitted:
▶ Operating controls for the heating
105
▶Operating controls for the air conditioning system
105
▶Operating controls for Climatronic
106
Key switch for switching off the front passenger airbag (in front
passenger storage compartment)
20
Note
The arrangement of the controls right-hand drive models may differ from the
layout shown in » Fig. 21. The symbols on the controls and switches are the
same as for left-hand drive models.212223242526272829303132333427Cockpit
Page 31 of 232
Revolutions counterRead and observe
on page 28 first.
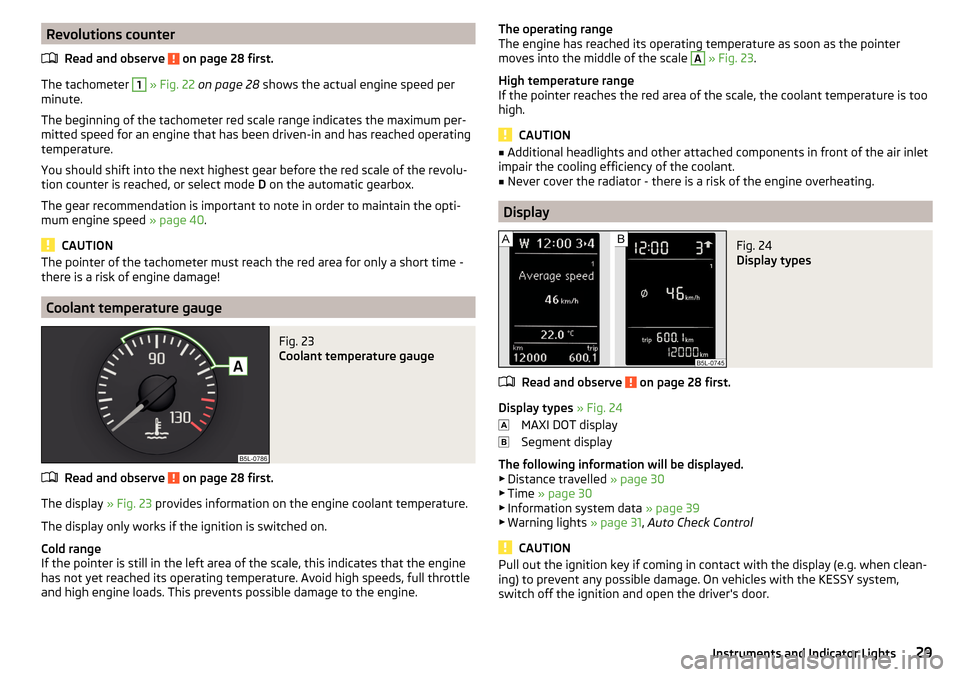
The tachometer
1
» Fig. 22 on page 28 shows the actual engine speed per
minute.
The beginning of the tachometer red scale range indicates the maximum per-
mitted speed for an engine that has been driven-in and has reached operating
temperature.
You should shift into the next highest gear before the red scale of the revolu-
tion counter is reached, or select mode D on the automatic gearbox.
The gear recommendation is important to note in order to maintain the opti-
mum engine speed » page 40.
CAUTION
The pointer of the tachometer must reach the red area for only a short time -
there is a risk of engine damage!
Coolant temperature gauge
Fig. 23
Coolant temperature gauge
Read and observe on page 28 first.
The display » Fig. 23 provides information on the engine coolant temperature.
The display only works if the ignition is switched on.
Cold range
If the pointer is still in the left area of the scale, this indicates that the engine
has not yet reached its operating temperature. Avoid high speeds, full throttle
and high engine loads. This prevents possible damage to the engine.
The operating range
The engine has reached its operating temperature as soon as the pointer
moves into the middle of the scale A
» Fig. 23 .
High temperature range
If the pointer reaches the red area of the scale, the coolant temperature is too
high.
CAUTION
■ Additional headlights and other attached components in front of the air inlet
impair the cooling efficiency of the coolant.■
Never cover the radiator - there is a risk of the engine overheating.
Display
Fig. 24
Display types
Read and observe on page 28 first.
Display types » Fig. 24
MAXI DOT display
Segment display
The following information will be displayed.
▶ Distance travelled » page 30
▶ Time » page 30
▶ Information system data » page 39
▶ Warning lights » page 31, Auto Check Control
CAUTION
Pull out the ignition key if coming in contact with the display (e.g. when clean-
ing) to prevent any possible damage. On vehicles with the KESSY system,
switch off the ignition and open the driver's door.29Instruments and Indicator Lights
Page 46 of 232
Menu itemPhone46Menu item
Assistants46
Menu item
Settings47
Compass point display
48
The MAXI DOT display provides you with information about the current operat-
ing state of your vehicle. In addition, it provides information, depending on ve-
hicle equipment, about the radio, multi-function display (MFA), telephone and
Infotainment. Furthermore, it allows the adjustment of some other features of
your vehicle.
WARNINGConcentrate fully at all times on your driving! As the driver, you are fully re-
sponsible for the operation of your vehicle.
Main menu
Read and observe
on page 44 first.
Call up the main menu
›
Press and hold the button
A
on the operating lever » Fig. 30 on page 44 .
or
›
Press and hold the button
H
on the multi-function steering wheel » Fig. 31
on page 45 .
Main menu items (depending on vehicle equipment) ■
MFD
(Multifunction display) » page 41
■
Audio
» page 46
■
Navigation
» page 45
■
Phone
» page 46 ;
■
Aux. heating
» page 109
■
Assistants
» page 46
■
Vehicle status
» page 31
■
Settings
» page 47
The
Audio
and
Navigation
menu items are only displayed when the factory Info-
tainment (or radio) is switched on.
The menus of the MAXI DOT display can be operated using the buttons on the
control lever » page 44 or on the multi-function steering wheel » page 45.
Switching the function with “Checkbox” in the menu on/off
▶ - Function is switched on
▶ - Function is switched off
Note
■
If warning messages are displayed, these messages must be verified to ac-
cess the main menu.■
If the display is not activated at that moment, the menu always shifts to one
of the higher levels after approx. 10 seconds.
■
The operation of the factory-installed Infotainment (or radio) » Owner´s
Manual Infotainment or » Owner´s Manual Radio .
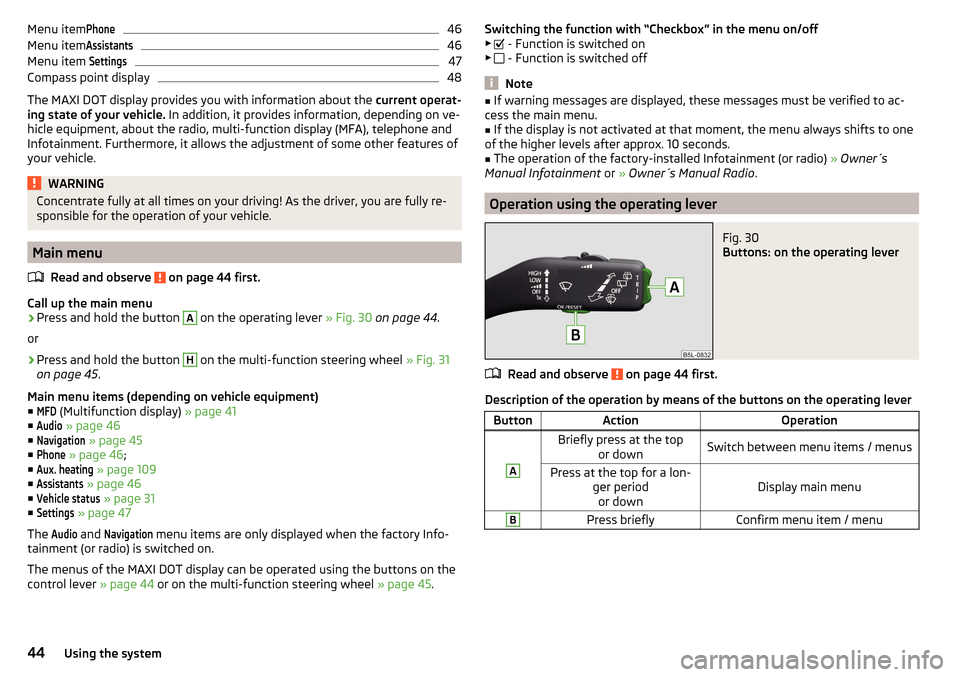
Operation using the operating lever
Fig. 30
Buttons: on the operating lever
Read and observe on page 44 first.
Description of the operation by means of the buttons on the operating lever
ButtonActionOperationABriefly press at the top
or downSwitch between menu items / menusPress at the top for a lon- ger periodor downDisplay main menu
BPress brieflyConfirm menu item / menu44Using the system
Page 61 of 232
NoteWhen driving always use the existing heating, air conditioning and ventilation
system for ventilating the interior of the vehicle. If the windows are opened,
dust as well as other dirt can get into the vehicle and in addition the wind
noise is more at certain speeds.
Mechanical window lefter
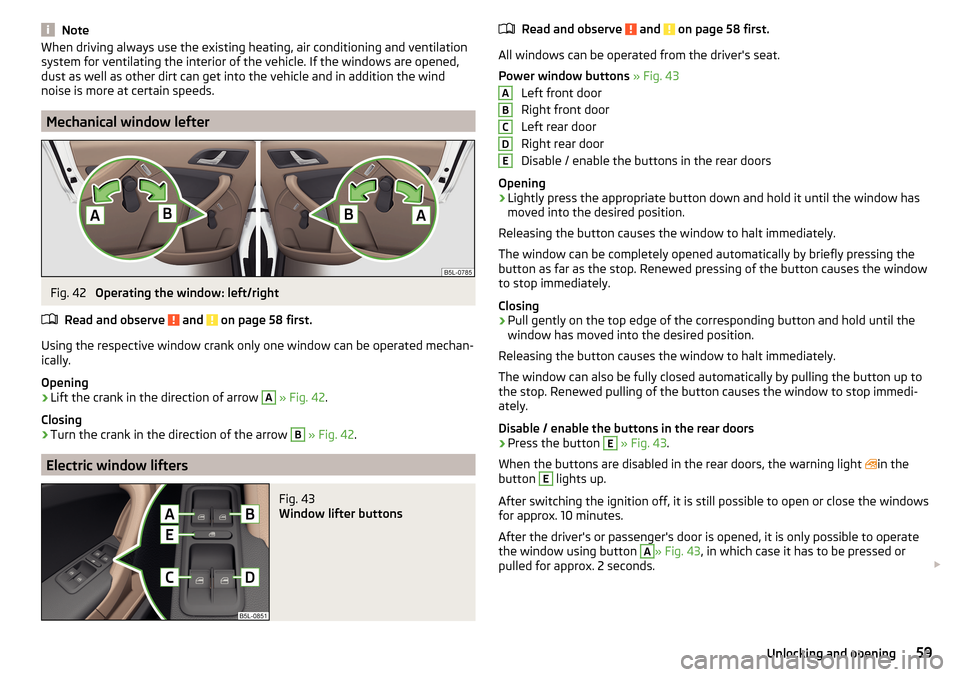
Fig. 42
Operating the window: left/right
Read and observe
and on page 58 first.
Using the respective window crank only one window can be operated mechan-
ically.
Opening
›
Lift the crank in the direction of arrow
A
» Fig. 42 .
Closing
›
Turn the crank in the direction of the arrow
B
» Fig. 42 .
Electric window lifters
Fig. 43
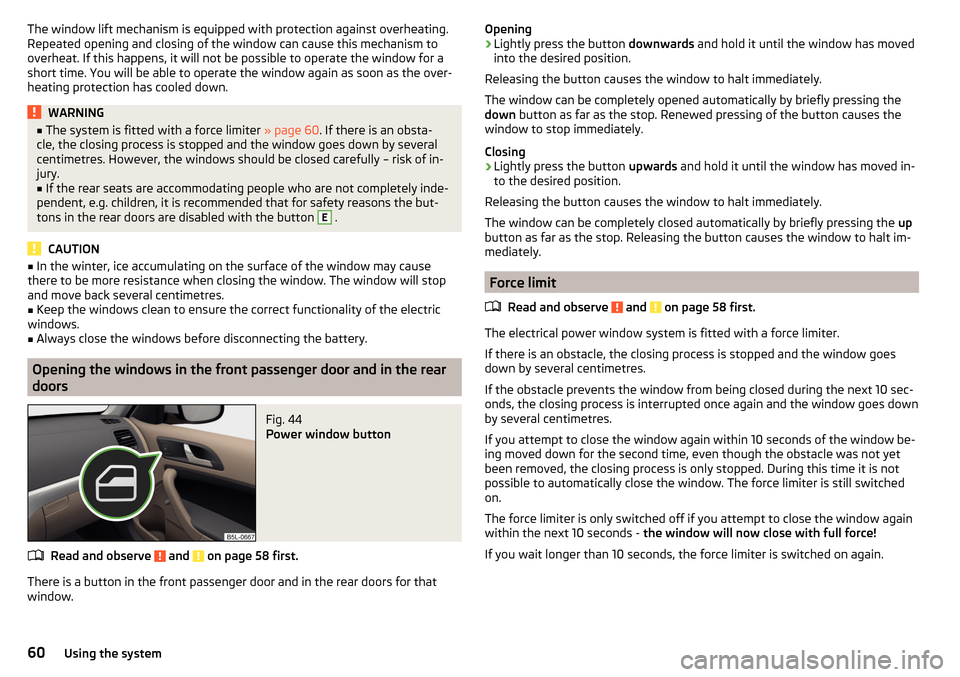
Window lifter buttons
Read and observe and on page 58 first.
All windows can be operated from the driver's seat.
Power window buttons » Fig. 43
Left front door
Right front door
Left rear door
Right rear door
Disable / enable the buttons in the rear doors
Opening
›
Lightly press the appropriate button down and hold it until the window has
moved into the desired position.
Releasing the button causes the window to halt immediately.
The window can be completely opened automatically by briefly pressing the
button as far as the stop. Renewed pressing of the button causes the window
to stop immediately.
Closing
›
Pull gently on the top edge of the corresponding button and hold until the
window has moved into the desired position.
Releasing the button causes the window to halt immediately.
The window can also be fully closed automatically by pulling the button up to
the stop. Renewed pulling of the button causes the window to stop immedi-
ately.
Disable / enable the buttons in the rear doors
›
Press the button
E
» Fig. 43 .
When the buttons are disabled in the rear doors, the warning light in the
button
E
lights up.
After switching the ignition off, it is still possible to open or close the windows
for approx. 10 minutes.
After the driver's or passenger's door is opened, it is only possible to operate
the window using button
A
» Fig. 43 , in which case it has to be pressed or
pulled for approx. 2 seconds.
ABCDE59Unlocking and opening
Page 62 of 232
The window lift mechanism is equipped with protection against overheating.
Repeated opening and closing of the window can cause this mechanism to
overheat. If this happens, it will not be possible to operate the window for a
short time. You will be able to operate the window again as soon as the over-
heating protection has cooled down.WARNING■ The system is fitted with a force limiter » page 60. If there is an obsta-
cle, the closing process is stopped and the window goes down by several
centimetres. However, the windows should be closed carefully – risk of in-
jury.■
If the rear seats are accommodating people who are not completely inde-
pendent, e.g. children, it is recommended that for safety reasons the but-
tons in the rear doors are disabled with the button
E
.
CAUTION
■ In the winter, ice accumulating on the surface of the window may cause
there to be more resistance when closing the window. The window will stop
and move back several centimetres.■
Keep the windows clean to ensure the correct functionality of the electric
windows.
■
Always close the windows before disconnecting the battery.
Opening the windows in the front passenger door and in the rear
doors
Fig. 44
Power window button
Read and observe and on page 58 first.
There is a button in the front passenger door and in the rear doors for that
window.
Opening›Lightly press the button downwards and hold it until the window has moved
into the desired position.
Releasing the button causes the window to halt immediately.
The window can be completely opened automatically by briefly pressing the
down button as far as the stop. Renewed pressing of the button causes the
window to stop immediately.
Closing›
Lightly press the button upwards and hold it until the window has moved in-
to the desired position.
Releasing the button causes the window to halt immediately.
The window can be completely closed automatically by briefly pressing the up
button as far as the stop. Releasing the button causes the window to halt im-
mediately.
Force limit
Read and observe
and on page 58 first.
The electrical power window system is fitted with a force limiter.
If there is an obstacle, the closing process is stopped and the window goes
down by several centimetres.
If the obstacle prevents the window from being closed during the next 10 sec-
onds, the closing process is interrupted once again and the window goes down
by several centimetres.
If you attempt to close the window again within 10 seconds of the window be-
ing moved down for the second time, even though the obstacle was not yet
been removed, the closing process is only stopped. During this time it is not
possible to automatically close the window. The force limiter is still switched
on.
The force limiter is only switched off if you attempt to close the window again
within the next 10 seconds - the window will now close with full force!
If you wait longer than 10 seconds, the force limiter is switched on again.
60Using the system
Page 72 of 232
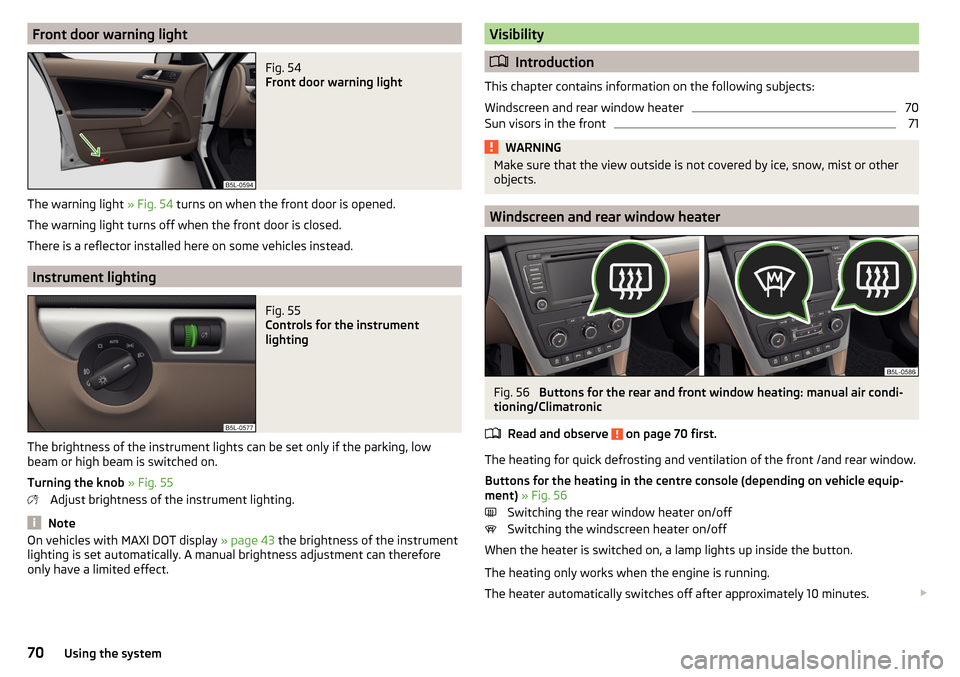
Front door warning lightFig. 54
Front door warning light
The warning light » Fig. 54 turns on when the front door is opened.
The warning light turns off when the front door is closed.
There is a reflector installed here on some vehicles instead.
Instrument lighting
Fig. 55
Controls for the instrument
lighting
The brightness of the instrument lights can be set only if the parking, low
beam or high beam is switched on.
Turning the knob » Fig. 55
Adjust brightness of the instrument lighting.
Note
On vehicles with MAXI DOT display » page 43 the brightness of the instrument
lighting is set automatically. A manual brightness adjustment can therefore
only have a limited effect.Visibility
Introduction
This chapter contains information on the following subjects:
Windscreen and rear window heater
70
Sun visors in the front
71WARNINGMake sure that the view outside is not covered by ice, snow, mist or other
objects.
Windscreen and rear window heater
Fig. 56
Buttons for the rear and front window heating: manual air condi-
tioning/Climatronic
Read and observe
on page 70 first.
The heating for quick defrosting and ventilation of the front /and rear window.Buttons for the heating in the centre console (depending on vehicle equip-
ment) » Fig. 56
Switching the rear window heater on/off Switching the windscreen heater on/off
When the heater is switched on, a lamp lights up inside the button.
The heating only works when the engine is running.
The heater automatically switches off after approximately 10 minutes.
70Using the system
Page 73 of 232
Note■If the on-board voltage decreases, the heating switches off automatically
» page 175 , Automatic load deactivation .■
If the light is flashing inside the button the heater is off due to low battery.
■
The position and shape of the switch may vary according to the equipment
fitted.
Sun visors in the front
Fig. 57
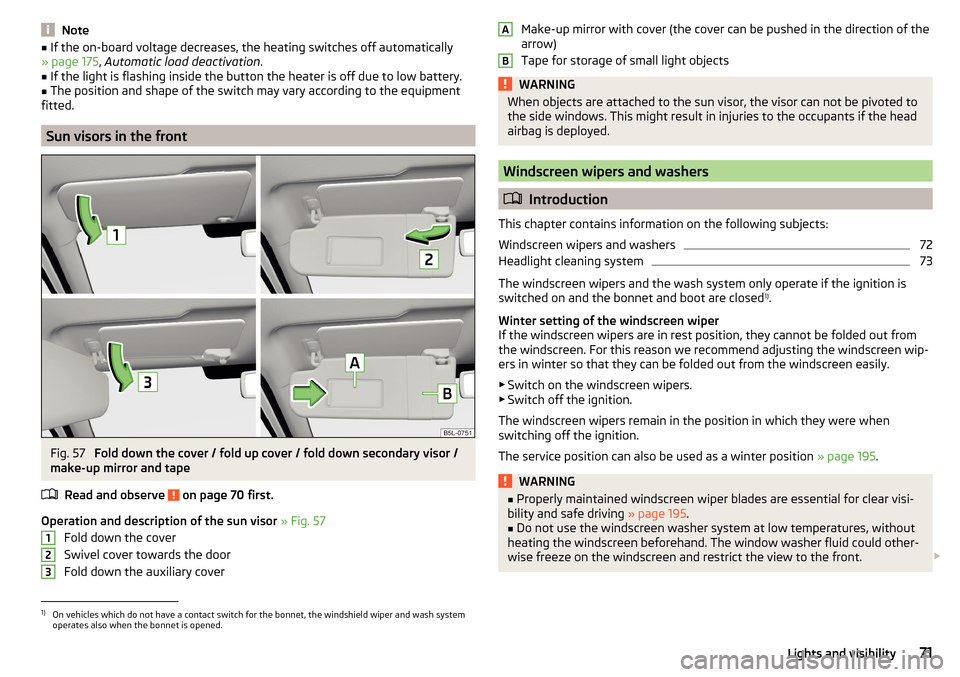
Fold down the cover / fold up cover / fold down secondary visor /
make-up mirror and tape
Read and observe
on page 70 first.
Operation and description of the sun visor » Fig. 57
Fold down the cover
Swivel cover towards the door
Fold down the auxiliary cover
123Make-up mirror with cover (the cover can be pushed in the direction of the
arrow)
Tape for storage of small light objectsWARNINGWhen objects are attached to the sun visor, the visor can not be pivoted to
the side windows. This might result in injuries to the occupants if the head
airbag is deployed.
Windscreen wipers and washers
Introduction
This chapter contains information on the following subjects:
Windscreen wipers and washers
72
Headlight cleaning system
73
The windscreen wipers and the wash system only operate if the ignition is
switched on and the bonnet and boot are closed 1)
.
Winter setting of the windscreen wiper
If the windscreen wipers are in rest position, they cannot be folded out from
the windscreen. For this reason we recommend adjusting the windscreen wip-
ers in winter so that they can be folded out from the windscreen easily.
▶ Switch on the windscreen wipers.
▶ Switch off the ignition.
The windscreen wipers remain in the position in which they were when
switching off the ignition.
The service position can also be used as a winter position » page 195.
WARNING■
Properly maintained windscreen wiper blades are essential for clear visi-
bility and safe driving » page 195.■
Do not use the windscreen washer system at low temperatures, without
heating the windscreen beforehand. The window washer fluid could other-
wise freeze on the windscreen and restrict the view to the front.
AB1)
On vehicles which do not have a contact switch for the bonnet, the windshield wiper and wash system
operates also when the bonnet is opened.
71Lights and visibility
Page 76 of 232
The mirror dimming is controlled by the light incident on the sensors on the
front and back of the mirror.
When the interior lights are switched on or the reverse gear is engaged, the
mirror moves back into the basic position (not dimmed).
Do not attach external devices (e.g. navigation systems) on to the windscreen or in the vicinity of the interior mirror »
.
WARNING■
The illuminated display of an external navigation device can lead to op-
erational faults to the automatic dimming interior mirror – risk of accident.■
Automatic mirror dimming only operates correctly if the light striking the
sensor is not affected by other objects.
Exterior mirrors
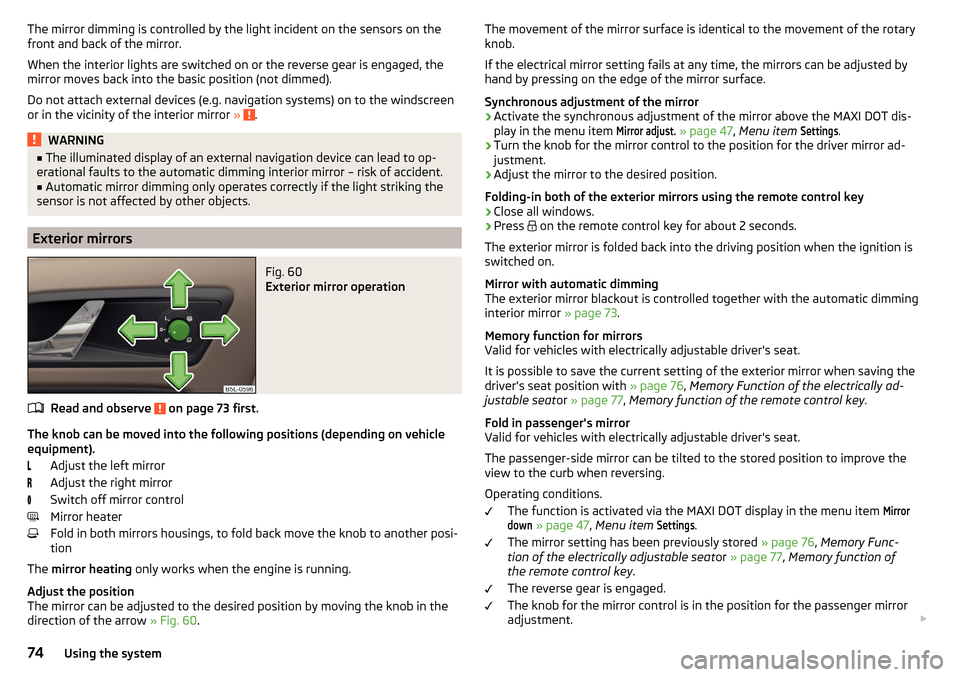
Fig. 60
Exterior mirror operation
Read and observe on page 73 first.
The knob can be moved into the following positions (depending on vehicle
equipment).
Adjust the left mirror
Adjust the right mirror
Switch off mirror control
Mirror heater
Fold in both mirrors housings, to fold back move the knob to another posi-
tion
The mirror heating only works when the engine is running.
Adjust the position
The mirror can be adjusted to the desired position by moving the knob in the direction of the arrow » Fig. 60.
The movement of the mirror surface is identical to the movement of the rotary
knob.
If the electrical mirror setting fails at any time, the mirrors can be adjusted by
hand by pressing on the edge of the mirror surface.
Synchronous adjustment of the mirror›
Activate the synchronous adjustment of the mirror above the MAXI DOT dis- play in the menu item
Mirror adjust.
» page 47 , Menu item
Settings
.
›
Turn the knob for the mirror control to the position for the driver mirror ad-
justment.
›
Adjust the mirror to the desired position.
Folding-in both of the exterior mirrors using the remote control key
›
Close all windows.
›
Press on the remote control key for about 2 seconds.
The exterior mirror is folded back into the driving position when the ignition is
switched on.
Mirror with automatic dimming
The exterior mirror blackout is controlled together with the automatic dimming
interior mirror » page 73.
Memory function for mirrors
Valid for vehicles with electrically adjustable driver's seat.
It is possible to save the current setting of the exterior mirror when saving the
driver's seat position with » page 76, Memory Function of the electrically ad-
justable seat or » page 77 , Memory function of the remote control key .
Fold in passenger's mirror
Valid for vehicles with electrically adjustable driver's seat.
The passenger-side mirror can be tilted to the stored position to improve the
view to the curb when reversing.
Operating conditions. The function is activated via the MAXI DOT display in the menu item
Mirrordown
» page 47 , Menu item
Settings
.
The mirror setting has been previously stored » page 76, Memory Func-
tion of the electrically adjustable seat or » page 77 , Memory function of
the remote control key .
The reverse gear is engaged.
The knob for the mirror control is in the position for the passenger mirror
adjustment.
74Using the system
Page 77 of 232
The mirror returns to its initial position after the rotary knob is put into anoth-
er position or if the speed is more than 15 km/h.WARNINGDo not touch the exterior mirror surfaces, if the exterior mirror heating is
switched on - hazard of burning.
CAUTION
■ Never adjust retractable exterior mirrors by hand - risk of damaging the
electric mirror actuator!■
When the mirror is swung by external influences (due to impact during ma-
noeuvring, for example), then first fold-in the mirror by turning the knob and
wait for a loud clapping noise.
Seats and head restraints
Front seat
Introduction
This chapter contains information on the following subjects:
Manually adjusting seats
76
Electrical adjustment
76
Memory Function of the electrically adjustable seat
76
Memory function of the remote control key
77WARNING■ Only adjust the driver's seat when the vehicle is stationary – risk of acci-
dent!■
Caution when adjusting the seat! You may suffer injuries or bruises as a
result of adjusting the seat without paying proper attention.
■
The electric front seat adjustment is functional even with the ignition off.
Therefore, when leaving the vehicle, never leave people who are not com-
pletely independent, such as children, unattended in the vehicle - there is a
danger of injury!
■
Do not carry any objects on the front passenger seat except objects de-
signed for this purpose (e.g. child seats) – risk of accident!
Note
■ After a certain time, play can develop within the adjustment mechanism of
the backrest angle.■
For safety reasons, it is not possible to store the seat position in the electric
seat memory and remote control key memory if the inclination angle of the
seat backrest is more than 102° in relation to the seat cushion.
■
Each time you store the position of the electrically adjustable driver's seat
and exterior mirrors, the existing setting is deleted.
75Seats and head restraints