infotainment SKODA YETI 2015 1.G / 5L Owner's Manual
[x] Cancel search | Manufacturer: SKODA, Model Year: 2015, Model line: YETI, Model: SKODA YETI 2015 1.G / 5LPages: 232, PDF Size: 30.84 MB
Page 3 of 232
Preface
You have opted for a ŠKODA – our sincere thanks for your confidence in us.
This manual contains instructions about the vehicle operation, important information about safety,
vehicle care, maintenance and self-help and technical vehicle data.
Please do not read just this Owner's Manual, but also read the Infotainment manual carefully. The pro-
cedure in accordance with the two instructions is a prerequisite for the correct use of the vehicle.
When using the vehicle, the general binding country-specific legal requirements (e.g. transporting
children, deactivating the airbag, tyre use, road traffic, etc.) must always be observed.
We hope you enjoy driving your ŠKODA, and wish you a pleasant journey at all times.
Your ŠKODA AUTO a.s. (hereinafter referred to as ŠKODA or manufacturer)
Page 6 of 232
Board literature
You will always find this Owner's Manual and the Service Plan included in the
on-board literature for your vehicle.
Depending on your vehicle equipment, the on-board literature may also in-
clude the Radio instruction manual , the Infotainment system manual and in
some countries also the On the road brochure.
Owner´s Manual
These Owner´s Manual apply to all body variants of the vehicle and all related
model versions as well as all equipment levels .
This owner's manual describes all possible equipment variants without identi-
fying them as special equipment, model variants or market-dependent equip-
ment. Consequently, this vehicle does not contain all of the equipment com-
ponents described in this Owner's Manual.
The level of equipment in your vehicle refers to your purchase contract for the
vehicle. For any questions regarding the scope of equipment, please contact a
ŠKODA Partner.
The Pictures in this manual are for illustrative purposes only. The illustrations
can differ in minor details from your vehicle; they are only intended to provide
general information.
ŠKODA AUTO a.s. pursues a policy of ongoing product and model development
with all vehicles. Changes in terms of supply scope are possible at any time
with regard to design, equipment and technology. The information listed in
this operating manual corresponds to the information available at the time of
going to press.
Therefore legal claims cannot be made based on the technical data, illustra-
tions and information contained in this Owner's Manual.
We recommend that web pages that are referred to in this Owner's Manual are
displayed using the classic view. Not all necessary information may be dis-
played correctly if the mobile view is chosen.
Service schedule
The service schedule includes the documentation of the vehicle handover,
warranty information and service events.
The radio instruction manual
The radio instruction manual describes the operation of the radio, and in some
cases various functions and vehicle systems.Infotainment Owner´s Manual
The Infotainment manual contains a description of the Infotainment service
and possibly also some functions and vehicle systems.
On-the-road brochure
The On-the-road brochure contains the importer's customer service number
and the service number in the individual countries as well as the emergency
numbers.
Online user manualsFig. 1
Using this QR code, the web page with a model overview of the ŠKODA brand
is opened.
The page can also be accessed by entering the following address in the web
browser.
http://www.skoda-auto.com/en/mini-apps/owners-manuals/
▶ Select the desired model - a menu for the user manuals is displayed.
▶ Select the construction period as well as the language.
▶ Select the desired manual - it can be displayed either online or in pdf format.
4Board literature
Page 29 of 232
Using the system
Cockpit
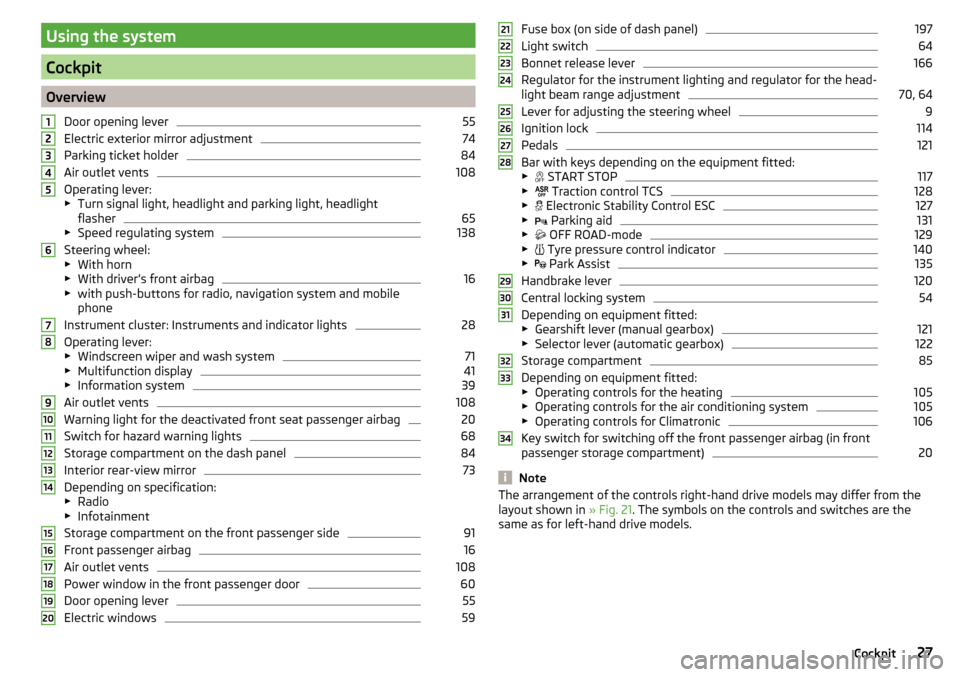
OverviewDoor opening lever
55
Electric exterior mirror adjustment
74
Parking ticket holder
84
Air outlet vents
108
Operating lever:
▶ Turn signal light, headlight and parking light, headlight
flasher
65
▶ Speed regulating system
138
Steering wheel:
▶ With horn
▶ With driver’s front airbag
16
▶with push-buttons for radio, navigation system and mobile
phone
Instrument cluster: Instruments and indicator lights
28
Operating lever:
▶ Windscreen wiper and wash system
71
▶Multifunction display
41
▶Information system
39
Air outlet vents
108
Warning light for the deactivated front seat passenger airbag
20
Switch for hazard warning lights
68
Storage compartment on the dash panel
84
Interior rear-view mirror
73
Depending on specification:
▶ Radio
▶ Infotainment
Storage compartment on the front passenger side
91
Front passenger airbag
16
Air outlet vents
108
Power window in the front passenger door
60
Door opening lever
55
Electric windows
591234567891011121314151617181920Fuse box (on side of dash panel)197
Light switch
64
Bonnet release lever
166
Regulator for the instrument lighting and regulator for the head-
light beam range adjustment
70, 64
Lever for adjusting the steering wheel
9
Ignition lock
114
Pedals
121
Bar with keys depending on the equipment fitted:
▶ START STOP
117
▶
Traction control TCS
128
▶
Electronic Stability Control ESC
127
▶
Parking aid
131
▶
OFF ROAD-mode
129
▶
Tyre pressure control indicator
140
▶
Park Assist
135
Handbrake lever
120
Central locking system
54
Depending on equipment fitted:
▶ Gearshift lever (manual gearbox)
121
▶Selector lever (automatic gearbox)
122
Storage compartment
85
Depending on equipment fitted:
▶ Operating controls for the heating
105
▶Operating controls for the air conditioning system
105
▶Operating controls for Climatronic
106
Key switch for switching off the front passenger airbag (in front
passenger storage compartment)
20
Note
The arrangement of the controls right-hand drive models may differ from the
layout shown in » Fig. 21. The symbols on the controls and switches are the
same as for left-hand drive models.212223242526272829303132333427Cockpit
Page 46 of 232
Menu itemPhone46Menu item
Assistants46
Menu item
Settings47
Compass point display
48
The MAXI DOT display provides you with information about the current operat-
ing state of your vehicle. In addition, it provides information, depending on ve-
hicle equipment, about the radio, multi-function display (MFA), telephone and
Infotainment. Furthermore, it allows the adjustment of some other features of
your vehicle.
WARNINGConcentrate fully at all times on your driving! As the driver, you are fully re-
sponsible for the operation of your vehicle.
Main menu
Read and observe
on page 44 first.
Call up the main menu
›
Press and hold the button
A
on the operating lever » Fig. 30 on page 44 .
or
›
Press and hold the button
H
on the multi-function steering wheel » Fig. 31
on page 45 .
Main menu items (depending on vehicle equipment) ■
MFD
(Multifunction display) » page 41
■
Audio
» page 46
■
Navigation
» page 45
■
Phone
» page 46 ;
■
Aux. heating
» page 109
■
Assistants
» page 46
■
Vehicle status
» page 31
■
Settings
» page 47
The
Audio
and
Navigation
menu items are only displayed when the factory Info-
tainment (or radio) is switched on.
The menus of the MAXI DOT display can be operated using the buttons on the
control lever » page 44 or on the multi-function steering wheel » page 45.
Switching the function with “Checkbox” in the menu on/off
▶ - Function is switched on
▶ - Function is switched off
Note
■
If warning messages are displayed, these messages must be verified to ac-
cess the main menu.■
If the display is not activated at that moment, the menu always shifts to one
of the higher levels after approx. 10 seconds.
■
The operation of the factory-installed Infotainment (or radio) » Owner´s
Manual Infotainment or » Owner´s Manual Radio .
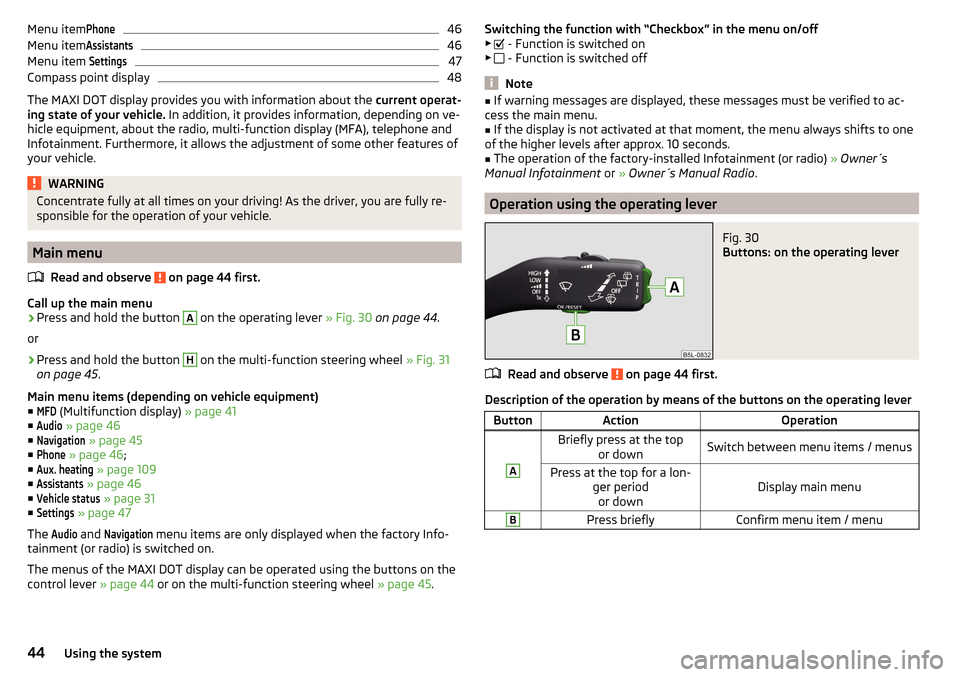
Operation using the operating lever
Fig. 30
Buttons: on the operating lever
Read and observe on page 44 first.
Description of the operation by means of the buttons on the operating lever
ButtonActionOperationABriefly press at the top
or downSwitch between menu items / menusPress at the top for a lon- ger periodor downDisplay main menu
BPress brieflyConfirm menu item / menu44Using the system
Page 47 of 232
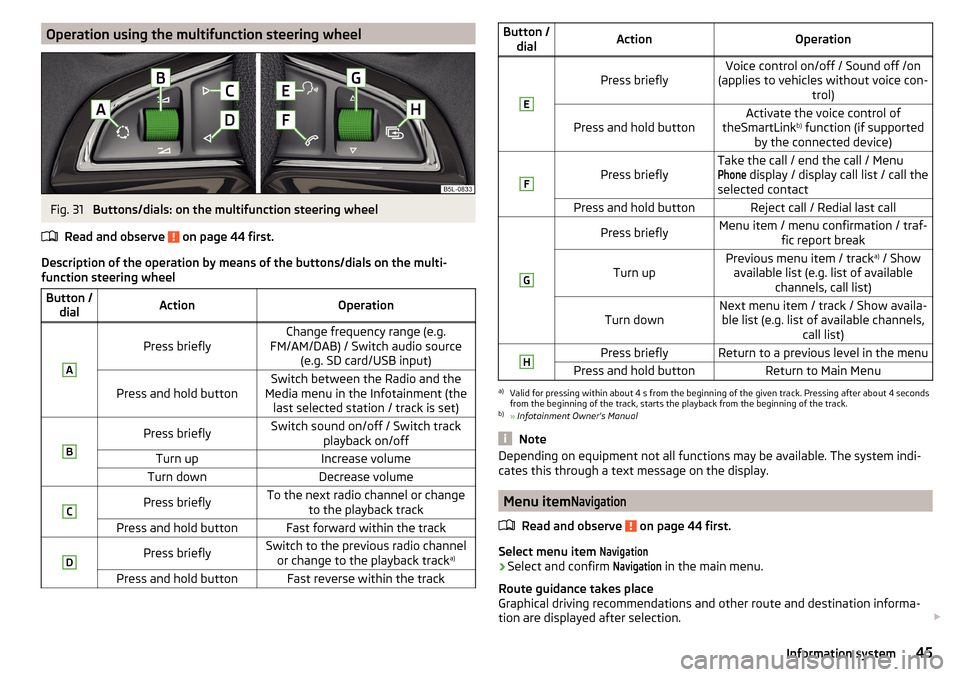
Operation using the multifunction steering wheelFig. 31
Buttons/dials: on the multifunction steering wheel
Read and observe
on page 44 first.
Description of the operation by means of the buttons/dials on the multi-
function steering wheel
Button / dialActionOperationA
Press brieflyChange frequency range (e.g.
FM/AM/DAB) / Switch audio source (e.g. SD card/USB input)Press and hold buttonSwitch between the Radio and the
Media menu in the Infotainment (the last selected station / track is set)BPress brieflySwitch sound on/off / Switch track playback on/offTurn upIncrease volumeTurn downDecrease volumeCPress brieflyTo the next radio channel or changeto the playback trackPress and hold buttonFast forward within the trackDPress brieflySwitch to the previous radio channelor change to the playback track a)Press and hold buttonFast reverse within the trackButton /
dialActionOperationE
Press brieflyVoice control on/off / Sound off /on
(applies to vehicles without voice con- trol)Press and hold buttonActivate the voice control of
theSmartLink b)
function (if supported
by the connected device)F
Press brieflyTake the call / end the call / MenuPhone
display / display call list / call the
selected contactPress and hold buttonReject call / Redial last callGPress brieflyMenu item / menu confirmation / traf- fic report breakTurn upPrevious menu item / track a)
/ Show
available list (e.g. list of available channels, call list)Turn downNext menu item / track / Show availa-ble list (e.g. list of available channels, call list)HPress brieflyReturn to a previous level in the menuPress and hold buttonReturn to Main Menua)
Valid for pressing within about 4 s from the beginning of the given track. Pressing after about 4 seconds
from the beginning of the track, starts the playback from the beginning of the track.
b)
» Infotainment Owner's Manual
Note
Depending on equipment not all functions may be available. The system indi-
cates this through a text message on the display.
Menu item
Navigation
Read and observe on page 44 first.
Select menu item
Navigation›
Select and confirm
Navigation
in the main menu.
Route guidance takes place
Graphical driving recommendations and other route and destination informa-
tion are displayed after selection.
45Information system
Page 96 of 232
›Place the empty through-loading bag in the gap between the front and rear
seats in such a way that the end of the bag with the zip lies in the boot.›
Open the boot lid.
›
Push the skis into the through-loading bag from the boot » .
›
Close the through-loading bag.
Securing through-loading bag and skis
›
Pull the securing belt with both lock tongues out of the pocket of the
through-loading bag.
›
Insert the lock tongues
A
» Fig. 99 in the belt locks of the rear middle seat
belt
C
, first on the one side and then on the other side.
›
Place the securing belt in the middle of the skis between the heel and the tip
of the bindings and pull the securing belt tight at the free end of the belt
B
.
WARNING■ After placing the skis into the through-loading bag, you must secure the
through-loading bag with the securing belt.■
The securing belt must hold the skis tight.
■
Ensure that the securing belt for skis grasps the middle between the tip
and the heel element of the binding (see also marking on the through-load-
ing bag).
■
The total weight of the skis which are transported must not exceed 10 kg.
CAUTION
■ Never fold and stow the through-loading bag wet - risk of damaging the
through-loading bag.■
The through-loading bag is designed for the transportation of a maximum of
two pairs of skis.
■
Place the skis and sticks in the through-loading bag with the tips facing to
the rear.
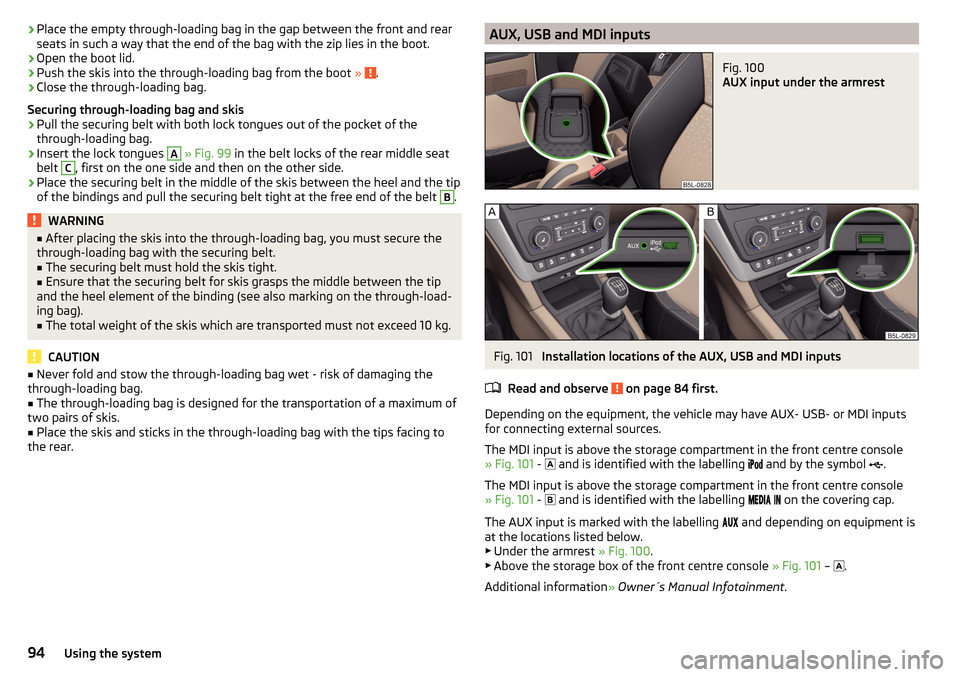
AUX, USB and MDI inputsFig. 100
AUX input under the armrest
Fig. 101
Installation locations of the AUX, USB and MDI inputs
Read and observe
on page 84 first.
Depending on the equipment, the vehicle may have AUX- USB- or MDI inputs
for connecting external sources.
The MDI input is above the storage compartment in the front centre console
» Fig. 101 -
and is identified with the labelling
and by the symbol
.
The MDI input is above the storage compartment in the front centre console
» Fig. 101 -
and is identified with the labelling
on the covering cap.
The AUX input is marked with the labelling
and depending on equipment is
at the locations listed below. ▶ Under the armrest » Fig. 100.
▶ Above the storage box of the front centre console » Fig. 101 –
.
Additional information » Owner´s Manual Infotainment .
94Using the system
Page 133 of 232
The system generated by a controlled locking of the wheels braked wheel be-
fore a “wedge” of piled material, which shortens the braking distance.
The system is only available, if the front wheels are in the straight-ahead posi-
tion.
The system operates at speeds of up to 50 km/h.
Start-Off Assistant 1)
Read and observe
and on page 129 first.
The Start-Off assistant assists the driver when setting off, such as on a steep
slope or on a slippery surface. When the driver presses the accelerator, the
maximum engine speed is electronically limited so that a gentle approach is
possible.
Parking assistance (ParkPilot)
Introduction
This chapter contains information on the following subjects:
Function
131
Display in the Infotainment display
132
Activation/deactivation
133
The parking aid (hereinafter referred to as system) draws attention via acous- tic signals or the Infotainment display when manoeuvring around obstacles in
the vicinity of the vehicle.
WARNING■ The general information relating to the use of assistance systems must
be observed » page 127, in section Introduction .■
Moving persons or objects may not be recognized by the system sensors.
■
Under certain circumstances, surfaces of certain objects and types of
clothing cannot reflect the system signals. For this reason, such people or
objects may not be recognised by the system sensors.
WARNING (Continued)■ External noise sources may affect the signals of the system sensors. Un-
der adverse conditions, this may cause objects or people not to be recog-
nised by the system.■
Before reversing, you should make sure that there are no small obstacles,
such as rocks, thin posts, trailer drawbars etc. in front or behind your vehi-
cle. Such obstacles may not be recognised by the system sensors.
CAUTION
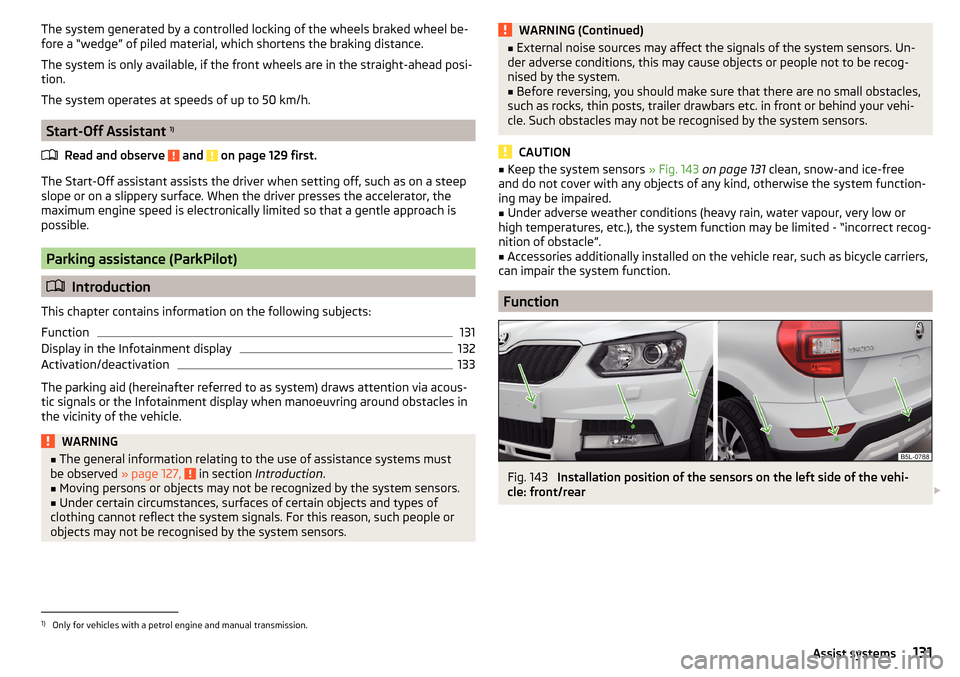
■ Keep the system sensors » Fig. 143 on page 131 clean, snow-and ice-free
and do not cover with any objects of any kind, otherwise the system function-
ing may be impaired.■
Under adverse weather conditions (heavy rain, water vapour, very low or
high temperatures, etc.), the system function may be limited - “incorrect recog-
nition of obstacle”.
■
Accessories additionally installed on the vehicle rear, such as bicycle carriers,
can impair the system function.
Function
Fig. 143
Installation position of the sensors on the left side of the vehi-
cle: front/rear
1)
Only for vehicles with a petrol engine and manual transmission.
131Assist systems
Page 134 of 232
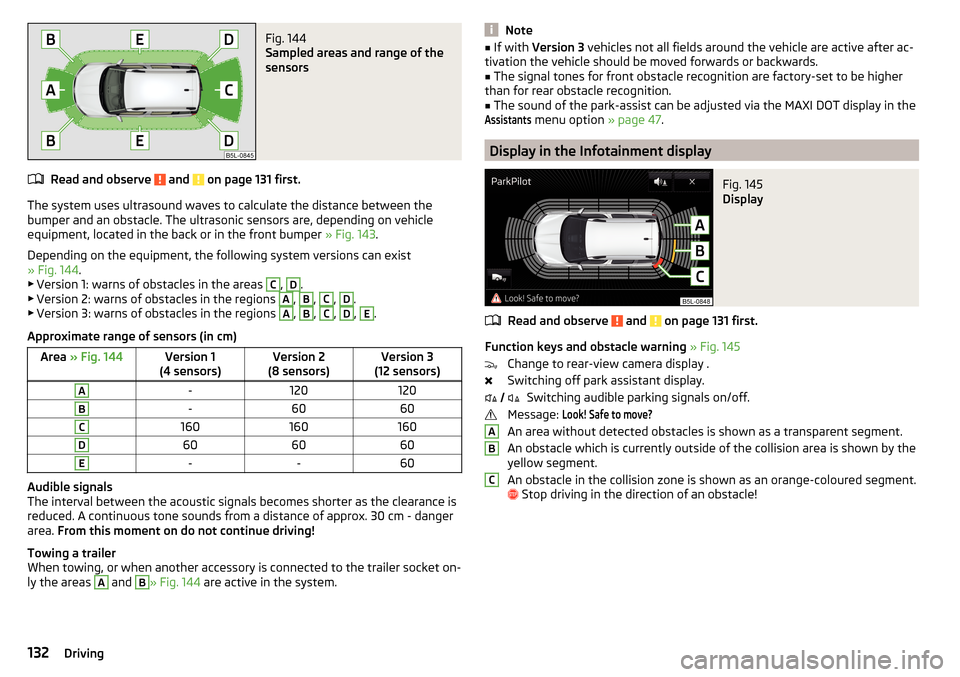
Fig. 144
Sampled areas and range of the
sensors
Read and observe and on page 131 first.
The system uses ultrasound waves to calculate the distance between the
bumper and an obstacle. The ultrasonic sensors are, depending on vehicle
equipment, located in the back or in the front bumper » Fig. 143.
Depending on the equipment, the following system versions can exist
» Fig. 144 .
▶ Version 1: warns of obstacles in the areas
C
,
D
.
▶ Version 2: warns of obstacles in the regions
A
,
B
,
C
,
D
.
▶ Version 3: warns of obstacles in the regions
A
,
B
,
C
,
D
,
E
.
Approximate range of sensors (in cm)
Area » Fig. 144Version 1
(4 sensors)Version 2
(8 sensors)Version 3
(12 sensors)A-120120B-6060C160160160D606060E--60
Audible signals
The interval between the acoustic signals becomes shorter as the clearance is
reduced. A continuous tone sounds from a distance of approx. 30 cm - danger
area. From this moment on do not continue driving!
Towing a trailer
When towing, or when another accessory is connected to the trailer socket on-
ly the areas
A
and
B
» Fig. 144 are active in the system.
Note■
If with Version 3 vehicles not all fields around the vehicle are active after ac-
tivation the vehicle should be moved forwards or backwards.■
The signal tones for front obstacle recognition are factory-set to be higher
than for rear obstacle recognition.
■
The sound of the park-assist can be adjusted via the MAXI DOT display in the
Assistants
menu option » page 47.
Display in the Infotainment display
Fig. 145
Display
Read and observe and on page 131 first.
Function keys and obstacle warning » Fig. 145
Change to rear-view camera display .
Switching off park assistant display. Switching audible parking signals on/off.
Message:
Look! Safe to move?
An area without detected obstacles is shown as a transparent segment.
An obstacle which is currently outside of the collision area is shown by the
yellow segment.
An obstacle in the collision zone is shown as an orange-coloured segment.
Stop driving in the direction of an obstacle!
ABC132Driving
Page 136 of 232
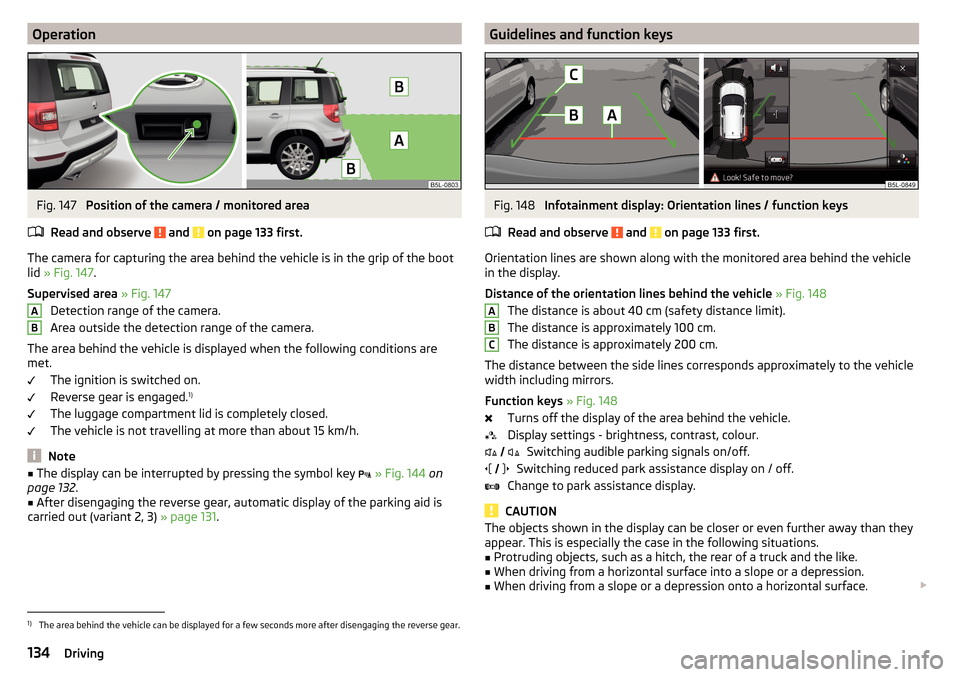
OperationFig. 147
Position of the camera / monitored area
Read and observe
and on page 133 first.
The camera for capturing the area behind the vehicle is in the grip of the boot
lid » Fig. 147 .
Supervised area » Fig. 147
Detection range of the camera.
Area outside the detection range of the camera.
The area behind the vehicle is displayed when the following conditions are
met.
The ignition is switched on.
Reverse gear is engaged. 1)
The luggage compartment lid is completely closed.
The vehicle is not travelling at more than about 15 km/h.
Note
■ The display can be interrupted by pressing the symbol key » Fig. 144 on
page 132 .■
After disengaging the reverse gear, automatic display of the parking aid is
carried out (variant 2, 3) » page 131.
ABGuidelines and function keysFig. 148
Infotainment display: Orientation lines / function keys
Read and observe
and on page 133 first.
Orientation lines are shown along with the monitored area behind the vehicle
in the display.
Distance of the orientation lines behind the vehicle » Fig. 148
The distance is about 40 cm (safety distance limit).
The distance is approximately 100 cm.
The distance is approximately 200 cm.
The distance between the side lines corresponds approximately to the vehicle width including mirrors.
Function keys » Fig. 148
Turns off the display of the area behind the vehicle.
Display settings - brightness, contrast, colour. Switching audible parking signals on/off.
Switching reduced park assistance display on / off.
Change to park assistance display.
CAUTION
The objects shown in the display can be closer or even further away than they
appear. This is especially the case in the following situations.■
Protruding objects, such as a hitch, the rear of a truck and the like.
■
When driving from a horizontal surface into a slope or a depression.
■
When driving from a slope or a depression onto a horizontal surface.
ABC
1)
The area behind the vehicle can be displayed for a few seconds more after disengaging the reverse gear.
134Driving
Page 219 of 232
G
Gear change Gear recommendation
40
Information on the selected gear40
Gear changing Gear stick
121
General view Cockpit
27
Genuine parts150
Glasses compartment90
Glow plug system Warning light
36
gradeability see pitch angle
208
H
Handbrake
120
Warning light33
Hazard warning light system68
HBA128
Head airbag19
Headlight cleaning system Headlight cleaning system
73
Headlights Bulb arrangement
200
Driving abroad69
Headlight cleaning system73
Headlights with CORNER function67
Head restraint79
Headrests adjusting
80
Heater Windscreen and rear window
70
Heating104
Air distribution control107
Controls105
Exterior mirrors74
Seats78
HHC128
Hill Start Assist (HHC)128
Hitch141
Drawback load141
Hook98
Horn27
I
Ignition lock
114
Immobilizer113
Individual settings Locking
55
Unlocking55
Inertia reel14
Information system39
Compass point display48
Display a low temperature39
Door warning40
Gear recommendation40
MAXI DOT display43
Multifunction display41
Operation41
Service interval display48
Infotainment4
Inserting the variable loading floor
102
Instrument cluster28
Auto Check Control31
Counter for distance driven30
Display29
Display of the second speedometer31
Fuel gauge30
Lighting70
Overview28
Revolutions counter29
see instrument cluster28
Temperature gauge29
Warning lights32
Instrument lighting70
Interior care157
Natural leather158
Interior light Front
69
Interior monitor57
iPad holder Behind the headrests
95
Handling95
ISOFIX23
J
Jack
182
- fit185
Maintenance156
Jump-starting189
K
KESSY Locking
53
Unlocking53
Key Lock
53
Start the engine114
Stopping the engine114
Switch off the ignition114
Switch on the ignition114
Unlock53
Knee airbag17
L
Lamp failure Warning light
36
Lamps Warning light
36
Leather Natural leather care
158
LEAVING HOME67
217Index