roof rack SKODA YETI 2015 1.G / 5L Owner's Manual
[x] Cancel search | Manufacturer: SKODA, Model Year: 2015, Model line: YETI, Model: SKODA YETI 2015 1.G / 5LPages: 232, PDF Size: 30.84 MB
Page 4 of 232
Table of Contents
Board literature4
Notes
5
Structure and more information about the
Owner's Manual
6
Abbreviations
Safety
Passive Safety
8
General information
8
Correct and safe seated position
8
Seat belts
11
Using seat belts
11
Inertia reels and belt tensioners
14
Airbag system
15
Description of the airbag system
15
Airbag overview
16
Deactivating airbags
19
Transporting children safely
21
Child seat
21
Fastening systems
23
Using the system
Cockpit
27
Overview
26
Instruments and Indicator Lights
28
Instrument cluster
28
Warning lights
32
Information system
39
Driver information system
39
Multifunction display (MFD)
41
MAXI DOT display
43Service interval display48SmartGate49
Unlocking and opening
52
Unlocking and locking
52
Anti-theft alarm system
56
Luggage compartment lid
57
Window operations
58
Panorama sliding/tilting roof
61
Lights and visibility
64
Lights
64
Interior lights
69
Visibility
70
Windscreen wipers and washers
71
Rear mirror
73
Seats and head restraints
75
Front seat
75
Front seat functions
78
Head restraints
79
Rear seats
80
Transporting and practical equipment
83
Useful equipment
83
Multimedia holder
95
Luggage compartment and transport of
cargo
96
Variable loading floor in the luggage
compartment (Estate)
102
Roof rack
103
Heating and ventilation
104
Heating, manual air conditioning system,
Climatronic
104
Auxiliary heating (auxiliary heating and
ventilation)
109Driving
Starting-off and Driving113
Starting and stopping the engine using the
key
113
Starting and stopping the engine at the push
of the button
115
START-STOPsystem
117
Brakes and parking
119
Manual gear changing and pedals
121
Automatic transmission
122
Running-in and economical driving
124
Avoiding damage to your vehicle
125
Assist systems
127
General information
127
Braking and stabilisation systems
127
OFF ROAD-mode
129
Parking assistance (ParkPilot)
131
Rear View Camera
133
Park Assist
135
Speed control system
138
Fatigue detection
139
Tyre pressure monitoring
140
Hitch and trailer
141
Hitch
141
Trailer
146
General Maintenance
Care and maintenance
149
Service work, adjustments and technical
alterations
149
Washing vehicle
152
Cleaning vehicle exterior
153
Interior care
1572Table of Contents
Page 105 of 232
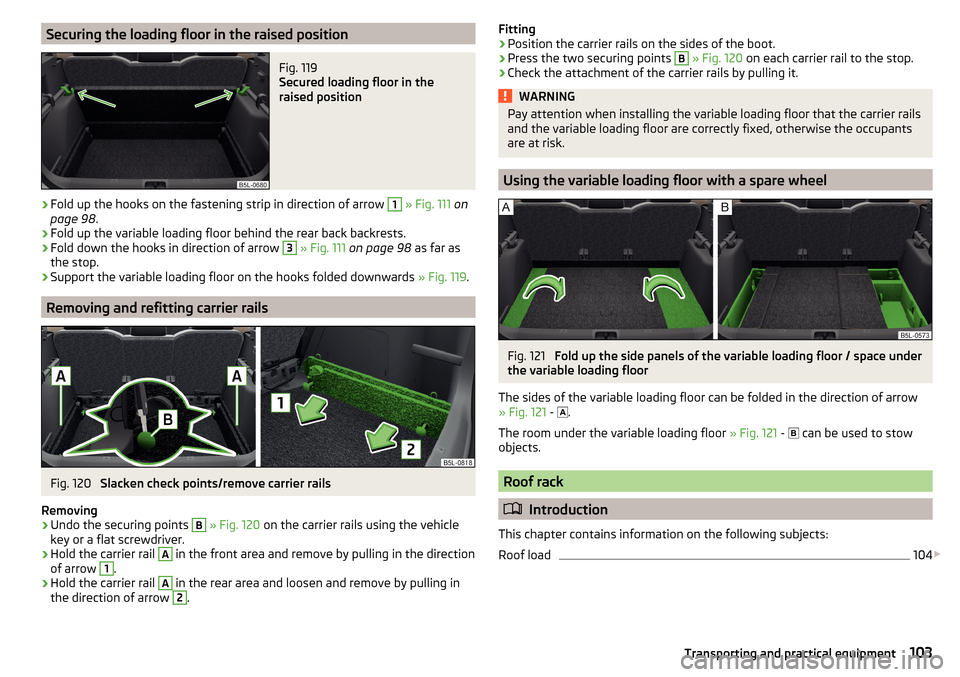
Securing the loading floor in the raised positionFig. 119
Secured loading floor in the
raised position
›
Fold up the hooks on the fastening strip in direction of arrow
1
» Fig. 111 on
page 98 .
›
Fold up the variable loading floor behind the rear back backrests.
›
Fold down the hooks in direction of arrow
3
» Fig. 111 on page 98 as far as
the stop.
›
Support the variable loading floor on the hooks folded downwards » Fig. 119.
Removing and refitting carrier rails
Fig. 120
Slacken check points/remove carrier rails
Removing
›
Undo the securing points
B
» Fig. 120 on the carrier rails using the vehicle
key or a flat screwdriver.
›
Hold the carrier rail
A
in the front area and remove by pulling in the direction
of arrow
1
.
›
Hold the carrier rail
A
in the rear area and loosen and remove by pulling in
the direction of arrow
2
.
Fitting›Position the carrier rails on the sides of the boot.›
Press the two securing points
B
» Fig. 120 on each carrier rail to the stop.
›
Check the attachment of the carrier rails by pulling it.
WARNINGPay attention when installing the variable loading floor that the carrier rails
and the variable loading floor are correctly fixed, otherwise the occupants
are at risk.
Using the variable loading floor with a spare wheel
Fig. 121
Fold up the side panels of the variable loading floor / space under
the variable loading floor
The sides of the variable loading floor can be folded in the direction of arrow
» Fig. 121 -
.
The room under the variable loading floor » Fig. 121 -
can be used to stow
objects.
Roof rack
Introduction
This chapter contains information on the following subjects:
Roof load
104
103Transporting and practical equipment
Page 106 of 232
WARNINGWhen transporting cargo, the following instructions must be adhered to.■The transported items on the roof rack must always be securely attached
– risk of accident!■
Always secure the load with appropriate and undamaged lashing straps
or tensioning straps.
■
Distribute the load evenly over the roof rack system.
■
When transporting heavy objects or objects which take up a large area on
the roof rack system, the handling of the car may change as a result of the
displacement of the centre of gravity. The style of driving and speed must
therefore be adapted to the current circumstances.
■
Avoid abrupt and sudden driving/braking manoeuvres.
■
The permissible roof load, permissible axle loads and permissible total ve-
hicle weight must not be exceeded under any circumstances – risk of acci-
dent!
CAUTION
■ On vehicles with a panoramic sunroof, make sure that the panorama roof
does not strike any items which are transported when it is tilted.■
Ensure that the boot lid does not hit the roof load when opened.
Note
We recommend that you use a roof rack from ŠKODA Original Accessories.
Roof load
Read and observe
and on page 104 first.
Do not exceed the permissible roof load of 100 kg – this includes the carrier
system.
The full permissible roof load cannot be used if a roof rack system with a lower
load carrying capacity is used. The maximum capacity of the carrier system
should never be exceeded.
Heating and ventilation
Heating, manual air conditioning system, Climatronic
Introduction
This chapter contains information on the following subjects:
Heating and manual air conditioning
105
Climatronic (automatic air conditioning)
106
Climatronic - automatic operation
107
Air distribution control
107
Air outlet vents
108
The heating and air conditioning ventilate and heat the vehicle interior. The air
conditioning system also cools and dehumidifies the vehicle interior.
The heating effect is dependent upon the coolant temperature, thus full heat
output only occurs when the engine has reached its operating temperature.
The cooling system only operates if the following conditions are met: The cooling system is switched on.
The engine is running.
The outside temperature is above approx. +2 °C.
The blower is switched on.
If the cooling system is switched on, the temperature and air humidity drops in the vehicle. The cooling system prevents the windows from misting up during
the cold season of the year.
It is possible to briefly activate recirculated air mode to enhance the cooling
effect » page 107 .
Health protection
To reduce health risks (e.g. common colds), the following instructions for the
use of the cooling system are to be observed. ▶ The difference between the indoor temperature and the outdoor air temper-
ature should not be greater than about 5 ° C.
▶ The cooling system is to be turned off about 10 minutes before the end of
the journey.
▶ Once a year, have the manual air conditioner or the Climatronic disinfected by
a specialist company.
104Using the system
Page 127 of 232
New tyres
New tyres must firstly be “run in”, as they do not offer optimal grip at first.
Therefore, drive especially carefully for the first 500 km or so.
New brake pads
New brake pads have to first “grind in” because these do not initially have the
best possible braking effect.
Therefore, drive especially carefully for the first 200 km or so.
Tips for economical driving
To achieve the lowest possible fuel consumption, the following instructions
must be observed.
Looking ahead when driving
Avoid unnecessary acceleration and braking.
Switch in an energy saving and timely manner Observe the recommended gear » page 40.
Avoid full throttle and high speeds
Fuel consumption can be reduced by half if only three-quarters of the possible
top speed of your vehicle is used.
Reducing idling
If the vehicle is fitted with the START - STOP system there is an automatic re-
duction of the idling. If the engine is stopped on vehicles without START-STOP
system, such as when waiting in a traffic jam, the fuel economy is already
greater after 30 - 40 s than the fuel quantity which is required for engine re-
start.
Avoid short distances
When driving a short distance of less than about 4 km, the engine cannot
reach its operating temperature. As long as the engine has not reached oper-
ating temperature, the fuel consumption is significantly higher than with the
engine hot.
Pay attention to the correct tyre inflation pressure being maintained
Further information » page 176.
Avoid unnecessary ballast
Per 100 kg of weight, consumption increases by about 0.3 l/100 km. At a speed
of 100 - 120 km/h, a vehicle fitted with a roof rack cross member without a load
will use about 10 % more fuel than normal due to the increased aerodynamic
drag.
Saving electricity
Only turn on electrical consumers (e.g. seat, window and mirror heating, etc.)
for as long as necessary.
Use the cooling system economically
The air conditioning system compressor uses power from the engine when in
cooling mode, which will affect the fuel consumption.
It recommended to open the windows or the doors of a vehicle for which the
interior has been strongly heated through the effect of direct sunlight in order
to allow the heated air to escape.
The cooling system should not be on if the windows are open.
Avoiding damage to your vehicle
Introduction
This chapter contains information on the following subjects:
Driving Tips
125
Driving through water
126
This section of the manual contains important information on preventing dam-
age to the vehicle while driving.
Driving Tips
Only drive on such roads and in such terrain, which match the vehicle parame-
ters » page 204 , Technical data as well as your driving skills.
The driver is always responsible for deciding whether the vehicle can handle
travelling in the given terrain.
When travelling off paved roads, we recommend activating the OFF ROAD
mode » page 129 .
125Starting-off and Driving
Page 155 of 232
Clean wheels, door sills and similar parts last. Use a second sponge for such
areas.
Give the vehicle a good rinse after washing it and dry it off using a chamois
leather.WARNINGProtect your hands and arms from sharp-edged metal parts when cleaning
the under floor or the inside of the wheel housings or the wheel trims – risk
of cuts!
CAUTION
■ Only apply slight pressure when cleaning the vehicle's paintwork.■Do not wash your vehicle in bright sunlight – risk of paint damage.
Automatic car wash systems
Read and observe
and on page 152 first.
The usual precautionary measures must be taken before washing the vehicle
in an automatic car wash system (e.g. closing the windows and the sliding/tilt-
ing roof etc.).
If your vehicle is fitted with any particular attached parts, such as a spoiler,
roof rack system etc., it is best to consult the operator of the car wash system
beforehand.
After an automatic wash with wax treatment, the lips of the wipers should be
cleaned with cleaning agents specially designed for the purpose, and then de-
greased.
CAUTION
■ Before driving through a car wash fold in the exterior mirrors - there is a risk
of damage.■
Before driving through a car wash unscrew the antenna - there is a risk of
damage.
Washing with a high-pressure cleaner
Read and observe
and on page 152 first.
When washing the vehicle with a high-pressure cleaner, the instructions foruse of the equipment must be observed. This applies in particular to the pres-
sure used and to the spraying distance .
Maintain a sufficiently large distance to the parking aid sensors and soft mate-
rials such as rubber hoses or insulation material.
CAUTION
■ The films should not be washed with any high-pressure cleaners - there is a
risk of damage » page 154.■
Do not aim the water jet directly at the lock cylinders or the door or opening
joints when washing the vehicle in the winter – there is a risk of freezing.
■
The sensors of the parking aid can be sprayed only for a short time and there
must be a minimum distance of 10 cm - there is a risk of damage.
Cleaning vehicle exterior
Introduction
This chapter contains information on the following subjects:
Vehicle paint work
154
Films
154
Plastic parts
155
Rubber seals
155
Chrome and anodized parts
155
Windows and mirrors
155
Headlight glasses
155
Camera lens
156
Door closing cylinder
156
Cavity protection
156
Jack
156
Wheels
156
Towing hitch and mounting recess
157
Under-body protection
157
Wiper blades
157
We recommend using vehicle care products from ŠKODA Original Accessories.
These are available from ŠKODA Partners. The usage instructions on the pack-
age must be observed.
153Care and maintenance
Page 156 of 232
WARNING■Vehicle care products may be harmful to your health if not used according
to the instructions.■
Always keep the vehicle care products safe from people who are not com-
pletely independent, e.g. children - there is a danger of poisoning!
■
Protect your hands and arms from sharp-edged metal parts when clean-
ing the under floor, the inside of the wheel housings or the wheel trims –
risk of cuts!
CAUTION
■ Do not use any insect sponges, rough kitchen sponges or similar cleaning
products – risk of damaging the paintwork surface.■
Cleaner that contain solvents can damage the material being cleaned.
Note
Due to the special tools and knowledge required, and to avoid any potential
problems with the cleaning and care of your vehicle's exterior, we recommend
that the cleaning and care of your vehicle be carried out by a ŠKODA Service
Partner.
Vehicle paint work
Read and observe
and on page 154 first.
Preserving the vehicle paintwork
A thorough wax treatment provides the vehicle's paintwork with highly effec-
tive protection against harmful environmental influences.
The vehicle must be treated with a high-quality hard wax polish at the latest, when no more drops form on the clean paintwork.
A new layer of a high-quality hard wax polish can be applied to the clean body- work after it has dried thoroughly.
Even if you use a wax preserver regularly we still recommend that you treat
the paintwork of the vehicle at least twice a year with hard wax.
Polishing
Polishing is necessary if the vehicle's paintwork has become unattractive and
if it is no longer possible to achieve a gloss with wax preservatives.
If the polish does not contain any preserving elements, the paint must be trea- ted with a preservative afterwards.
CAUTION■ Paint damage is to be repaired immediately.■Never apply wax to the windows.■
Mat painted or plastic parts must not be treated with polishing products or
hard waxes.
■
Do not polish the paintwork in a dusty environment - risk of paint scratches.
■
Do not apply any paint care products to door seals or window guides.
■
If possible, do not apply any paint care products to parts of the bodywork
that come into contact with door seals or window guides.
Films
Read and observe
and on page 154 first.
Cleaning
Films (e.g. Roof, decorative, protective films, etc.) must be cleaned more care-
fully than the vehicle paint.
The films may not be washed with a high-pressure cleaner.
Only wash the films with a soft cloth, mild soap solution and clean, warm wa-
ter.
Service life
Environmental influences (e.g. sunlight, humidity, air pollution, rockfall) affect
the life of the films.
Sunlight may also affect the strength of the film colour.
Films will age and become brittle – this is entirely normal; this is not a fault.
CAUTION
■ Never use aggressive cleaning agents or chemical solvents for the glued sur-
faces with films - there is a danger of film damage.■
Never use dirty cloths or chemical solvents for the glued surfaces with films -
there is a danger of damaging the film.
■
In the winter months, do not use an ice scraper to remove ice and snow from
the areas with films. Do not use any other objects to remove frozen layers of
snow or ice – risk of film damage.
■
Do not polish the films - risk of damage!
■
When transporting a load on the roof rack (e.g. roof box or similar), there is
an increased risk of film damage (e.g. of chipping from the secured load).
154General Maintenance
Page 160 of 232
■Do not attach any stickers to the filaments or glass antenna - there is risk of
damage.■
Do not clean the roof panelling with a brush – there is a risk of damage to
the surface of the panelling.
■
Cleaner that contain solvents can damage the material being cleaned.
■
Apply only a small amount of the cleaning and care product.
Note
Due to the special tools and knowledge required, and to avoid any potential
problems with the cleaning and care of the interior of your vehicle, we recom-
mend that cleaning and care of the interior of your vehicle be carried out by a
ŠKODA service partner.
Natural leather
Read and observe
and on page 157 first.
The leather needs, depending on the strain placed on it, regular cleaning andmaintenance.
Dust and dirt in pores and creases cause abrasions on the surface and lead to
premature embrittlement of the leather surface. Therefore, they must be re-
moved regularly at short intervals with a cloth or vacuum cleaner.
Clean soiled leather surfaces with a water-dampened cotton or woollen cloth
and then dry with a clean, dry cloth »
.
Clean severely soiled areas with a cloth soaked in a mild soap solution (2 ta-
blespoons of neutral soap to 1 litre of water).
To remove stains , use a cleaning agent specially designed for this purpose.
Treat the leather periodically with a suitable leather protector and use a skin
care cream with light blocker and impregnation after each cleaning.
CAUTION
■ Ensure that no part of the leather is soaked through during cleaning and that
no water gets into the seams. Otherwise, the leather could become brittle or
cracked.■
Avoid leaving the vehicle for lengthy periods in bright sunlight to avoid the
leather from bleaching. If the vehicle is parked in the open for lengthy periods,
protect the leather from direct sunlight by covering it.
■
The use of an additional mechanical steering wheel lock may damage the
leather surface of the steering wheel.
■ Some clothing materials, e.g. dark denim, do not have sufficient colour fast-
ness. This can cause damage or clearly visible discolouration to seat covers,
even when used correctly. This applies particularly to light-coloured seat cov-
ers. This does not relate to a fault in the seat cover, but rather to poor colour
fastness of the clothing textiles.■
Sharp-edged objects on items of clothing such as zip fasteners, rivets, sharp-
edged belts etc may leave permanent scratches or signs of rubbing on the sur-
face or damage these. Such damage cannot be subsequently recognised as a
justified complaint.
Note
When using the vehicle, minor visible changes may occur to the leather parts
of the covers (e.g. wrinkles or creases) as a result of the stress applied to the
covers.
Artificial leather, materials and Alcantara ®
Read and observe
and on page 157 first.
Artificial leather
Clean artificial leather with a damp cloth.
If this method does not completely clean the artificial leather, use a mild soap solution or cleaning products specially designed for this purpose.
Fabric
Clean upholstery cover materials and cloth trims on doors, boot cover, etc. us-
ing specific cleaning agents, e.g., dry foam.
Use a soft sponge, brush, or commercially available microfibre cloth.
Use a cloth and a cleaning agent specifically designed for this purpose to clean
the roof trim.
Remove any lumps on the cover fabric and any fabric residue using a brush.
Remove stubborn hair using a “cleaning glove”.
Alcantara ®
Dust and dirt in pores, creases and seams may chafe and damage the surface.
Therefore, they must be removed regularly at short intervals with a cloth or
vacuum cleaner.
Minor changes in colour caused by use are normal.
158General Maintenance
Page 200 of 232
No.Consumer19ABS, ESP, switch for tyre air pressure control, parking aid, switch for
OFF ROAD mode, START STOP button20Switch, airbag21WIV, tail lamp, dimming mirror, pressure sensor, telephone prepara-
tion, air mass sensor, headlight range control and headlight tilt22Instrument cluster, electromechanical power steering, databus23Central locking system and bonnet lid24Rear power window25Rear window heater, auxiliary heating and ventilation26Power socket in the boot27Panorama window - sliding / tilting roof, electric sunblind28Fuel pump, injectors, AdBlue ®
heating29Front power window30front and rear lighter31Headlight cleaning system32Front seat heating, regulator for seat heating33Heating, air conditioning, Climatronic, remote control for auxiliary
heating34Alarm, spare horn35Automatic gearbox DSG36Tow hitch
Fuses in the engine compartment
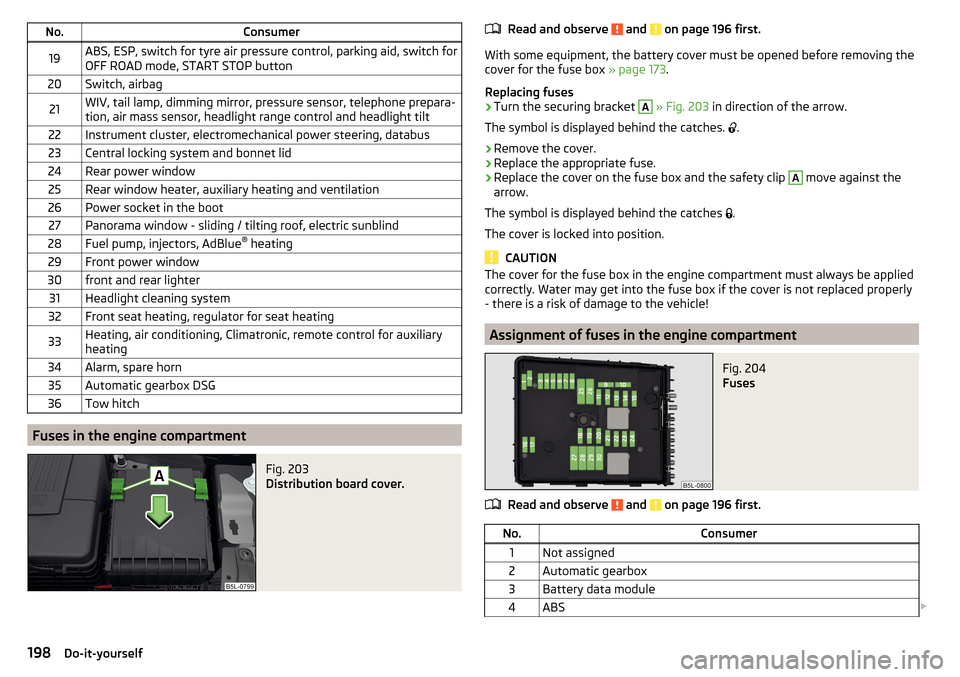
Fig. 203
Distribution board cover.
Read and observe and on page 196 first.
With some equipment, the battery cover must be opened before removing the
cover for the fuse box » page 173.
Replacing fuses
›
Turn the securing bracket
A
» Fig. 203 in direction of the arrow.
The symbol is displayed behind the catches.
.
›
Remove the cover.
›
Replace the appropriate fuse.
›
Replace the cover on the fuse box and the safety clip
A
move against the
arrow.
The symbol is displayed behind the catches .
The cover is locked into position.
CAUTION
The cover for the fuse box in the engine compartment must always be applied
correctly. Water may get into the fuse box if the cover is not replaced properly
- there is a risk of damage to the vehicle!
Assignment of fuses in the engine compartment
Fig. 204
Fuses
Read and observe and on page 196 first.
No.Consumer1Not assigned2Automatic gearbox3Battery data module4ABS 198Do-it-yourself
Page 207 of 232
Maximum permissible front axle load
Maximum permissible rear axle load
Vehicle identification number (VIN)
The vehicle identification number - VIN (vehicle body number) is stamped into
the engine compartment on the right hand suspension strut dome. This num-
ber is also located on a sign on the lower left hand edge below the windscreen
(together with a VIN bar code), and on the type plate.
Engine number
The engine number (three-digit identifier and serial number) is stamped on the
engine block.
Supplementary Information (applies to Russia)
The full type approval number of the means of transport is indicated in the
registration documents, field 17.
Maximum permissible trailer weight
The listed maximum permissible trailer weight is only valid for altitudes up to 1000 m above sea level.
The engine output falls as altitude increases, as does the vehicle's climbing
power. Therefore, for every additional 1000 m in height (or part), the maximum
permissible towed weight must be reduced by 10%.
The towed weight is made up of the actual weights of the loaded towing vehi-
cle and the loaded trailer.WARNINGDo not exceed the specified maximum permissible weights – risk of acci-
dent and damage!
Operating weight
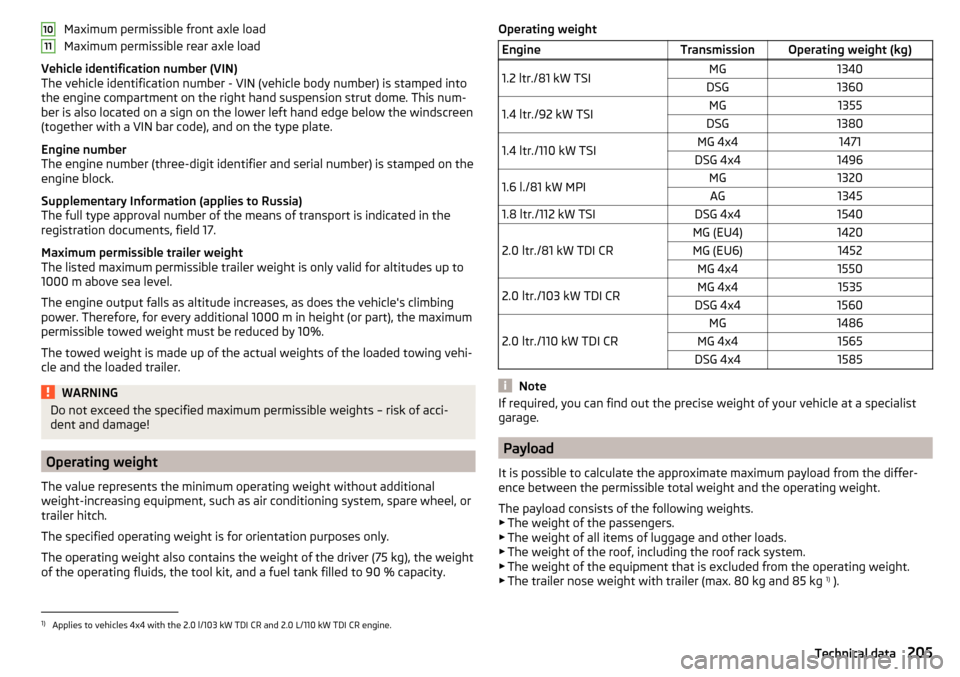
The value represents the minimum operating weight without additional
weight-increasing equipment, such as air conditioning system, spare wheel, or trailer hitch.
The specified operating weight is for orientation purposes only.
The operating weight also contains the weight of the driver (75 kg), the weight
of the operating fluids, the tool kit, and a fuel tank filled to 90 % capacity.
1011Operating weightEngineTransmissionOperating weight (kg)1.2 ltr./81 kW TSIMG1340DSG13601.4 ltr./92 kW TSIMG1355DSG13801.4 ltr./110 kW TSIMG 4x41471DSG 4x414961.6 l./81 kW MPIMG1320AG13451.8 ltr./112 kW TSIDSG 4x41540
2.0 ltr./81 kW TDI CR
MG (EU4)1420MG (EU6)1452MG 4x415502.0 ltr./103 kW TDI CRMG 4x41535DSG 4x41560
2.0 ltr./110 kW TDI CR
MG1486MG 4x41565DSG 4x41585
Note
If required, you can find out the precise weight of your vehicle at a specialist
garage.
Payload
It is possible to calculate the approximate maximum payload from the differ-
ence between the permissible total weight and the operating weight.
The payload consists of the following weights.
▶ The weight of the passengers.
▶ The weight of all items of luggage and other loads.
▶ The weight of the roof, including the roof rack system.
▶ The weight of the equipment that is excluded from the operating weight.
▶ The trailer nose weight with trailer (max. 80 kg and 85 kg 1)
).
1)
Applies to vehicles 4x4 with the 2.0 l/103 kW TDI CR and 2.0 L/110 kW TDI CR engine.
205Technical data
Page 216 of 232
BatteryIn the remote control key193
Belts11
Belt tensioners14
Bonnet Closing
166
Opening166
Boot Class N1 vehicles
102
See Boot lid58
Boot lid automatic locking
58
Closing58
Opening58
Warning light34
Brake information messages
33
warning light33
Brake Assist (HBA)128
Brake booster120
brake fluid specification
172
Brake fluid171
Checking171
information messages33
Brake pedal (automatic gearbox) Warning light
39
Brakes Brake booster
120
Brake fluid171
Braking and stabilisation systems127
Handbrake120
Running-in124
Brakes and parking119
Brake system127
Braking Information on braking
119
Bulbs Replacing
199
Buttons in the doorselectric window lifters59
C
Camera Lens care
156
Camera lens care
156
Car care Jack
156
Car computer See multifunction display
41
Care and maintenance149
Car park ticket holder84
Carrier Roof rack
103
Cavity protection156
Central locking52
Problems56
Central locking button54
Change engine oil
168
light bulb in tail light202
Change engine oil
168
Changing Wheels
182
Changing a wheel Follow-up tasks
186
Preparation183
Changing wheels Wheel removal and fix
186
Charging a vehicle battery174
Check Fit ball head properly
144
Checking Battery electrolyte level
173
Brake fluid171
Coolant170
Engine oil169
Oil level169
Windscreen washer fluid167
Checks Statutory checks
149
Children and safety21
Child safety Side airbag
23
Child safety lock56
Child safety seat Use of child safety seats
23
Child seat Classification
23
ISOFIX23
on the front passenger seat22
TOP TETHER25
Use of ISOFIX child seats24
Chrome parts Refer to vehicle maintenance
155
Cigarette lighter86
Clean Anodized parts
155
Chrome parts155
Cleaning Alcantara
158
and maintaining belts159
artificial leather158
headlight glasses155
materials158
natural leather158
plastic parts155
seats covers of the electrically heated seats159
wheels156
Cleaning safety belt
159
Cleaning seat covers
159
Cleaning the interior artificial leather
158
Seat covers159
214Index