wiper fluid SKODA YETI 2015 1.G / 5L Owner's Manual
[x] Cancel search | Manufacturer: SKODA, Model Year: 2015, Model line: YETI, Model: SKODA YETI 2015 1.G / 5LPages: 232, PDF Size: 30.84 MB
Page 5 of 232
Inspecting and replenishing160Fuel160
AdBlue®
and its refilling
163
Engine compartment
165
Engine oil
168
Coolant
169
Brake fluid
171
Vehicle battery
172
Wheels
176
Tyres and wheel rims
176
Winter operation
180
Do-it-yourself
Emergency equipment and self-help
181
Emergency equipment
181
Changing a wheel
182
Puncture repair kit
186
Jump-starting
189
Towing the vehicle
190
Remote control and removable light
192
Emergency unlocking/locking
194
Replacing windscreen wiper blades
195
Fuses and light bulbs
196
Fuses
196
Bulbs
199
Technical data
Technical data
204
Basic vehicle data
204
Vehicle-specific data depending on the
engine
210
Index
3Table of Contents
Page 10 of 232
Safety
Passive Safety
General information
Introduction
This chapter contains information on the following subjects:
Before setting off
8
Driving safety
8
In this section of the instructions you will find important information, tips and
notes on the subject of passive safety.
We have combined everything here which you should be familiar with, for ex-
ample, regarding seat belts, airbags, safety of children and anything similar.
You can find further information on safety concerning you and those travelling
with you in the following chapters of this owner's manual.
The complete on-board literature should therefore always be in the vehicle. This applies in particular, if you rent out or sell the vehicle.
Before setting off
For your own safety and the safety of the people travelling with you, please
pay attention to the following points before setting off.
▶ Ensure that the lighting and the turn signal system are functioning properly.
▶ Ensure that the function of the wipers and the condition of the wiper blades
are free of any defects.
▶ Ensure that all of the windows offer good visibility to the outside.
▶ Adjust the rear-view mirror so that vision to the rear is guaranteed.
▶ Ensure that the mirrors are not covered.
▶ Check the tyre inflation pressure.
▶ Check the engine oil, brake fluid and coolant level.
▶ Secure all items of luggage.
▶ Do not exceed the permissible axle loads and permissible gross weight of the
vehicle.
▶ Close all doors as well as the bonnet and boot lid.
▶ Ensure that no objects can obstruct the pedals.
▶
Protect children in suitable child seats with correctly fastened seat belts
» page 21 , Transporting children safely .
▶ Adopt the correct seated position » page 8, Correct and safe seated posi-
tion . Tell your passengers to assume the correct seated position.
Driving safety
The driver is fully responsible for himself and passengers, especially children. If
your driving safety is effected, you place yourself and the oncoming traffic at
risk.
The following guidelines must therefore be observed. ▶ Do not become distracted from concentrating on the traffic situation, (e.g. by
your passengers or mobile phone calls).
▶ Never drive when your driving ability is impaired, (e.g. due to medication, al-
cohol or drugs).
▶ Keep to the traffic regulations and the permissible speed limit.
▶ Always adjust the driving speed to the road, traffic and weather conditions.
▶ Take regular breaks on long journeys (at least every two hours).
The following list contains instructions for the Passenger which, if not ob-
served, may cause serious injuries or death. ▶ Do not lean against the dash panel.
▶ Do not put your feet on the dash panel.
The following list contains instructions for all Passengers which, if not ob-
served, may cause serious injuries or death. ▶ Do not sit only on the front part of the seat.
▶ Do not sit facing to the side.
▶ Do not lean out of the window.
▶ Do not put your limbs out of the window.
▶ Do not put your feet on the seat cushion.
Correct and safe seated position
Introduction
This chapter contains information on the following subjects:
Correct seat position of the driver
9
Adjusting the steering wheel position
9
Correct seated position for the front passenger
10
Correct seated position for the passengers in the rear seats
10
8Safety
Page 73 of 232
Note■If the on-board voltage decreases, the heating switches off automatically
» page 175 , Automatic load deactivation .■
If the light is flashing inside the button the heater is off due to low battery.
■
The position and shape of the switch may vary according to the equipment
fitted.
Sun visors in the front
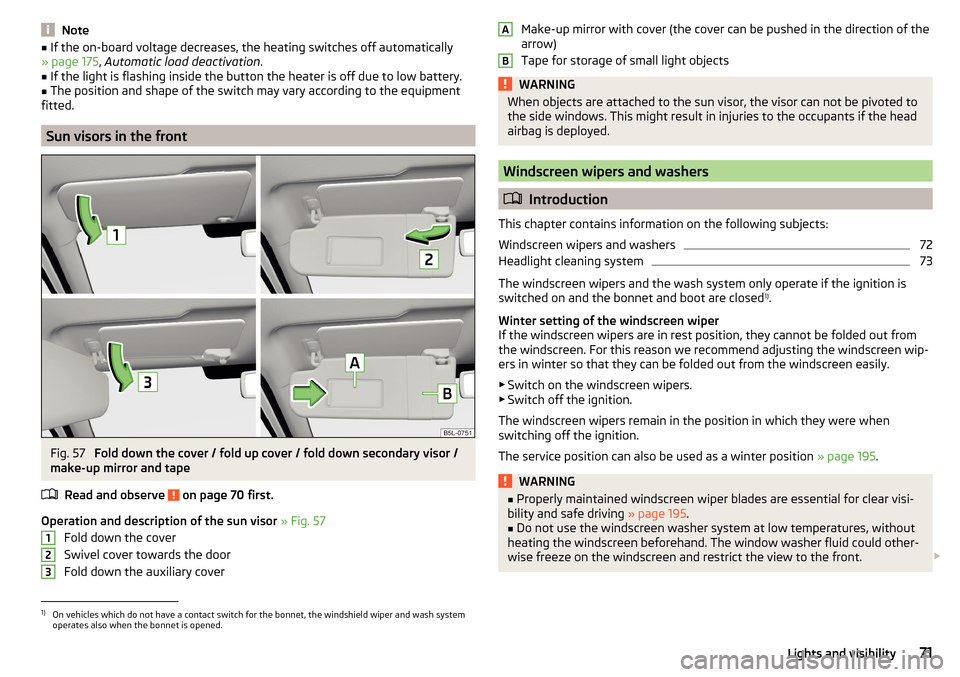
Fig. 57
Fold down the cover / fold up cover / fold down secondary visor /
make-up mirror and tape
Read and observe
on page 70 first.
Operation and description of the sun visor » Fig. 57
Fold down the cover
Swivel cover towards the door
Fold down the auxiliary cover
123Make-up mirror with cover (the cover can be pushed in the direction of the
arrow)
Tape for storage of small light objectsWARNINGWhen objects are attached to the sun visor, the visor can not be pivoted to
the side windows. This might result in injuries to the occupants if the head
airbag is deployed.
Windscreen wipers and washers
Introduction
This chapter contains information on the following subjects:
Windscreen wipers and washers
72
Headlight cleaning system
73
The windscreen wipers and the wash system only operate if the ignition is
switched on and the bonnet and boot are closed 1)
.
Winter setting of the windscreen wiper
If the windscreen wipers are in rest position, they cannot be folded out from
the windscreen. For this reason we recommend adjusting the windscreen wip-
ers in winter so that they can be folded out from the windscreen easily.
▶ Switch on the windscreen wipers.
▶ Switch off the ignition.
The windscreen wipers remain in the position in which they were when
switching off the ignition.
The service position can also be used as a winter position » page 195.
WARNING■
Properly maintained windscreen wiper blades are essential for clear visi-
bility and safe driving » page 195.■
Do not use the windscreen washer system at low temperatures, without
heating the windscreen beforehand. The window washer fluid could other-
wise freeze on the windscreen and restrict the view to the front.
AB1)
On vehicles which do not have a contact switch for the bonnet, the windshield wiper and wash system
operates also when the bonnet is opened.
71Lights and visibility
Page 75 of 232
Automatic rear window wiping can be activated / deactivated via the MAXI
DOT display in the menu item Rear wiper
» page 47 .WARNINGAutomatic wiping during rain is only a support. The driver is not released
from the responsibility to set the function of the windscreen wipers man-
ually depending on the visibility conditions.
Note
■ If the operating lever is in the position 2 or 3 and the speed of the vehicle
drops below 4 km / h, the wiping speed is reduced. The original wiping speed is
restored step by step when the speed of the vehicle exceeds 8 km/h.■
The rear window is wiped once automatically if the windscreen wipers are on
when reverse gear is selected.
Headlight cleaning system
Read and observe
and on page 71 first.
To clean the headlights, the headlamp is also sprayed after every five squirts.The headlight washer system works under the following conditions. The ignition is switched on.
The low beam is switched on.
The outside temperature is about -12° C to +39° C.
To ensure the correct functioning of the system, even in winter, this needs to be regularly cleared of snow and ice, e.g. free with a de-icing spray.
CAUTION
Never remove the nozzles from the headlight cleaning system by hand – risk of
damage!
Rear mirror
Introduction
This chapter contains information on the following subjects:
Interior mirror dimming
73
Exterior mirrors
74WARNING■ Convex (curved outward) or aspheric exterior mirrors increase the field of
vision. They do, however, make objects appear smaller in the mirror. These
mirrors are therefore only of limited use for estimating distances to the fol-
lowing vehicles.■
Whenever possible use the interior mirror for estimating the distances to
the following vehicles.
WARNINGThe mirrors with automatic dimming contain an electrolyte liquid which can
escape if mirror glass is broken.■
The leaking electrolytic fluid can irritate the skin, eyes and breath appara-
tus.
■
If your eyes or skin come into contact with the electrolytic fluid, immedi-
ately wash the affected area for a few minutes long with a lot of water. If
necessary get medical assistance.
Interior mirror dimming
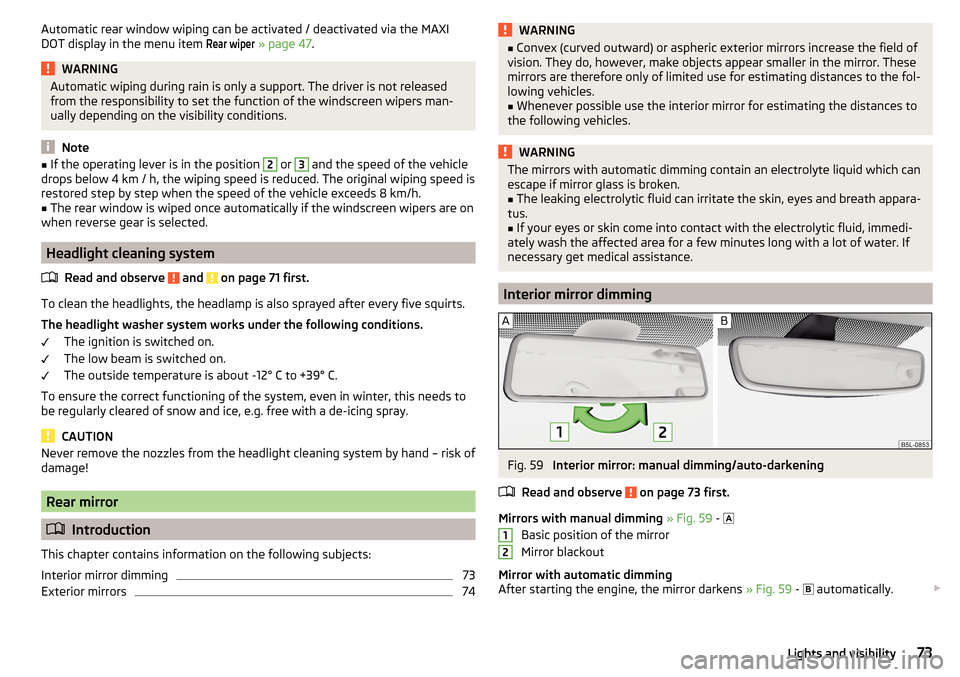
Fig. 59
Interior mirror: manual dimming/auto-darkening
Read and observe
on page 73 first.
Mirrors with manual dimming » Fig. 59 -
Basic position of the mirror
Mirror blackout
Mirror with automatic dimming
After starting the engine, the mirror darkens » Fig. 59 -
automatically.
1273Lights and visibility
Page 168 of 232
WARNING■Read and observe the information and warning instructions on the fluid
containers.■
Keep the working fluids in sealed original containers and safe from peo-
ple who are not completely independent, e.g. children.
■
Never spill operating fluids over the hot engine - risk of fire.
■
If you intend to work underneath the vehicle, you must secure the vehicle
from rolling away and support it with suitable supporting blocks; the car
jack is not sufficient – risk of injury!
CAUTION
Always top up using the correct specification of fluids. This may result in major
operating problems and also vehicle damage!
For the sake of the environment
In view of the requirements for the environmentally friendly disposal of fluids and the special tools and knowledge required for such work, we recommend
that fluids be changed by a specialist garage.
Note
■ Please consult a specialist garage for any questions relating to fluids.■Fluids with the proper specifications can be purchased from the ŠKODA Origi-
nal Accessories or from the ŠKODA Genuine Parts ranges.
Opening and closing the bonnet
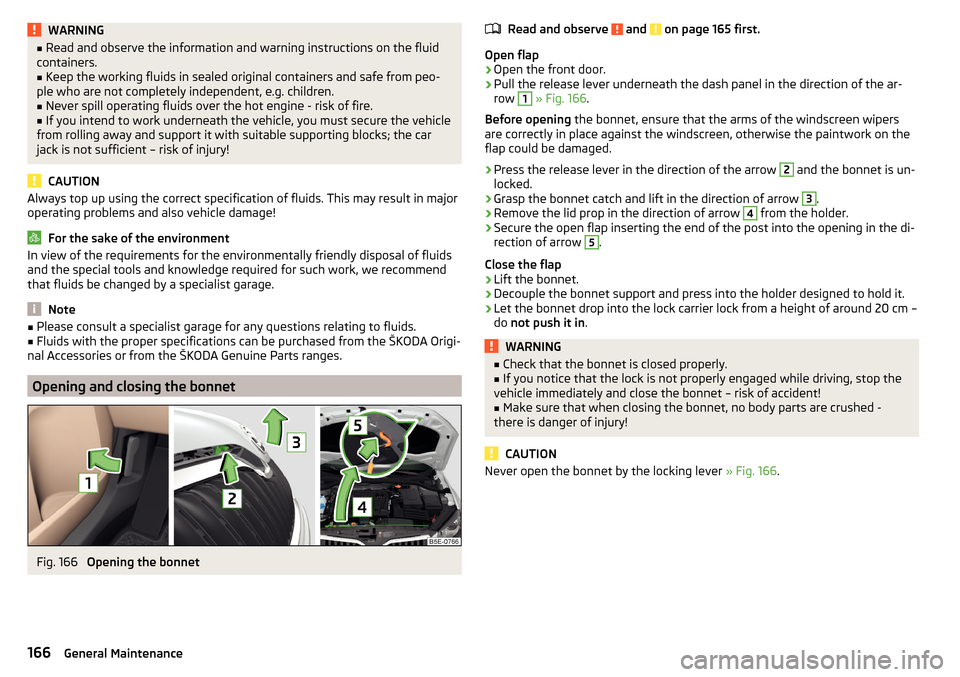
Fig. 166
Opening the bonnet
Read and observe and on page 165 first.
Open flap
›
Open the front door.
›
Pull the release lever underneath the dash panel in the direction of the ar-
row
1
» Fig. 166 .
Before opening the bonnet, ensure that the arms of the windscreen wipers
are correctly in place against the windscreen, otherwise the paintwork on the
flap could be damaged.
›
Press the release lever in the direction of the arrow
2
and the bonnet is un-
locked.
›
Grasp the bonnet catch and lift in the direction of arrow
3
.
›
Remove the lid prop in the direction of arrow
4
from the holder.
›
Secure the open flap inserting the end of the post into the opening in the di-
rection of arrow
5
.
Close the flap
›
Lift the bonnet.
›
Decouple the bonnet support and press into the holder designed to hold it.
›
Let the bonnet drop into the lock carrier lock from a height of around 20 cm –
do not push it in .
WARNING■
Check that the bonnet is closed properly.■If you notice that the lock is not properly engaged while driving, stop the
vehicle immediately and close the bonnet – risk of accident!■
Make sure that when closing the bonnet, no body parts are crushed -
there is danger of injury!
CAUTION
Never open the bonnet by the locking lever » Fig. 166.166General Maintenance
Page 222 of 232
rear seatsin the longitudinal direction81
Rear seats80
Fold back82
fold down seat back81
Fold down seat fully81
Removing seats82
Setting outer seat in the transverse direction82
Rear View Camera133
Function keys134
Operation134
Orientation Lines134
Rear view mirror Interior mirror
73
Rear window - heater70
Refuelling160
Fuel160
Remote control Locking
53
Replacing the battery193
Synchronisation process193
Unlocking53
Remote control key Replacing the battery
193
Removable light Removing light
101
replace batteries of the lights193
Removable through-loading bag93
Removing the variable loading floor
102
Repairs and technical alterations149
Replace Bulb for dipped beam (Halogen headlamp)
200
Bulb for main beam (Halogen headlamp)200
the battery in the auxiliary heating (auxiliary heating) in the remote control
193
replace - batteries of the lights193
Replacing bulb for fog lights
201
Bulb for the licence plate light202
Bulb in rear light203
Bulbs199
Fuses196
Fuses in the dash panel197
Fuses in the engine compartment198
Vehicle battery175
windscreen wiper blades195
Replacing windscreen wiper blades195
Replenishing Coolant
171
Engine oil169
Windscreen washer fluid167
Reversing camera Lens care
156
Revolutions counter29
Roof Load
104
Roof rack103
Roof load104
Rubber seals155
Running-in Brake linings
124
Engine124
Tyres124
S
SAFE See Safe securing system
54
SAFELOCK See Safe securing system
54
Safe securing system54
Safety8
Child safety21
Child safety seats21
Correct seated position8
Head restraints79
ISOFIX23
TOP TETHER25
Safety belts rear middle seat
13
Save electrical energy125
Save fuel125
Seals Vehicle care
155
Seat Front seat adjustment
75
Seat belt height adjustment
12
warning light33
Seat belts11
Belt tensioners14
fastening and unfastening13
Seatbelts Inertia reels
14
Seat belts The physical principle of a head-on collision
12
Seat electrical adjustment76
Seat functions78
Seats Electrical adjustment
76
Folding front passenger seat79
Front armrest78
Head restraints79
Heating78
Manual adjustment76
Memory Function of the electrically adjustable seat
76
Storing in memory of remote control key77
Seats and head restraint75
Securing the variable load floor in the raised position
103
Selector lever Refer to Selector lever
122
Selector lever lock (automatic gearbox) Warning light
39
Service150
Service interval display48
Setting Seat belt height
12
220Index
Page 225 of 232
Headlight glasses155
Interior care157
Maintenance154
Materials158
Natural leather158
Plastic parts155
Polishing vehicle paint work154
Rubber seals155
Safety belt159
Seat covers159
Under-body protections157
washing152
Vehicle condition See Auto-Check Control
31
Vehicle data sticker204
Vehicle data sticker and nameplate Vehicle data sticker and nameplate
204
Vehicle dimensions207
Vehicle height207
Vehicle Identification Number (VIN)204
Vehicle length207
Vehicle tool kit182
Vehicle width207
vest Location of the reflective vest
181
VIN Vehicle Identification Number
204
Visibility70
Visors see front sun visors
71
W
Warning lights
32
MAXI DOT display31
warning messages Diesel particulate filter
37
Warning symbols MAXI DOT display
31
see Warning lights32
Warning triangle181
warning when speeding42
Washing Automatic car wash system
153
by hand152
High-pressure cleaner153
Washing vehicles152
Waste container88
Water in the fuel filter Warning light
31
warning messages31
Weather conditions149
Wheel bolts Anti-theft wheel bolts
184
Caps184
Loosening and tightening185
Wheel rims176
Wheels Age of wheels
176
Changing182
Driving style177
Full trim183
General information176
Load index179
Remove183
Snow chains180
Speed symbol179
Storage of wheels176
stow183
Tyre damage178
Tyre pressure176
Tyre size179
Tyre wear177
Tyre wear indicator178
unidirectional tyres178
Wheel balance177
Wheel replacement178
Winter tyres180
Wi-Fi Connection50
Password50
Password change51
Setting51
Wi-Fi Direct Connection
50
Password change51
Setting51
Window operation Malfunctions
61
Windscreen Heater
70
Windscreen washer fluid Checking
167
Replenishing167
Warning light38
Winter167
Windscreen washer system167
Windscreen washers72
Windscreen wiper Replacing the rear window wiper blade
196
Windscreen wipers automatic rear window wipers
72
Cleaning windscreen wipers195
Replacing the front windscreen wipers195
Service position of windscreen wiper arms195
Windscreen washer fluid167
Windscreen wipers and washers71
Winter operation180
De-icing window155
Snow chains180
Winter tyres180
Winter tyres See Wheels
180
Wiper blades157
Wipers Maintaining wiper blades
157
Wiping interval72
223Index