ESP SKODA YETI 2016 1.G / 5L Columbus Amundsen Bolero Infotainment System Navigation Manual
[x] Cancel search | Manufacturer: SKODA, Model Year: 2016, Model line: YETI, Model: SKODA YETI 2016 1.G / 5LPages: 100, PDF Size: 12.8 MB
Page 32 of 100
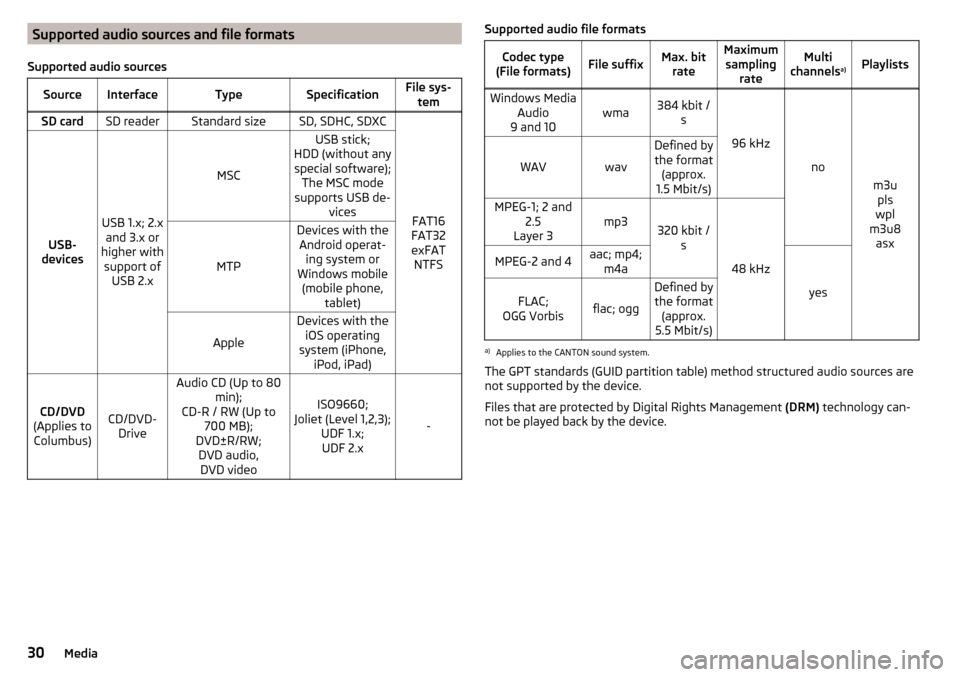
Supported audio sources and file formats
Supported audio sourcesSourceInterfaceTypeSpecificationFile sys- temSD cardSD readerStandard sizeSD, SDHC, SDXC
FAT16
FAT32
exFAT NTFSUSB-
devices
USB 1.x; 2.x and 3.x or
higher with support of USB 2.x
MSC
USB stick;
HDD (without any special software); The MSC mode
supports USB de- vices
MTP
Devices with theAndroid operat- ing system or
Windows mobile (mobile phone, tablet)
Apple
Devices with theiOS operating
system (iPhone, iPod, iPad)
CD/DVD
(Applies to Columbus)CD/DVD- Drive
Audio CD (Up to 80 min);
CD-R / RW (Up to 700 MB);
DVD±R/RW; DVD audio,DVD video
ISO9660;
Joliet (Level 1,2,3); UDF 1.x;UDF 2.x
-
Supported audio file formatsCodec type
(File formats)File suffixMax. bit rateMaximumsampling rateMulti
channels a)PlaylistsWindows Media
Audio
9 and 10wma384 kbit / s
96 kHz
no
m3upls
wpl
m3u8 asx
WAVwav
Defined bythe format (approx.
1.5 Mbit/s)MPEG-1; 2 and 2.5
Layer 3mp3320 kbit / s
48 kHz
MPEG-2 and 4aac; mp4;m4a
yes
FLAC;
OGG Vorbisflac; ogg
Defined by the format (approx.
5.5 Mbit/s)a)
Applies to the CANTON sound system.
The GPT standards (GUID partition table) method structured audio sources are
not supported by the device.
Files that are protected by Digital Rights Management (DRM) technology can-
not be played back by the device.
30Media
Page 34 of 100
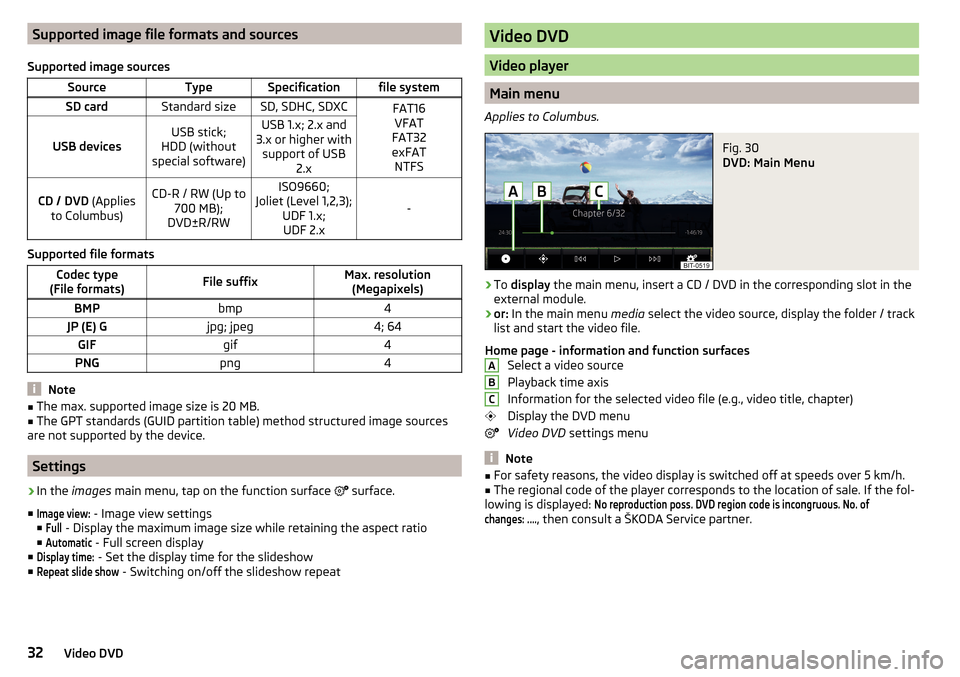
Supported image file formats and sources
Supported image sourcesSourceTypeSpecificationfile systemSD cardStandard sizeSD, SDHC, SDXCFAT16 VFAT
FAT32
exFAT NTFS
USB devicesUSB stick;
HDD (without
special software)USB 1.x; 2.x and
3.x or higher with support of USB 2.xCD / DVD (Applies
to Columbus)CD-R / RW (Up to 700 MB);
DVD±R/RWISO9660;
Joliet (Level 1,2,3); UDF 1.x;UDF 2.x
-
Supported file formats
Codec type
(File formats)File suffixMax. resolution (Megapixels)BMPbmp4JP (E) Gjpg; jpeg4; 64GIFgif4PNGpng4
Note
■ The max. supported image size is 20 MB.■The GPT standards (GUID partition table) method structured image sources
are not supported by the device.
Settings
›
In the images main menu, tap on the function surface
surface.
■
Image view:
- Image view settings
■
Full
- Display the maximum image size while retaining the aspect ratio
■
Automatic
- Full screen display
■
Display time:
- Set the display time for the slideshow
■
Repeat slide show
- Switching on/off the slideshow repeat
Video DVD
Video player
Main menu
Applies to Columbus.
Fig. 30
DVD: Main Menu
›
To display the main menu, insert a CD / DVD in the corresponding slot in the
external module.
›
or: In the main menu media select the video source, display the folder / track
list and start the video file.
Home page - information and function surfaces Select a video source
Playback time axis
Information for the selected video file (e.g., video title, chapter)
Display the DVD menu
Video DVD settings menu
Note
■
For safety reasons, the video display is switched off at speeds over 5 km/h.■The regional code of the player corresponds to the location of sale. If the fol-
lowing is displayed:
No reproduction poss. DVD region code is incongruous. No. ofchanges: ....
, then consult a ŠKODA Service partner.
ABC32Video DVD
Page 35 of 100
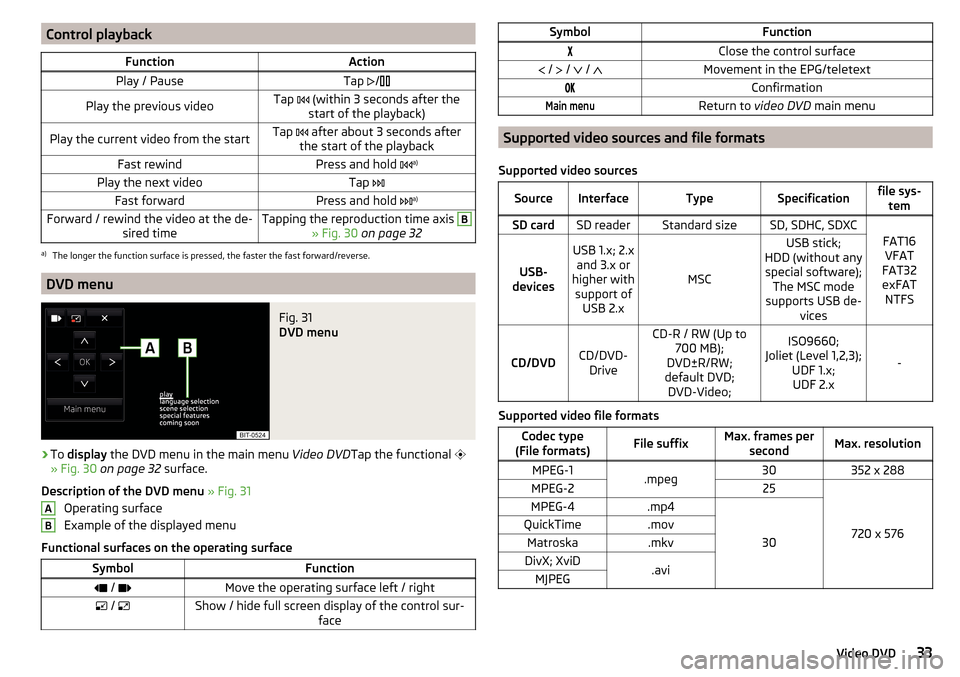
Control playbackFunctionActionPlay / PauseTap /Play the previous videoTap (within 3 seconds after the
start of the playback)Play the current video from the startTap after about 3 seconds after
the start of the playbackFast rewindPress and hold a)Play the next videoTap
Fast forwardPress and hold a)Forward / rewind the video at the de-
sired timeTapping the reproduction time axis B
» Fig. 30 on page 32
a)
The longer the function surface is pressed, the faster the fast forward/reverse.
DVD menu
Fig. 31
DVD menu
›
To display the DVD menu in the main menu Video DVDTap the functional
» Fig. 30 on page 32 surface.
Description of the DVD menu » Fig. 31
Operating surface
Example of the displayed menu
Functional surfaces on the operating surface
SymbolFunction / Move the operating surface left / right / Show / hide full screen display of the control sur-
faceABSymbolFunctionClose the control surface / / / Movement in the EPG/teletextConfirmationMain menuReturn to video DVD main menu
Supported video sources and file formats
Supported video sources
SourceInterfaceTypeSpecificationfile sys- temSD cardSD readerStandard sizeSD, SDHC, SDXC
FAT16VFAT
FAT32
exFAT NTFSUSB-
devices
USB 1.x; 2.x and 3.x or
higher with support of USB 2.x
MSC
USB stick;
HDD (without any special software); The MSC mode
supports USB de- vices
CD/DVDCD/DVD-Drive
CD-R / RW (Up to 700 MB);
DVD±R/RW;
default DVD; DVD-Video;ISO9660;
Joliet (Level 1,2,3); UDF 1.x;UDF 2.x
-
Supported video file formats
Codec type
(File formats)File suffixMax. frames per secondMax. resolutionMPEG-1.mpeg30352 x 288MPEG-225
720 x 576
MPEG-4.mp4
30
QuickTime.movMatroska.mkvDivX; XviD.aviMJPEG33Video DVD
Page 37 of 100
Note■For safety reasons, the image display is switched off at speeds over 5 km/h.
Only the sound continues. The message: Vehicle is in motion.
appears on the
screen.
The display has been switched off for your safety.■
Tap on the function
Also offers the option to select AV (Audio Video Sig-
nal) as a signal source. However, no input is present in the vehicle for this
source.
List of available stations and preset list
In the list of available stations, stations that have an adequately strong signal
are presented in alphabetical order.
›
to Display the list of available stations From theTV tuner main menu , tap on
the functional surface Tap or the controller
Turn.
›
To
Store a station on a station button in the list of available stations first
tap on the functional surface
Save
and then the corresponding preset button.
Up to 99 stations can be stored in the preset list.
Find available stations and select
The unit has a TV tuner to receive digital TV channels DVB-T and DVB-T2 (only
Codec h. 264).
Setting stations
›
In the main menu TV tuner press the function surface
→
or
surface.
A search commences in the selected direction and stops at the next station
group with sufficient signal strength.
The search is performed again by pressing the function surface or
stopped.
Select a station from the preset list
›
In the main menu TV tuner press the function surface
surface.
›
Select the desired station.
Select the station from the station list
›
In the main menu TV tuner turn the control
turn or the functional surface
surface.
›
Select the desired station.
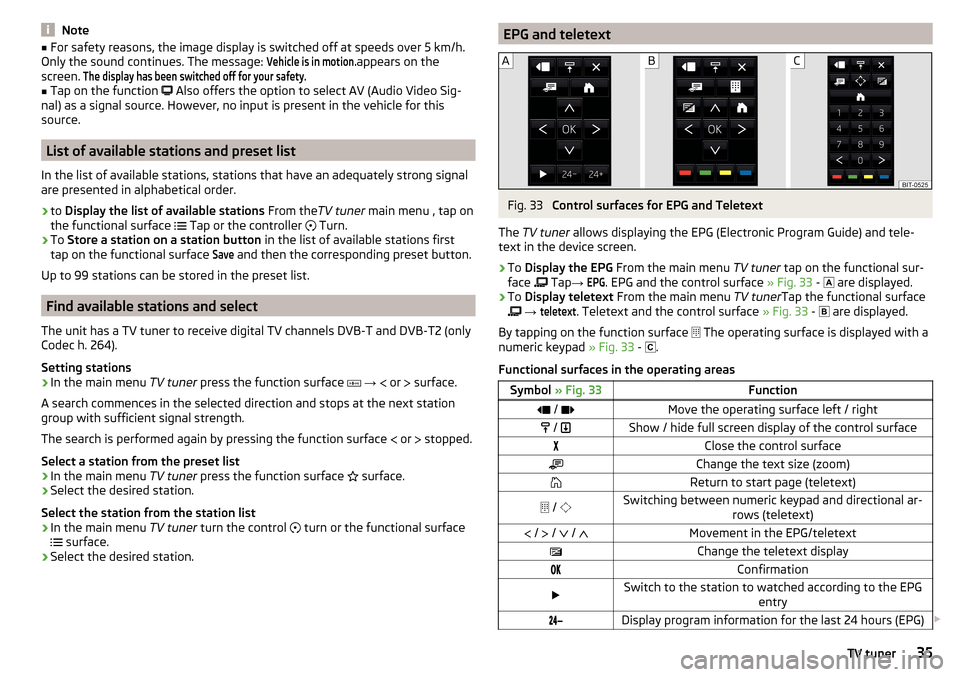
EPG and teletextFig. 33
Control surfaces for EPG and Teletext
The TV tuner allows displaying the EPG (Electronic Program Guide) and tele-
text in the device screen.
›
To Display the EPG From the main menu TV tuner tap on the functional sur-
face Tap
→
EPG
. EPG and the control surface » Fig. 33 -
are displayed.
›
To
Display teletext From the main menu TV tunerTap the functional surface
→
teletext
. Teletext and the control surface » Fig. 33 -
are displayed.
By tapping on the function surface The operating surface is displayed with a
numeric keypad » Fig. 33 -
.
Functional surfaces in the operating areas
Symbol » Fig. 33Function / Move the operating surface left / right / Show / hide full screen display of the control surfaceClose the control surfaceChange the text size (zoom)Return to start page (teletext) / Switching between numeric keypad and directional ar-
rows (teletext) / / / Movement in the EPG/teletextChange the teletext displayConfirmationSwitch to the station to watched according to the EPG
entryDisplay program information for the last 24 hours (EPG) 35TV tuner
Page 56 of 100
SmartLink
Introductory information
Introduction to the subject
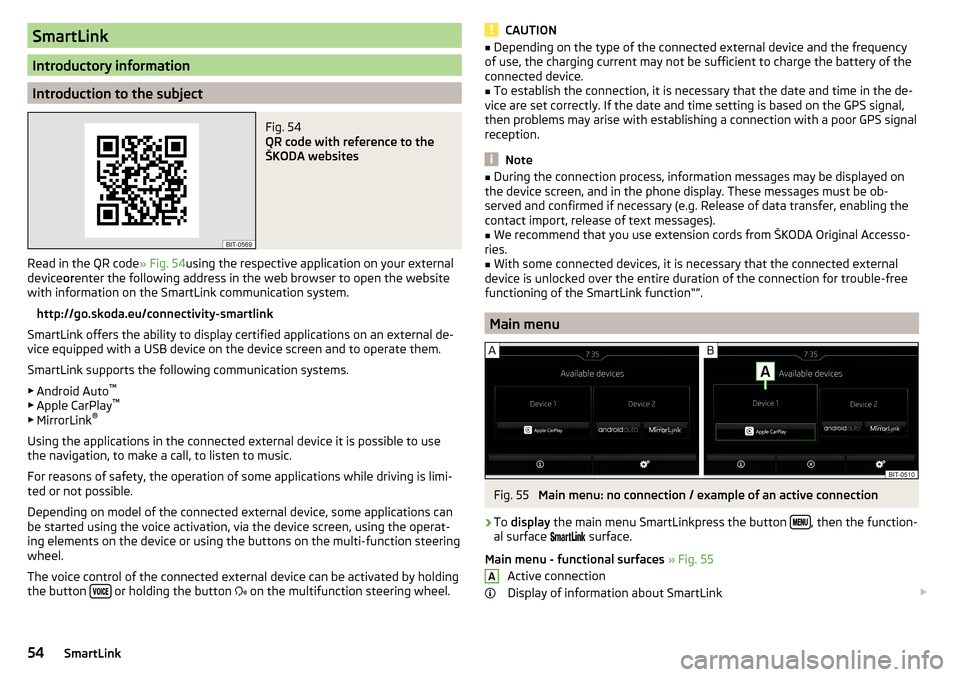
Fig. 54
QR code with reference to the
ŠKODA websites
Read in the QR code » Fig. 54using the respective application on your external
device orenter the following address in the web browser to open the website
with information on the SmartLink communication system.
http://go.skoda.eu/connectivity-smartlink
SmartLink offers the ability to display certified applications on an external de-
vice equipped with a USB device on the device screen and to operate them.
SmartLink supports the following communication systems. ▶ Android Auto ™
▶ Apple CarPlay ™
▶ MirrorLink ®
Using the applications in the connected external device it is possible to use
the navigation, to make a call, to listen to music.
For reasons of safety, the operation of some applications while driving is limi-
ted or not possible.
Depending on model of the connected external device, some applications can
be started using the voice activation, via the device screen, using the operat-
ing elements on the device or using the buttons on the multi-function steering
wheel.
The voice control of the connected external device can be activated by holding
the button
or holding the button
on the multifunction steering wheel.
CAUTION■
Depending on the type of the connected external device and the frequency
of use, the charging current may not be sufficient to charge the battery of the
connected device.■
To establish the connection, it is necessary that the date and time in the de-
vice are set correctly. If the date and time setting is based on the GPS signal,
then problems may arise with establishing a connection with a poor GPS signal
reception.
Note
■ During the connection process, information messages may be displayed on
the device screen, and in the phone display. These messages must be ob-
served and confirmed if necessary (e.g. Release of data transfer, enabling the
contact import, release of text messages).■
We recommend that you use extension cords from ŠKODA Original Accesso-
ries.
■
With some connected devices, it is necessary that the connected external
device is unlocked over the entire duration of the connection for trouble-free
functioning of the SmartLink function“”.
Main menu
Fig. 55
Main menu: no connection / example of an active connection
›
To display the main menu SmartLinkpress the button , then the function-
al surface
surface.
Main menu - functional surfaces » Fig. 55
Active connection
Display of information about SmartLink
A54SmartLink
Page 59 of 100
The ignition is switched on.
The unit is switched on.
The external device to be connected is switched on.
Some applications require the data connection in the connected external de-
vice to be turned on.
If you want to use the menu Telephone, then before establishing the
MirrorLink ®
connection with the telephone then connect the device first via
Bluetooth ®
.
An external device connected using MirrorLink ®
cannot be used as an audio
source in the menu Media.
If route guidance is taking place at this moment using the device, then this is
not terminated by starting the route guidance in the MirrorLink ®
- application.
Read in the QR code » Fig. 58using the respective application on your external
device (e.g. Telephone, tablet) orenter the following address in the web
browser to open the website with supported Mirrorlink ®
applications.
http://go.skoda.eu/connectivity
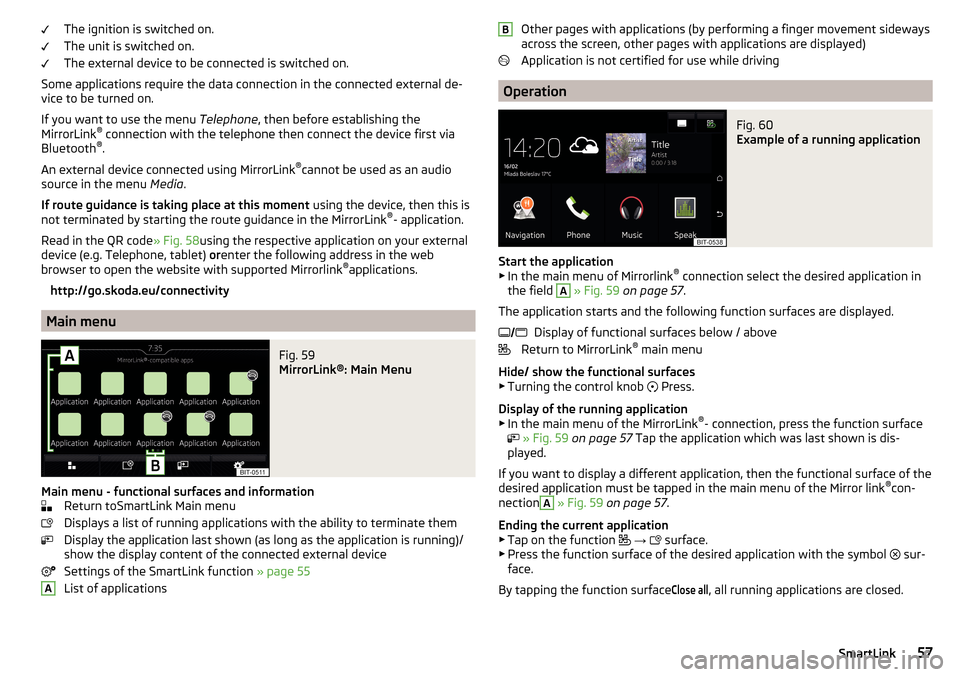
Main menu
Fig. 59
MirrorLink®: Main Menu
Main menu - functional surfaces and information Return toSmartLink Main menu
Displays a list of running applications with the ability to terminate them
Display the application last shown (as long as the application is running)/
show the display content of the connected external device
Settings of the SmartLink function » page 55
List of applications
AOther pages with applications (by performing a finger movement sideways
across the screen, other pages with applications are displayed)
Application is not certified for use while driving
Operation
Fig. 60
Example of a running application
Start the application ▶ In the main menu of Mirrorlink ®
connection select the desired application in
the field
A
» Fig. 59 on page 57 .
The application starts and the following function surfaces are displayed. Display of functional surfaces below / above
Return to MirrorLink ®
main menu
Hide/ show the functional surfaces ▶ Turning the control knob Press.
Display of the running application
▶ In the main menu of the MirrorLink ®
- connection, press the function surface
» Fig. 59 on page 57 Tap the application which was last shown is dis-
played.
If you want to display a different application, then the functional surface of the
desired application must be tapped in the main menu of the Mirror link ®
con-
nection
A
» Fig. 59 on page 57 .
Ending the current application
▶ Tap on the function
→
surface.
▶ Press the function surface of the desired application with the symbol sur-
face.
By tapping the function surface
Close all
, all running applications are closed.
B 57SmartLink
Page 61 of 100
Navigation
Introductory information
Navigation - function sequence
Applies to Columbus, Amundsen.
Route guidance is started as follows.
›
Search for/ enter a new destination or Select one of the stored destinations.
›
Confirm the route calculation in the destination details or if necessary, adjust
the route options.
›
Select the preferred route type, if this is requested by the device.
A route calculation occurs and route guidance starts.
The route guidance is provided by graphical driving recommendations and nav- igation announcements.
The is an option to add additional destinations during route guidance, or to
adapt the route.
If a traffic radio station is available, information concerning traffic delays is
evaluated by the device and, if necessary, an alternative route is offered.
If you deviate from the route, then a new route calculation is carried out.
GPS satellite signal
The unit uses the GPS (Global Positioning System) satellite signal for route
guidance.
Outside the range of the GPS satellite signal (e.g. in dense vegetation, in tun-
nels, parking garages, etc.), the unit navigates only with restrictions using ve-
hicle sensors.
The unit offers the possibility to show in the split screen display the following
Position
» Fig. 62 on page 60 information about the current geographical posi-
tion of the vehicle and the satellite signal.
Geographical longitude
Geographical latitude
Elevation
Number of received/available satellites
If no GPS satellite signal is available, no values are displayed.
Navigation data
Columbus navigation data source
The navigation data is stored in the internal memory.
Amundsen navigation data source
The navigation data is stored on an Original SD Card .
In order to ensure the function of the navigation, the Original SD card, with the
navigation data, must be inserted in the respective slot » page 28, SD card .
If the original SD card should be damaged or lost, a new original SD card can be
purchased from the ŠKODA Original Accessories.
With a Non-original SD Card, the navigation does not work .
Finding out the version of the navigation data›
In the Navigation main menu, tap on the function surface,
Tap
→
Versioninformation
.
Update navigation data
We recommend that you update the navigation data on a regular basis (e.g.
Due to newly developed roads and changed traffic signs).
The information on updating the navigation data is to be obtained from a
ŠKODA partner or on the following ŠKODA Internet pages.
http://go.skoda.eu/infotainment
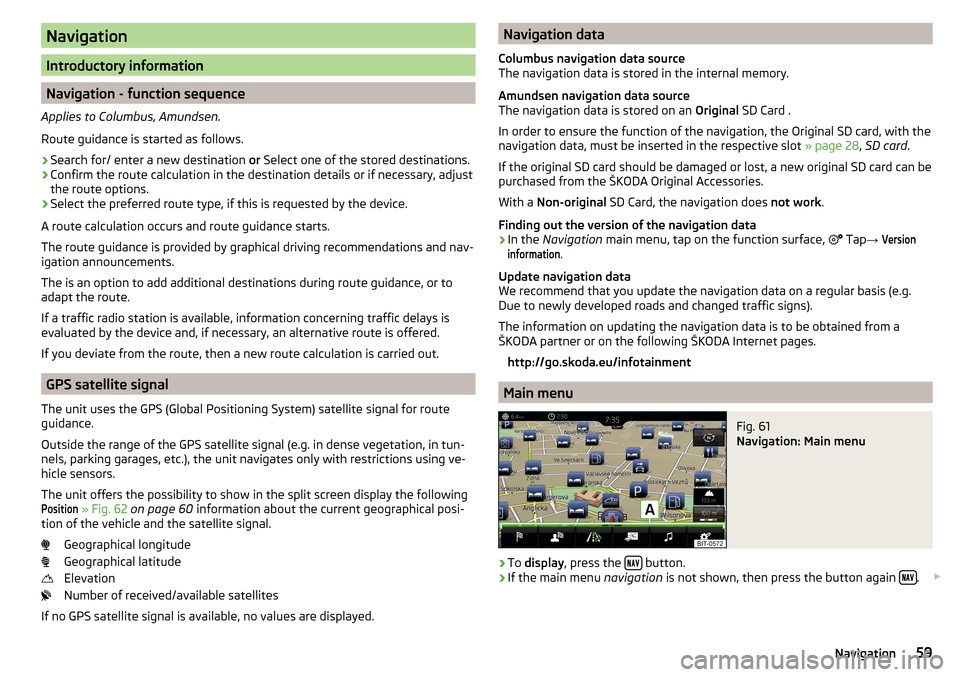
Main menu
Fig. 61
Navigation: Main menu
›
To display , press the button.
›
If the main menu
navigation is not shown, then press the button again .
59Navigation
Page 63 of 100
If route guidance e.g. Is required in a car park or restaurant which is close to
the chosen destination, then the Nearby
function surface must be tapped in the
destination details of the chosen destination. Then search for and select the
desired destination.
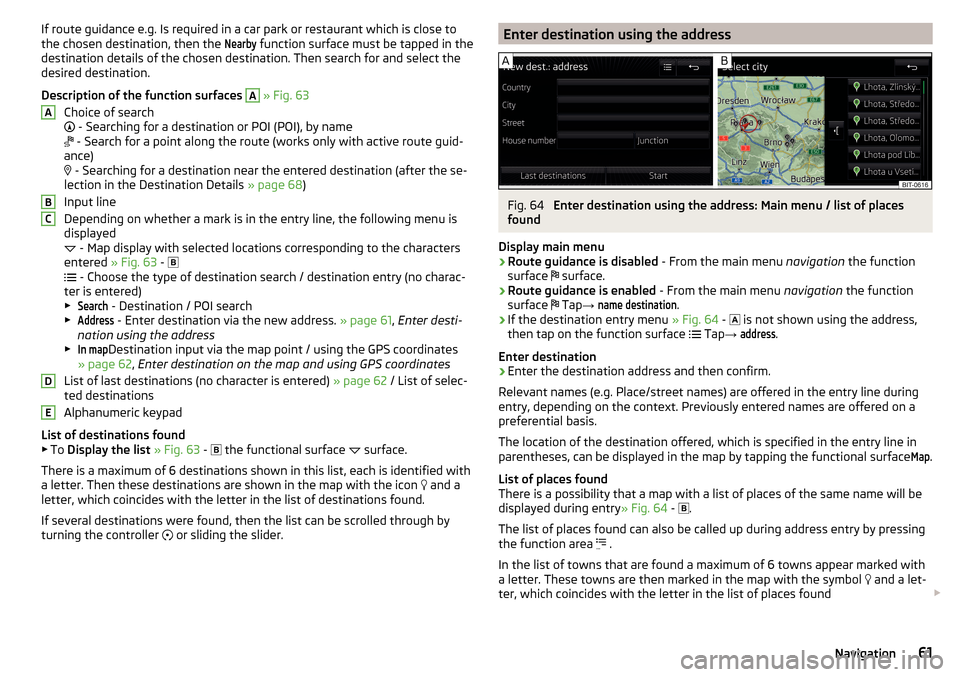
Description of the function surfaces A
» Fig. 63
Choice of search
- Searching for a destination or POI (POI), by name
- Search for a point along the route (works only with active route guid-
ance)
- Searching for a destination near the entered destination (after the se-
lection in the Destination Details » page 68)
Input line
Depending on whether a mark is in the entry line, the following menu is
displayed
- Map display with selected locations corresponding to the characters
entered » Fig. 63 -
- Choose the type of destination search / destination entry (no charac-
ter is entered)
▶
Search
- Destination / POI search
▶
Address
- Enter destination via the new address. » page 61, Enter desti-
nation using the address
▶
In map
Destination input via the map point / using the GPS coordinates
» page 62 , Enter destination on the map and using GPS coordinates
List of last destinations (no character is entered) » page 62 / List of selec-
ted destinations
Alphanumeric keypad
List of destinations found ▶ To Display the list » Fig. 63 -
the functional surface
surface.
There is a maximum of 6 destinations shown in this list, each is identified with
a letter. Then these destinations are shown in the map with the icon and a
letter, which coincides with the letter in the list of destinations found.
If several destinations were found, then the list can be scrolled through by
turning the controller or sliding the slider.
ABCDEEnter destination using the addressFig. 64
Enter destination using the address: Main menu / list of places
found
Display main menu
›
Route guidance is disabled - From the main menu navigation the function
surface surface.
›
Route guidance is enabled
- From the main menu navigation the function
surface Tap
→
name destination
.
›
If the destination entry menu » Fig. 64 -
is not shown using the address,
then tap on the function surface Tap
→
address
.
Enter destination
›
Enter the destination address and then confirm.
Relevant names (e.g. Place/street names) are offered in the entry line during entry, depending on the context. Previously entered names are offered on a
preferential basis.
The location of the destination offered, which is specified in the entry line in
parentheses, can be displayed in the map by tapping the functional surface
Map
.
List of places found
There is a possibility that a map with a list of places of the same name will be
displayed during entry » Fig. 64 -
.
The list of places found can also be called up during address entry by pressing
the function area .
In the list of towns that are found a maximum of 6 towns appear marked with
a letter. These towns are then marked in the map with the symbol and a let-
ter, which coincides with the letter in the list of places found
61Navigation
Page 66 of 100
›Edit the home address or set one up using the current vehicle position or by
entering the address.
Delete home address›
In the Navigation main menu, tap on the functional surface
Tap →
Managememory
→
Delete user data
→
Home address
.
›
Tap the function surface
Delete
and confirm the deletion.
Import my destinations
Introduction to the subject
Fig. 67
QR code with reference to the
ŠKODA websites
In this chapter, destinations are described which can be imported into the de-
vice memory.
Custom destinations can be created by means of the ŠKODA application
“MyDestination”.
Read in the QR code » Fig. 67using the respective application on your external
device (e.g. Telephone, tablet) orAfter entering the following address in the
web browser more information on the “MyDestination” application will be dis-
played.
http://go.skoda.eu/my-destination
Custom destination in vCard-format
In the device memory, a custom destination can be imported in the vCard for-
mat (*.vcf) from an SD card or a USB source.
Import
›
Insert an SD card into the external module or in the device (applies to Yeti) or
connect a USB source to your own destination file.
› In the
Navigation main menu, tap on the functional surface Tap → Managememory
→
Import objectives (SD / USB)
.›
Select the source and confirm the import.
Route guidance
›
In the Navigation main menu, tap on the functional surface
→
Destinations
→
→
surface.
›
Search for and select the desired imported destination.
Delete own destination
›
In the Navigation main menu, tap on the functional surface
→
Destinations
→
→
surface.
›
Tap on the function
Tap on the desired own destination.
›
In the destination details, tap the functional surface
Edit
→
Delete
and confirm
the deletion.
Own POI categories (My POIs)
Import / update
›
Insert an SD card with POI categories into the external module or into the
device (applies to Yeti).
›
In the Navigation main menu, tap on the functional surface
Tap
→
UpdateMy POIs (SD / USB)
→
Update
.
›
Select the source and confirm the import.
If there is already the same POI category name in the device, then it will be
overwritten during import.
Show own category destinations in the map
›
In the Navigation main menu, tap on the functional surface
Tap
→
Map
→
Select categories for POIs
→
My points of interest (Personal POI)
.
Clear all own POI categories
›
In the Navigation main menu, tap on the functional surface
Tap
→
Managememory
→
Delete my POIs
.
›
Tap the function surface
Delete
and confirm the deletion.
Image with GPS coordinates
The device enables the guidance to the GPScoordinate data stored in the im-
age.
The image can be obtained from an external device in which GPS coordinates
are stored when creating an image. If necessary, this can be created and im-
ported in the “MyDestination” application.
64Navigation
Page 73 of 100
A route destination
In the route plan, the following information is displayed at the destina-
tion » Fig. 75 -
.
Area with function surfaces
Destination information Estimated time of arrival at destination / remaining driving time to desti-
nation 1)
Remaining distance to the destination
Chosen route type (economic, fastest, shortest)
Current vehicle position (address / GPS coordinates)
The display of the arrival time or the remaining driving time can be adjusted as
follows.
▶ In the Navigation main menu, tap on the functional surface
→ Advanced set-tings
→
Time display:
.
Several route destinations
In the route plan, the following information is displayed at the respective des- tinations » Fig. 75 -
.
Area with functional surfaces
Stopover (with sequential number)
Final destination
Estimated time of arrival at destination / stopover
Driving distance to destination / stopover
Substitution of destinations among themselves
Delete the destination
Continuation of the route guidance from the selected target (previous
waypoints are skipped)
Display the destination details » page 68
Insert destination into the route ▶ In the area
A
Name destination
Tap the functional surface and enter a new
destination.
▶ or: In the area
A
destinations
Tap the functional surface and select a destina-
tion in the list of stored destinations.
AB CDAEach additional destination is added to the list as the first subsequent destina-
tion route.
Change positions of destinations with each other
▶ The relevant function surface
and move the destination to the desired po-
sition.
With destinations on the route already reached the note Dest. reached
is dis-
played below the destination name. It is not possible to change the position of
these destinations with each other.
Store route ▶ In the area
A
, tap the functional surface
Save
.
▶ Save the edited route as a new route or replace the existing saved route.
Stop route guidance ▶ In the area
A
, tap the functional surface
stop
.
Route change in the map
Applies to Columbus.
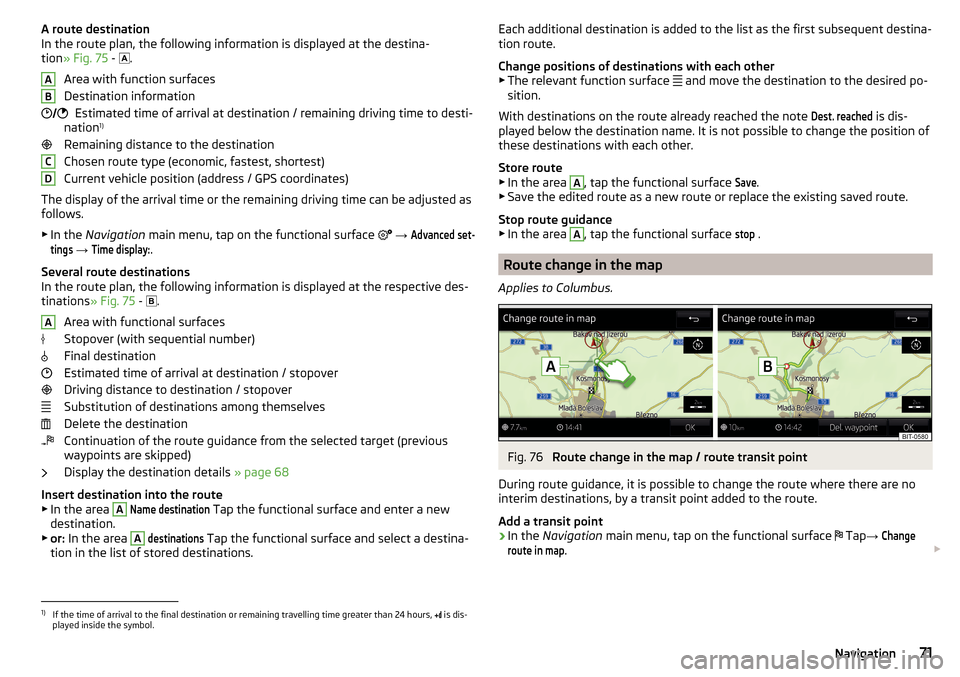
Fig. 76
Route change in the map / route transit point
During route guidance, it is possible to change the route where there are no
interim destinations, by a transit point added to the route.
Add a transit point
›
In the Navigation main menu, tap on the functional surface
Tap
→
Changeroute in map
.
1)
If the time of arrival to the final destination or remaining travelling time greater than 24 hours,
is dis-
played inside the symbol.
71Navigation