key SKODA YETI 2016 1.G / 5L Owner's Guide
[x] Cancel search | Manufacturer: SKODA, Model Year: 2016, Model line: YETI, Model: SKODA YETI 2016 1.G / 5LPages: 200, PDF Size: 28.98 MB
Page 61 of 200

Note■If, with a low beam, the ignition is turned off, then the dipped beam will au-
tomatically switch off 1)
and the parking lights illuminate. The parking lights are
switched off when the ignition key is removed (for vehicles with the KESSY
system, after opening the driver's door).■
If there is a fault in the light switch, the low beam comes on automatically.
Daylight running lights (DAY LIGHT)
Read and observe
on page 58 first.
The daytime running light (hereinafter referred to as "function") lights the
front and rear vehicle area (only valid for some countries).
The daytime running lights are switched on automatically if the following
conditions are met.
The light switch is in the position or
.
The ignition is switched on.
The function is activated.
Function for vehicles with MAXI DOT display disable / enable
The function menu item
Daytime driving light
can be deactivated / activated
» page 43 , Menu item
Settings
.
Disable function for vehicles with segment display
›
Pull the indicator / main beam lever towards the steering wheel, push down
and hold in this position.
›
Switch on the ignition and hold the lever in the above position until you hear
a signal (about 3 s).
Enable function for vehicles with segment display
›
Pull the indicator / main beam lever towards the steering wheel, push up and
hold in this position.
›
Switch on the ignition and hold the lever in the above position until you hear
a signal (about 3 s).
WARNINGAlways switch on the low beam when visibility is poor.Turn signal and main beamFig. 43
Operating lever: Turn signal and
main beam operation
Read and observe on page 58 first.
Control stalk positions » Fig. 43
Switch on right turn signal
Switch on left turn signal
Switch on main beam (spring-tensioned position) Switching off main beam / switching on headlamp flasher (spring-loaded
position)
The main beam can only be switched on when the low beam lights are on.
The headlight flasher can be operated even if the ignition is switched off.
The turn signal switches off automatically, depending on the steering angle
after completing the turn.
Comfort signalling
When the operating lever is pressed lightly up or down, the indicator in ques-
tion flashes three times.
Comfort signalling can be activated / deactivated via the Maxi DOT display in
the
Comfort Signalling
» page 43 , Menu item
Settings
menu item.
WARNINGOnly turn on the main beam or the headlight flasher if other road users will
not be dazzled. 1)
Does not apply to the position , as long as the conditions are met for the COMING HOME function
» page 61 .
59Lights and visibility
Page 64 of 200
Switching on the side light on both sides ›Switch on the ignition and turn the light switch to position » page 58 , the
parking lights are turned on.›
Switch off the ignition and lock the car.
After pulling out the ignition key and opening the driver's door, an audible
warning sounds. After a few seconds or after closing the driver's door, the au-
dible warning is turned off.
CAUTION
■ Turning on the parking light means the battery is heavily loaded.■The parking lights may switch off automatically due to a low battery charge.
If the two-sided parking lights are switched on when the ignition is off, the
parking lights will not switch on automatically!
Driving abroad
Read and observe
on page 58 first.
When driving in countries with opposing traffic system (traffic on the
left/right), your headlights may dazzle oncoming traffic. Therefore, it is neces-
sary to have the headlights adapted by a specialist garage.
You can adjust the settings of the Xenon headlights for a reverse traffic sys-
tem in the menu of the MAXI DOT display under the
Travel mode
menu
item » page 43 , Menu item
Settings
. In this mode, no automatic beam adjust-
ment is made ahead of the vehicle. When switching on the ignition the warn-
ing light flashes for 10 seconds.
Interior lighting
Introduction
This chapter contains information on the following subjects:
Front interior light
62
Interior lighting, rear
63
The inner lighting also works if the ignition is switched off. With the ignition
switched off, the lights will automatically switch off after approximately after
10 minutes.
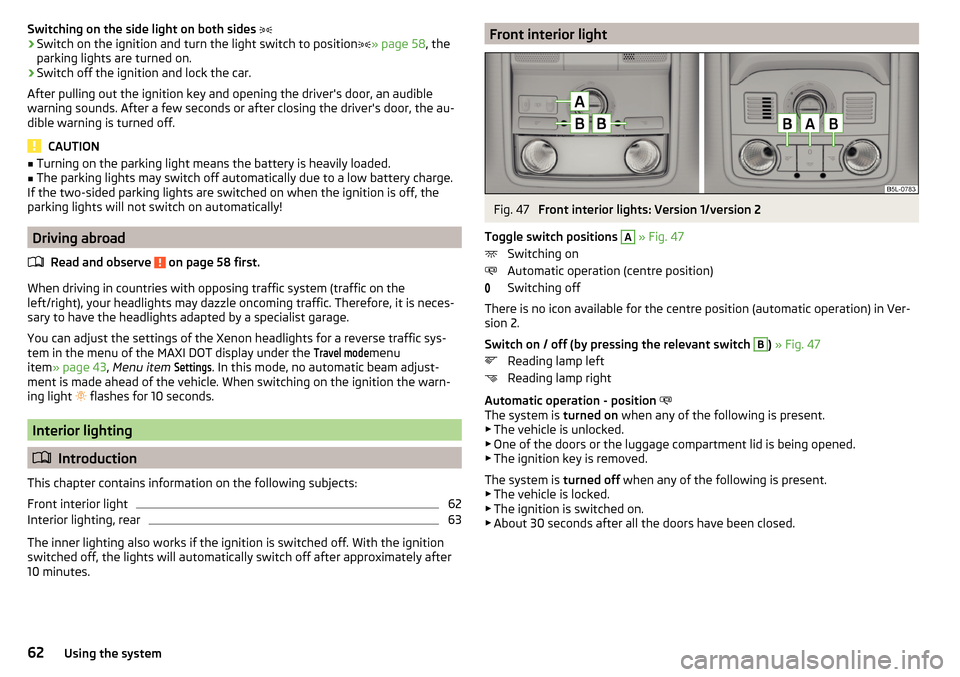
Front interior lightFig. 47
Front interior lights: Version 1/version 2
Toggle switch positions
A
» Fig. 47
Switching on
Automatic operation (centre position)
Switching off
There is no icon available for the centre position (automatic operation) in Ver-
sion 2.
Switch on / off (by pressing the relevant switch
B
) » Fig. 47
Reading lamp left
Reading lamp right
Automatic operation - position
The system is turned on when any of the following is present.
▶ The vehicle is unlocked.
▶ One of the doors or the luggage compartment lid is being opened.
▶ The ignition key is removed.
The system is turned off when any of the following is present.
▶ The vehicle is locked.
▶ The ignition is switched on.
▶ About 30 seconds after all the doors have been closed.
62Using the system
Page 69 of 200
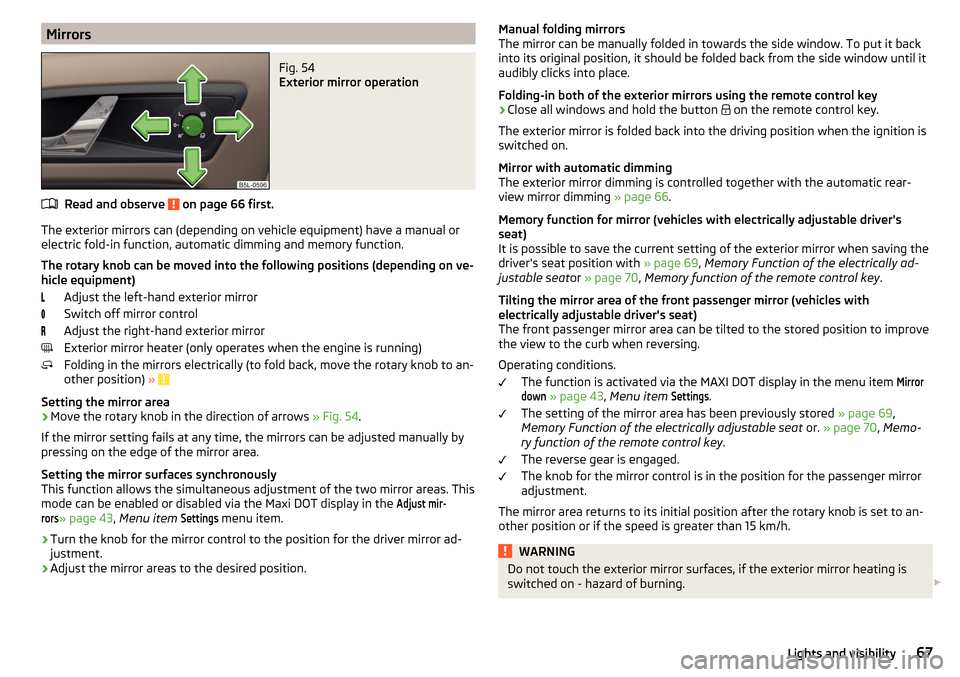
MirrorsFig. 54
Exterior mirror operation
Read and observe on page 66 first.
The exterior mirrors can (depending on vehicle equipment) have a manual orelectric fold-in function, automatic dimming and memory function.
The rotary knob can be moved into the following positions (depending on ve- hicle equipment)
Adjust the left-hand exterior mirror
Switch off mirror control
Adjust the right-hand exterior mirror
Exterior mirror heater (only operates when the engine is running)
Folding in the mirrors electrically (to fold back, move the rotary knob to an-
other position) »
Setting the mirror area
›
Move the rotary knob in the direction of arrows » Fig. 54.
If the mirror setting fails at any time, the mirrors can be adjusted manually by
pressing on the edge of the mirror area.
Setting the mirror surfaces synchronously
This function allows the simultaneous adjustment of the two mirror areas. This
mode can be enabled or disabled via the Maxi DOT display in the
Adjust mir-rors
» page 43 , Menu item
Settings
menu item.
›
Turn the knob for the mirror control to the position for the driver mirror ad-
justment.
›
Adjust the mirror areas to the desired position.
Manual folding mirrors
The mirror can be manually folded in towards the side window. To put it back
into its original position, it should be folded back from the side window until it
audibly clicks into place.
Folding-in both of the exterior mirrors using the remote control key›
Close all windows and hold the button
on the remote control key.
The exterior mirror is folded back into the driving position when the ignition is
switched on.
Mirror with automatic dimming
The exterior mirror dimming is controlled together with the automatic rear-
view mirror dimming » page 66.
Memory function for mirror (vehicles with electrically adjustable driver's
seat)
It is possible to save the current setting of the exterior mirror when saving the
driver's seat position with » page 69, Memory Function of the electrically ad-
justable seat or » page 70 , Memory function of the remote control key .
Tilting the mirror area of the front passenger mirror (vehicles with
electrically adjustable driver's seat)
The front passenger mirror area can be tilted to the stored position to improve the view to the curb when reversing.
Operating conditions. The function is activated via the MAXI DOT display in the menu item
Mirrordown
» page 43 , Menu item
Settings
.
The setting of the mirror area has been previously stored » page 69,
Memory Function of the electrically adjustable seat or. » page 70 , Memo-
ry function of the remote control key .
The reverse gear is engaged.
The knob for the mirror control is in the position for the passenger mirror
adjustment.
The mirror area returns to its initial position after the rotary knob is set to an-
other position or if the speed is greater than 15 km/h.
WARNINGDo not touch the exterior mirror surfaces, if the exterior mirror heating is
switched on - hazard of burning. 67Lights and visibility
Page 70 of 200
CAUTION■Never manually fold in/out the electrically folding exterior mirrors - there is a
risk of damage to the mirror!■
When the mirror is swung by external influences (due to impact during ma-
noeuvring, for example), then first fold-in the mirror by turning the knob and
wait for a loud clapping noise.
Seats and head restraints
Front seats
Introduction
This chapter contains information on the following subjects:
Manual adjustment
68
Electrical adjustment
69
Memory Function of the electrically adjustable seat
69
Memory function of the remote control key
70
Folding front passenger seat
70
Armrest setting
71WARNING■ Only adjust the driver's seat when the vehicle is stationary – otherwise
there is a risk of accident!■
Caution when adjusting the seat! You may suffer injuries or bruises as a
result of adjusting the seat without paying proper attention.
Manual adjustment
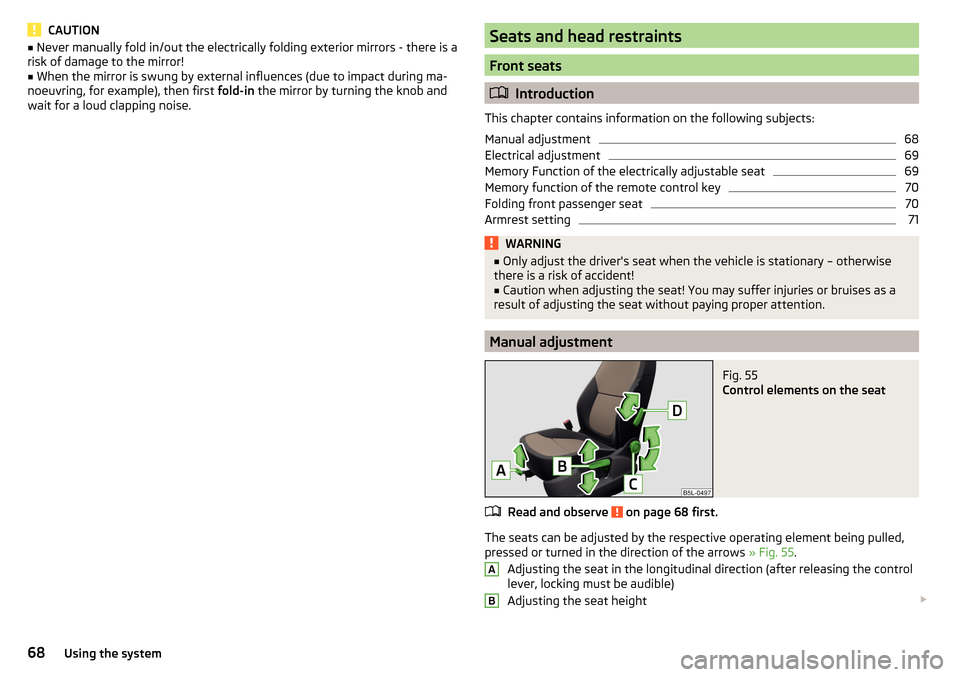
Fig. 55
Control elements on the seat
Read and observe on page 68 first.
The seats can be adjusted by the respective operating element being pulled,
pressed or turned in the direction of the arrows » Fig. 55.
Adjusting the seat in the longitudinal direction (after releasing the control
lever, locking must be audible)
Adjusting the seat height
AB68Using the system
Page 71 of 200
Adjusting the tilt of the backrest (do not lean on the backrest when ad-
justing)
Setting the extent of the curvature of the lumbar support
Note
After a certain time, play can develop within the adjustment mechanism of the
backrest angle.
Electrical adjustment
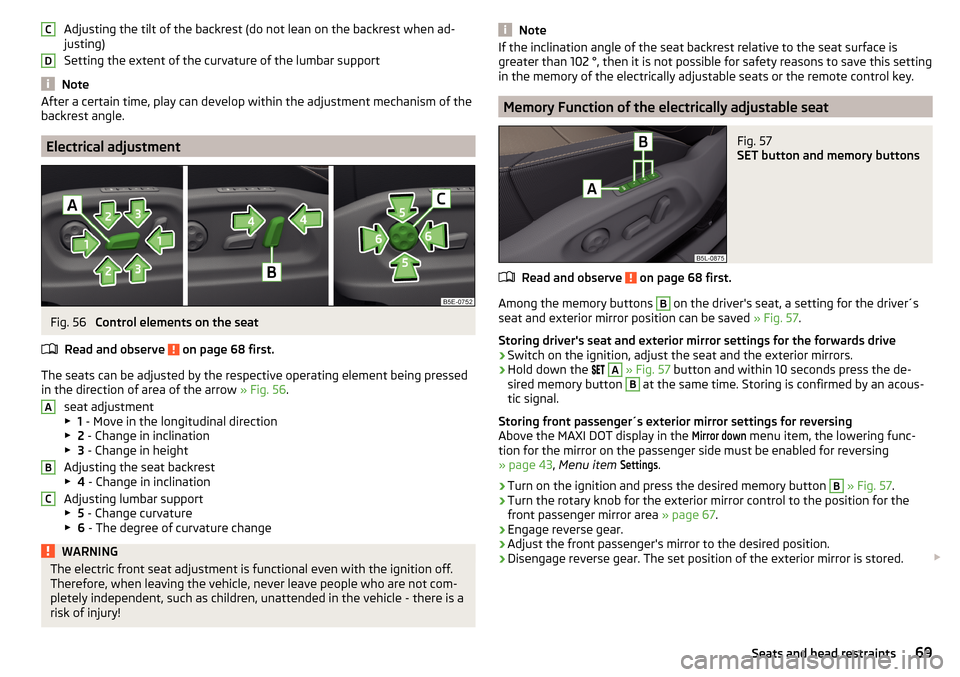
Fig. 56
Control elements on the seat
Read and observe
on page 68 first.
The seats can be adjusted by the respective operating element being pressed in the direction of area of the arrow » Fig. 56.
seat adjustment
▶ 1 - Move in the longitudinal direction
▶ 2 - Change in inclination
▶ 3 - Change in height
Adjusting the seat backrest
▶ 4 - Change in inclination
Adjusting lumbar support
▶ 5 - Change curvature
▶ 6 - The degree of curvature change
WARNINGThe electric front seat adjustment is functional even with the ignition off.
Therefore, when leaving the vehicle, never leave people who are not com-
pletely independent, such as children, unattended in the vehicle - there is a
risk of injury!CDABCNoteIf the inclination angle of the seat backrest relative to the seat surface is
greater than 102 °, then it is not possible for safety reasons to save this setting
in the memory of the electrically adjustable seats or the remote control key.
Memory Function of the electrically adjustable seat
Fig. 57
SET button and memory buttons
Read and observe on page 68 first.
Among the memory buttons
B
on the driver's seat, a setting for the driver´s
seat and exterior mirror position can be saved » Fig. 57.
Storing driver's seat and exterior mirror settings for the forwards drive
›
Switch on the ignition, adjust the seat and the exterior mirrors.
›
Hold down the
A
» Fig. 57 button and within 10 seconds press the de-
sired memory button
B
at the same time. Storing is confirmed by an acous-
tic signal.
Storing front passenger´s exterior mirror settings for reversing
Above the MAXI DOT display in the
Mirror down
menu item, the lowering func-
tion for the mirror on the passenger side must be enabled for reversing
» page 43 , Menu item
Settings
.
›
Turn on the ignition and press the desired memory button
B
» Fig. 57 .
›
Turn the rotary knob for the exterior mirror control to the position for the
front passenger mirror area » page 67.
›
Engage reverse gear.
›
Adjust the front passenger's mirror to the desired position.
›
Disengage reverse gear. The set position of the exterior mirror is stored.
69Seats and head restraints
Page 72 of 200
Retrieving the saved setting
The retrieval is possible when turned the ignition is switched on and the vehi-
cle speed is less than 5 km/h or when the ignition key is inserted in the igni-
tion lock.›
Hold the desired memory button
B
» Fig. 57 .
Stopping the ongoing adjustment
›
Press any button on the driver's seat or the
button on the remote control
key.
Note
Every time you save new seat and exterior mirror settings for driving forwards,
you must also save the front passenger mirror setting for reversing again.
Memory function of the remote control key
Read and observe
on page 68 first.
Every time the vehicle is locked, the driver´s seat and exterior mirror settingsare saved and assigned to the key with which the vehicle was locked.
After the following unlocking of the vehicle with the same key, the driver´s
seat and exterior mirrors that are saved to this key will be adopted.
Activating the function
›
Unlock the vehicle with the corresponding remote control key and open the
driver door.
›
Press and hold any memory button
B
» Fig. 57 on page 69 .
›
After the seat has assumed the position stored under this button, at the
same time press the button on the remote control key within 10 seconds.
Activation is confirmed by an acoustic signal.
Storing front passenger´s exterior mirror settings for reversing
Above the MAXI DOT display in the
Mirror down
menu item, the lowering func-
tion for the mirror on the passenger side must be enabled for reversing
» page 43 , Menu item
Settings
.
›
Unlock the vehicle with the remote control key and switch on the ignition.
›
Turn the rotary knob for the exterior mirror control to the position for the
front passenger mirror area » page 67.
›
Engage reverse gear.
›
Adjust the front passenger's mirror to the desired position.
›
Disengage reverse gear. The adjusted position of the exterior mirror is stored
in the remote control key memory.
Deactivating the function›Unlock the vehicle with the remote control key.›
Press and hold down the
A
» Fig. 57 on page 69 button. At the same time,
press the
button on the remote control key within 10 seconds. Deactivation
is confirmed by an acoustic signal.
Stopping the ongoing adjustment
›
Press any button on the driver's seat or the
button on the remote control
key.
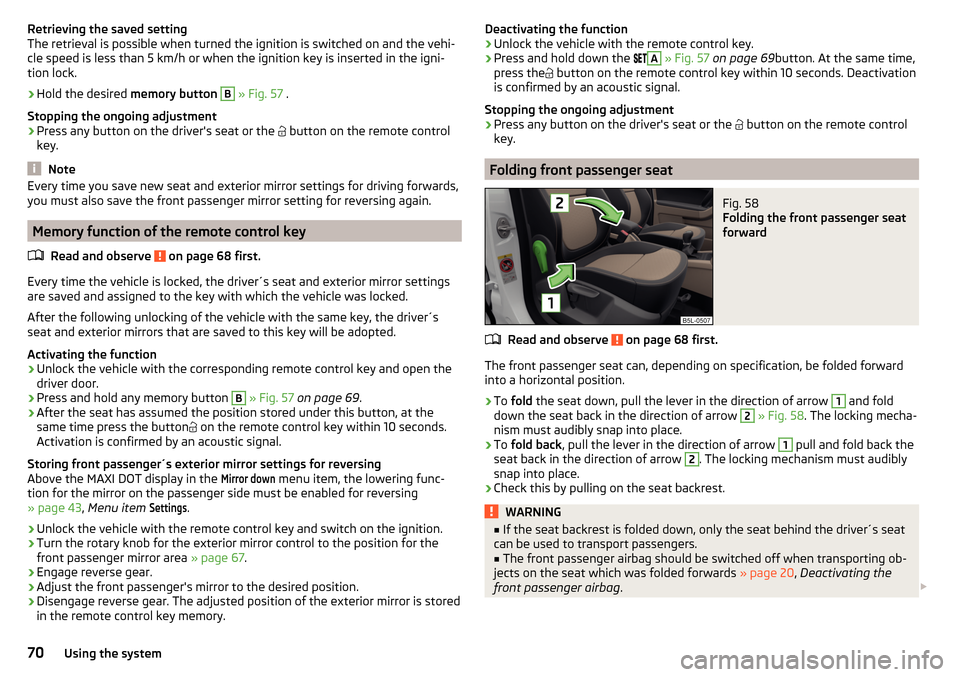
Folding front passenger seat
Fig. 58
Folding the front passenger seat
forward
Read and observe on page 68 first.
The front passenger seat can, depending on specification, be folded forward into a horizontal position.
›
To fold the seat down, pull the lever in the direction of arrow
1
and fold
down the seat back in the direction of arrow
2
» Fig. 58 . The locking mecha-
nism must audibly snap into place.
›
To fold back , pull the lever in the direction of arrow
1
pull and fold back the
seat back in the direction of arrow
2
. The locking mechanism must audibly
snap into place.
›
Check this by pulling on the seat backrest.
WARNING■ If the seat backrest is folded down, only the seat behind the driver´s seat
can be used to transport passengers.■
The front passenger airbag should be switched off when transporting ob-
jects on the seat which was folded forwards » page 20, Deactivating the
front passenger airbag .
70Using the system
Page 76 of 200
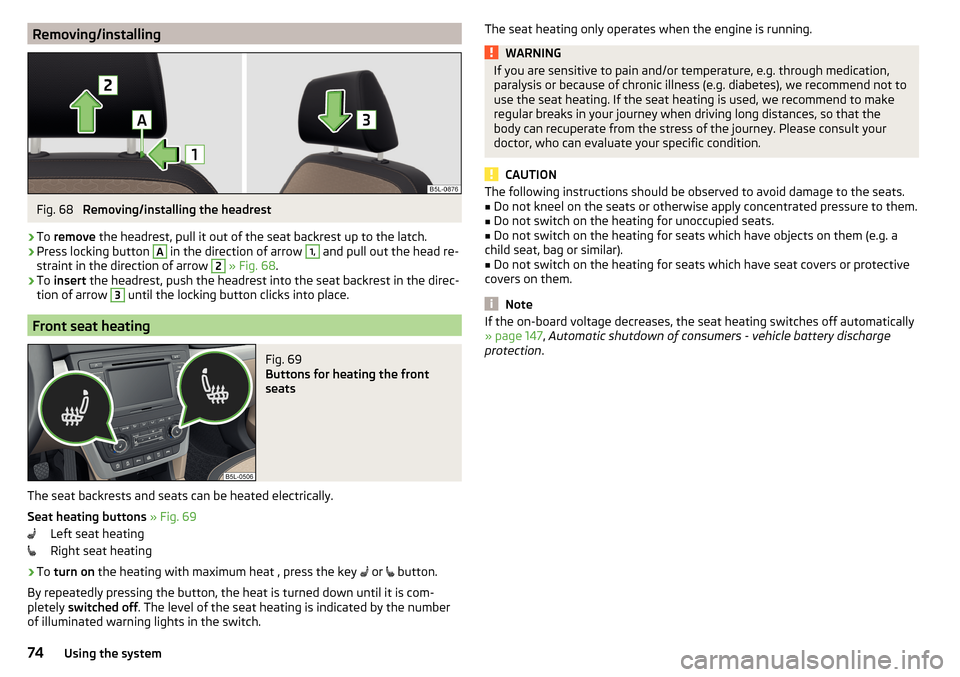
Removing/installingFig. 68
Removing/installing the headrest
›
To remove the headrest, pull it out of the seat backrest up to the latch.
›
Press locking button
A
in the direction of arrow
1,
and pull out the head re-
straint in the direction of arrow
2
» Fig. 68 .
›
To insert the headrest, push the headrest into the seat backrest in the direc-
tion of arrow
3
until the locking button clicks into place.
Front seat heating
Fig. 69
Buttons for heating the front
seats
The seat backrests and seats can be heated electrically.
Seat heating buttons » Fig. 69
Left seat heating
Right seat heating
›
To turn on the heating with maximum heat , press the key
or
button.
By repeatedly pressing the button, the heat is turned down until it is com-
pletely switched off . The level of the seat heating is indicated by the number
of illuminated warning lights in the switch.
The seat heating only operates when the engine is running.WARNINGIf you are sensitive to pain and/or temperature, e.g. through medication,
paralysis or because of chronic illness (e.g. diabetes), we recommend not to
use the seat heating. If the seat heating is used, we recommend to make
regular breaks in your journey when driving long distances, so that the
body can recuperate from the stress of the journey. Please consult your
doctor, who can evaluate your specific condition.
CAUTION
The following instructions should be observed to avoid damage to the seats.■Do not kneel on the seats or otherwise apply concentrated pressure to them.■
Do not switch on the heating for unoccupied seats.
■
Do not switch on the heating for seats which have objects on them (e.g. a
child seat, bag or similar).
■
Do not switch on the heating for seats which have seat covers or protective
covers on them.
Note
If the on-board voltage decreases, the seat heating switches off automatically
» page 147 , Automatic shutdown of consumers - vehicle battery discharge
protection .74Using the system
Page 82 of 200
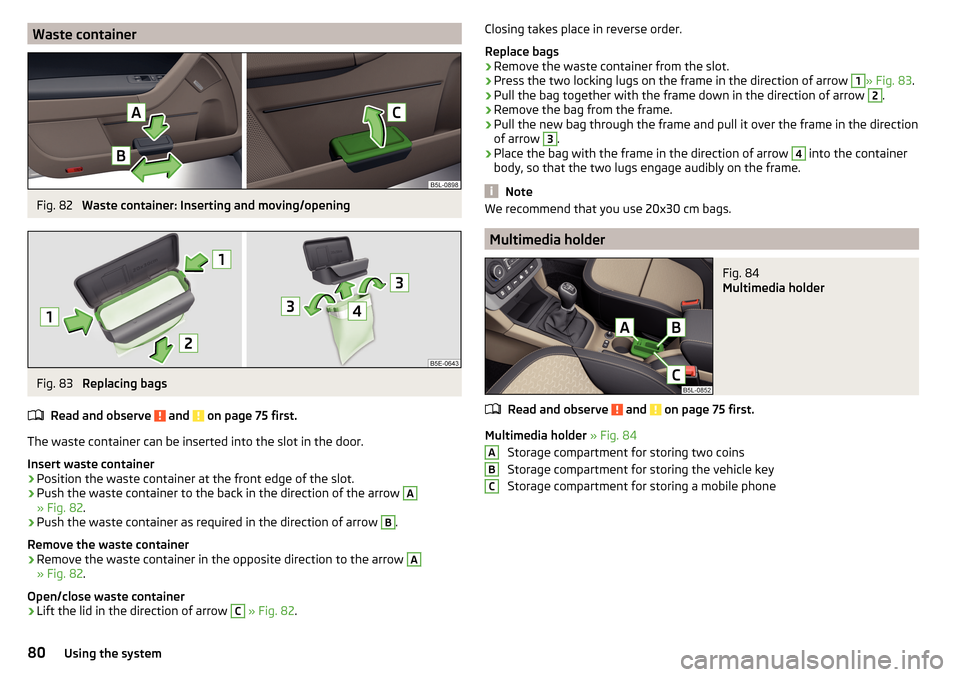
Waste containerFig. 82
Waste container: Inserting and moving/opening
Fig. 83
Replacing bags
Read and observe
and on page 75 first.
The waste container can be inserted into the slot in the door.
Insert waste container
›
Position the waste container at the front edge of the slot.
›
Push the waste container to the back in the direction of the arrow
A
» Fig. 82 .
›
Push the waste container as required in the direction of arrow
B
.
Remove the waste container
›
Remove the waste container in the opposite direction to the arrow
A
» Fig. 82 .
Open/close waste container
›
Lift the lid in the direction of arrow
C
» Fig. 82 .
Closing takes place in reverse order.
Replace bags›
Remove the waste container from the slot.
›
Press the two locking lugs on the frame in the direction of arrow
1
» Fig. 83 .
›
Pull the bag together with the frame down in the direction of arrow
2
.
›
Remove the bag from the frame.
›
Pull the new bag through the frame and pull it over the frame in the direction
of arrow
3
.
›
Place the bag with the frame in the direction of arrow
4
into the container
body, so that the two lugs engage audibly on the frame.
Note
We recommend that you use 20x30 cm bags.
Multimedia holder
Fig. 84
Multimedia holder
Read and observe and on page 75 first.
Multimedia holder » Fig. 84
Storage compartment for storing two coins
Storage compartment for storing the vehicle key
Storage compartment for storing a mobile phone
ABC80Using the system
Page 94 of 200
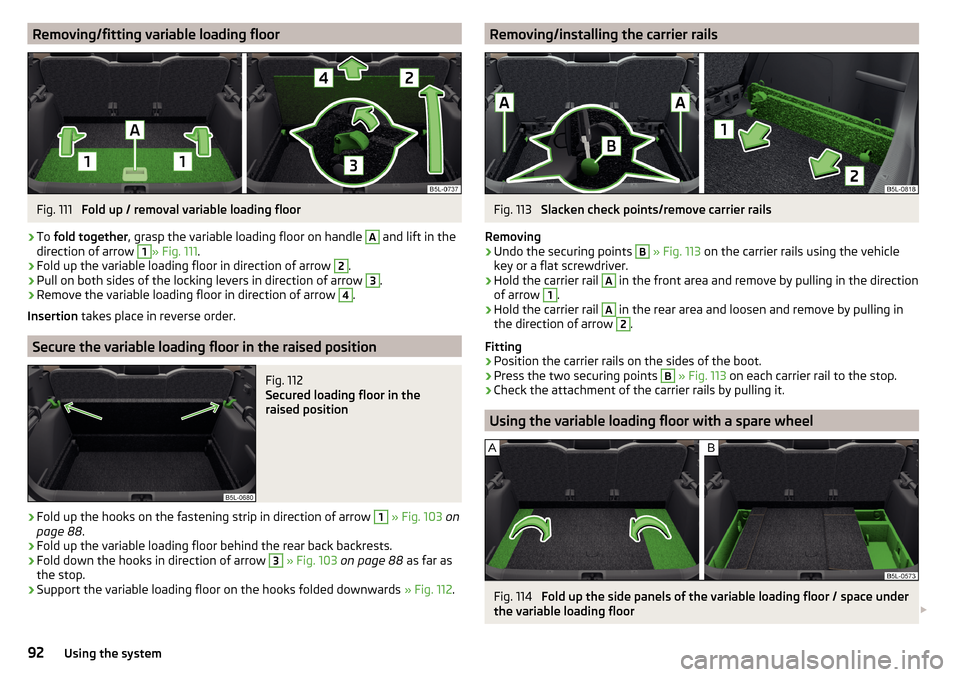
Removing/fitting variable loading floorFig. 111
Fold up / removal variable loading floor
›
To fold together , grasp the variable loading floor on handle
A
and lift in the
direction of arrow
1
» Fig. 111 .
›
Fold up the variable loading floor in direction of arrow
2
.
›
Pull on both sides of the locking levers in direction of arrow
3
.
›
Remove the variable loading floor in direction of arrow
4
.
Insertion takes place in reverse order.
Secure the variable loading floor in the raised position
Fig. 112
Secured loading floor in the
raised position
›
Fold up the hooks on the fastening strip in direction of arrow
1
» Fig. 103 on
page 88 .
›
Fold up the variable loading floor behind the rear back backrests.
›
Fold down the hooks in direction of arrow
3
» Fig. 103 on page 88 as far as
the stop.
›
Support the variable loading floor on the hooks folded downwards » Fig. 112.
Removing/installing the carrier railsFig. 113
Slacken check points/remove carrier rails
Removing
›
Undo the securing points
B
» Fig. 113 on the carrier rails using the vehicle
key or a flat screwdriver.
›
Hold the carrier rail
A
in the front area and remove by pulling in the direction
of arrow
1
.
›
Hold the carrier rail
A
in the rear area and loosen and remove by pulling in
the direction of arrow
2
.
Fitting
›
Position the carrier rails on the sides of the boot.
›
Press the two securing points
B
» Fig. 113 on each carrier rail to the stop.
›
Check the attachment of the carrier rails by pulling it.
Using the variable loading floor with a spare wheel
Fig. 114
Fold up the side panels of the variable loading floor / space under
the variable loading floor
92Using the system
Page 98 of 200
Air distribution controlRead and observe
on page 94 first.
The recirculation mode prevents contaminated outside air getting into the in-
terior of the vehicle. In recirculated air mode air is sucked out of the interior of
the vehicle and then fed back into the interior.
Heating and manual air conditioning system
›
To switch on press the
button.
›
To switch off , press the
button again.
If the air distribution control is set to position
when the recirculation modes
is switched on, the recirculated-air mode is switched off.
By pressing the button, the air recirculation also in this position can be
switched on again.
Climatronic (automatic air conditioning)
›
To turn the recirculation mode on, press the Symbol key
repeatedly until
the indicator light is lit on the left side of the button.
›
To activate the automatic recirculation mode, press the Symbol key
re-
peatedly until the indicator light is lit on the right side of the button.
The Climatronic can have a sensor that measures the air recirculation mode
and automatically turns on if there is an increased concentration of pollutants
in the incoming air.
When the pollutant concentration decreases to the normal level, the recircula-
ted air mode is automatically switched off.
If the air quality sensor does not automatically switch on the recirculated air mode, you can switch it on yourself by pressing the button . The indicator
light lights up in the button on the left side.
To turn off the air recirculation or to deactivate the automatic air recircula-
tion , press the
button of press the
symbol button repeatedly until the
warning lights in the button go out.
WARNINGThe recirculation system cannot be switched on for a longer period of time,
because no fresh air is fed through from the outside. “Stale air” may result
in fatigue in the driver and occupants, reduce attention levels and also
cause the windows to mist up. As soon as windows mist up, turn on the re-
circulation system immediately - There is a risk of accident!CAUTIONWe recommend not smoking in the vehicle when the recirculating air operation
is switched on. The smoke sucked from the interior is deposited on the evapo-
rator of the air conditioner. This produces a permanent odour when the air
conditioning system is operating which can only be eliminated through consid-
erable effort and expense (replacement of compressor).
Note
The Climatronic automatic air distribution control operates only if the outside
temperature is higher than approx. 2 °C.
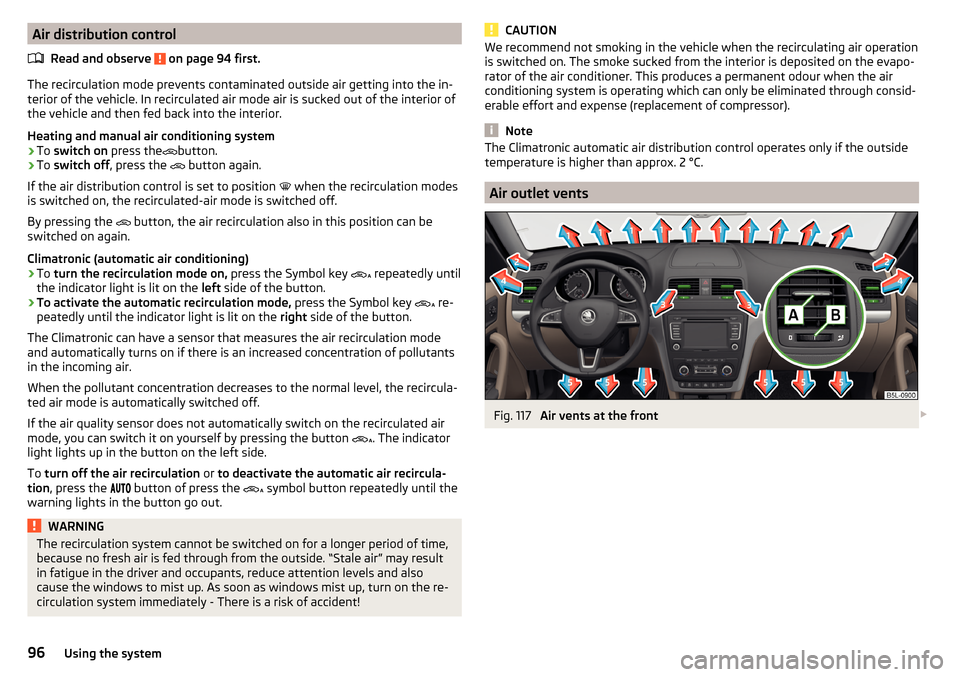
Air outlet vents
Fig. 117
Air vents at the front
96Using the system