display SKODA YETI 2016 1.G / 5L Swing Infotainment System Navigation Manual
[x] Cancel search | Manufacturer: SKODA, Model Year: 2016, Model line: YETI, Model: SKODA YETI 2016 1.G / 5LPages: 40, PDF Size: 4.41 MB
Page 18 of 40
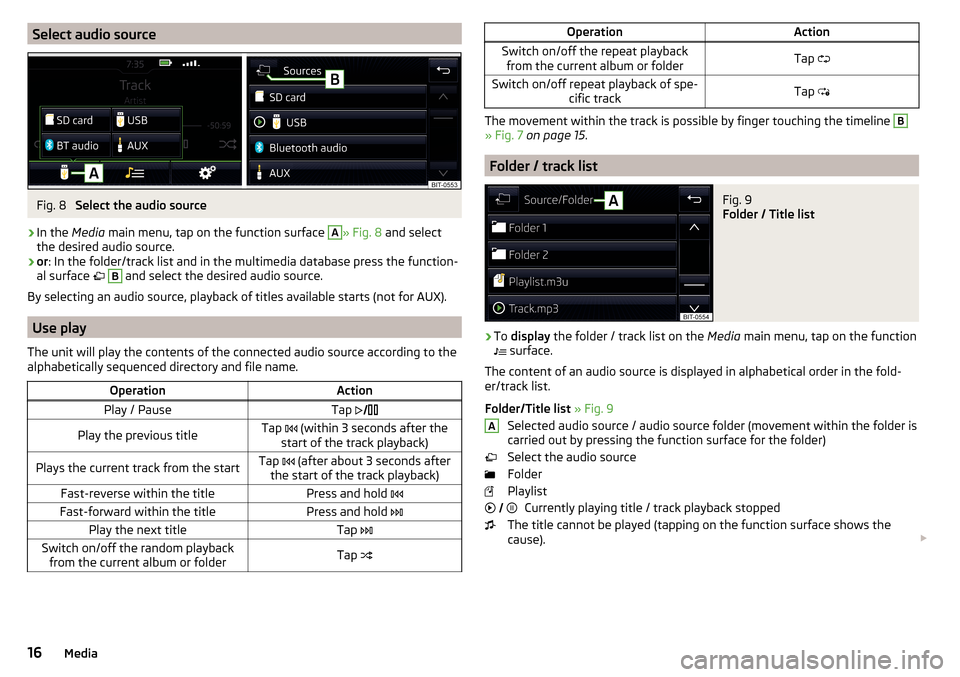
Select audio sourceFig. 8
Select the audio source
›
In the Media main menu, tap on the function surface
A
» Fig. 8 and select
the desired audio source.
›
or : In the folder/track list and in the multimedia database press the function-
al surface
B
and select the desired audio source.
By selecting an audio source, playback of titles available starts (not for AUX).
Use play
The unit will play the contents of the connected audio source according to the
alphabetically sequenced directory and file name.
OperationActionPlay / PauseTap Play the previous titleTap (within 3 seconds after the
start of the track playback)Plays the current track from the startTap (after about 3 seconds after
the start of the track playback)Fast-reverse within the titlePress and hold Fast-forward within the titlePress and hold Play the next titleTap Switch on/off the random playback
from the current album or folderTap OperationActionSwitch on/off the repeat playback
from the current album or folderTap Switch on/off repeat playback of spe-
cific trackTap
The movement within the track is possible by finger touching the timeline
B
» Fig. 7 on page 15 .
Folder / track list
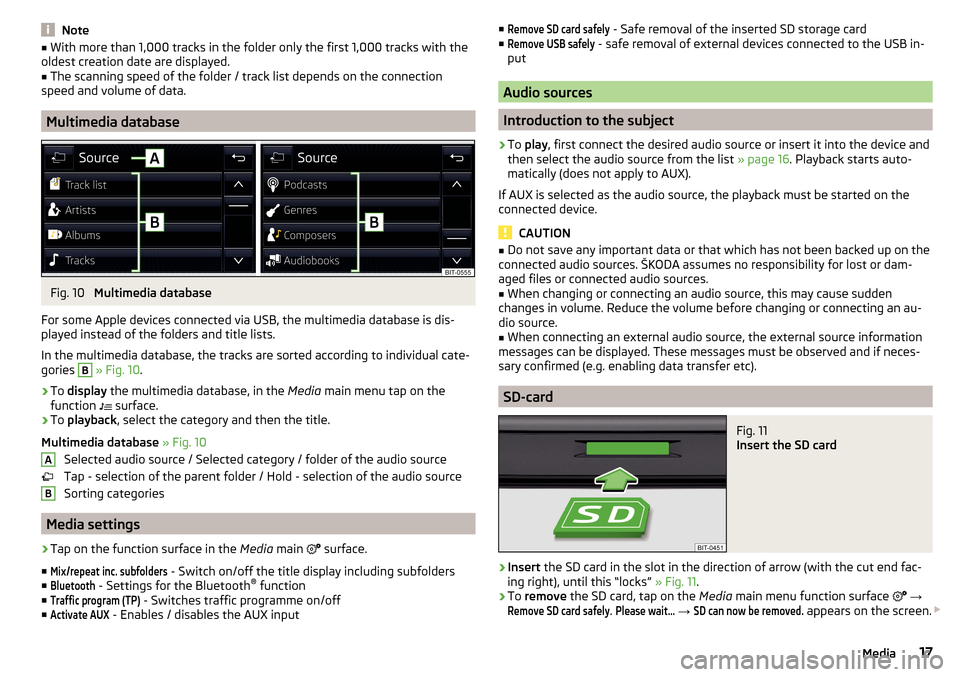
Fig. 9
Folder / Title list
›
To display the folder / track list on the Media main menu, tap on the function
surface.
The content of an audio source is displayed in alphabetical order in the fold- er/track list.
Folder/Title list » Fig. 9
Selected audio source / audio source folder (movement within the folder is
carried out by pressing the function surface for the folder)
Select the audio source
Folder
Playlist Currently playing title / track playback stopped
The title cannot be played (tapping on the function surface shows the
cause).
A
16Media
Page 19 of 40
Note■With more than 1,000 tracks in the folder only the first 1,000 tracks with the
oldest creation date are displayed.■
The scanning speed of the folder / track list depends on the connection
speed and volume of data.
Multimedia database
Fig. 10
Multimedia database
For some Apple devices connected via USB, the multimedia database is dis-
played instead of the folders and title lists.
In the multimedia database, the tracks are sorted according to individual cate-
gories
B
» Fig. 10 .
›
To display the multimedia database, in the Media main menu tap on the
function surface.
›
To
playback , select the category and then the title.
Multimedia database » Fig. 10
Selected audio source / Selected category / folder of the audio source
Tap - selection of the parent folder / Hold - selection of the audio source
Sorting categories
Media settings
›
Tap on the function surface in the Media main
surface.
■
Mix/repeat inc. subfolders
- Switch on/off the title display including subfolders
■
Bluetooth
- Settings for the Bluetooth ®
function
■
Traffic program (TP)
- Switches traffic programme on/off
■
Activate AUX
- Enables / disables the AUX input
AB■Remove SD card safely - Safe removal of the inserted SD storage card
■Remove USB safely
- safe removal of external devices connected to the USB in-
put
Audio sources
Introduction to the subject
›
To play , first connect the desired audio source or insert it into the device and
then select the audio source from the list » page 16. Playback starts auto-
matically (does not apply to AUX).
If AUX is selected as the audio source, the playback must be started on the
connected device.
CAUTION
■ Do not save any important data or that which has not been backed up on the
connected audio sources. ŠKODA assumes no responsibility for lost or dam-
aged files or connected audio sources.■
When changing or connecting an audio source, this may cause sudden
changes in volume. Reduce the volume before changing or connecting an au-
dio source.
■
When connecting an external audio source, the external source information
messages can be displayed. These messages must be observed and if neces-
sary confirmed (e.g. enabling data transfer etc).
SD-card
Fig. 11
Insert the SD card
›
Insert the SD card in the slot in the direction of arrow (with the cut end fac-
ing right), until this “locks” » Fig. 11.
›
To remove the SD card, tap on the Media main menu function surface
→
Remove SD card safely
.
Please wait...
→
SD can now be removed.
appears on the screen.
17Media
Page 22 of 40
Telephone
Introductory information
Introduction to the subject
This chapter covers the operation of a Bluetooth ®
device connected to the tel-
ephone.
If a telephone is connected to the device with multiple SIM cards, then calls
can be accepted by all SIM cards of the connected phone.
For outgoing calls, it depends on the type of connected telephone, either only
the primary SIM card or one of the other SIM cards can be selected.
Phonebox
The storage compartment in the front centre console can be equipped with
the Phonebox function » Vehicle - Owner´s Manual .
If a telephone is directed, with its rear side downwards, on the pad in the stor-
age compartment, the phone signal is amplified by the roof antenna.
Telephones that support the Qi standard for wireless charging, can also be charged wirelessly in the storage compartment. At the start of the wireless
charging, the appropriate message appears on the device screen.
WARNINGThe general binding country-specific regulations for operating mobile
phones in the vehicle must be observed.
Telephone
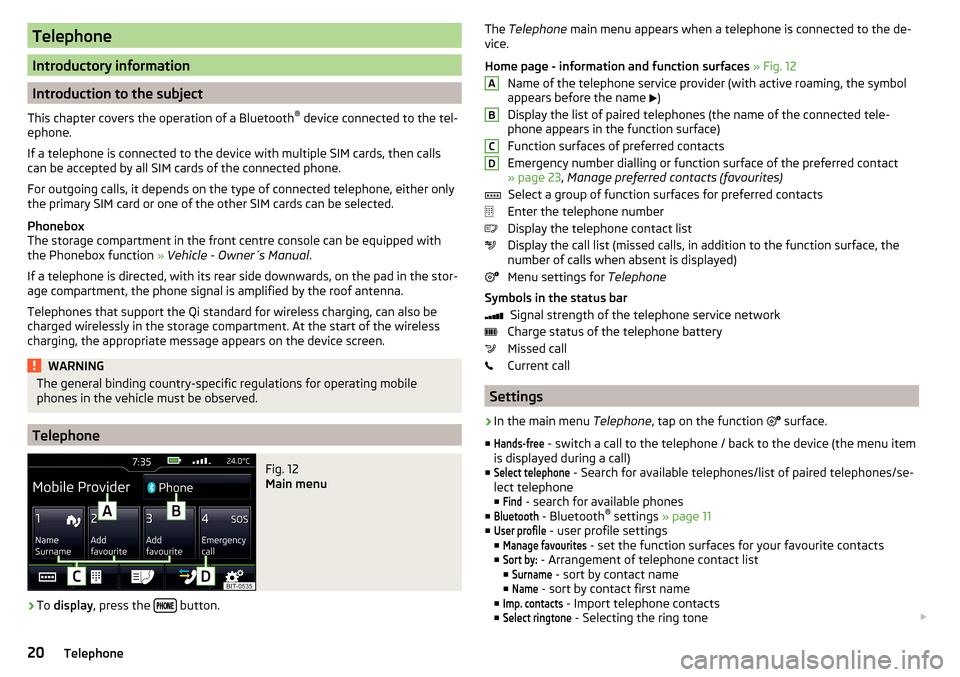
Fig. 12
Main menu
›
To display , press the button.
The
Telephone main menu appears when a telephone is connected to the de-
vice.
Home page - information and function surfaces » Fig. 12
Name of the telephone service provider (with active roaming, the symbol
appears before the name
)
Display the list of paired telephones (the name of the connected tele-
phone appears in the function surface)
Function surfaces of preferred contacts
Emergency number dialling or function surface of the preferred contact
» page 23 , Manage preferred contacts (favourites)
Select a group of function surfaces for preferred contacts
Enter the telephone number
Display the telephone contact list
Display the call list (missed calls, in addition to the function surface, the
number of calls when absent is displayed)
Menu settings for Telephone
Symbols in the status bar Signal strength of the telephone service network
Charge status of the telephone battery
Missed call
Current call
Settings
›
In the main menu Telephone, tap on the function
surface.
■
Hands-free
- switch a call to the telephone / back to the device (the menu item
is displayed during a call)
■
Select telephone
- Search for available telephones/list of paired telephones/se-
lect telephone
■
Find
- search for available phones
■
Bluetooth
- Bluetooth ®
settings » page 11
■
User profile
- user profile settings
■
Manage favourites
- set the function surfaces for your favourite contacts
■
Sort by:
- Arrangement of telephone contact list
■
Surname
- sort by contact name
■
Name
- sort by contact first name
■
Imp. contacts
- Import telephone contacts
■
Select ringtone
- Selecting the ring tone
ABCD20Telephone
Page 23 of 40
■Remember your mobile - Turn on/off the warning mode before forgetting the
phone in the vehicle (if the phone was connected to the device)
■Simultaneous calls
- enable/disable the option to hold two concurrent calls
Pair and connect
Introduction to the subject
The range of the connection to the hands-free system is limited to the passen-
ger compartment.
To pair a telephone with the device using Bluetooth ®
, it is necessary to pair
the two devices.
The pairing process is dependent on whether another telephone is connected
or not connected to the device at the time of pairing.
A telephone and a Bluetooth ®
player can be connected to the device. The tele-
phone can also be a player at the same time.
Up to 20 external devices can be paired with the device. After reaching the
maximum number, the pairing of the next external device will replace that of
the device that has not been used for the longest period of time.
A connection with a telephone that is already paired does not require pairing. It is enough to find the telephone that has been paired in the list of paired
phones and make the connection.
WARNINGPair and connect a telephone to the device only when the vehicle is at a
standstill - there is risk of accident!
conditions for pairing
The telephone can be paired with the device under the following conditions. The ignition is switched on.
The Bluetooth ®
function of the device and the telephone is switched on.
The visibility of the device and the telephone is switched on.
The telephone is within range of the Bluetooth ®
signal of the device.
The telephone is compatible with the device.
The telephone is connected to an external Bluetooth ®
device (e.g. “head-
set”).
The pairing can be initiated from the device or from the telephone.
During the pairing and connection process, information messages are dis-
played in the device screen and the telephone screen. These messages must
be observed and if necessary confirmed (e.g. enabling the contact import or
connecting the Bluetooth ®
player among others).
Please refer to the compatibility of telephones as well as updates which are available for the Bluetooth ®
device, and are available on the ŠKODA Internet
pages.
http://go.skoda.eu/infotainment
Pairing and connection process
Pair the telephone with the device
›
Search available Bluetooth ®
devices in your telephone.
›
Select the device (name of the device
→
Bluetooth
→
Name:
).
›
Confirm or enter the PIN code to confirm the pairing.
The telephone is connected to the device or merely paired, depending on
whether one or no other external device is already connected.
Pair the device with the telephone
›
If there is no telephone connected to the device, then press the button
then tap the function surface
Find telephone
.
›
If a telephone is connected to the device, press the button, then tap on
the function surface
→
Find telephone
.
›
Select the desired telephone from the list of selected external Bluetooth ®
devices.
›
Confirm or enter the PIN code to confirm the pairing.
If external Bluetooth ®
devices are already connected to the device, then dur-
ing the pairing and connection process messages and options for the possible
connection type (e.g. replacement of the connected external Bluetooth ®
de-
vice) are displayed.
21Telephone
Page 25 of 40
Delete the last number entered
Display of function surfaces
/
for the movement of the cursor in the
input line » Fig. 14 -
Breakdown and info numbers
The breakdown and info numbers are free of charge. Charges are only made
for a telephone call in accordance with the fare conditions of your telephone
service provider.
The phone numbers are already set at the factory. If you want to change the
numbers, then consult a ŠKODA service partner.
If no breakdown or Info calls can be made then a ŠKODA service partner should
be consulted.
Search for a contact using the numeric keypad
The numeric keypad can also be used for a contact search.
For example, if you enter 32, the unit will display contacts with the letter se-
quence DA, FA, EB, etc. next to the numerical keypad in areas A
» Fig. 14 .
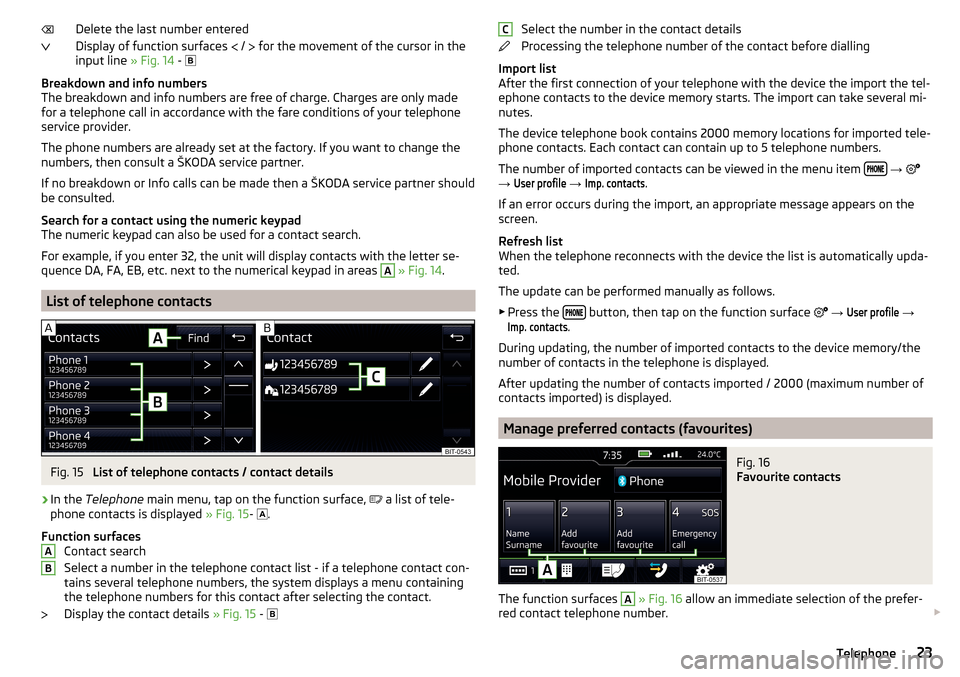
List of telephone contacts
Fig. 15
List of telephone contacts / contact details
›
In the Telephone main menu, tap on the function surface,
a list of tele-
phone contacts is displayed » Fig. 15-
.
Function surfaces Contact search
Select a number in the telephone contact list - if a telephone contact con-
tains several telephone numbers, the system displays a menu containing
the telephone numbers for this contact after selecting the contact.
Display the contact details » Fig. 15 -
ABSelect the number in the contact details
Processing the telephone number of the contact before dialling
Import list
After the first connection of your telephone with the device the import the tel-
ephone contacts to the device memory starts. The import can take several mi-
nutes.
The device telephone book contains 2000 memory locations for imported tele-
phone contacts. Each contact can contain up to 5 telephone numbers.
The number of imported contacts can be viewed in the menu item
→
→
User profile
→
Imp. contacts
.
If an error occurs during the import, an appropriate message appears on the
screen.
Refresh list
When the telephone reconnects with the device the list is automatically upda-
ted.
The update can be performed manually as follows. ▶ Press the
button, then tap on the function surface
→
User profile
→
Imp. contacts
.
During updating, the number of imported contacts to the device memory/the
number of contacts in the telephone is displayed.
After updating the number of contacts imported / 2000 (maximum number of
contacts imported) is displayed.
Manage preferred contacts (favourites)
Fig. 16
Favourite contacts
The function surfaces
A
» Fig. 16 allow an immediate selection of the prefer-
red contact telephone number.
C23Telephone
Page 26 of 40
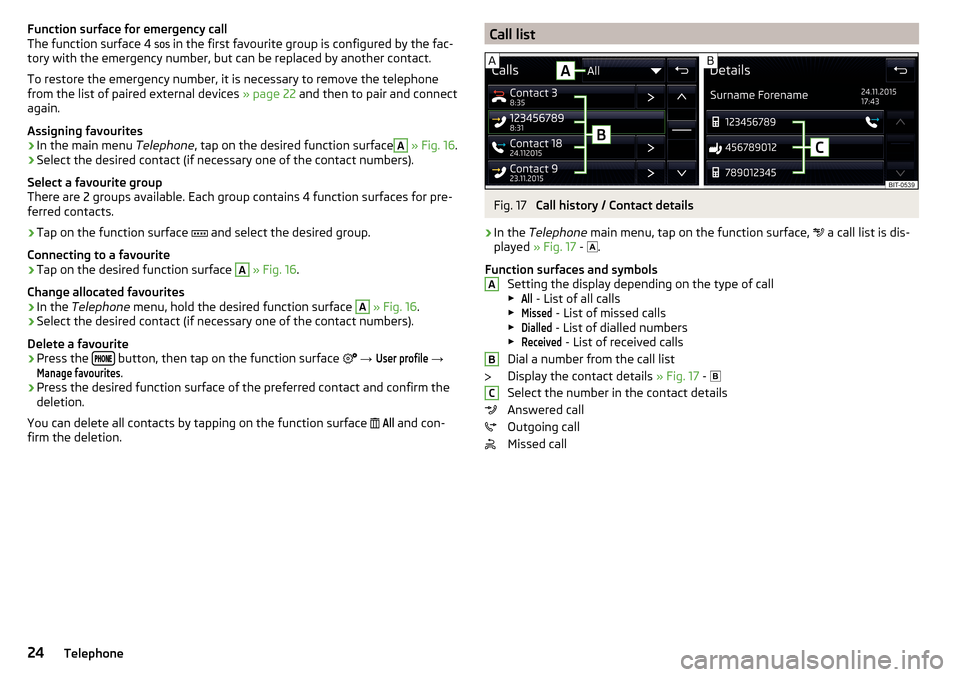
Function surface for emergency call
The function surface 4 in the first favourite group is configured by the fac-
tory with the emergency number, but can be replaced by another contact.
To restore the emergency number, it is necessary to remove the telephone
from the list of paired external devices » page 22 and then to pair and connect
again.
Assigning favourites›
In the main menu Telephone, tap on the desired function surface
A
» Fig. 16 .
›
Select the desired contact (if necessary one of the contact numbers).
Select a favourite group
There are 2 groups available. Each group contains 4 function surfaces for pre-
ferred contacts.
›
Tap on the function surface and select the desired group.
Connecting to a favourite
›
Tap on the desired function surface
A
» Fig. 16 .
Change allocated favourites
›
In the Telephone menu, hold the desired function surface
A
» Fig. 16 .
›
Select the desired contact (if necessary one of the contact numbers).
Delete a favourite
›
Press the button, then tap on the function surface
→
User profile
→
Manage favourites
.
›
Press the desired function surface of the preferred contact and confirm the
deletion.
You can delete all contacts by tapping on the function surface
All
and con-
firm the deletion.
Call listFig. 17
Call history / Contact details
›
In the Telephone main menu, tap on the function surface,
a call list is dis-
played » Fig. 17 -
.
Function surfaces and symbols Setting the display depending on the type of call▶
All
- List of all calls
▶
Missed
- List of missed calls
▶
Dialled
- List of dialled numbers
▶
Received
- List of received calls
Dial a number from the call list
Display the contact details » Fig. 17 -
Select the number in the contact details
Answered call
Outgoing call
Missed call
ABC24Telephone
Page 28 of 40
Vehicle systems
CAR - vehicle setting
Introduction to the subject
In the menu CAR travel data and information displayed on the vehicle and
some vehicle systems can be set.
Description of the individual systems » Vehicle Owner's Manual .
Note
Settings relating to the vehicle systems can only be made when the ignition is
switched on.
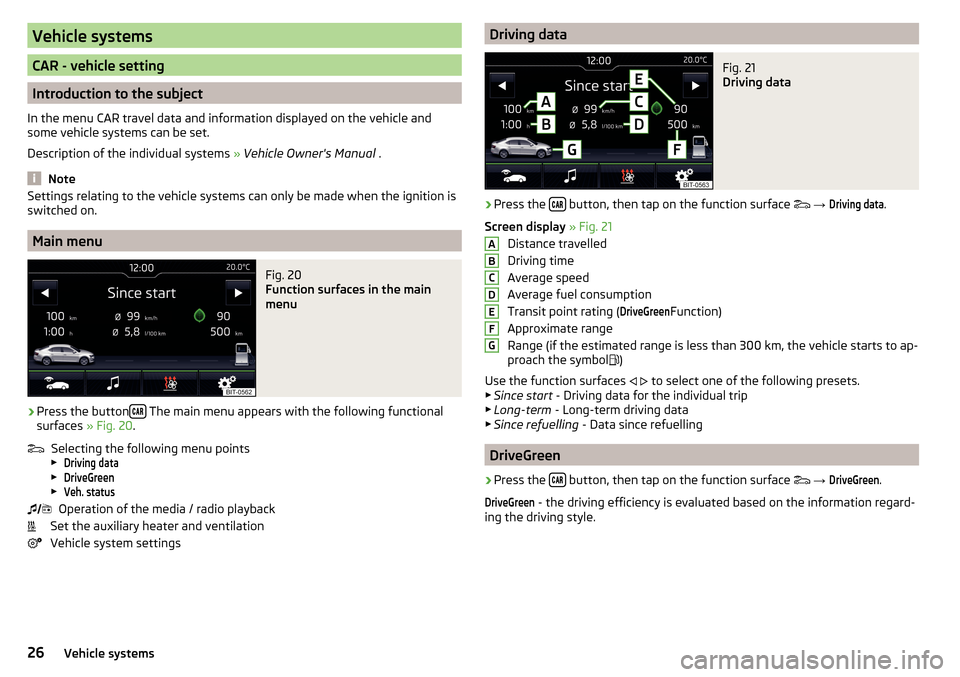
Main menu
Fig. 20
Function surfaces in the main
menu
›
Press the button The main menu appears with the following functional
surfaces » Fig. 20.
Selecting the following menu points
▶
Driving data
▶
DriveGreen
▶
Veh. status
Operation of the media / radio playback
Set the auxiliary heater and ventilation
Vehicle system settings
Driving dataFig. 21
Driving data
›
Press the button, then tap on the function surface
→
Driving data
.
Screen display » Fig. 21
Distance travelled
Driving time
Average speed
Average fuel consumption
Transit point rating (
DriveGreen
Function)
Approximate range
Range (if the estimated range is less than 300 km, the vehicle starts to ap-
proach the symbol )
Use the function surfaces
to select one of the following presets.
▶ Since start - Driving data for the individual trip
▶ Long-term - Long-term driving data
▶ Since refuelling - Data since refuelling
DriveGreen
›
Press the button, then tap on the function surface
→
DriveGreen
.
DriveGreen
- the driving efficiency is evaluated based on the information regard-
ing the driving style.
ABCDEFG26Vehicle systems
Page 29 of 40
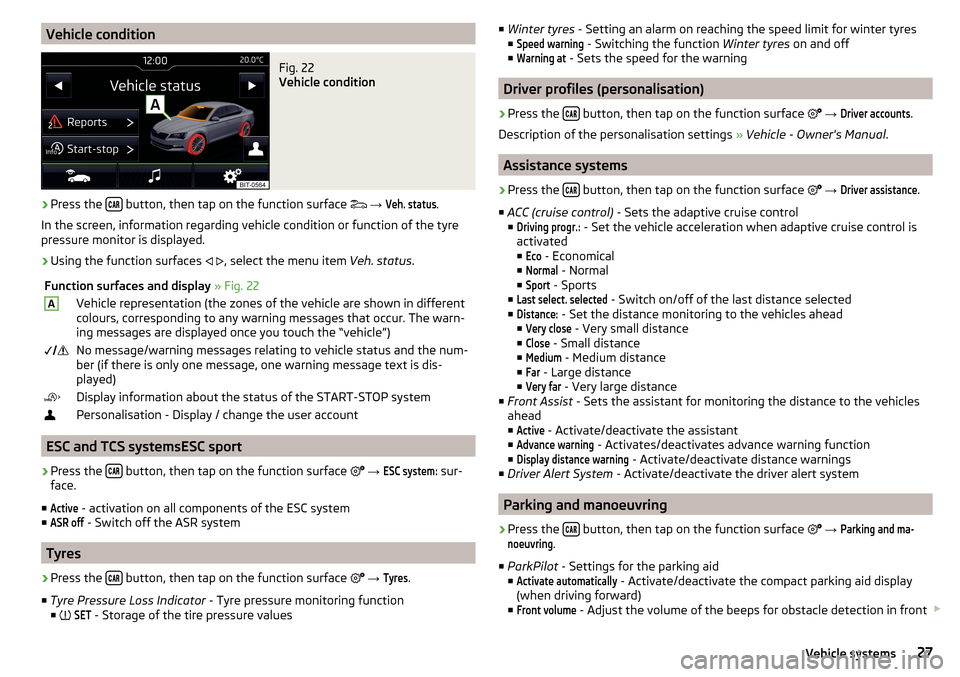
Vehicle conditionFig. 22
Vehicle condition
›
Press the button, then tap on the function surface
→
Veh. status
.
In the screen, information regarding vehicle condition or function of the tyre
pressure monitor is displayed.
›
Using the function surfaces
, select the menu item
Veh. status.
Function surfaces and display » Fig. 22AVehicle representation (the zones of the vehicle are shown in different
colours, corresponding to any warning messages that occur. The warn-
ing messages are displayed once you touch the “vehicle”) No message/warning messages relating to vehicle status and the num-
ber (if there is only one message, one warning message text is dis-
played)Display information about the status of the START-STOP systemPersonalisation - Display / change the user account
ESC and TCS systemsESC sport
›
Press the button, then tap on the function surface
→
ESC system:
sur-
face.
■
Active
- activation on all components of the ESC system
■
ASR off
- Switch off the ASR system
Tyres
›
Press the button, then tap on the function surface
→
Tyres
.
■ Tyre Pressure Loss Indicator - Tyre pressure monitoring function
■
SET
- Storage of the tire pressure values
■
Winter tyres - Setting an alarm on reaching the speed limit for winter tyres
■Speed warning
- Switching the function Winter tyres on and off
■
Warning at
- Sets the speed for the warning
Driver profiles (personalisation)
›
Press the button, then tap on the function surface
→
Driver accounts
.
Description of the personalisation settings » Vehicle - Owner's Manual .
Assistance systems
›
Press the button, then tap on the function surface
→
Driver assistance
.
■ ACC (cruise control) - Sets the adaptive cruise control
■
Driving progr.:
- Set the vehicle acceleration when adaptive cruise control is
activated
■
Eco
- Economical
■
Normal
- Normal
■
Sport
- Sports
■
Last select. selected
- Switch on/off of the last distance selected
■
Distance:
- Set the distance monitoring to the vehicles ahead
■
Very close
- Very small distance
■
Close
- Small distance
■
Medium
- Medium distance
■
Far
- Large distance
■
Very far
- Very large distance
■ Front Assist - Sets the assistant for monitoring the distance to the vehicles
ahead
■
Active
- Activate/deactivate the assistant
■
Advance warning
- Activates/deactivates advance warning function
■
Display distance warning
- Activate/deactivate distance warnings
■ Driver Alert System - Activate/deactivate the driver alert system
Parking and manoeuvring
›
Press the button, then tap on the function surface
→
Parking and ma-noeuvring
.
■ ParkPilot - Settings for the parking aid
■
Activate automatically
- Activate/deactivate the compact parking aid display
(when driving forward)
■
Front volume
- Adjust the volume of the beeps for obstacle detection in front
27Vehicle systems
Page 30 of 40
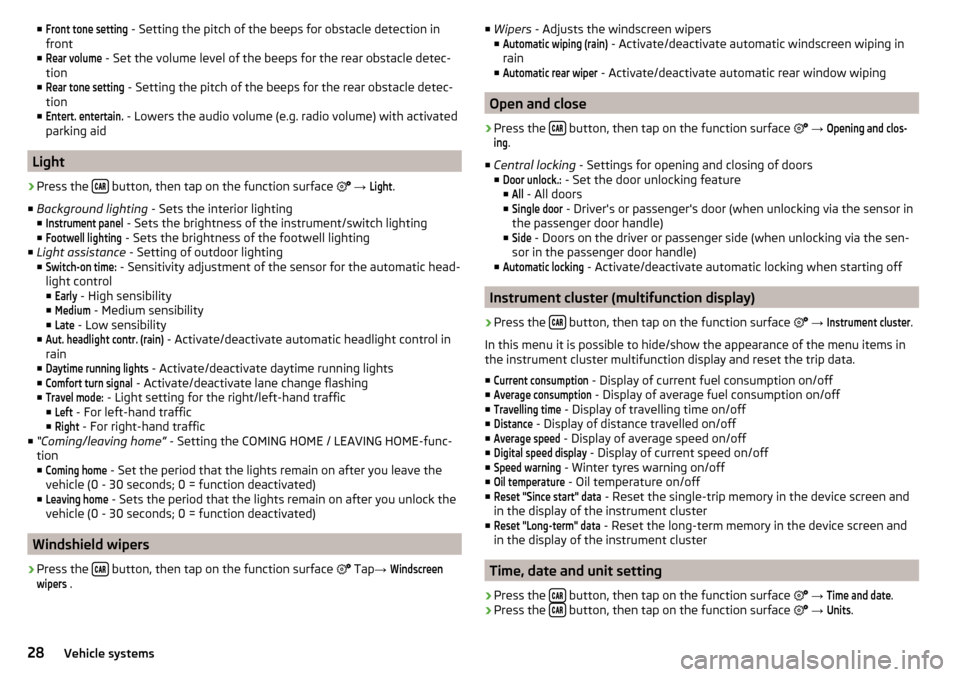
■Front tone setting - Setting the pitch of the beeps for obstacle detection in
front
■Rear volume
- Set the volume level of the beeps for the rear obstacle detec-
tion
■
Rear tone setting
- Setting the pitch of the beeps for the rear obstacle detec-
tion
■
Entert. entertain.
- Lowers the audio volume (e.g. radio volume) with activated
parking aid
Light
›
Press the button, then tap on the function surface
→
Light
.
■ Background lighting - Sets the interior lighting
■
Instrument panel
- Sets the brightness of the instrument/switch lighting
■
Footwell lighting
- Sets the brightness of the footwell lighting
■ Light assistance - Setting of outdoor lighting
■
Switch-on time:
- Sensitivity adjustment of the sensor for the automatic head-
light control ■
Early
- High sensibility
■
Medium
- Medium sensibility
■
Late
- Low sensibility
■
Aut. headlight contr. (rain)
- Activate/deactivate automatic headlight control in
rain
■
Daytime running lights
- Activate/deactivate daytime running lights
■
Comfort turn signal
- Activate/deactivate lane change flashing
■
Travel mode:
- Light setting for the right/left-hand traffic
■
Left
- For left-hand traffic
■
Right
- For right-hand traffic
■ “Coming/leaving home” - Setting the COMING HOME / LEAVING HOME-func-
tion ■
Coming home
- Set the period that the lights remain on after you leave the
vehicle (0 - 30 seconds; 0 = function deactivated)
■
Leaving home
- Sets the period that the lights remain on after you unlock the
vehicle (0 - 30 seconds; 0 = function deactivated)
Windshield wipers
›
Press the button, then tap on the function surface
Tap
→
Windscreenwipers
.
■
Wipers - Adjusts the windscreen wipers
■Automatic wiping (rain)
- Activate/deactivate automatic windscreen wiping in
rain
■
Automatic rear wiper
- Activate/deactivate automatic rear window wiping
Open and close
›
Press the button, then tap on the function surface
→
Opening and clos-ing
.
■ Central locking - Settings for opening and closing of doors
■
Door unlock.:
- Set the door unlocking feature
■
All
- All doors
■
Single door
- Driver's or passenger's door (when unlocking via the sensor in
the passenger door handle)
■
Side
- Doors on the driver or passenger side (when unlocking via the sen-
sor in the passenger door handle)
■
Automatic locking
- Activate/deactivate automatic locking when starting off
Instrument cluster (multifunction display)
›
Press the button, then tap on the function surface
→
Instrument cluster
.
In this menu it is possible to hide/show the appearance of the menu items in
the instrument cluster multifunction display and reset the trip data.
■
Current consumption
- Display of current fuel consumption on/off
■
Average consumption
- Display of average fuel consumption on/off
■
Travelling time
- Display of travelling time on/off
■
Distance
- Display of distance travelled on/off
■
Average speed
- Display of average speed on/off
■
Digital speed display
- Display of current speed on/off
■
Speed warning
- Winter tyres warning on/off
■
Oil temperature
- Oil temperature on/off
■
Reset "Since start" data
- Reset the single-trip memory in the device screen and
in the display of the instrument cluster
■
Reset "Long-term" data
- Reset the long-term memory in the device screen and
in the display of the instrument cluster
Time, date and unit setting
›
Press the button, then tap on the function surface
→
Time and date
.
›
Press the button, then tap on the function surface
→
Units
.
28Vehicle systems
Page 31 of 40
Service›
Press the button, then tap on the function surface
→
Service
.
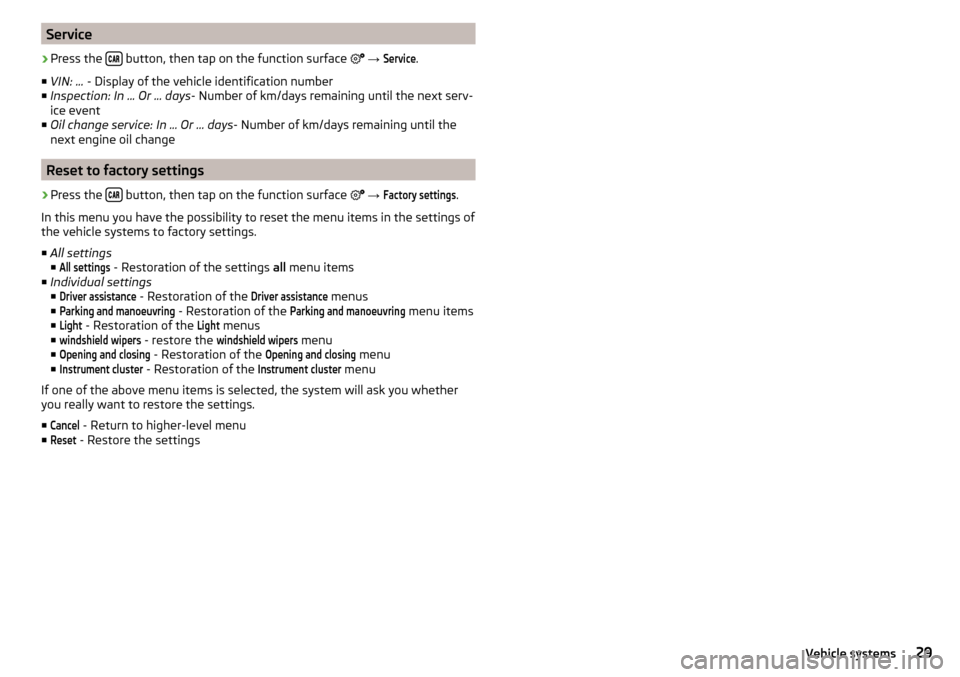
■ VIN: ... - Display of the vehicle identification number
■ Inspection: In ... Or ... days - Number of km/days remaining until the next serv-
ice event
■ Oil change service: In ... Or ... days - Number of km/days remaining until the
next engine oil change
Reset to factory settings
›
Press the button, then tap on the function surface
→
Factory settings
.
In this menu you have the possibility to reset the menu items in the settings of
the vehicle systems to factory settings.
■ All settings
■
All settings
- Restoration of the settings all menu items
■ Individual settings
■
Driver assistance
- Restoration of the
Driver assistance
menus
■
Parking and manoeuvring
- Restoration of the
Parking and manoeuvring
menu items
■
Light
- Restoration of the
Light
menus
■
windshield wipers
- restore the
windshield wipers
menu
■
Opening and closing
- Restoration of the
Opening and closing
menu
■
Instrument cluster
- Restoration of the
Instrument cluster
menu
If one of the above menu items is selected, the system will ask you whether
you really want to restore the settings.
■
Cancel
- Return to higher-level menu
■
Reset
- Restore the settings
29Vehicle systems