stop start SMART FORTWO 2016 Owner's Manual
[x] Cancel search | Manufacturer: SMART, Model Year: 2016, Model line: FORTWO, Model: SMART FORTWO 2016Pages: 214, PDF Size: 4.93 MB
Page 143 of 214

Vehicle
ProblemPossible causes/consequences and0050Solutions
\
The red door warning
lamp comes on while the
vehicle is moving.
In addition, further
warning lamps light up,
such as 00E5.The central vehicle electronics system is malfunctioning.
After the engine is switched off:
Rdo not lock/unlock the doors using the remote control function of
the key
Ryou can no longer start the engine.
XObserve the additional display messages in the display.
XPull over and stop the vehicle safely as soon as possible, paying
attention to road and traffic conditions. Do not continue driv-
ing under any circumstances.
XSecure the vehicle against rolling away (Ypage 100).
XConsult a qualified specialist workshop.
\
The red door warning
lamp is on.A door or the tailgate is open. If you are driving at speeds above
13 mph (20 km/h), an additional warning tone will sound.
XObserve the additional display messages in the display.
XPull over at a suitable place and stop the vehicle safely, paying
attention to road and traffic conditions.
XSecure the vehicle against rolling away (Ypage 100).
XClose all doors and the tailgate.
0052
The yellow power steer-
ing warning lamp is lit
while the engine is
running.The power steering is malfunctioning.
GWARNING
You may need to use more force to steer.
There is a risk of an accident.
XObserve the additional display messages in the display.
XCheck whether you are able to apply the extra force required.
XIf you are able to steer safely: carefully drive on to a qualified
specialist workshop.
XIf you are unable to steer safely: do not drive on. Contact the
nearest qualified specialist workshop.
Warning and indicator lamps in the instrument cluster141
>> On-board computer and displays.
Z
Page 152 of 214

When checking the oil level:
Rpark the vehicle on a level surface.
Rthe engine should be switched off for
approximately 5 minutes if the engine is at
normal operating temperature
Rif the engine is not at normal operating
temperature, e.g. if the engine was only
started briefly, wait approximately
30 minutes before carrying out the meas-
urement
Checking the oil level using the oil dip-
stick
GWARNING
Certain components in the engine compart- ment, such as the engine, radiator and parts
of the exhaust system, can become very hot.
Working in the engine compartment poses a risk of injury.
Where possible, let the engine cool down
and touch only the components described in
the following.
GWARNING
Opening the hood when the engine is over-
heated or when there is a fire in the engine
compartment could expose you to hot gases
or other service products. There is a risk of injury.
Let an overheated engine cool down before
opening the hood. If there is a fire in the
engine compartment, keep the hood closed
and contact the fire department.
GWARNING
The engine compartment contains moving
components. Certain components, such as
the radiator fan, may continue to run or
start again suddenly when the ignition is
off. There is a risk of injury.
If you need to do any work inside the engine compartment:
Rswitch off the ignition
Rnever reach into the area where there is a
risk of danger from moving components,
such as the fan rotation area
Rremove jewelry and watches
Rkeep items of clothing and hair, for
example, away from moving parts
XOpen the engine compartment cover
(Ypage 149).
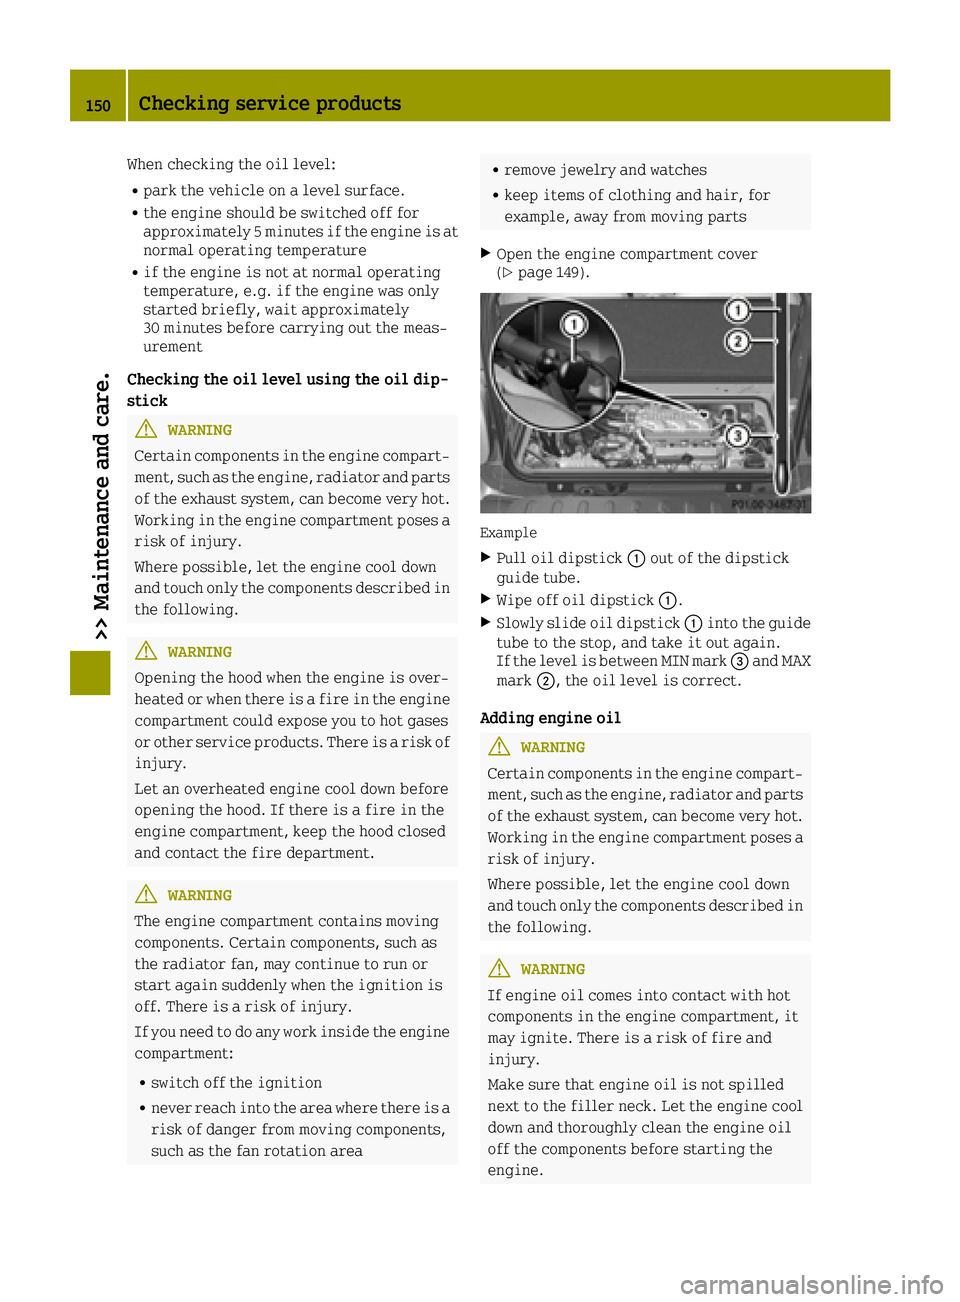
Example
XPull oil dipstick 0043out of the dipstick
guide tube.
XWipe off oil dipstick 0043.
XSlowly slide oil dipstick 0043into the guide
tube to the stop, and take it out again.
If the level is between MIN mark 0087and MAX
mark 0044, the oil level is correct.
Adding engine oil
GWARNING
Certain components in the engine compart- ment, such as the engine, radiator and parts
of the exhaust system, can become very hot.
Working in the engine compartment poses a risk of injury.
Where possible, let the engine cool down
and touch only the components described in
the following.
GWARNING
If engine oil comes into contact with hot
components in the engine compartment, it
may ignite. There is a risk of fire and
injury.
Make sure that engine oil is not spilled
next to the filler neck. Let the engine cool down and thoroughly clean the engine oil
off the components before starting the
engine.
150Checking service products
>> Maintenance and care.
Page 156 of 214

Information on the type of service and ser-
vice intervals (see the separate Maintenance
Booklet).
For further information inquire at any smart
center or look under
http://www.smartUSA.com (only USA).
iThe service display does not show any
information on the engine oil level.
Observe the notes on the engine oil level
(
Ypage 150).
Whenever a service is due, this is shown
approximately 30 days or 1500 km (1000 miles)
beforehand. After starting the engine, a ser-
vice message appears in the instrument clus-
ter display for a few seconds; see the follow-
ing example.
Next
Servicein.. Daystogether with the
0099 or009A symbol. If the service due date
has been exceeded, Service Due .. Days
Ago.
The symbol shows the type of service. 0099
stands for a minor service and 009Afor a
major service.
The service display does not take into
account any periods of time during which the
battery is disconnected.
Maintaining the time-dependent service
schedule:
XNote down the service due date in the ser-
vice display before disconnecting the bat-
tery.
or
XAfter reconnecting the battery, subtract
the battery disconnection periods from the
service date shown on the display.
Hiding a service message
XPress the 0076button on the multifunction
steering wheel.
Calling up the service display
XSwitch on the ignition.
XPress the 0063or0064 button on the steer-
ing wheel to select the MessagesandSer‐vicemenu.
The service display shows when the service
is due.
Information about Service
Resetting the service display
!Have service work carried out as descri-
bed in the Maintenance Booklet. This may
otherwise lead to increased wear and dam-
age to the major assemblies or the vehicle.
A qualified specialist workshop, e.g. a smart center, will reset the service interval dis-
play after the service work has been carried
out. You can also obtain further information
on maintenance work, for example.
Special service requirements
The prescribed service interval is based on
normal operation of the vehicle. Service work
will need to be performed more often if the
vehicle is operated under arduous conditions
or increased loads, for example:
Rregular city driving with frequent inter-
mediate stops
Rif the vehicle is primarily used to travel
short distances
Rfor frequent operation in mountainous ter-
rain or on poor road surfaces
Rif the engine is often left idling for long
periods
In these or similar operating conditions,
have, for example, the air filter, engine oil
and oil filter changed more frequently. The
tires must be checked more frequently if the
vehicle is operated under increased loads.
You can obtain further information at a
qualified specialist workshop, e.g. a smart
center.
Driving abroad
An extensive smart service network is also
available in other countries. For further
information inquire at any smart center.
Care
General notes
HEnvironmental note
Dispose of empty packaging and cleaning
cloths in an environmentally responsible
manner.
154Care
>> Maintenance and care.
Page 173 of 214

It is better to have the vehicle transported
than to have it towed.
Vehicles with automatic transmission:when
towing a vehicle, the transmission must be in
position N.
The battery must be connected and charged.
Otherwise, you:
Rcannot turn the SmartKey to position 2in
the ignition lock
Rcannot shift the transmission to position N
on vehicles with automatic transmission
iDeactivate the automatic locking feature
(Ypage 55). You could otherwise be locked
out when pushing or towing the vehicle.
iVehicles with the basic carrier fitted:
Do not tow away the vehicle with the basic
carrier fitted.
Do not secure the tow cable or tow bar to the
basic carrier.
Installing/removing the towing eye
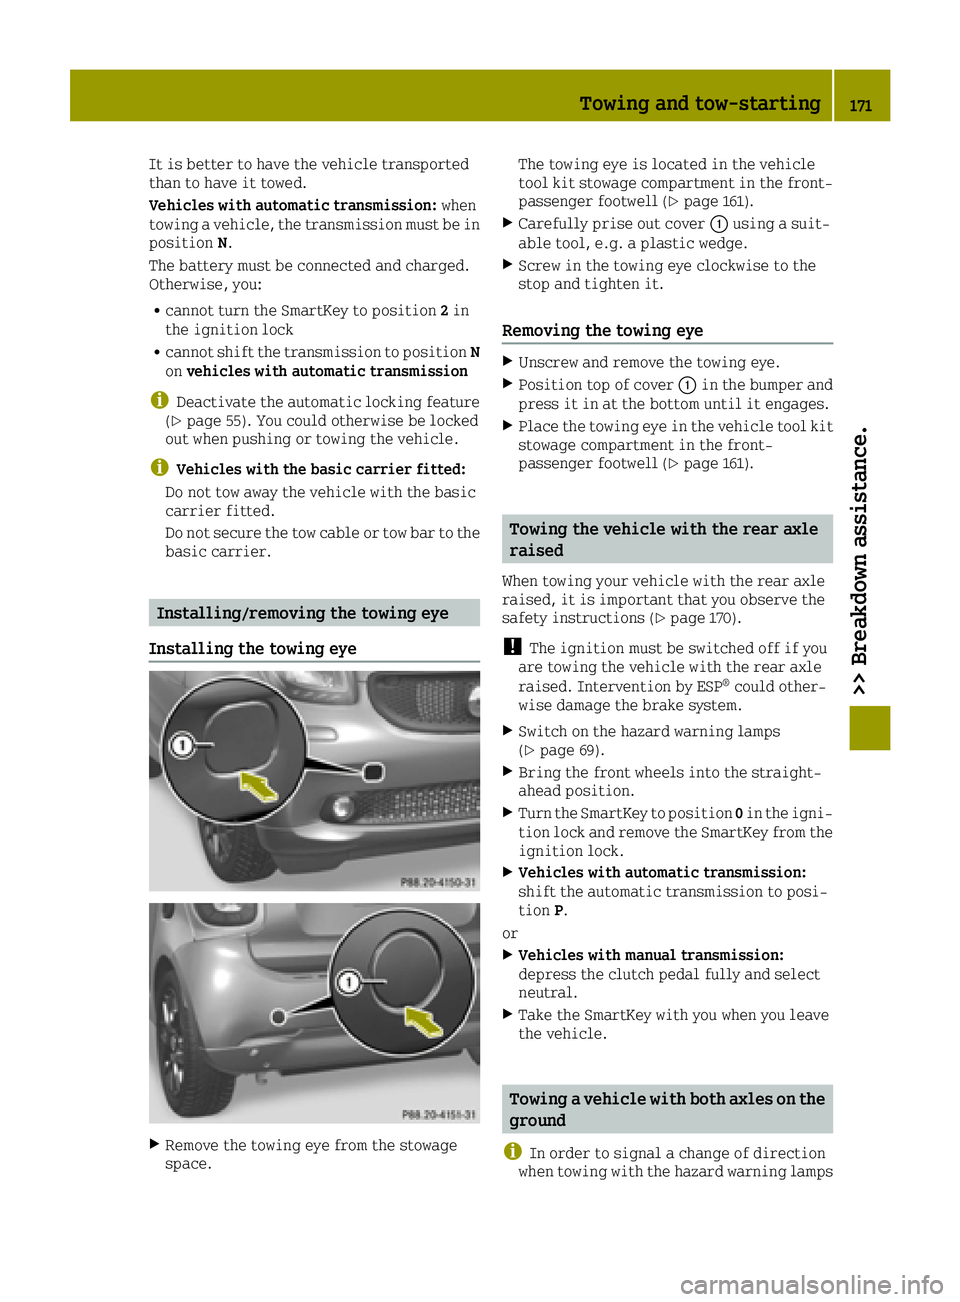
Installing the towing eye
XRemove the towing eye from the stowage
space. The towing eye is located in the vehicle
tool kit stowage compartment in the front-
passenger footwell (
Ypage 161).
XCarefully prise out cover 0043using a suit-
able tool, e.g. a plastic wedge.
XScrew in the towing eye clockwise to the
stop and tighten it.
Removing the towing eye
XUnscrew and remove the towing eye.
XPosition top of cover 0043in the bumper and
press it in at the bottom until it engages.
XPlace the towing eye in the vehicle tool kit
stowage compartment in the front-
passenger footwell (
Ypage 161).
Towing the vehicle with the rear axle
raised
When towing your vehicle with the rear axle
raised, it is important that you observe the
safety instructions (
Ypage 170).
!The ignition must be switched off if you
are towing the vehicle with the rear axle
raised. Intervention by ESP
®could other-
wise damage the brake system.
XSwitch on the hazard warning lamps
(Ypage 69).
XBring the front wheels into the straight-
ahead position.
XTurn the SmartKey to position 0in the igni-
tion lock and remove the SmartKey from the
ignition lock.
XVehicles with automatic transmission:
shift the automatic transmission to posi-
tion P.
or
XVehicles with manual transmission:
depress the clutch pedal fully and select
neutral.
XTake the SmartKey with you when you leave
the vehicle.
Towing a vehicle with both axles on the
ground
i
In order to signal a change of direction
when towing with the hazard warning lamps
Towing and tow-starting171
>> Breakdown assistance.
Z
Page 174 of 214

switched on, use the combination switch as
usual. In this case, only the indicator
lamps for the direction of travel flash.
After resetting the combination switch, the
hazard warning lamp starts flashing again.
Vehicles with automatic transmission: the
automatic transmission automatically shifts
to position Pwhen you open the driver's or
front-passenger door or when you remove the
key from the ignition lock. In order to ensure
that the automatic transmission stays in
position Nwhen towing the vehicle, you must
observe the following points:
XMake sure that the vehicle is stationary.
XTurn the SmartKey to position 2in the igni-
tion lock.
XDepress and hold the brake pedal.
XShift the automatic transmission to posi-
tion N.
Vehicles with manual transmission:
XLeave the SmartKey in position 2in the
ignition lock.
XRelease the brake pedal.
XRelease the parking brake.
XSwitch on the hazard warning lamps
(Ypage 69).
It is important that you observe the safety
instructions when towing away your vehicle
(
Ypage 170).
Transporting the vehicle
!
You may only secure the vehicle by the
wheels, not by parts of the vehicle such as
axle or steering components. Otherwise,
the vehicle could be damaged.
XVehicles with automatic transmission:
turn the SmartKey to position 2in the igni-
tion lock (
Ypage 87).
XVehicles with manual transmission:
depress the clutch pedal fully and select
neutral.
XShift the transmission to position N.
As soon as the vehicle has been loaded:
XPrevent the vehicle from rolling away by
applying the parking brake.
XVehicles with automatic transmission:
shift the transmission to position P.
XVehicles with manual transmission:
depress the clutch pedal fully and engage
first or reverse gear.
XTurn the SmartKey to position0in the igni-
tion lock and remove it.
XSecure the vehicle.
The towing eye can be used to pull the vehicle
onto a trailer or transporter for transporting
purposes.
Tow-starting (emergency engine start-
ing)
!
Vehicles with automatic transmission
must not be started by tow-starting. This
could otherwise damage the transmission.
iYou can find information on "Jump-start-
ing" at (Ypage 168).
Before tow-starting:
Rthe battery must be connected
Rthe engine must be cold
Rthe exhaust system has cooled down.
XSwitch on the hazard warning lamps
(Ypage 69).
XInstall the towing eye (Ypage 171).
XSecure the rigid towing bar or the towing
rope.
XDepress and hold the brake pedal.
XTurn the SmartKey to position 2in the igni-
tion lock.
XDepress the clutch pedal fully, engage sec-
ond gear and keep the clutch pedal fully
depressed.
XRelease the brake pedal.
XTow-start the vehicle.
XRelease the clutch pedal slowly; do not
depress the accelerator pedal while doing
so.
XWhen the engine is started, immediately
depress the clutch pedal fully and select
neutral.
XPull over at a suitable place and stop the
vehicle safely, paying attention to road
and traffic conditions.
XSecure the vehicle against rolling away
with the parking brake.
XRemove the rigid towing bar or towing
rope.
172Towing and tow-starting
>> Breakdown assistance.