ROLL SMART FORTWO COUPE 2010 Owners Manual
[x] Cancel search | Manufacturer: SMART, Model Year: 2010, Model line: FORTWO COUPE, Model: SMART FORTWO COUPE 2010Pages: 216, PDF Size: 9.7 MB
Page 34 of 216

restraint when the wearer is in a position
that is as upright as possible and the belt
is properly positioned on the body.GWarning!
Never let more people ride in the vehicle
than there are seat belts available. Make
sure everyone riding in the vehicle is
correctly restrained with a separate seat
belt. Never use a seat belt for more than one
person at a time.
GWarning!
Seat belts of a vehicle involved in an
accident must be inspected by smart. Only
then is it possible to determine whether
the seat belts were damaged or stressed in
the accident. Damaged or stressed seat
belts may not properly protect you in a
subsequent accident.
Only use seat belts which have been
approved by smart.
Do not make any modifications to the seat
belts. This can lead to unintended
activation of the Emergency Tensioning
Devices (ETDs) or to their failure to
activate when necessary.
Do not bleach or dye seat belts as this may
severely weaken them. In a crash, they may
not be able to provide adequate protection.
Have all work carried out only by qualified
technicians. Contact an authorized smart
center.
GWarning!
USE SEAT BELTS PROPERLY
R Seat belts can only work when used
properly. Never wear seat belts in any
other way than as described in this
section, as that could result in serious
injuries in case of an accident.
R Each occupant should wear their seat belt
at all times, because seat belts help
reduce the likelihood of and potential
severity of injuries in accidents,
including rollovers. The integrated
restraint system includes SRS (driver
front air bag, passenger front air bag,
head-thorax air bags) and Emergency
Tensioning Devices (ETDs) with seat belt
force limiters.
The system is designed to enhance the
protection provided by secured seat
belts in certain frontal and side
impacts.
R Never wear the shoulder belt under your
arm, against your neck or off your
shoulder. Doing so may cause your body to
move too far forward in a frontal crash,
which would increase the chance of head
and neck injuries. The seat belt would
also apply too much force to the ribs or
abdomen, which could severely injure
internal organs such as your liver or
spleen.
R Never wear seat belts over rigid or
breakable objects in or on your clothing,
such as eyeglasses, pens, keys, etc., as
these might cause injuries.
R Position the lap belt as low as possible
on your hips and not across the abdomen.
If the lap seat belt is positioned across
your abdomen, it could cause serious
injuries in a crash.
R Never use a seat belt for more than one
person at a time. Do not fasten a seat belt
around a person and another person or
other objects at the same time.
R Seat belts should not be worn twisted. In
a crash, you would not have the full width
of the seat belt to manage impact forces.
The twisted seat belt against your body
could cause injuries.
R Pregnant women should also always use a
lap-shoulder belt. The lap belt portion
should be positioned as low as possible
on the hips to avoid any possible
pressure on the abdomen.
R Never place your feet on the instrument
panel, dashboard or on the seat. Always32Occupant safety>> Safety.
451_AKB; 3; 22, en-USd2ureepe,Version: 2.11.8.12009-07-27T09:36:34+02:00 - Seite 32
Page 36 of 216
have any breathing difficulty but cannot
get out of the vehicle after the air bag
inflates, then get fresh air by opening a
window or door.GWarning!
To reduce the risk of injury when the front
air bags inflate, it is very important for
the driver and passenger to always be in a
properly seated position and to wear their
respective seat belt.
For maximum protection in the event of a
collision always be in normal seated
position with your back against the
backrest. Fasten your seat belt and ensure
it is properly positioned on your body.
Since the air bag inflates with
considerable speed and force, a proper
seating and hands on steering wheel
position will help to keep you at a safe
distance from the air bag.
Occupants who are unbelted, out of position
or too close to the air bag can be seriously
injured or killed by an air bag as it
inflates extremely quickly and with great
force:
R Sit properly belted in a position that is
as upright as possible with your back
against the seat backrest.
R Adjust the driver’s seat as far as possible
rearward, still permitting proper
operation of vehicle controls. The
distance from the center of the driver’s
breastbone to the center of the air bag
cover on the steering wheel must be at
least 10 inches (25 cm) or more. You should
be able to accomplish this by
adjustments to the seat. If you have any
problems, please contact an authorized
smart center.
R Do not lean your head or chest close to the
steering wheel or dashboard.
R Keep hands on the outside of the steering
wheel rim. Placing hands and arms inside
the rim can increase the risk and
potential severity of hand/arm injury
when the driver’s front air bag inflates.
R Adjust the passenger seat as far as
possible rearward from the dashboard
when the seat is occupied.
R Occupants, especially children, should
always sit as upright as possible,
properly use the seat belts and use an
appropriately sized infant restraint,
toddler restraint, or booster seat
recommended for the size and weight of
the child.
Failure to follow these instructions can
result in severe injuries to you or other
occupants.
If you sell your vehicle, it is important that
you make the buyer aware of this safety
information. Be sure to give the buyer this
Operator’s Manual.
i Air bags are designed to deploy only in
certain frontal impacts (front air bags),
and in side impacts (head-thorax air
bags) which exceed preset thresholds.
Only during these events will they
provide their supplemental protection.
The driver and passenger should always
wear their seat belts. Otherwise it is not
possible for air bags to provide their
supplemental protection.
In case of other types of impacts and
impacts below air bag deployment
thresholds, air bags will not deploy. The
driver and passenger will then be
protected to the extent possible by a
properly fastened seat belt. A properly
fastened seat belt is also needed to
provide the best possible protection in
a rollover.
We caution you not to rely on the presence
of the air bags in order to avoid wearing
your seat belt.34Occupant safety>> Safety.
451_AKB; 3; 22, en-USd2ureepe,Version: 2.11.8.12009-07-27T09:36:34+02:00 - Seite 34
Page 39 of 216
Driver front air bag/passenger front air
bag
The front air bags are designed to reduce
the potential of injury in certain frontal
impacts.
Driver front air bag and passenger front
air bag are deployed
R at the start of an accident with high
vehicle deceleration in the longitudinal
direction
R independently of other air bags in the
vehicle being deployed
R never in the event of a rollover, unless
high vehicle deceleration in the
longitudinal direction is detected
i The front air bags in this vehicle have
been designed to inflate in two stages.
This allows the air bag to have different
rates of inflation that are based on the
rate of relevant vehicle deceleration
and a fastened or unfastened seat belt as
assessed by the air bag control unit.
On the passenger side, the front air bag
deployment is additionally influenced
by the passenger’s weight category as
identified by the Occupant
Classification System (OCS)
( Y page 37).
The lighter the passenger side occupant,
the higher the vehicle deceleration rate
required for the second stage inflation
of the air bag.
The air bags will not deploy in impacts
which do not exceed the system’s
deployment thresholds. In such instances,
the seat belts are designed to protect you.
The passenger air bag will only be
deployed if
R the system, based on OCS weight sensor
readings, senses that the passenger seat
is occupied and the 007F 007B
indicator lamp is not lit ( Y page 40)
R the impact exceeds a preset deployment
threshold
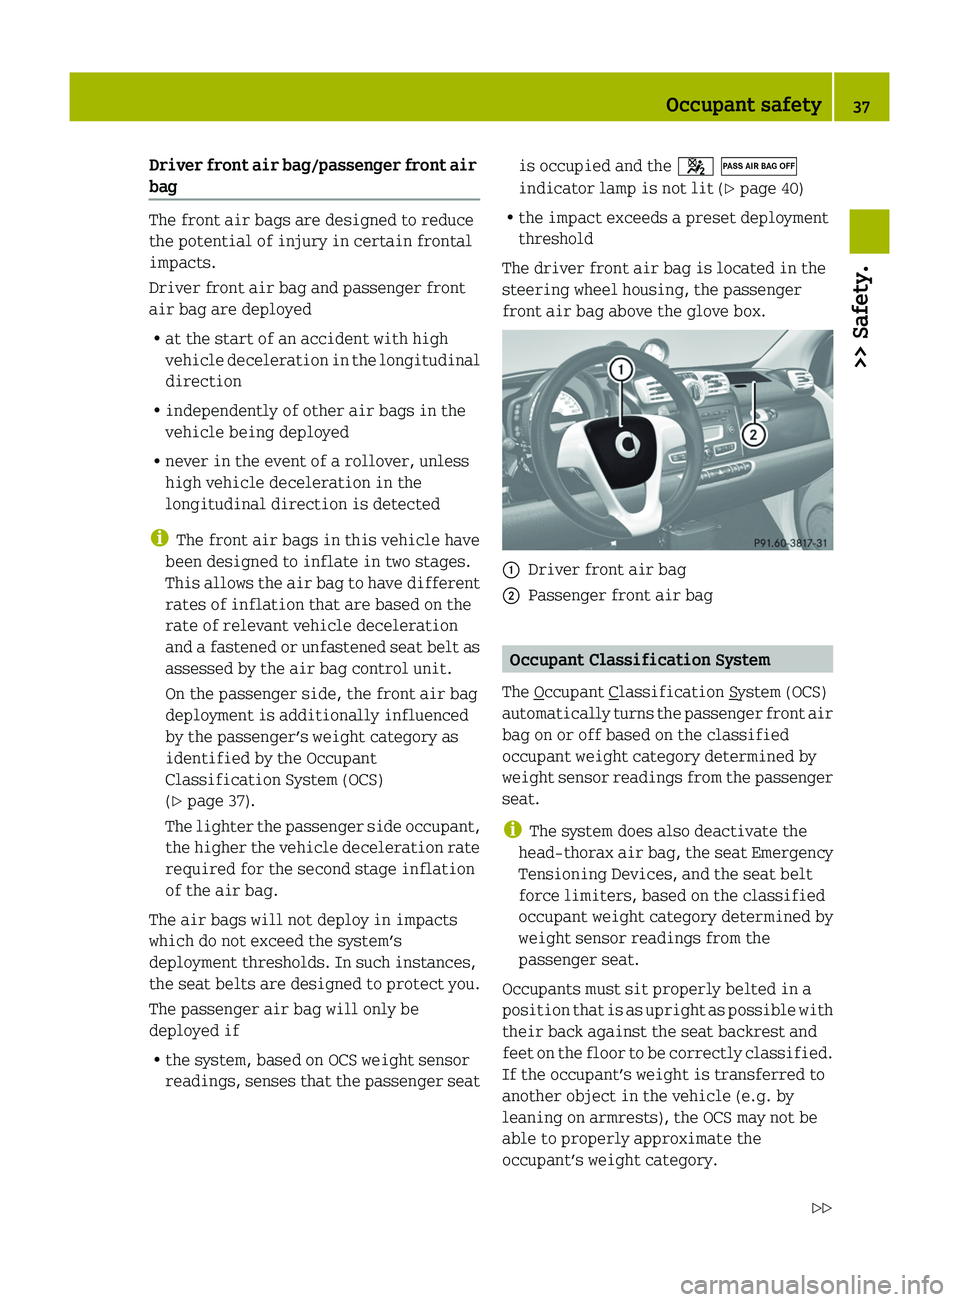
The driver front air bag is located in the
steering wheel housing, the passenger
front air bag above the glove box.0046Driver front air bag0047Passenger front air bag
Occupant Classification System
The
Occupant Classification System (OCS)
automatically turns the passenger front air
bag on or off based on the classified
occupant weight category determined by
weight sensor readings from the passenger
seat.
i The system does also deactivate the
head-thorax air bag, the seat Emergency
Tensioning Devices, and the seat belt
force limiters, based on the classified
occupant weight category determined by
weight sensor readings from the
passenger seat.
Occupants must sit properly belted in a
position that is as upright as possible with
their back against the seat backrest and
feet on the floor to be correctly classified.
If the occupant’s weight is transferred to
another object in the vehicle (e.g. by
leaning on armrests), the OCS may not be
able to properly approximate the
occupant’s weight category.
Occupant safety37>> Safety.451_AKB; 3; 22, en-USd2ureepe,Version: 2.11.8.12009-07-27T09:36:34+02:00 - Seite 37Z
Page 70 of 216
before attempting to remove any
blockage.
R Remove blockage.
R Turn the windshield wipers on again.XSwitching off: Turn the wiper switch to
position 005D.
Intermittent wiping
Only switch on intermittent wiping under
wet weather conditions or in the presence
of precipitation.
Vehicles with rain-light sensor*: When you
select intermittent wiping, the sensor is
activated. The sensor automatically sets a
suitable wiping interval depending on the
wetness of the sensor surface.
! Vehicles with rain-light sensor*:
Do not leave windshield wipers in
intermittent setting when the vehicle is
taken to an automatic car wash or during
windshield cleaning. Windshield wipers
will operate in the presence of water
sprayed on the windshield, and
windshield wipers may be damaged as a
result.
! Vehicles with rain-light sensor*:
If you have set intermittent wiping, dirt
on the surface of the sensor or optical
effects may cause the windshield wipers
to wipe in an undesired fashion. This
could then damage the windshield wiper
blades or scratch the windshield. You
should therefore switch off the
windshield wipers when weather
conditions are dry.
XMake sure the key is in starter switch
position 1.XActivating intermittent wiping: Turn the
wiper switch to position 004A.
After the initial wipe, pauses between
wipes are automatically controlled
depending on the vehicle speed and by the
rain-light sensor*.XDeactivating intermittent wiping: Turn
the wiper switch to position 005D.
Wiping with windshield washer fluid
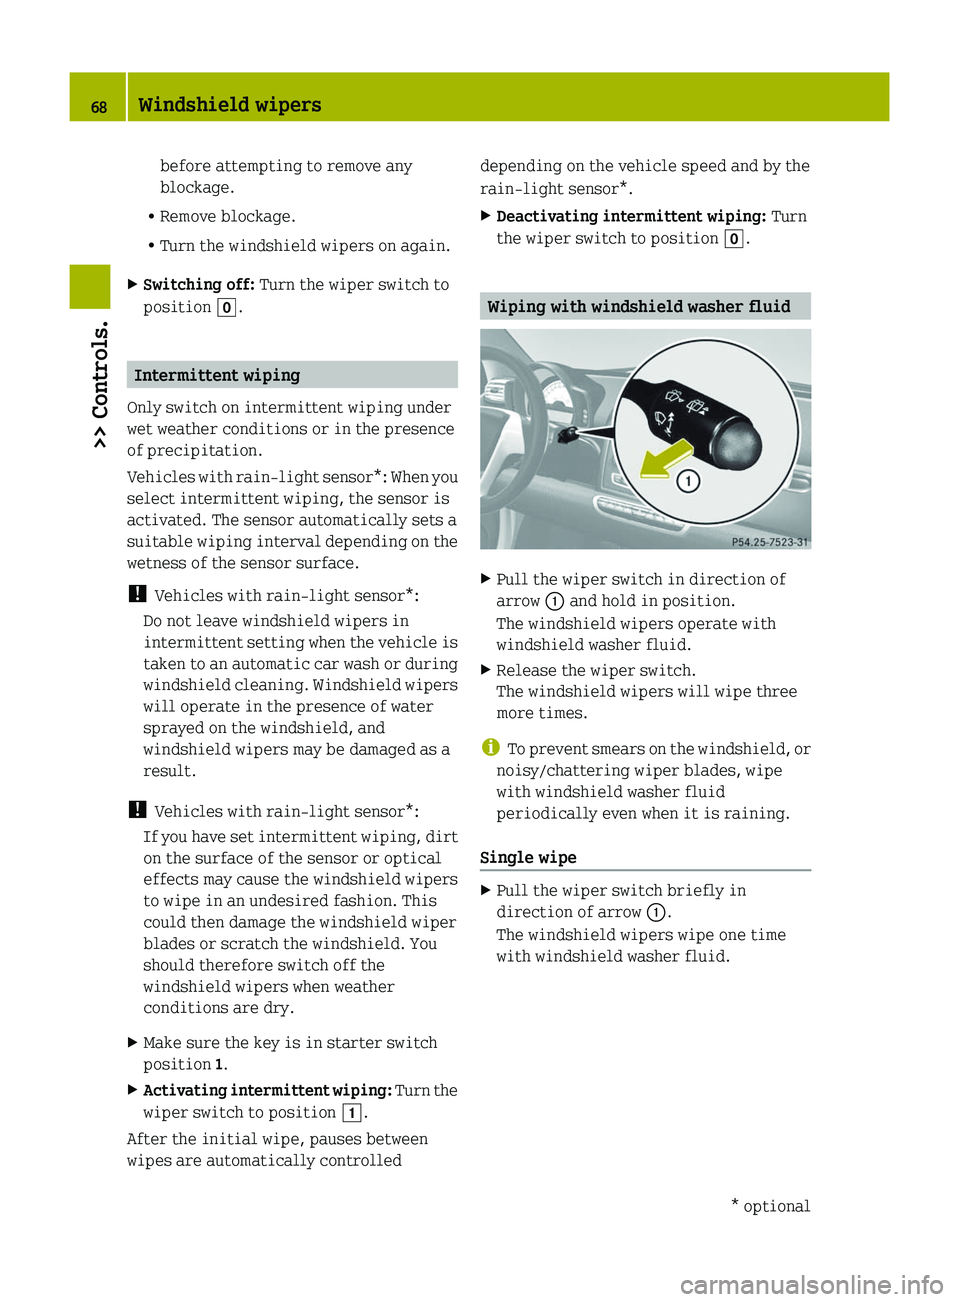
XPull the wiper switch in direction of
arrow 0046 and hold in position.
The windshield wipers operate with
windshield washer fluid.XRelease the wiper switch.
The windshield wipers will wipe three
more times.
i To prevent smears on the windshield, or
noisy/chattering wiper blades, wipe
with windshield washer fluid
periodically even when it is raining.
Single wipe
XPull the wiper switch briefly in
direction of arrow 0046.
The windshield wipers wipe one time
with windshield washer fluid.68Windshield wipers>> Controls.* optional451_AKB; 3; 22, en-USd2ureepe,Version: 2.11.8.12009-07-27T09:36:34+02:00 - Seite 68
Page 72 of 216
the vehicle interior, vehicle
electronics could be damaged which is
not covered by the smart Limited
Warranty.
Opening and closing the retractable
soft top
You can open and close the retractable soft
top when the vehicle is either stationary
or in motion.
GWarning!
Never operate the retractable soft top if
there is the possibility of anyone being
harmed by the opening or closing
procedure.
GWarning!
The retractable soft top is made out of
fabric. In the event of an accident, the
fabric may tear. This may result in an
opening in the roof.
In a vehicle rollover, occupants not
wearing their seat belts or not wearing
them properly may be thrown out of the
opening. Such an opening also presents a
potential for injury for occupants wearing
their seat belts properly as entire body
parts or portions of them may protrude from
the passenger compartment.
GWarning!
When leaving the vehicle, always remove the
key from the starter switch, take it with
you, and lock the vehicle. Do not leave
children unattended in the vehicle, or with
access to an unlocked vehicle. A child’s
unsupervised access to a vehicle could
result in an accident and/or serious
personal injury.
! To avoid damaging the seals, do not
transport any objects with sharp edges
which can stick out of the retractable
soft top.
Do not open the retractable soft top if
there is snow or ice on the roof, as this
could result in malfunctions.
If you cannot open or close the
retractable soft top due to a malfunction
contact Roadside Assistance or an
authorized smart center.
Opening from outside
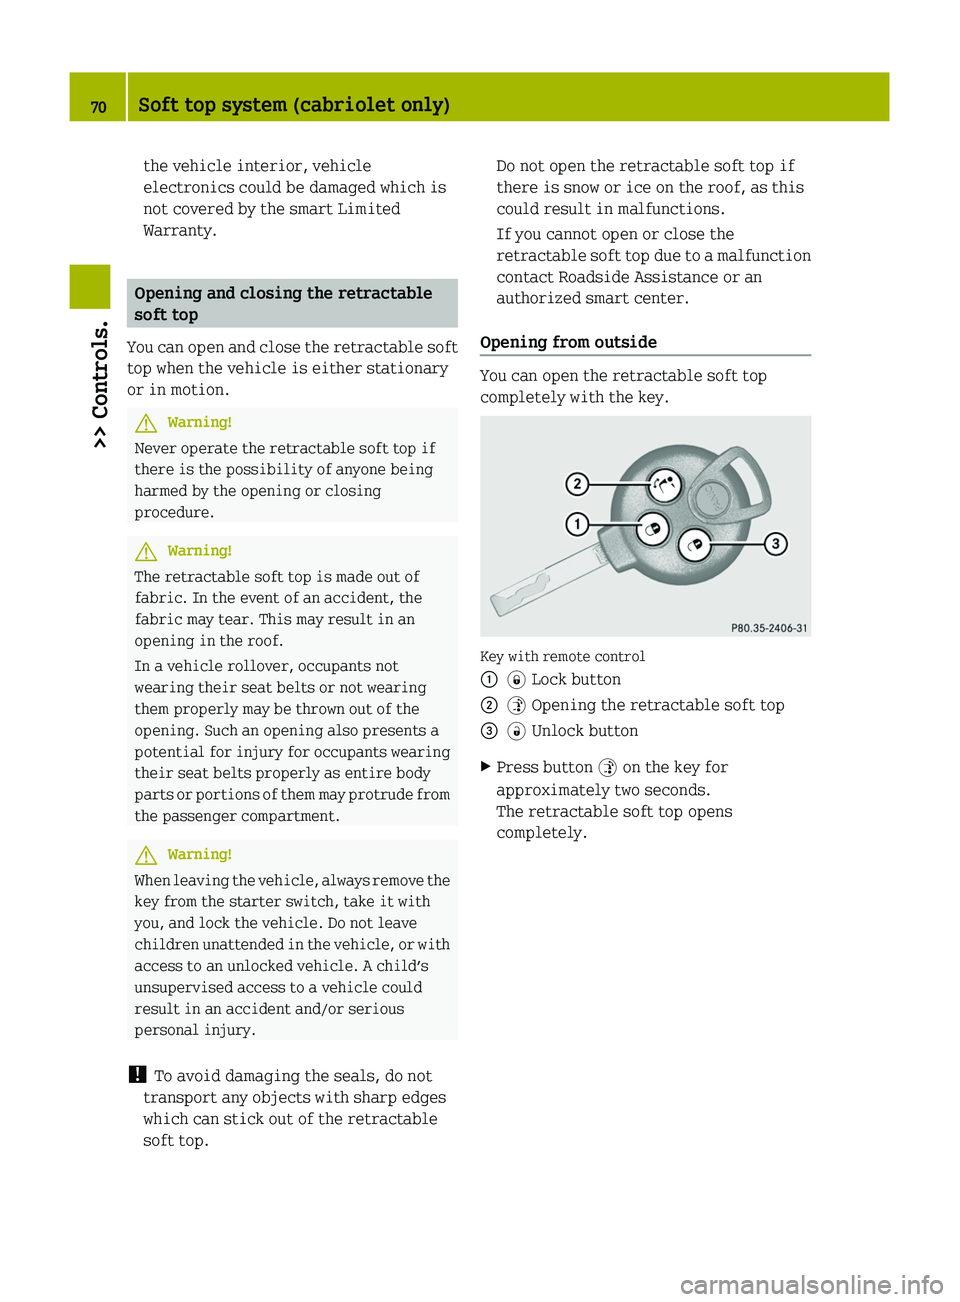
You can open the retractable soft top
completely with the key.
Key with remote control
00460038 Lock button00470035 Opening the retractable soft top008A0034 Unlock buttonXPress button 0035 on the key for
approximately two seconds.
The retractable soft top opens
completely.70Soft top system (cabriolet only)>> Controls.
451_AKB; 3; 22, en-USd2ureepe,Version: 2.11.8.12009-07-27T09:36:34+02:00 - Seite 70
Page 79 of 216
in order to avoid damaging the
transmission.
You can drive in reverse gear at a speed
of up to 9 mph (15 km/h).XDepress the brake pedal.XPress the release button ( Y page 76) to
disengage the gear selector lever lock.XMove the gear selector lever to reverse
gear R.
R appears in the transmission position
indicator.XRelease the brake pedal.XCarefully depress the accelerator pedal.
Parking
GWarning!
Do not park this vehicle in areas where
combustible materials such as grass, hay or
leaves can come into contact with the hot
exhaust system. These materials could be
ignited and cause a vehicle fire.
Vehicle movement can cause serious
personal injury or damage to the vehicle or
the vehicle drivetrain. Therefore, always
do the following before turning off the
engine and leaving the vehicle:
R Keep right foot on the brake pedal.
R Engage the parking brake.
R Move the gear selector lever to park
position P.
R Slowly release the brake pedal.
R When parked on an incline, always turn
the front wheels towards the curb.
R Turn the key to starter switch position 0
and remove the key from the starter
switch.
R Take the key with you and lock the vehicle
when leaving.
GWarning!
With the engine not running, there is no
power assistance for the brake and
steering* systems. In this case, it is
important to keep in mind that a
considerably higher degree of effort is
necessary to brake and steer the vehicle.
Adapt your driving accordingly.
XProperly stop and park the vehicle.XDepress the brake pedal.XEngage the parking brake ( Y page 77).
When the ignition is switched on or the
engine is running, the brake warning
lamp 0027 (USA only) or 004D (Canada
only) in the instrument cluster comes on.XRelease the brake pedal.
Parking brake
The parking brake serves to secure the
vehicle against rolling away when it is
stationary or parked.
GWarning!
Engaging the parking brake while the
vehicle is in motion can cause the rear
wheels to lock up. You could lose control of
the vehicle and cause an accident. In
addition, the vehicle’s brake lights do not
light up when the parking brake is engaged.
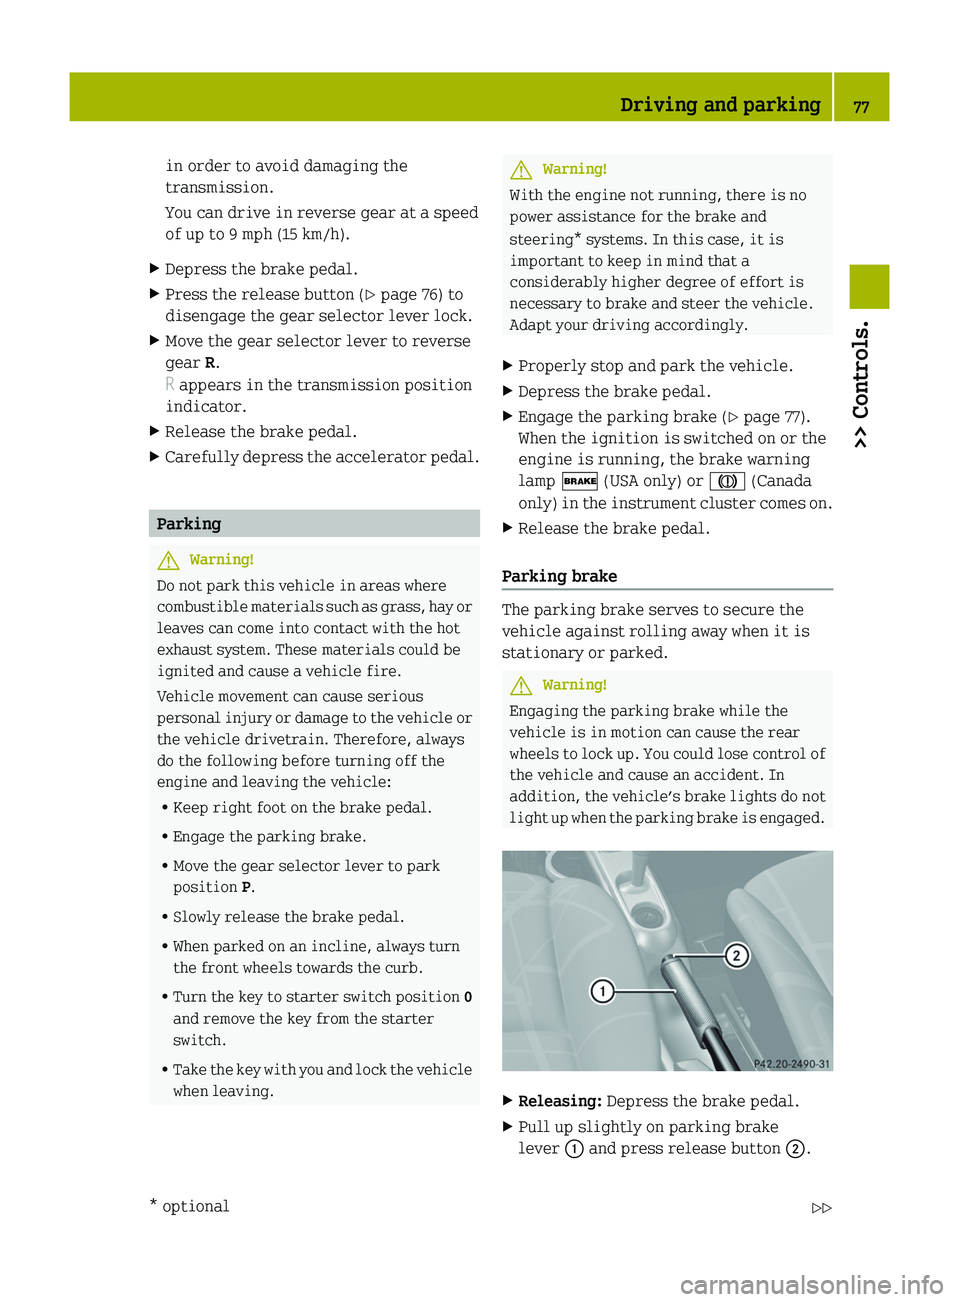
XReleasing: Depress the brake pedal.XPull up slightly on parking brake
lever 0046 and press release button 0047.Driving and parking77>> Controls.* optional451_AKB; 3; 22, en-USd2ureepe,Version: 2.11.8.12009-07-27T09:36:34+02:00 - Seite 77Z
Page 80 of 216
XPush parking brake lever 0046 down as far
as it will go.
When the ignition is switched on or the
engine is running, the brake warning
lamp 0027 (USA only) or 004D (Canada
only) in the instrument cluster goes out.XEngaging: Pull up parking brake
lever 0046 firmly.
When the ignition is switched on or the
engine is running, the brake warning
lamp 0027 (USA only) or 004D (Canada
only) in the instrument cluster comes on.GWarning!
Getting out of your vehicle with the
transmission not fully engaged in park
position P is dangerous. When the engine is
shut off and the brakes are released, the
vehicle can be moved freely with the gear
selector lever in all positions except park
position P. Also, when parked on an incline,
park position P alone may not prevent your
vehicle from moving, possibly hitting
people or objects.
Always engage the parking brake in
addition to shifting to park position P.
When parked on an incline, always turn the
front wheels towards the curb.
GWarning!
When leaving the vehicle, always remove the
key from the starter switch, take it with
you, and lock the vehicle. Do not leave
children unattended in the vehicle, or with
access to an unlocked vehicle. Children
could release the parking brake and/or
move the gear selector lever from park
position P, either of which could result in
an accident and/or serious personal
injury.
Brake pedal
The brake pedal has two brake circuits
independent of each other. A brake servo is
used during braking (when the engine is
running) to increase pedal force.
GWarning!
Make sure absolutely no objects are
obstructing the pedals’ range of motion.
Keep the driver’s footwell clear of all
obstacles. If there are any floormats* or
carpets in the footwell, make sure the
pedals still have sufficient clearance.
During sudden acceleration or braking
maneuvers, the objects could get caught
between or beneath the pedals and restrict
your ability to brake or accelerate. This
could lead to accidents and/or injury.
GWarning!
Considerably more effort will be required
to apply the brakes if
R the brake servo has failed
R a brake circuit has failed
R the engine is switched off, e.g. for
towing the vehicle
The braking distance is likewise greater.
Make sure the engine is running whenever
the vehicle is rolling. Have the brake
system repaired at an authorized smart
center, if there is a fault in the brake
system.
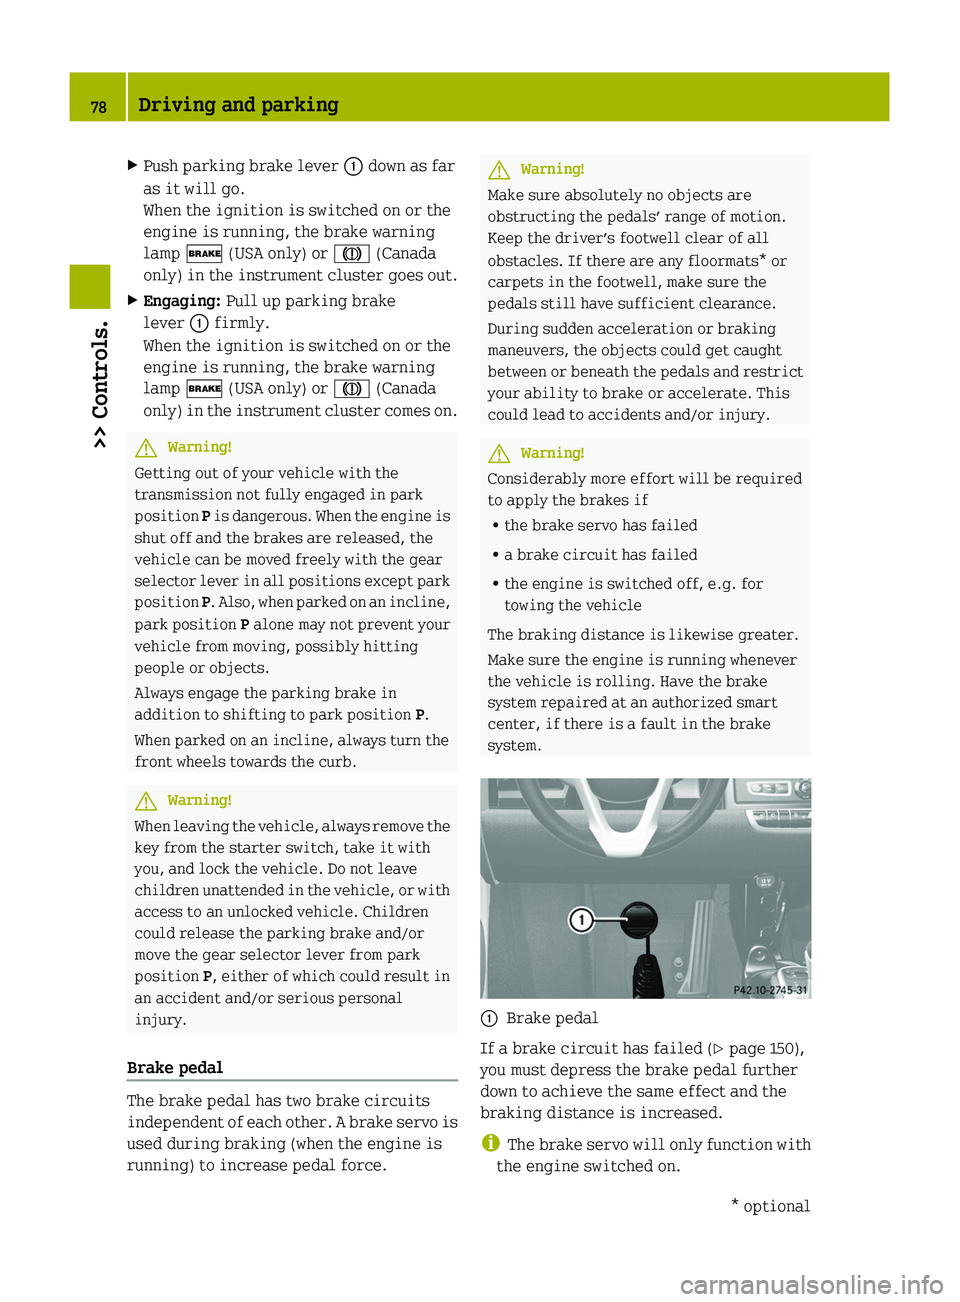
0046Brake pedal
If a brake circuit has failed ( Y page 150),
you must depress the brake pedal further
down to achieve the same effect and the
braking distance is increased.
i The brake servo will only function with
the engine switched on.
78Driving and parking>> Controls.* optional451_AKB; 3; 22, en-USd2ureepe,Version: 2.11.8.12009-07-27T09:36:34+02:00 - Seite 78
Page 83 of 216
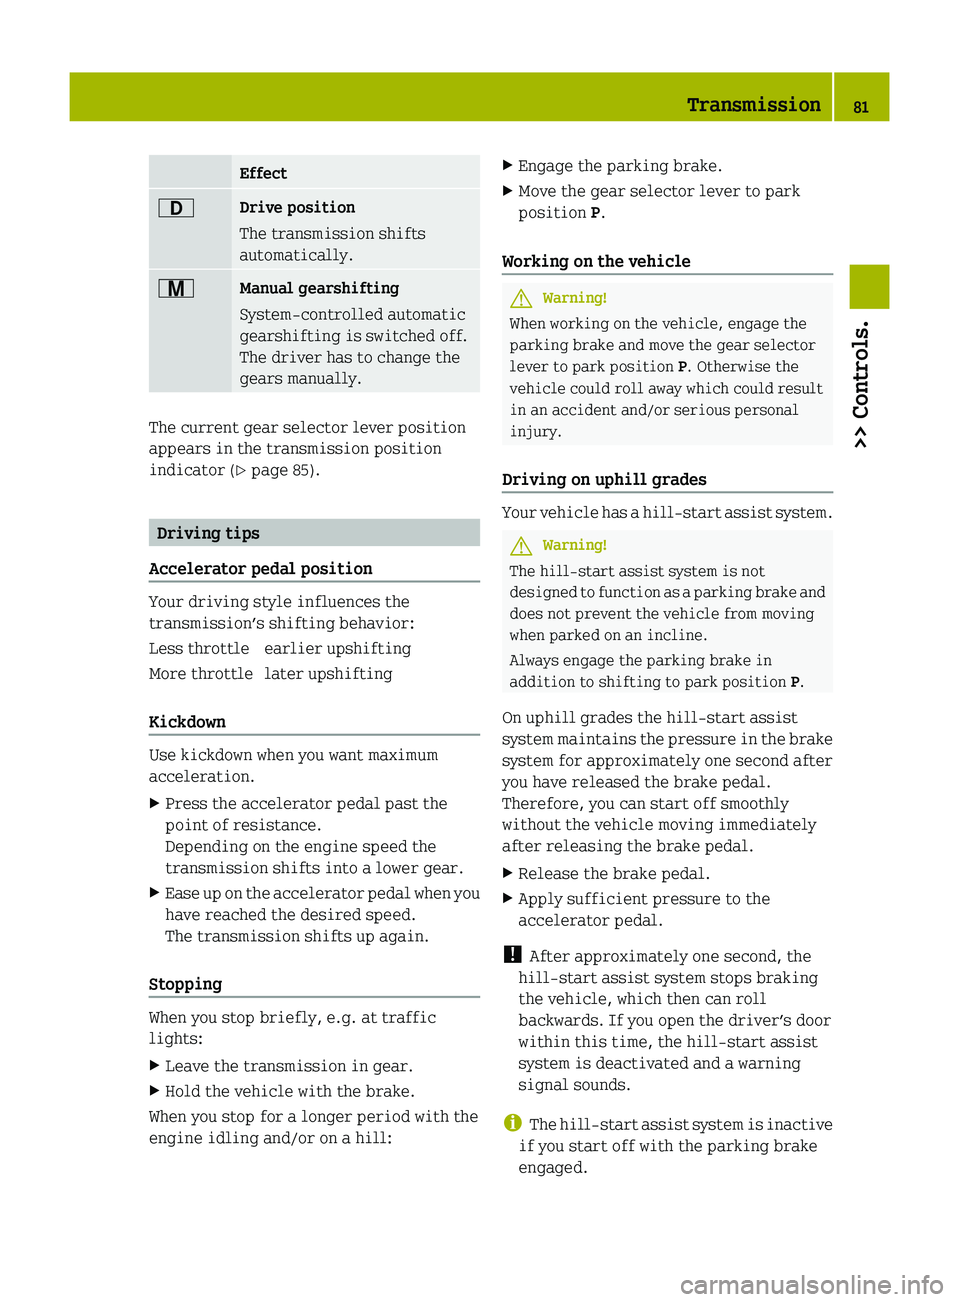
Effect003ADrive position
The transmission shifts
automatically.009CManual gearshifting
System-controlled automatic
gearshifting is switched off.
The driver has to change the
gears manually.
The current gear selector lever position
appears in the transmission position
indicator ( Y page 85).
Driving tips
Accelerator pedal position
Your driving style influences the
transmission’s shifting behavior:
Less throttleearlier upshiftingMore throttlelater upshifting
Kickdown
Use kickdown when you want maximum
acceleration.
XPress the accelerator pedal past the
point of resistance.
Depending on the engine speed the
transmission shifts into a lower gear.XEase up on the accelerator pedal when you
have reached the desired speed.
The transmission shifts up again.
Stopping
When you stop briefly, e.g. at traffic
lights:
XLeave the transmission in gear.XHold the vehicle with the brake.
When you stop for a longer period with the
engine idling and/or on a hill:
XEngage the parking brake.XMove the gear selector lever to park
position P.
Working on the vehicle
GWarning!
When working on the vehicle, engage the
parking brake and move the gear selector
lever to park position P. Otherwise the
vehicle could roll away which could result
in an accident and/or serious personal
injury.
Driving on uphill grades
Your vehicle has a hill‑start assist system.
GWarning!
The hill-start assist system is not
designed to function as a parking brake and
does not prevent the vehicle from moving
when parked on an incline.
Always engage the parking brake in
addition to shifting to park position P.
On uphill grades the hill‑start assist
system maintains the pressure in the brake
system for approximately one second after
you have released the brake pedal.
Therefore, you can start off smoothly
without the vehicle moving immediately
after releasing the brake pedal.
XRelease the brake pedal.XApply sufficient pressure to the
accelerator pedal.
! After approximately one second, the
hill‑start assist system stops braking
the vehicle, which then can roll
backwards. If you open the driver’s door
within this time, the hill‑start assist
system is deactivated and a warning
signal sounds.
i The hill‑start assist system is inactive
if you start off with the parking brake
engaged.
Transmission81>> Controls.451_AKB; 3; 22, en-USd2ureepe,Version: 2.11.8.12009-07-27T09:36:34+02:00 - Seite 81Z
Page 84 of 216
Manual gearshifting
With manual gearshifting M selected,
system-controlled automatic gearshifting
is switched off and you need to change the
gears by upshifting or downshifting
manually using the gear selector lever or
the steering wheel gearshift control 12
.
! Allow the engine to warm up under low
load use. Do not place full load on the
engine until the operating temperature
has been reached.
Shift into reverse gear R or parking
position P only when the vehicle is
stopped.
Avoid spinning of a drive wheel for an
extended period when driving off on
slippery road surfaces. Otherwise, the
drivetrain could be damaged, which is
not covered by the smart Limited
Warranty.Activating manual gearshiftingXMove the gear selector lever to drive
position D ( Y page 79).XPull one of the shift paddles ( Y page 82)
towards you.
or
XMove the gear selector lever to manual
gearshifting M (Y page 79).
System-controlled automatic
gearshifting is switched off.
You can upshift or downshift through the
gears in succession.
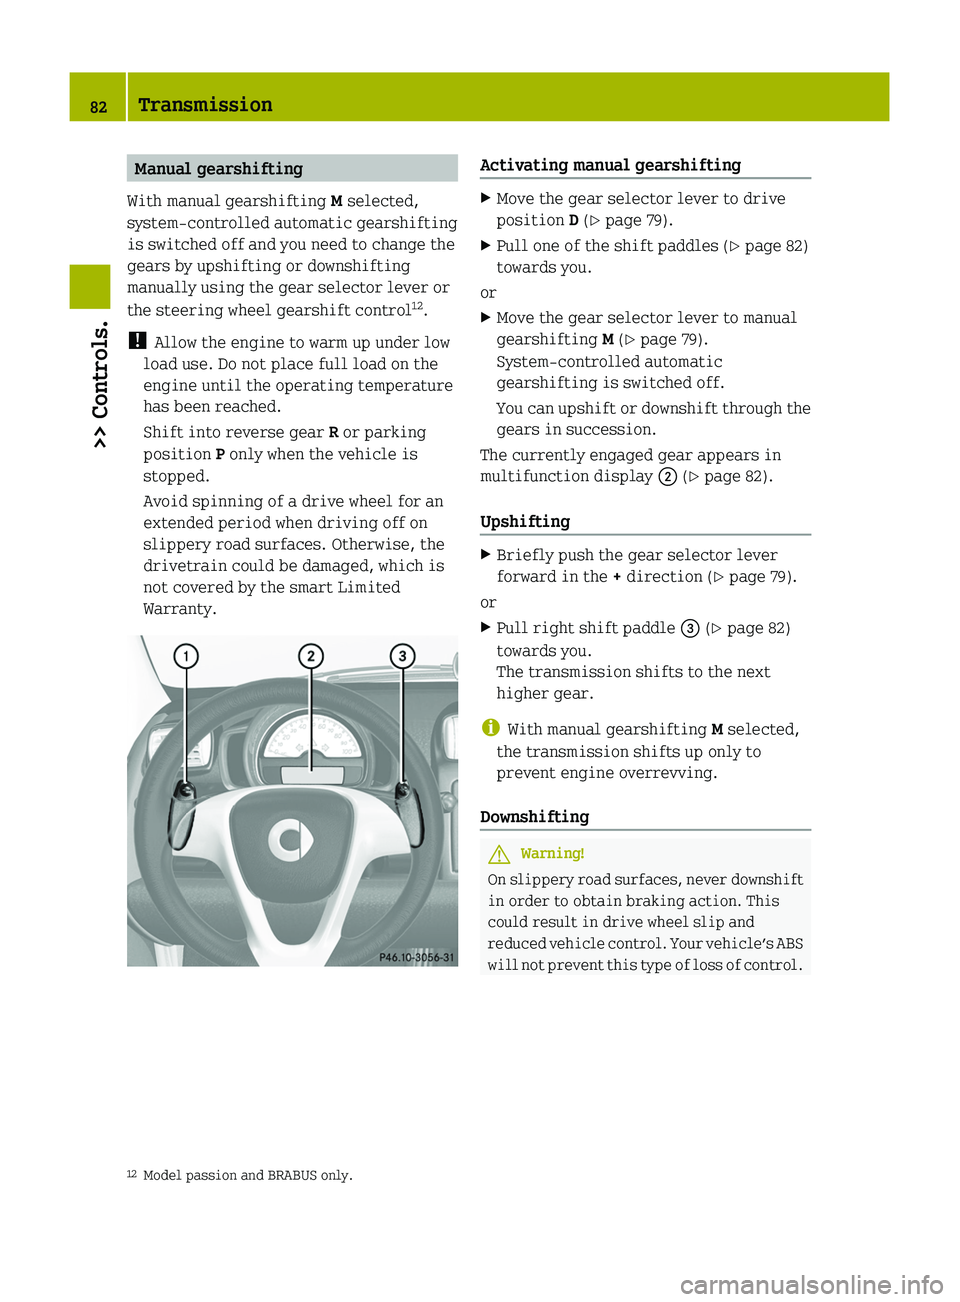
The currently engaged gear appears in
multifunction display 0047 (Y page 82).
Upshifting
XBriefly push the gear selector lever
forward in the + direction ( Y page 79).
or
XPull right shift paddle 008A (Y page 82)
towards you.
The transmission shifts to the next
higher gear.
i With manual gearshifting M selected,
the transmission shifts up only to
prevent engine overrevving.
Downshifting
GWarning!
On slippery road surfaces, never downshift
in order to obtain braking action. This
could result in drive wheel slip and
reduced vehicle control. Your vehicle’s ABS
will not prevent this type of loss of control.
12 Model passion and BRABUS only.82Transmission>> Controls.
451_AKB; 3; 22, en-USd2ureepe,Version: 2.11.8.12009-07-27T09:36:34+02:00 - Seite 82
Page 85 of 216
XBriefly pull the gear selector lever
backward in the - direction ( Y page 79).
or
XPull left shift paddle 0046 (Y page 82)
towards you.
The transmission shifts to the next lower
gear.
Kickdown
You can use kickdown when you want
maximum acceleration.
XPress the accelerator pedal past the
point of resistance.
Depending on the engine speed the
transmission shifts into a lower gear.XWhen you have reached the desired speed,
briefly push the gear selector lever
forward in the + direction ( Y page 79).
or
XPull right shift paddle 008A (Y page 82)
towards you.
The transmission shifts to the next
higher gear.
Deactivating manual gearshifting
XWith drive position D selected: Pull and
hold right shift paddle 008A (Y page 82)
towards you for longer than two seconds.
or
XWith manual gearshifting M selected:
Move the gear selector lever to drive
position D ( Y page 79).
System-controlled automatic
gearshifting is switched on again.
Emergency operation (limp-home
mode)
In this mode only a certain gear or a
certain gear combination can be selected.
This mode is triggered in case of
transmission malfunctions and enables you
driving to the nearest workshop such as a
smart center.
If vehicle acceleration becomes less
responsive or sluggish or the transmission
no longer shifts, the transmission is most
likely operating in limp-home (emergency
operation) mode. The transmission
position indicator flashes and the ¬
symbol appears in the multifunction
display.
Driving in limp-home mode:XMove the gear selector lever to drive
position D ( Y page 79).XContinue to drive.XHave the transmission checked at an
authorized smart center as soon as
possible.
i It is possible that a gear combination
including the reverse gear can not be
selected. Keep in mind when parking,
that reversing the vehicle might be
impossible.
In case of a minor transmission
malfunction, it might be possible to teach-
in the transmission in order to restore the
normal transmission mode.
i If the attempt to teach-in the
transmission fails, you cannot continue
to drive. Therefore we strongly
recommend that you have the
transmission taught-in at a qualified
workshop or at an authorized smart
center.
Teaching-in the transmission system:
XStop the vehicle in a safe location.XMove the gear selector lever to park
position P.XTurn off the engine.XWait at least 30 seconds before
restarting.XPress the brake pedal.Transmission83>> Controls.451_AKB; 3; 22, en-USd2ureepe,Version: 2.11.8.12009-07-27T09:36:34+02:00 - Seite 83Z