headlamp SMART FORTWO COUPE 2011 User Guide
[x] Cancel search | Manufacturer: SMART, Model Year: 2011, Model line: FORTWO COUPE, Model: SMART FORTWO COUPE 2011Pages: 228, PDF Size: 11.48 MB
Page 72 of 228
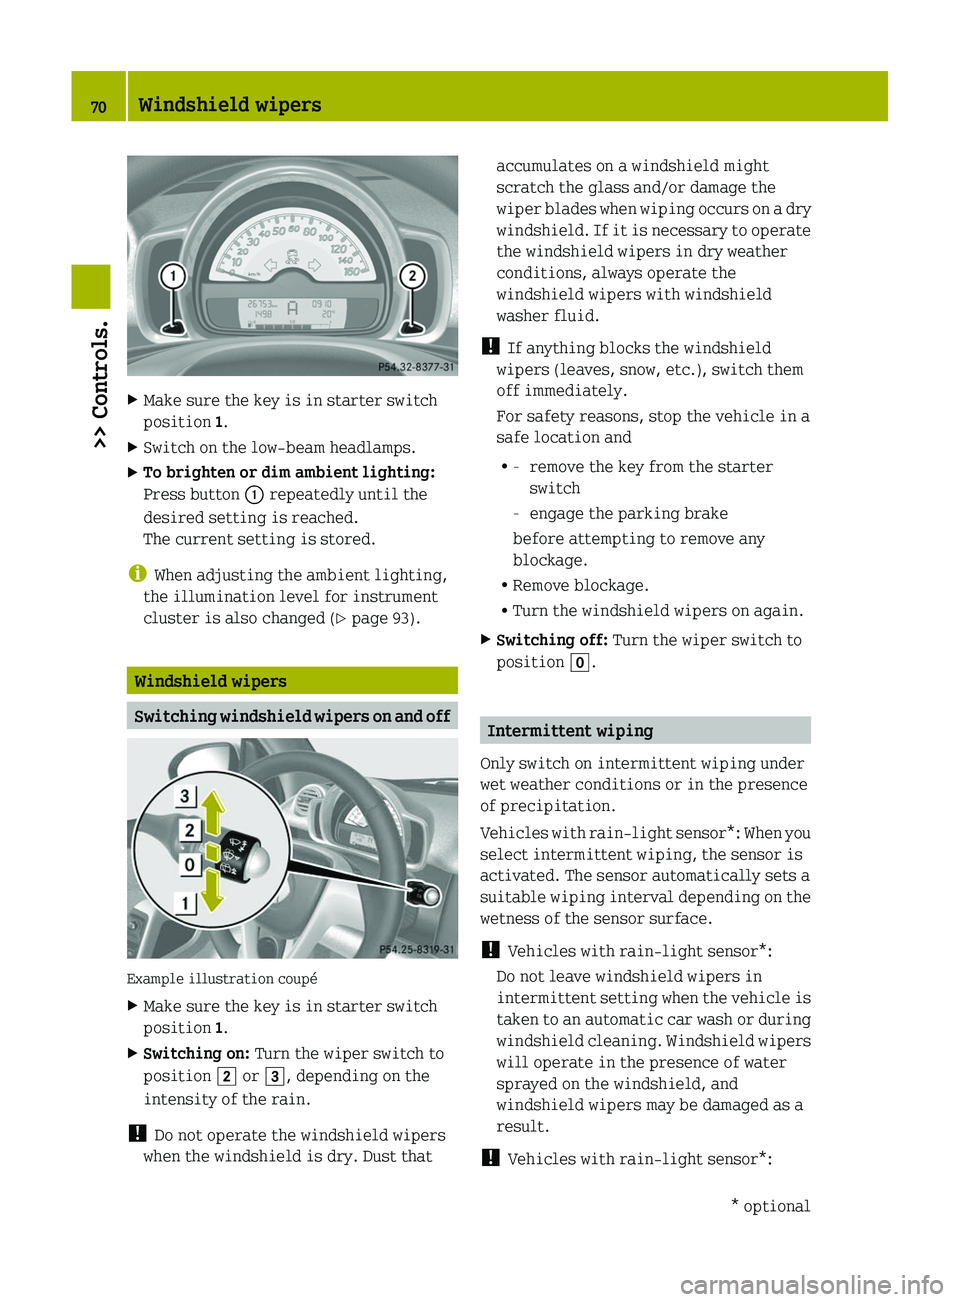
XMake sure the key is in starter switch
position 1.
XSwitch on the low-beam headlamps.XTo brighten or dim ambient lighting:
Press button \000F repeatedly until the
desired setting is reached.
The current setting is stored.
iWhen adjusting the ambient lighting,
the illumination level for instrument
cluster is also changed (Y page 93).
Windshield wipers
Switching windshield wipers on and off
Example illustration coupé
XMake sure the key is in starter switch
position 1.
XSwitching on: Turn the wiper switch to
position \000K or \000L, depending on the
intensity of the rain.
! Do not operate the windshield wipers
when the windshield is dry. Dust that
accumulates on a windshield might
scratch the glass and/or damage the
wiper blades when wiping occurs on a dry
windshield. If it is necessary to operate
the windshield wipers in dry weather
conditions, always operate the
windshield wipers with windshield
washer fluid.
! If anything blocks the windshield
wipers (leaves, snow, etc.), switch them
off immediately.
For safety reasons, stop the vehicle in a
safe location and
R-remove the key from the starter
switch
-engage the parking brake
before attempting to remove any
blockage.
RRemove blockage.
RTurn the windshield wipers on again.
XSwitching off: Turn the wiper switch to
position \000].
Intermittent wiping
Only switch on intermittent wiping under
wet weather conditions or in the presence
of precipitation.
Vehicles with rain-light sensor*: When you
select intermittent wiping, the sensor is
activated. The sensor automatically sets a
suitable wiping interval depending on the
wetness of the sensor surface.
! Vehicles with rain-light sensor*:
Do not leave windshield wipers in
intermittent setting when the vehicle is
taken to an automatic car wash or during
windshield cleaning. Windshield wipers
will operate in the presence of water
sprayed on the windshield, and
windshield wipers may be damaged as a
result.
! Vehicles with rain-light sensor*:
70Windshield wipers>> Controls.* optionalBA 451 USA, CA Edition A 2011; 1; 4, en-UShereepeVersion: 3.0.3.62010-05-11T15:12:26+02:00 - Seite 70
Page 155 of 228
Coolant temperature
During severe operating conditions and
stop-and-go city traffic, the coolant
temperature may rise.
! Excessive coolant temperature causes
the red coolant temperature warning
lamp 00AE in the instrument cluster
comes on.
The engine should not be operated with
the red coolant temperature warning
lamp illuminated. Doing so may cause
serious engine damage which is not
covered by the smart Limited Warranty.
For more information on coolant
temperature warning lamp ( Y page 172).GWarning!
Driving when your engine is overheated can
cause some fluids which may have leaked
into the engine compartment to catch fire.
You could be seriously burned.
Steam from an overheated engine can cause
serious burns which can occur just by
opening the engine hood. Stay away from the
engine if you see or hear steam coming from
it.
Stop the vehicle in a safe location away
from other traffic. Turn off the engine, get
out of the vehicle and do not stand near the
vehicle until the engine has cooled down.
Driving abroad
Abroad, there is an extensive smart service
network at your disposal. If you plan to
drive into areas which are not listed in the
index of your smart center directory, you
should request pertinent information from
an authorized smart center.
Symmetrical low beams
i If you drive in countries where
vehicles drive on the other side of the
road than the country in which the
vehicle is registered, you must have the
headlamps modified for symmetrical low
beams. Relevant information can be
obtained at any authorized smart center.
Vehicle care
Care tips
Regular and proper care will help to
maintain the value of your vehicle. The
best way to protect your vehicle from
harmful environmental influences is to
wash it and use protective treatments
regularly.
smart recommends that you care for the
paintwork at least twice a year (e.g. in the
spring and autumn).
GWarning!
Many cleaning products can be hazardous.
Some are poisonous, others are flammable.
Always follow the instructions on the
particular container. Always open your
vehicle’s doors or windows when cleaning
the inside.
Never use fluids or solvents that are not
designed for cleaning your vehicle.
Always lock away cleaning products and
keep them out of reach of children.
! Follow the care tips. Wash your vehicle
preferably by hand.
While in operation or even while parked,
your vehicle is subjected to varying
external influences, which left unchecked
can attack the paint as well as the vehicle
underbody and lead to permanent damage.
Such damage is caused not only by extreme
and varying climatic conditions, but also
by:
R Air pollution
R Road salt
R Tar
R Gravel and stone chipping
Vehicle care153>> Operation.BA 451 USA, CA Edition A 2011; 1; 4, en-UShereepeVersion: 3.0.3.62010-05-11T15:12:26+02:00 - Seite 153Z
Page 173 of 228
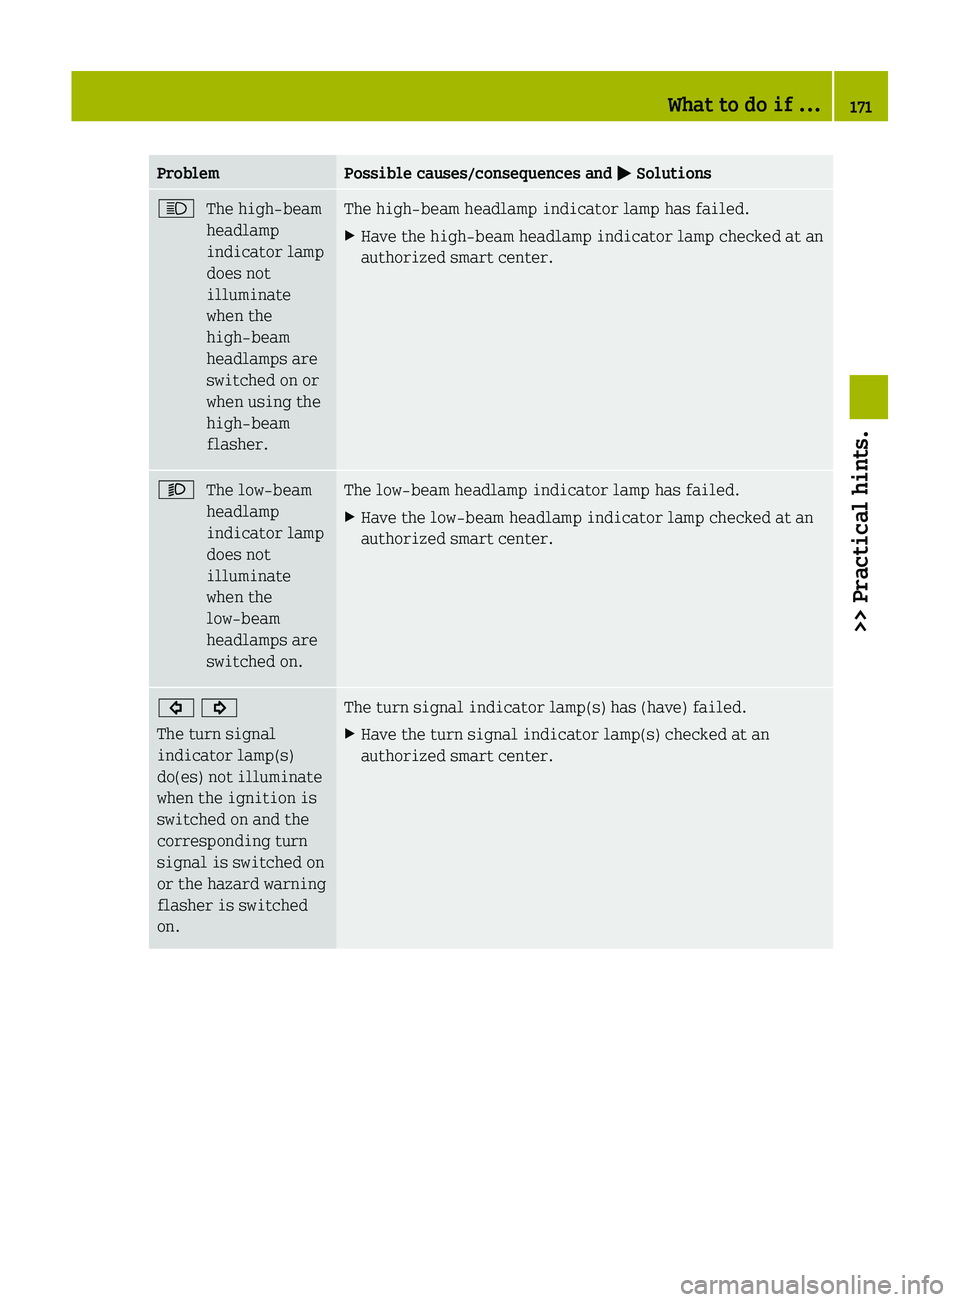
ProblemPossible causes/consequences and 0050 Solutions0063The high‑beam
headlamp
indicator lamp
does not
illuminate
when the
high‑beam
headlamps are
switched on or
when using the
high‑beam
flasher.The high‑beam headlamp indicator lamp has failed.XHave the high‑beam headlamp indicator lamp checked at an
authorized smart center.0065The low‑beam
headlamp
indicator lamp
does not
illuminate
when the
low‑beam
headlamps are
switched on.The low‑beam headlamp indicator lamp has failed.XHave the low‑beam headlamp indicator lamp checked at an
authorized smart center.0026 0024
The turn signal
indicator lamp(s)
do(es) not illuminate
when the ignition is
switched on and the
corresponding turn
signal is switched on
or the hazard warning
flasher is switched
on.The turn signal indicator lamp(s) has (have) failed. XHave the turn signal indicator lamp(s) checked at an
authorized smart center.What to do if ...171>> Practical hints.BA 451 USA, CA Edition A 2011; 1; 4, en-UShereepeVersion: 3.0.3.62010-05-11T15:12:26+02:00 - Seite 171Z
Page 182 of 228
Replacing bulbs
About replacing bulbs
Safe vehicle operation depends on proper
exterior lighting and signaling. It is
therefore essential that all bulbs and lamp
assemblies are in good working order at all
times.
Correct headlamp adjustment is extremely
important. Have headlamps checked and
readjusted at regular intervals and when a
bulb has been replaced. Contact an
authorized smart center for headlamp
adjustment.
GWarning!
Bulbs and bulb sockets can be very hot.
Allow the lamp to cool down before changing
a bulb. Otherwise you could be burned if you
touch them.
Keep bulbs out of the reach of children.
Halogen lamps contain pressurized gas. A
bulb can explode if you:
R touch or move it when hot
R drop the bulb
R scratch the bulb
Wear eye and hand protection.
i If the headlamps or front fog lamps* are
fogged up on the inside as a result of
high humidity, driving the vehicle a
distance with the lights on should clear
up the fogging.
Notes on bulb replacement:
R Only use bulbs of the same type and with
the specified watt rating.
R Switch the lights off before replacing a
bulb to prevent short circuits.
R Always use a clean lint-free cloth when
handling bulbs.
R Your hands should be dry and free of oil
and grease.
R Avoid touching the glass of the bulb with
bare fingers.
R If the newly installed bulb does not come
on, contact an authorized smart center.
R Have the bulbs for the front fog lamps*
replaced at an authorized smart center.180Replacing bulbs>> Practical hints.* optionalBA 451 USA, CA Edition A 2011; 1; 4, en-UShereepeVersion: 3.0.3.62010-05-11T15:12:26+02:00 - Seite 180
Page 183 of 228
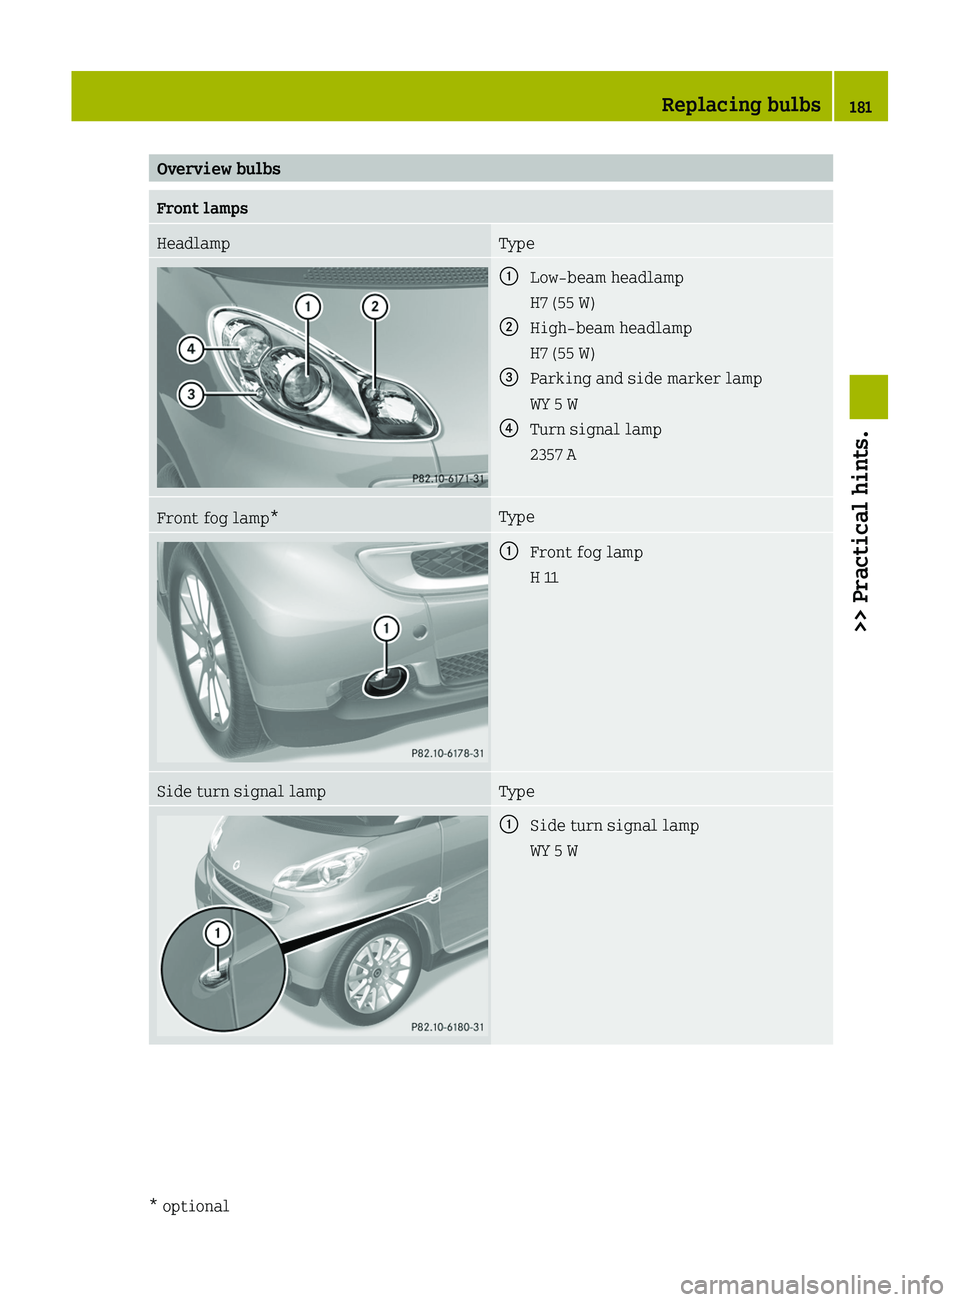
Overview bulbsFront lamps Headlamp Type\000FLow‑beam headlamp
H7 (55 W)
\000GHigh‑beam headlamp
H7 (55 W)
\000
Page 185 of 228
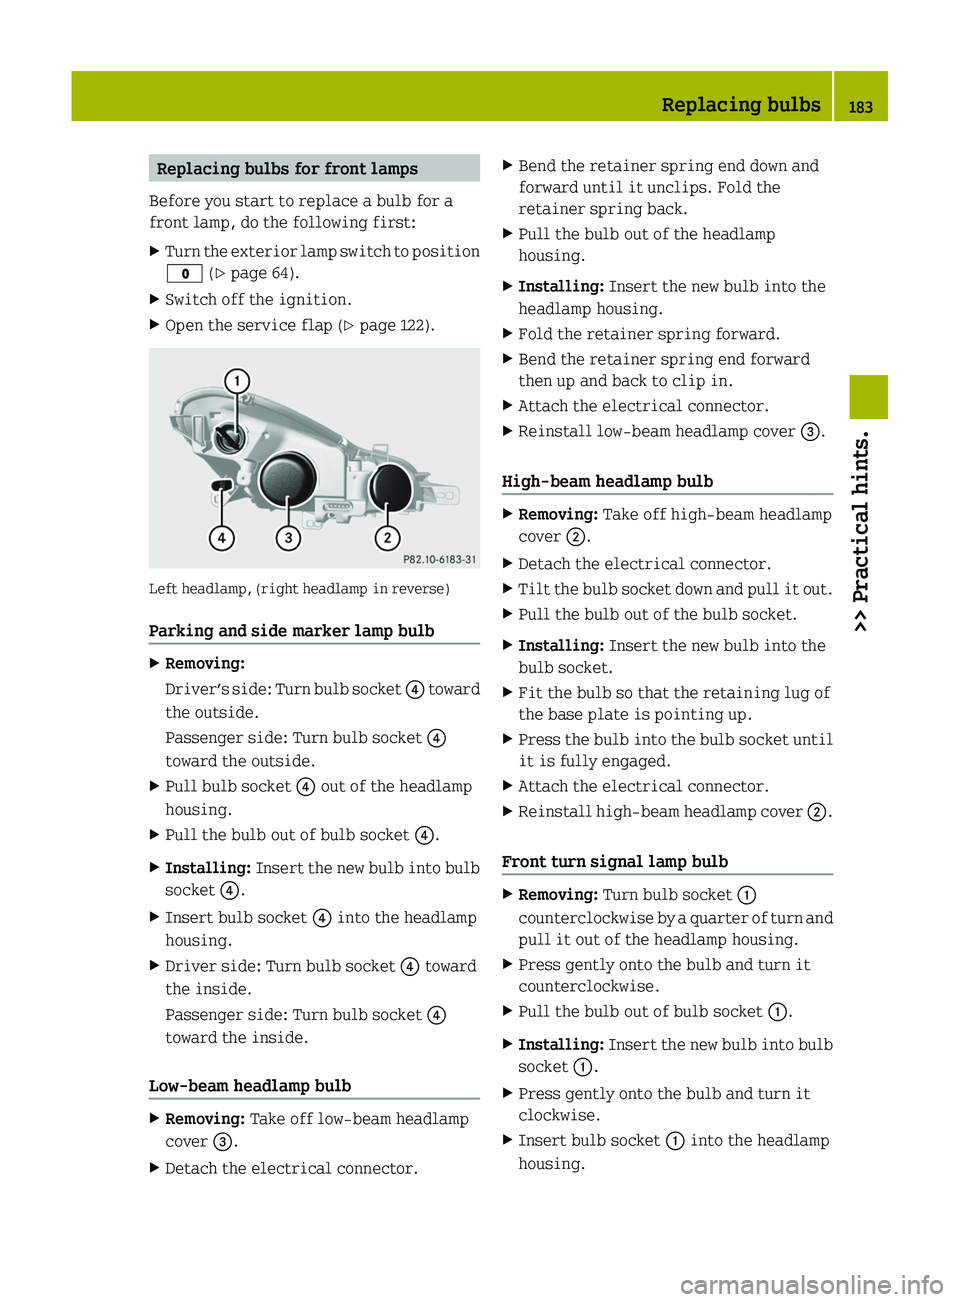
Replacing bulbs for front lamps
Before you start to replace a bulb for a
front lamp, do the following first:
XTurn the exterior lamp switch to position
\000' (Y page 64).
XSwitch off the ignition.XOpen the service flap (Y page 122).
Left headlamp, (right headlamp in reverse)
Parking and side marker lamp bulb
XRemoving:
Driver’s side: Turn bulb socket \000
Page 186 of 228
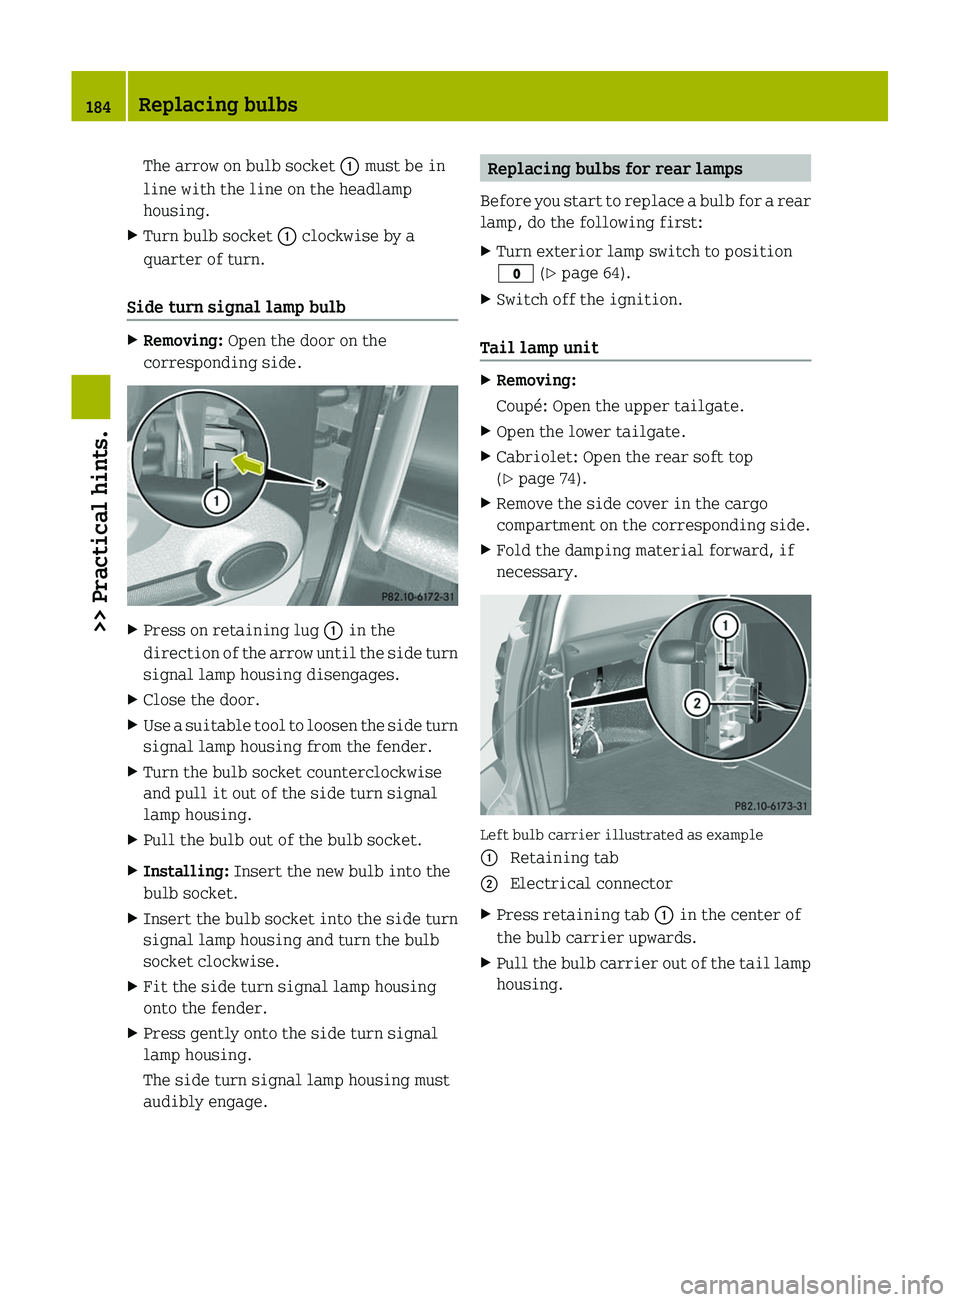
The arrow on bulb socket \000F must be in
line with the line on the headlamp
housing.
XTurn bulb socket \000F clockwise by a
quarter of turn.
Side turn signal lamp bulb
XRemoving: Open the door on the
corresponding side.
XPress on retaining lug \000F in the
direction of the arrow until the side turn
signal lamp housing disengages.
XClose the door.XUse a suitable tool to loosen the side turn
signal lamp housing from the fender.
XTurn the bulb socket counterclockwise
and pull it out of the side turn signal
lamp housing.
XPull the bulb out of the bulb socket.XInstalling: Insert the new bulb into the
bulb socket.
XInsert the bulb socket into the side turn
signal lamp housing and turn the bulb
socket clockwise.
XFit the side turn signal lamp housing
onto the fender.
XPress gently onto the side turn signal
lamp housing.
The side turn signal lamp housing must
audibly engage.
Replacing bulbs for rear lamps
Before you start to replace a bulb for a rear
lamp, do the following first:
XTurn exterior lamp switch to position
\000' (Y page 64).
XSwitch off the ignition.
Tail lamp unit
XRemoving:
Coupé: Open the upper tailgate.
XOpen the lower tailgate.XCabriolet: Open the rear soft top
(Y page 74).
XRemove the side cover in the cargo
compartment on the corresponding side.
XFold the damping material forward, if
necessary.
Left bulb carrier illustrated as example
\000F Retaining tab\000G Electrical connectorXPress retaining tab \000F in the center of
the bulb carrier upwards.
XPull the bulb carrier out of the tail lamp
housing.
184Replacing bulbs>> Practical hints.
BA 451 USA, CA Edition A 2011; 1; 4, en-UShereepeVersion: 3.0.3.62010-05-11T15:12:26+02:00 - Seite 184
Page 203 of 228
XRemove the jumper cables from negative terminals 008A and 0088 first.XRemove the jumper cables from positive terminals 0046 and 0047.
You can now switch on the headlamps.XRemount the positive terminal cover.XHave the battery checked at the nearest authorized smart center.Towing
About towing
This section offers information on towing
methods for breakdown situations,
emergency towing, and flat towing smart
vehicles.
Recommended towing method -
Breakdown situation
smart recommends that the vehicle be
transported with all wheels off the ground
using a flatbed carrier truck or
appropriate wheel lift/dolly equipment.
XSwitch off the tow‑away protection* and
interior motion sensor* ( Y page 49).
!
To prevent damage during transport, do
not tie down the vehicle by its chassis or
suspension parts — use only wheel straps
to position and hold down the vehicle.
Improper tie down on a flatbed carrier
truck or trailer can damage suspension
parts and body panels.
Emergency towing
When circumstances do not permit the
recommended towing method, the vehicle
may be towed with all wheels on the ground
using a strap or tow bar connected to
another vehicle. Only tow the vehicle as far
as necessary to have the vehicle moved to a
safe location where the recommended
towing method can be employed.
GWarning!
If circumstances require towing the
vehicle with all wheels on the ground,
always tow with a tow bar if:
R the engine will not run
R there is a malfunction in the brake
system
R there is a malfunction in the power
supply or in the vehicle’s electrical
system
A tow bar is necessary to adequately control
the towed vehicle.
Prior to towing the vehicle with all wheels
on the ground, make sure the gear selector
lever is in neutral position N and the
ignition is switched off.
GWarning!
With the engine not running, there is no
power assistance for the brake and
steering* systems. In this case, it is
important to keep in mind that a
considerably higher degree of effort is
necessary to brake and steer the vehicle.
Adapt your driving accordingly.
! Do not tow the vehicle with the front
axle raised. Doing so may cause serious
damage to the brake system which is not
covered by the smart Limited Warranty.
! Before towing the vehicle observe the
following instructions:
R Do not tow with sling-type equipment
attached to suspension parts. This may
Towing201>> Practical hints.* optionalBA 451 USA, CA Edition A 2011; 1; 4, en-UShereepeVersion: 3.0.3.62010-05-11T15:12:26+02:00 - Seite 201Z
Page 210 of 228
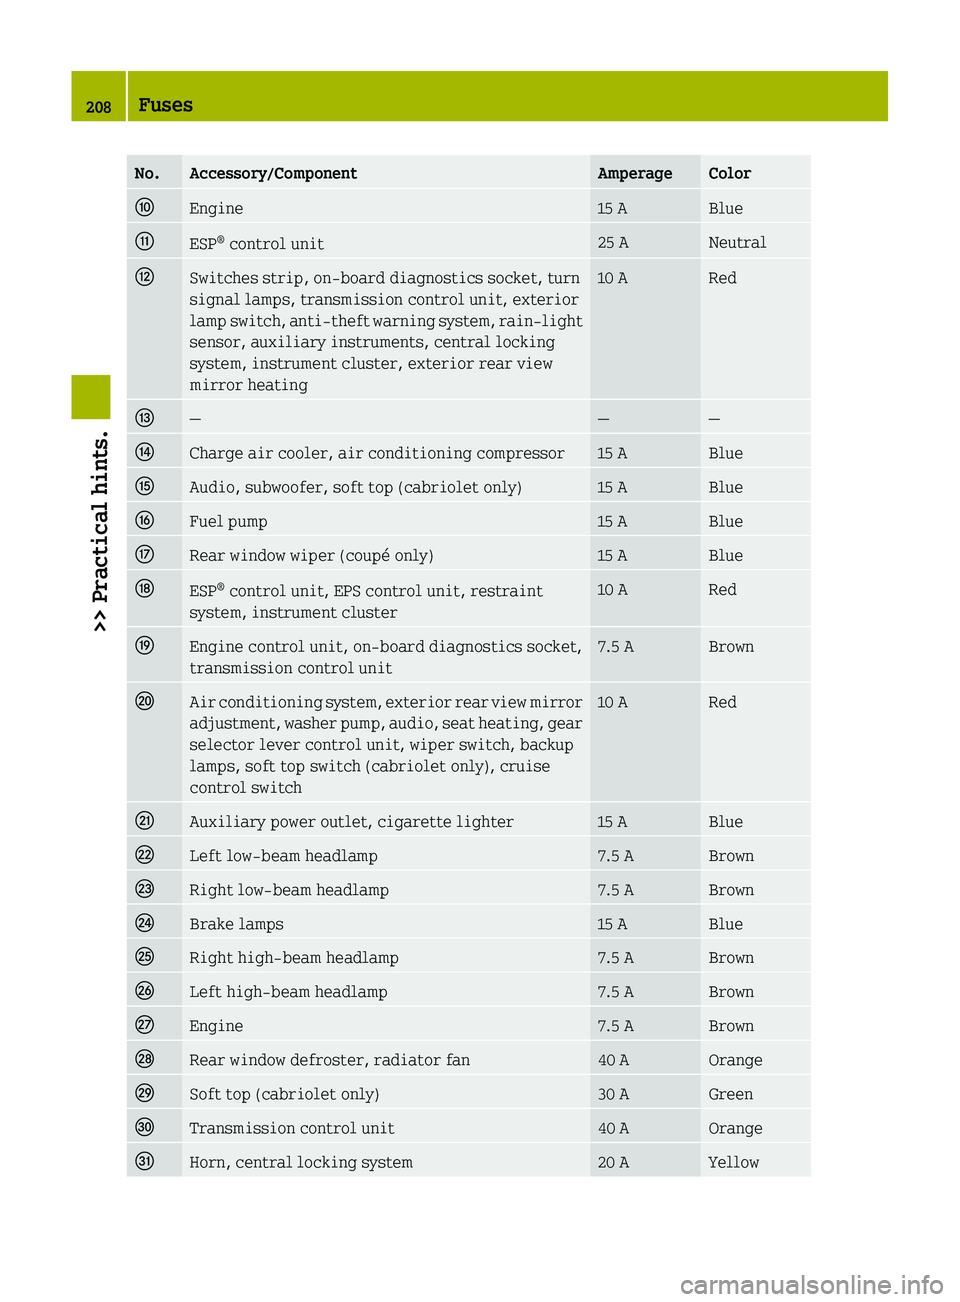
No.Accessory/ComponentAmperageColor0071Engine15 ABlue0072ESP®
control unit25 ANeutral0073Switches strip, on-board diagnostics socket, turn
signal lamps, transmission control unit, exterior
lamp switch, anti-theft warning system, rain-light
sensor, auxiliary instruments, central locking
system, instrument cluster, exterior rear view
mirror heating10 ARed0074———0075Charge air cooler, air conditioning compressor15 ABlue0076Audio, subwoofer, soft top (cabriolet only)15 ABlue0077Fuel pump15 ABlue0078Rear window wiper (coupé only)15 ABlue0079ESP ®
control unit, EPS control unit, restraint
system, instrument cluster10 ARed007AEngine control unit, on-board diagnostics socket,
transmission control unit7.5 ABrown007BAir conditioning system, exterior rear view mirror
adjustment, washer pump, audio, seat heating, gear
selector lever control unit, wiper switch, backup
lamps, soft top switch (cabriolet only), cruise
control switch10 ARed007CAuxiliary power outlet, cigarette lighter15 ABlue007DLeft low‑beam headlamp7.5 ABrown007ERight low‑beam headlamp7.5 ABrown007FBrake lamps15 ABlue0080Right high‑beam headlamp7.5 ABrown0081Left high‑beam headlamp7.5 ABrown0082Engine7.5 ABrown0083Rear window defroster, radiator fan40 AOrange0084Soft top (cabriolet only)30 AGreen0085Transmission control unit40 AOrange006DHorn, central locking system20 AYellow208Fuses>> Practical hints.
BA 451 USA, CA Edition A 2011; 1; 4, en-UShereepeVersion: 3.0.3.62010-05-11T15:12:26+02:00 - Seite 208