towing SMART FORTWO COUPE 2011 Owners Manual
[x] Cancel search | Manufacturer: SMART, Model Year: 2011, Model line: FORTWO COUPE, Model: SMART FORTWO COUPE 2011Pages: 228, PDF Size: 11.48 MB
Page 11 of 228
OCS (Occupant Classification
System) ........................................ 39
Self-test ................................. 42
Oil
see Engine oil
Oil level
see Engine oil, Checking level
On-board Diagnostics Socket (OBD) ... 213
Operating safety ............................ 15
Outside temperature display ............ 89
Overhead control panel ................... 28
P
Paintwork care ............................. 157
Panic alarm .................................. 45
Parcel nets ............................. 108, 112
Parking ........................................ 79
Parking brake ............................... 80
Parking lamps .............................. 181
Parts service ............................... 212
PASS AIR BAG OFF indicator lamp see Passenger front air bag off
indicator lamp
Passenger front air bag ................... 36
Passenger front air bag off
indicator lamp .................... 28, 36, 175
Passenger safety see Occupant safety
Passenger seat ............................... 60
Pedals ........................................ 146
Power assistance .......................... 146
Power outlet ................................. 115
Power washer ................................ 156
Practical hints Battery .................................. 195
Display messages .....................160
Flat tire ................................. 188
Fuses ..................................... 204
Jump starting .......................... 198
Replacing bulbs ....................... 180
Replacing transmitter battery ....179
Replacing wiper blades .............186
Towing ................................... 201
Unlocking/locking manually .......178
Warning and indicator
lamps ............................... 164, 175
What to do if ........................... 164
Where will I find...? .................160
Premium unleaded gasoline ............ 222
Problems with your vehicle .............. 16
Product information ....................... 13
Production options weight .............. 143
PSI (air pressure unit) ................... 144
R
Radio .......................................... 99
smart entry line ....................... 100
smart high line ........................ 100
Radio transmitters ........................ 152
Rain-light sensor .......................... 70
Rear lamps Overview ................................ 182
Rear window defroster .................... 107
Rear window wiper/washer ................ 71
Replacing wiper blade ..............186
Recommended tire inflation
pressure ................................ 127, 144
Refrigerant, air conditioning ......... 221
Refueling .................................... 118
Remote control see Key
Replacing bulbs ............................ 180
Reporting safety defects .................. 16
Research Octane Number see RON
Reserve fuel indicator .................... 92
Restraint systems see Occupant safety
Rims ..................................... 144, 217
Roadside Assistance ....................... 14
RON (Research Octane Number) ......... 222
Roof see Soft top system
S
Safety Driving safety systems ...............46
Occupant safety ......................... 30
Reporting defects ......................16
Safety belts
see Seat belts
Seat belt force limiter .................... 33
Index9BA 451 USA, CA Edition A 2011; 1; 4, en-UShereepeVersion: 3.0.3.62010-05-11T15:12:26+02:00 - Seite 9
Page 13 of 228
Technical data (dimensions)see Vehicle specification
Technical data (weights)
see Vehicle specification
Temperature
Coolant .................................. 153
Interior temperature ................105
Outside ................................... 89
Tether anchorage points
see Children in the vehicle
Thorax-pelvis side air bags ............. 38
Tightening torque Wheels ................................... 138
TIN (Tire Identification
Number) ................................. 141, 144
Tire and Loading Information
placard ....................................... 132
Tire and loading terminology .......... 142
Tire Identification Number see TIN
Tire inflation pressure
Checking ................................ 128
Important notes on ....................128
Placard on driver’s door B-
pillar .................................... 132
Tire labeling ............................... 138
Tire load rating ........................... 144
Tire ply composition and material
used ........................................... 144
Tire Pressure Monitoring System
(TPMS) ........................................ 129
Tire repair kit ....................... 160, 188
Tires .................................... 126, 217
Air pressure ............................ 127
Care and maintenance ................ 135
Cleaning ................................ 136
Direction of rotation, spinning ..135
Driving instructions ................149
Flat tire ................................. 188
Important notes on tire
inflation pressure .................... 128
Inflation pressure ..............128, 129
Information placard .................132
Inspection .............................. 136
Labeling ................................ 138
Load rating ............................. 144Ply composition and material
used ...................................... 144
Problems under-/overinflation ...128
Retreads ................................. 126
Rims and tires (technical data) ...217
Rotation ................................. 138
Service life ............................ 136
Sizes ..................................... 217
Snow chains ............................ 145
Speed rating ................ 140, 144, 150
Storing .................................. 136
Temperature ...................... 128, 137
Terminology ............................ 142
Tire Identification Number ..141, 144
Tire Pressure Monitoring
System (TPMS) .......................... 129
Traction ...................... 137, 144, 150
Tread ..................................... 144
Tread depth ....................... 136, 145
Treadwear indicators ..........136, 144
Vehicle maximum load on ...........145
Wheel change ........................... 193
Winter tires ...................... 145, 217
Tire speed rating .................... 140, 144
Top tether see Children in the vehicle
Total load limit ........................... 144
Tow-away alarm ............................. 49
Towing ....................................... 201
Traction ................................ 144, 150
Transmission see Automatic transmission
Transmission position indicator ...... 88
Transmitting power values .............. 212
Traveling abroad .......................... 153
Tread (tires) ................................ 144
Tread depth (tires) .................. 136, 145
Treadwear indicators (tires) ..... 136, 144
Trip odometer, resetting ................. 91
Turning off the engine .................... 81
Turn signal lamps .......................... 181
Turn signals .................................. 67
Indicator lamps ....................... 171Index11BA 451 USA, CA Edition A 2011; 1; 4, en-UShereepeVersion: 3.0.3.62010-05-11T15:12:26+02:00 - Seite 11
Page 14 of 228
U
Uniform Tire Quality Grading
Standards .............................. 137, 144
Unleaded gasoline, premium ........... 221
Unlocking the vehicle ..................... 52
Manually ................................. 178
USB socket ................................... 100
V
Vehicle Bulbs ..................................... 180
Care ...................................... 153
Identification Number (VIN) .......214
Locking/unlocking ....................52
Locking/unlocking manually .......178
Modifications and alterations,
Operating safety ....................... 15
Towing ................................... 201
Vehicle dimensions
see Vehicle specification
Vehicle Identification Number
(VIN) .......................................... 214
Vehicle lighting ............................ 64
Vehicle loading Instructions ............................ 113
Load limit .............................. 134
Roof rack ................................ 113
Terminology ............................ 142
Vehicle maximum load on the tire .... 145
Vehicle specification Model BRABUS .......................... 216
Model passion ......................... 215
Model pure .............................. 215
Vehicle washing
see Vehicle care
Vehicle weights
see Vehicle specification
Ventilation
see HVAC ................................ 103
W
Warning signals Anti-theft warning system ..........177
Brake pads .............................. 177
Door ...................................... 177
Seat belt reminder system .....167, 177
Warranty coverage ......................... 212
Warranty information ...................... 13
Washer fluid Mixing ratio ........................... 222
Refilling ............................... 124
Wiping .................................... 71
Washer jet nozzles ......................... 188
Washing the vehicle ...................... 153
Weights (vehicle) see Vehicle specification
Wheel change ............................... 193
Wheel cover ................................. 193
Wheels, sizes ............................... 217
Wheels, Tires and .......................... 126
Where will I find...? First-aid kit ........................... 160
Tire repair kit ........................ 160
Window curtain air bags .................. 38
Windshield Washer fluid ....................... 71, 222
Wipers .................................... 70
Windshield wipers .......................... 70
Adjusting washer jet nozzles ....... 188
Rain-light sensor ......................70
Replacing wiper blades .............186
Winter driving
Driving instructions .................151
Snow chains ............................ 145
Tires ..................................... 145
Winter tires ........................... 145, 21712IndexBA 451 USA, CA Edition A 2011; 1; 4, en-UShereepeVersion: 3.0.3.62010-05-11T15:12:26+02:00 - Seite 12
Page 83 of 228
you, and lock the vehicle. Do not leave
children unattended in the vehicle, or with
access to an unlocked vehicle. Children
could release the parking brake and/or
move the gear selector lever from park
position P, either of which could result in
an accident and/or serious personal
injury.
Brake pedal
The brake pedal has two brake circuits
independent of each other. A brake servo is
used during braking (when the engine is
running) to increase pedal force.
GWarning!
Make sure absolutely no objects are
obstructing the pedals’ range of motion.
Keep the driver’s footwell clear of all
obstacles. If there are any floormats* or
carpets in the footwell, make sure the
pedals still have sufficient clearance.
During sudden acceleration or braking
maneuvers, the objects could get caught
between or beneath the pedals and restrict
your ability to brake or accelerate. This
could lead to accidents and/or injury.
GWarning!
Considerably more effort will be required
to apply the brakes if
Rthe brake servo has failed
Ra brake circuit has failed
Rthe engine is switched off, e.g. for
towing the vehicle
The braking distance is likewise greater.
Make sure the engine is running whenever
the vehicle is rolling. Have the brake
system repaired at an authorized smart
center, if there is a fault in the brake
system.
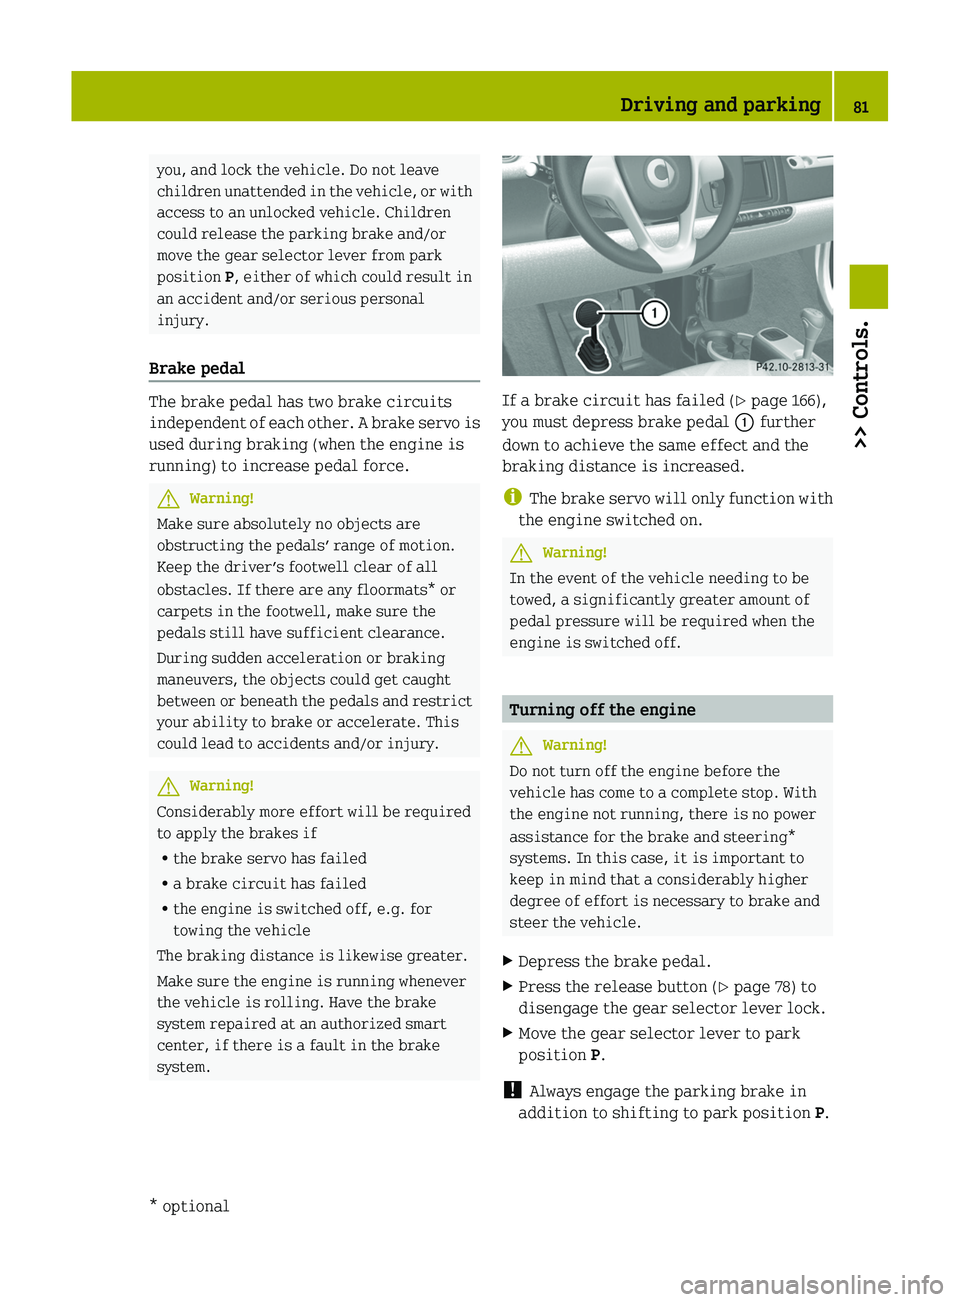
If a brake circuit has failed (Y page 166),
you must depress brake pedal \000F further
down to achieve the same effect and the
braking distance is increased.
iThe brake servo will only function with
the engine switched on.
GWarning!
In the event of the vehicle needing to be
towed, a significantly greater amount of
pedal pressure will be required when the
engine is switched off.
Turning off the engine
GWarning!
Do not turn off the engine before the
vehicle has come to a complete stop. With
the engine not running, there is no power
assistance for the brake and steering*
systems. In this case, it is important to
keep in mind that a considerably higher
degree of effort is necessary to brake and
steer the vehicle.
XDepress the brake pedal.XPress the release button (Y page 78) to
disengage the gear selector lever lock.
XMove the gear selector lever to park
position P.
! Always engage the parking brake in
addition to shifting to park position P.
Driving and parking81>> Controls.* optionalBA 451 USA, CA Edition A 2011; 1; 4, en-UShereepeVersion: 3.0.3.62010-05-11T15:12:26+02:00 - Seite 81Z
Page 115 of 228
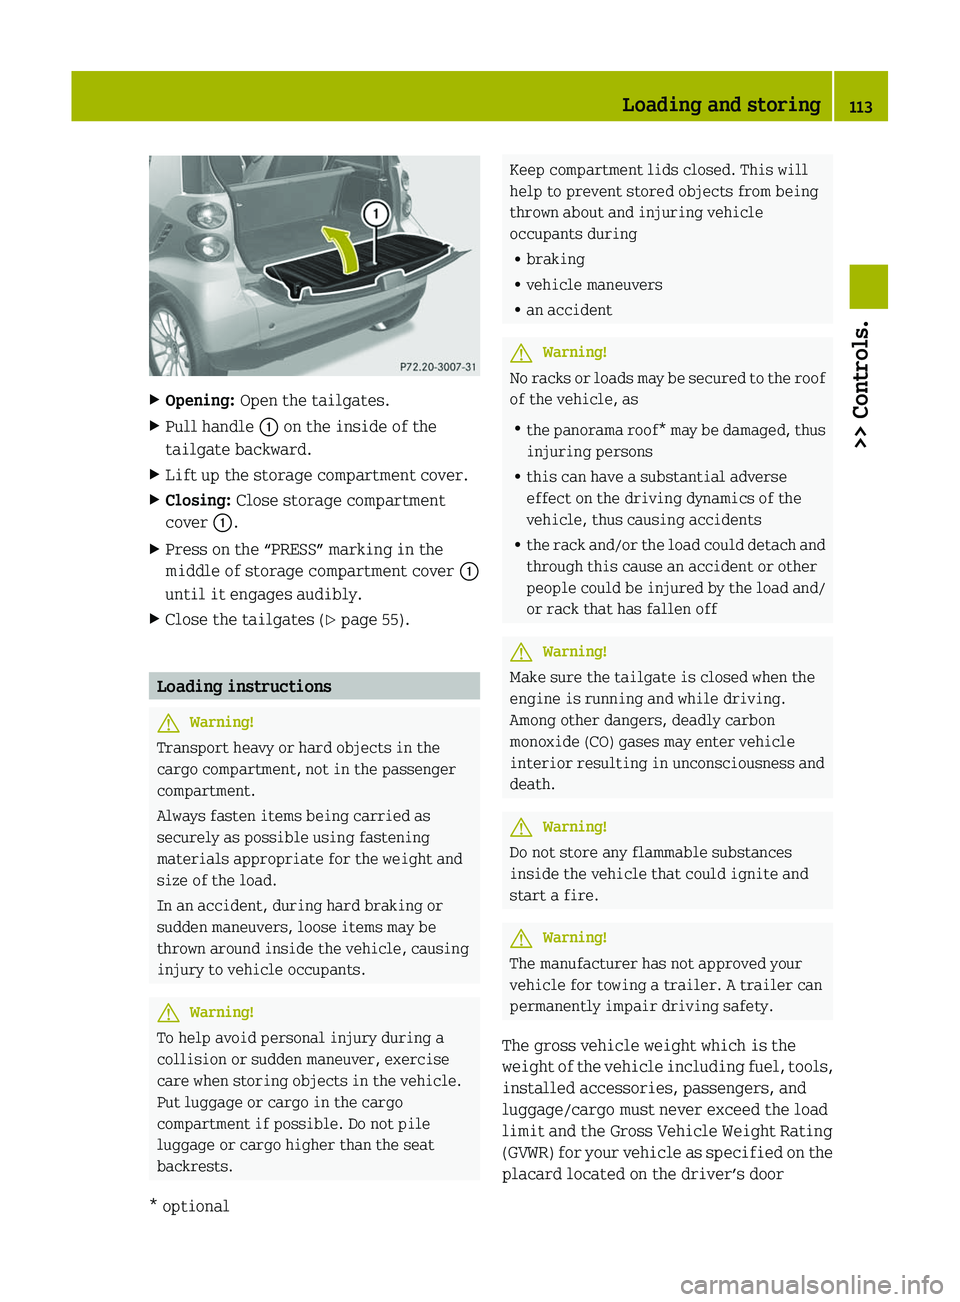
XOpening: Open the tailgates.XPull handle \000F on the inside of the
tailgate backward.
XLift up the storage compartment cover.XClosing: Close storage compartment
cover \000F.
XPress on the “PRESS” marking in the
middle of storage compartment cover \000F
until it engages audibly.
XClose the tailgates (Y page 55).
Loading instructions
GWarning!
Transport heavy or hard objects in the
cargo compartment, not in the passenger
compartment.
Always fasten items being carried as
securely as possible using fastening
materials appropriate for the weight and
size of the load.
In an accident, during hard braking or
sudden maneuvers, loose items may be
thrown around inside the vehicle, causing
injury to vehicle occupants.
GWarning!
To help avoid personal injury during a
collision or sudden maneuver, exercise
care when storing objects in the vehicle.
Put luggage or cargo in the cargo
compartment if possible. Do not pile
luggage or cargo higher than the seat
backrests.
Keep compartment lids closed. This will
help to prevent stored objects from being
thrown about and injuring vehicle
occupants during
Rbraking
Rvehicle maneuvers
Ran accident
GWarning!
No racks or loads may be secured to the roof
of the vehicle, as
Rthe panorama roof* may be damaged, thus
injuring persons
Rthis can have a substantial adverse
effect on the driving dynamics of the
vehicle, thus causing accidents
Rthe rack and/or the load could detach and
through this cause an accident or other
people could be injured by the load and/
or rack that has fallen off
GWarning!
Make sure the tailgate is closed when the
engine is running and while driving.
Among other dangers, deadly carbon
monoxide (CO) gases may enter vehicle
interior resulting in unconsciousness and
death.
GWarning!
Do not store any flammable substances
inside the vehicle that could ignite and
start a fire.
GWarning!
The manufacturer has not approved your
vehicle for towing a trailer. A trailer can
permanently impair driving safety.
The gross vehicle weight which is the
weight of the vehicle including fuel, tools,
installed accessories, passengers, and
luggage/cargo must never exceed the load
limit and the Gross Vehicle Weight Rating
(GVWR) for your vehicle as specified on the
placard located on the driver’s door
Loading and storing113>> Controls.* optionalBA 451 USA, CA Edition A 2011; 1; 4, en-UShereepeVersion: 3.0.3.62010-05-11T15:12:26+02:00 - Seite 113Z
Page 161 of 228
>> Practical hints.Where will I find ... ..........................160
Display messages .............................160
What to do if ... ...............................164
Unlocking/locking manually ...............178
Replacing transmitter battery ............179
Replacing bulbs ..............................180
Replacing wiper blades .....................186
Flat tire ........................................188
Wheel change ..................................193
Battery ..........................................195
Jump starting ..................................198
Towing ..........................................201
Fuses ............................................204
BA 451 USA, CA Edition A 2011; 1; 4, en-UShereepeVersion: 3.0.3.62010-05-11T15:12:26+02:00 - Seite 159
Page 203 of 228
XRemove the jumper cables from negative terminals 008A and 0088 first.XRemove the jumper cables from positive terminals 0046 and 0047.
You can now switch on the headlamps.XRemount the positive terminal cover.XHave the battery checked at the nearest authorized smart center.Towing
About towing
This section offers information on towing
methods for breakdown situations,
emergency towing, and flat towing smart
vehicles.
Recommended towing method -
Breakdown situation
smart recommends that the vehicle be
transported with all wheels off the ground
using a flatbed carrier truck or
appropriate wheel lift/dolly equipment.
XSwitch off the tow‑away protection* and
interior motion sensor* ( Y page 49).
!
To prevent damage during transport, do
not tie down the vehicle by its chassis or
suspension parts — use only wheel straps
to position and hold down the vehicle.
Improper tie down on a flatbed carrier
truck or trailer can damage suspension
parts and body panels.
Emergency towing
When circumstances do not permit the
recommended towing method, the vehicle
may be towed with all wheels on the ground
using a strap or tow bar connected to
another vehicle. Only tow the vehicle as far
as necessary to have the vehicle moved to a
safe location where the recommended
towing method can be employed.
GWarning!
If circumstances require towing the
vehicle with all wheels on the ground,
always tow with a tow bar if:
R the engine will not run
R there is a malfunction in the brake
system
R there is a malfunction in the power
supply or in the vehicle’s electrical
system
A tow bar is necessary to adequately control
the towed vehicle.
Prior to towing the vehicle with all wheels
on the ground, make sure the gear selector
lever is in neutral position N and the
ignition is switched off.
GWarning!
With the engine not running, there is no
power assistance for the brake and
steering* systems. In this case, it is
important to keep in mind that a
considerably higher degree of effort is
necessary to brake and steer the vehicle.
Adapt your driving accordingly.
! Do not tow the vehicle with the front
axle raised. Doing so may cause serious
damage to the brake system which is not
covered by the smart Limited Warranty.
! Before towing the vehicle observe the
following instructions:
R Do not tow with sling-type equipment
attached to suspension parts. This may
Towing201>> Practical hints.* optionalBA 451 USA, CA Edition A 2011; 1; 4, en-UShereepeVersion: 3.0.3.62010-05-11T15:12:26+02:00 - Seite 201Z
Page 204 of 228
cause damage to the radiator and other
supports if towing on a bumpy road.
RTowing the vehicle should only be done
using the properly installed towing
eye bolt. Never attach a tow cable, tow
rope, or tow rod to the vehicle chassis,
frame, or suspension parts.
! Make sure the ignition is switched off
while towing the vehicle. Doing
otherwise may result in
Rthe ESP® being activated. Active
braking action through the ESP® may
seriously damage the brake system
which is not covered by the smart
Limited Warranty.
Ra discharged battery.
! Make sure the gear selector lever is in
neutral position N while towing the
vehicle. Doing otherwise may result in
significant transmission damage.
! Towing the vehicle with a luggage
rack* mounted is not permissible. The
vehicle must not be towed by the luggage
rack*.
iIf the battery is disconnected or
discharged, the gear selector lever will
remain locked in park position P.
Contact an authorized smart center for
assistance or call Roadside Assistance.
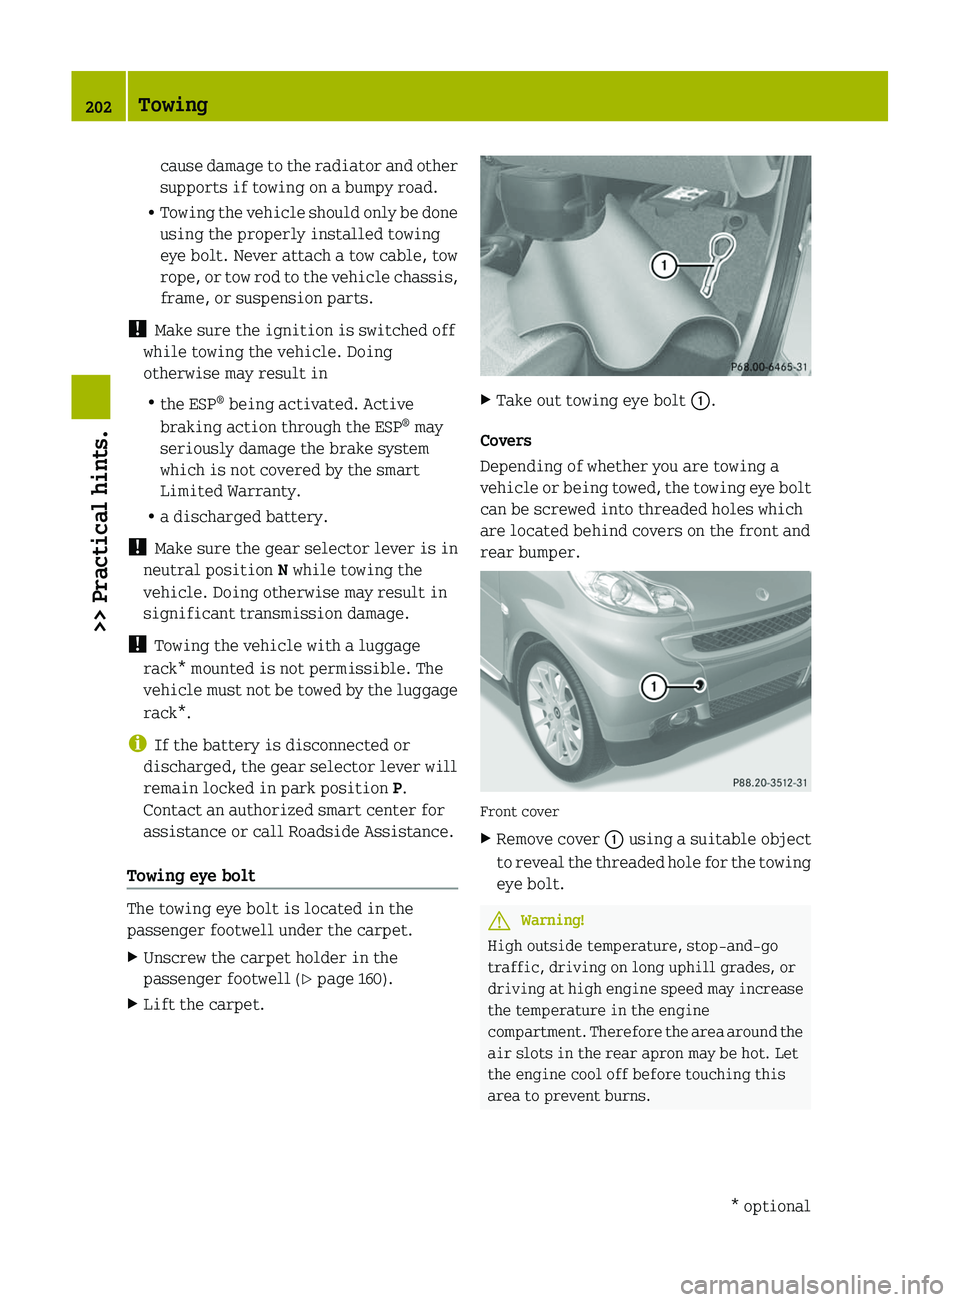
Towing eye bolt
The towing eye bolt is located in the
passenger footwell under the carpet.
XUnscrew the carpet holder in the
passenger footwell (Y page 160).
XLift the carpet.XTake out towing eye bolt \000F.
Covers
Depending of whether you are towing a
vehicle or being towed, the towing eye bolt
can be screwed into threaded holes which
are located behind covers on the front and
rear bumper.
Front cover
XRemove cover \000F using a suitable object
to reveal the threaded hole for the towing
eye bolt.
GWarning!
High outside temperature, stop-and-go
traffic, driving on long uphill grades, or
driving at high engine speed may increase
the temperature in the engine
compartment. Therefore the area around the
air slots in the rear apron may be hot. Let
the engine cool off before touching this
area to prevent burns.
202Towing>> Practical hints.* optionalBA 451 USA, CA Edition A 2011; 1; 4, en-UShereepeVersion: 3.0.3.62010-05-11T15:12:26+02:00 - Seite 202
Page 205 of 228
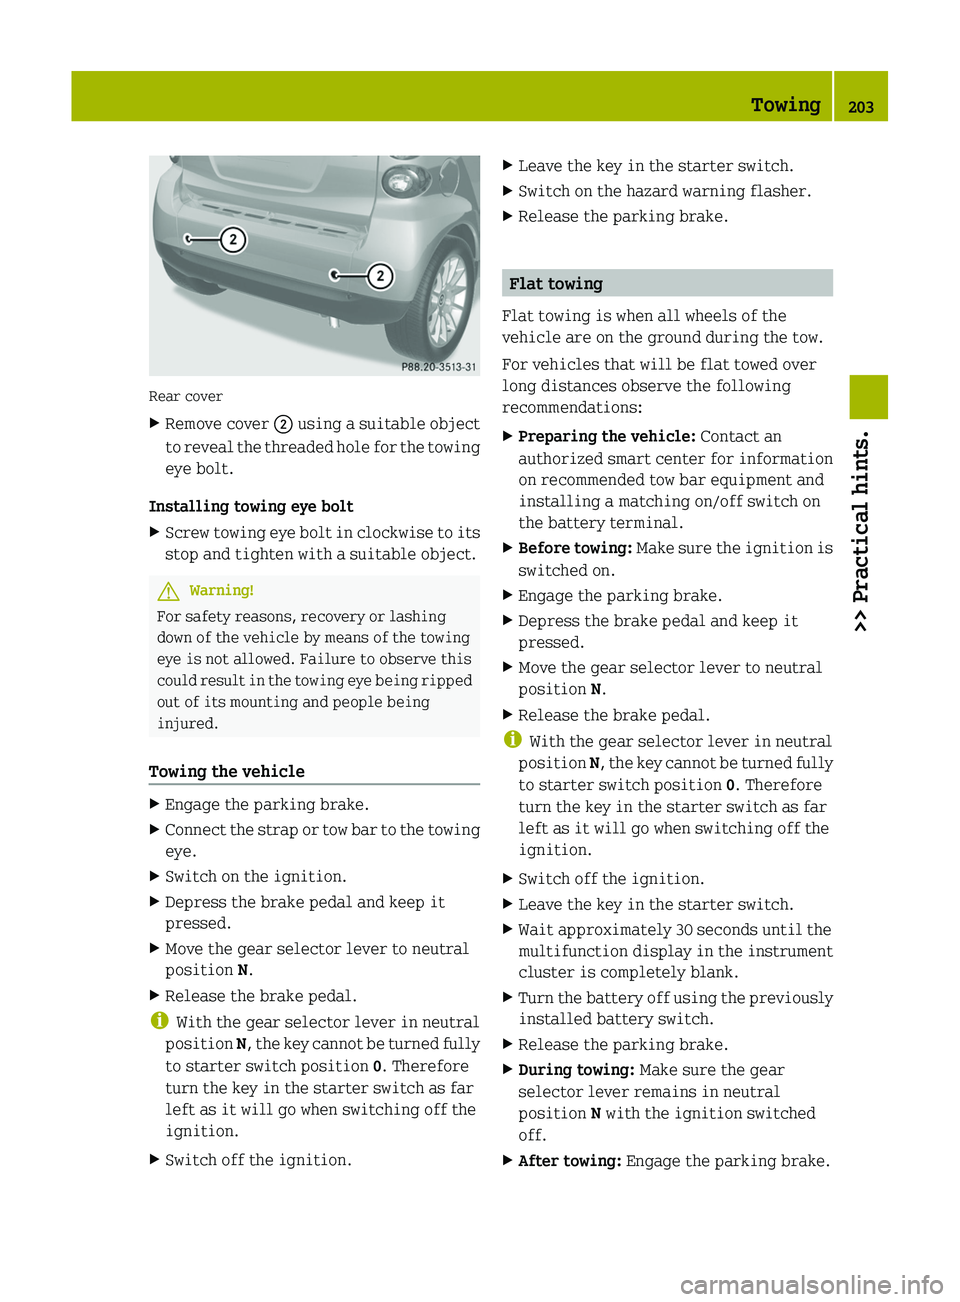
Rear cover
XRemove cover \000G using a suitable object
to reveal the threaded hole for the towing
eye bolt.
Installing towing eye bolt
XScrew towing eye bolt in clockwise to its
stop and tighten with a suitable object.
GWarning!
For safety reasons, recovery or lashing
down of the vehicle by means of the towing
eye is not allowed. Failure to observe this
could result in the towing eye being ripped
out of its mounting and people being
injured.
Towing the vehicle
XEngage the parking brake.XConnect the strap or tow bar to the towing
eye.
XSwitch on the ignition.XDepress the brake pedal and keep it
pressed.
XMove the gear selector lever to neutral
position N.
XRelease the brake pedal.
iWith the gear selector lever in neutral
position N, the key cannot be turned fully
to starter switch position 0. Therefore
turn the key in the starter switch as far
left as it will go when switching off the
ignition.
XSwitch off the ignition.XLeave the key in the starter switch.XSwitch on the hazard warning flasher.XRelease the parking brake.
Flat towing
Flat towing is when all wheels of the
vehicle are on the ground during the tow.
For vehicles that will be flat towed over
long distances observe the following
recommendations:
XPreparing the vehicle: Contact an
authorized smart center for information
on recommended tow bar equipment and
installing a matching on/off switch on
the battery terminal.
XBefore towing: Make sure the ignition is
switched on.
XEngage the parking brake.XDepress the brake pedal and keep it
pressed.
XMove the gear selector lever to neutral
position N.
XRelease the brake pedal.
iWith the gear selector lever in neutral
position N, the key cannot be turned fully
to starter switch position 0. Therefore
turn the key in the starter switch as far
left as it will go when switching off the
ignition.
XSwitch off the ignition.XLeave the key in the starter switch.XWait approximately 30 seconds until the
multifunction display in the instrument
cluster is completely blank.
XTurn the battery off using the previously
installed battery switch.
XRelease the parking brake.XDuring towing: Make sure the gear
selector lever remains in neutral
position N with the ignition switched
off.
XAfter towing: Engage the parking brake.Towing203>> Practical hints.BA 451 USA, CA Edition A 2011; 1; 4, en-UShereepeVersion: 3.0.3.62010-05-11T15:12:26+02:00 - Seite 203Z
Page 206 of 228
XTurn the battery on using the previously
installed battery switch.
XMove the gear selector lever to park
position P.
XRemove the key from the starter switch.XLock the doors.
! Do not flat tow the vehicle with the front
axle raised. Doing so may cause serious
damage to the brake system which is not
covered by the smart Limited Warranty.
! Failure to follow the recommendations
for flat towing can cause damage to your
vehicle:
RNot following the battery disconnect
procedure in the proper sequence may
result in data loss in the vehicle’s
control units.
RNot disconnecting the battery and
leaving the key in starter switch
position 1 (ignition on) may result in
-the vehicle locking. The vehicle will
lock if the wheels are turning at
vehicle speeds of approximately
8 mph (14 km/h) or more.
-the ESP® being activated. Active
braking action through the ESP® may
seriously damage the brake system
which is not covered by the smart
Limited Warranty.
RNot moving the gear selector lever to
neutral position N may result in
significant transmission damage.
Rin a discharged battery.
Fuses
The electrical fuses in your vehicle serve
to switch off malfunctioning power
circuits.
If a fuse is blown, the components and
systems secured by that fuse will stop
operating.
GWarning!
Only use fuses approved by smart with the
specified amperage for the system in
question and do not attempt to repair or
bridge a blown fuse this may cause an
overload leading to a fire, and/or cause
damage to electrical components and/or
systems. Contact a smart center if you
encounter any electrical problems.
! A blown fuse must be replaced by an
appropriate spare fuse (recognizable by
its color or the fuse rating given on the
fuse) of the amperage recommended in
the fuse chart. Any smart center will be
glad to advise you on this subject.
If a newly inserted fuse blows again, have
the cause determined and rectified at an
authorized smart center.
Before replacing fuses:
REngage the parking brake.
RMake sure the gear selector lever is in
park position P.
RTurn off all electrical accessories.
RTurn off the engine.
RRemove the key from the starter switch.
Replacing a fuse
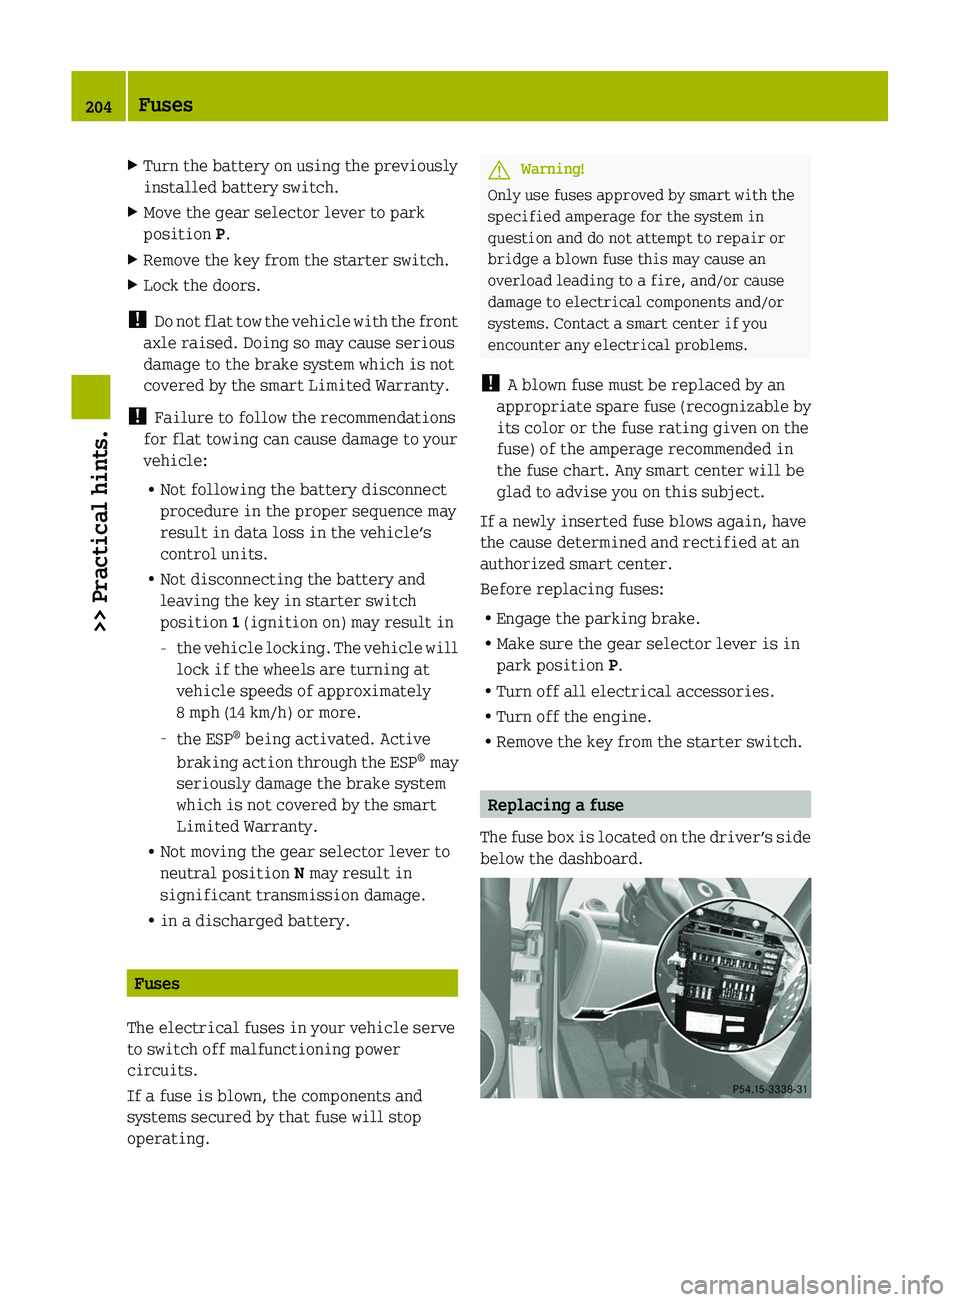
The fuse box is located on the driver’s side
below the dashboard.
204Fuses>> Practical hints.
BA 451 USA, CA Edition A 2011; 1; 4, en-UShereepeVersion: 3.0.3.62010-05-11T15:12:26+02:00 - Seite 204