air condition SMART FORTWO COUPE ELECTRIC DRIVE 2013 Owners Manual
[x] Cancel search | Manufacturer: SMART, Model Year: 2013, Model line: FORTWO COUPE ELECTRIC DRIVE, Model: SMART FORTWO COUPE ELECTRIC DRIVE 2013Pages: 218, PDF Size: 2.69 MB
Page 6 of 218

1, 2, 3 ...
12-volt battery Charging ................................ 192
Indicator lamp ........................ 164
Notes ..................................... 190
Removing and installing ............192 A
ABS (Antilock Brake System) .............44
Indicator lamp ........................ 160
Accessory weight .......................... 137
Accidents Air bags .................................. 31
Address change .............................. 14
Air bags ....................................... 31
Children .................................. 31
Front, driver and passenger ......... 34
Front, passenger ....................... 34
Head-thorax ............................. 35
Knee bag .................................. 35
Passenger front air bag off
indicator lamp ..................... 26, 39
Safety guidelines ......................33
SRS indicator lamp ...................162
Thorax-pelvi s.......................... 36
Window curtain ......................... 36
Air conditioning with climate
control
Air distribution ....................... 98
Air recirculation mode ............... 99
Air vents ................................. 97
Air volume ............................... 99
Control panel ............................ 97
Defrosting ............................... 99
Notes ...................................... 95
Rear window defroster ................99
Switching on/off ....................... 97
Temperature ............................. 97
Air pressure
see Tire inflation pressure
Air pressure (tires) .......................138
Air vents ...................................... 97
Alarm system see Anti-theft systems
Ambient lighting* .......................... 65
Anticorrosion/antifreeze .........213, 214 Antiglare, Interior rear view
mirror
......................................... 59
Antilock Brake System see ABS
Anti-theft systems ......................... 46
Anti-theft warning system ...........47
Electronic immobilizer ..............46
Interior motion sensor ...............47
Tow-away alarm ......................... 47
Aquaplaning
see Hydroplaning
Armrest ........................................ 57
Aspect ratio (tires) .......................138
Audio system ................................. 91
Basic ...................................... 92
Navigation/multimedia ..............92
Automatic headlamp mode ................62
Automatic locking .......................... 51
AUX socket .................................... 93 B
Backrest see Seats
Backup lamp ................................. 174
Bar (air pressure unit) ...................138
Batteries .................................... 190
Battery Jump starting .......................... 193
Battery (key)
Replacing the transmitter
battery ................................... 171
Battery coolant ............................. 119
Bead (tire) .................................. 138
Brake fluid .................................. 121
Checking ................................ 121
Brake lamp .................................. 174
Brake pedal ................................... 76
Brakes ........................................ 142
Parking brake ........................... 75
Warning lamp .......................... 160
Bulbs
Fron t..................................... 173
Rear ...................................... 174
Replacing ............................... 1724
Index
Page 15 of 218

R
Emission System Warranty
R Emission Performance Warranty
R Corrosion Warranty
R California, Connecticut, Maine,
Massachusetts, New York, Pennsylvania,
Rhode Island, and Vermont Emission
Control System Warranty
R smartmove Assistance (Canada only)
R State Warranty Enforcement Laws (Lemon
Laws, USA only) Important notice for California retail
buyers and lessees of smart
automobiles
Under California law you may be entitled
to a replacement of your vehicle or a refund
of the purchase price or lease price, if
Daimler Vehicle Innovations USA LLC and/
or its authorized repair or service
facilities fail to fix one or more
substantial defects or malfunctions in the
vehicle that are covered by its express
warranty after a reasonable number of
repair attempts. During the period of
18 months from original delivery of the
vehicle or the accumulation of 18 000 miles
(approximately 29 000 km) on the odometer
of the vehicle, whicheve roccurs first, a
reasonable number of repair attempts is
presumed for a retail buyer or lessee if one
or more of the following occurs:
(1) the same substantial defect or malfunction results in a condition that
is likely to cause death or serious
bodily injury if the vehicle is driven,
that defect or malfunction has been
subject to repair two or more times,
and you have directly notified Daimler
Vehicle Innovations USA LLC in
writing of the need for its repair,
(2) the same substantial defect or malfunction of a less serious nature
than category (1) has been subject to
repair four or more times and you have directly notified us in writing of the
need for its repair, or
(3) the vehicle is out of service by reason of repair of the same or different
substantial defects or malfunctions
for a cumulative total of more than
30 calendar days.
Written notification should not be sent to
a dealer, it should be addressed to:
Daimler Vehicle Innovations USA LLC
One Mercedes Drive
Montvale, NJ 07645 Maintenance
The Scheduled Maintenance Guide (USA) and
Service Booklet (Canada) describes all the
necessary maintenance work which should
be performed at regular intervals. It is
important that you service your vehicle in
accordance with the prescribed
maintenance schedule. Failure to do so may
render your vehicle unsafe, it may affect
the durability of the vehicle, and it may
otherwise void the limited, express
warranty.
Always have the Scheduled Maintenance
Guide (USA) or Service Booklet (Canada)
with you when you take the vehicle to your
authorized electric drive smart center for
service. The service advisor will record
each service in the booklet for you. Operating range
If you plan a long distance trip, please be
aware that:
R You will need to have access to an AC
power socket or a private wallbox to >> Introduction.
13
Page 27 of 218

Center console
Function Page
0002
Charge level gauge 79
0003
Power gauge 79
002B
Air conditioning with
climate control
95
002A
Radio 91
0028
Drawer 103
0029
Switching seat heating*
on/off
58
0018
Restarting TPMS button 125
0019
Switching tow-away
protection*/interior
motion sensor* on/off
47
001A
Central unlocking switch
51 Function Page
001B
Hazard warning flasher
switch
66
001D
Central locking switch 51
001E
Switching front fog
lamps* on/off
65
0020
Storage tray* 103
0021
Gear selecto
rlever 77
0022
Starter switch 55
0023
Parking brake lever 75
0024
Coin holder 102
Retractable soft top
switch
2 70
2
cabriolet only. Center console
25>> At a glance.
* optional
Page 51 of 218

>> Controls.Openin
gand closing .......................... 50
Starter switch positions .....................55
Seats .............................................. 56
Mirrors ........................................... 58
Seat belts ........................................ 60
Lighting ......................................... 62
Windshield wipers ............................. 67
Soft top system (cabriolet only) ...........68
Side windows .................................... 73
Driving and parking .......................... 74
Transmission ................................... 77
Instrument cluster ............................. 79
Control system .................................. 81
Audio system* ................................... 91
Driving systems ................................ 93
Air conditioning with climate control ..95
Loading and storing ......................... 100
Useful feature s................................ 105
Page 88 of 218

Odometer menu appears in the
multifunction display.
X To switch between submenus: Press the OK
button on the control lever briefly.
X To reset the trip odometer: Select the
trip odometer display.
X Press button 0029on the instrument cluster
until the trip odometer is reset to 0
(Y page 21).
If the remaining cruise range of the charge
level of the high-voltage battery has
dropped below 10 %, Low Battery is
displayed on position 002B.Start menu
The 0001START menu shows you the trip
statistics since start. 0002
Average speed since start
0003 Time elapsed since start
002B Distance driven since start
002A Average energy consumption
X Press the control switch on the control
lever (Y page 81) up or down until the
0001START menu appears in the
multifunction display.
X To reset: Press button 0029on the
instrument cluster until the 0001START menu
is reset to 0(Y page 21).
i The 0001START menu is reset to 0
automatically
R when the ignition has been switched
off for more than 4 hours
R after driving more than 9999 miles or
kilometers Reset menu
The 0001RESET menu menu shows you the trip
statistics since the last reset. 0002
Average speed since last reset
0003 Time elapsed since since last reset
002B Distance driven since last reset
002A Average energy consumption
X Press the control switch on the control
lever (Y page 81) up or down until the
0001RESET menu appears in the
multifunction display.
X To reset: Press button 0029on the
instrument cluster until the 0001RESET menu
is reset to 0(Y page 21). Charge and depart menu
In the Charge and Depart menu you can
change the following settings:
R set a departure time
R switch on/off the "Air conditioning
before start" function
R instant charge of the high‑voltage
battery
R set the maximum charge current.
X Press the control switch on the control
lever up or down until Charge and Depart appears in the multifunction
display.
X Press the OK button on the control lever
briefly.
Setting the departure time With this function, you can preset a
departure time.86
Control system>> Controls.
Page 89 of 218
This is useful:
R
if you wish to cool the interior of the
vehicle before driving
R if you wish to charge the vehicle at a
charging station/wallbox at the most
inexpensive electricity rate
With the "Air conditioning before start"
function, the vehicle interior is cooled
prior to a desired departure time.
Prerequisites:
R The doors and tailgate are closed.
R The charging cable for the high‑voltage
battery is connected to a power source
and inserted into the vehicle's power
socket.
R The high‑voltage battery has a
sufficient charge.
The maximum duration of "Air
conditioning before start" is 30 minutes.
Set the air distribution of your vehicle as
follows so that the "Air conditioning
before start" function has the greatest
effect:
R in summer, to the center and side vents
R in winter, onto the windshield and side
windows
Information on air distribution can be
found on (Y page 98).
The setting of the airflow regulator has no
influence on the "Air conditioning before
start" function.
i If the programmed time is too short, the
high‑voltage battery cannot be
completely charged. After setting the
departure time, the maximum charge
level which can be reached is then shown.
i If the high‑voltage battery is not
sufficiently charged and the "Air
conditioning before start" function is
activated, the high‑voltage battery is
charged first. When acharge level of at
least 20 % has been reached, the "Air
conditioning before start" function is
activated. This function then has priority over the charging of the
high‑voltage battery.
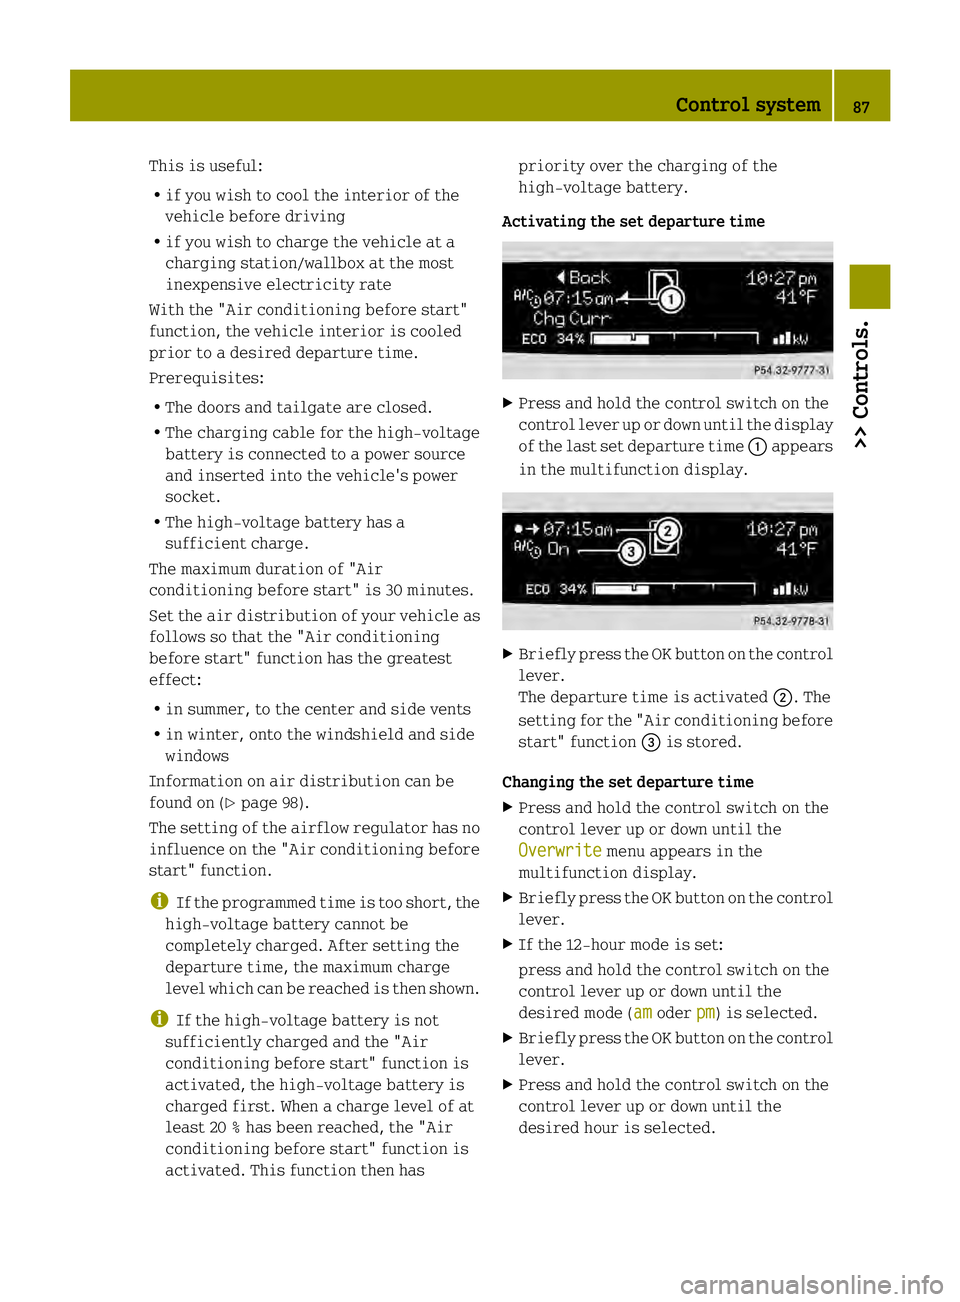
Activating the set departure time X
Press and hold the control switch on the
control lever up or down until the display
of the last set departure time 0002appears
in the multifunction display. X
Briefl ypress the OK button on the control
lever.
The departure time is activated 0003. The
setting for the "Air conditioning before
start" function 002Bis stored.
Changing the set departure time
X Press and hold the control switch on the
control lever up or down until the
Overwrite menu appears in the
multifunction display.
X Briefly press the OK button on the control
lever.
X If the 12-hour mode is set:
press and hold the control switch on the
control lever up or down until the
desired mode (am oder
pm ) is selected.
X Briefly press the OK button on the control
lever.
X Press and hold the control switch on the
control lever up or down until the
desired hour is selected. Control system
87>> Controls. Z
Page 90 of 218

X
Briefly press the OK button on the control
lever.
X Press and hold the control switch on the
control lever up or down until the "Air
conditioning before start" function is
activated or deactivated.
X Briefly press the OK button on the control
lever.
X Press and hold the control switch on the
control lever up or down until the "Air
conditioning before start" function is
activated or deactivated.
X Briefly press the OK button on the control
lever.
The new departure time is stored and
activated.
The "Air conditioning before start"
function is activated or deactivated.
Starting the charging process of the
high‑voltage battery immediately This function allows you to start the
charging process immediately. The
charging process begins as soon as the
charging cable is connected.
i The charging process also begins when
you insert the charging cable into the
vehicle's power socket. However, this is
only the case if you have not made any
departure time settings.
Information on the chargin gprocess can
be found on (Y page 112).
X Press and hold the control switch on the
control lever up or down until the
Instant Charge menu appears in the
multifunction display.
X Briefly press the OK button on the control
lever.
The charging process is started as soon
as the charging cable is connected.
i When you call up the Instant Chargemenu, the "Air conditioning before
start" function is not available. Setting the maximum charge current G
WARNING
When connected to a power supply socket, a
high electrical load during the charging
process can lead to overheating of the
external power supply. There is a risk of
fire.
Find out about the maximum permissible
current load of the external power supply
socket for the respective country at an
authorized electric drive smart center.
Check the maximum permissible charge
current on site before you begin the
charging process. Contact an authorized
electric drive smart center should you
require assistance. If necessary, adjust
the settings of your vehicle.
You can limit the charge current of the
high‑voltage battery. This can protect the
power supply from overloading. You can set
the limit either on the control unit of the
charging cable or via the control system.
The preset standard value is "Max". This
corresponds to the maximum available
charge current of the power supply.
Check the maximum permissible charge
current for the respective power supply
socket before charging the high‑voltage
battery.
The following values are available for
selection: 8 A, 10 A, 12 A, Max. The last value
set remains stored until a chang eis made.
X Press and hold the control switch on the
control lever up or down until the
Charge Current menu appears in the
multifunction display.
X Briefly press the OK button on the control
lever.
X Press and hold the control switch on the
control lever up or down until the
desired amperage is selected.
X Briefly press the OK button on the control
lever.
The selected amperage is set. 88
Control system>> Controls.
Page 97 of 218

could cause an accident and/or serious
injury to you and others.
X Press RES/+ button 0003briefly.
The cruise control resumes the
previously set speed.
i The last set speed stored in memory is
deleted when the drive system is
switched off.
Changing the set speed You must have set a speed prior to
increasing or decreasing the current
speed.
i
Depressing the accelerator pedal does
not deactivate the cruise control. After
a brief acceleration (e.g. for passing),
the cruise control will resume the last
set speed.
Continuous adjustment
X Press and hold RES/+ button 0003to
increase the speed.
or
X Press and hold SET/− 002Bto decrease the
speed.
X Press and hold the respective button
until the desired speed is reached.
X Release the respective button.
The new speed is stored.
Adjustment in 1 mph (Canada 1 km/h)
increments
X Press RES/+ button 0003briefly to increase
the speed.
or
X Press SET/− 002Bbriefly to decrease the
speed.
The new speed is stored after releasing the
respective button. Air conditioning with climatec
ontrol Notes
G
WARNING
Follow the recommended settings for
heating and cooling given on the following
pages .Otherwise the windows could fog up,
impairing visibility and endangering you
and others.
The air conditionin gimproves the leve lof
comfort when driving at high outside
temperatures by cooling and
dehumidifying the air.
Nearly all dust particles, pollutants, are
filtered out by an integrated particle
filter before outside air enters the
passenger compartment through the air
distribution system .It also operates when
the air conditioning is switched off and
you have switched on the blower.
The dehumidification of the air by the air
conditioner prevents the windows from
misting up when the outside air humidity
is high.
This effect can also be used to defrost the
windows. For this, make sure, in addition
to the air conditioner, that the heater is
on the maximum setting.
The air conditioner only works when:
R the ignition is switched on
R the blower is switched on
R the driver's door is closed
Maximum effectiveness is achieved if you
drive with the windows closed.
If the operating temperature of the
high‑voltage battery is too high, the
high‑voltage battery is cooled by the air
conditioner. When the air conditioner
switches on, the cooling output in the
vehicle's interior is reduced as a result.
The temperature in the vehicle's interior
may rise briefly.
If the air conditioner is not switched on,
the compressor of the air conditioner and Air conditioning with climate control
95>> Controls. Z
Page 98 of 218

the vehicle's cooling fan are switched on
automatically. This cools the high‑voltage
battery but not the vehicle's interior .When
the high‑voltage battery reaches the
nominal temperature again, the air
conditioner switches off automatically.
i The range of the vehicle is decreased
when the air conditioner is switched on.
i In warmer weather, ventilate the
passenger compartment for a short
period of time before utilizing the air
conditioning.
Further information on the "Air
conditioning before start" function can be
found on (Y page 86).96
Air conditioning with climate control>> Controls.
Page 99 of 218

Control panel
0002
Air volume control
0003 Air conditioning switch
002B Rear window defroster switch
002A Air recirculation switch
0028 Temperature control
0029 Air distribution control Switching on/off
Control panel (Y page 97).
X Make sure the ignition is switched on.
X Switching on: Push air volume
control 0002to level 1or higher.
X Press air conditioning switch 0003.
The indicator lamp in air conditioning
switch 0003comes on.
X Switching off: Press air conditioning
switch 0003once more.
The indicator lamp in air conditioning
switch 0003goes out.
i The stored status is restored, if you
switch on the ignition again. Setting the temperature
Control panel (Y page 97).
i You should raise or lower the
temperature setting in small
increments, preferably starting at
70¦ (21¥). X
Increasing or decreasing: Push
temperature control 0028up or down. Adjusting air vents
G
WARNING
When operating the heating or air
conditioning with climat econtrol, the air
that enters the passenger compartment
through the air vents can be very hot or very
cold (depending on the set temperature).
This may cause burns or frostbite on
unprotected skin in the immediate area of
the air vents. Always keep sufficient
distance between unprotected parts of the
body and the air vents. If necessary, use the
air distribution control to direct the air
to air vents in the vehicle interior that are
not in the immediate area of unprotected
skin. Air conditioning with climate control
97>> Controls. Z