steering SMART FORTWO COUPE ELECTRIC DRIVE 2013 Owners Manual
[x] Cancel search | Manufacturer: SMART, Model Year: 2013, Model line: FORTWO COUPE ELECTRIC DRIVE, Model: SMART FORTWO COUPE ELECTRIC DRIVE 2013Pages: 218, PDF Size: 2.69 MB
Page 8 of 218
Driving and parking
Safety notes ............................. 74
Driving safety systems ....................44
ABS ........................................ 44
ESP ®
....................................... 45
Hydraulic brake assistant ...........46 E
ECO indicator ............................... 83
Electrical system Improper work on or
modifications ........................... 15
Power outlet ............................ 106
Electronic immobilizer ..................46
Electronic Power Steering see EPS
Electronic Stability Program
see ESP ®
Emergency, in case of Hazard warning flasher ..........46, 66
Roadside Assistance ..................14
Emergency Tensioning Device
see ETD
Emission control
Information label .................... 208
System warranties ......................12
Engine
Electronic s............................. 206
Starting .................................. 74
Turning off .............................. 77
EPS (Electronic Power Steering)
Warning lamp .......................... 163
ESP ®
(Electronic Stability Program) ..45
Warning lamp .......................... 163
ETD (Emergency Tensioning Device) ...31
Safet yguidelines ...................... 33
Exterior lamp switch ......................62
Exterior lighting Overview ................................ 173
Exterior rear view mirrors ..............59 F
First-aid kit ............................... 154
Flat tire ..................................... 180
Fluids Capacities .............................. 212 Fog lamps
................................ 65, 173
Front air bags see Air bags
Front compartment ......................... 117
Front lamps Overview ................................ 173
Fuse chart ................................... 201
Fuses .......................................... 198 G
GAWR (Gross Axle Weight Rating) ......138
Global locking/unlocking ................51
Glove box .................................... 103
Gross Axle Weight Rating see GAWR
Gross Vehicle Weight
see GVW
Gross Vehicle Weight Rating
see GVWR
GVW (Gross Vehicle Weight) .............138
GVWR (Gross Vehicle Weight Rating) ..138 H
Halogen headlamps see Headlamps
Hazard warning flasher .................... 66
Headlamps Automatic headlamp mode ............ 62
Daytime running lamp mode .........63
High-beam flasher .....................64
High-beam headlamps ................. 64
Low-beam headlamps ..................62
Switch ..................................... 62
Head-thorax air bags ......................35
Heated exterior rear view mirrors .....59
Height adjustment Seats ...................................... 57
High-beam flasher ......................... 64
High-beam headlamps ................64, 173
Indicator lamp ........................ 164
High-mounted brake lamp ...............174
High-voltage battery Charg elevel gauge .................... 79
Charging (AC power socket) .........112
Charging (control system) ...........88
Charging (private wallbox) .........112 6
Index
Page 11 of 218
Problems with your vehicle
..............17
Product information .......................12
Production options weight ..............139
PSI (air pressure unit) ...................139 R
Radio .......................................... .91
Radio transmitters ........................ 146
Rain-light sensor .......................... 67
READY indicator ............................ 82
Rear lamps Overview ................................ 174
Rear window defroster .....................99
Rear window wiper/washer ...............68
Replacing wiper blade ..............178
Recommended tire inflation
pressure ................................ 122, 139
Remote control see Key
Replacing bulbs ............................ 172
Reporting safety defects ..................17
Restraint systems see Occupant safety
Rims ..................................... 139, 210
Roadside Assistance .......................14
Roof see Soft top system S
Safety Driving safety systems ...............44
Occupant safety ......................... 28
Reporting defects ......................17
Safety belts
see Seat belts
Saving energy .............................. 143
Seat belt force limiter ....................31
Seat belts ..................................... 29
Children in the vehicle ..............40
Fastening ................................ 60
Proper use of ............................ 29
Safety guidelines ......................33
Safet ynotes ............................. 29
Telltale .................................. 161
Seat heating ................................. 58
Seating capacity ........................... 128 Seats
........................................... 56
Adjustment ............................... 56
Armrest ................................... 57
Heating ................................... 58
Passenger seat .......................... 57
Self-test
OCS (Occupant Classification
System) ................................... 40
SRS ......................................... 28
Service
see Maintenance
Service, parts .............................. 206
Service and warranty Booklet .................................. 206
Service flap ................................. 117
Service life (tires) .......................131
Setting the departur etime (Control
system) ........................................ 86
Setting the maximum charge current
(Control system) ............................. 88
Side marker lamps ......................... 173
Sidewall (tires) ............................ 139
Side windows Operatio n................................ 73
Signs and labels ........................... 208
smart surround sound system ............93
Snow chains ................................. 140
Snow tires see Winte rtires
Soft top system .............................. 68
Cleaning the soft top fabric .......151
Locking rear soft top manually ....171
Mounting the side rails ..............72
Opening and closing the rear
soft top ............................... 54, 70
Opening and closing the
retractable soft top ...............53, 69
Removing the side rails ..............71
Storing the side rails ................72
Sound package ............................... 93
SRS (Supplemental Restraint
System)
Indicator lamp ........................ 162
Standing water, driving through ......145
Starter switch positions .................. 55
Starting the engine ........................74
Steering wheel paddle shifters .........77 Index
9
Page 12 of 218
Storage compartments
....................102
Coin holder ............................. 102
Door pockets ........................... 102
Drawer ................................... 103
Glove box ................................ 103
in the tailgate ........................ 104
Parcel nets ............................. 103
Storage tray in center console ....103
Storage trays next to steering
whee l..................................... 102
Storing tires ............................... 132
Sun screen ................................... 105
Sun visors ................................... 105T
Tailgate Closin g............................... 53, 55
Opening .............................. 52, 54
Tail lamps ................................... 174
Technical data Brake fluid ............................. 212
Coolant .................................. 213
Dimensions and weights ............ 209
Identification label s............... 208
Rims and tire s......................... 210
Service fluids and capacities .....211
Windshield/rear window washer
system ................................... 212
Temperature
Coolant .................................. 146
Interior temperature .................. 97
Outside ................................... 83
Tether anchorage points
see Children in the vehicle
Thorax-pelvis side air bags .............36
Tightening torque Wheels ................................... 133
TIN (Tire Identification
Number) ................................. 136, 139
Tire and Loading Information
placard ....................................... 127
Tire and loading terminology ..........137
Tire Identification Number see TIN Tire inflation pressure
Checking ................................ 124
Importan tnotes on .................... 124
Placard on driver’s door B-
pillar .................................... 127
Tire labeling ............................... 133
Tire load rating ........................... 139
Tire ply composition and material
used ........................................... 139
Tire Pressure Monitoring System
(TPMS) ........................................ 125
Tire repair kit ....................... 154, 180
Tires .................................... 122, 210
Air pressure ........................... 122
Care and maintenance ................131
Cleaning ................................ 132
Direction of rotation, spinning ... 131
Driving instructions ................143
Flat tire ................................. 180
Important notes on tire
inflation pressure ...................124
Inflation pressure ....................124
Information placard .................. 127
Inspection .............................. 131
Labeling ................................ 133
Load rating ............................. 139
Ply composition and material
used ...................................... 139
Problems under-/overinflation ...124
Retreads ................................. 122
Rims and tires (technical data) ...210
Rotatio n................................. 133
Service life ............................ 131
Sizes ..................................... 210
Snow chain s............................ 140
Speed rating ................ 135, 139, 145
Storing .................................. 132
Temperature ...................... 124, 133
Terminology ............................ 137
Tire Identification Number ..136, 139
Tire Pressure Monitoring
System (TPMS) .......................... 125
Traction ..................... 132, 139, 144
Tread ..................................... 139
Tread depth ....................... 131, 140
Treadwear indicators ..........131, 140
Vehicle maximum load on ...........140 10
Index
Page 22 of 218
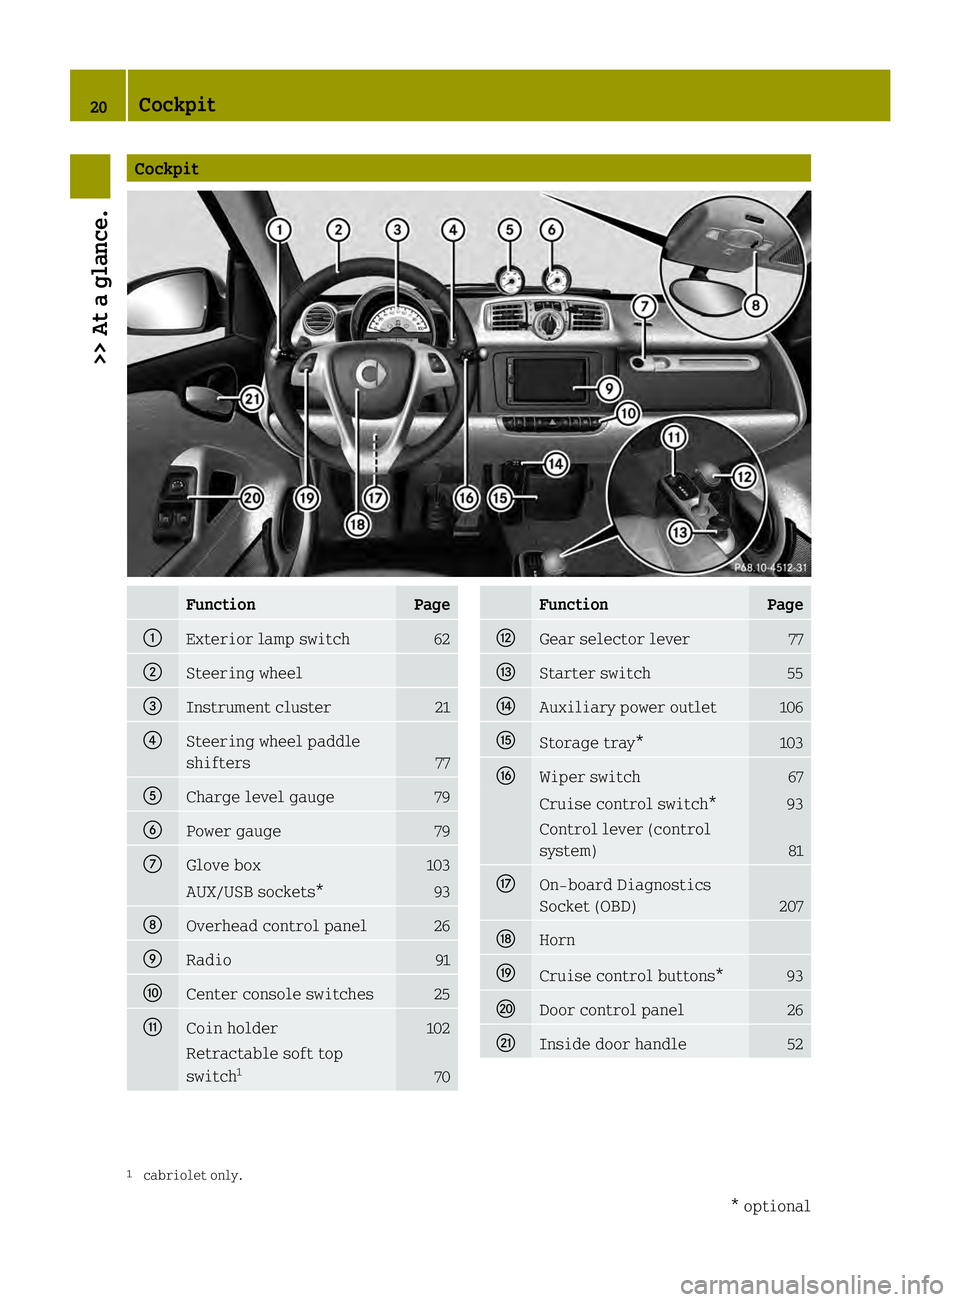
Cockpit
Function Page
0002
Exterior lamp switch 62
0003
Steering wheel
002B
Instrument cluster 21
002A
Steering wheel paddle
shifters
77
0028
Charge level gauge 79
0029
Power gauge 79
0018
Glove box 103
AUX/USB sockets* 93
0019
Overhead control panel 26
001A
Radio 91
001B
Center console switches 25
001D
Coin holder 102
Retractable soft top
switch
1 70 Function Page
001E
Gear selecto
rlever 77
0020
Starter switch 55
0021
Auxiliary power outlet 106
0022
Storage tray* 103
0023
Wiper switch 67
Cruise control switch* 93
Control lever (control
system)
81
0024
On-board Diagnostics
Socket (OBD)
207
0033
Horn
0034
Cruise control buttons* 93
0035
Door control panel 26
0036
Inside door handle 52
1
cabriolet only. 20
Cockpit>> At a glance.
* optional
Page 34 of 218
temporary breathing difficulty for people
with asthma or other breathing trouble. To
avoid this, you may wish to get out of the
vehicle as soon as it is safe to do so. If you
have any breathing difficulty but cannot
get out of the vehicle after the air bag
inflates, then get fresh air by opening a
window or door. G
WARNING
To reduce the risk of injury when the front
air bags inflate, it is very important for
the driver and passenger to always be in a
properly seated position and to wear their
respective seat belt.
For maximum protection in the event of a
collision always be in normal seated
position with your back against the
backrest. Fasten your seat belt and ensure
it is properly positioned on your body.
Since the air bag inflates with
considerable speed and force, a proper
seating and hands on steering wheel
position will help to keep you at a safe
distance from the air bag.
Occupants who are unbelted, out of position
or too close to the air bag can be seriously
injured or killed by an air bag as it
inflates extremely quickly and with great
force:
R Sit properly belted in a position that is
as upright as possible with your back
against the seat backrest.
R Adjust the driver’s seat as far as possible
rearward, still permitting proper
operation of vehicle controls. The
distance from the center of the driver’s
breastbone to the center of the air bag
cover on the steering wheel must be at
least 10 inches (25 cm) or more. You should
be able to accomplish this by
adjustments to the seat. If you have any
problems, please contact an authorized
electric drive smart center.
R Do not lean your head or chest close to the
steering wheel or dashboard. R
Keep hand son the outside of the steering
wheel rim. Placing hands and arms inside
the rim can increase the risk and
potential severity of hand/arm injury
when the driver’s front air bag inflates.
R Adjust the passenger seat as far as
possible rearward from the dashboard
when the seat is occupied.
R Occupants, especially children, should
never place their bodies or lean their
heads in the area of the door where the
head-thorax air bag (cabriolet) or
thorax-pelvis side air bag (coupé)
inflates. This could result in serious
injuries or death should the head-thorax
air bag (cabriolet) or thorax-pelvis side
air bag (coupé) be deployed. Always sit
as upright as possible, wear the seat belt
properly and use an appropriately sized
infant restraint, toddler restraint, or
booster seat recommended for the size
and weight of the child.
Failure to follow these instructions can
result in severe injuries to you or other
occupants.
If you sell your vehicle, it is important that
you make the buyer aware of this safety
information. Be sure to give the buyer this
Operator’s Manual.
i Air bags are designed to deploy only in
certain frontal impacts (front air bags
and knee bags), or side impacts (head-
thorax air bags, window curtain air bags
and thorax-pelvis air bags) which
exceed preset thresholds. Only during
these events will they provide their
supplemental protection.
The driver and passenger should always
wear their seat belts .Otherwise it is not
possible for air bags to provide their
supplemental protection.
In case of other types of impacts and
impacts below air bag deployment
thresholds, air bags will not deploy. The
driver and passenger will then be
protected to the extent possible by a 32
Occupant safety>> Safety.
Page 35 of 218
properly fastened seat belt. A properly
fastened seat belt is also needed to
provide the best possible protection in
a rollover.
We caution you not to rely on the presence
of the air bags in order to avoid wearing
your seat belt.
It is important to your safety and that of
your passenger that you replace deployed
air bags and repair any malfunctioning
air bags to make sure the vehicle will
continue to provide supplemental crash
protection for occupants.
Safety guidelines for the seat belt,
Emergency Tensioning Devices (ETDs)
and air bag G
WARNING
R Damaged seat belts or seat belts that have
been highly stressed in an accident must
be replaced and their anchoring points
must also be checked. Only use seat belts
installed or supplied by an authorized
electric drive smart center.
R Air bags and Emergency Tensioning
Devices (ETDs) contain Perchlorate
material, which may require special
handling and regard for the environment.
Check with your local government’s
disposal guidelines. California
residents, see http://www.dtsc.ca.gov/
HazardousWaste/Perchlorate/index.cfm .
R Given the considerable deployment
speed, required inflation volume, and
the textile structure of the air bags,
there is the possibility of abrasions or
other, potentially more serious injuries
resulting from air bag deployment.
R Air bags and Emergency Tensioning
Devices (ETDs) are designed to function
on a one-time-only basis. An air bag or
ETD that has deployed must be replaced.
R Do not pass seat belts over sharp edges.
They could tear. R
Do not make any modification that could
change the effectiveness of the seat
belts.
R No modifications of any kind may be made
to any components or wiring of the SRS.
This includes changing or removing any
component or part of the SRS, the
installation of additional trim
material, badges, etc. over the steering
wheel hub, passenger front air bag cover,
outboard sides of the seat backrests, and
installation of additional electrical/
electronic equipment on or near SRS
components and wiring. Keep area
between air bags and occupants free from
objects (e.g. packages, purses,
umbrellas, etc.).
R Do not bleach or dye seat belts as this may
severely weaken them. In acrash they may
not be able to provide adequate
protection.
R Do not hang hangers on the coat hooks or
handles over the door. These items may
turn into projectiles and cause head and
other injuries when the head-thorax air
bag is deployed.
R Air bag system components will be hot
after an air bag has inflated. Do not touch
them.
R Never place your feet on the instrument
panel, dashboard, or on the seat. Always
keep both feet on the floor in front of the
seat.
R In addition, improper repair work on the
SRS creates a risk of rendering the SRS
inoperative or causing unintended air
bag deployment. Work on the SRS must
therefore only be performed by qualified
technicians. Contact an authorized
electric drive smart center.
R For your protection and the protection of
others, when scrapping the air bag unit
or Emergency Tensioning Devices (ETDs),
our safety instructions must be followed.
These instructions are available from Occupant safety
33>> Safety.
Z
Page 36 of 218
any authorized electric drive smart
center.
How an air bag operates An air bag is inflated in a matter of
milliseconds. If an air bag is triggered,
the SRS indicator lamp
000Ain the
instrument cluster illuminates.
! If the air bags are activated, you will
hear a loud noise and some dust may be
generated. The explosion fundamentally
represents no risk to your hearing.
An inflated air bag slows down and reduces
the movement of the occupant. When the
occupant makes contact with a front air bag
or head-thorax air bag (cabriolet only),
hot gas flows out of the inflated front air
bags and head-thorax air bags (cabriolet
only). This reduces the load on the
occupant’s head and upper body. These air
bags are consequently deflated after the
accident.
Driver front air bag/passenger front air
bag The front air bags are designed to reduce
the potential of injury in certain frontal
impacts.
Driver front air bag and passenger front
air bag are deployed
R
at the start of an accident with high
vehicle deceleration in the longitudinal
direction
R independently of other air bags in the
vehicle being deployed
R never in the event of arollover, unless
high vehicle deceleration in the
longitudinal direction is detected
i The front air bags in this vehicle have
been designed to inflate in two stages.
This allows the air bag to have different
rates of inflation that are based on the
rate of relevant vehicle deceleration and a fastened or unfastened seat belt as
assessed by the air bag control unit.
On the passenger side, the front air bag
deployment is additionally influenced
by the passenger’s weight category as
identified by the Occupant
Classification System (OCS)
(Y
page 37).
The lighter the passenger side occupant,
the higher the vehicle deceleration rate
required for the second stage inflation
of the air bag.
The air bags will not deploy in impacts
which do not exceed the system’s
deployment thresholds. In such instances,
the seat belts are designed to protect you.
The passenger air bag will only be
deployed if
R the system, based on OCS weight sensor
readings, senses that the passenger seat
is occupied and the 00090007
indicator lamp is not lit (Y page 39)
R the impact exceeds a preset deployment
threshold
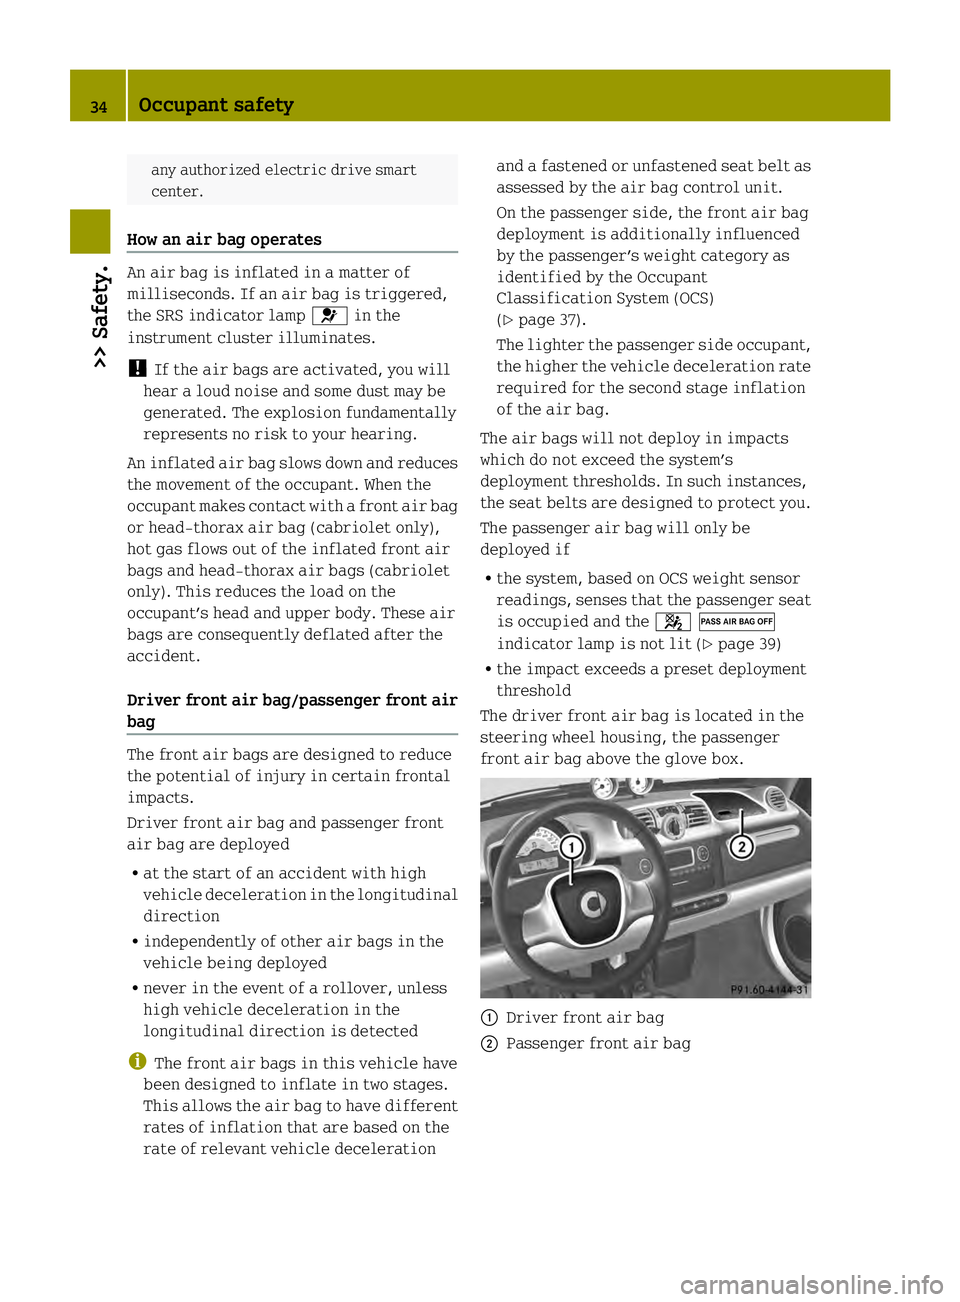
The driver front air bag is located in the
steering wheel housing, the passenger
front air bag above the glove box. 0002
Driver front air bag
0003 Passenger front air bag 34
Occupant safety>> Safety.
Page 47 of 218
Emergency brake maneuver
X
Keep continuous full pressure on the
brake pedal. G
WARNING
When the ABS is malfunctioning, the
hydraulic brake assistant and the ESP ®
are
also switched off.
When the ABS is malfunctioning, the wheels
may lock during hard braking, reducing
steering capability and extending the
braking distance. G
WARNING
The ABS cannot prevent the natural laws of
physics from acting on the vehicle, nor can
it increase brakin gor steering efficiency
beyond that afforded by the condition of the
vehicle brakes and tires or the traction
afforded. The ABS cannot prevent
accidents, including those resulting from
excessive speed in turns, following
another vehicle too closely, or
hydroplaning. Only a safe, attentive, and
skillful driver can prevent accidents. The
capabilities of an ABS equipped vehicle
must never be exploited in a reckless or
dangerous manner which could jeopardize
the user’s safety or the safety of others. Electronic Stability Program (ESP
®
)
Your vehicle is equipped with the
Electronic StabilityProgram (ESP ®
). The
ESP ®
is operational as soon as the drive
system is switched on and it monitors the
vehicle’s traction (force of adhesive
friction between the tires and the road
surface) and handling.
The ESP ®
recognizes when awheel is
spinning or if the vehicle starts to skid.
By applying brakes to the appropriate
wheel and by limiting the power output, the
ESP ®
works to stabilize the vehicle. The
ESP ®
is especially useful while driving off
and on wet or slippery road surfaces. The ESP
®
also stabilizes the vehicle during
braking and steering maneuvers.
The ESP ®
warning lamp 0004in the
instrument cluster flashes when the ESP ®
is
engaged.
The ESP ®
warning lamp 0004in the
instrument cluster comes on when you
switch on the ignition. It goes out when the
drive system is active.
Depending on the driving situation, the
ESP ®
R reduces the speed
R selectively brakes individual wheels
R equalizes the speed of the driven wheels
R stabilizes the vehicle when braking
R assists you in evasive maneuvers on all
roads G
WARNING
If the ESP ®
warning lamp 0004in the
instrument cluster flashes, proceed as
follows:
R While driving off, apply as little
throttle as possible.
R While driving, ease up on the accelerator
pedal.
R Adapt your speed and driving style to the
prevailing road conditions.
Failure to observe these guidelines could
cause the vehicle to skid.
The ESP ®
cannot prevent accidents
resulting from excessive speed. G
WARNING
The ESP ®
cannot prevent the natura llaws of
physics from acting on the vehicle, nor can
it increase the traction afforded. The
ESP ®
cannot prevent accidents, including
those resulting from excessive speed in
turns, or hydroplaning. Only a safe,
attentive, and skillful driver can prevent
accidents. The capabilities of an ESP ®
equipped vehicle must never be exploited
in a reckless or dangerous manner which Driving safety systems
45>> Safety.
Z
Page 58 of 218
Seats
Safety notes
G
WARNING
All seat adjustments, as well as fastening
of seat belts, must be done before the
vehicle is operated. G
WARNING
When adjusting the seat, make sure no one
becomes trapped.
Do not adjust the driver’s seat while
driving. Adjusting the seat while driving
could cause the driver to lose control of the
vehicle.
Never ride in amoving vehicle with the seat
backrest in an excessively reclined
position as this can be dangerous. You
could slide under the seat belt in a
collision. If you slide under the seat belt,
it could apply force at the abdomen or neck,
potentially causing serious or fatal
injuries. The seat backrest and seat belts
provide the best restraint when the wearer
is in a position that is as upright as
possible and seat belts are properly
positioned on the body.
Your seat must be adjusted so that you can
correctly fasten your seat belt.
Observe the following points:
R Adjust the seat backrest until your arms
are slightly angled when holding the
steering wheel.
R Adjust the seat to a comfortable seating
position that still allows you to reach the
accelerator/brake pedal safely. The
position should be as far back as
possible with the driver still able to
operate the controls properly.
R Never place hands under the seat or near
any moving parts while a seat is being
adjusted.
Failure to do so could result in an accident
and/or serious personal injury.
Observe the notes on the air bag system. G
WARNING
Children 12 years old and under must be
seated and properly secured in an
appropriately sized infant restraint,
toddler restraint, or booster seat
recommended for the size and weight of the
child. For additional information, see
“Children in the vehicle”.
A child’s risk of serious or fatal injuries
is significantly increased if the child
restraints are not properly secured in the
vehicle and/or the child is not properly
secured in the child restraint. G
WARNING
Contact an authorized electric drive smart
center if the seats have become damaged.
The seat is an integral part of the vehicle’s
safety system in the same way as seat belts
and air bags. Damage to the seats may
reduce their ability to protect the
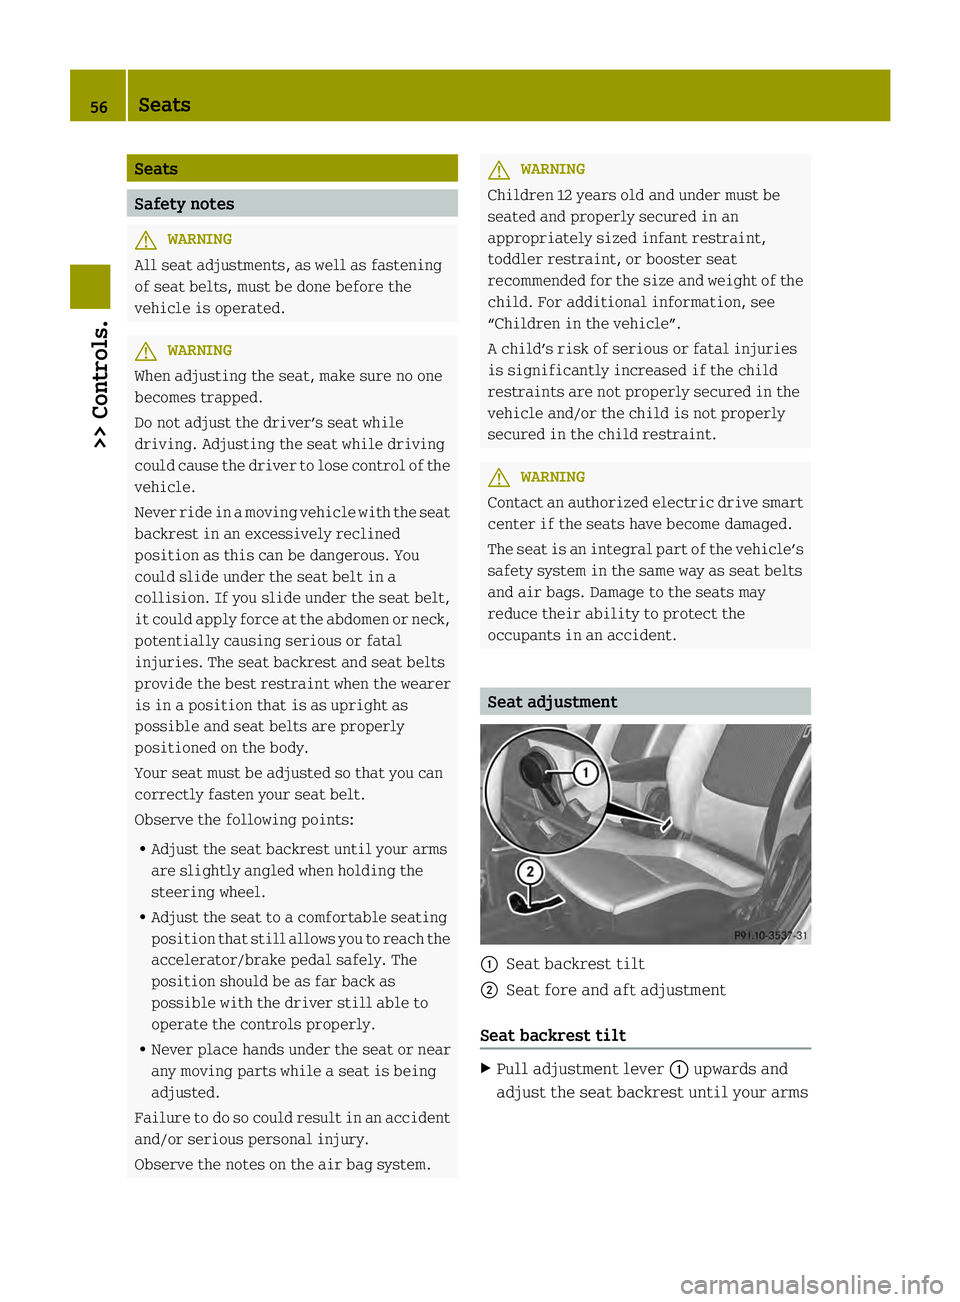
occupants in an accident. Seat adjustment
0002
Seat backrest tilt
0003 Seat fore and aft adjustment
Seat backrest tilt X
Pull adjustment lever 0002upwards and
adjust the seat backrest until your arms 56
Seats>> Controls.
Page 59 of 218
are slightly angled when holding the
steering wheel.
X Release adjustment lever 0002when the
desired seat backrest tilt is reached.
When you hear an audible click, the seat
backrest is again fixed into place.
X Check for proper engagement before
driving.
Seat fore and aft adjustment X
Pull adjustment handle 0003upwards and
slide the seat to a seating position that
still allows you to reach the accelerator/
brake pedal safely.
X Release adjustment handle 0003when the
desired seating position is reached.
When you hear an audible click, the seat
is again fixed into place.
X Check for proper engagement before
driving.
Seat height The seat guide is inclined in the
horizontal plane. Seat fore and aft
adjustment also alters the seat height.
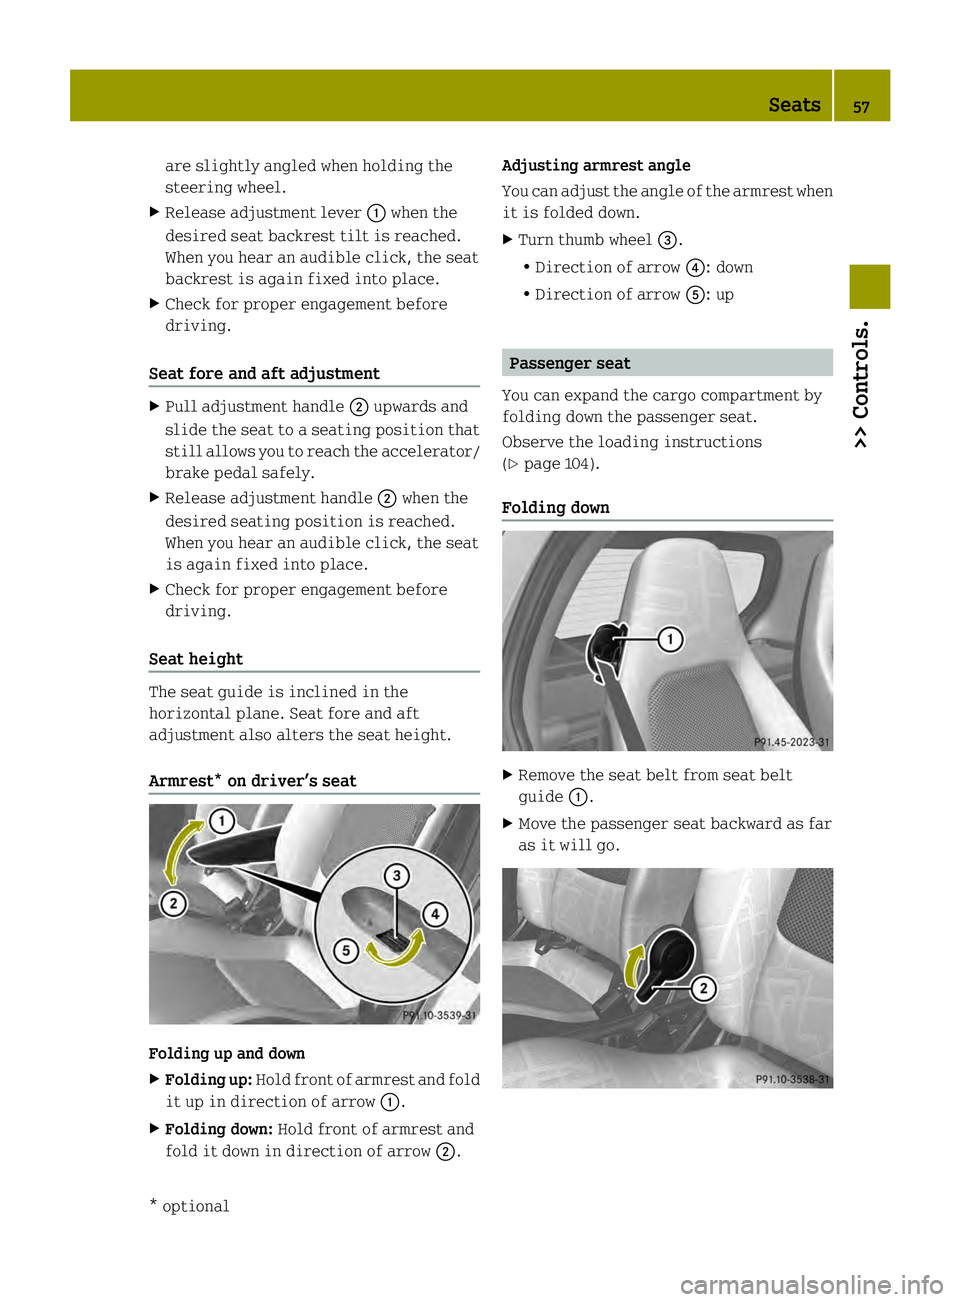
Armrest* on driver’s seat
Folding up and down
X
Folding up: Hold front of armrest and fold
it up in direction of arrow 0002.
X Folding down: Hold front of armrest and
fold it down in direction of arrow 0003.Adjusting armrest angle
You can adjust the angle of the armrest when
it is folded down.
X
Turn thumb wheel 002B.
R Direction of arrow 002A: down
R Direction of arrow 0028: up Passenger seat
You can expand the cargo compartment by
folding down the passenger seat.
Observe the loading instructions
(Y page 104).
Folding down X
Remove the seat belt from seat belt
guide 0002.
X Move the passenger seat backward as far
as it will go. Seats
57>> Controls.
* optional Z