park assist SMART FORTWO COUPE ELECTRIC DRIVE 2014 User Guide
[x] Cancel search | Manufacturer: SMART, Model Year: 2014, Model line: FORTWO COUPE ELECTRIC DRIVE, Model: SMART FORTWO COUPE ELECTRIC DRIVE 2014Pages: 222, PDF Size: 16.17 MB
Page 169 of 222
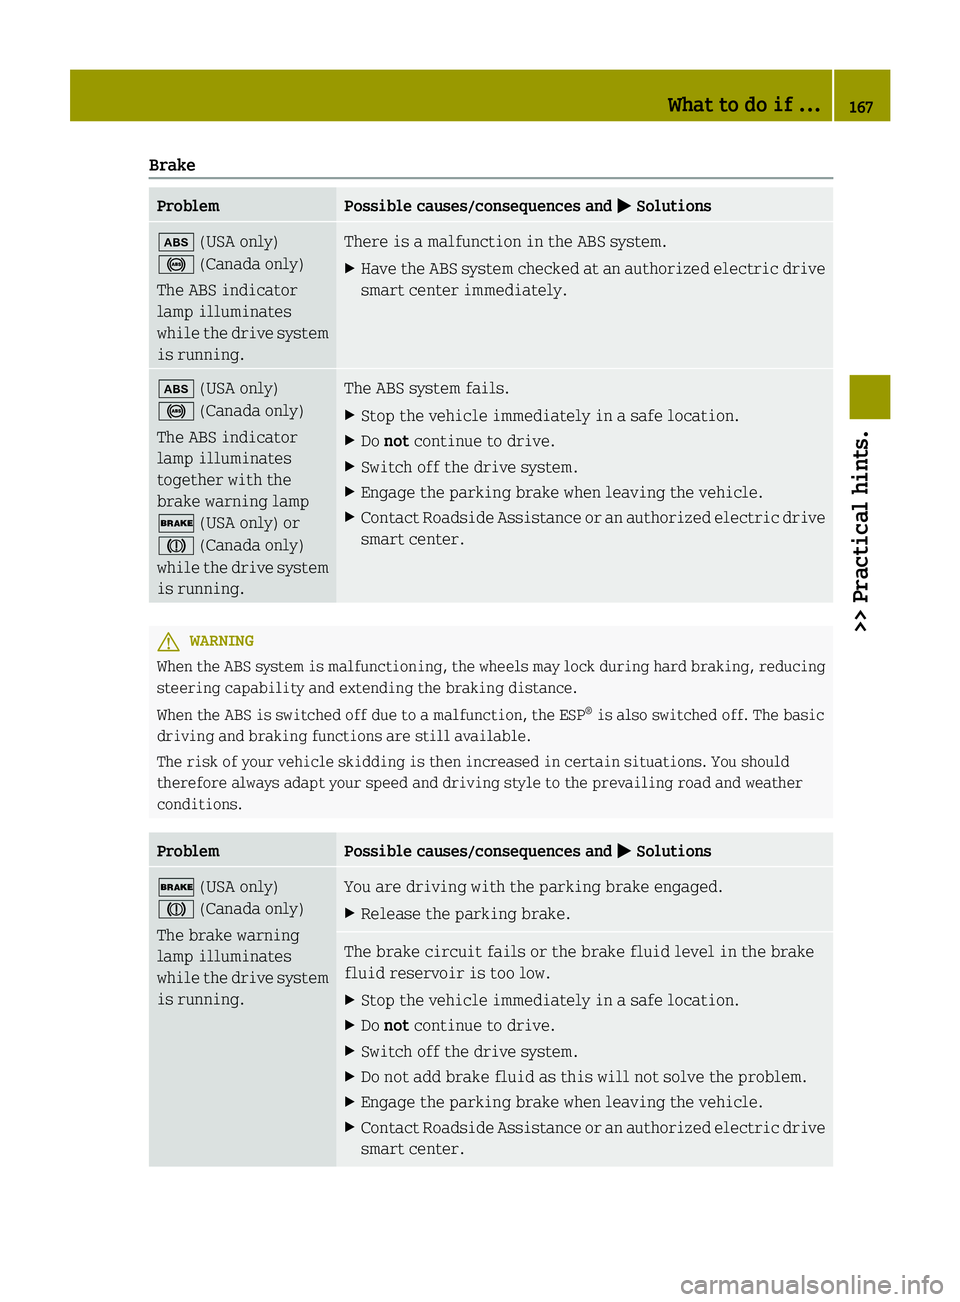
Brake
Problem Possible causes/consequences and
0050
0050Solutions 00DF
(USA only)
0025 (Canada only)
The ABS indicator
lamp illuminates
while the drive system
is running. There is a malfunction in the ABS system.
X
Have the ABS system checked at an authorized electric drive
smart center immediately. 00DF
(USA only)
0025 (Canada only)
The ABS indicator
lamp illuminates
together with the
brake warning lamp
0027 (USA only) or
004D (Canada only)
while the drive system
is running. The ABS system fails.
X
Stop the vehicle immediately in a safe location.
X Do not continue to drive.
X Switch off the drive system.
X Engage the parking brake when leaving the vehicle.
X Contact Roadside Assistance or an authorized electric drive
smart center. G
WARNING
When the ABS system is malfunctioning, the wheels may lock during hard braking, reducing
steering capability and extending the braking distance.
When the ABS is switched off due to a malfunction, the ESP ®
is also switched off. The basic
driving and braking functions are still available.
The risk of your vehicle skidding is then increased in certain situations. You should
therefore always adapt your speed and driving style to the prevailing road and weather
conditions. Problem Possible causes/consequences and
0050 0050Solutions 0027
(USA only)
004D (Canada only)
The brake warning
lamp illuminates
while the drive system
is running. You are driving with the parking brake engaged.
X
Release the parking brake. The brake circuit fails or the brake fluid level in the brake
fluid reservoir is too low.
X
Stop the vehicle immediately in a safe location.
X Do not continue to drive.
X Switch off the drive system.
X Do not add brake fluid as this will not solve the problem.
X Engage the parking brake when leaving the vehicle.
X Contact Roadside Assistance or an authorized electric drive
smart center. What to do if ...
167>> Practical hints. Z
Page 173 of 222
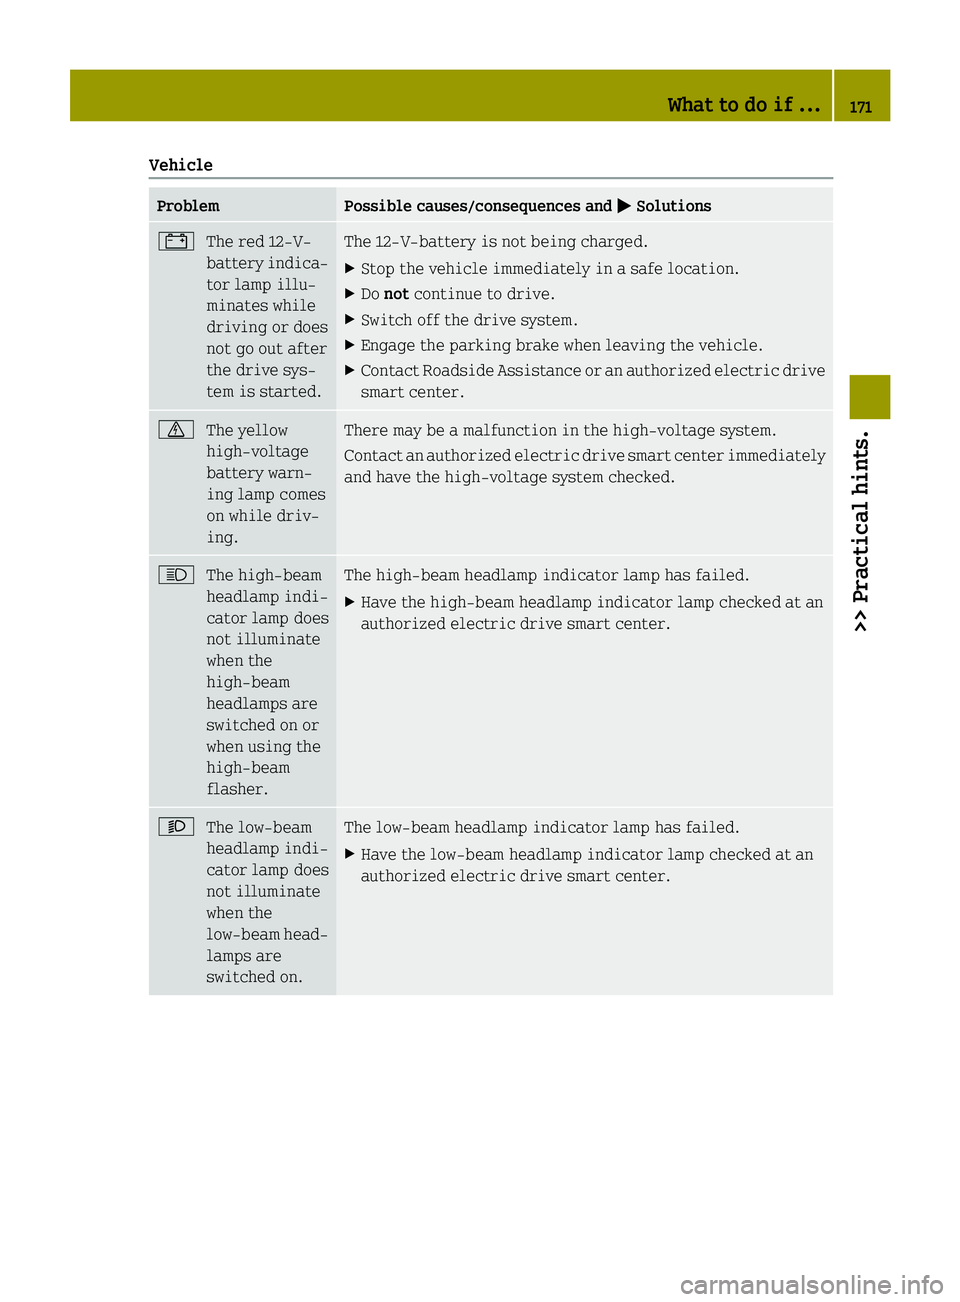
Vehicle
Problem Possible causes/consequences and
0050
0050Solutions 003D
The red 12-V-
battery indica-
tor lamp illu-
minates while
driving or does
not go out after
the drive sys-
tem is started. The 12-V-battery is not being charged.
X
Stop the vehicle immediately in a safe location.
X Do not continue to drive.
X Switch off the drive system.
X Engage the parking brake when leaving the vehicle.
X Contact Roadside Assistance or an authorized electric drive
smart center. 0075
The yellow
high-voltage
battery warn-
ing lamp comes
on while driv-
ing. There may be a malfunction in the high-voltage system.
Contact an authorized electric drive smart center immediately
and have the high-voltage system checked.
0057
The high‑beam
headlamp indi-
cator lamp does
not illuminate
when the
high‑beam
headlamps are
switched on or
when using the
high‑beam
flasher. The high‑beam headlamp indicator lamp has failed.
X
Have the high‑beam headlamp indicator lamp checked at an
authorized electric drive smart center. 0059
The low‑beam
headlamp indi-
cator lamp does
not illuminate
when the
low‑beam head-
lamps are
switched on. The low‑beam headlamp indicator lamp has failed.
X
Have the low‑beam headlamp indicator lamp checked at an
authorized electric drive smart center. What to do if ...
171>> Practical hints. Z
Page 174 of 222
Problem Possible causes/consequences and
0050
0050Solutions 003E003D
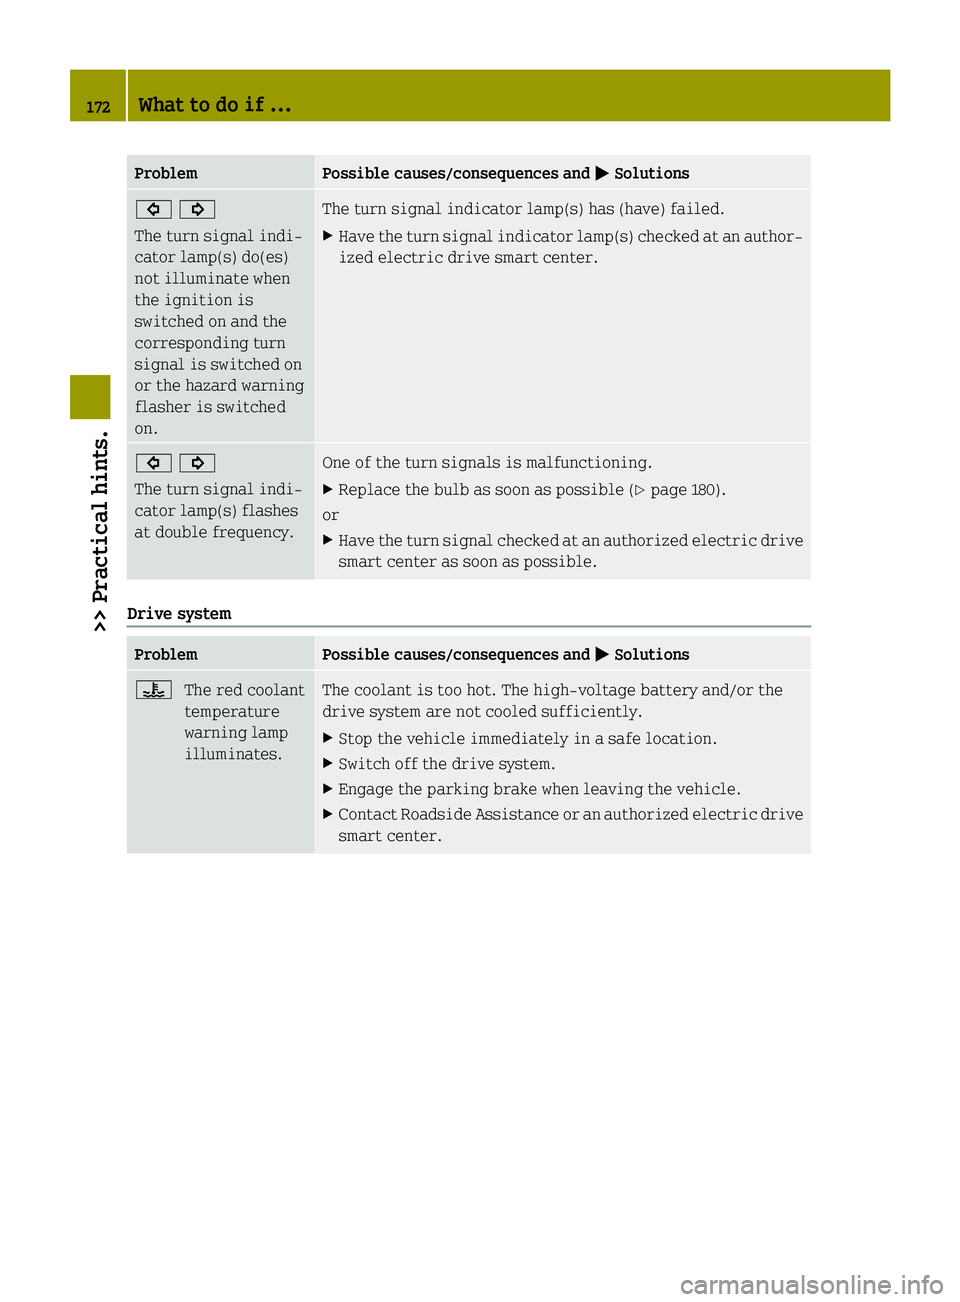
The turn signal indi-
cator lamp(s) do(es)
not illuminate when
the ignition is
switched on and the
corresponding turn
signal is switched on
or the hazard warning
flasher is switched
on. The turn signal indicator lamp(s) has (have) failed.
X
Have the turn signal indicator lamp(s) checked at an author-
ized electric drive smart center. 003E003D
The turn signal indi-
cator lamp(s) flashes
at double frequency. One of the turn signals is malfunctioning.
X
Replace the bulb as soon as possible (Y page 180).
or
X Have the turn signal checked at an authorized electric drive
smart center as soon as possible. Drive system
Problem Possible causes/consequences and
0050 0050Solutions 00AC
The red coolant
temperature
warning lamp
illuminates. The coolant is too hot. The high-voltage battery and/or the
drive system are not cooled sufficiently.
X
Stop the vehicle immediately in a safe location.
X Switch off the drive system.
X Engage the parking brake when leaving the vehicle.
X Contact Roadside Assistance or an authorized electric drive
smart center. 172
What to do if ...>> Practical hints.
Page 175 of 222
Problem Possible causes/consequences and
0050
0050Solutions 00ED
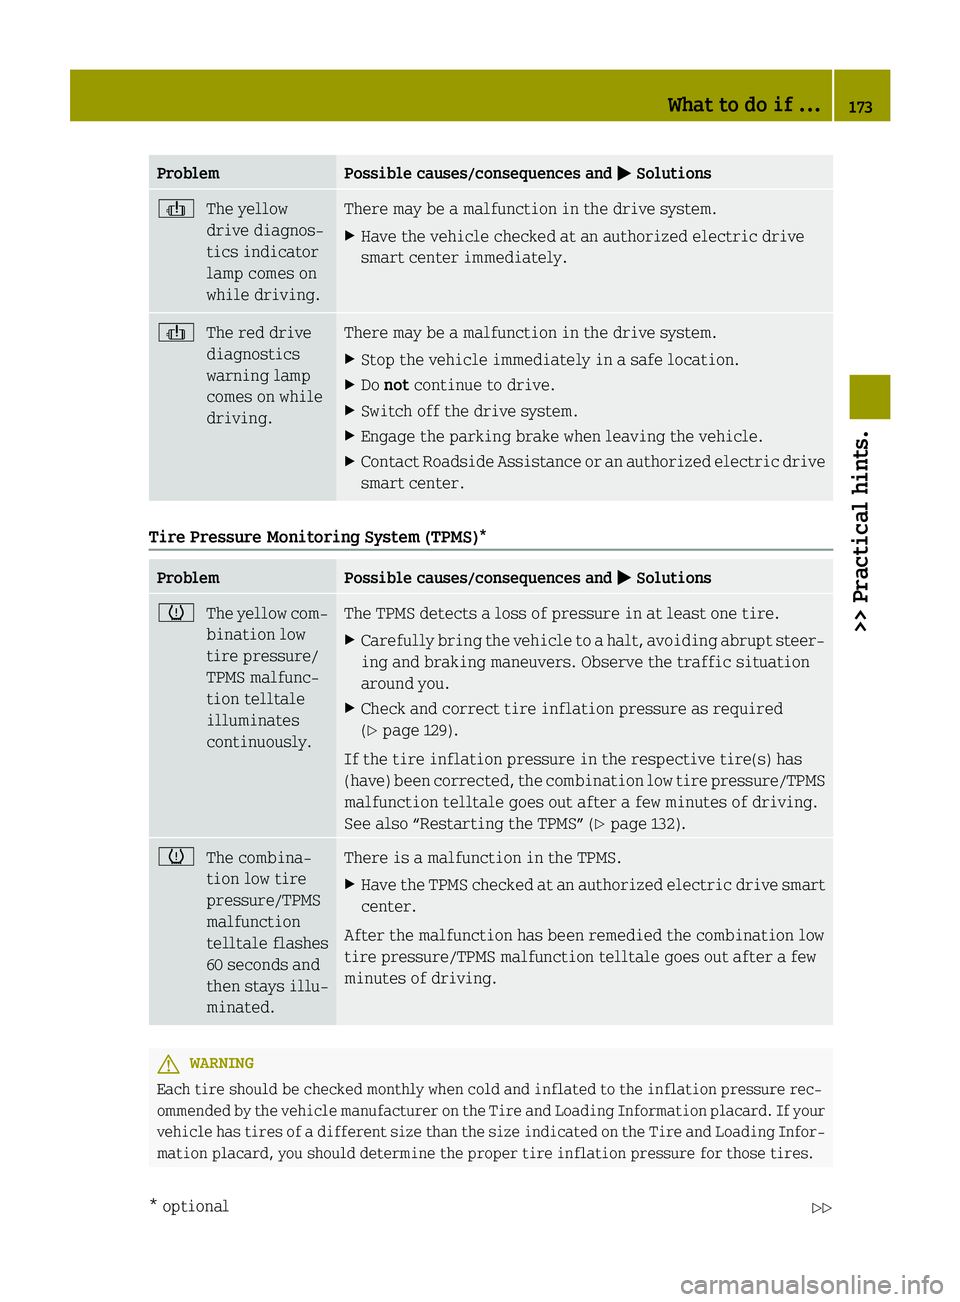
The yellow
drive diagnos-
tics indicator
lamp comes on
while driving. There may be a malfunction in the drive system.
X
Have the vehicle checked at an authorized electric drive
smart center immediately. 00ED
The red drive
diagnostics
warning lamp
comes on while
driving. There may be a malfunction in the drive system.
X
Stop the vehicle immediately in a safe location.
X Do not continue to drive.
X Switch off the drive system.
X Engage the parking brake when leaving the vehicle.
X Contact Roadside Assistance or an authorized electric drive
smart center. Tire Pressure Monitoring System (TPMS)*
Problem Possible causes/consequences and
0050 0050Solutions 0077
The yellow com-
bination low
tire pressure/
TPMS malfunc-
tion telltale
illuminates
continuously. The TPMS detects a loss of pressure in at least one tire.
X
Carefully bring the vehicle to a halt, avoiding abrupt steer-
ing and braking maneuvers. Observe the traffic situation
around you.
X Check and correct tire inflation pressure as required
(Y page 129).
If the tire inflation pressure in the respective tire(s) has
(have) been corrected, the combination low tire pressure/TPMS
malfunction telltale goes out after a few minutes of driving.
See also “Restarting the TPMS” (Y page 132).0077
The combina-
tion low tire
pressure/TPMS
malfunction
telltale flashes
60 seconds and
then stays illu-
minated. There is a malfunction in the TPMS.
X
Have the TPMS checked at an authorized electric drive smart
center.
After the malfunction has been remedied the combination low
tire pressure/TPMS malfunction telltale goes out after a few
minutes of driving. G
WARNING
Each tire should be checked monthly when cold and inflated to the inflation pressure rec-
ommended by the vehicle manufacturer on the Tire and Loading Information placard. If your
vehicle has tires of a different size than the size indicated on the Tire and Loading Infor-
mation placard, you should determine the proper tire inflation pressure for those tires. What to do if ...
173>> Practical hints.
* optional Z
Page 193 of 222
X
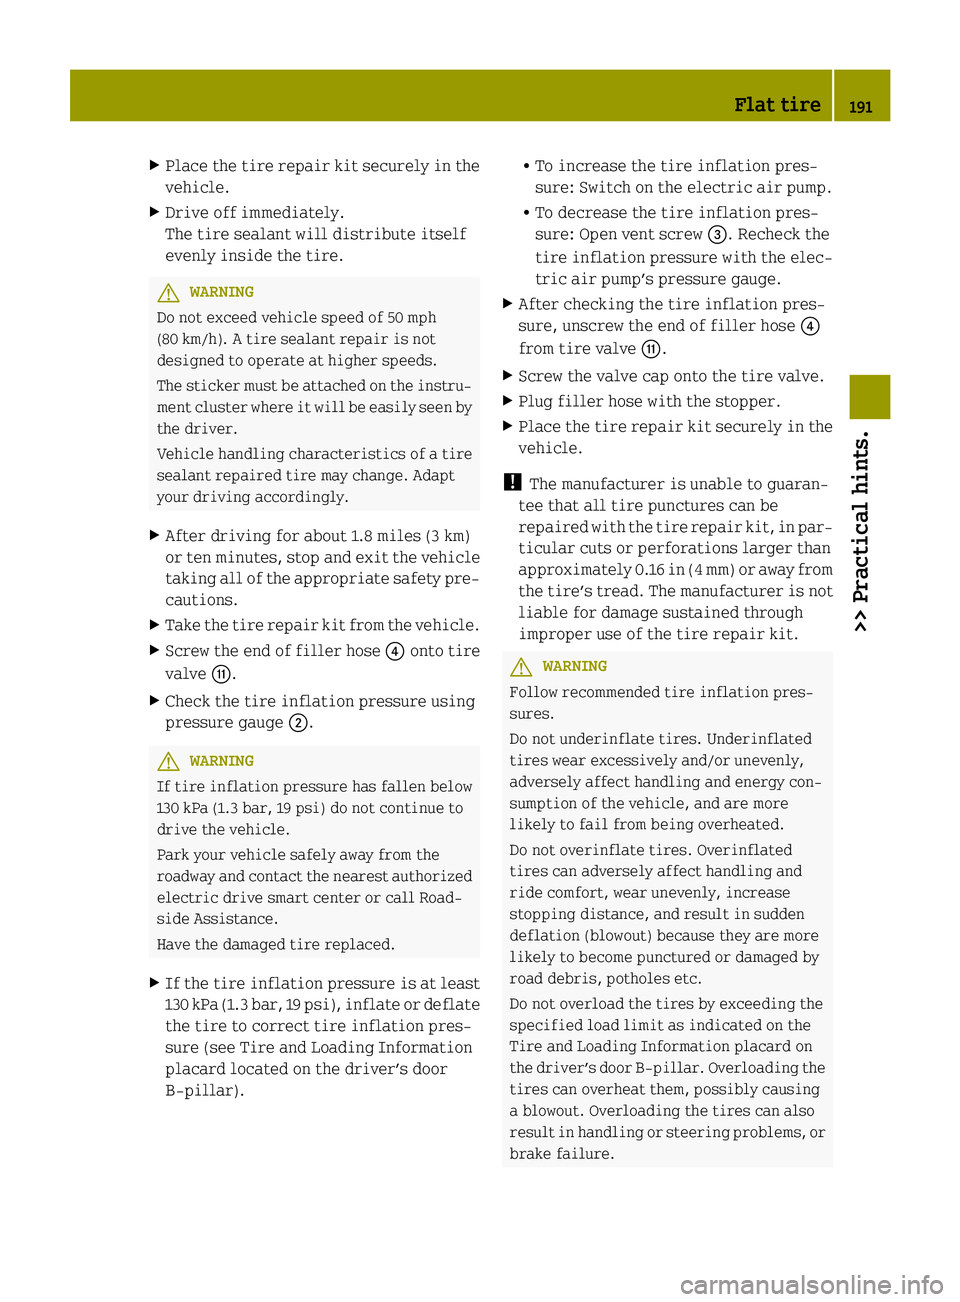
Place the tire repair kit securely in the
vehicle.
X Drive off immediately.
The tire sealant will distribute itself
evenly inside the tire. G
WARNING
Do not exceed vehicle speed of 50 mph
(80 km/h). A tire sealant repair is not
designed to operate at higher speeds.
The sticker must be attached on the instru-
ment cluster where it will be easily seen by
the driver.
Vehicle handling characteristics of a tire
sealant repaired tire may change. Adapt
your driving accordingly.
X After driving for about 1.8 miles (3 km)
or ten minutes, stop and exit the vehicle
taking all of the appropriate safety pre-
cautions.
X Take the tire repair kit from the vehicle.
X Screw the end of filler hose 0085onto tire
valve 006F.
X Check the tire inflation pressure using
pressure gauge 0044. G
WARNING
If tire inflation pressure has fallen below
130 kPa (1.3 bar, 19 psi) do not continue to
drive the vehicle.
Park your vehicle safely away from the
roadway and contact the nearest authorized
electric drive smart center or call Road-
side Assistance.
Have the damaged tire replaced.
X If the tire inflation pressure is at least
130 kPa (1.3 bar, 19 psi), inflate or deflate
the tire to correct tire inflation pres-
sure (see Tire and Loading Information
placard located on the driver’s door
B‑pillar). R
To increase the tire inflation pres-
sure: Switch on the electric air pump.
R To decrease the tire inflation pres-
sure: Open vent screw 0087. Recheck the
tire inflation pressure with the elec-
tric air pump’s pressure gauge.
X After checking the tire inflation pres-
sure, unscrew the end of filler hose 0085
from tire valve 006F.
X Screw the valve cap onto the tire valve.
X Plug filler hose with the stopper.
X Place the tire repair kit securely in the
vehicle.
! The manufacturer is unable to guaran-
tee that all tire punctures can be
repaired with the tire repair kit, in par-
ticular cuts or perforations larger than
approximately 0.16 in (4 mm) or away from
the tire’s tread. The manufacturer is not
liable for damage sustained through
improper use of the tire repair kit. G
WARNING
Follow recommended tire inflation pres-
sures.
Do not underinflate tires. Underinflated
tires wear excessively and/or unevenly,
adversely affect handling and energy con-
sumption of the vehicle, and are more
likely to fail from being overheated.
Do not overinflate tires. Overinflated
tires can adversely affect handling and
ride comfort, wear unevenly, increase
stopping distance, and result in sudden
deflation (blowout) because they are more
likely to become punctured or damaged by
road debris, potholes etc.
Do not overload the tires by exceeding the
specified load limit as indicated on the
Tire and Loading Information placard on
the driver’s door B‑pillar. Overloading the
tires can overheat them, possibly causing
a blowout. Overloading the tires can also
result in handling or steering problems, or
brake failure. Flat tire
191>> Practical hints. Z
Page 195 of 222
You may operate the electrical air pump
again after it has cooled off.
X If a tire inflation pressure of at least
200 kpa (2.0 bar, 29 psi) is not attained,
turn off the electric air pump by press-
ing OFF on electric air pump switch 0085.
X Unscrew the end of filler hose 0085from
tire valve 006B.
X After clearing the area around the vehi-
cle of people and obstacles, drive vehi-
cle back or forth very slowly approx-
imately 30 ft (10 m).
This serves to better distribute the tire
sealant material inside the tire.
X Screw the end of filler hose 0085onto tire
valve 006B.
X Inflate the tire again. G
WARNING
If a tire inflation pressure of
200 kPa (2.0 bar, 29 psi) is not attained, the
tire is too severely damaged for the tire
sealant to provide a reliable tire repair.
In this case, the tire sealant cannot prop-
erly seal the tire.
Do not drive the vehicle.
Contact the nearest authorized electric
drive smart center for assistance or call
Roadside Assistance.
X After attaining a tire inflation pressure
of at least 200 kPa (2.0 bar, 29 psi), press
OFF on electric air pump switch 0085.
The electric air pump is switched off.
X Turn the key in the starter switch to
position 0.
X Unscrew the end of filler hose 0085from
tire valve 006B.
X Place the tire repair kit securely in the
vehicle.
X Drive off immediately.
The tire sealant will distribute itself
evenly inside the tire. G
WARNING
Do not exceed vehicle speed of 50 mph
(80 km/h). A tire sealant repair is not
designed to operate at higher speeds.
The sticker must be attached on the instru-
ment cluster where it will be easily seen by
the driver.
Vehicle handling characteristics of a tire
sealant repaired tire may change. Adapt
your driving accordingly.
X After driving for about 1.8 miles (3 km)
or ten minutes, stop and exit the vehicle
taking all of the appropriate safety pre-
cautions.
X Take the tire repair kit from the vehicle.
X Screw the end of filler hose 0085onto tire
valve 006B. X
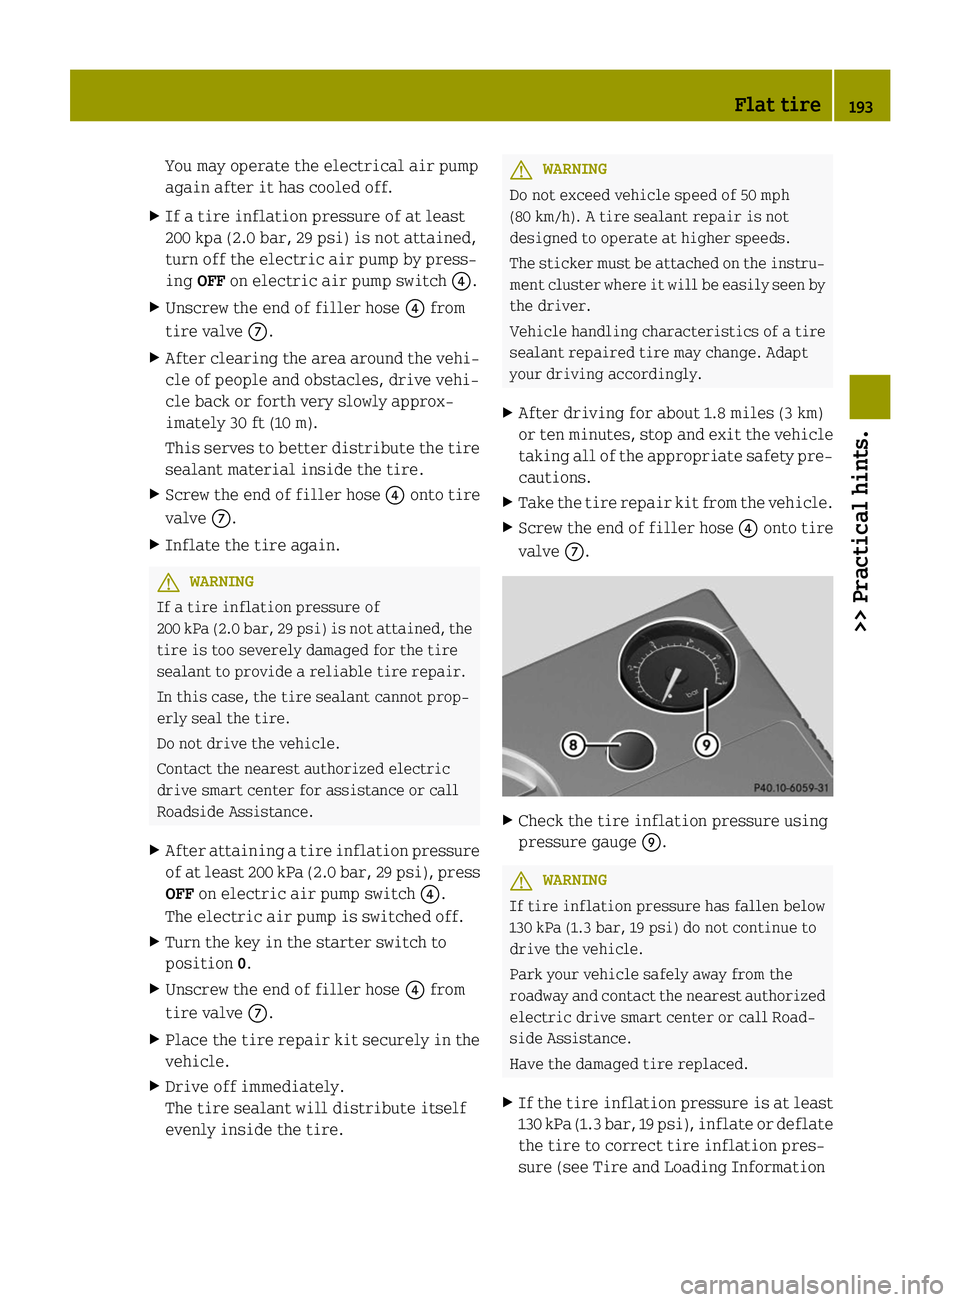
Check the tire inflation pressure using
pressure gauge 006D. G
WARNING
If tire inflation pressure has fallen below
130 kPa (1.3 bar, 19 psi) do not continue to
drive the vehicle.
Park your vehicle safely away from the
roadway and contact the nearest authorized
electric drive smart center or call Road-
side Assistance.
Have the damaged tire replaced.
X If the tire inflation pressure is at least
130 kPa (1.3 bar, 19 psi), inflate or deflate
the tire to correct tire inflation pres-
sure (see Tire and Loading Information Flat tire
193>> Practical hints. Z
Page 198 of 222
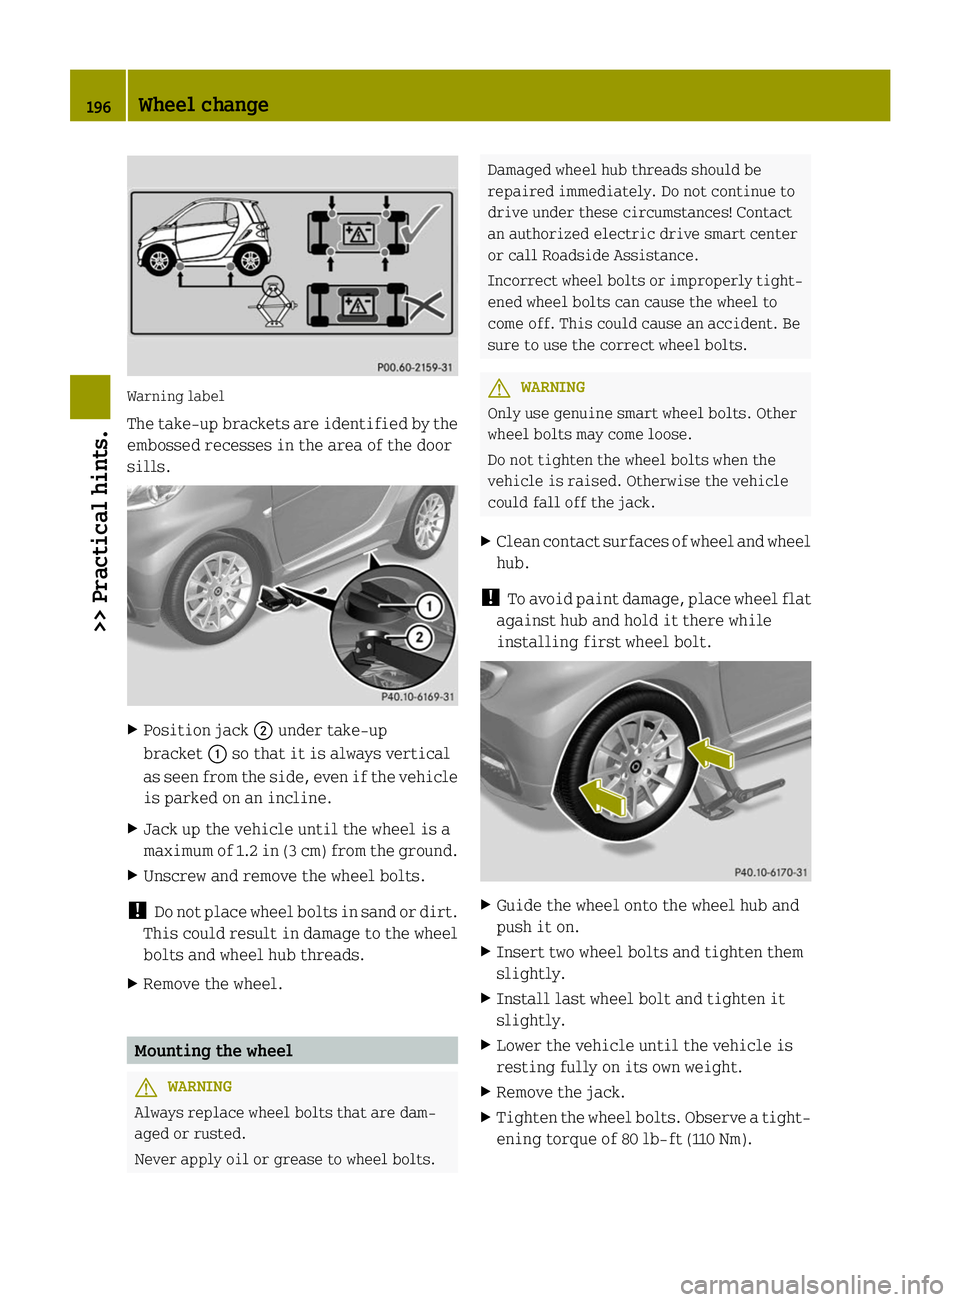
Warning label
The take-up brackets are identified by the
embossed recesses in the area of the door
sills. X
Position jack 0044under take-up
bracket 0043so that it is always vertical
as seen from the side, even if the vehicle
is parked on an incline.
X Jack up the vehicle until the wheel is a
maximum of 1.2 in (3 cm) from the ground.
X Unscrew and remove the wheel bolts.
! Do not place wheel bolts in sand or dirt.
This could result in damage to the wheel
bolts and wheel hub threads.
X Remove the wheel. Mounting the wheel
G
WARNING
Always replace wheel bolts that are dam-
aged or rusted.
Never apply oil or grease to wheel bolts. Damaged wheel hub threads should be
repaired immediately. Do not continue to
drive under these circumstances! Contact
an authorized electric drive smart center
or call Roadside Assistance.
Incorrect wheel bolts or improperly tight-
ened wheel bolts can cause the wheel to
come off. This could cause an accident. Be
sure to use the correct wheel bolts.
G
WARNING
Only use genuine smart wheel bolts. Other
wheel bolts may come loose.
Do not tighten the wheel bolts when the
vehicle is raised. Otherwise the vehicle
could fall off the jack.
X Clean contact surfaces of wheel and wheel
hub.
! To avoid paint damage, place wheel flat
against hub and hold it there while
installing first wheel bolt. X
Guide the wheel onto the wheel hub and
push it on.
X Insert two wheel bolts and tighten them
slightly.
X Install last wheel bolt and tighten it
slightly.
X Lower the vehicle until the vehicle is
resting fully on its own weight.
X Remove the jack.
X Tighten the wheel bolts. Observe a tight-
ening torque of 80 lb-ft (110 Nm). 196
Wheel change>> Practical hints.
Page 204 of 222
Jump start assistance
Your vehicle’s 12-volt battery is located in the passenger footwell below the footrest
(Y page 199).
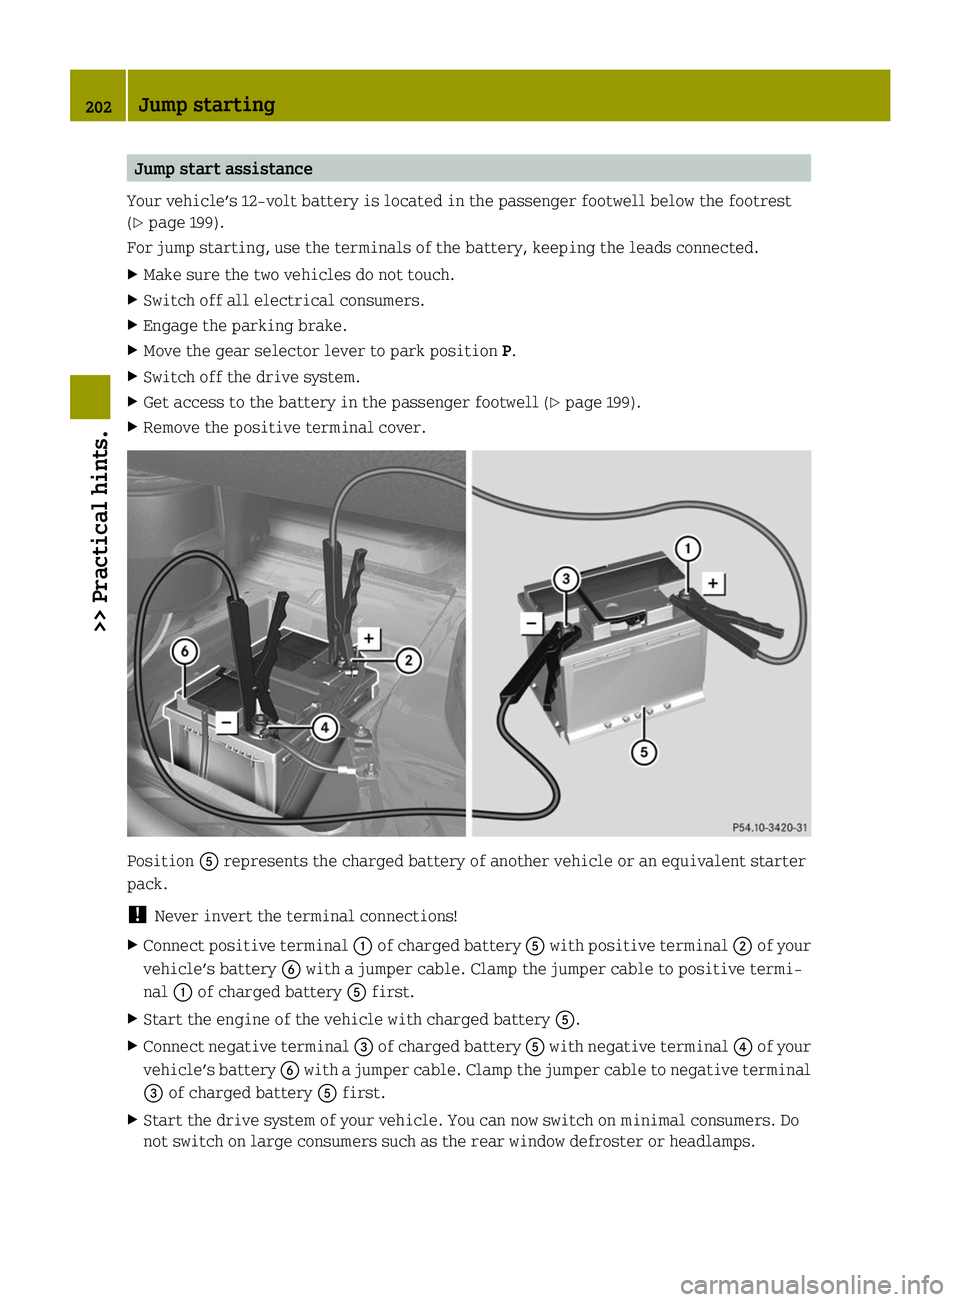
For jump starting, use the terminals of the battery, keeping the leads connected.
X Make sure the two vehicles do not touch.
X Switch off all electrical consumers.
X Engage the parking brake.
X Move the gear selector lever to park position P.
X Switch off the drive system.
X Get access to the battery in the passenger footwell (Y page 199).
X Remove the positive terminal cover. Position
0083represents the charged battery of another vehicle or an equivalent starter
pack.
! Never invert the terminal connections!
X Connect positive terminal 0043of charged battery 0083with positive terminal 0044of your
vehicle’s battery 0084with a jumper cable. Clamp the jumper cable to positive termi-
nal 0043of charged battery 0083first.
X Start the engine of the vehicle with charged battery 0083.
X Connect negative terminal 0087of charged battery 0083with negative terminal 0085of your
vehicle’s battery 0084with a jumper cable. Clamp the jumper cable to negative terminal
0087 of charged battery 0083first.
X Start the drive system of your vehicle. You can now switch on minimal consumers. Do
not switch on large consumers such as the rear window defroster or headlamps. 202
Jump starting>> Practical hints.
Page 206 of 222
A tow bar is necessary to adequately control
the towed vehicle.
Prior to towing the vehicle with all wheels
on the ground, make sure the gear selector
lever is in neutral position Nand the igni-
tion is switched on. G
WARNING
With the drive system inactive, there is no
power assistance for the brake and steering
systems. In this case, it is important to
keep in mind that a considerably higher
degree of effort is necessary to brake and
steer the vehicle. Adapt your driving
accordingly.
! The vehicle may be towed only for dis-
tances up to 30 miles (50 km) and at a
speed not to exceed 30 mph (50 km/h).
Otherwise, the electric drive or the
high-voltage system could be damaged.
! Do not tow other vehicles.
Otherwise, the drive system or compo-
nents of the high-voltage system could be
damaged.
! Do not tow the vehicle with the front
axle raised. Doing so may cause serious
damage to the brake system which is not
covered by the smart Limited Warranty.
! Before towing the vehicle observe the
following instructions:
R Do not tow with sling-type equipment
attached to suspension parts. This may
cause damage to the supports if towing
on a bumpy road.
R Towing the vehicle should only be done
using the properly installed towing
eye bolt. Never attach a tow cable, tow
rope, or tow rod to the vehicle chassis,
frame, or suspension parts.
! Make sure the gear selector lever is in
neutral position Nwhile towing the
vehicle. Doing otherwise may result in
significant drive train damage. !
Towing the vehicle with a luggage
rack* mounted is not permissible. The
vehicle must not be towed by the luggage
rack*.
i If the 12-volt battery is disconnected
or discharged, the gear selector lever
will remain locked in park position P.
Contact an authorized electric drive
smart center for assistance or call Road-
side Assistance.
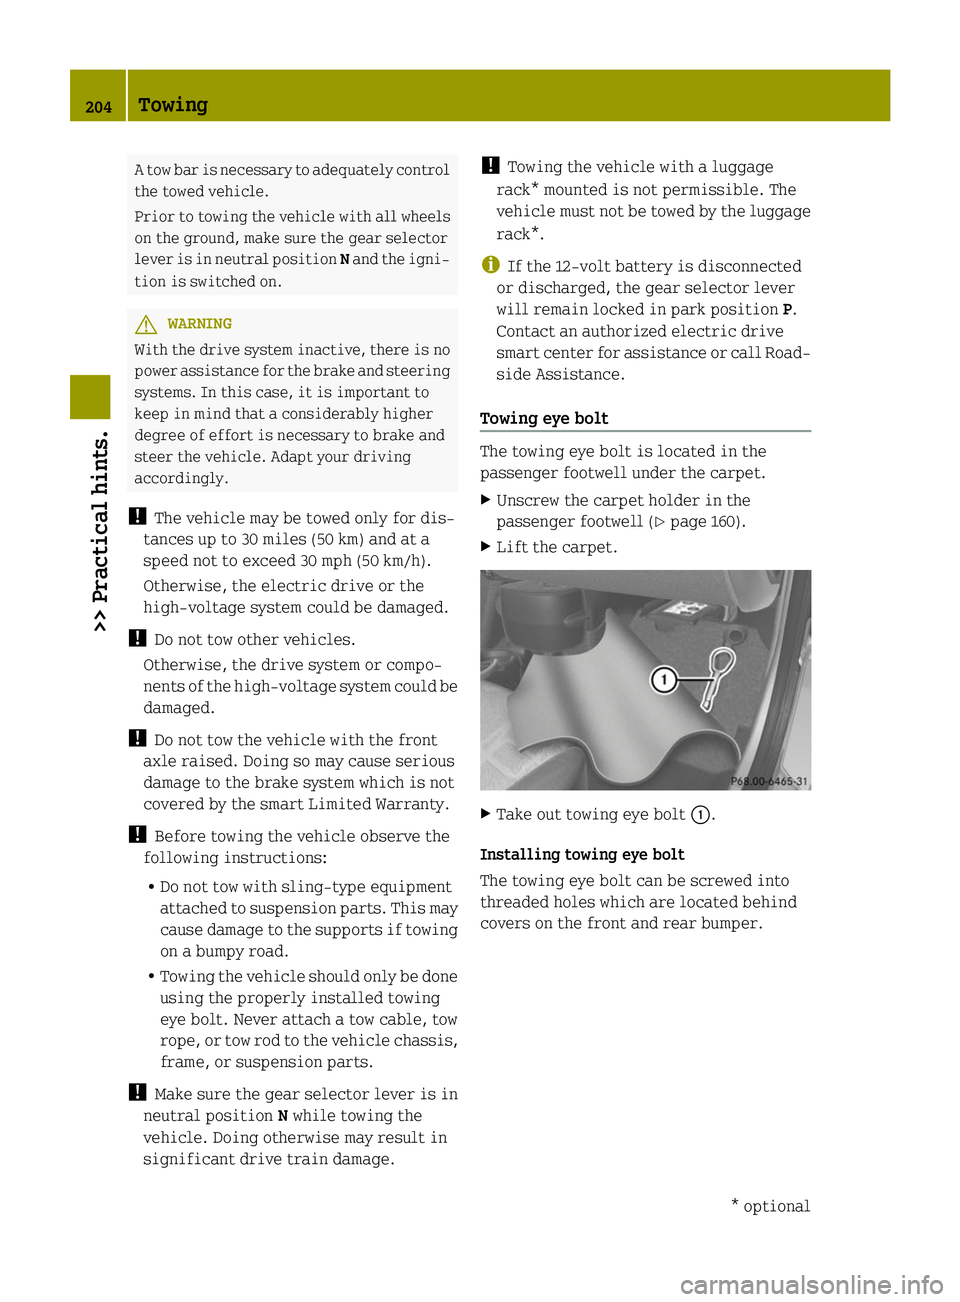
Towing eye bolt The towing eye bolt is located in the
passenger footwell under the carpet.
X
Unscrew the carpet holder in the
passenger footwell (Y page 160).
X Lift the carpet. X
Take out towing eye bolt 0043.
Installing towing eye bolt
The towing eye bolt can be screwed into
threaded holes which are located behind
covers on the front and rear bumper. 204
Towing>> Practical hints.
* optional