air conditioning SMART FORTWO COUPE ELECTRIC DRIVE 2014 Owners Manual
[x] Cancel search | Manufacturer: SMART, Model Year: 2014, Model line: FORTWO COUPE ELECTRIC DRIVE, Model: SMART FORTWO COUPE ELECTRIC DRIVE 2014Pages: 222, PDF Size: 16.17 MB
Page 6 of 222

1, 2, 3 ...
12-volt battery Charging ................................ 199
Indicator lamp ........................ .171
Notes ..................................... 197
Removing and installing ............199 A
ABS (Antilock Brake System) .............46
Indicator lamp ......................... 167
Accessory weight .......................... 143
Accidents Air bags .................................. 33
Acoustic Vehicle Indication* ...........48
Address change .............................. 15
Air bags ....................................... 33
Children .................................. 33
Front, driver and passenger .........36
Front, passenger ....................... 36
Head-thorax ............................. 37
Knee bag .................................. 37
Passenger front air bag off
indicator lamp ..................... 28, 41
Safety guidelines ......................35
SRS indicator lamp ...................169
Thorax-pelvis .......................... 38
Window curtain ......................... 38
Air conditioning with climate
control
Air distribution ...................... 102
Air recirculation mode .............103
Air vents ................................ 101
Air volume .............................. 102
Control panel .......................... 101
Defrosting .............................. 103
Notes ...................................... 99
Rear window defroster ...............103
Switching on/off ...................... 101
Temperature ............................ 101
Air pressure
see Tire inflation pressure
Air pressure (tires) ......................144
Air vents ..................................... 101
Alarm system see Anti-theft systems
Ambient lighting* .......................... 67Anticorrosion/antifreeze
.........219, 220
Antiglare, Interior rear view mir-
ror .............................................. 61
Antilock Brake System see ABS
Anti-theft systems ......................... 49
Anti-theft warning system ...........49
Electronic immobilizer ..............49
Interior motion sensor ...............49
Tow-away alarm ......................... 49
Aquaplaning
see Hydroplaning
Armrest ....................................... .59
Aspect ratio (tires) .......................144
Audio system ................................. 95
Basic ...................................... 96
Navigation/multimedia ..............96
Automatic headlamp mode ................64
Automatic locking .......................... 53
AUX socket .................................... 96 B
Backrest see Seats
Backup lamp ................................. 181
Bar (air pressure unit) ...................144
Batteries .................................... 197
Battery Jump starting .......................... 200
Battery (key)
Replacing the transmitter bat-
tery ....................................... 178
Battery coolant ............................ 125
Bead (tire) .................................. 144
Brake fluid .................................. 127
Checking ................................ 127
Brake lamp ................................... 181
Brake pedal ................................... 78
Brakes ........................................ 148
Parking brake ........................... 77
Warning lamp ........................... 167
Bulbs
Front ..................................... 180
Rear ...................................... 181
Replacing ............................... 1794
Index
Page 29 of 222

Center console
Function Page
0043
Charge level gauge 81
0044
Power gauge 81
0087
Air conditioning with
climate control 99
0085
Radio 95
0083
Drawer 107
0084
Switching seat heating*
on/off
60
006B
Restarting TPMS button 131
006C
Switching tow-away pro-
tection*/interior motion
sensor* on/off
49
006D
Central unlocking switch
53 Function Page
006E
Hazard warning flasher
switch
68
006F
Central locking switch 53
0070
Switching front fog
lamps* on/off
67
0071
Storage tray* 107
0072
Gear selector lever 79
0073
Starter switch 57
0074
Parking brake lever 77
0075
Coin holder 106
Retractable soft top
switch
2 72
2
cabriolet only. Center console
27>> At a glance.
* optional
Page 53 of 222

>> Controls.Opening and closing
.......................... 52
Starter switch positions .....................57
Seats .............................................. 58
Mirrors ........................................... 61
Seat belts ........................................ 62
Lighting ......................................... 64
Windshield wipers ............................ 69
Soft top system (cabriolet only) ............ 70
Side windows .................................... 75
Driving and parking .......................... 76
Transmission ................................... 79
Instrument cluster ............................. 81
Control system .................................. 83
Audio system* .................................. 95
Driving systems ................................ 97
Air conditioning with climate con-
trol ................................................ 99
Loading and storing ......................... 104
Useful features ................................ 109
Page 92 of 222

Odometer
Odometer
menu appears in the multi-
function display.
X To switch between submenus: Press the OK
button on the control lever briefly.
X To reset the trip odometer: Select the
trip odometer display.
X Press button 0084on the instrument cluster
until the trip odometer is reset to 0
(Y page 23).
If the remaining cruise range of the charge
level of the high-voltage battery has drop-
ped below 10 %, Low Battery
Low Battery is displayed
on position 0087. Start menu
The 0096STARTSTART menu shows you the trip statis-
tics since start. 0043
Average speed since start
0044 Time elapsed since start
0087 Distance driven since start
0085 Average energy consumption
X Press the control switch on the control
lever (Y page 83) up or down until the
0096START START menu appears in the multifunc-
tion display.
X To reset: Press button 0084on the instru-
ment cluster until the 0096STARTSTART menu is
reset to 0(Y page 23).
i The 0096STARTSTART menu is reset to 0 automat-
ically
R when the ignition has been switched
off for more than 4 hours
R after driving more than 9999 miles or
kilometers Reset menu
The 0096RESETRESET menu menu shows you the trip
statistics since the last reset. 0043
Average speed since last reset
0044 Time elapsed since since last reset
0087 Distance driven since last reset
0085 Average energy consumption
X Press the control switch on the control
lever (Y page 83) up or down until the
0096RESET RESET menu appears in the multifunc-
tion display.
X To reset: Press button 0084on the instru-
ment cluster until the 0096RESETRESET menu is
reset to 0(Y page 23). Charge and depart menu
In the Charge and Depart Charge and Depart menu you can
change the following settings:
R set a departure time
R switch on/off the "Air conditioning
before start" function
R instant charge of the high‑voltage bat-
tery
R set the maximum charge current.
X Press the control switch on the control
lever up or down until Charge and Charge and
Depart Depart appears in the multifunction
display.
X Press the OK button on the control lever
briefly.
Setting the departure time With this function, you can preset a depar-
ture time.90
Control system>> Controls.
Page 93 of 222
This is useful:
R
if you wish to cool the interior of the
vehicle before driving
R if you wish to charge the vehicle at a
charging station/wallbox at the most
inexpensive electricity rate
With the "Air conditioning before start"
function, the vehicle interior is cooled
prior to a desired departure time.
Prerequisites:
R The doors and tailgate are closed.
R The charging cable for the high‑voltage
battery is connected to a power source
and inserted into the vehicle's power
socket.
R The high‑voltage battery has a suffi-
cient charge.
The maximum duration of "Air condition-
ing before start" is 30 minutes.
Set the air distribution of your vehicle as
follows so that the "Air conditioning
before start" function has the greatest
effect:
R in summer, to the center and side vents
R in winter, onto the windshield and side
windows
Information on air distribution can be
found on (Y page 102).
The setting of the airflow regulator has no
influence on the "Air conditioning before
start" function.
i If the programmed time is too short, the
high‑voltage battery cannot be com-
pletely charged. After setting the depar-
ture time, the maximum charge level
which can be reached is then shown.
i If the high‑voltage battery is not suf-
ficiently charged and the "Air condi-
tioning before start" function is acti-
vated, the high‑voltage battery is
charged first. When a charge level of at
least 20 % has been reached, the "Air con-
ditioning before start" function is acti-
vated. This function then has priority over the charging of the high‑voltage
battery.
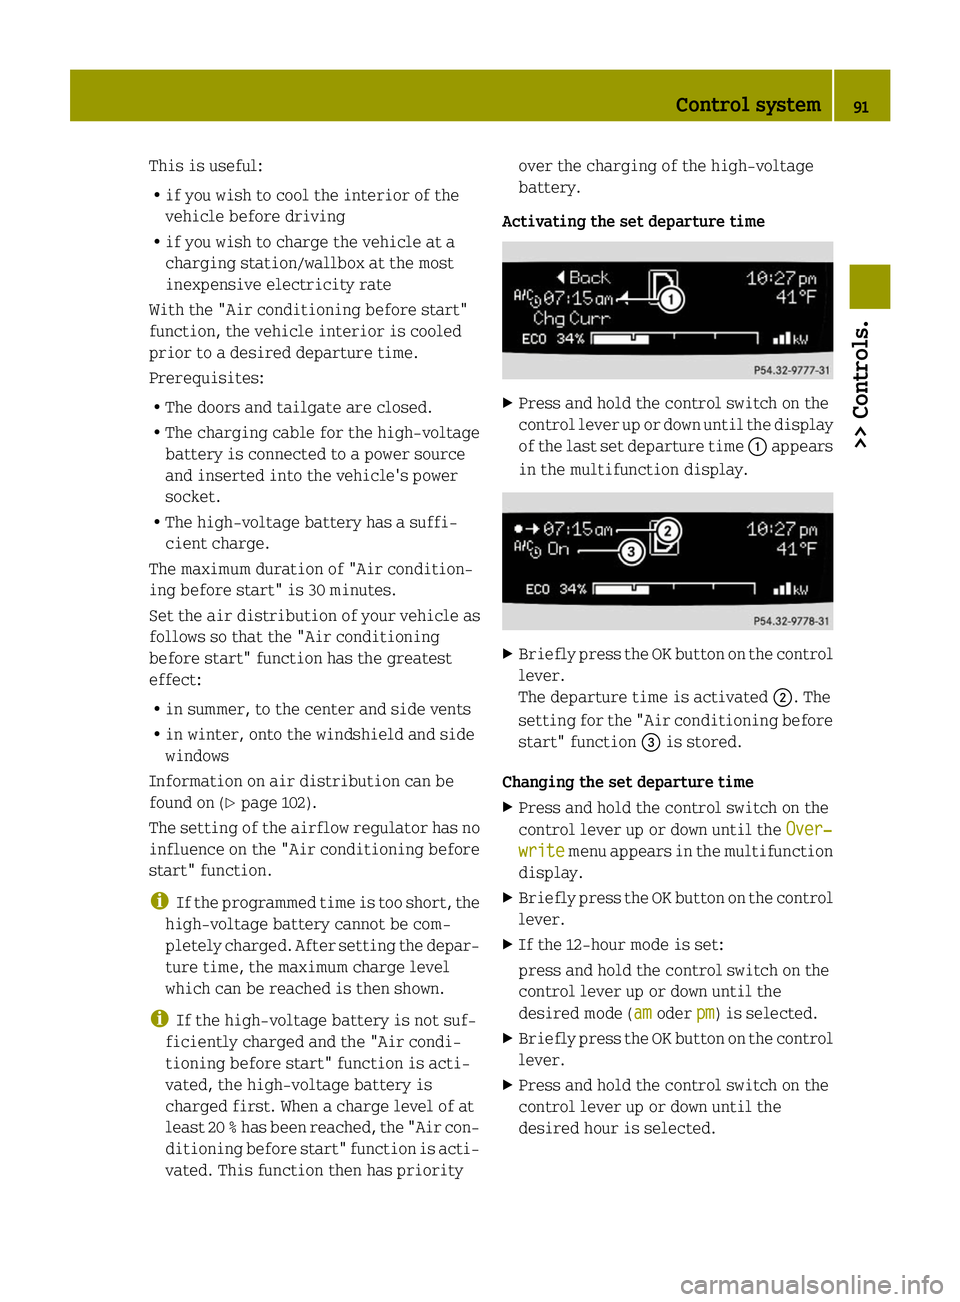
Activating the set departure time X
Press and hold the control switch on the
control lever up or down until the display
of the last set departure time 0043appears
in the multifunction display. X
Briefly press the OK button on the control
lever.
The departure time is activated 0044. The
setting for the "Air conditioning before
start" function 0087is stored.
Changing the set departure time
X Press and hold the control switch on the
control lever up or down until the Over‐ Over‐
write
write menu appears in the multifunction
display.
X Briefly press the OK button on the control
lever.
X If the 12-hour mode is set:
press and hold the control switch on the
control lever up or down until the
desired mode (am amoder pm
pm) is selected.
X Briefly press the OK button on the control
lever.
X Press and hold the control switch on the
control lever up or down until the
desired hour is selected. Control system
91>> Controls. Z
Page 94 of 222

X
Briefly press the OK button on the control
lever.
X Press and hold the control switch on the
control lever up or down until the "Air
conditioning before start" function is
activated or deactivated.
X Briefly press the OK button on the control
lever.
X Press and hold the control switch on the
control lever up or down until the "Air
conditioning before start" function is
activated or deactivated.
X Briefly press the OK button on the control
lever.
The new departure time is stored and
activated.
The "Air conditioning before start"
function is activated or deactivated.
Starting the charging process of the
high‑voltage battery immediately This function allows you to start the charg-
ing process immediately. The charging
process begins as soon as the charging
cable is connected.
i The charging process also begins when
you insert the charging cable into the
vehicle's power socket. However, this is
only the case if you have not made any
departure time settings.
Information on the charging process can
be found on (Y page 115).
X Press and hold the control switch on the
control lever up or down until the
Instant Charge
Instant Charge menu appears in the
multifunction display.
X Briefly press the OK button on the control
lever.
The charging process is started as soon
as the charging cable is connected.
i When you call up the Instant Charge
Instant Charge
menu, the "Air conditioning before
start" function is not available. Setting the maximum charge current G
WARNING
When connected to a power supply socket, a
high electrical load during the charging
process can lead to overheating of the
external power supply. There is a risk of
fire.
Check the maximum permissible charge
current on site before you begin the charg-
ing process. Contact an authorized electric
drive smart center should you require
assistance. If necessary, adjust the set-
tings of your vehicle.
You can limit the charge current of the
high‑voltage battery. This can protect the
power supply from overloading. You can set
the limit either on the control unit of the
charging cable or via the control system.
The preset standard value is "Max". This
corresponds to the maximum available
charge current of the power supply.
Check the maximum permissible charge
current for the respective power supply
socket before charging the high‑voltage
battery.
The following values are available for
selection: 8 A,12 A,Max. The last value set
remains stored until a change is made.
X Press and hold the control switch on the
control lever up or down until the
Charge Current Charge Current menu appears in the
multifunction display.
X Briefly press the OK button on the control
lever.
X Press and hold the control switch on the
control lever up or down until the
desired amperage is selected.
X Briefly press the OK button on the control
lever.
The selected amperage is set.
i If differing values are set on the charg-
ing cable and the control system, the
high‑voltage battery is charged using
the lowest value. 92
Control system>> Controls.
Page 101 of 222

X
Press RES/+ button 0044briefly.
The cruise control resumes the previ-
ously set speed.
i The last set speed stored in memory is
deleted when the drive system is
switched off.
Changing the set speed You must have set a speed prior to increas-
ing or decreasing the current speed.
i Depressing the accelerator pedal does
not deactivate the cruise control. After
a brief acceleration (e.g. for passing),
the cruise control will resume the last
set speed.
Continuous adjustment
X Press and hold RES/+ button 0044to
increase the speed.
or
X Press and hold SET/ −0087 to decrease the
speed.
X Press and hold the respective button
until the desired speed is reached.
X Release the respective button.
The new speed is stored.
Adjustment in 1 mph (Canada 1 km/h) incre-
ments
X Press RES/+ button 0044briefly to increase
the speed.
or
X Press SET/ −0087 briefly to decrease the
speed.
The new speed is stored after releasing the
respective button. Air conditioning with climate control
Notes
G
WARNING
Follow the recommended settings for heat-
ing and cooling given on the following pages. Otherwise the windows could fog up,
impairing visibility and endangering you
and others.
The air conditioning improves the level of
comfort when driving at high outside tem-
peratures by cooling and dehumidifying
the air.
Nearly all dust particles, pollutants, are
filtered out by an integrated particle fil-
ter before outside air enters the passenger
compartment through the air distribution
system. It also operates when the air con-
ditioning is switched off and you have
switched on the blower.
The dehumidification of the air by the air
conditioner prevents the windows from
misting up when the outside air humidity
is high.
This effect can also be used to defrost the
windows. For this, make sure, in addition
to the air conditioner, that the heater is
on the maximum setting.
The air conditioner only works when:
R the ignition is switched on
R the blower is switched on
R the driver's door is closed
Maximum effectiveness is achieved if you
drive with the windows closed.
If the operating temperature of the
high‑voltage battery is too high, the
high‑voltage battery is cooled by the air
conditioner. When the air conditioner
switches on, the cooling output in the vehi-
cle's interior is reduced as a result. The
temperature in the vehicle's interior may
rise briefly.
If the air conditioner is not switched on,
the compressor of the air conditioner and
the vehicle's cooling fan are switched on
automatically. This cools the high‑voltage
battery but not the vehicle's interior. When
the high‑voltage battery reaches the nom-
inal temperature again, the air condi-
tioner switches off automatically. Air conditioning with climate control
99>> Controls. Z
Page 102 of 222

i
The range of the vehicle is decreased
when the air conditioner is switched on.
i In warmer weather, ventilate the
passenger compartment for a short
period of time before utilizing the air
conditioning.
Further information on the "Air condition-
ing before start" function can be found on
(Y page 90). 100
Air conditioning with climate control>> Controls.
Page 103 of 222

Control panel
0043
Air volume control
0044 Air conditioning switch
0087 Rear window defroster switch
0085 Air recirculation switch
0083 Temperature control
0084 Air distribution control Switching on/off
Control panel (Y page 101).
X Make sure the ignition is switched on.
X Switching on: Push air volume
control 0043to level 1or higher.
X Press air conditioning switch 0044.
The indicator lamp in air conditioning
switch 0044comes on.
X Switching off: Press air conditioning
switch 0044once more.
The indicator lamp in air conditioning
switch 0044goes out.
i The stored status is restored, if you
switch on the ignition again. Setting the temperature
Control panel (Y page 101).
i You should raise or lower the tempera-
ture setting in small increments, pref-
erably starting at 70¦ (21¥).X
Increasing or decreasing: Push temper-
ature control 0083up or down. Adjusting air vents
G
WARNING
When operating the heating or air condi-
tioning with climate control, the air that
enters the passenger compartment through
the air vents can be very hot or very cold
(depending on the set temperature). This
may cause burns or frostbite on unprotected
skin in the immediate area of the air vents.
Always keep sufficient distance between
unprotected parts of the body and the air
vents. If necessary, use the air distribu-
tion control to direct the air to air vents
in the vehicle interior that are not in the
immediate area of unprotected skin.
To make sure the heating or air condition-
ing with climate control works properly,
please observe the following:
R Keep the air intake grill free from
deposits, e.g. ice or snow, to ensure that Air conditioning with climate control
101>> Controls. Z
Page 104 of 222

fresh air can flow freely into the vehicle
interior.
R Do not obstruct air vents or ventilation
grilles in the vehicle interior.
i For draft-free ventilation, move the
sliders for the center air vents and side
air vents to the middle position.
Center air vents 0043
Left center air vent, adjustable
0044 Right center air vent, adjustable
X Adjusting: Turn slider 0043or0044 to the
left, right, up, or down.
X Opening: Turn slider 0043or0044 inwards
towards the center console.
X Closing: Turn slider 0043or0044 fully out-
wards towards the side window.
Side air vents Side air vents on driver’s side illustrated as
example
0043 Left side air vent, adjustable
0044 Left side defroster air vent, fixed X
Adjusting: Turn slider 0043to the left,
right, up, or down.
X Opening: Turn slider 0043inwards towards
the center console.
X Closing: Turn slider 0043fully outwards
towards the side window. Adjusting air distribution
Symbol Function
0085
Directs air to the windshield
and side windows
009B
Directs air to the footwells
and air distribution is
reduced at the center and side
air vents
009C
Directs air through the center
and side air vents
i
You can also turn the air distribution
control to a position between two sym-
bols.
Control panel (Y page 101).
X Turn air distribution control 0084to the
desired symbol.
The air distribution is controlled
depending on the position of the air dis-
tribution control. Adjusting air volume
The air volume is controlled depending on
the blower speed selected. Five blower
speeds are available. 0
Off
1
Slow
2
Medium
3
High/defrosting
4
Maximum102
Air conditioning with climate control>> Controls.