check engine SSANGYONG KORANDO 2012 User Guide
[x] Cancel search | Manufacturer: SSANGYONG, Model Year: 2012, Model line: KORANDO, Model: SSANGYONG KORANDO 2012Pages: 1082, PDF Size: 96.1 MB
Page 148 of 1082
03-130000-00
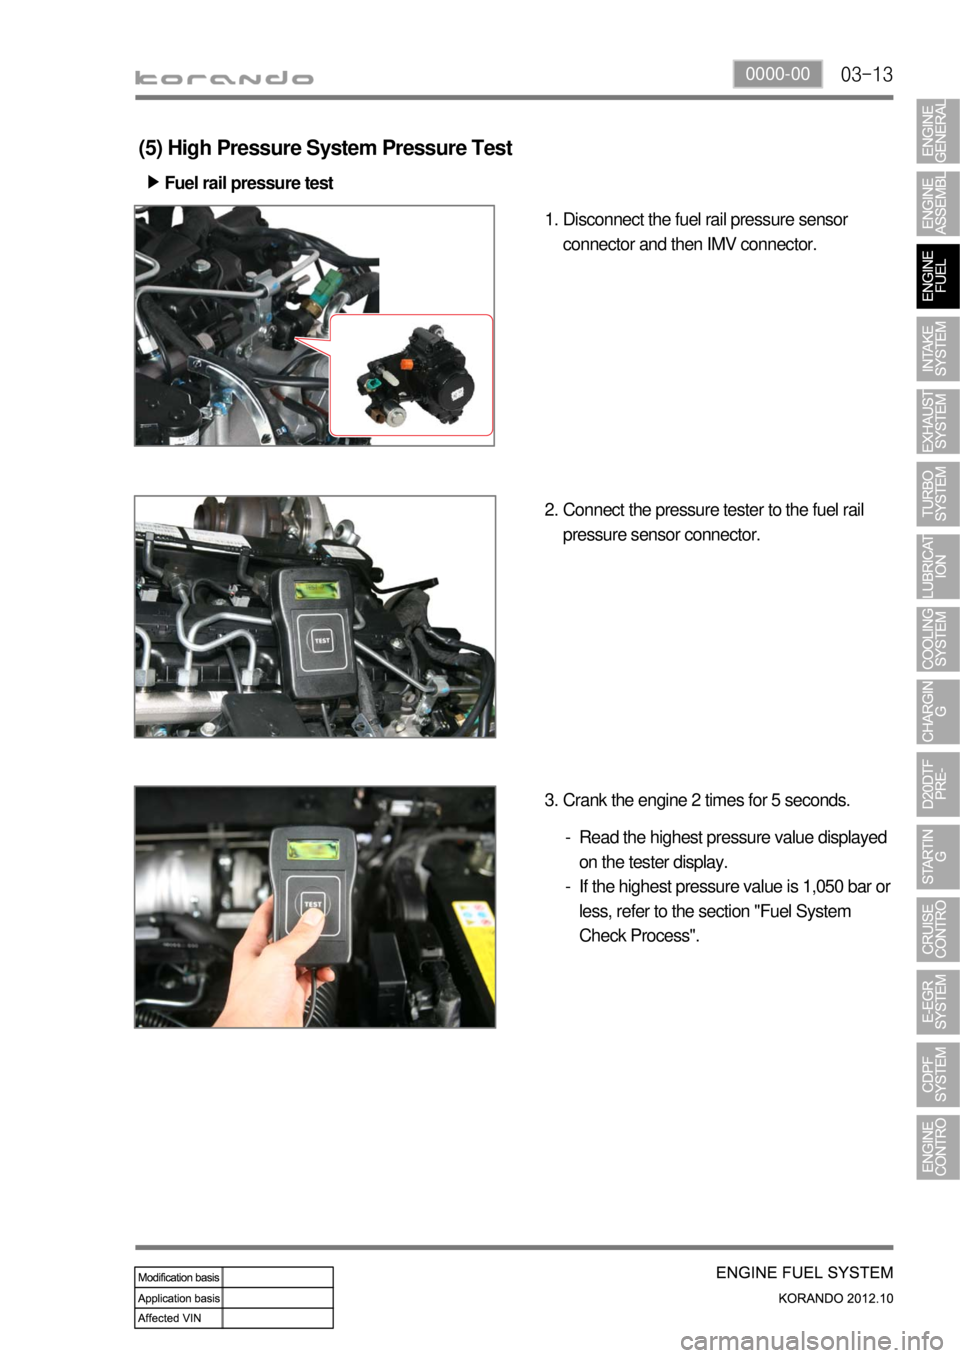
(5) High Pressure System Pressure Test
Fuel rail pressure test ▶
Disconnect the fuel rail pressure sensor
connector and then IMV connector. 1.
Connect the pressure tester to the fuel rail
pressure sensor connector. 2.
Crank the engine 2 times for 5 seconds. 3.
Read the highest pressure value displayed
on the tester display.
If the highest pressure value is 1,050 bar or
less, refer to the section "Fuel System
Check Process". -
-
Page 149 of 1082
03-14
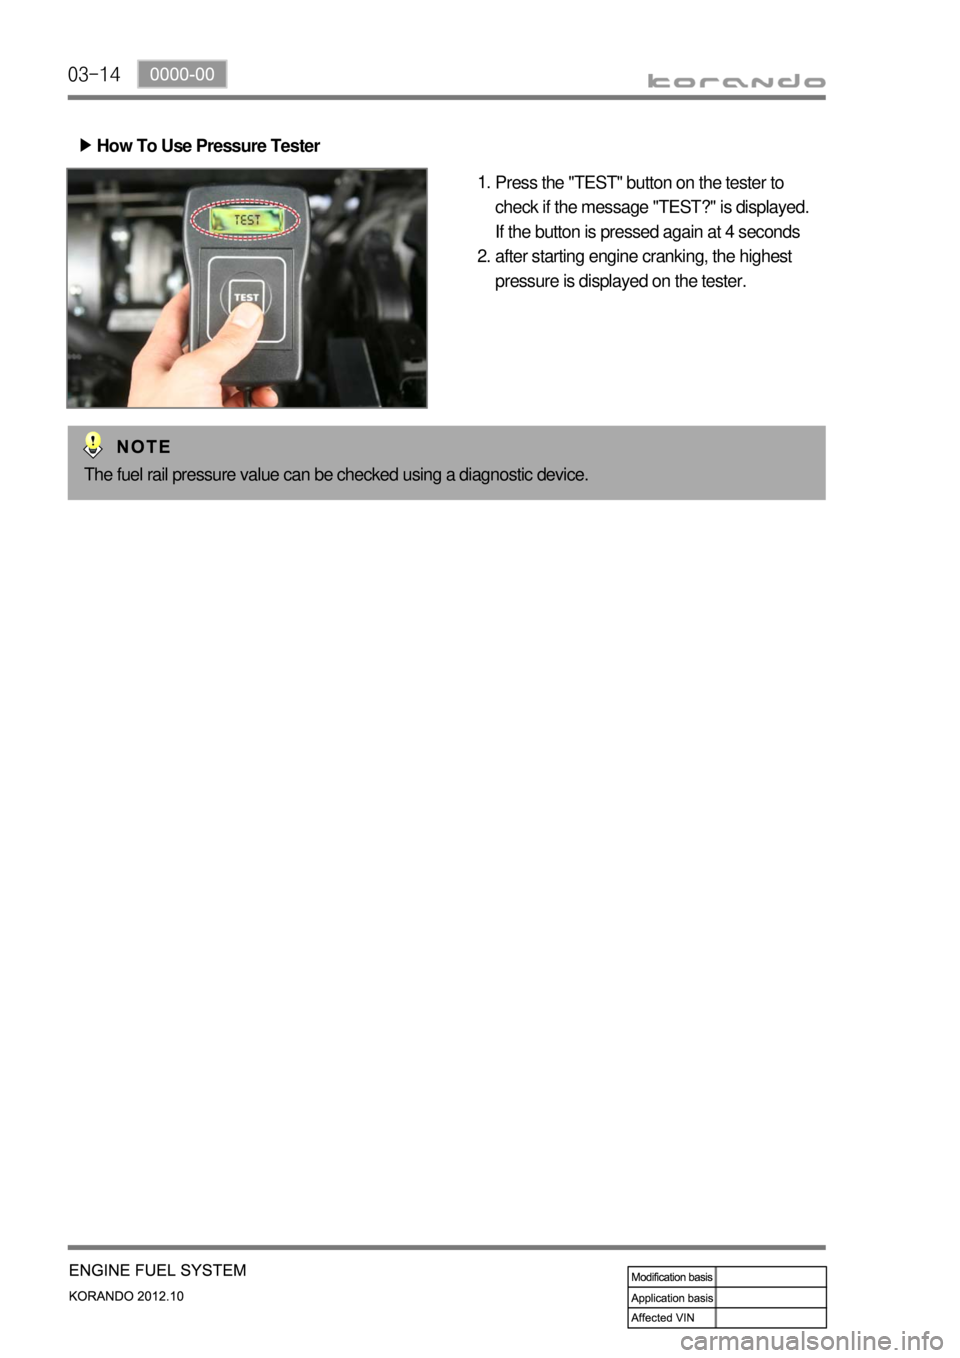
How To Use Pressure Tester ▶
Press the "TEST" button on the tester to
check if the message "TEST?" is displayed.
If the button is pressed again at 4 seconds
after starting engine cranking, the highest
pressure is displayed on the tester. 1.
2.
The fuel rail pressure value can be checked using a diagnostic device.
Page 150 of 1082
03-150000-00
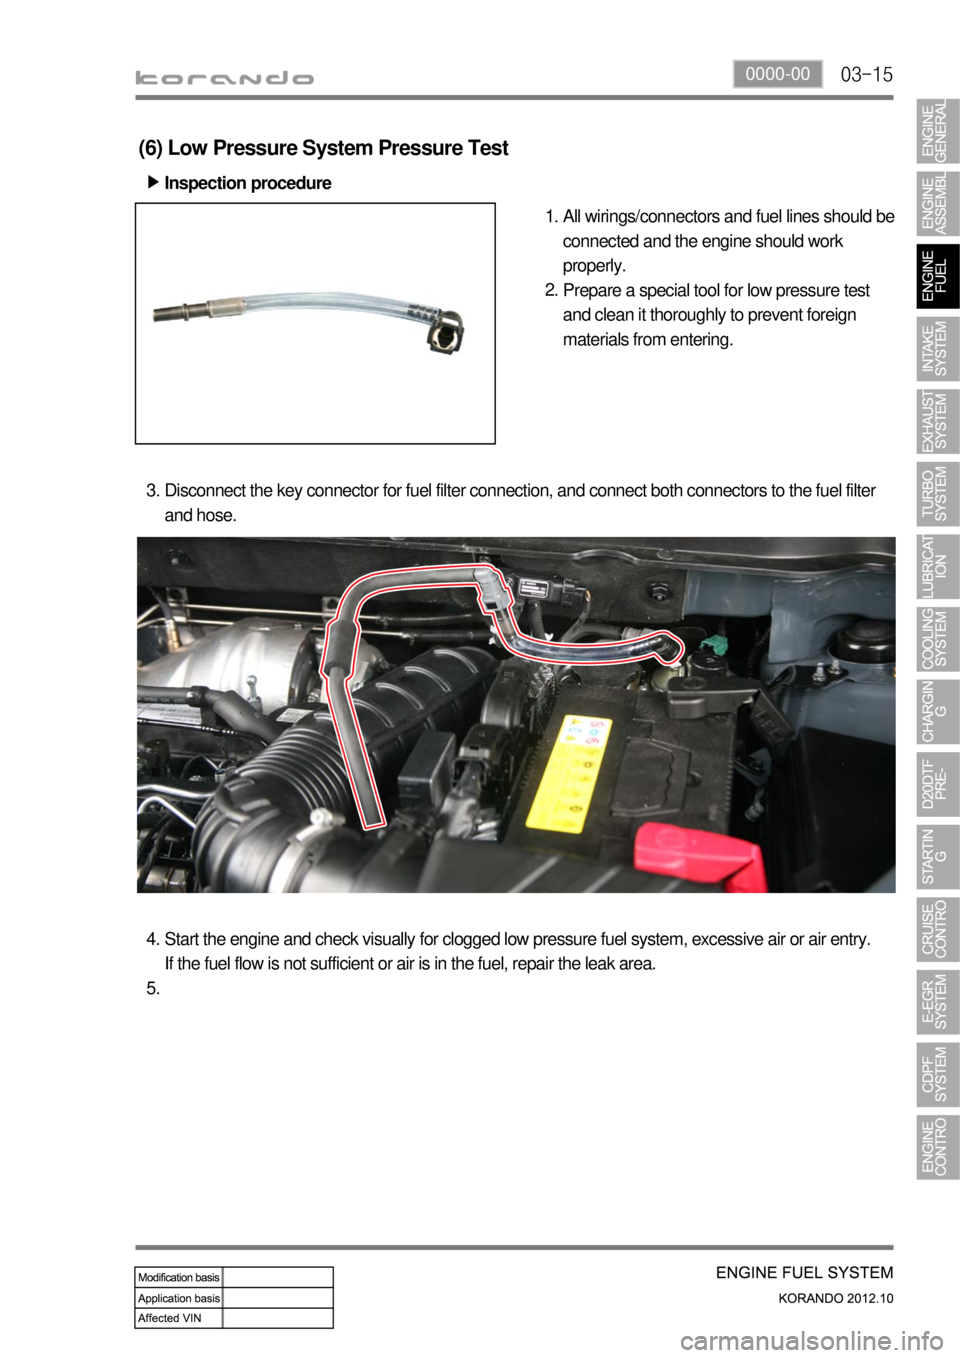
(6) Low Pressure System Pressure Test
Inspection procedure ▶
All wirings/connectors and fuel lines should be
connected and the engine should work
properly.
Prepare a special tool for low pressure test
and clean it thoroughly to prevent foreign
materials from entering. 1.
2.
Disconnect the key connector for fuel filter connection, and connect both connectors to the fuel filter
and hose. 3.
Start the engine and check visually for clogged low pressure fuel system, excessive air or air entry.
If the fuel flow is not sufficient or air is in the fuel, repair the leak area. 4.
5.
Page 151 of 1082
03-16
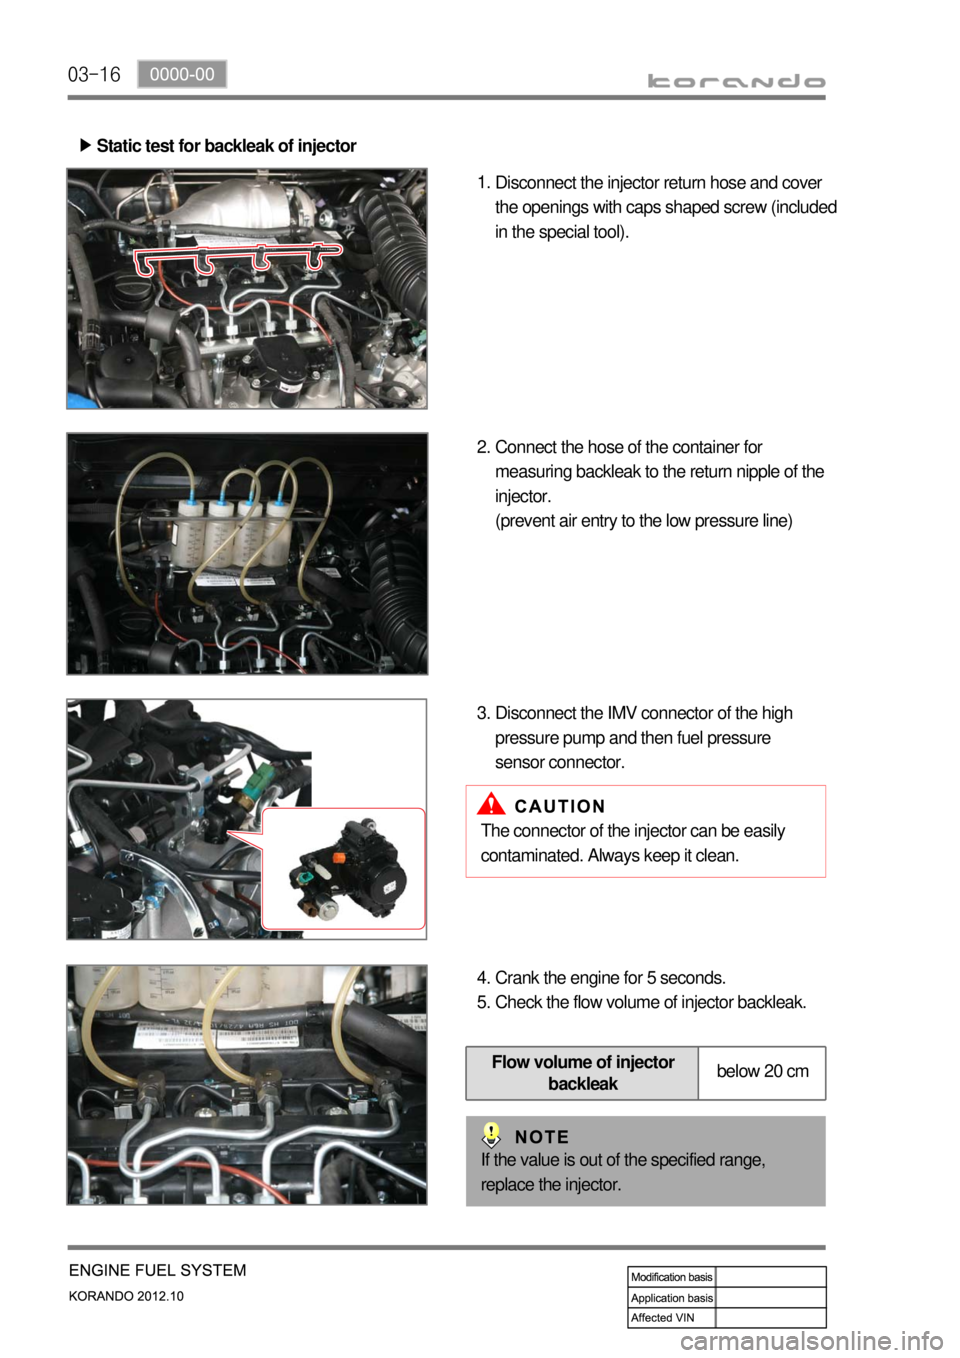
Static test for backleak of injector ▶
Disconnect the injector return hose and cover
the openings with caps shaped screw (included
in the special tool). 1.
Connect the hose of the container for
measuring backleak to the return nipple of the
injector.
(prevent air entry to the low pressure line) 2.
Disconnect the IMV connector of the high
pressure pump and then fuel pressure
sensor connector. 3.
The connector of the injector can be easily
contaminated. Always keep it clean.
Crank the engine for 5 seconds.
Check the flow volume of injector backleak. 4.
5.
If the value is out of the specified range,
replace the injector.
Flow volume of injector
backleakbelow 20 cm
Page 152 of 1082
03-170000-00
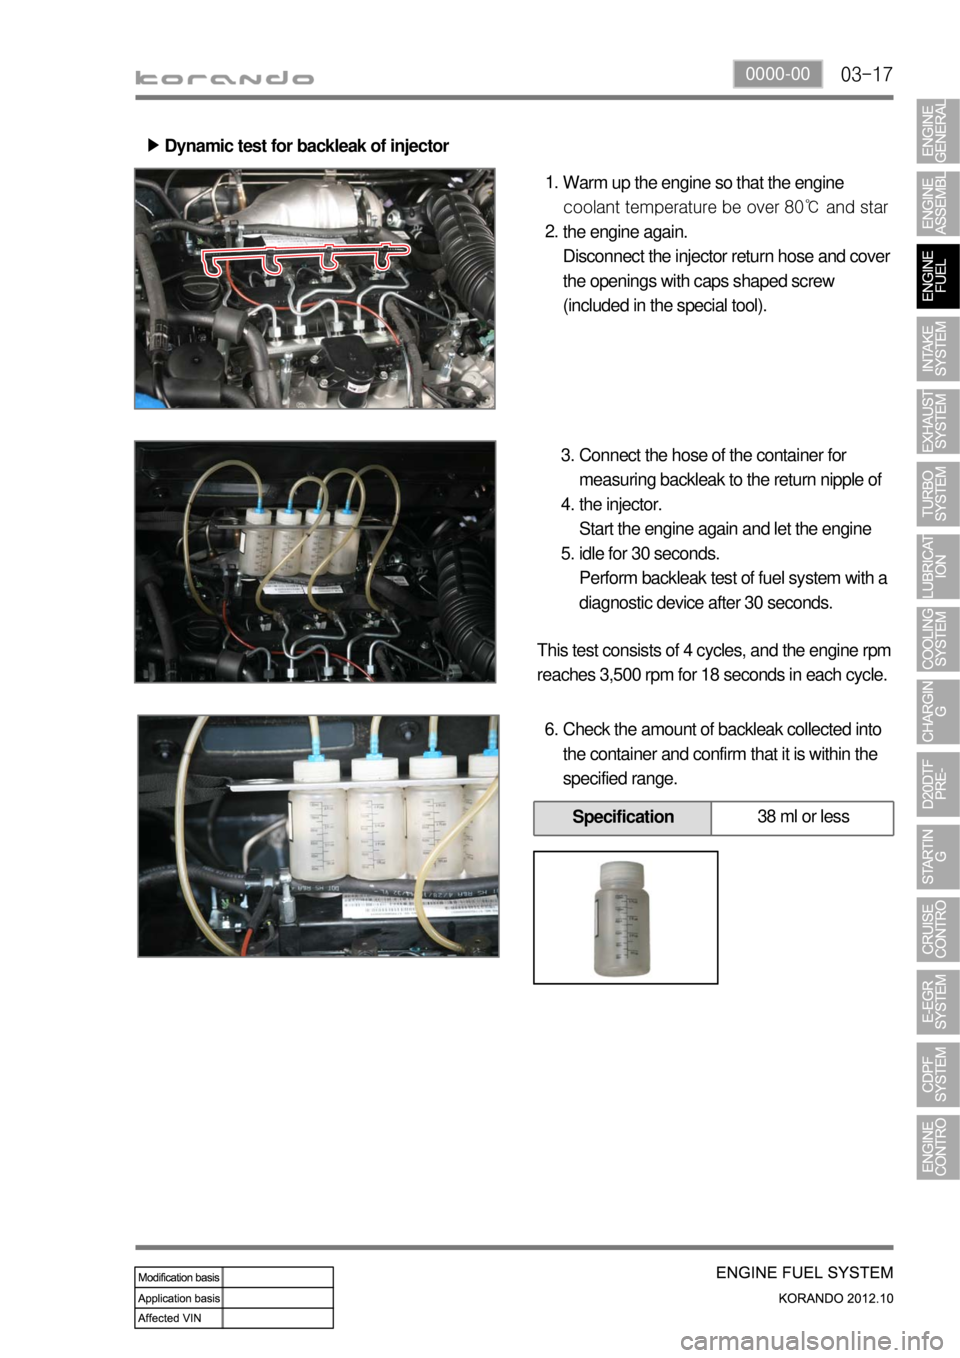
Dynamic test for backleak of injector ▶
Warm up the engine so that the engine
coolant temperature be over 80℃ and star
the engine again.
Disconnect the injector return hose and cover
the openings with caps shaped screw
(included in the special tool). 1.
2.
Connect the hose of the container for
measuring backleak to the return nipple of
the injector.
Start the engine again and let the engine
idle for 30 seconds.
Perform backleak test of fuel system with a
diagnostic device after 30 seconds. 3.
4.
5.
This test consists of 4 cycles, and the engine rpm
reaches 3,500 rpm for 18 seconds in each cycle.
Check the amount of backleak collected into
the container and confirm that it is within the
specified range. 6.
Specification38 ml or less
Page 153 of 1082
03-18
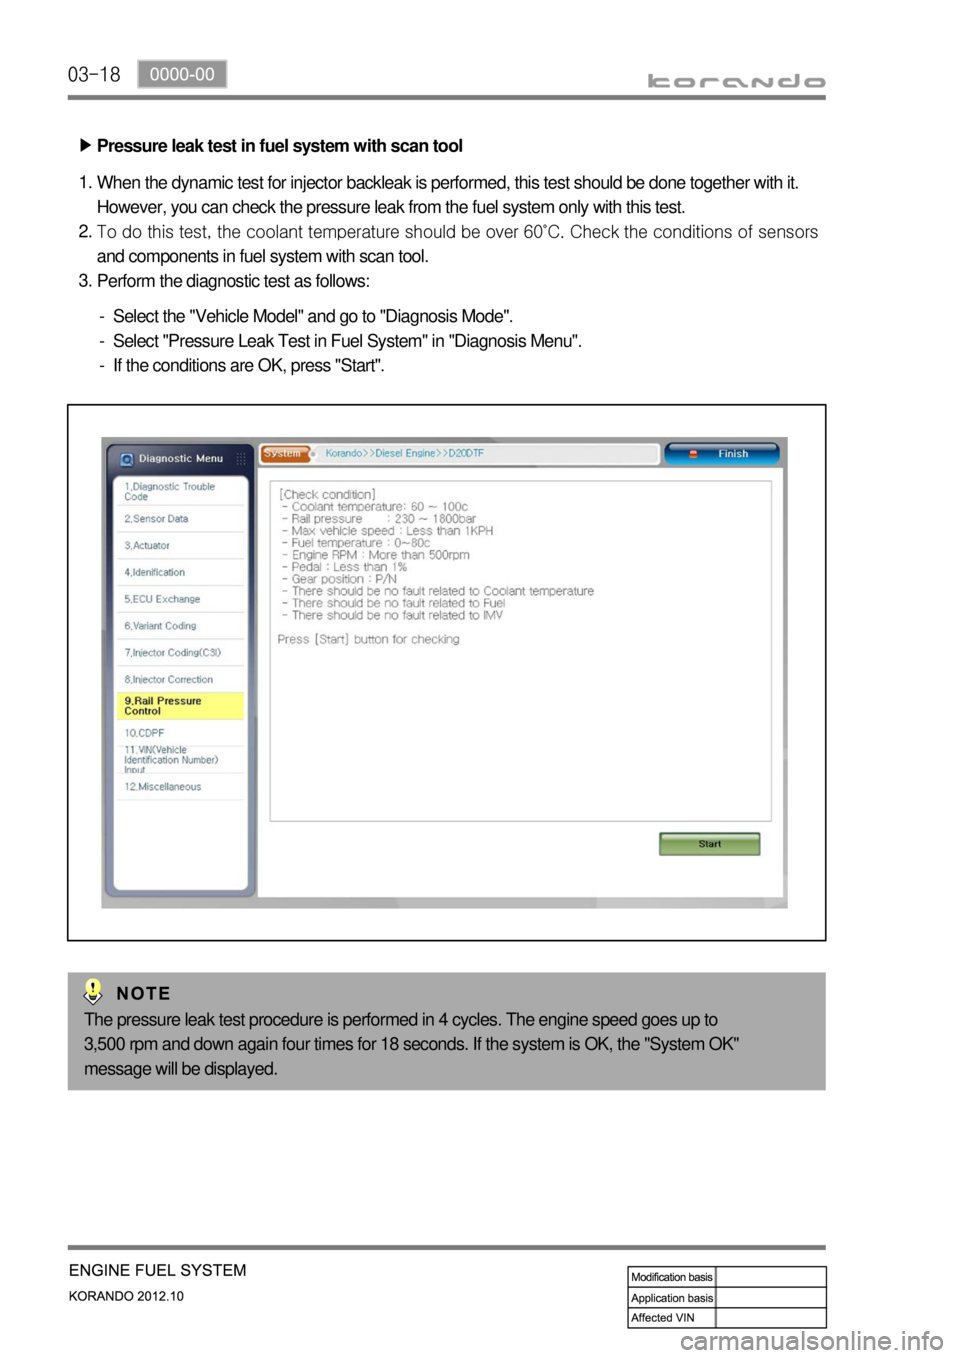
Pressure leak test in fuel system with scan tool ▶
When the dynamic test for injector backleak is performed, this test should be done together with it.
However, you can check the pressure leak from the fuel system only with this test.
<007b00960047008b00960047009b008f0090009a0047009b008c009a009b00530047009b008f008c0047008a00960096009300880095009b0047009b008c00940097008c00990088009b009c0099008c0047009a008f0096009c0093008b00470089008c00
470096009d008c00990047005d0057020b006a00550047006a>heck the conditions of sensors
and components in fuel system with scan tool.
Perform the diagnostic test as follows: 1.
2.
3.
Select the "Vehicle Model" and go to "Diagnosis Mode".
Select "Pressure Leak Test in Fuel System" in "Diagnosis Menu".
If the conditions are OK, press "Start". -
-
-
The pressure leak test procedure is performed in 4 cycles. The engine speed goes up to
3,500 rpm and down again four times for 18 seconds. If the system is OK, the "System OK"
message will be displayed.
Page 155 of 1082
03-20
3. CAUTIONS FOR DI ENGINE
1) Cautions for DI Engine
This chapter describes the cautions for DI engine equipped vehicle. This includes the water separation
from engine, warning lights, symptoms when engine malfunctioning, causes and actions.
DI Engine 1.
Comparatively conventional diesel engines, DI engine controls the fuel injection and timing electrically,
delivers high power and reduces less emission.
System Safety Mode 2.
When a severe failure has been occurred in a vehicle, the system safety mode is activated to protect the
system. It reduces the driving force, restricts the engine speed (rpm) and stops engine operation. Refer
to "Diagnosis" section in this manual.
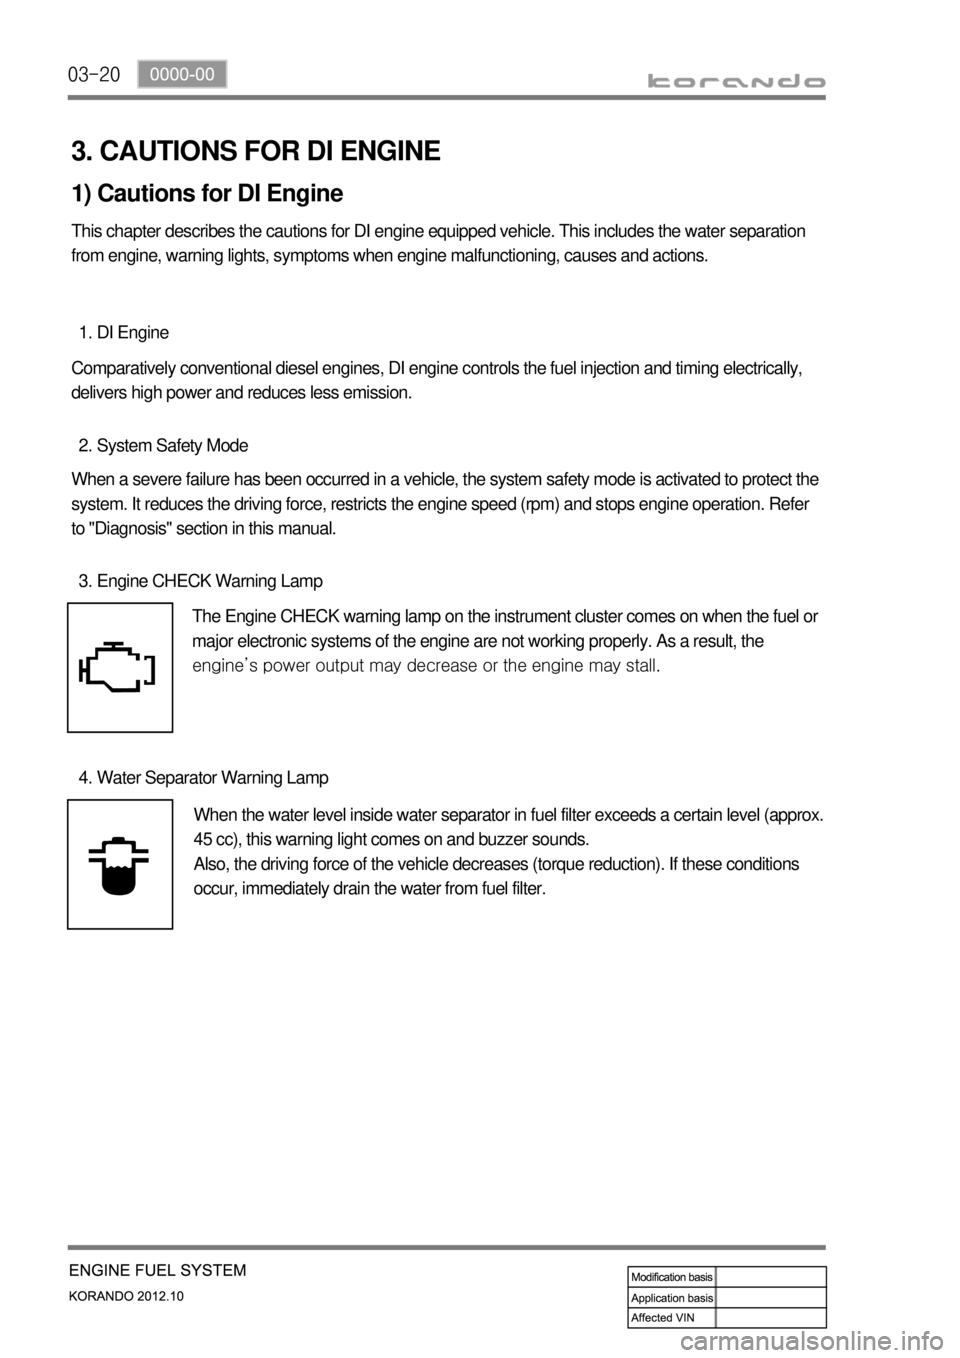
Engine CHECK Warning Lamp 3.
The Engine CHECK warning lamp on the instrument cluster comes on when the fuel or
major electronic systems of the engine are not working properly. As a result, the
<008c0095008e00900095008c02c5009a004700970096009e008c009900470096009c009b0097009c009b00470094008800a00047008b008c008a0099008c0088009a008c0047009600990047009b008f008c0047008c0095008e00900095008c0047009400
8800a00047009a009b0088009300930055>
Water Separator Warning Lamp 4.
When the water level inside water separator in fuel filter exceeds a certain level (approx.
45 cc), this warning light comes on and buzzer sounds.
Also, the driving force of the vehicle decreases (torque reduction). If these conditions
occur, immediately drain the water from fuel filter.
Page 157 of 1082
03-22
(2) Di engine and its expected problems and remedies can be caused by
water in fuel
System supplement against paraffin separation ▶
In case of Diesel fuel, paraffin, one of the elements, can be separated from fuel during winter and then
can stick on the fuel filter blocking fuel flow and causing difficult starting finally. Oil companies supply
summer fuel and winter fuel by differentiating mixing ratio of kerosene and other elements by region and
season. However, above phenomenon can be happened if stations have poor facilities or sell improper
fuel for the season. In case of DI engine, purity of fuel is very important factor to keep internal
preciseness of HP pump and injector.
Accordingly, more dense mesh than conventional fuel filter is used. To prevent fuel filter internal clogging
due to paraffin separation, SYMC is using fuel line that high pressure and temperature fuel injected by
injector returns through fuel filter to have an effect of built-in heater (see fuel system).
System supplement and remedy against water in fuel ▶
As mentioned above, some gas stations supply fuel with excessive than specified water. In the
conventional IDI engine, excessive water in the fuel only causes dropping engine power or engine
hunting. However, fuel system in the DI engine consists of precise components so water in the fuel can
cause malfunctions of HP pump due to poor lubrication of pump caused by poor coating film during high
speed pumping and bacterization (under long period parking). To prevent problems can be caused by
excessive water in fuel, water separator is installed inside of fuel filter. When fuel is passing filter, water
that has relatively bigger specific gravity is accumulated on the bottom of the filter.
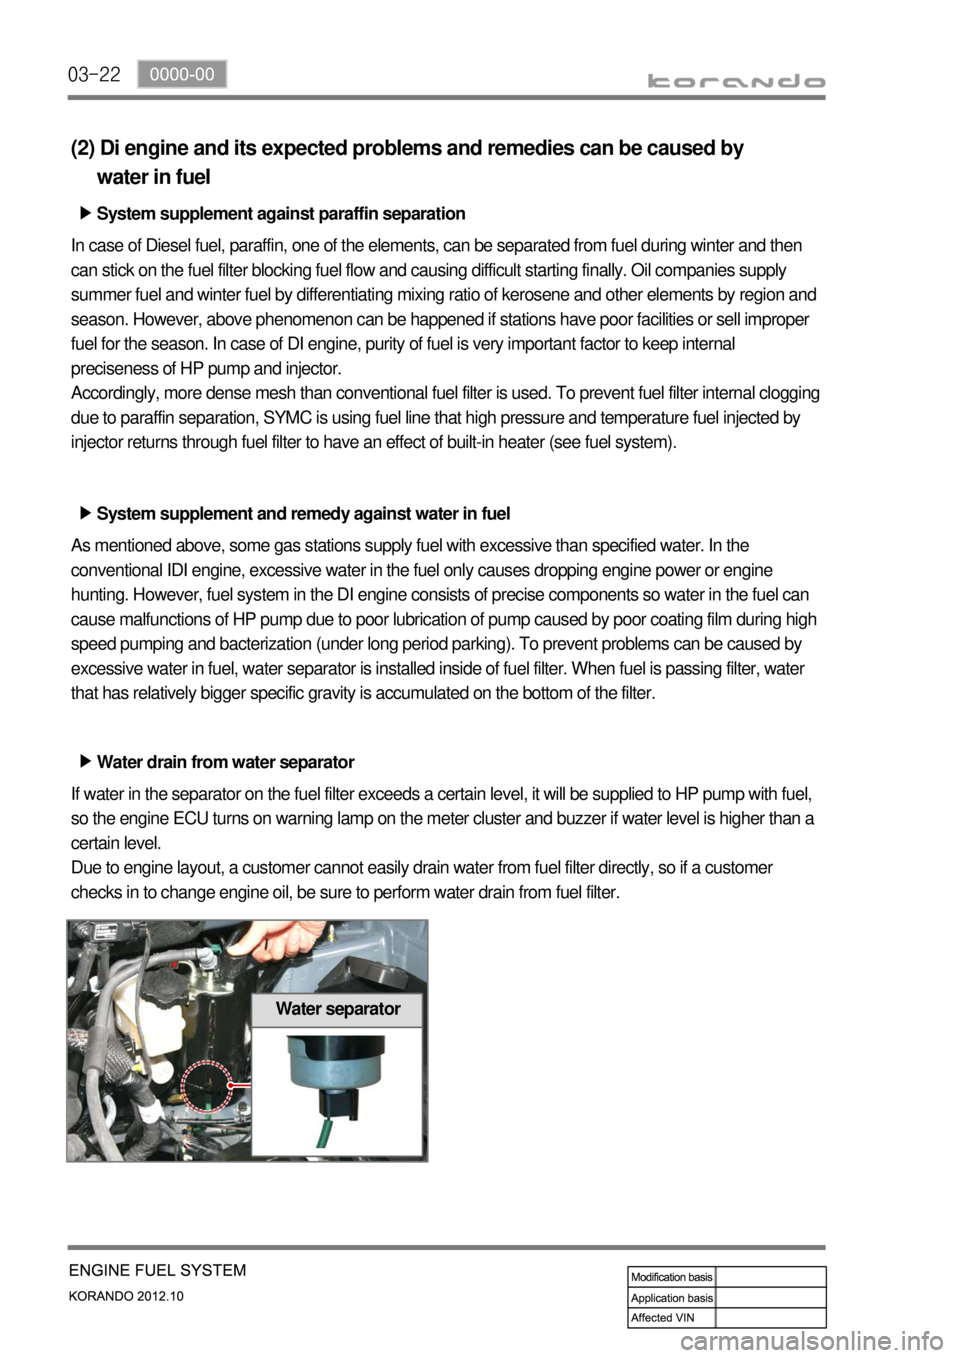
Water drain from water separator ▶
If water in the separator on the fuel filter exceeds a certain level, it will be supplied to HP pump with fuel,
so the engine ECU turns on warning lamp on the meter cluster and buzzer if water level is higher than a
certain level.
Due to engine layout, a customer cannot easily drain water from fuel filter directly, so if a customer
checks in to change engine oil, be sure to perform water drain from fuel filter.
Water separator
Page 167 of 1082
04-4
2. INSPECTION
1) Troubleshooting
When Abnormal Noises are Heard from the Engine Room ▶
For the vehicle equipped with DI engine, if a learning noise occurs in each range or other noises occur,
the major cause of it is a faulty turbocharger assembly. But an interference issue, poor tightness or
loose in the intake and exhaust system also can cause those noises. This is mainly because the
operator didn't follow the instruction exactly when reconnecting the intake hoses and pipes which were
disconnected to check the system or replace the air cleaner. If the intake system is free of any faults,
check the EGR and PCV oil separator connected to the intake system.
The figure may be different from the actual engine. Therefore, read thoroughly below before replacing
the parts.
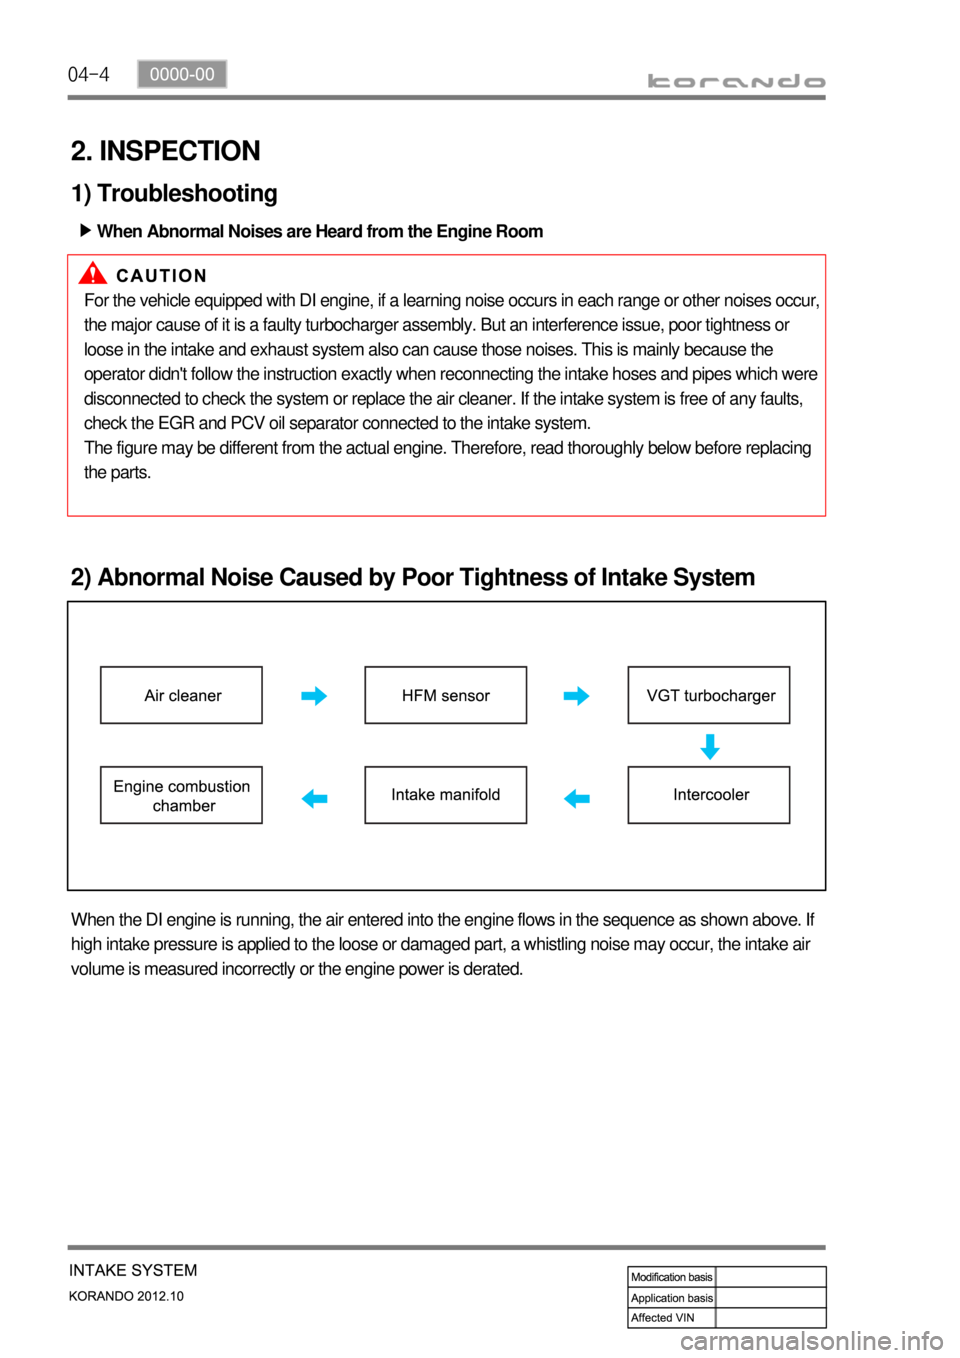
2) Abnormal Noise Caused by Poor Tightness of Intake System
When the DI engine is running, the air entered into the engine flows in the sequence as shown above. If
high intake pressure is applied to the loose or damaged part, a whistling noise may occur, the intake air
volume is measured incorrectly or the engine power is derated.
Page 168 of 1082
04-50000-00
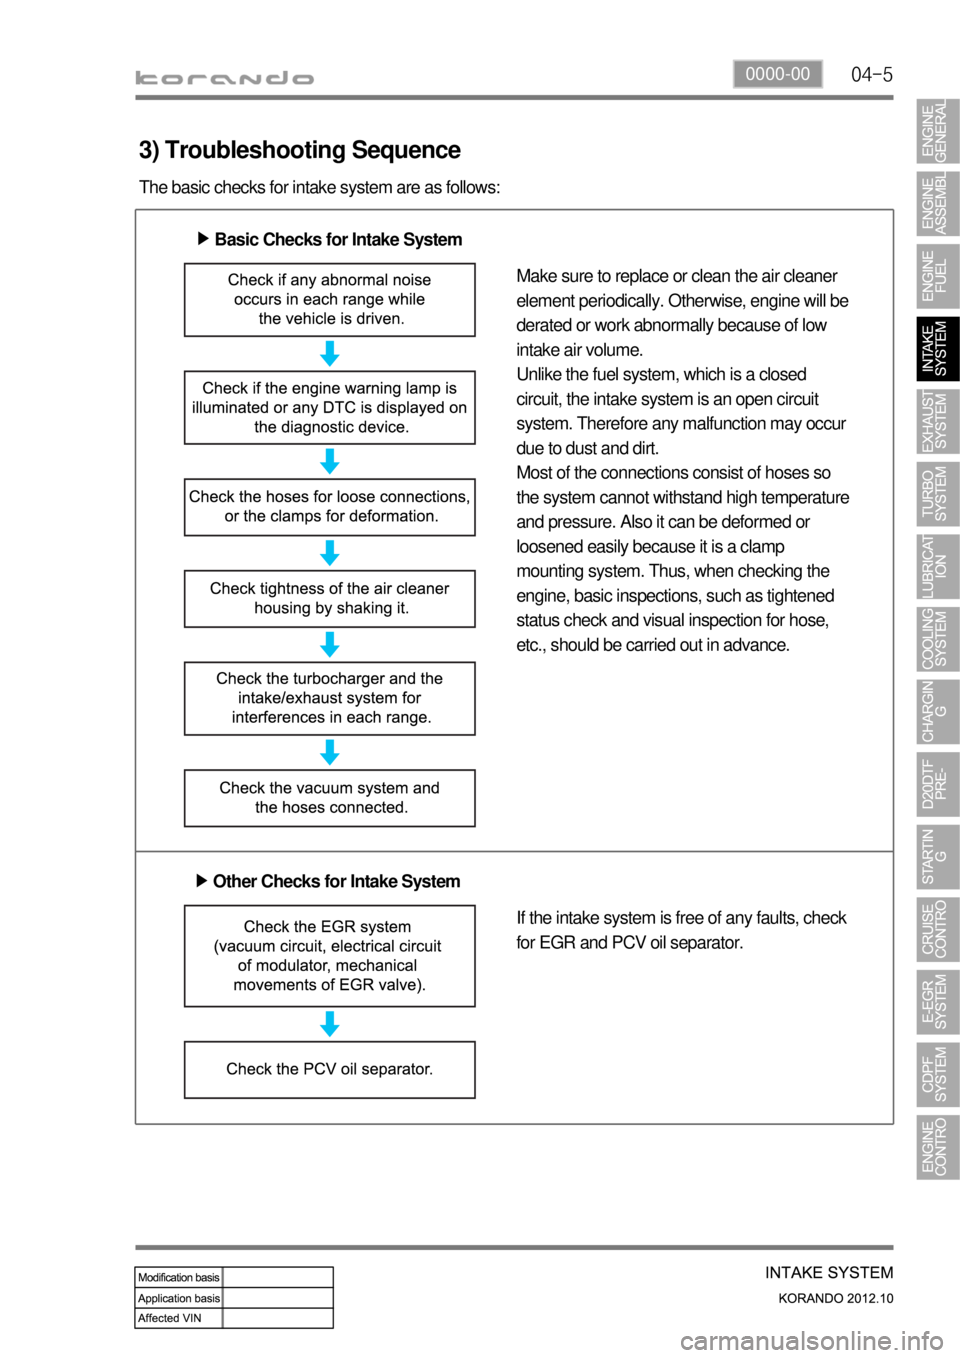
3) Troubleshooting Sequence
The basic checks for intake system are as follows:
Basic Checks for Intake System ▶
Make sure to replace or clean the air cleaner
element periodically. Otherwise, engine will be
derated or work abnormally because of low
intake air volume.
Unlike the fuel system, which is a closed
circuit, the intake system is an open circuit
system. Therefore any malfunction may occur
due to dust and dirt.
Most of the connections consist of hoses so
the system cannot withstand high temperature
and pressure. Also it can be deformed or
loosened easily because it is a clamp
mounting system. Thus, when checking the
engine, basic inspections, such as tightened
status check and visual inspection for hose,
etc., should be carried out in advance.
Other Checks for Intake System ▶
If the intake system is free of any faults, check
for EGR and PCV oil separator.