low beam SSANGYONG MUSSO 2003 Service Manual
[x] Cancel search | Manufacturer: SSANGYONG, Model Year: 2003, Model line: MUSSO, Model: SSANGYONG MUSSO 2003Pages: 1574, PDF Size: 26.41 MB
Page 12 of 1574

0B-12 GENERAL INFORMATIONOWNER INSPECTIONS AND SERVICES
WHILE OPERATING THE VEHICLE Horn Operation Blow the horn occasionally to make sure it works. Check all the button locations. Brake System Operation Be alert for abnormal sounds, increased brake pedal travel or repeated puling to one side when braking. Also, if the brake warning light goes on, or flashes, something may be wrong with part of the brake system. Exhaust System Operation Be alert to any changes in the sound of the system or the smell of the fumes. These are signs that the system may be leaking or overheating. Have the system
inspected and repaired immediately. Tires, Wheels and Alignment Operation Be alert to any vibration of the steering wheel or the seats at normal highway speeds. This may mean a wheelneeds to be balanced. Also, a pull right or left on a straight, level road may show the need for a tire pressure adjustment or a wheel alignment. Steering System Operation Be alert to changes in the steering action. An inspection is needed when the steering wheel is hard to turn or
has too much free play, or is unusual sounds are noticedwhen turning or parking. Headlight Aim
Take note of the light pattern occasionally. Adjust the headlights if the beams seem improperly aimed.
AT EACH FUEL FILL A fluid loss in any (except windshield washer) system may indicate a problem. Have the system inspected and
repaired immediately. Engine Oil Level
Check the oil level and add oil if necessary. The best time to check the engine oil level is when the oil is warm.
1. After stopping the engine, wait a few minutes for the oil to drain back to the oil pan.
2. Pull out the oil level indicator (dip stick).
3. Wipe it clean, and push the oil level indicator back down all the way.
4. Pull out the oil level indicator and look at the oil level on it. 5. Add oil, if needed, to keep the oil level above the
lower mark. Avoid overfilling the engine, since this may cause engine damage.
6. Push the indicator all the way back down into the engine after taking the reading.
If you check the oil level when the oil is cold, do not runthe engine first. The cold oil will not drain back to the pan fast enough to give a true oil level reading. Engine Coolant Level and Condition Check the coolant level in the coolant reservoir tank
and add coolant if necessary. Inspect the coolant. Replace dirty or rusty coolant.
Windshield Washer Fluid Level
Check the washer fluid level in the reservoir. Add fluid if
necessary.
AT LEAST TWICE A MONTH Tire And Wheel Inspection and Pressure Check Check the tire for abnormal wear or damage. Also check for damaged wheels. Check the tire pressure when the tires are cold ( check the spare also, unless it is astowaway). Maintain the recommended pressures. Refer
to “Tire and Wheel” is in section 0B.
AT LEAST MONTHLY Light Operation Check the operation of the license plate light, the headlights (including the high beams), the parking lights,the fog lights, the taillight, the brake lights, the turn
signals, the backup lights and the hazard warning flasher. Fluid Leak Check Periodically inspect the surface beneath the vehicle for
water, oil, fuel or other fluids, after the vehicle has been
parked for a while. Water dripping from the air conditioning system after use is normal. If you notice fuel leaks or fumes, find the cause and correct it at once.
AT LEAST TWICE A YEAR Power Steering System Reservoir Level Check the power steering fluid level. Keep the power steering fluid at the proper level. Refer to Section 6A,
Power Steering System. Brake Master Cylinder Reservoir Level Check the fluid and keep it at the proper level. A low fluid level can indicate worn disc brake pads which mayneed to be serviced. Check the breather hole in the reservoir cover to be free from dirt and check for an open passage.
Page 1237 of 1574

LIGHTING SYSTEM 9B-9
FRONT AND REAR LAMPS
1 Low-beam Head Lamp
2 High-beam Head Lamp
3 Turn Signal Lamp
4 Position Lamp5 Back-up Lamp
6 Tail / Stop Lamp
7 Turn Signal Lamp
8 Tail / Stop Lamp
MAINTENANCE AND REPAIR
ON-VEHICLE SERVICE
Page 1239 of 1574

LIGHTING SYSTEM 9B-11
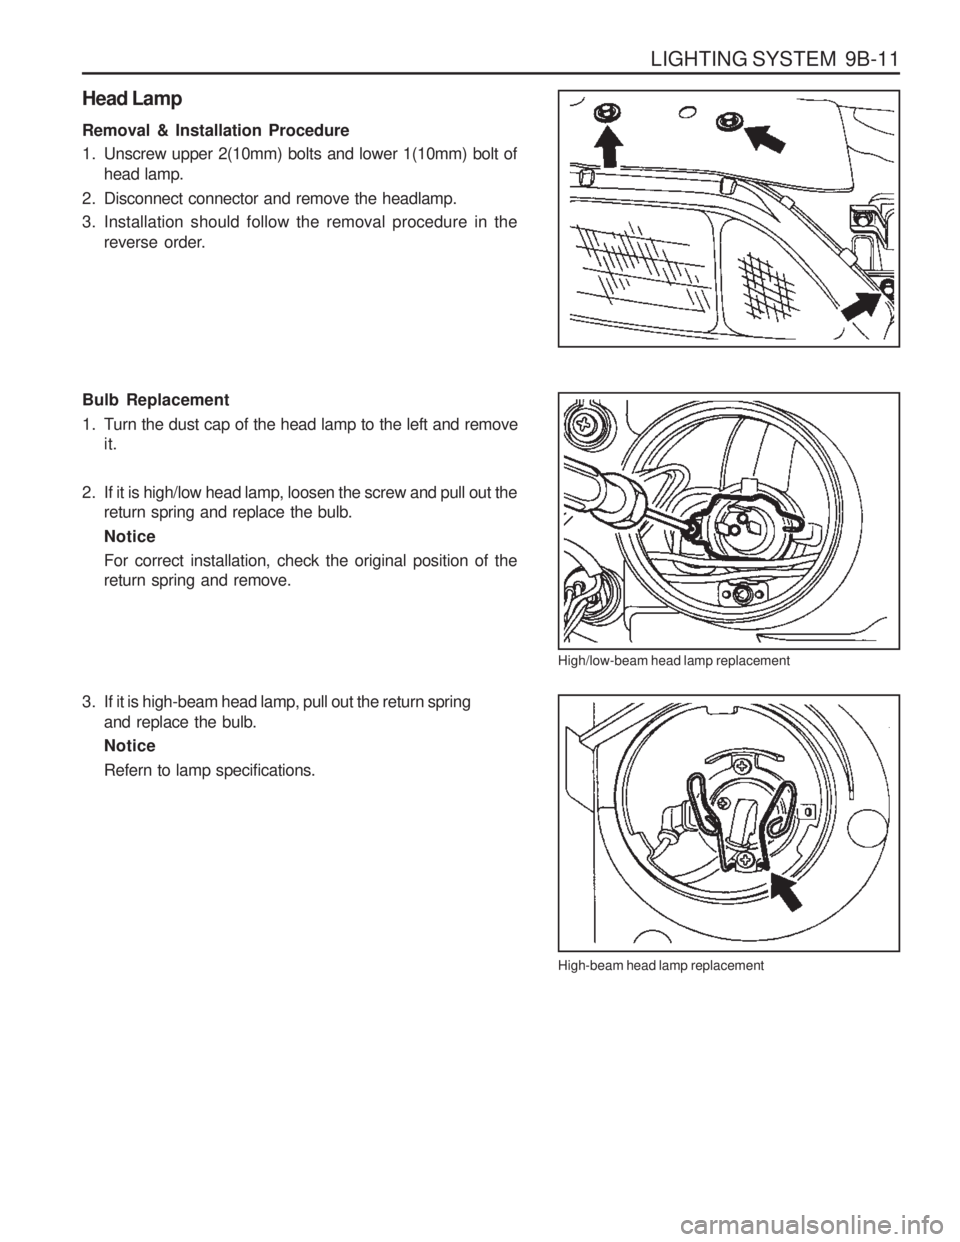
Head Lamp Removal & Installation Procedure
1. Unscrew upper 2(10mm) bolts and lower 1(10mm) bolt ofhead lamp.
2. Disconnect connector and remove the headlamp.
3. Installation should follow the removal procedure in the reverse order.
Bulb Replacement
1. Turn the dust cap of the head lamp to the left and removeit.
2. If it is high/low head lamp, loosen the screw and pull out the return spring and replace the bulb.NoticeFor correct installation, check the original position of the return spring and remove.
High/low-beam head lamp replacement High-beam head lamp replacement
3. If it is high-beam head lamp, pull out the return spring
and replace the bulb. Notice Refern to lamp specifications.
Page 1252 of 1574

INSTRUMENTATION/DRIVER INFORMATION 9E-3
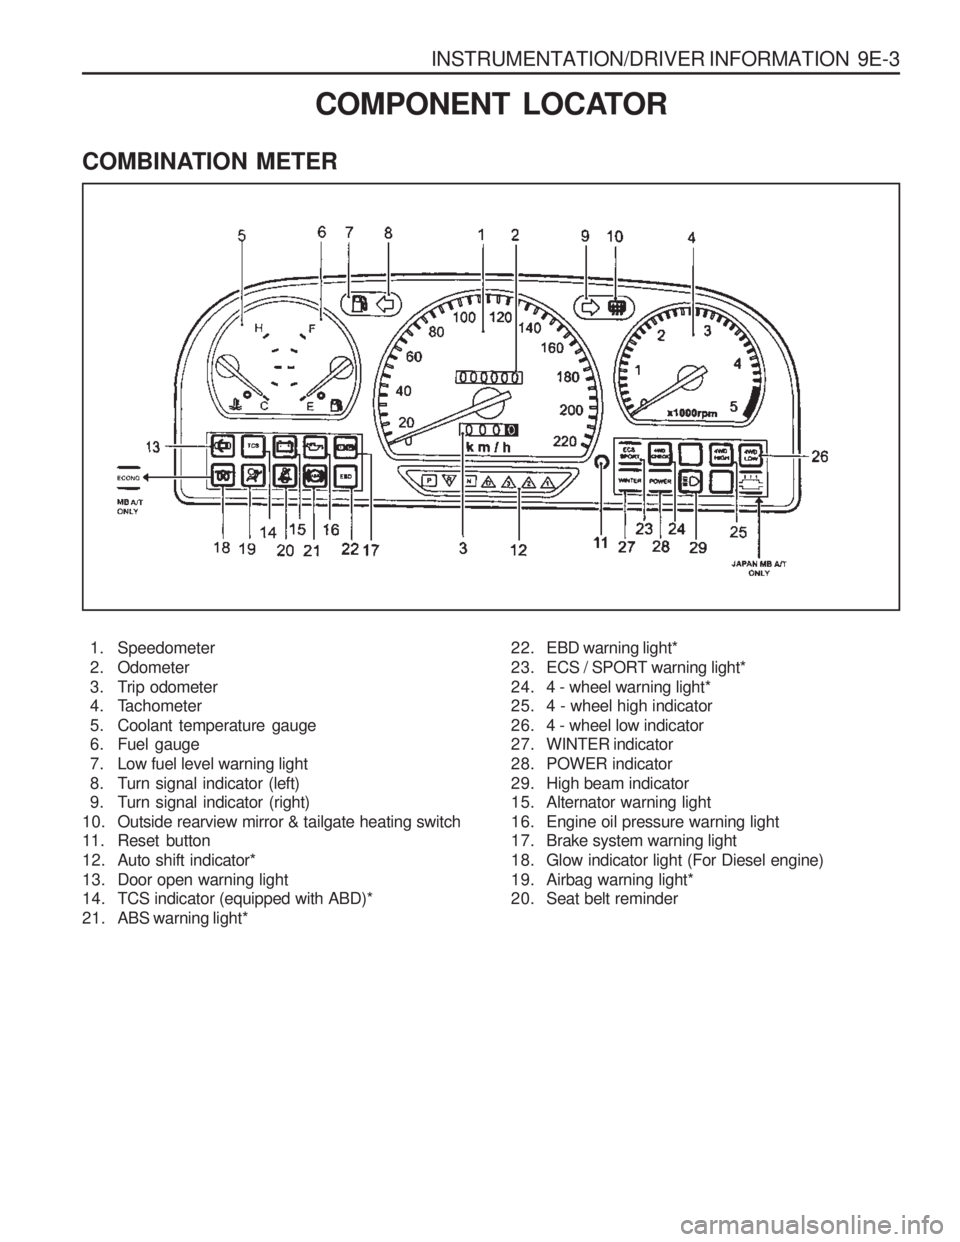
COMBINATION METER
COMPONENT LOCATOR
1. Speedometer
2. Odometer
3. Trip odometer
4. Tachometer
5. Coolant temperature gauge
6. Fuel gauge
7. Low fuel level warning light
8. Turn signal indicator (left)
9. Turn signal indicator (right)
10. Outside rearview mirror & tailgate heating switch
11. Reset button
12. Auto shift indicator*
13. Door open warning light
14. TCS indicator (equipped with ABD)*
21. ABS warning light* 22. EBD warning light*
23. ECS / SPORT warning light*
24. 4 - wheel warning light*
25. 4 - wheel high indicator
26. 4 - wheel low indicator
27. WINTER indicator
28. POWER indicator
29. High beam indicator
15. Alternator warning light
16. Engine oil pressure warning light
17. Brake system warning light
18. Glow indicator light (For Diesel engine)
19. Airbag warning light*
20. Seat belt reminder
Page 1513 of 1574

5-148 ELECTRICAL WIRING DIAGRAMS
4) WARNING LAMP(PREHEAT'G, DOOR OPEN), INDICATOR LAMP(ECONOMIC, DE-FROSTER, WINTER, T/SIGNAL, FOG, HIGH BEAM) CIRCUIT
Main - Engine Engine - Main Main
C101 (21Pin, Colorless)C104 (15Pin, Black)G201
b. CONNECTOR IDENTIFICATION SYMBOL & PIN NUMBER POSITION
a. CONNECTOR INFORMATION
CONNECTOR(NUMBER)
CONNECTING. WIRING HARNESSCONNECTOR POSITION
Inside The Engine Room Fuse Block Under The Engine Room Fuse Block Right The I/P Fuse Block
C101
W/H MAINC104
W/H ENGINE
CLUSTER
11 2
29 38
28
13 2021
39 434842
S/E MODE
SWITCH
PREHEATING UNIT TCM
MULTI-FUNCTIONSWITCH
HAZARD SWITCH STICS
12
1 235
46
B1
A1 B6
B7B14
A15 A30
A14
C1
C2
C3 C4
B1 B2 B3 B4
B5 B6 B7 B8 B9B10
A1 A2 A3 A4 A5 A6
A7 A8 A9A10 A11 A12 A13 A14
12
5678910 34
10987654321
20 19 18 17 16 15 14 13 12 11
28 27 26 25 24 23 22 21
36 35 34 33 32 31 30 29
30
BAT +
31 GND
G201
Lg
12 Cluster2
GrR
27
B
Preheat'g Defroster Winter Turn siganl
LHHigh-Beam Door Open
RH Ef12
15A Ef9
60A
F8 10A C103
RB
W
1
C101
9
C104
6
S/E Mode
Switch
(GSL, MB A/T)
"2"
RB
RB
12
Preheat'g
Unit
"2(DSL LA)"
BR
26
Defroster
Relay"87"
"7"
Stics
"87"
Head Lamp
Relay (Hi)
GBr
24 TCM
"A12" Hazard
Switch
"5"
HazardSwitch
"6"
G
28 Tu r m
Signal
Switch
"B2"
Tu r m
Signal
Switch "B1"
Y
25 RW RB RB
C104
7 RY RY
22
21 1
Head Lamp
Relay (Low)
"87" Ef2 80A