display SSANGYONG RODIUS 2012 Service Manual
[x] Cancel search | Manufacturer: SSANGYONG, Model Year: 2012, Model line: RODIUS, Model: SSANGYONG RODIUS 2012Pages: 715, PDF Size: 79.36 MB
Page 210 of 715
03-6
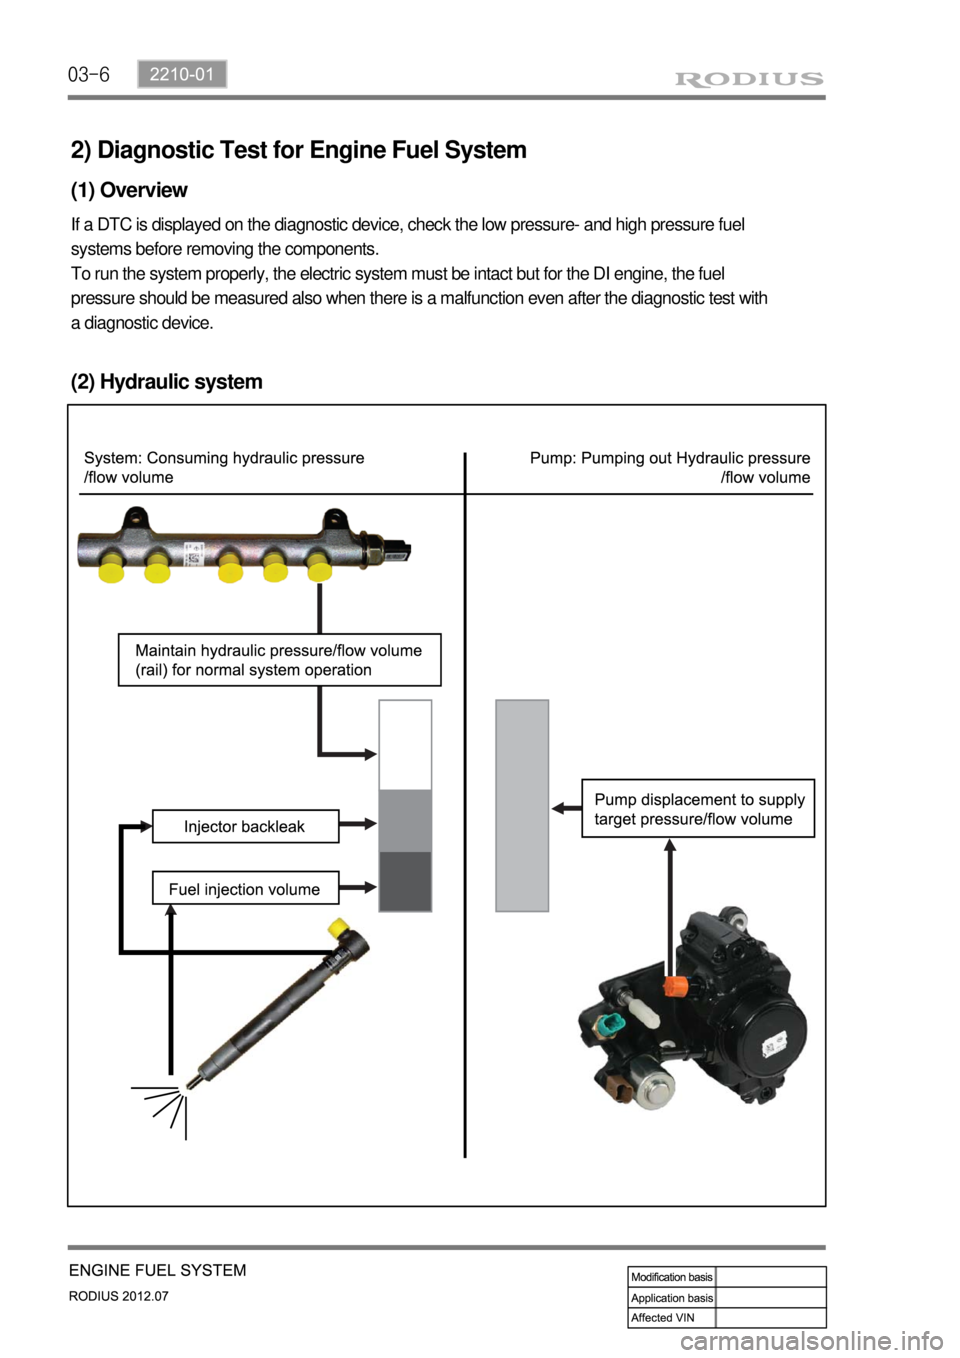
2) Diagnostic Test for Engine Fuel System
(1) Overview
If a DTC is displayed on the diagnostic device, check the low pressure- and high pressure fuel
systems before removing the components.
To run the system properly, the electric system must be intact but for the DI engine, the fuel
pressure should be measured also when there is a malfunction even after the diagnostic test with
a diagnostic device.
(2) Hydraulic system
Page 216 of 715
03-12
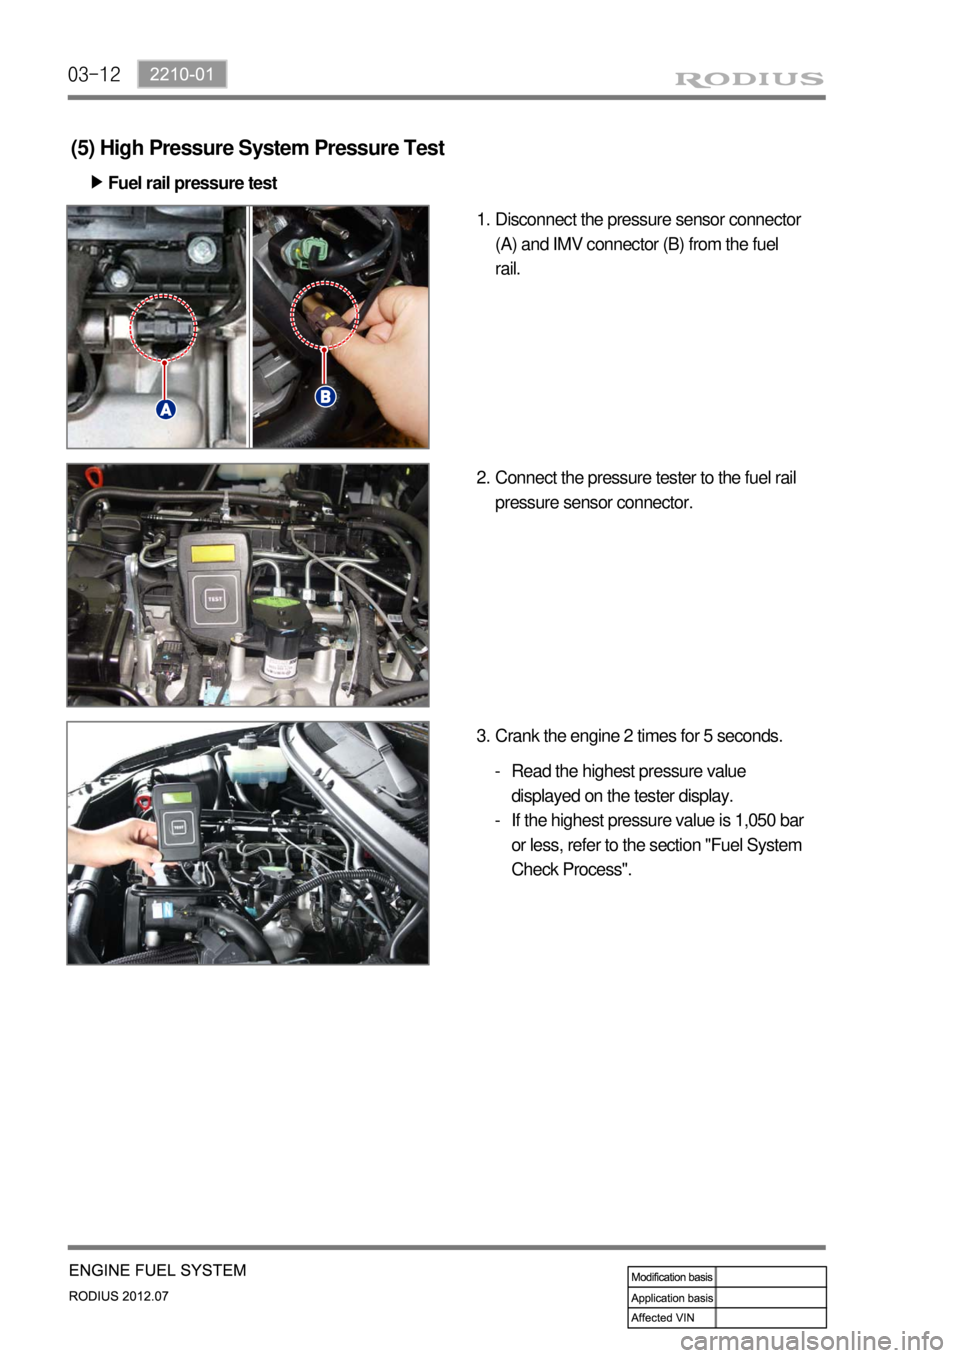
(5) High Pressure System Pressure Test
Fuel rail pressure test ▶
Disconnect the pressure sensor connector
(A) and IMV connector (B) from the fuel
rail. 1.
Connect the pressure tester to the fuel rail
pressure sensor connector. 2.
Crank the engine 2 times for 5 seconds. 3.
Read the highest pressure value
displayed on the tester display.
If the highest pressure value is 1,050 bar
or less, refer to the section "Fuel System
Check Process". -
-
Page 217 of 715
03-132210-01
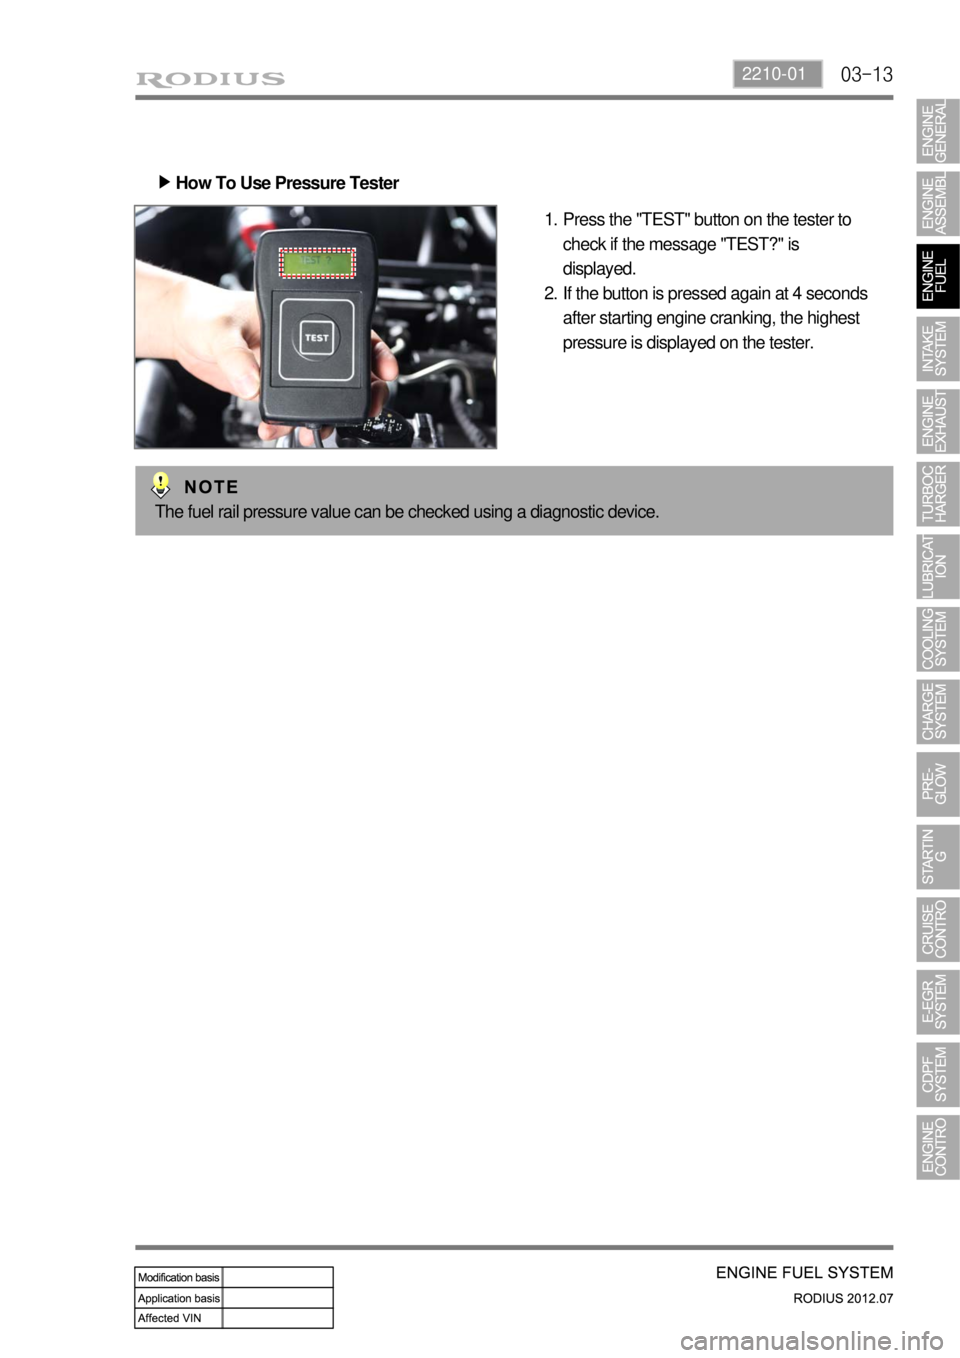
How To Use Pressure Tester ▶
Press the "TEST" button on the tester to
check if the message "TEST?" is
displayed.
If the button is pressed again at 4 seconds
after starting engine cranking, the highest
pressure is displayed on the tester. 1.
2.
The fuel rail pressure value can be checked using a diagnostic device.
Page 221 of 715
03-172210-01
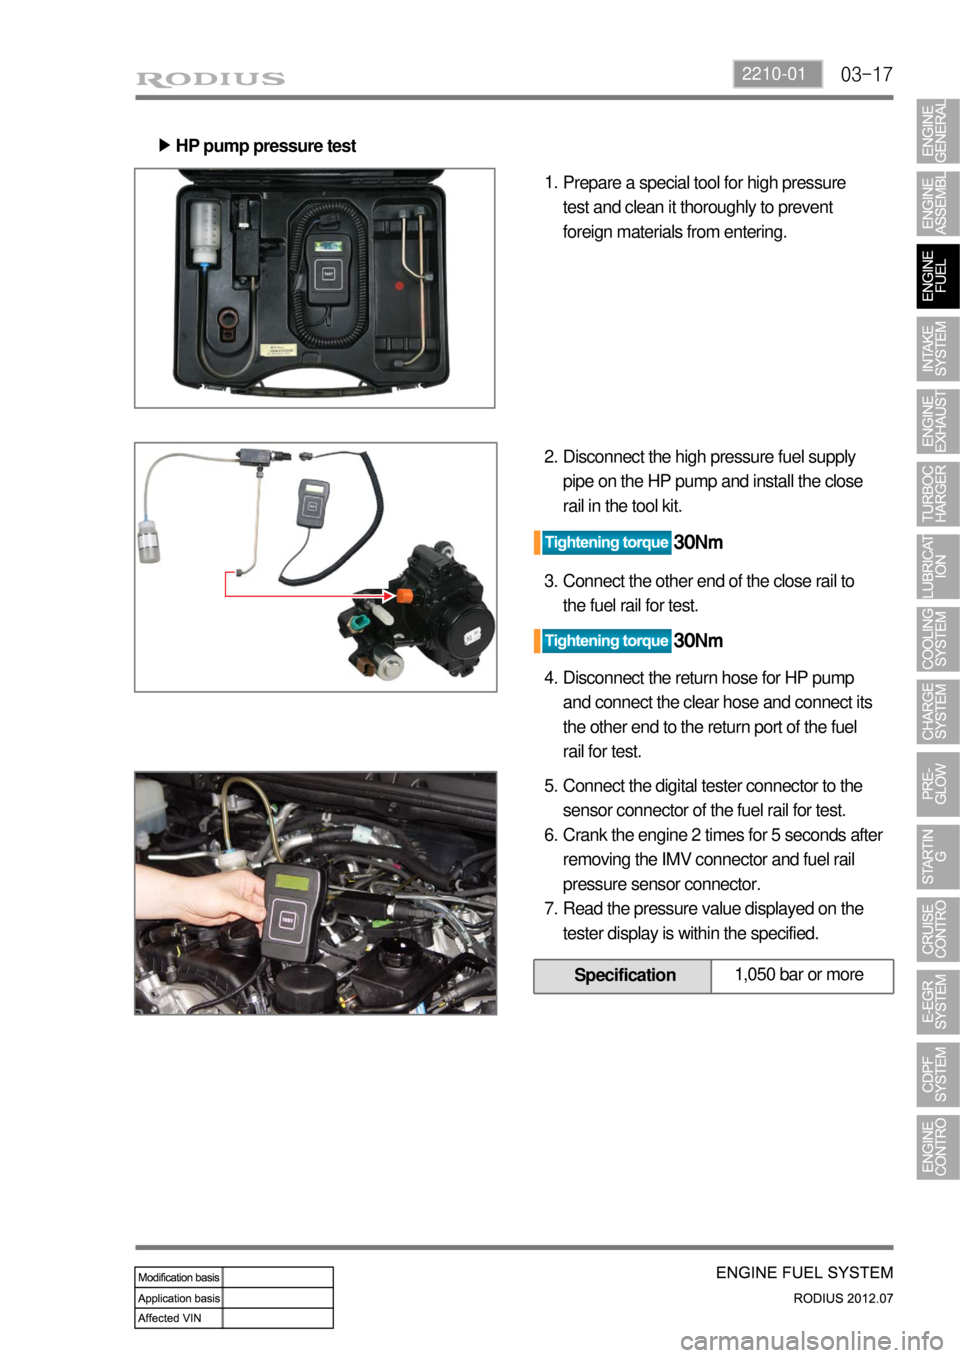
HP pump pressure test ▶
Prepare a special tool for high pressure
test and clean it thoroughly to prevent
foreign materials from entering. 1.
Disconnect the high pressure fuel supply
pipe on the HP pump and install the close
rail in the tool kit. 2.
Connect the other end of the close rail to
the fuel rail for test. 3.
Disconnect the return hose for HP pump
and connect the clear hose and connect its
the other end to the return port of the fuel
rail for test. 4.
Connect the digital tester connector to the
sensor connector of the fuel rail for test.
Crank the engine 2 times for 5 seconds after
removing the IMV connector and fuel rail
pressure sensor connector.
Read the pressure value displayed on the
tester display is within the specified. 5.
6.
7.
Specification1,050 bar or more
Page 279 of 715

09-71451-01
(1) Checking
Using battery tester ▶
PASS (11.0 V or more): Explain to the customer that the battery is reusable.
Need to be charged (9.0 to 11.0 V): Charge the battery with a charger and reinstall it. Explain it
to the customer.
Need to be replaced (9.0 V or more): The battery should be replaced due to overdischarging. -
-
-
(2) How to use battery tester
How it works and How to use it ▶
Determine battery capacity by fixing current
(load capacity) and time and varying voltage.
Determine battery capacity based on the
amount of voltage drop when discharging a
fixed load capacity (120 A) for 5 seconds.
Connect the tester to the battery and read
the display while applying a load for 5
seconds. -
-
-
How to read display ▶
Red area (①): overdischarge or faulty
battery
Yellow area (②): Need to be charged (using
a vehicle alternator and a battery charger)
Green area (③): Normal
Red area on the left-hand side of OK (④):
Impossible to charge with an alternator
Green area with OK (⑤): Normally charged
Red area on the right-hand side of OK (⑥):
Overcharged by an alternator -
-
-
-
-
-
Page 405 of 715

09-31522-16
1. ENGINE DATA DISPLAY TABLE
Page 453 of 715

02-22
5) Seat Belt Warning
The seat belt warning light comes on and the chime buzzer in the ICM box sounds for 6
<009a008c008a00960095008b009a0047009e008f008c00950047009b009c0099009500900095008e0047009b008f008c00470090008e00950090009b00900096009500470092008c00a00047009b0096004702c80076007502c90047008d00990096009400
4702c80076006d006d02c9005500470070008d0047009b008f>e seat belt is fastened before
<009b009c0099009500900095008e0047009b008f008c00470090008e00950090009b00900096009500470092008c00a00047009b0096004702c80076007502c9004700970096009a0090009b00900096009500530047009b008f008c0047009e0088009900
9500900095008e004700930090008e008f009b004700900095> the indicator display blinks for 6
seconds, however, the chime buzzer does not sound.
The seat belt warning light goes off and the chime buzzer in the ICM box stops when turning
the ignition switch to “OFF” position.
The chime buzzer stops and the seat belt warning light stays on for the specified duration (6
seconds) when fastening the seat belt during the warning operation.
The seat belt warning light comes on and the chime buzzer sounds for 6 seconds again when
unfastening the seat belt during fastening operation. 1.
2.
3.
4.
Page 482 of 715
04-38010-01
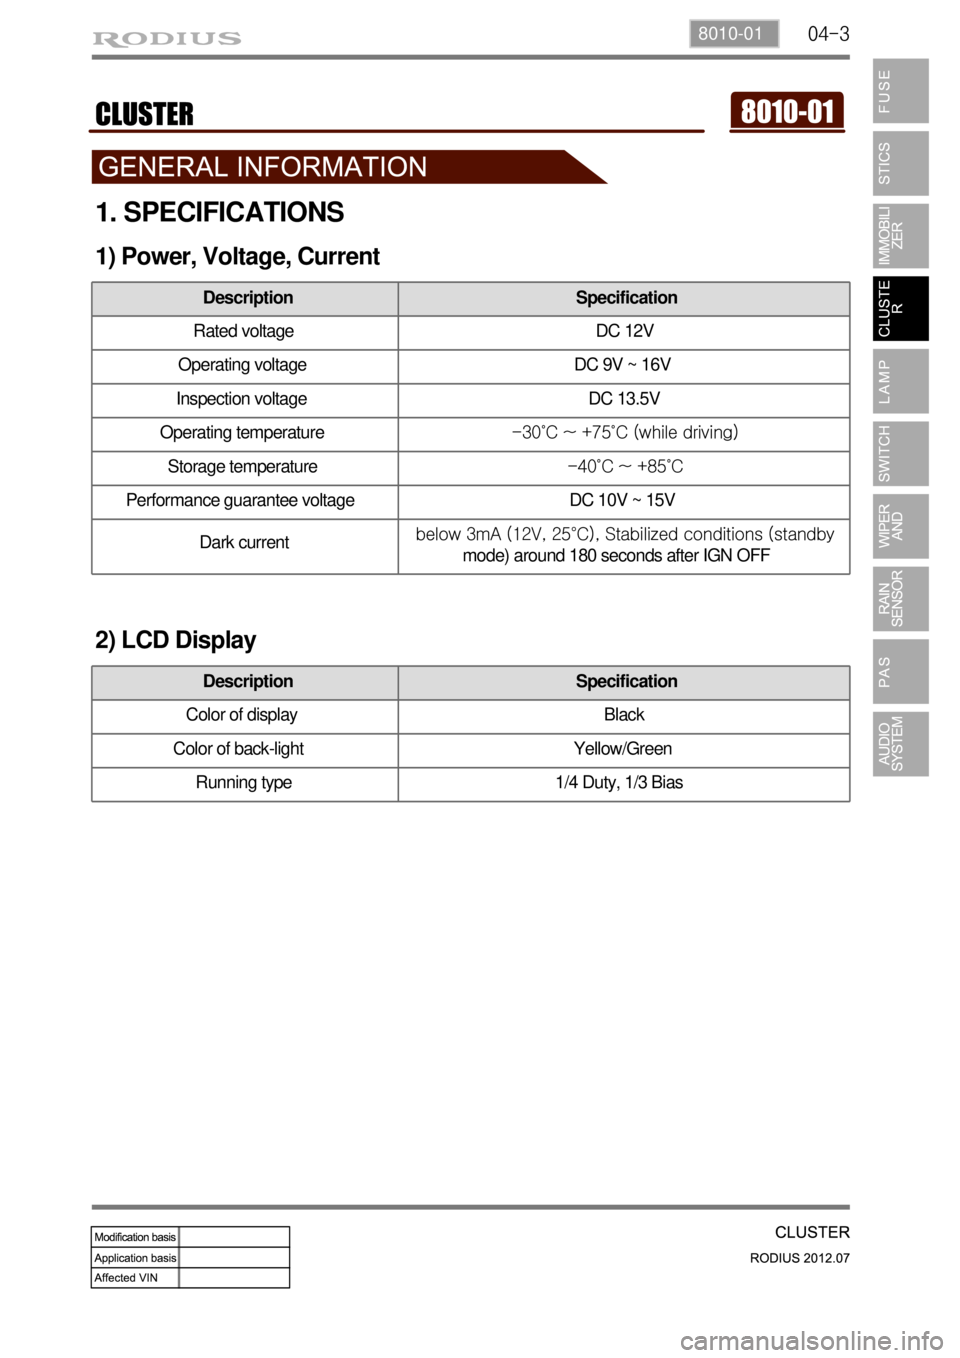
1. SPECIFICATIONS
1) Power, Voltage, Current
Description Specification
Rated voltage DC 12V
Operating voltage DC 9V ~ 16V
Inspection voltage DC 13.5V
Operating temperature-30˚C ~ +75˚C (while driving)
Storage temperature-40˚C ~ +85˚C
Performance guarantee voltage DC 10V ~ 15V
Dark currentbelow 3mA (12V, 25°C), Stabilized conditions (standby
mode) around 180 seconds after IGN OFF
2) LCD Display
Description Specification
Color of display Black
Color of back-light Yellow/Green
Running type 1/4 Duty, 1/3 Bias
Page 512 of 715

09-58790-01
2. CAUTIONS
The parking aid system is just a supplemental device to help your parking.
Always keep the safety precautions.
Do not press or shock the sensors by hitting or using a high-pressure water gun while
washing, since it may damage the sensors.
If the system is in normal operating condition, a short beep sounds when the shift lever is
moved into "R" position with the ignition key "ON".
If the system is defective, the warning buzzer sounds for 3 seconds when moving the gear
<009a008f0090008d009b00470093008c009d008c00990047009b0096004702c8007902c9004700970096009a0090009b0090009600950047009e0090009b008f0047009b008f008c00470090008e00950090009b0090009600950047007600750055004700
69008c0047008a00880099008c008d009c0093004700950096>t to confuse this and the parking
aid alarm (in 50 cm). 1.
2.
3.
4.
5.
· Note that the display does not show everything in the rear area. Always check
nobody, especially animals and children, is behind the vehicle when parking or
reversing.
· If you can not properly check the vehicle behind, get out of the vehicle and then
visually check it.
The parking aid system will not work or improperly work under following cases: ▶
1) Certain obstacles that sensors can not detect
Thin and narrow objects, such as wires, ropes, chains
Cotton, sponge, clothes, snow; that absorb ultrasonic waves
Obstacles lower than the bumper (ex. drain ditch or mud puddle) -
-
-
2) Not defective but improperly working
When the sensing portion is frozen (operates normally after thawed)
When the sensing portion is covered by rain, water drops, snow or mud (operates normally
after cleaned)
When receiving other ultrasonic signals (metal sound or air braking noises from heavy
commercial vehicles)
When a high-power radio is turned on -
-
-
-
3) Narrowed sensing area
When the sensing portion is partially covered by snow or mud (operates normally after cleaned)
<007a009c009900990096009c0095008b00900095008e0047009b008c00940097008c00990088009b009c0099008c00470096008d0047009a008c0095009a0096009900470090009a0047009b009600960047008f0090008e008f0047004f00880097009700
990096009f005500470096009d008c00990047005f005700b6>C) or too low
(approx. below -30°C) -
-
4) Not defective but may cause malfunction
When driving on the rough roads, gravel road, hill and grass
When the bumper height is changed due to heavy load
When the sensing portion is frozen
When the sensing portion is covered by rain, water drops, snow or mud
When receiving other ultrasonic signals (metal sound or air braking noises from heavy
commercial vehicles)
When a high-power radio is turned on
When some accessories are attached in detecting ranges -
-
-
-
-
-
-
Page 513 of 715
09-6
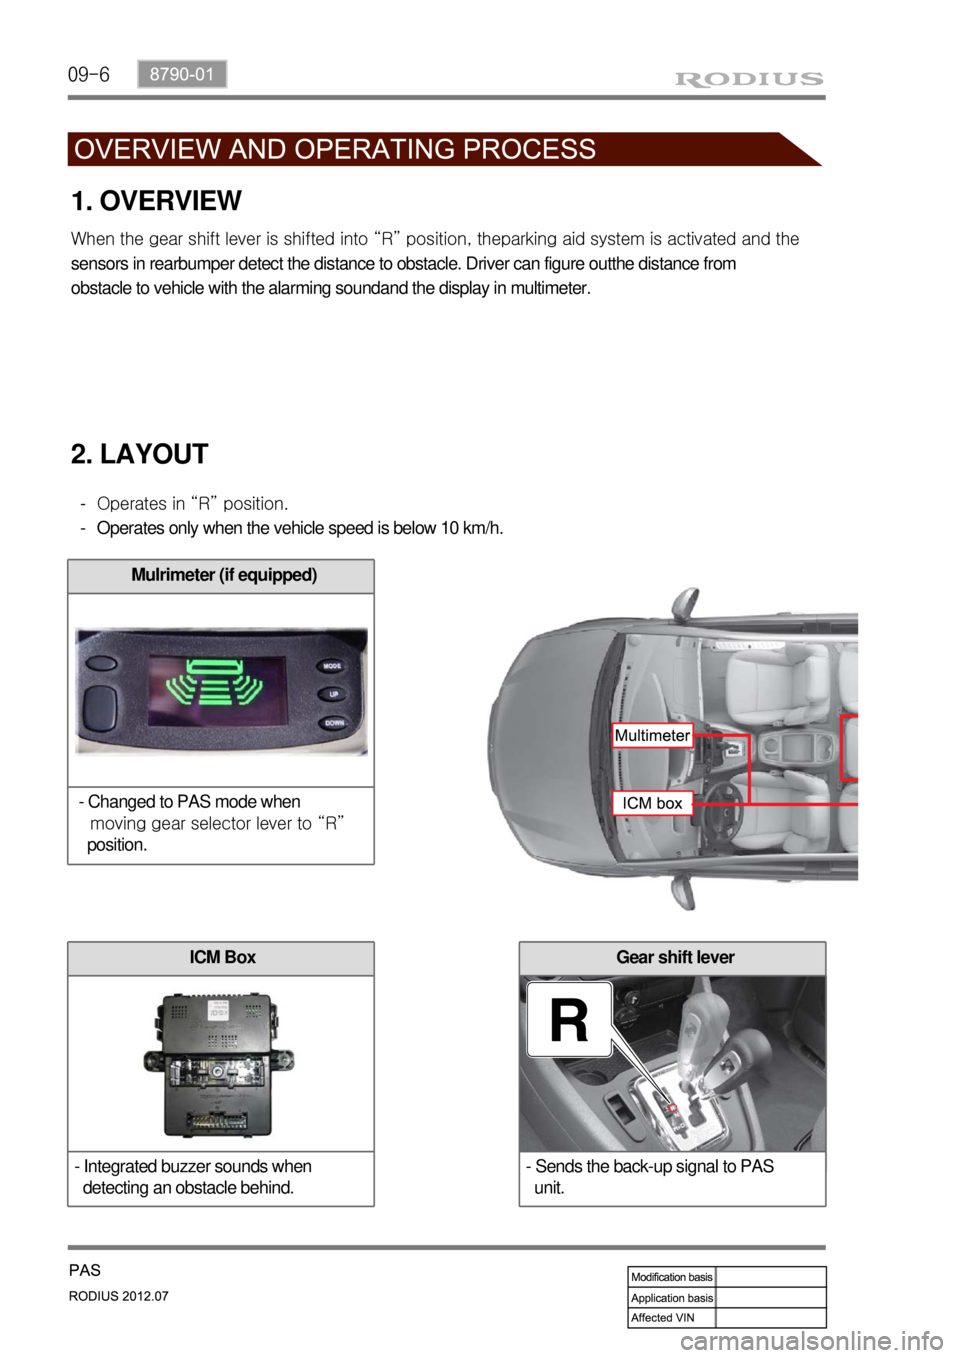
Gear shift lever
- Sends the back-up signal to PAS
unit.
1. OVERVIEW
<007e008f008c00950047009b008f008c0047008e008c008800990047009a008f0090008d009b00470093008c009d008c009900470090009a0047009a008f0090008d009b008c008b004700900095009b0096004702c8007902c9004700970096009a009000
9b00900096009500530047009b008f008c0097008800990092>ing aid system is activated and the
sensors in rearbumper detect the distance to obstacle. Driver can figure outthe distance from
obstacle to vehicle with the alarming soundand the display in multimeter.
2. LAYOUT
Operates in “R” position.
Operates only when the vehicle speed is below 10 km/h. -
-
Mulrimeter (if equipped)
- Changed to PAS mode when
moving gear selector lever to “R”
position.
ICM Box
- Integrated buzzer sounds when
detecting an obstacle behind.