display SUBARU ASCENT 2020 Quick Guide
[x] Cancel search | Manufacturer: SUBARU, Model Year: 2020, Model line: ASCENT, Model: SUBARU ASCENT 2020Pages: 52, PDF Size: 14.04 MB
Page 8 of 52
Automatic Door Locking/Unlocking
With this function, all doors and the fuel lid will automatically lock or unlock when certain
conditions are met based on your preference. You can change the setting in the
Combination Meter Display (CMD) or the Touchscreen. Possible settings are:
AUTO DOOR LOCK
Vehicle Speed
(12 mph)Shift in/out of
PARKOFF
AUTO DOOR UNLOCK
Ignition OFF Drivers Door
OpenShift in/out of
PARKOFF
KEYLESS ACCESS WITH PUSH BUTTON START(if
equipped)
Your Subaru allows for customizing of the door unlock settings. The default setting is when
you unlock the vehicle, only the driver’s door and fuel lid unlock. If preferred, you can set
the vehicle to unlock all doors, the rear gate and the fuel lid. This adjustment can be
performed through the SUBARU STARLINK
®Multimedia Touchscreen under “Settings”,
then “Vehicle”.
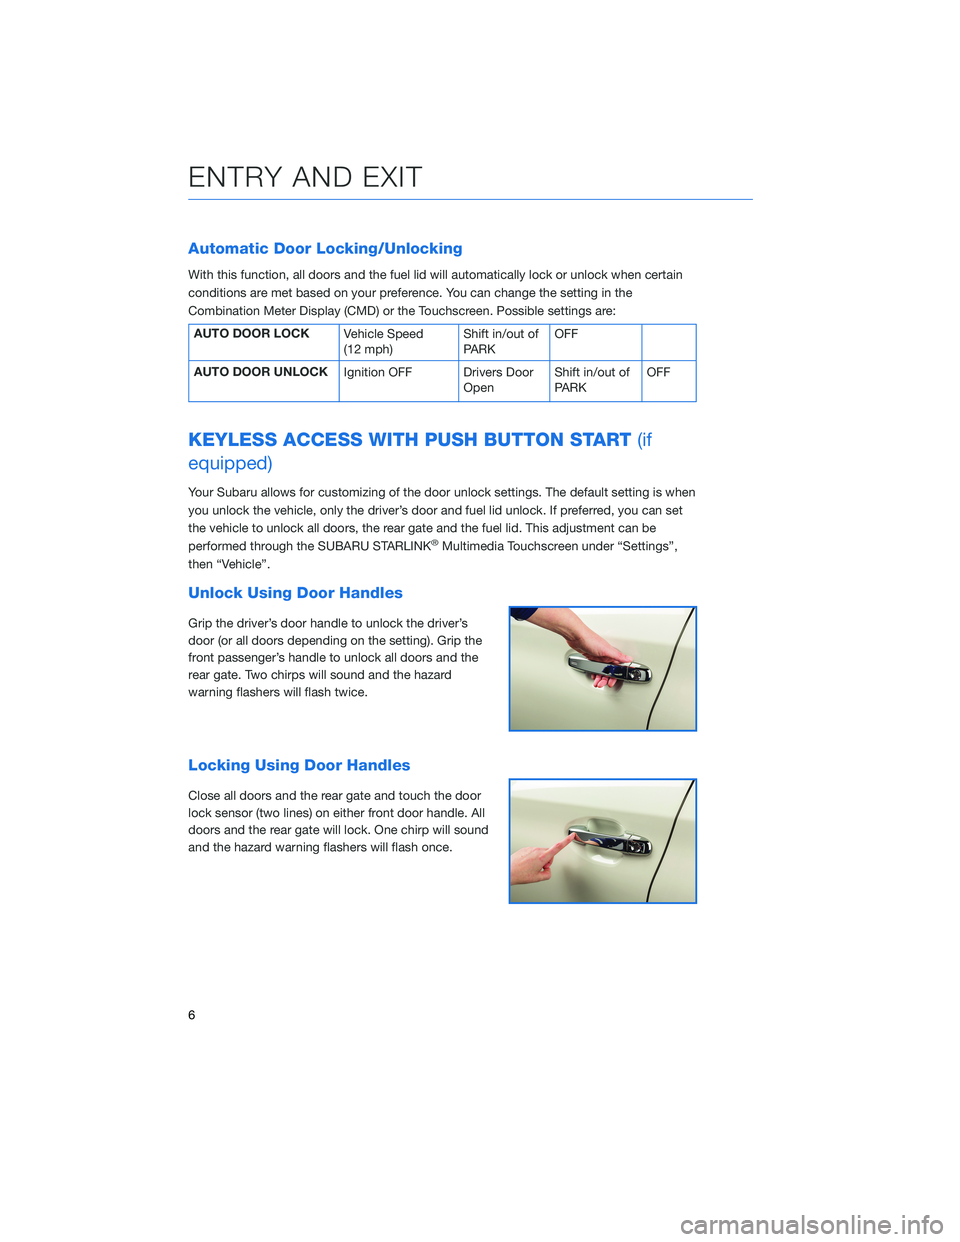
Unlock Using Door Handles
Grip the driver’s door handle to unlock the driver’s
door (or all doors depending on the setting). Grip the
front passenger’s handle to unlock all doors and the
rear gate. Two chirps will sound and the hazard
warning flashers will flash twice.
Locking Using Door Handles
Close all doors and the rear gate and touch the door
lock sensor (two lines) on either front door handle. All
doors and the rear gate will lock. One chirp will sound
and the hazard warning flashers will flash once.
ENTRY AND EXIT
6
Page 11 of 52
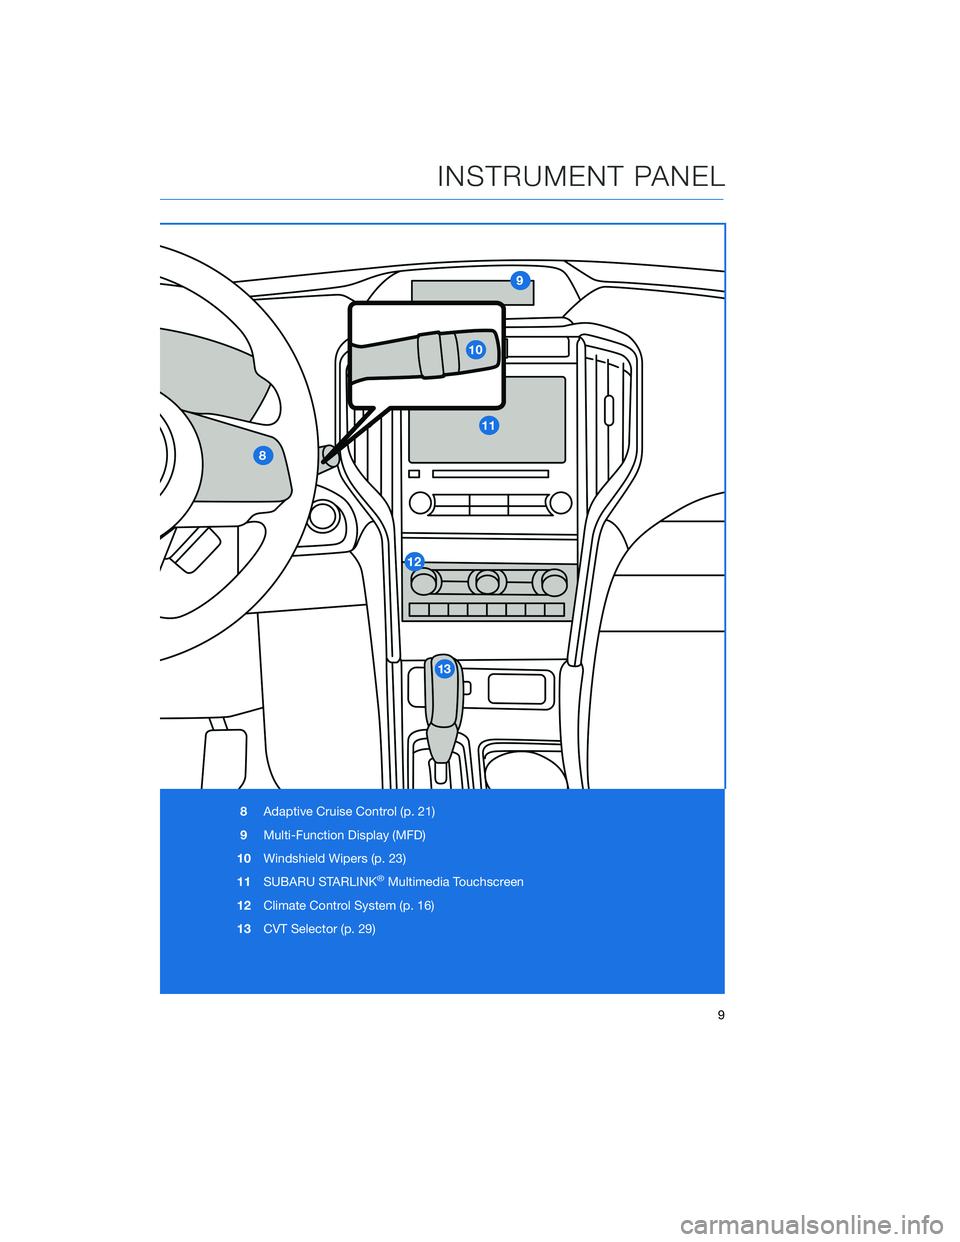
8Adaptive Cruise Control (p. 21)
9Multi-Function Display (MFD)
10Windshield Wipers (p. 23)
11SUBARU STARLINK
®Multimedia Touchscreen
12Climate Control System (p. 16)
13CVT Selector (p. 29)
INSTRUMENT PANEL
9
Page 18 of 52
CLIMATE CONTROL SYSTEM
Three-zone Automatic Climate Control
You can set separate temperatures for the driver, front passenger, and rear seats. Set your
desired temperature and let the system automatically make the adjustments for you. At
any time, you can manually take control of the climate settings.
Operation in Automatic Mode
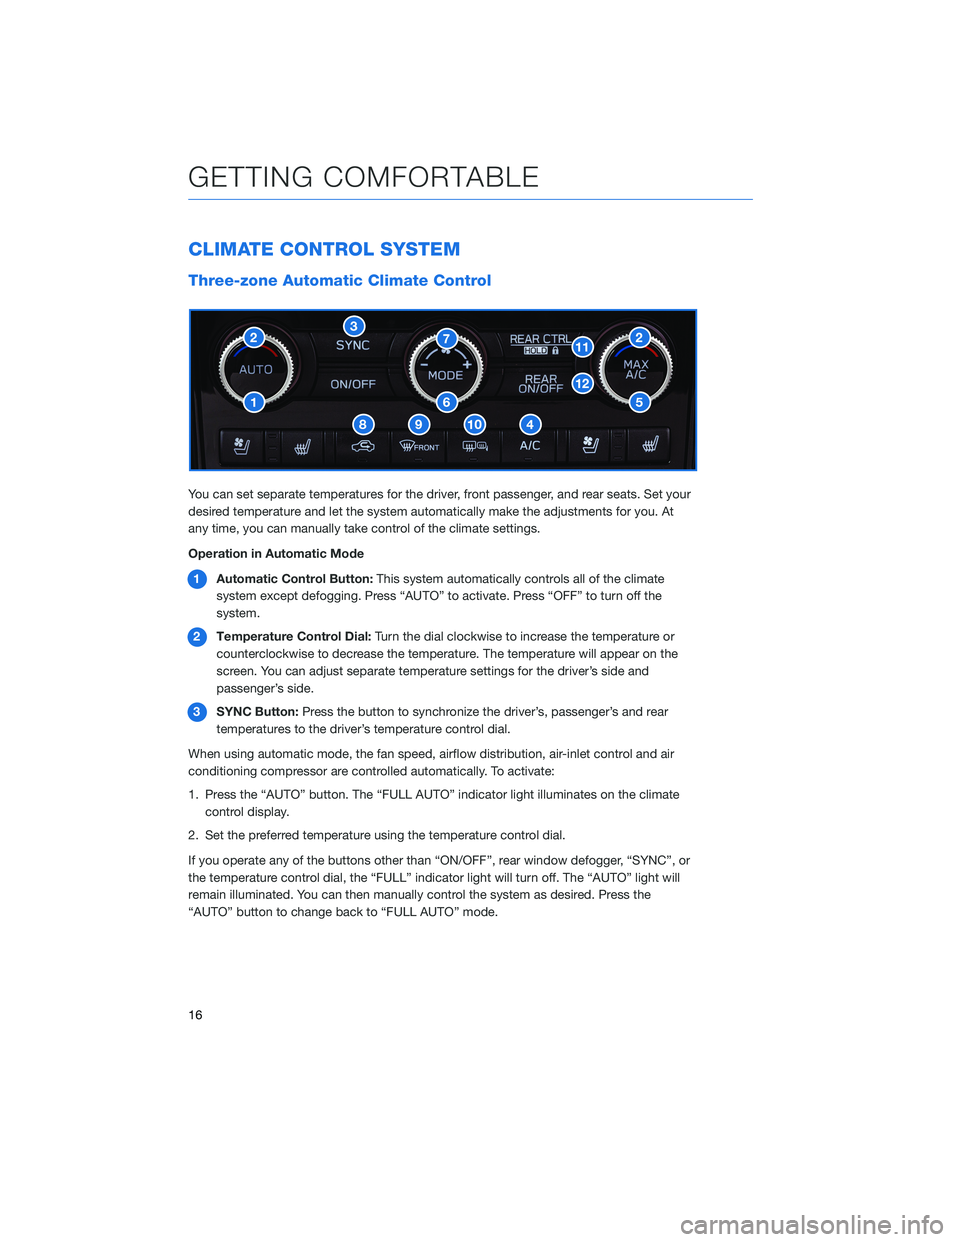
1Automatic Control Button:This system automatically controls all of the climate
system except defogging. Press “AUTO” to activate. Press “OFF” to turn off the
system.
2Temperature Control Dial:Turn the dial clockwise to increase the temperature or
counterclockwise to decrease the temperature. The temperature will appear on the
screen. You can adjust separate temperature settings for the driver’s side and
passenger’s side.
3SYNC Button:Press the button to synchronize the driver’s, passenger’s and rear
temperatures to the driver’s temperature control dial.
When using automatic mode, the fan speed, airflow distribution, air-inlet control and air
conditioning compressor are controlled automatically. To activate:
1. Press the “AUTO” button. The “FULL AUTO” indicator light illuminates on the climate
control display.
2. Set the preferred temperature using the temperature control dial.
If you operate any of the buttons other than “ON/OFF”, rear window defogger, “SYNC”, or
the temperature control dial, the “FULL” indicator light will turn off. The “AUTO” light will
remain illuminated. You can then manually control the system as desired. Press the
“AUTO” button to change back to “FULL AUTO” mode.
GETTING COMFORTABLE
16
Page 19 of 52
Operation in Manual Mode
4Air Conditioner Button:Press this button to activate or deactivate the air
conditioning.
5MAX A/C Button:Press this button for quickest cooling.
6Airflow Mode Selection Button:Press the button to select the desired airflow mode.
The selected mode – ventilation, ventilation 2, bi-level, feet, feet-defrost or defrost – is
shown on the display.
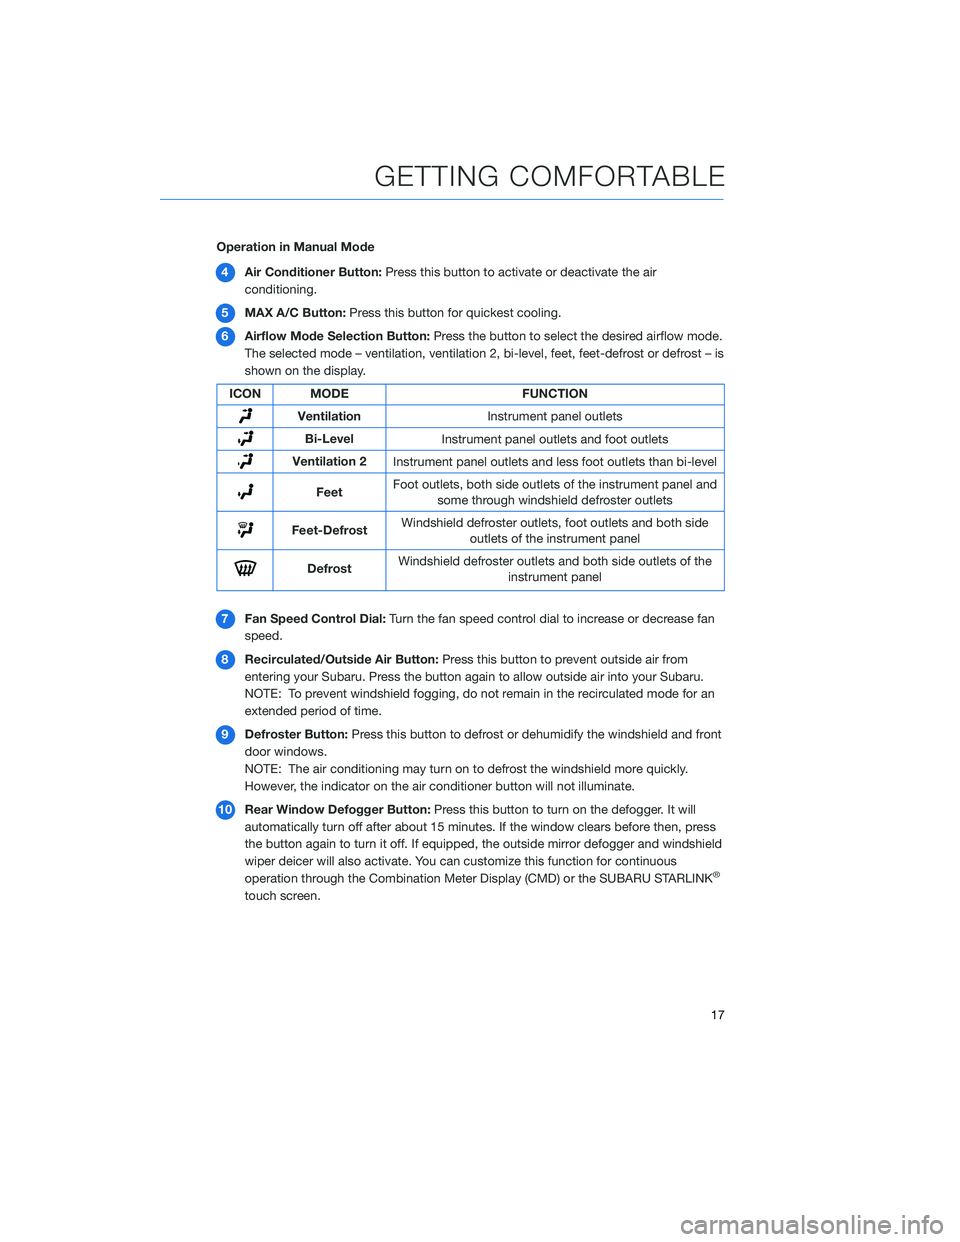
ICON MODE FUNCTION
Ventilation
Instrument panel outlets
Bi-Level
Instrument panel outlets and foot outlets
Ventilation 2
Instrument panel outlets and less foot outlets than bi-level
FeetFoot outlets, both side outlets of the instrument panel and
some through windshield defroster outlets
Feet-DefrostWindshield defroster outlets, foot outlets and both side
outlets of the instrument panel
DefrostWindshield defroster outlets and both side outlets of the
instrument panel
7Fan Speed Control Dial:Turn the fan speed control dial to increase or decrease fan
speed.
8Recirculated/Outside Air Button:Press this button to prevent outside air from
entering your Subaru. Press the button again to allow outside air into your Subaru.
NOTE: To prevent windshield fogging, do not remain in the recirculated mode for an
extended period of time.
9Defroster Button:Press this button to defrost or dehumidify the windshield and front
door windows.
NOTE: The air conditioning may turn on to defrost the windshield more quickly.
However, the indicator on the air conditioner button will not illuminate.
10Rear Window Defogger Button:Press this button to turn on the defogger. It will
automatically turn off after about 15 minutes. If the window clears before then, press
the button again to turn it off. If equipped, the outside mirror defogger and windshield
wiper deicer will also activate. You can customize this function for continuous
operation through the Combination Meter Display (CMD) or the SUBARU STARLINK
®
touch screen.
GETTING COMFORTABLE
17
Page 20 of 52
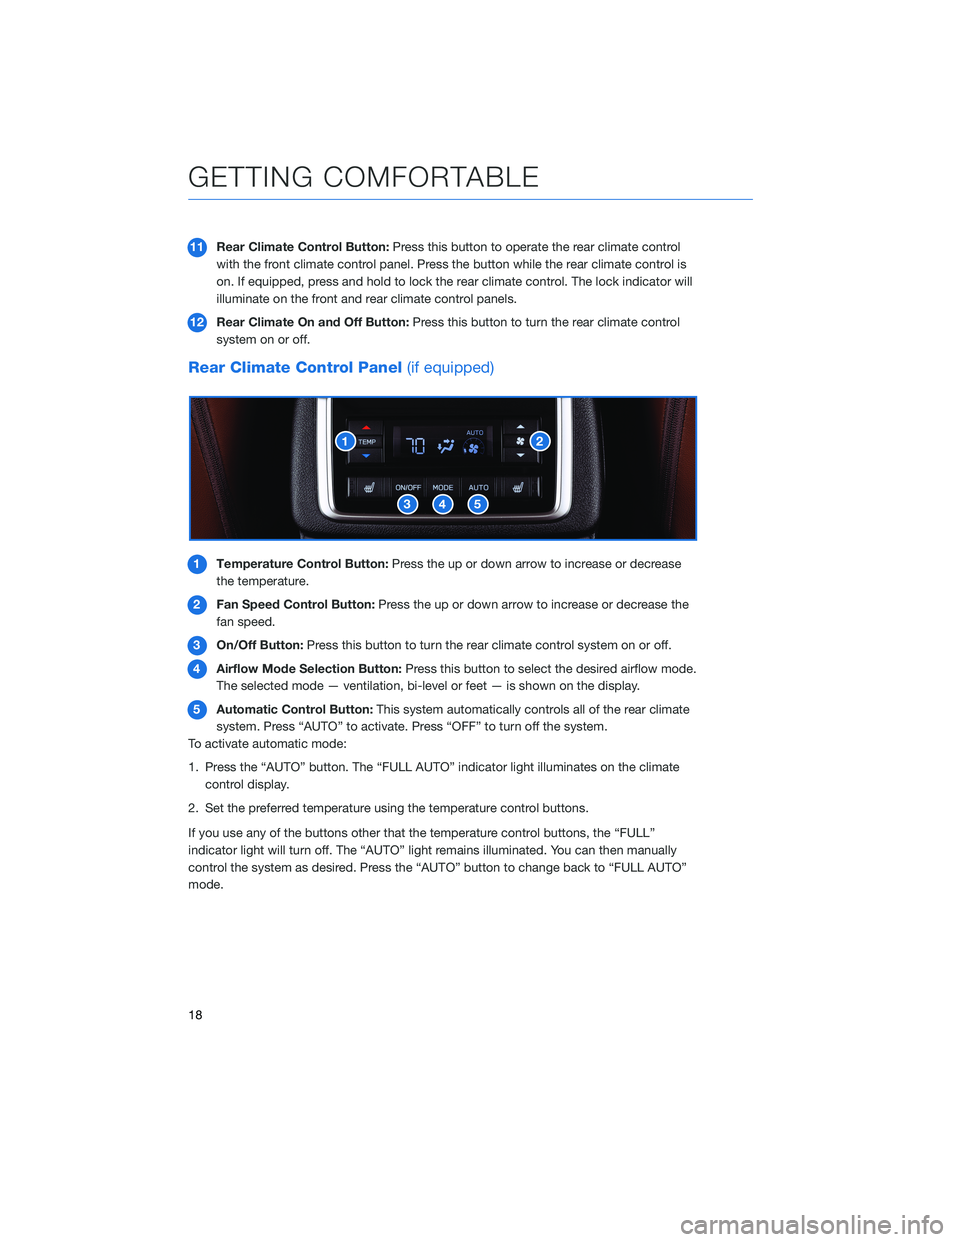
11Rear Climate Control Button:Press this button to operate the rear climate control
with the front climate control panel. Press the button while the rear climate control is
on. If equipped, press and hold to lock the rear climate control. The lock indicator will
illuminate on the front and rear climate control panels.
12Rear Climate On and Off Button:Press this button to turn the rear climate control
system on or off.
Rear Climate Control Panel(if equipped)
1Temperature Control Button:Press the up or down arrow to increase or decrease
the temperature.
2Fan Speed Control Button:Press the up or down arrow to increase or decrease the
fan speed.
3On/Off Button:Press this button to turn the rear climate control system on or off.
4Airflow Mode Selection Button:Press this button to select the desired airflow mode.
The selected mode — ventilation, bi-level or feet — is shown on the display.
5Automatic Control Button:This system automatically controls all of the rear climate
system. Press “AUTO” to activate. Press “OFF” to turn off the system.
To activate automatic mode:
1. Press the “AUTO” button. The “FULL AUTO” indicator light illuminates on the climate
control display.
2. Set the preferred temperature using the temperature control buttons.
If you use any of the buttons other that the temperature control buttons, the “FULL”
indicator light will turn off. The “AUTO” light remains illuminated. You can then manually
control the system as desired. Press the “AUTO” button to change back to “FULL AUTO”
mode.
GETTING COMFORTABLE
18
Page 24 of 52
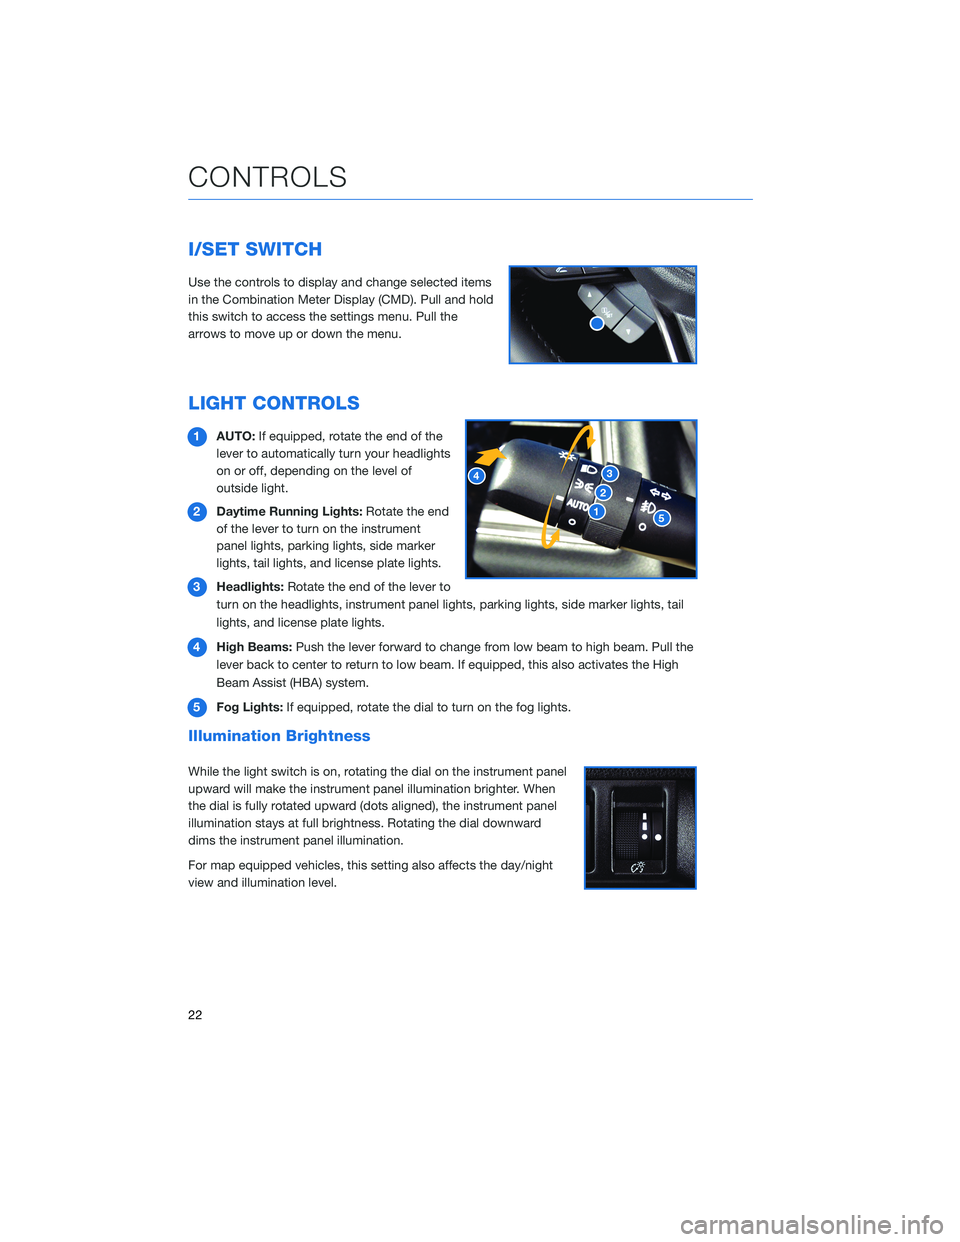
I/SET SWITCH
Use the controls to display and change selected items
in the Combination Meter Display (CMD). Pull and hold
this switch to access the settings menu. Pull the
arrows to move up or down the menu.
LIGHT CONTROLS
1AUTO:If equipped, rotate the end of the
lever to automatically turn your headlights
on or off, depending on the level of
outside light.
2Daytime Running Lights:Rotate the end
of the lever to turn on the instrument
panel lights, parking lights, side marker
lights, tail lights, and license plate lights.
3Headlights:Rotate the end of the lever to
turn on the headlights, instrument panel lights, parking lights, side marker lights, tail
lights, and license plate lights.
4High Beams:Push the lever forward to change from low beam to high beam. Pull the
lever back to center to return to low beam. If equipped, this also activates the High
Beam Assist (HBA) system.
5Fog Lights:If equipped, rotate the dial to turn on the fog lights.
Illumination Brightness
While the light switch is on, rotating the dial on the instrument panel
upward will make the instrument panel illumination brighter. When
the dial is fully rotated upward (dots aligned), the instrument panel
illumination stays at full brightness. Rotating the dial downward
dims the instrument panel illumination.
For map equipped vehicles, this setting also affects the day/night
view and illumination level.
CONTROLS
22
Page 29 of 52
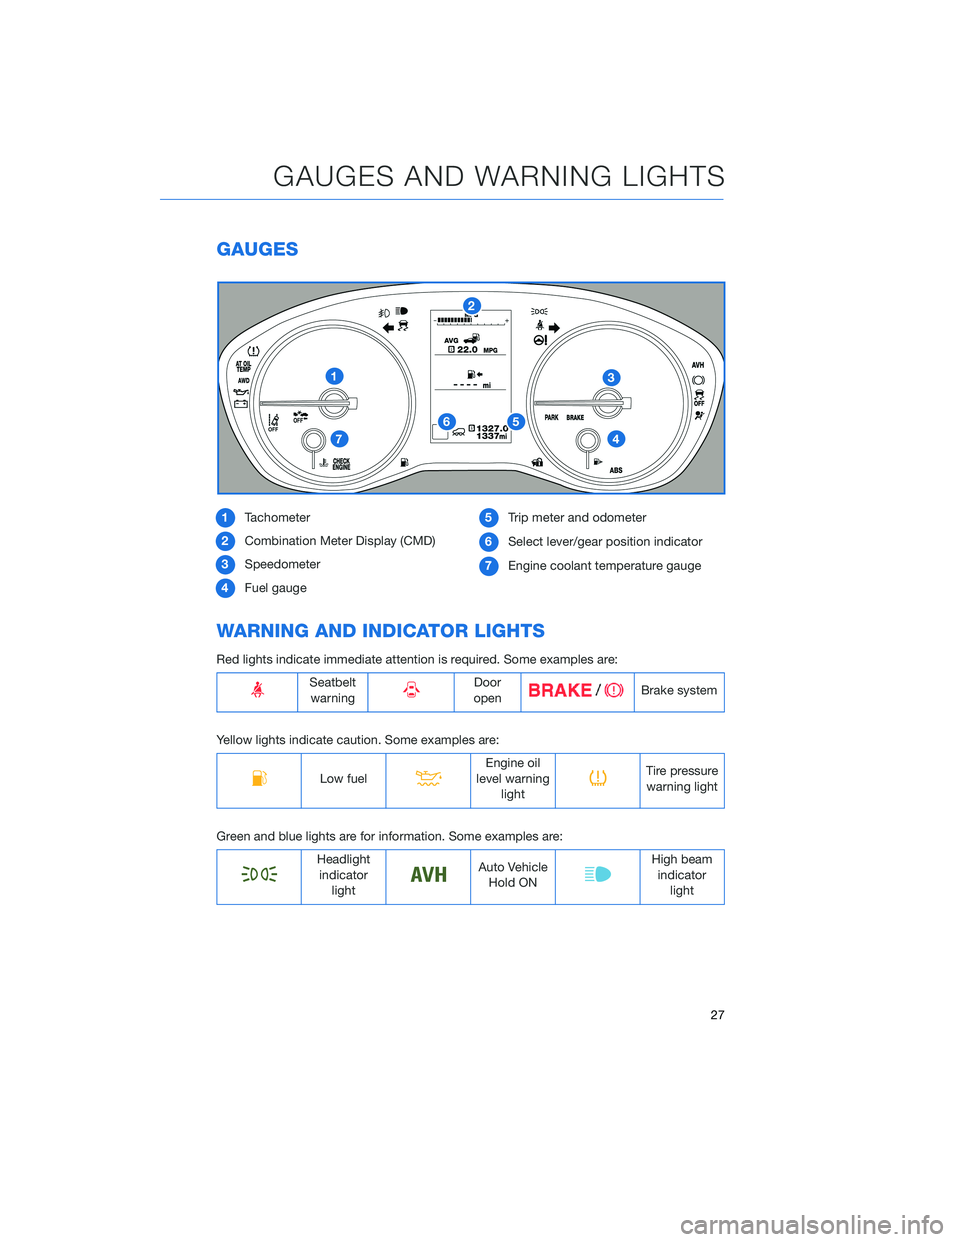
GAUGES
1Tachometer
2Combination Meter Display (CMD)
3Speedometer
4Fuel gauge5Trip meter and odometer
6Select lever/gear position indicator
7Engine coolant temperature gauge
WARNING AND INDICATOR LIGHTS
Red lights indicate immediate attention is required. Some examples are:
Seatbelt
warningDoor
openBrake system
Yellow lights indicate caution. Some examples are:
Low fuelEngine oil
level warning
lightTire pressure
warning light
Green and blue lights are for information. Some examples are:
Headlight
indicator
lightAuto Vehicle
Hold ONHigh beam
indicator
light
GAUGES AND WARNING LIGHTS
27
Page 31 of 52
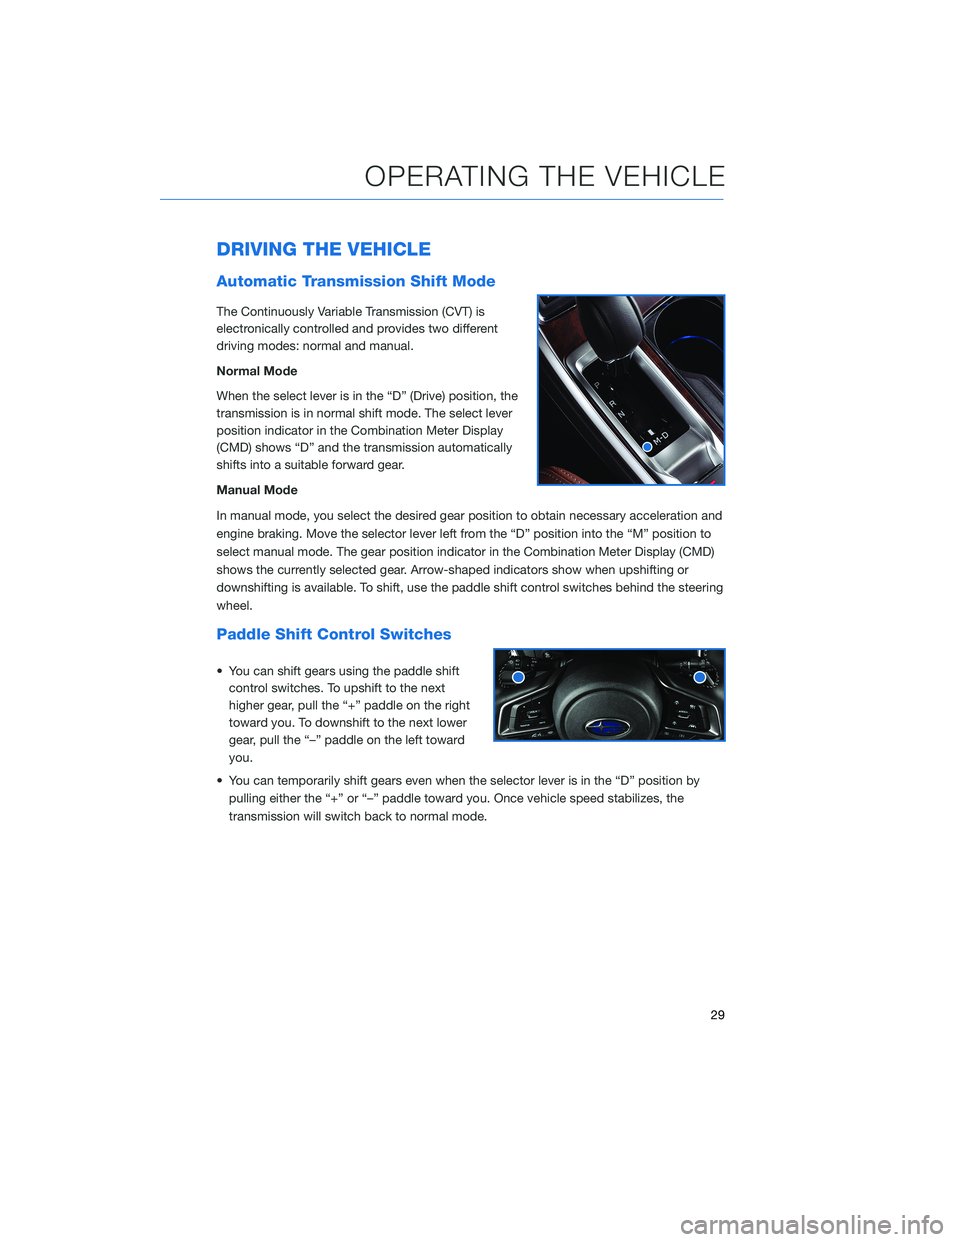
DRIVING THE VEHICLE
Automatic Transmission Shift Mode
The Continuously Variable Transmission (CVT) is
electronically controlled and provides two different
driving modes: normal and manual.
Normal Mode
When the select lever is in the “D” (Drive) position, the
transmission is in normal shift mode. The select lever
position indicator in the Combination Meter Display
(CMD) shows “D” and the transmission automatically
shifts into a suitable forward gear.
Manual Mode
In manual mode, you select the desired gear position to obtain necessary acceleration and
engine braking. Move the selector lever left from the “D” position into the “M” position to
select manual mode. The gear position indicator in the Combination Meter Display (CMD)
shows the currently selected gear. Arrow-shaped indicators show when upshifting or
downshifting is available. To shift, use the paddle shift control switches behind the steering
wheel.
Paddle Shift Control Switches
• You can shift gears using the paddle shift
control switches. To upshift to the next
higher gear, pull the “+” paddle on the right
toward you. To downshift to the next lower
gear, pull the “–” paddle on the left toward
you.
• You can temporarily shift gears even when the selector lever is in the “D” position by
pulling either the “+” or “–” paddle toward you. Once vehicle speed stabilizes, the
transmission will switch back to normal mode.
OPERATING THE VEHICLE
29
Page 32 of 52
X-MODE®
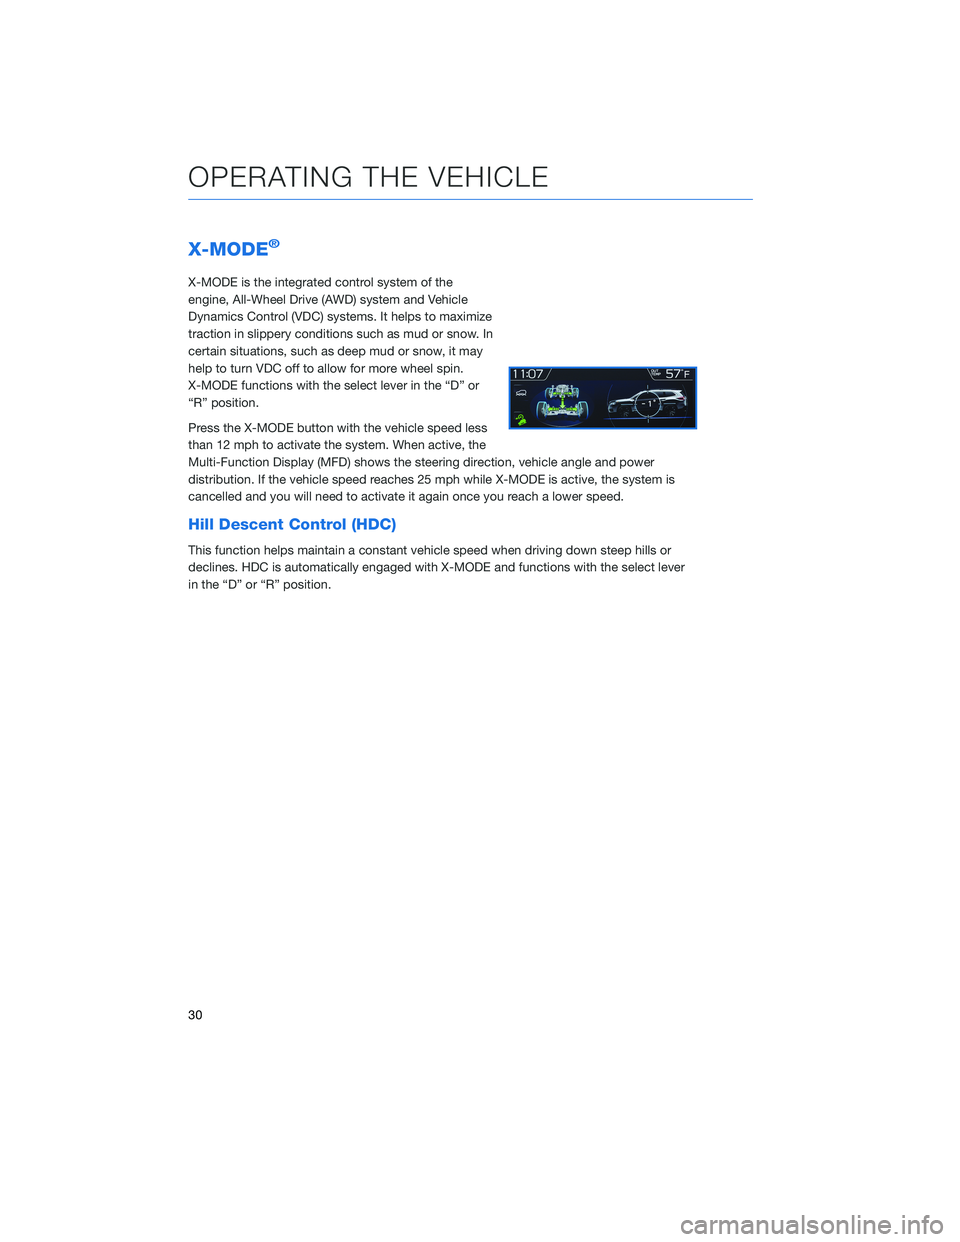
X-MODE is the integrated control system of the
engine, All-Wheel Drive (AWD) system and Vehicle
Dynamics Control (VDC) systems. It helps to maximize
traction in slippery conditions such as mud or snow. In
certain situations, such as deep mud or snow, it may
help to turn VDC off to allow for more wheel spin.
X-MODE functions with the select lever in the “D” or
“R” position.
Press the X-MODE button with the vehicle speed less
than 12 mph to activate the system. When active, the
Multi-Function Display (MFD) shows the steering direction, vehicle angle and power
distribution. If the vehicle speed reaches 25 mph while X-MODE is active, the system is
cancelled and you will need to activate it again once you reach a lower speed.
Hill Descent Control (HDC)
This function helps maintain a constant vehicle speed when driving down steep hills or
declines. HDC is automatically engaged with X-MODE and functions with the select lever
in the “D” or “R” position.
OPERATING THE VEHICLE
30
Page 38 of 52

REAR SEAT REMINDER
The Rear Seat Reminder system assists you in
preventing a child or pet from being left in your
Subaru. The system monitors the opening and
closing of the rear side door. It does not
physically sense the presence of a child or pet.
The system turns on if your Subaru is started
within 30 minutes of a rear side door opening
or closing. It also turns on if a rear side door is
opened and closed when your Subaru is
running and stationary. The system remains on
if your Subaru is turned off and back on again
within 30 minutes and the rear side doors
remained closed.
When you turn your Subaru off, the system warns you audibly and with a “Reminder, Look
in Rear Seat” message in the Combination Meter Display (CMD).
The system operates only one time with each ignition cycle and opening and closing of a
rear side door. You can turn the Rear Seat Reminder off in the Combination Meter Display
(CMD).
POWER REAR GATE (PRG)(if equipped)
Power Rear Gate Button
Briefly press and release the button on the instrument
panel to automatically open or close the rear gate. Two
chirps will sound and the hazard warning flashers will
flash twice. If you briefly press the button while it is
closing, it will open. If you briefly press the button
while it is opening, it will pause. Press the button again
to close the rear gate. If you attempt to open the Power Rear Gate with the doors locked,
three rapid beeps will sound.
The operation is the same using the Power Rear Gate Button on the access key fob or
transmitter.
NOTE: This button only functions to open the PRG when the doors are unlocked. If the
doors are locked, you will hear three rapid beeps from the vehicle.
PASSENGER/CARGO AREAS
36