lock SUBARU ASCENT 2021 Getting Started Guide
[x] Cancel search | Manufacturer: SUBARU, Model Year: 2021, Model line: ASCENT, Model: SUBARU ASCENT 2021Pages: 140, PDF Size: 45.48 MB
Page 49 of 140
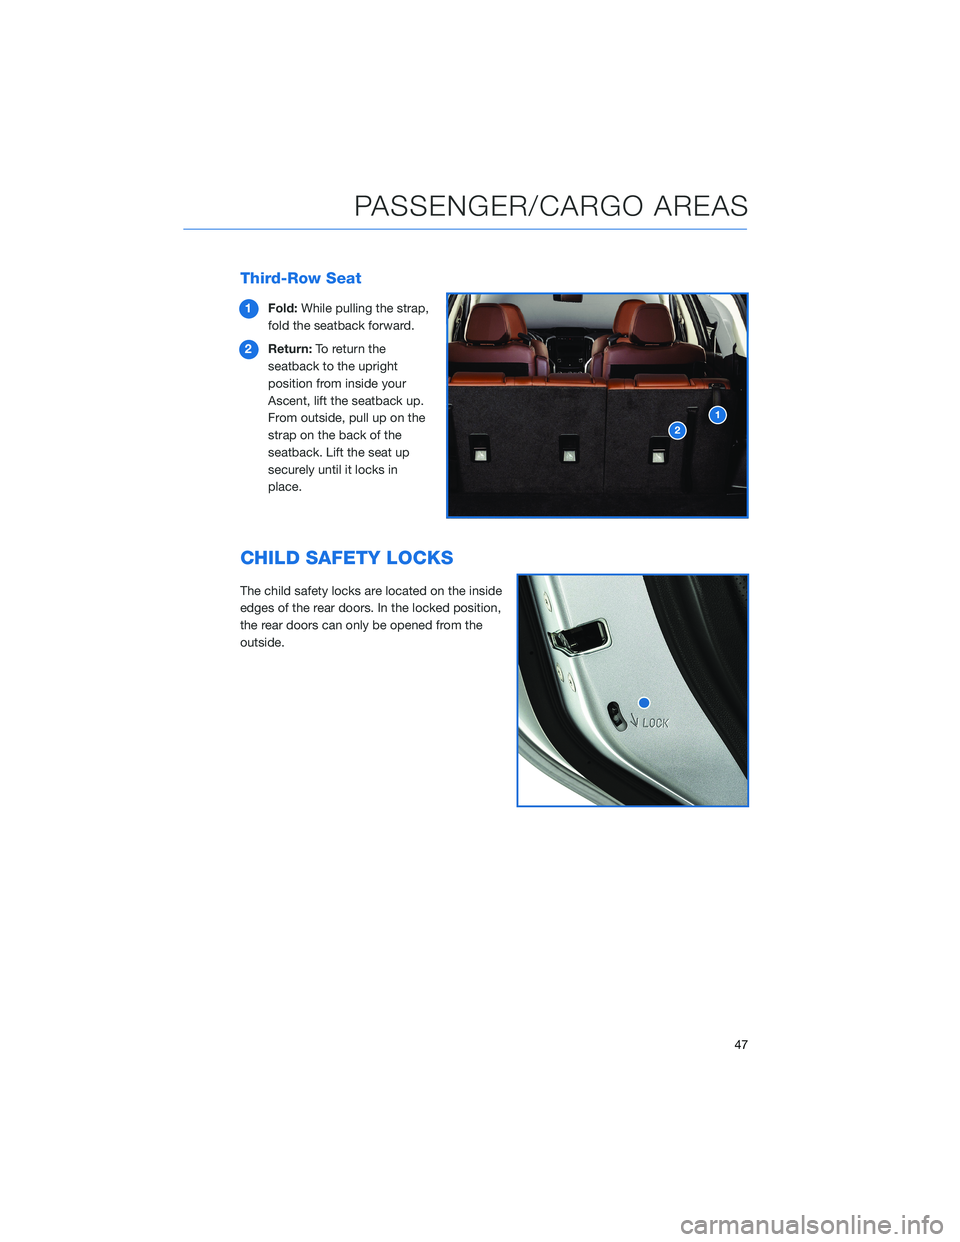
Third-Row Seat
1Fold:While pulling the strap,
fold the seatback forward.
2Return:To return the
seatback to the upright
position from inside your
Ascent, lift the seatback up.
From outside, pull up on the
strap on the back of the
seatback. Lift the seat up
securely until it locks in
place.
CHILD SAFETY LOCKS
The child safety locks are located on the inside
edges of the rear doors. In the locked position,
the rear doors can only be opened from the
outside.
PASSENGER/CARGO AREAS
47
Page 85 of 140
Updating Maps Using Your PC/MAC
Maps can also be updated using a USB memory device, which will
allow the entire map program to be updated at one time. This is a
great option if you are going to take a cross-country trip and your
maps have not been updated in a while.
To update the map using a USB memory device, start by going to
www.subaru-maps.com
CLOCK
The clock can be set manually or automatically. When set to “Auto”, the clock
automatically adjusts when a Bluetooth®connected phone is paired (vehicles without
navigation), or through the GPS signal (vehicles with navigation system).
Manually
Use the STARLINK®Touchscreen to set the clock:
1Press the “Home” button.
2Select “Settings”.
3Select “Vehicle”.
4Select “Time/Date”.
5Select “Mode”.
SETTINGS AND UPDATES
83
Page 86 of 140
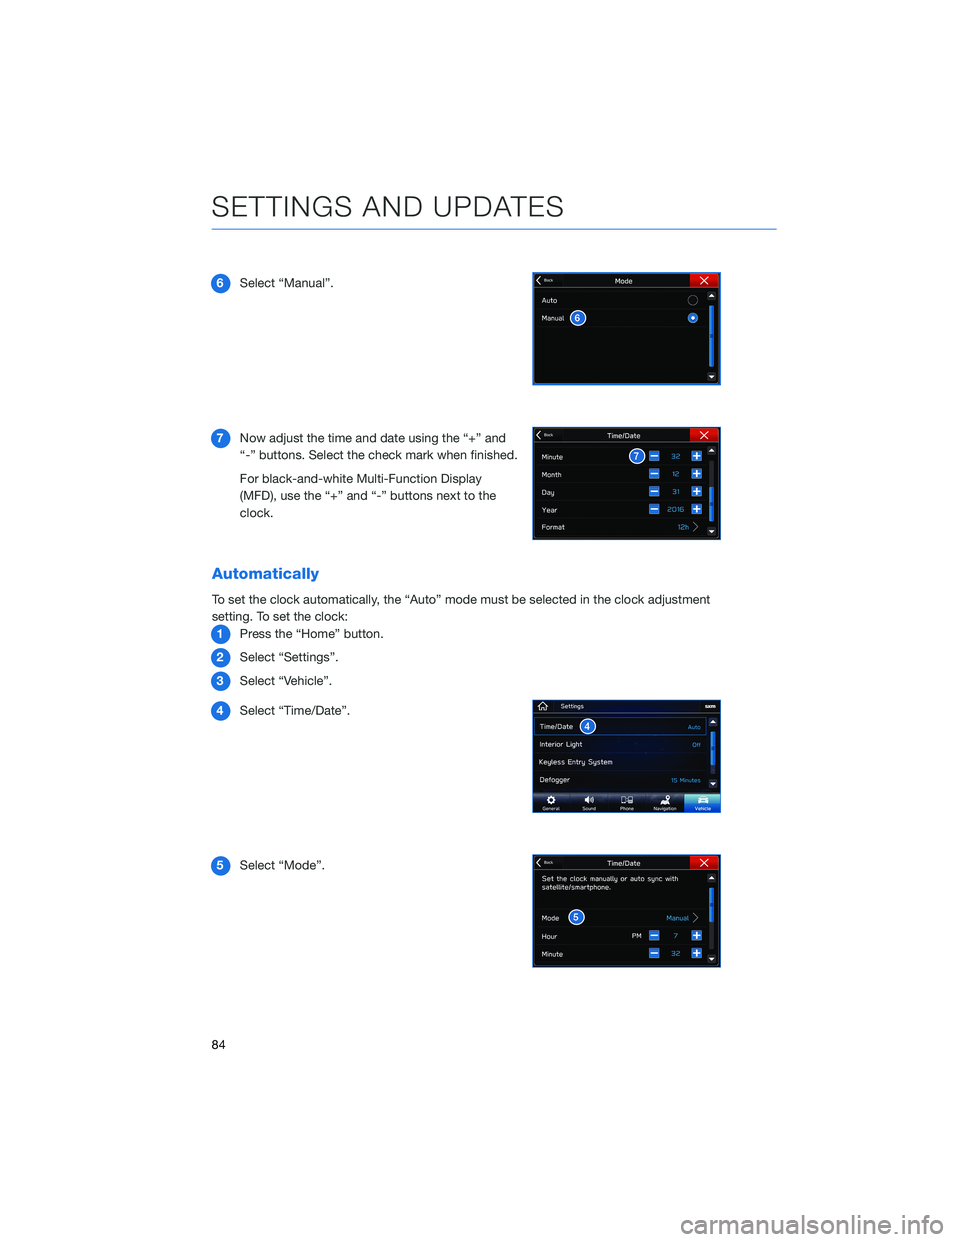
6Select “Manual”.
7Now adjust the time and date using the “+” and
“-” buttons. Select the check mark when finished.
For black-and-white Multi-Function Display
(MFD), use the “+” and “-” buttons next to the
clock.
Automatically
To set the clock automatically, the “Auto” mode must be selected in the clock adjustment
setting. To set the clock:
1Press the “Home” button.
2Select “Settings”.
3Select “Vehicle”.
4Select “Time/Date”.
5Select “Mode”.
SETTINGS AND UPDATES
84
Page 87 of 140
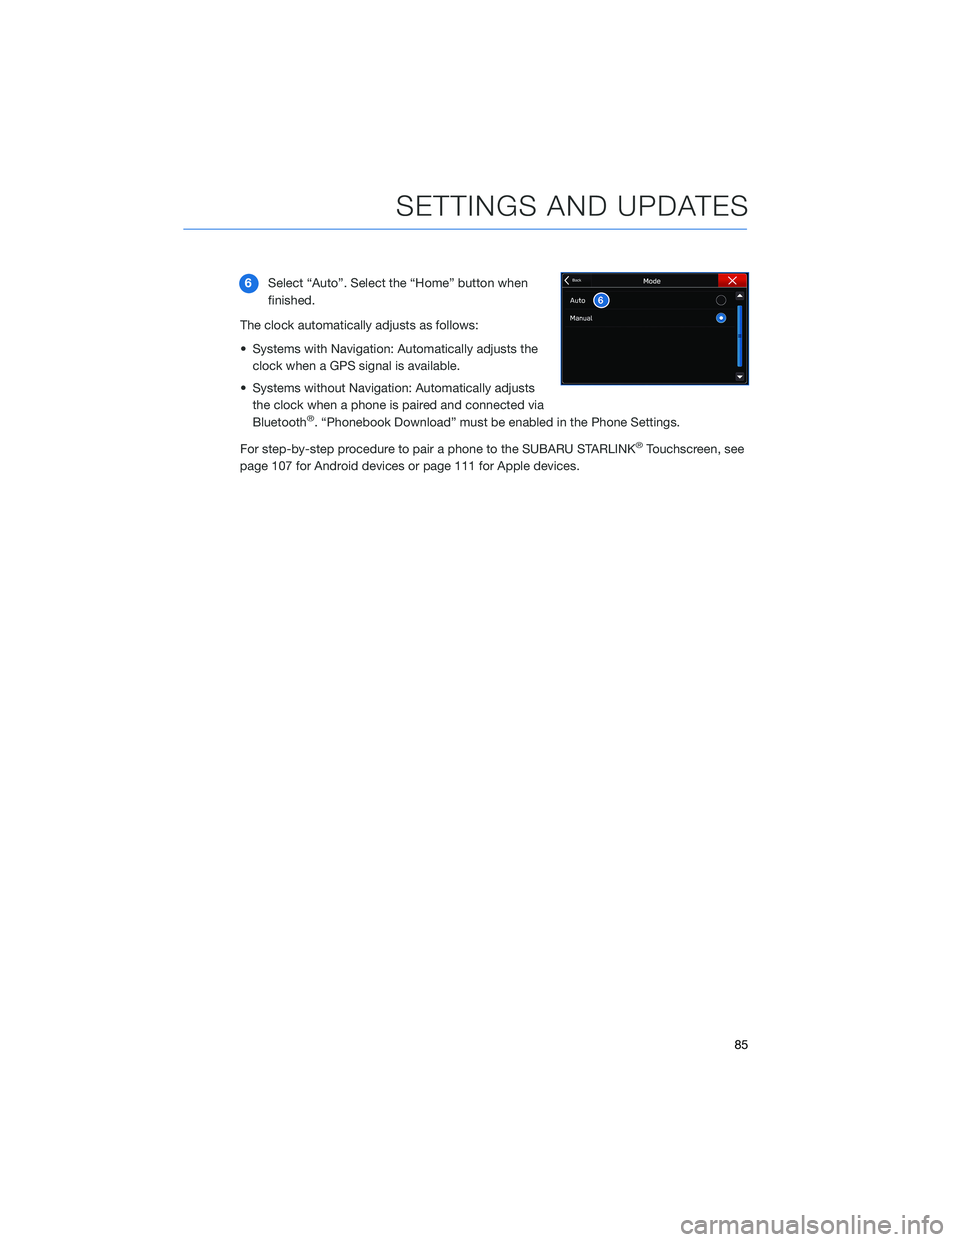
6Select “Auto”. Select the “Home” button when
finished.
The clock automatically adjusts as follows:
• Systems with Navigation: Automatically adjusts the
clock when a GPS signal is available.
• Systems without Navigation: Automatically adjusts
the clock when a phone is paired and connected via
Bluetooth
®. “Phonebook Download” must be enabled in the Phone Settings.
For step-by-step procedure to pair a phone to the SUBARU STARLINK
®Touchscreen, see
page 107 for Android devices or page 111 for Apple devices.
SETTINGS AND UPDATES
85
Page 106 of 140
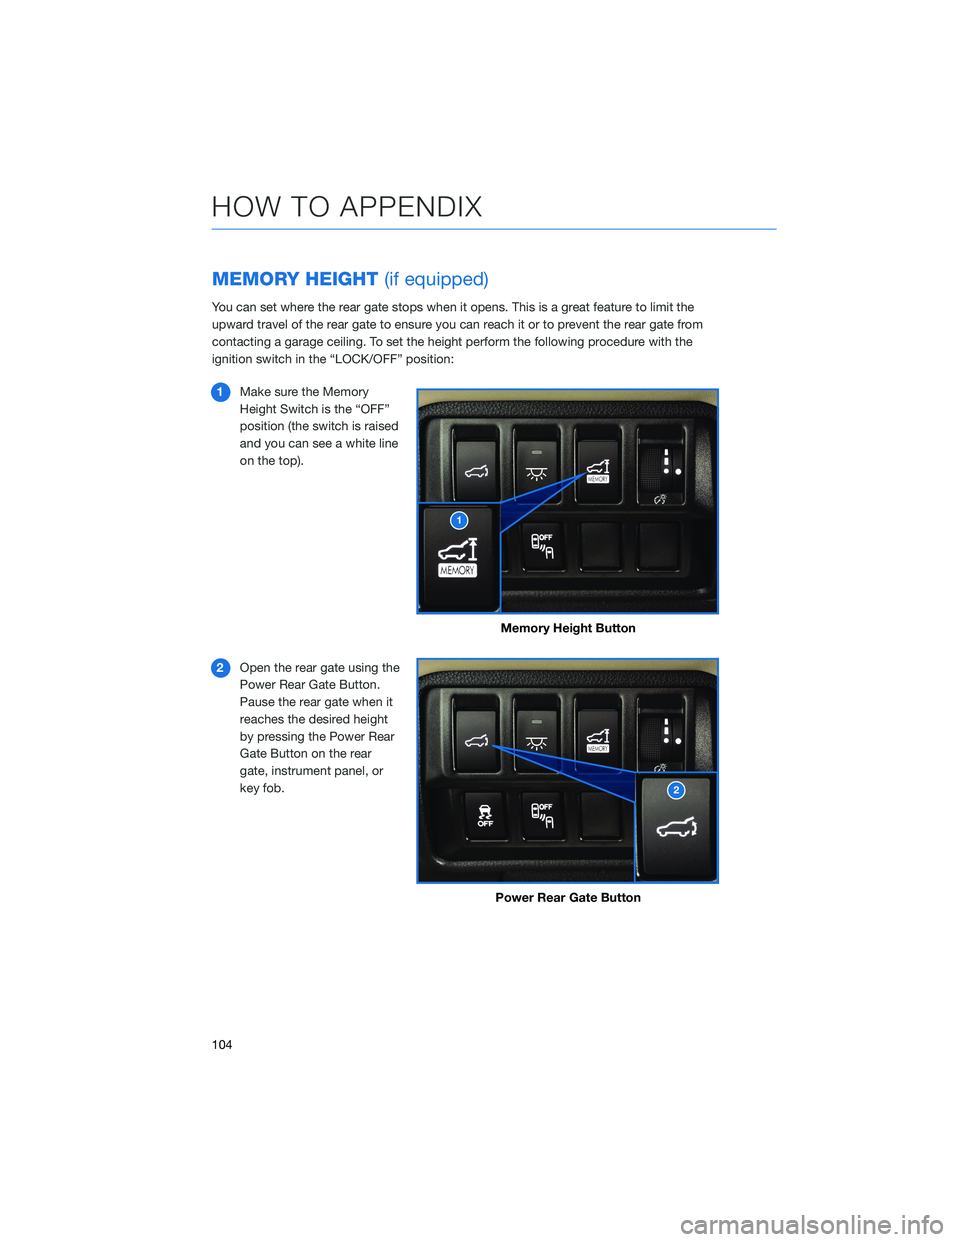
MEMORY HEIGHT(if equipped)
You can set where the rear gate stops when it opens. This is a great feature to limit the
upward travel of the rear gate to ensure you can reach it or to prevent the rear gate from
contacting a garage ceiling. To set the height perform the following procedure with the
ignition switch in the “LOCK/OFF” position:
1Make sure the Memory
Height Switch is the “OFF”
position (the switch is raised
and you can see a white line
on the top).
2Open the rear gate using the
Power Rear Gate Button.
Pause the rear gate when it
reaches the desired height
by pressing the Power Rear
Gate Button on the rear
gate, instrument panel, or
key fob.
Memory Height Button
Power Rear Gate Button
HOW TO APPENDIX
104
Page 108 of 140
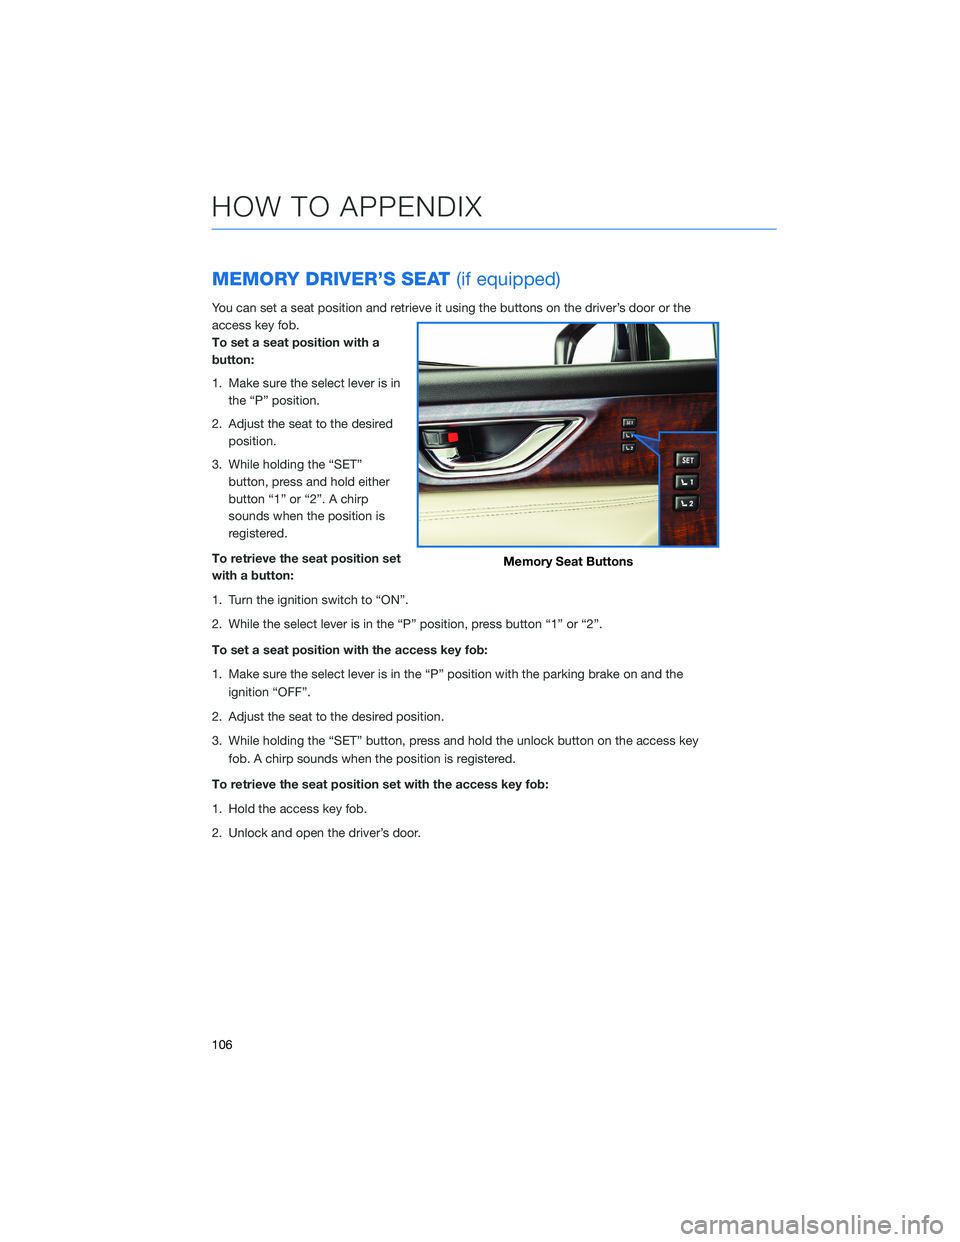
MEMORY DRIVER’S SEAT(if equipped)
You can set a seat position and retrieve it using the buttons on the driver’s door or the
access key fob.
To set a seat position with a
button:
1. Make sure the select lever is in
the “P” position.
2. Adjust the seat to the desired
position.
3. While holding the “SET”
button, press and hold either
button “1” or “2”. A chirp
sounds when the position is
registered.
To retrieve the seat position set
with a button:
1. Turn the ignition switch to “ON”.
2. While the select lever is in the “P” position, press button “1” or “2”.
To set a seat position with the access key fob:
1. Make sure the select lever is in the “P” position with the parking brake on and the
ignition “OFF”.
2. Adjust the seat to the desired position.
3. While holding the “SET” button, press and hold the unlock button on the access key
fob. A chirp sounds when the position is registered.
To retrieve the seat position set with the access key fob:
1. Hold the access key fob.
2. Unlock and open the driver’s door.
Memory Seat Buttons
HOW TO APPENDIX
106
Page 121 of 140
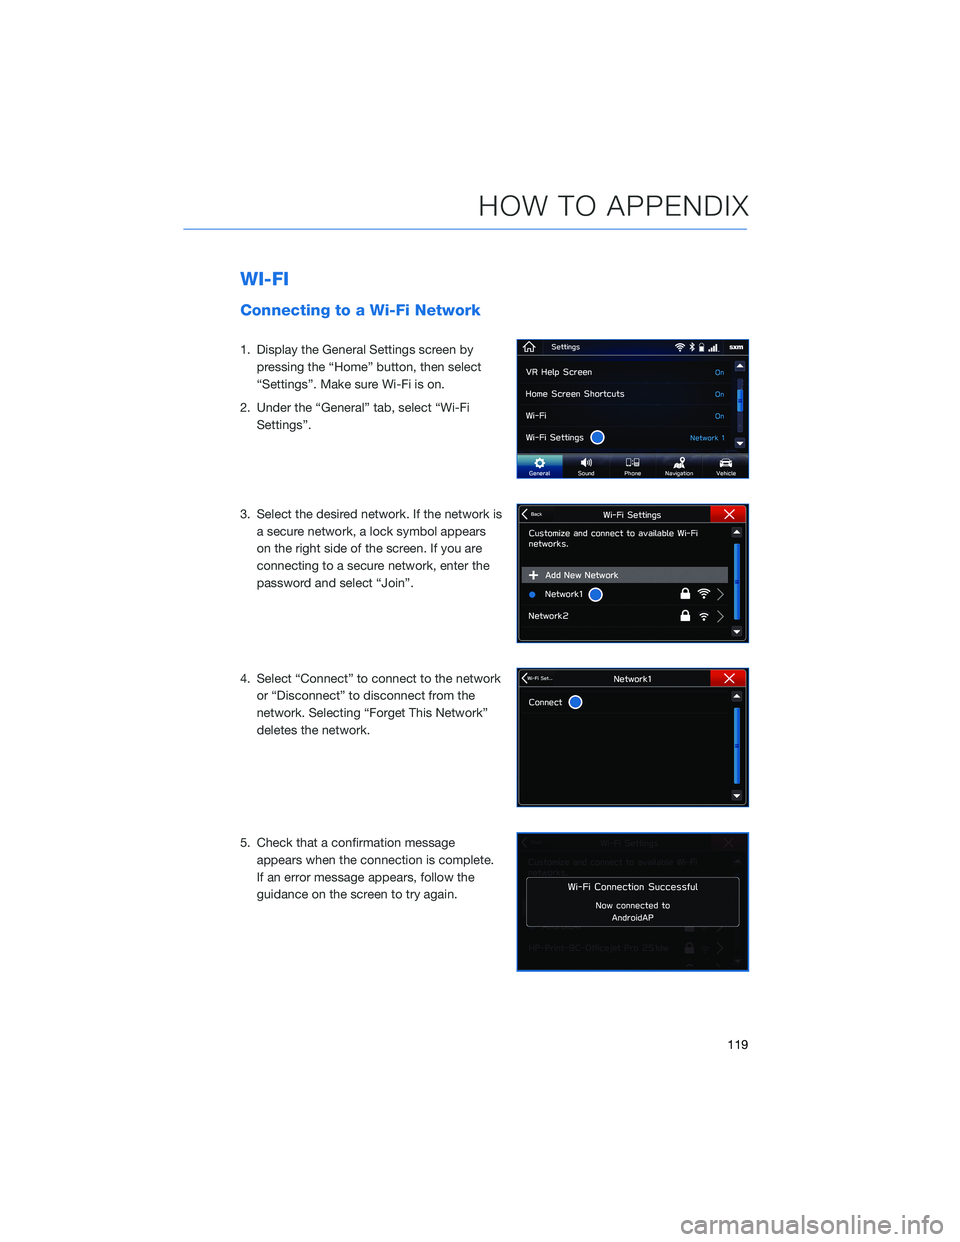
WI-FI
Connecting to a Wi-Fi Network
1. Display the General Settings screen by
pressing the “Home” button, then select
“Settings”. Make sure Wi-Fi is on.
2. Under the “General” tab, select “Wi-Fi
Settings”.
3. Select the desired network. If the network is
a secure network, a lock symbol appears
on the right side of the screen. If you are
connecting to a secure network, enter the
password and select “Join”.
4. Select “Connect” to connect to the network
or “Disconnect” to disconnect from the
network. Selecting “Forget This Network”
deletes the network.
5. Check that a confirmation message
appears when the connection is complete.
If an error message appears, follow the
guidance on the screen to try again.
HOW TO APPENDIX
119
Page 131 of 140
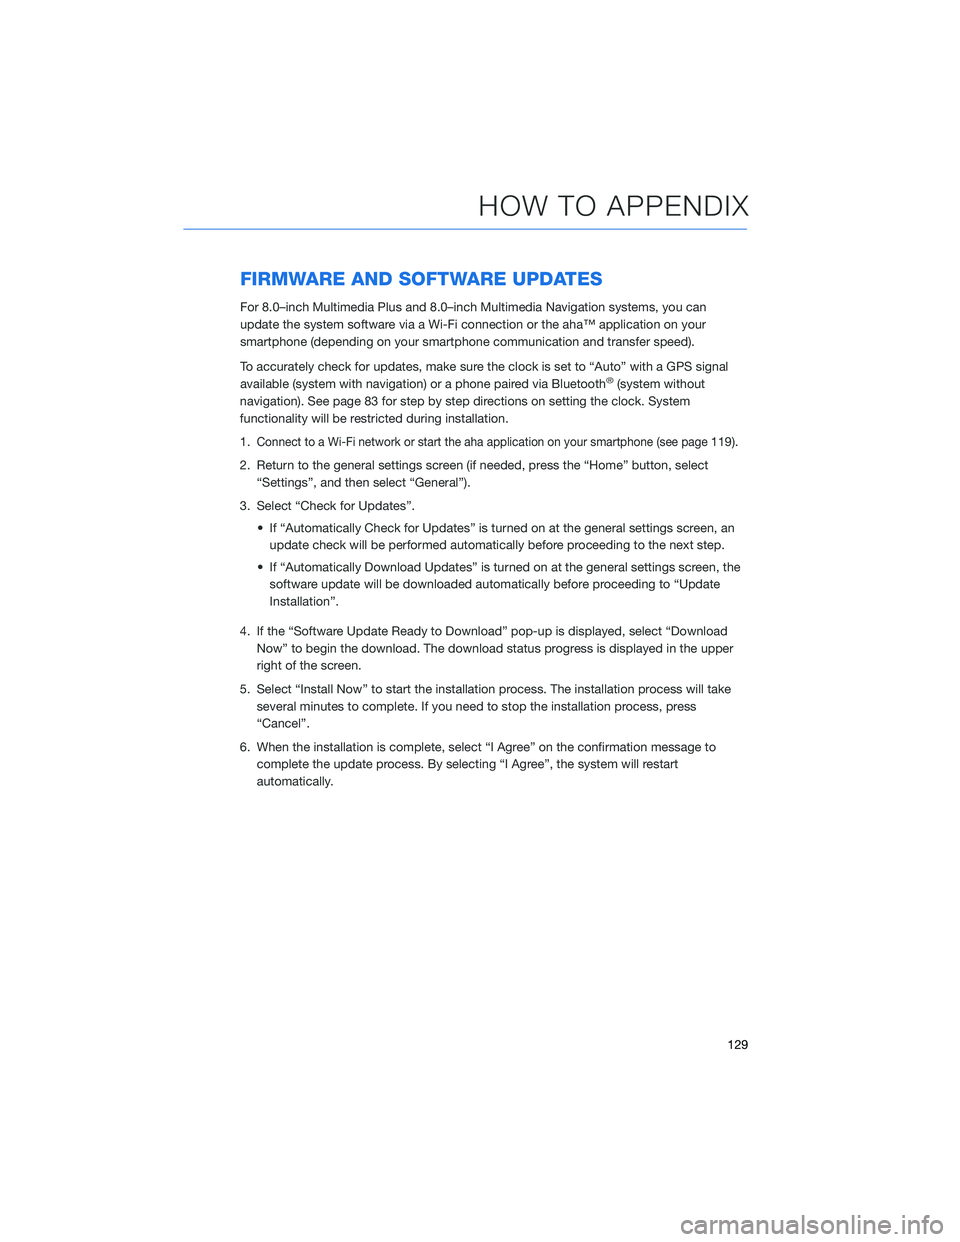
FIRMWARE AND SOFTWARE UPDATES
For 8.0–inch Multimedia Plus and 8.0–inch Multimedia Navigation systems, you can
update the system software via a Wi-Fi connection or the aha™ application on your
smartphone (depending on your smartphone communication and transfer speed).
To accurately check for updates, make sure the clock is set to “Auto” with a GPS signal
available (system with navigation) or a phone paired via Bluetooth
®(system without
navigation). See page 83 for step by step directions on setting the clock. System
functionality will be restricted during installation.
1.
Connect to a Wi-Fi network or start the aha application on your smartphone (see page119).
2. Return to the general settings screen (if needed, press the “Home” button, select
“Settings”, and then select “General”).
3. Select “Check for Updates”.
• If “Automatically Check for Updates” is turned on at the general settings screen, an
update check will be performed automatically before proceeding to the next step.
• If “Automatically Download Updates” is turned on at the general settings screen, the
software update will be downloaded automatically before proceeding to “Update
Installation”.
4. If the “Software Update Ready to Download” pop-up is displayed, select “Download
Now” to begin the download. The download status progress is displayed in the upper
right of the screen.
5. Select “Install Now” to start the installation process. The installation process will take
several minutes to complete. If you need to stop the installation process, press
“Cancel”.
6. When the installation is complete, select “I Agree” on the confirmation message to
complete the update process. By selecting “I Agree”, the system will restart
automatically.
HOW TO APPENDIX
129
Page 132 of 140
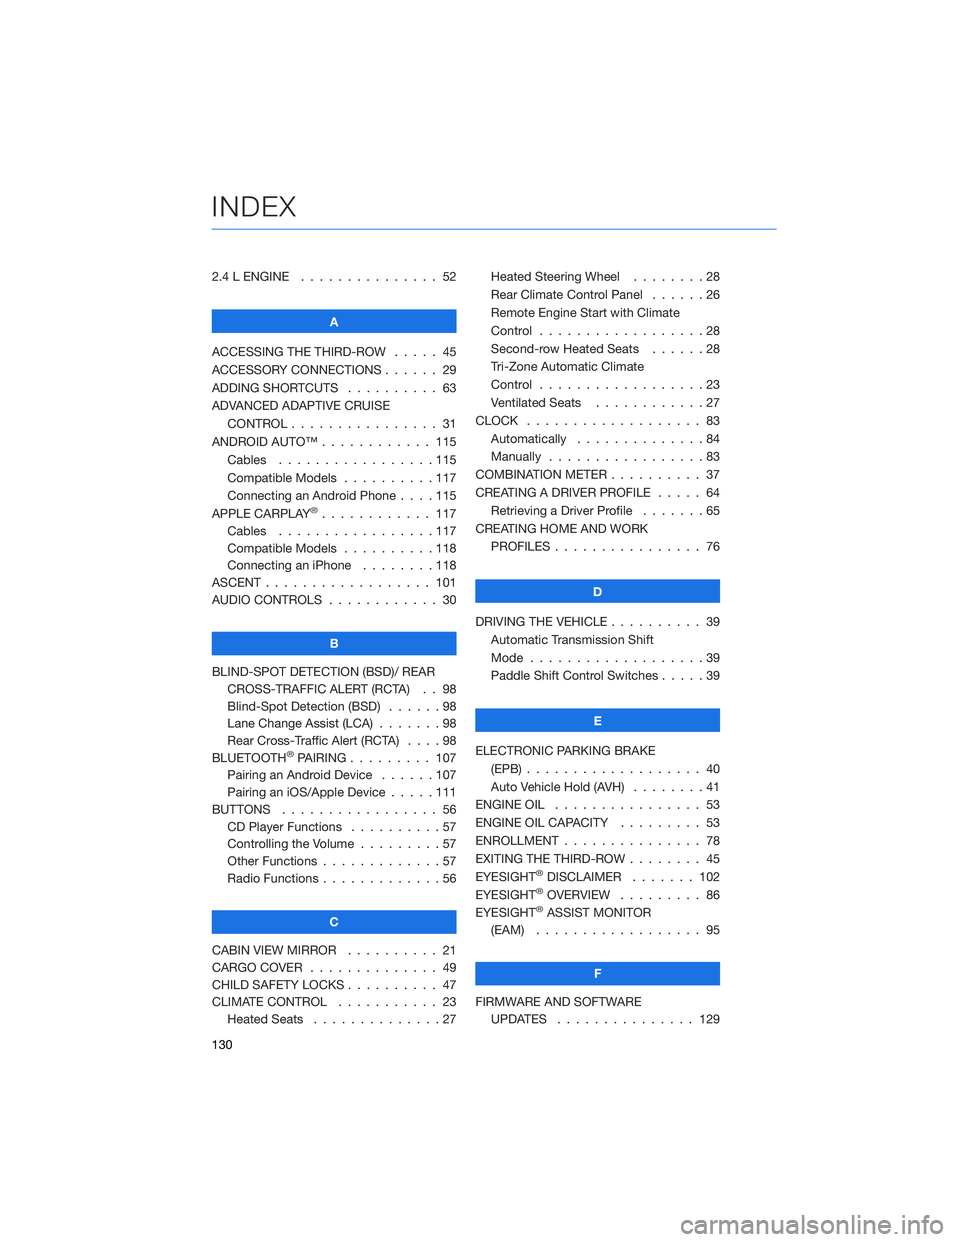
2.4 L ENGINE . . . . . . . . . . . . . . . 52
A
ACCESSING THE THIRD-ROW..... 45
ACCESSORY CONNECTIONS . . . . . . 29
ADDING SHORTCUTS . ......... 63
ADVANCED ADAPTIVE CRUISE
CONTROL . . . . . . . . ........ 31
ANDROID AUTO™ . . . . . . . . . . . . 115
Cables . . . . . . . . . . . . .....115
Compatible Models . . . . . . . . . . 117
Connecting an Android Phone....115
APPLE CARPLAY
®............ 117
Cables . . . . . . . . . . . . .....117
Compatible Models . . . . . . . . . . 118
Connecting an iPhone . . . . . . . . 118
ASCENT . . . . . . . . . . . . . . . . . . 101
AUDIO CONTROLS . . . . . . . . . . . . 30
B
BLIND-SPOT DETECTION (BSD)/ REAR
CROSS-TRAFFIC ALERT (RCTA) . . 98
Blind-Spot Detection (BSD)......98
Lane Change Assist (LCA).......98
Rear Cross-Traffic Alert (RCTA)....98
BLUETOOTH
®PAIRING . . . ...... 107
Pairing an Android Device......107
Pairing an iOS/Apple Device . . . . . 111
BUTTONS . . . . . . . . . . . . . . . . . 56
CD Player Functions . . ........57
Controlling the Volume . ........57
Other Functions . . . . . . . . . . . . . 57
Radio Functions . . . . . . . . . . . . . 56
C
CABIN VIEW MIRROR . . . . . . . . . . 21
CARGO COVER . . . . . . ........ 49
CHILD SAFETY LOCKS .......... 47
CLIMATE CONTROL . . . . . . ..... 23
Heated Seats . . . . . . ........27Heated Steering Wheel . . ......28
Rear Climate Control Panel . . . . . . 26
Remote Engine Start with Climate
Control . . . . . . . . . . . . . . . . . . 28
Second-row Heated Seats . .....28
Tri-Zone Automatic Climate
Control . . . . . . . . . . . . . . . . . . 23
Ventilated Seats . ...........27
CLOCK . .................. 83
Automatically . . . . ..........84
Manually . . . . . . ...........83
COMBINATION METER . ......... 37
CREATING A DRIVER PROFILE . . . . . 64
Retrieving a Driver Profile . . . . . . . 65
CREATING HOME AND WORK
PROFILES................ 76
D
DRIVING THE VEHICLE . . . . . . . . . . 39
Automatic Transmission Shift
Mode...................39
Paddle Shift Control Switches .....39
E
ELECTRONIC PARKING BRAKE
(EPB) . . . ................ 40
Auto Vehicle Hold (AVH)........41
ENGINE OIL................ 53
ENGINE OIL CAPACITY ......... 53
ENROLLMENT............... 78
EXITING THE THIRD-ROW ........ 45
EYESIGHT
®DISCLAIMER....... 102
EYESIGHT®OVERVIEW . . . . . . . . . 86
EYESIGHT®ASSIST MONITOR
(EAM) . . ................ 95
F
FIRMWARE AND SOFTWARE
UPDATES . . . . . . . . . . . . . . . 129
INDEX
130
Page 133 of 140
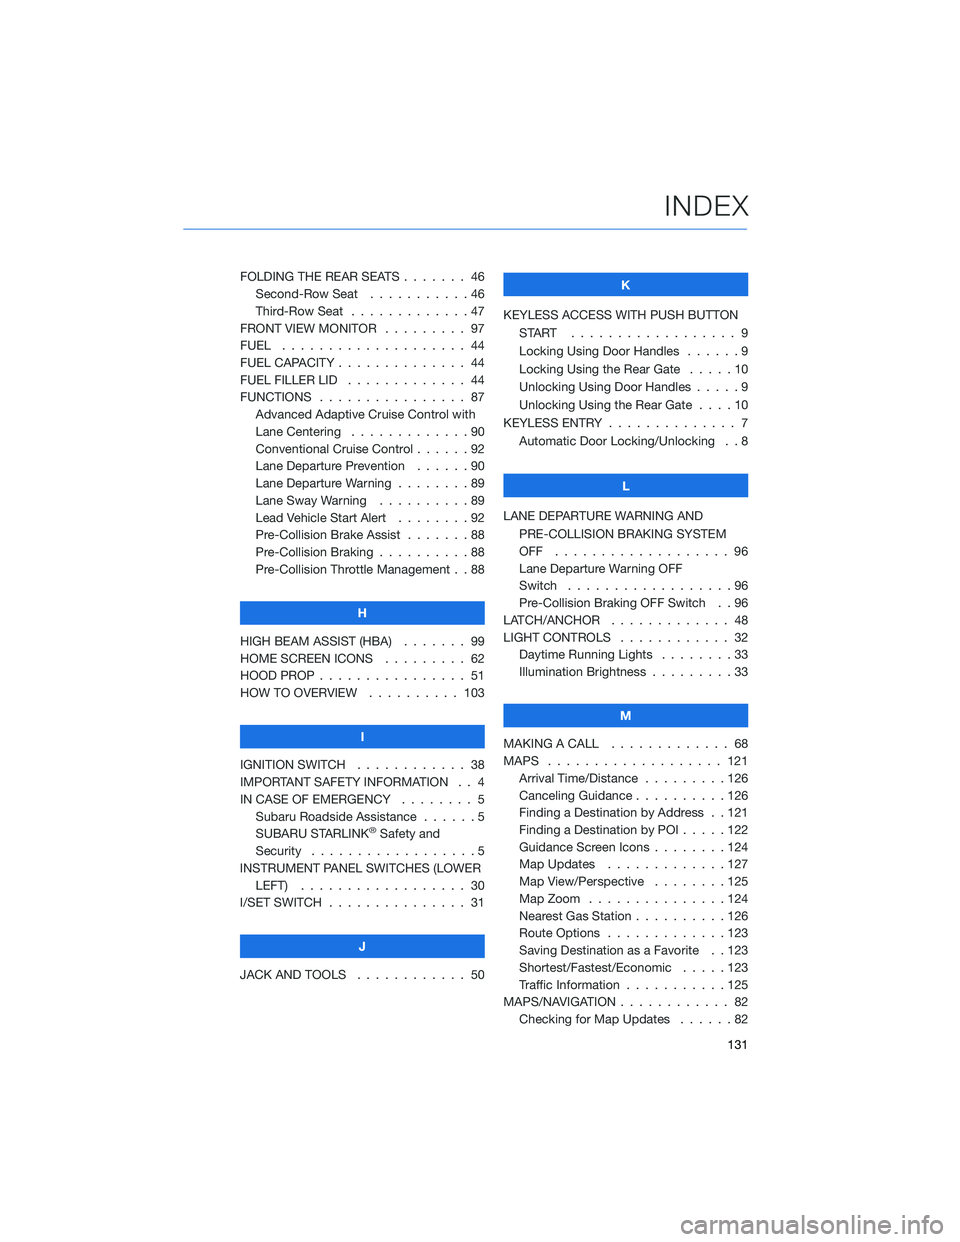
FOLDING THE REAR SEATS....... 46
Second-Row Seat . . . . .......46
Third-Row Seat . . . . .........47
FRONT VIEW MONITOR......... 97
FUEL . . . . . . . . . ........... 44
FUEL CAPACITY . . ............ 44
FUEL FILLER LID . . . .......... 44
FUNCTIONS . . . . ............ 87
Advanced Adaptive Cruise Control with
Lane Centering . . . . . ........90
Conventional Cruise Control......92
Lane Departure Prevention . . . . . . 90
Lane Departure Warning . . . . . . . . 89
Lane Sway Warning..........89
Lead Vehicle Start Alert . . . . . . . . 92
Pre-Collision Brake Assist.......88
Pre-Collision Braking..........88
Pre-Collision Throttle Management . . 88
H
HIGH BEAM ASSIST (HBA)....... 99
HOME SCREEN ICONS . . . . . . . . . 62
HOOD PROP . . . . ............ 51
HOW TO OVERVIEW .......... 103
I
IGNITION SWITCH . ........... 38
IMPORTANT SAFETY INFORMATION . . 4
IN CASE OF EMERGENCY . . . . . . . . 5
Subaru Roadside Assistance . . . . . . 5
SUBARU STARLINK
®Safety and
Security . . . . . . . . . .........5
INSTRUMENT PANEL SWITCHES (LOWER
LEFT) . . . . . . . ........... 30
I/SET SWITCH . . . . ........... 31
J
JACK AND TOOLS . ........... 50K
KEYLESS ACCESS WITH PUSH BUTTON
START .................. 9
Locking Using Door Handles ......9
Locking Using the Rear Gate . . . . . 10
Unlocking Using Door Handles .....9
Unlocking Using the Rear Gate....10
KEYLESS ENTRY . ............. 7
Automatic Door Locking/Unlocking . . 8
L
LANE DEPARTURE WARNING AND
PRE-COLLISION BRAKING SYSTEM
OFF ................... 96
Lane Departure Warning OFF
Switch . . . . ..............96
Pre-Collision Braking OFF Switch . . 96
LATCH/ANCHOR . . ........... 48
LIGHT CONTROLS . ........... 32
Daytime Running Lights . .......33
Illumination Brightness . ........33
M
MAKING A CALL . . . .......... 68
MAPS . . . ................ 121
Arrival Time/Distance.........126
Canceling Guidance . . ........126
Finding a Destination by Address . . 121
Finding a Destination by POI.....122
Guidance Screen Icons . .......124
Map Updates .............127
Map View/Perspective . . . .....125
Map Zoom . . . . . . . . . ......124
Nearest Gas Station ..........126
Route Options . . . . . . . ......123
Saving Destination as a Favorite . . 123
Shortest/Fastest/Economic .....123
Traffic Information . ..........125
MAPS/NAVIGATION . . . ......... 82
Checking for Map Updates......82
INDEX
131