key SUBARU ASCENT 2022 Getting Started Guide
[x] Cancel search | Manufacturer: SUBARU, Model Year: 2022, Model line: ASCENT, Model: SUBARU ASCENT 2022Pages: 148, PDF Size: 40.03 MB
Page 71 of 148
CREATING A DRIVER PROFILE
Creating a Driver Profile provides many benefits beyond just pairing a phone. The profile
records and remembers station presets, sound preferences, home and work address (if
equipped with navigation), phone favorites, screen icons and placement, and the
background wallpaper.
To create a driver profile:
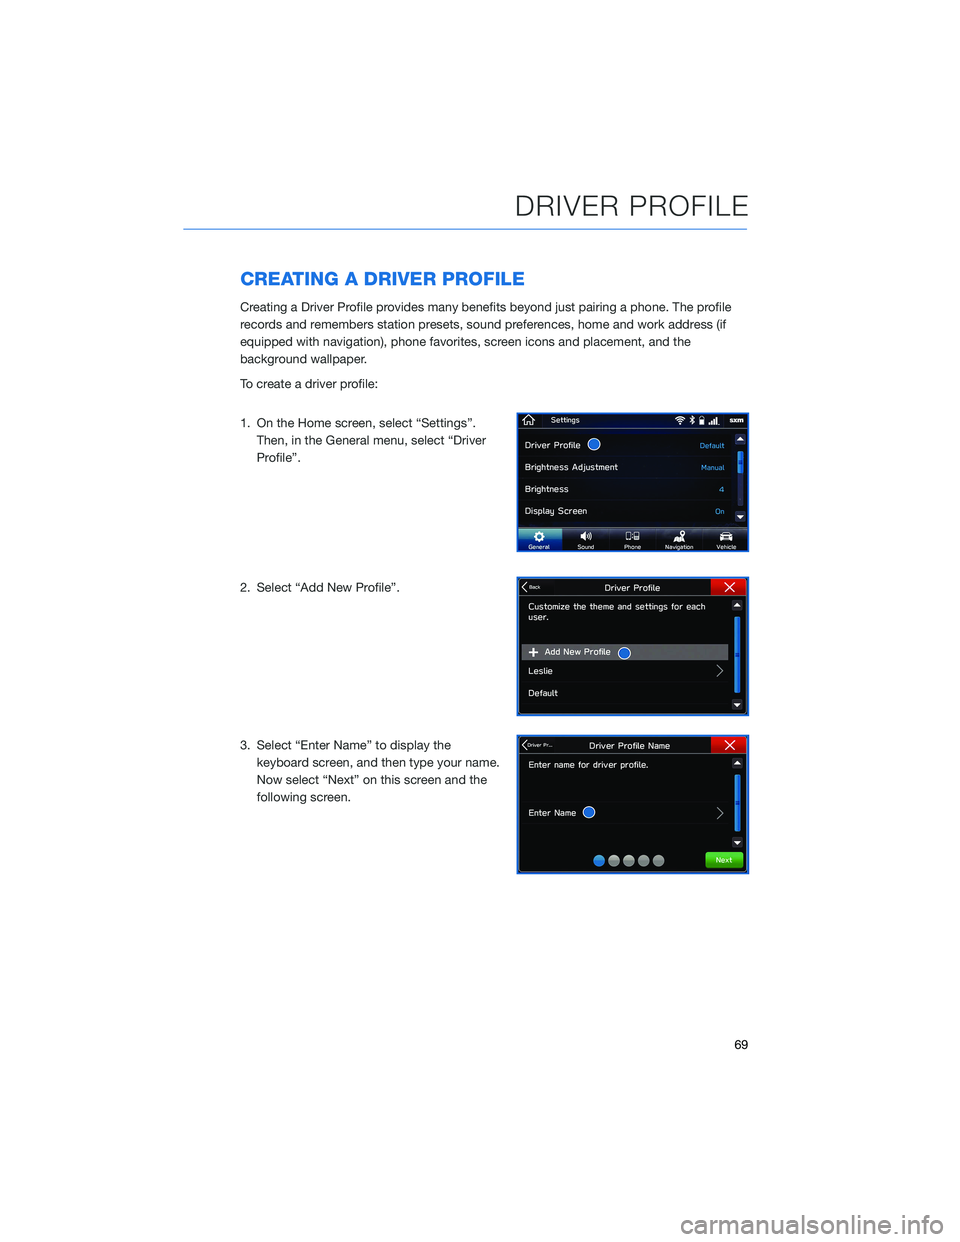
1. On the Home screen, select “Settings”.
Then, in the General menu, select “Driver
Profile”.
2. Select “Add New Profile”.
3. Select “Enter Name” to display the
keyboard screen, and then type your name.
Now select “Next” on this screen and the
following screen.
DRIVER PROFILE
69
Page 75 of 148
PAIRING A PHONE
To begin using your Bluetooth®hands-free device you must first
pair your phone with the system. Phone pairing provides access to
the contact list on your phone and allows you to use the voice
recognition system to make and receive calls. The system can also
read incoming text messages, as well as allowing you send short
messages to reply to texts. The system automatically reconnects to
your Bluetooth
®device and will remember your driver profile.
Visitwww.subaru.com/engineering/starlink/multimedia.htmlfor
more information on what is available by connecting a phone to the
Touchscreen.
For instructions on how to pair your phone to the Touchscreen, see page 111 for
Android devices or page 115 for Apple devices.
MAKING A CALL
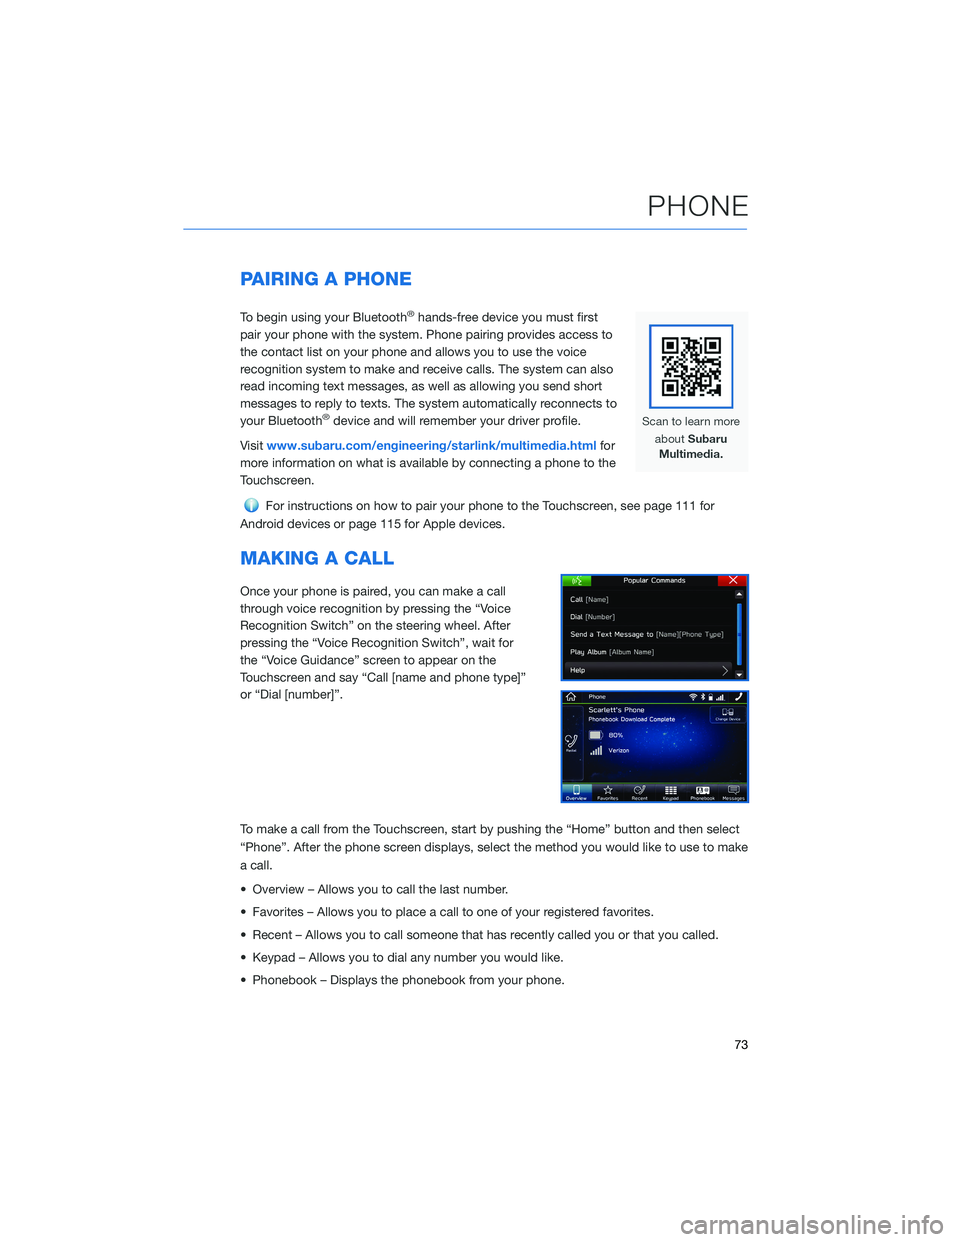
Once your phone is paired, you can make a call
through voice recognition by pressing the “Voice
Recognition Switch” on the steering wheel. After
pressing the “Voice Recognition Switch”, wait for
the “Voice Guidance” screen to appear on the
Touchscreen and say “Call [name and phone type]”
or “Dial [number]”.
To make a call from the Touchscreen, start by pushing the “Home” button and then select
“Phone”. After the phone screen displays, select the method you would like to use to make
a call.
• Overview – Allows you to call the last number.
• Favorites – Allows you to place a call to one of your registered favorites.
• Recent – Allows you to call someone that has recently called you or that you called.
• Keypad – Allows you to dial any number you would like.
• Phonebook – Displays the phonebook from your phone.
PHONE
73
Page 83 of 148
SAFETY AND SECURITY OVERVIEW
STARLINK®Safety and Security services* are designed to help in your time of need. These
include Advanced Automatic Collision Notification, SOS Emergency Assistance, Enhanced
Roadside Assistance, Stolen Vehicle Recovery, the added convenience of Remote Engine
Start with Climate Control, and so much more.
With the SUBARU STARLINK
®system integrated into your vehicle, advanced safety and
security technology is just a button press away. The SUBARU STARLINK®experience
includes in-vehicle call center support, maintenance and diagnostic alerts as well as
remote services that keep you connected to your Subaru vehicle.
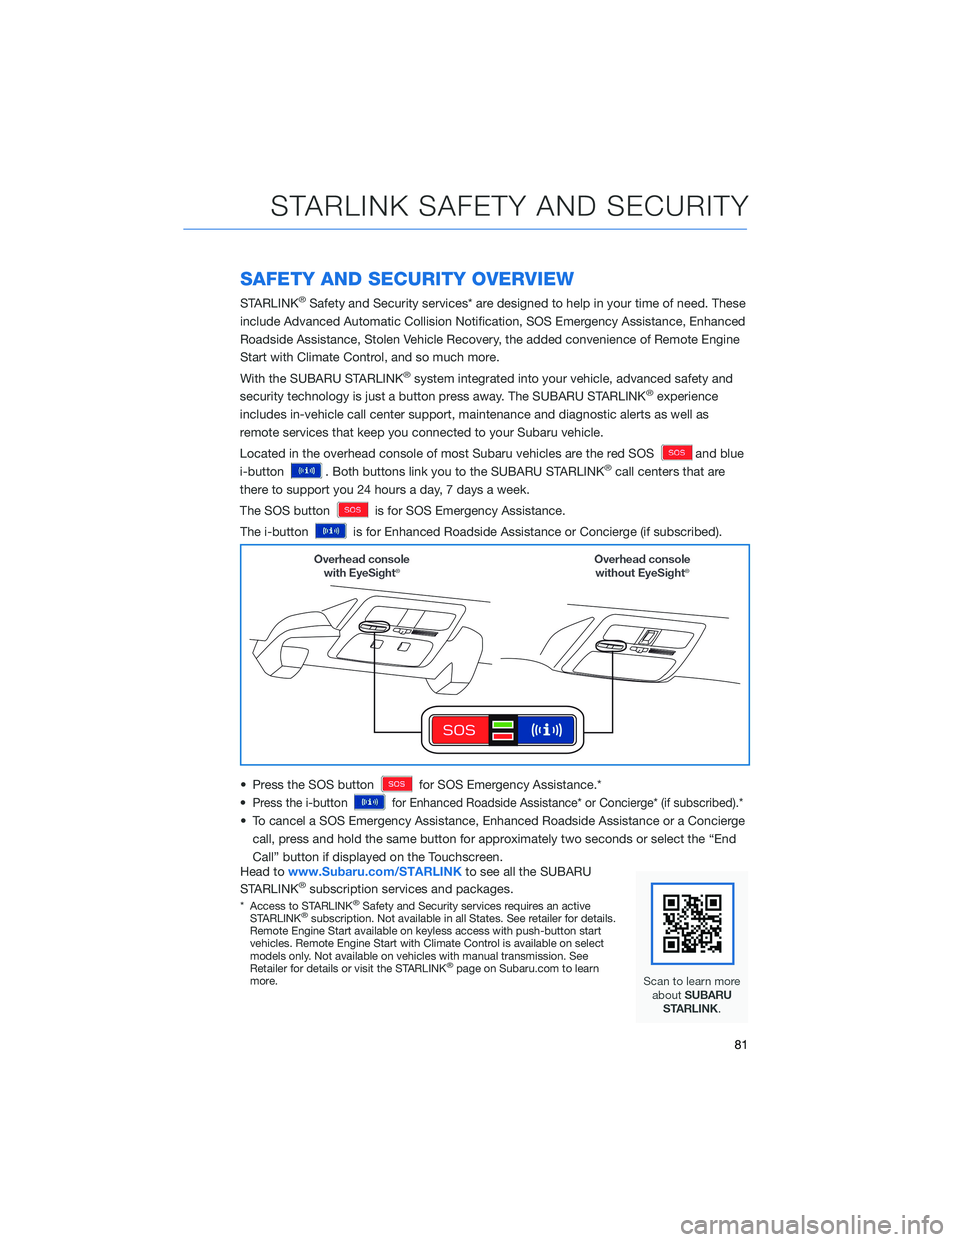
Located in the overhead console of most Subaru vehicles are the red SOS
and blue
i-button
. Both buttons link you to the SUBARU STARLINK®call centers that are
there to support you 24 hours a day, 7 days a week.
The SOS button
is for SOS Emergency Assistance.
The i-button
is for Enhanced Roadside Assistance or Concierge (if subscribed).
• Press the SOS button
for SOS Emergency Assistance.*
•
Press the i-buttonfor Enhanced Roadside Assistance* or Concierge* (if subscribed).*
• To cancel a SOS Emergency Assistance, Enhanced Roadside Assistance or a Concierge
call, press and hold the same button for approximately two seconds or select the “End
Call” button if displayed on the Touchscreen.
Head towww.Subaru.com/STARLINKto see all the SUBARU
STARLINK
®subscription services and packages.
* Access to STARLINK®Safety and Security services requires an active
STARLINK®subscription. Not available in all States. See retailer for details.
Remote Engine Start available on keyless access with push-button start
vehicles. Remote Engine Start with Climate Control is available on select
models only. Not available on vehicles with manual transmission. See
Retailer for details or visit the STARLINK
®page on Subaru.com to learn
more.
STARLINK SAFETY AND SECURITY
81
Page 110 of 148
MEMORY HEIGHT(if equipped)
You can set where the Power Rear Gate stops when it opens.
This is a great feature to limit the upward travel of the rear gate to
ensure you can reach it or to prevent the rear gate from contacting a
garage ceiling. You can learn more about setting the Power Rear
Gate Memory Height from the how-to video linked in the QR code
and the following steps.
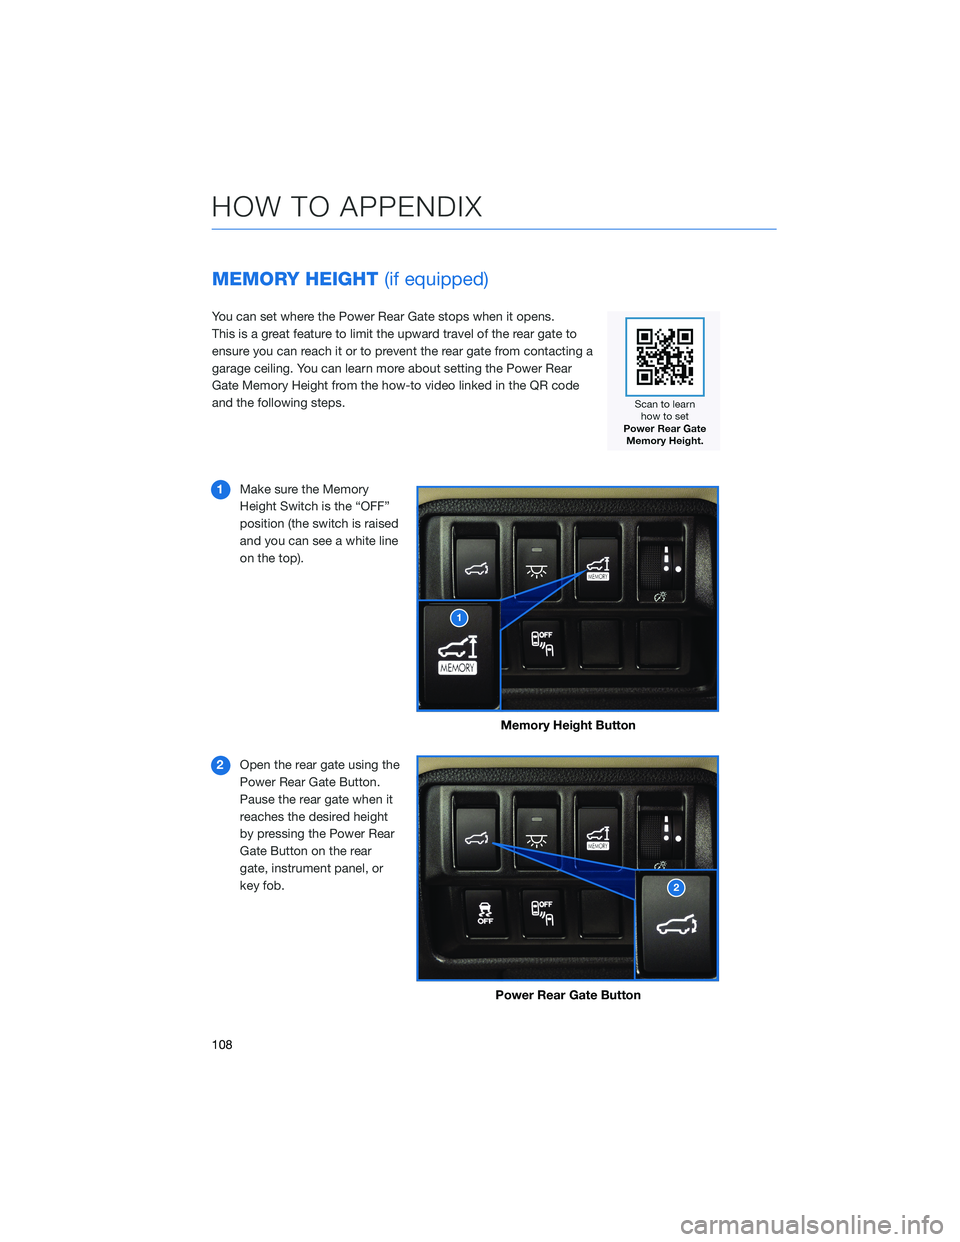
1Make sure the Memory
Height Switch is the “OFF”
position (the switch is raised
and you can see a white line
on the top).
2Open the rear gate using the
Power Rear Gate Button.
Pause the rear gate when it
reaches the desired height
by pressing the Power Rear
Gate Button on the rear
gate, instrument panel, or
key fob.
Memory Height Button
Power Rear Gate Button
HOW TO APPENDIX
108
Page 111 of 148
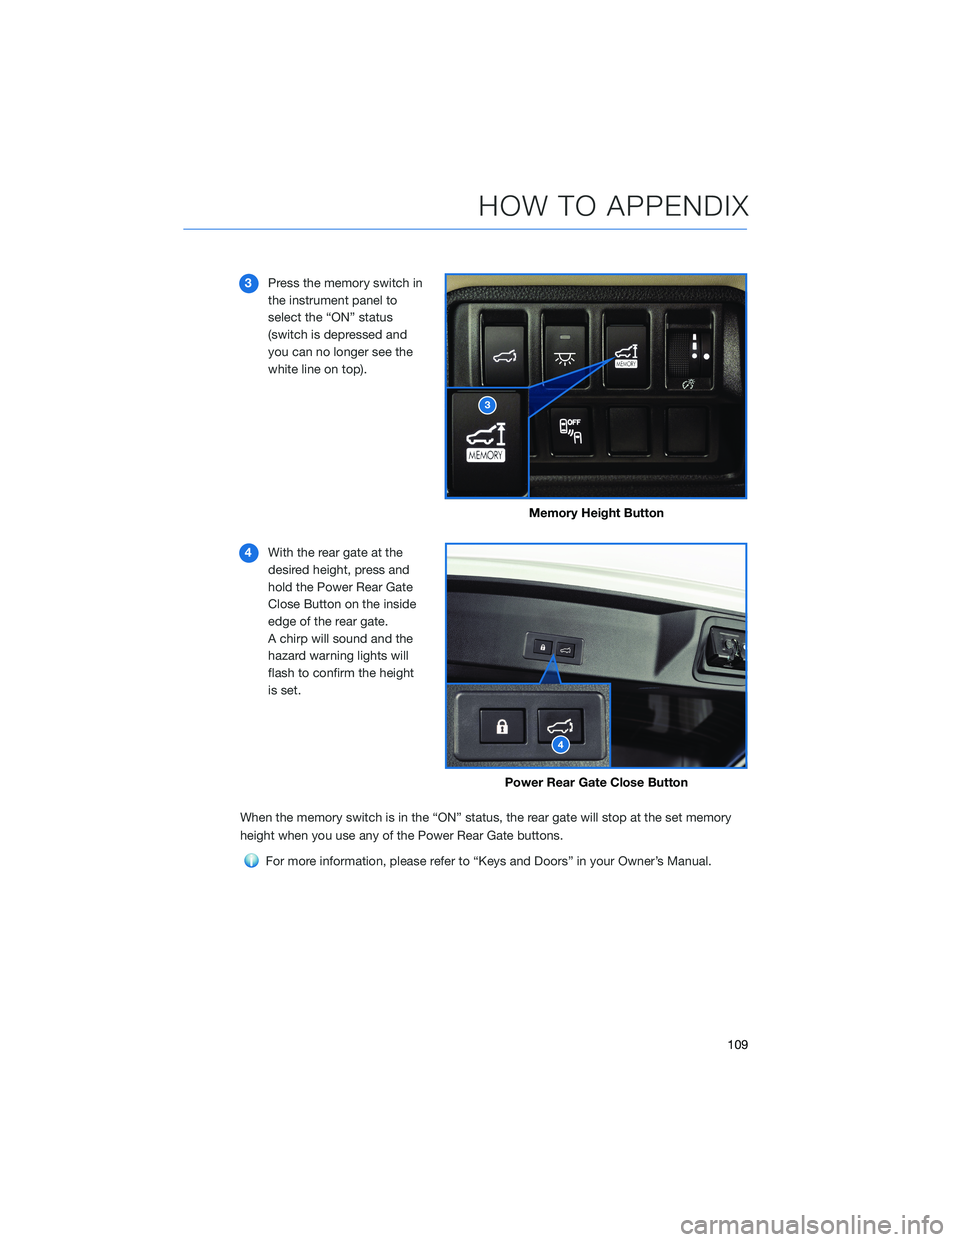
3Press the memory switch in
the instrument panel to
select the “ON” status
(switch is depressed and
you can no longer see the
white line on top).
4With the rear gate at the
desired height, press and
hold the Power Rear Gate
Close Button on the inside
edge of the rear gate.
A chirp will sound and the
hazard warning lights will
flash to confirm the height
is set.
When the memory switch is in the “ON” status, the rear gate will stop at the set memory
height when you use any of the Power Rear Gate buttons.
For more information, please refer to “Keys and Doors” in your Owner’s Manual.
Memory Height Button
Power Rear Gate Close Button
HOW TO APPENDIX
109
Page 112 of 148
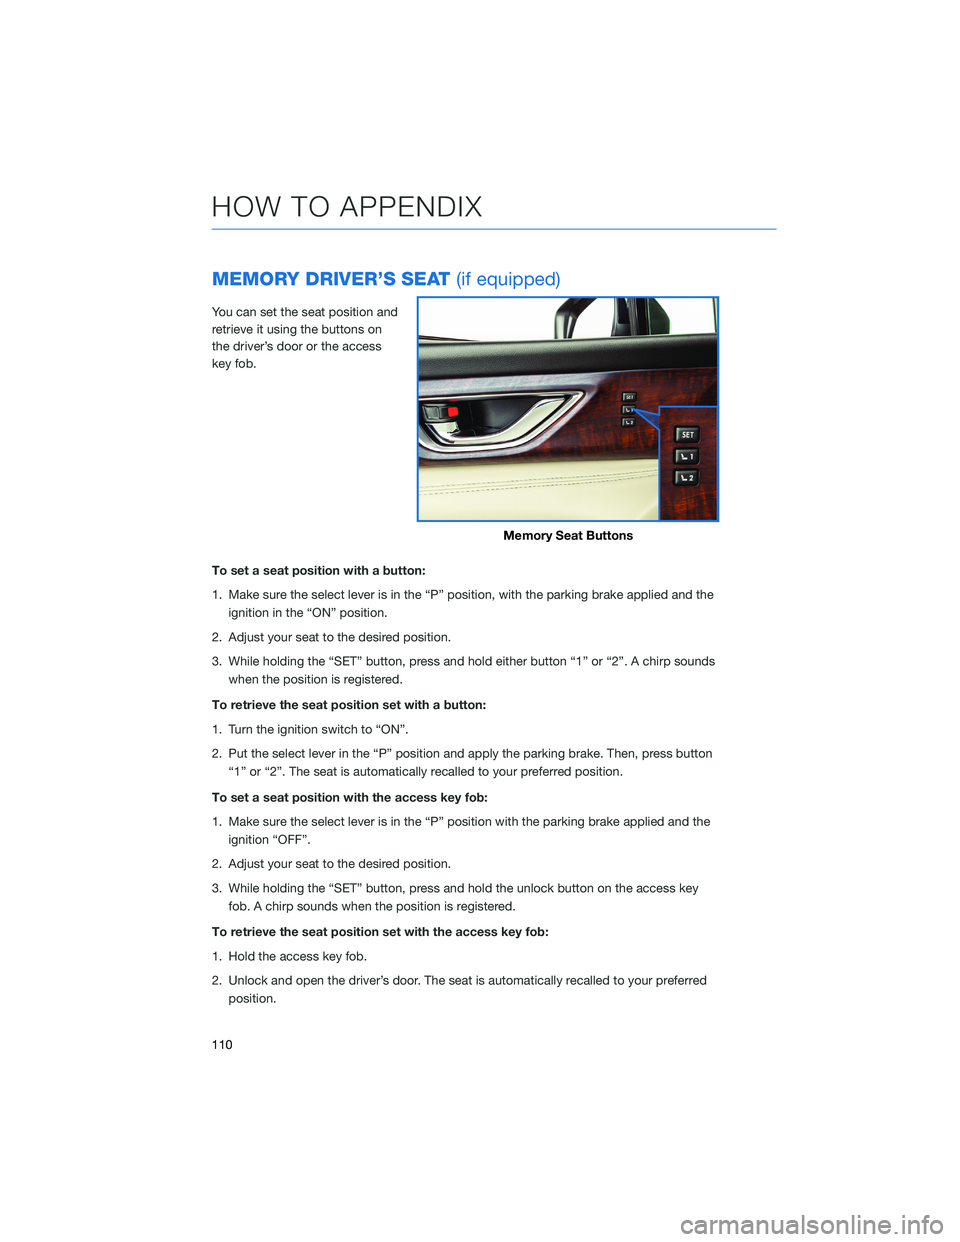
MEMORY DRIVER’S SEAT(if equipped)
You can set the seat position and
retrieve it using the buttons on
the driver’s door or the access
key fob.
To set a seat position with a button:
1. Make sure the select lever is in the “P” position, with the parking brake applied and the
ignition in the “ON” position.
2. Adjust your seat to the desired position.
3. While holding the “SET” button, press and hold either button “1” or “2”. A chirp sounds
when the position is registered.
To retrieve the seat position set with a button:
1. Turn the ignition switch to “ON”.
2. Put the select lever in the “P” position and apply the parking brake. Then, press button
“1” or “2”. The seat is automatically recalled to your preferred position.
To set a seat position with the access key fob:
1. Make sure the select lever is in the “P” position with the parking brake applied and the
ignition “OFF”.
2. Adjust your seat to the desired position.
3. While holding the “SET” button, press and hold the unlock button on the access key
fob. A chirp sounds when the position is registered.
To retrieve the seat position set with the access key fob:
1. Hold the access key fob.
2. Unlock and open the driver’s door. The seat is automatically recalled to your preferred
position.
Memory Seat Buttons
HOW TO APPENDIX
110
Page 127 of 148
MAPS(if equipped)
Finding a Destination by Address
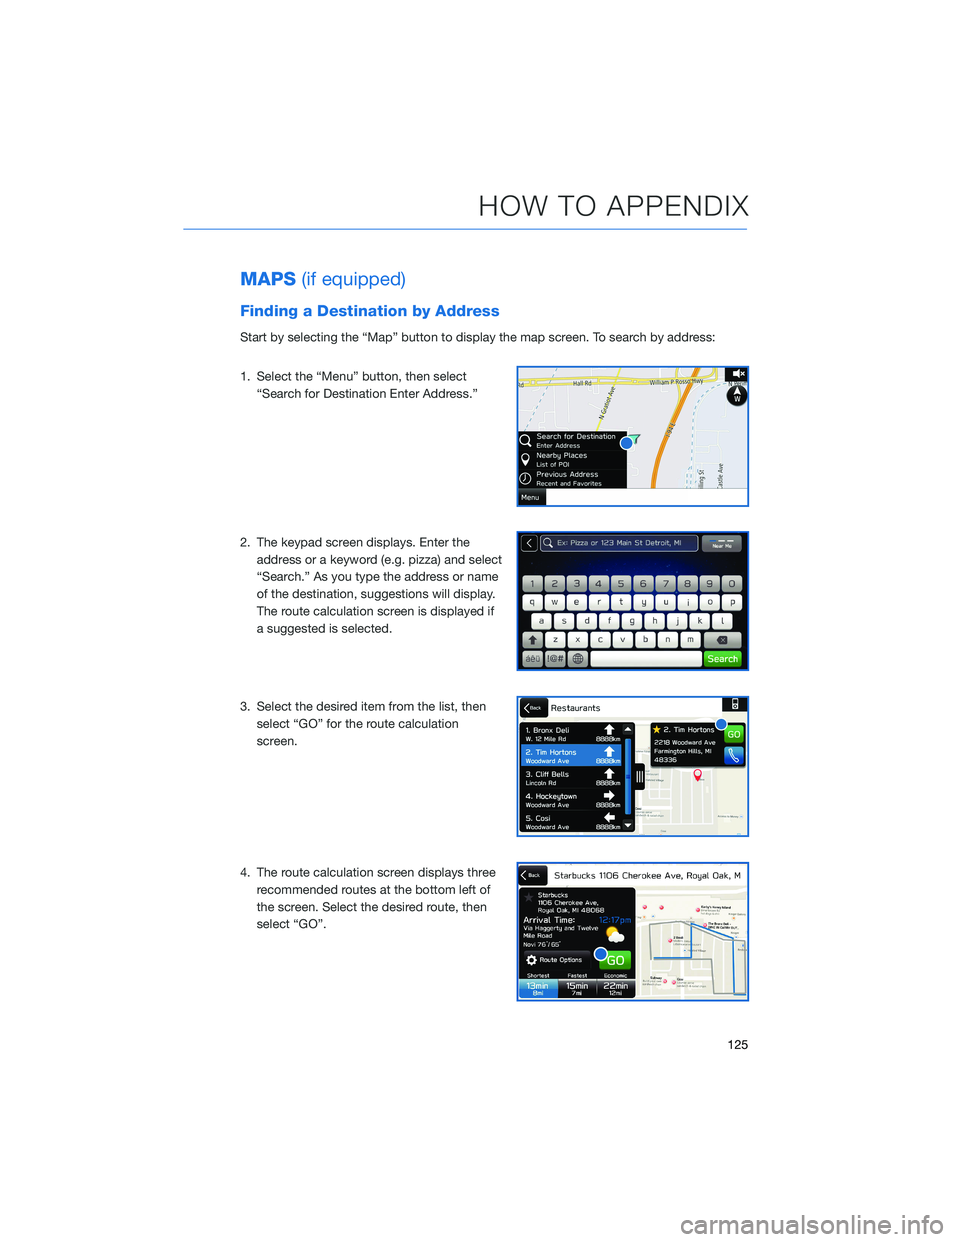
Start by selecting the “Map” button to display the map screen. To search by address:
1. Select the “Menu” button, then select
“Search for Destination Enter Address.”
2. The keypad screen displays. Enter the
address or a keyword (e.g. pizza) and select
“Search.” As you type the address or name
of the destination, suggestions will display.
The route calculation screen is displayed if
a suggested is selected.
3. Select the desired item from the list, then
select “GO” for the route calculation
screen.
4. The route calculation screen displays three
recommended routes at the bottom left of
the screen. Select the desired route, then
select “GO”.
HOW TO APPENDIX
125
Page 137 of 148
F
FIRMWARE AND SOFTWARE
UPDATES . . . ............ 133
FOLDING THE REAR SEATS....... 49
Second-Row Seat . . . . .......49
Third-Row Seat . . . . .........50
FRONT VIEW MONITOR . . . . . . . . 101
FUEL FILLER LID . . . .......... 47
FUEL SPECIFICATIONS AND
CAPACITY . . . . ............ 47
FUNCTIONS . . . . ............ 91
Advanced Adaptive Cruise Control
with Lane Centering . . . . . . . . . . 94
Conventional Cruise Control......96
Lane Departure Prevention . . . . . . 94
Lane Departure Warning . . . . . . . . 93
Lane Sway Warning..........93
Lead Vehicle Start Alert . . . . . . . . 96
Pre-Collision Brake Assist.......92
Pre-Collision Braking..........92
Pre-Collision Throttle Management . . 92
H
HIGH BEAM ASSIST (HBA) . . . . . . . 103
HOME SCREEN ICONS . . . . . . . . . 67
HOOD PROP . . . . ............ 55
HOW TO OVERVIEW .......... 107
I
IGNITION SWITCH . ........... 41
IMPORTANT SAFETY INFORMATION . . 4
IN CASE OF EMERGENCY . . . . . . . . 5
Subaru Roadside Assistance . . . . . . 5
SUBARU STARLINK
®Safety and
Security . . . . . . . . . .........5
INSTRUMENT PANEL SWITCHES
(LOWER LEFT) . . . . . . . . . . . . . 18
i/SET SWITCH . . . . ........... 19J
JACK AND TOOLS . . .......... 54
K
KEYLESS ACCESS WITH PUSH BUTTON
START .................. 9
Locking Using Door Handles ......9
Locking Using the Rear Gate . . . . . 10
Unlocking Using Door Handles .....9
Unlocking Using the Rear Gate....10
KEYLESS ENTRY . ............. 7
Automatic Door Locking/Unlocking . . 8
L
LANE DEPARTURE WARNING AND
PRE-COLLISION BRAKING SYSTEM
OFF .................. 100
Lane Departure Warning
OFF Switch . . . ............100
Pre-Collision Braking System
OFF Switch . . . ............100
LATCH/ANCHOR . . ........... 51
LIGHT CONTROLS . ........... 20
Daytime Running Lights . .......21
Illumination Brightness . ........21
M
MAKING A CALL . . . .......... 73
MAPS . . . ................ 125
Arrival Time/Distance.........130
Canceling Guidance . . ........130
Finding a Destination by Address . . 125
Finding a Destination by POI.....126
Guidance Screen Icons . .......128
Map Updates .............131
Map View/Perspective . . . .....129
Map Zoom . . . . . . . . . ......128
Nearest Gas Station ..........130
Route Options . . . . . . . ......127
INDEX
135