Eco SUBARU ASCENT 2022 Getting Started Guide
[x] Cancel search | Manufacturer: SUBARU, Model Year: 2022, Model line: ASCENT, Model: SUBARU ASCENT 2022Pages: 148, PDF Size: 40.03 MB
Page 88 of 148
MAPS/NAVIGATION
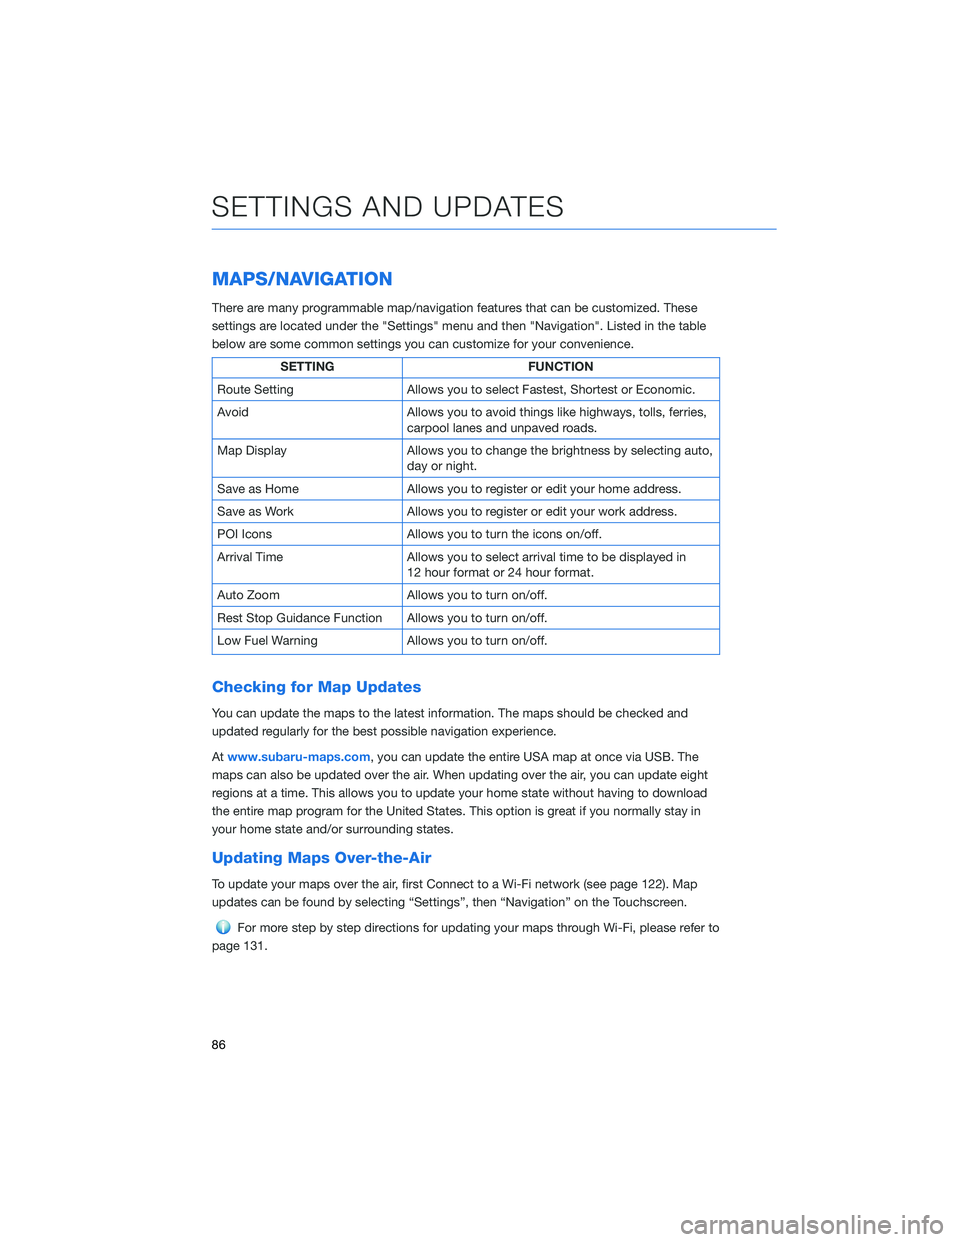
There are many programmable map/navigation features that can be customized. These
settings are located under the "Settings" menu and then "Navigation". Listed in the table
below are some common settings you can customize for your convenience.
SETTING FUNCTION
Route Setting Allows you to select Fastest, Shortest or Economic.
Avoid Allows you to avoid things like highways, tolls, ferries,
carpool lanes and unpaved roads.
Map Display Allows you to change the brightness by selecting auto,
day or night.
Save as Home Allows you to register or edit your home address.
Save as Work Allows you to register or edit your work address.
POI Icons Allows you to turn the icons on/off.
Arrival Time Allows you to select arrival time to be displayed in
12 hour format or 24 hour format.
Auto Zoom Allows you to turn on/off.
Rest Stop Guidance Function Allows you to turn on/off.
Low Fuel Warning Allows you to turn on/off.
Checking for Map Updates
You can update the maps to the latest information. The maps should be checked and
updated regularly for the best possible navigation experience.
Atwww.subaru-maps.com, you can update the entire USA map at once via USB. The
maps can also be updated over the air. When updating over the air, you can update eight
regions at a time. This allows you to update your home state without having to download
the entire map program for the United States. This option is great if you normally stay in
your home state and/or surrounding states.
Updating Maps Over-the-Air
To update your maps over the air, first Connect to a Wi-Fi network (see page 122). Map
updates can be found by selecting “Settings”, then “Navigation” on the Touchscreen.
For more step by step directions for updating your maps through Wi-Fi, please refer to
page 131.
SETTINGS AND UPDATES
86
Page 98 of 148
Conventional Cruise Control
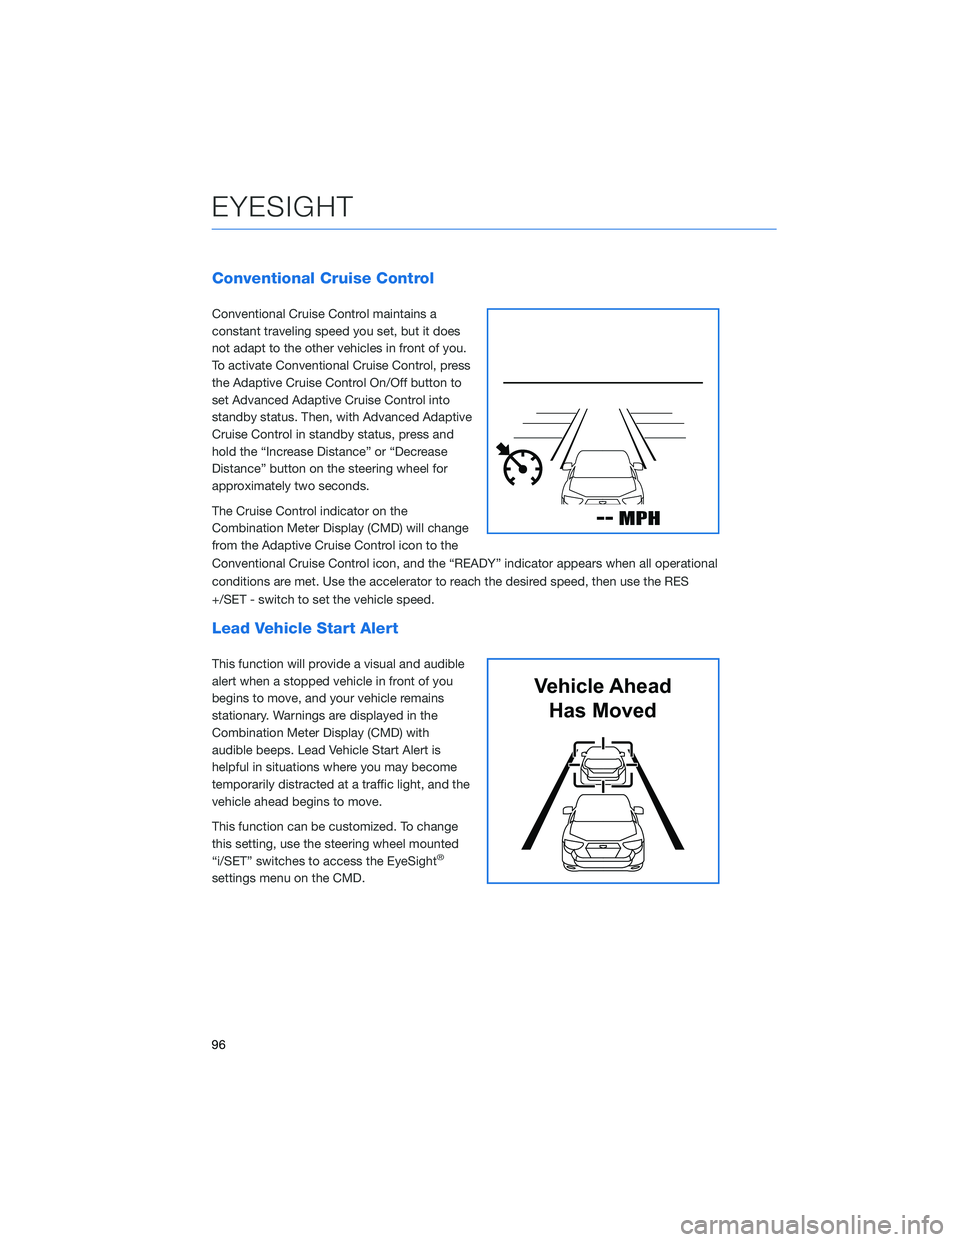
Conventional Cruise Control maintains a
constant traveling speed you set, but it does
not adapt to the other vehicles in front of you.
To activate Conventional Cruise Control, press
the Adaptive Cruise Control On/Off button to
set Advanced Adaptive Cruise Control into
standby status. Then, with Advanced Adaptive
Cruise Control in standby status, press and
hold the “Increase Distance” or “Decrease
Distance” button on the steering wheel for
approximately two seconds.
The Cruise Control indicator on the
Combination Meter Display (CMD) will change
from the Adaptive Cruise Control icon to the
Conventional Cruise Control icon, and the “READY” indicator appears when all operational
conditions are met. Use the accelerator to reach the desired speed, then use the RES
+/SET - switch to set the vehicle speed.
Lead Vehicle Start Alert
This function will provide a visual and audible
alert when a stopped vehicle in front of you
begins to move, and your vehicle remains
stationary. Warnings are displayed in the
Combination Meter Display (CMD) with
audible beeps. Lead Vehicle Start Alert is
helpful in situations where you may become
temporarily distracted at a traffic light, and the
vehicle ahead begins to move.
This function can be customized. To change
this setting, use the steering wheel mounted
“i/SET” switches to access the EyeSight
®
settings menu on the CMD.
Vehicle Ahead
Has Moved
EYESIGHT
96
Page 99 of 148
STEERING WHEEL CONTROLS
Advanced Adaptive Cruise Control
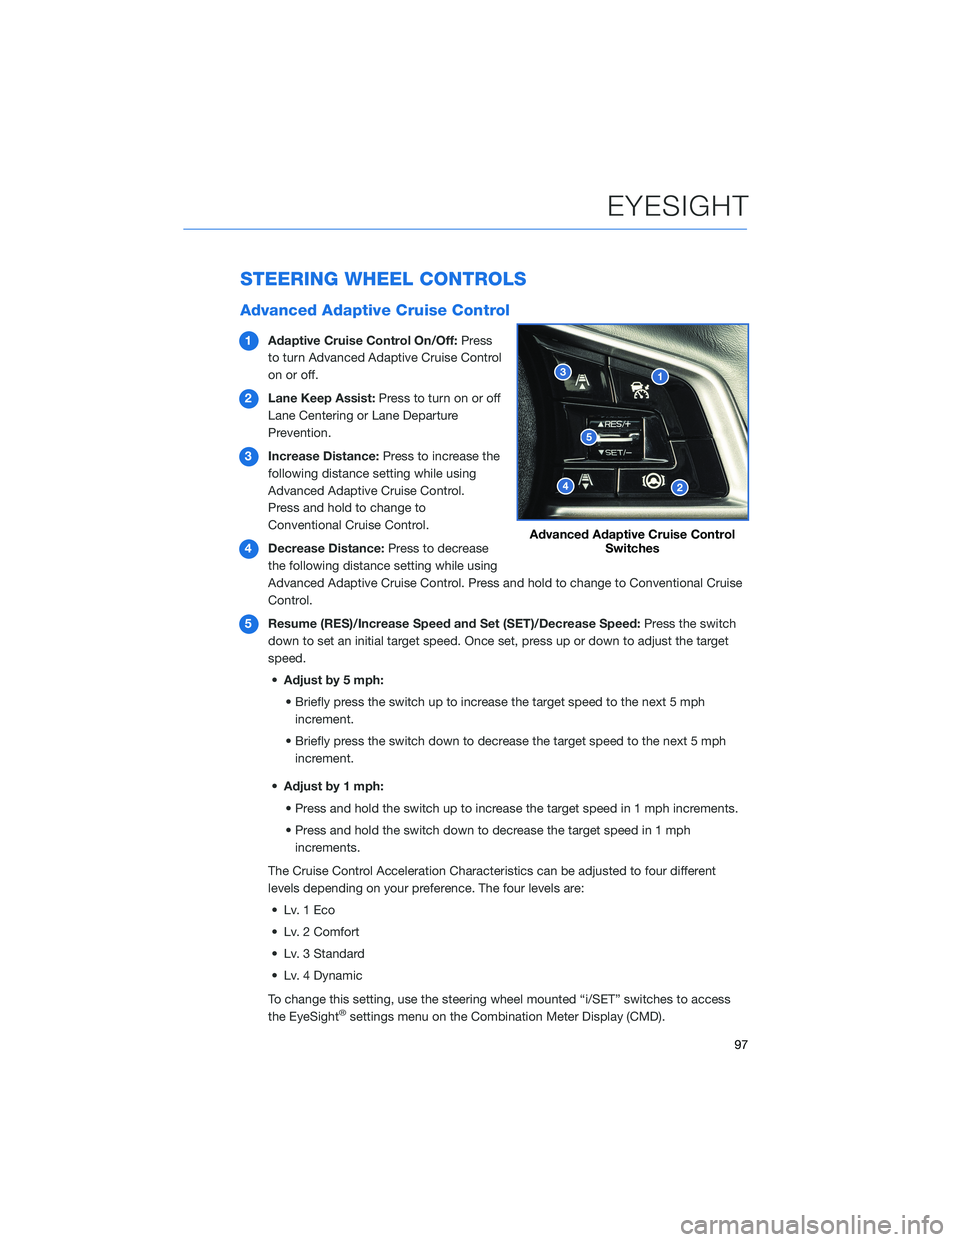
1Adaptive Cruise Control On/Off:Press
to turn Advanced Adaptive Cruise Control
on or off.
2Lane Keep Assist:Press to turn on or off
Lane Centering or Lane Departure
Prevention.
3Increase Distance:Press to increase the
following distance setting while using
Advanced Adaptive Cruise Control.
Press and hold to change to
Conventional Cruise Control.
4Decrease Distance:Press to decrease
the following distance setting while using
Advanced Adaptive Cruise Control. Press and hold to change to Conventional Cruise
Control.
5Resume (RES)/Increase Speed and Set (SET)/Decrease Speed:Press the switch
down to set an initial target speed. Once set, press up or down to adjust the target
speed.
•Adjust by 5 mph:
• Briefly press the switch up to increase the target speed to the next 5 mph
increment.
• Briefly press the switch down to decrease the target speed to the next 5 mph
increment.
•Adjust by 1 mph:
• Press and hold the switch up to increase the target speed in 1 mph increments.
• Press and hold the switch down to decrease the target speed in 1 mph
increments.
The Cruise Control Acceleration Characteristics can be adjusted to four different
levels depending on your preference. The four levels are:
• Lv. 1 Eco
• Lv. 2 Comfort
• Lv. 3 Standard
• Lv. 4 Dynamic
To change this setting, use the steering wheel mounted “i/SET” switches to access
the EyeSight
®settings menu on the Combination Meter Display (CMD).
Advanced Adaptive Cruise Control
Switches
EYESIGHT
97
Page 100 of 148
Customizing EyeSight®Settings
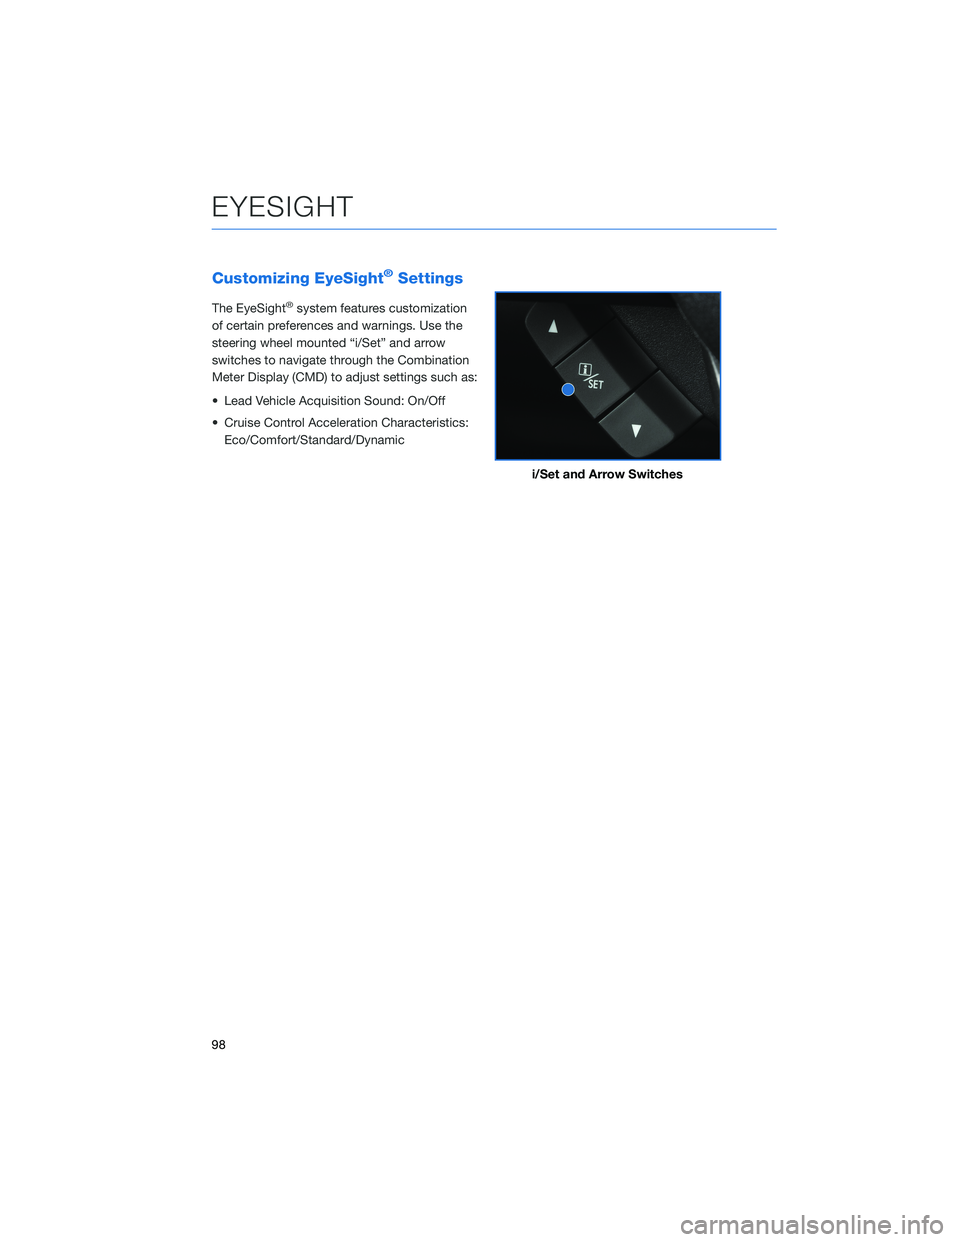
The EyeSight®system features customization
of certain preferences and warnings. Use the
steering wheel mounted “i/Set” and arrow
switches to navigate through the Combination
Meter Display (CMD) to adjust settings such as:
• Lead Vehicle Acquisition Sound: On/Off
• Cruise Control Acceleration Characteristics:
Eco/Comfort/Standard/Dynamic
i/Set and Arrow Switches
EYESIGHT
98
Page 102 of 148
LANE DEPARTURE WARNING AND PRE-COLLISION
BRAKING SYSTEM OFF SWITCHES
Lane Departure Warning OFF Switch
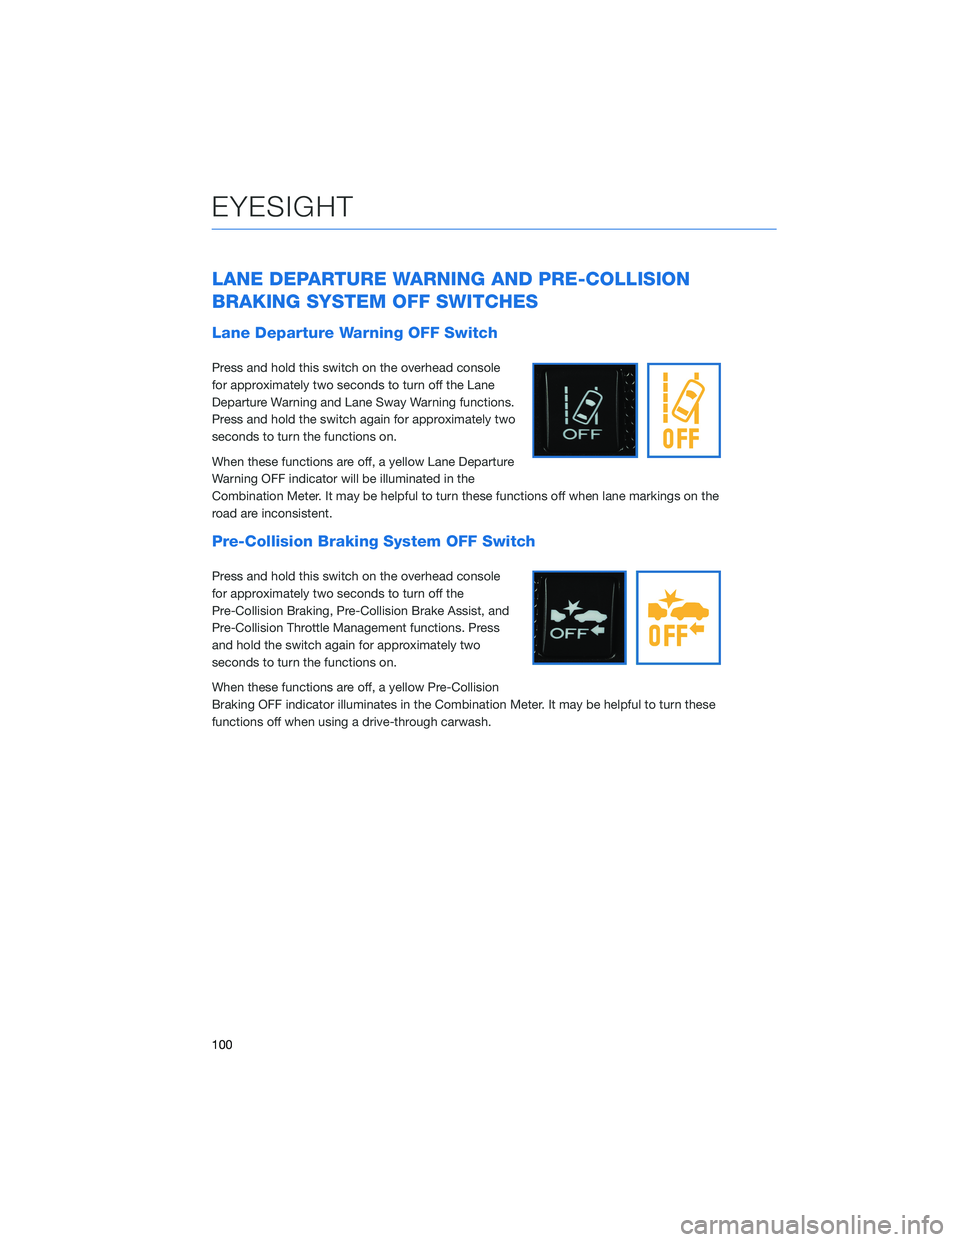
Press and hold this switch on the overhead console
for approximately two seconds to turn off the Lane
Departure Warning and Lane Sway Warning functions.
Press and hold the switch again for approximately two
seconds to turn the functions on.
When these functions are off, a yellow Lane Departure
Warning OFF indicator will be illuminated in the
Combination Meter. It may be helpful to turn these functions off when lane markings on the
road are inconsistent.
Pre-Collision Braking System OFF Switch
Press and hold this switch on the overhead console
for approximately two seconds to turn off the
Pre-Collision Braking, Pre-Collision Brake Assist, and
Pre-Collision Throttle Management functions. Press
and hold the switch again for approximately two
seconds to turn the functions on.
When these functions are off, a yellow Pre-Collision
Braking OFF indicator illuminates in the Combination Meter. It may be helpful to turn these
functions off when using a drive-through carwash.
EYESIGHT
100
Page 105 of 148
HIGH BEAM ASSIST (HBA)
This function uses the EyeSight®cameras to automatically switch the
headlights between high and low beam settings, enhancing safety for
both you and other drivers on the road. To activate High Beam Assist,
set the headlight control switch to the “AUTO” position and push the
headlight lever forward to the high beam position. The green HBA
indicator illuminates on the Combination Meter.
HBA automatically activates the high beams when the forward area is dark, there are no
preceding/oncoming vehicles or sharp curves in the road, and your speed is approximately
20 mph or greater. When a preceding/oncoming vehicle is detected, the forward area is
bright, your speed decreases to 10 mph or less, or the EyeSight
®system is malfunctioning
or is temporarily stopped, HBA automatically switches to low beams.
STEERING RESPONSIVE HEADLIGHTS (SRH)
The Steering Responsive Headlights (SRH) system aims the headlight beams in the
direction you are steering, improving visibility at corners and intersections when driving at
night. You can turn the SRH system on or off using the steering wheel mounted “i/SET”
switches to access the settings menu on the Combination Meter Display (CMD).
For more information, please refer to “Instruments and Controls” in your Owner’s
Manual.
REVERSE AUTOMATIC BRAKING (RAB)(if equipped)
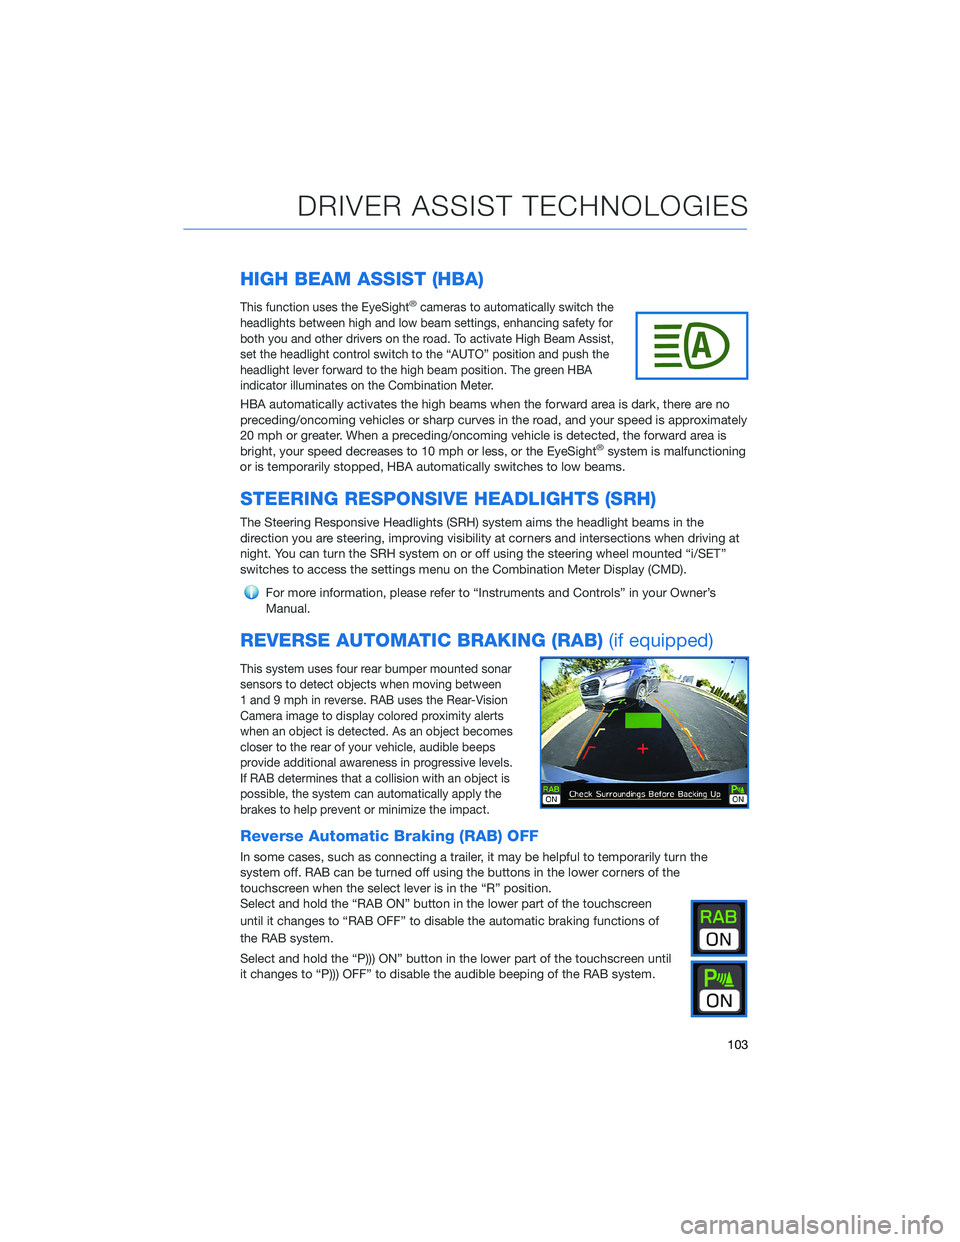
This system uses four rear bumper mounted sonar
sensors to detect objects when moving between
1 and 9 mph in reverse. RAB uses the Rear-Vision
Camera image to display colored proximity alerts
when an object is detected. As an object becomes
closer to the rear of your vehicle, audible beeps
provide additional awareness in progressive levels.
If RAB determines that a collision with an object is
possible, the system can automatically apply the
brakes to help prevent or minimize the impact.
Reverse Automatic Braking (RAB) OFF
In some cases, such as connecting a trailer, it may be helpful to temporarily turn the
system off. RAB can be turned off using the buttons in the lower corners of the
touchscreen when the select lever is in the “R” position.
Select and hold the “RAB ON” button in the lower part of the touchscreen
until it changes to “RAB OFF” to disable the automatic braking functions of
the RAB system.
Select and hold the “P))) ON” button in the lower part of the touchscreen until
it changes to “P))) OFF” to disable the audible beeping of the RAB system.
DRIVER ASSIST TECHNOLOGIES
103
Page 108 of 148
EYESIGHT®DISCLAIMER
EyeSight®is a driver assist technology which may not operate optimally under all driving
conditions. The driver is always responsible for safe and attentive driving. System
effectiveness depends on many factors such as vehicle maintenance, weather and road
conditions. See Owner’s Manual for complete details on system operations and limitations.
The Pre-Collision Braking system is designed to provide automatic braking that either
prevents a collision or reduces the severity of a frontal impact.
The Pre-Collision Throttle Management system is designed to reduce acceleration and
minimize the severity of certain frontal impacts.
Advanced Adaptive Cruise Control and Brake Light Recognition are designed to assist the
driver and are not substitutes for safe and attentive driving.
Lane Centering function operates only when used in conjunction with Advanced Adaptive
Cruise Control.
Lane Departure Prevention operates only when the lane markings are visible, and system
effectiveness depends on many factors.
Blind-Spot Detection, Lane Change Assist and Rear Cross Traffic Alert are systems
designed to assist the driver by monitoring the rear and side areas of the vehicle during a
lane change or reversing and are not a substitute for safe and attentive driving.
The Reverse Automatic Braking System is not a substitute for safe and attentive driving.
System effectiveness depends on many factors, such as vehicle maintenance, weather
and road conditions. Always exercise caution and use vehicle mirrors and the Rear-Vision
Camera when backing up. See Owner’s Manual for complete details on system operation
and limitations.
EYESIGHT DISCLAIMER
106
Page 120 of 148
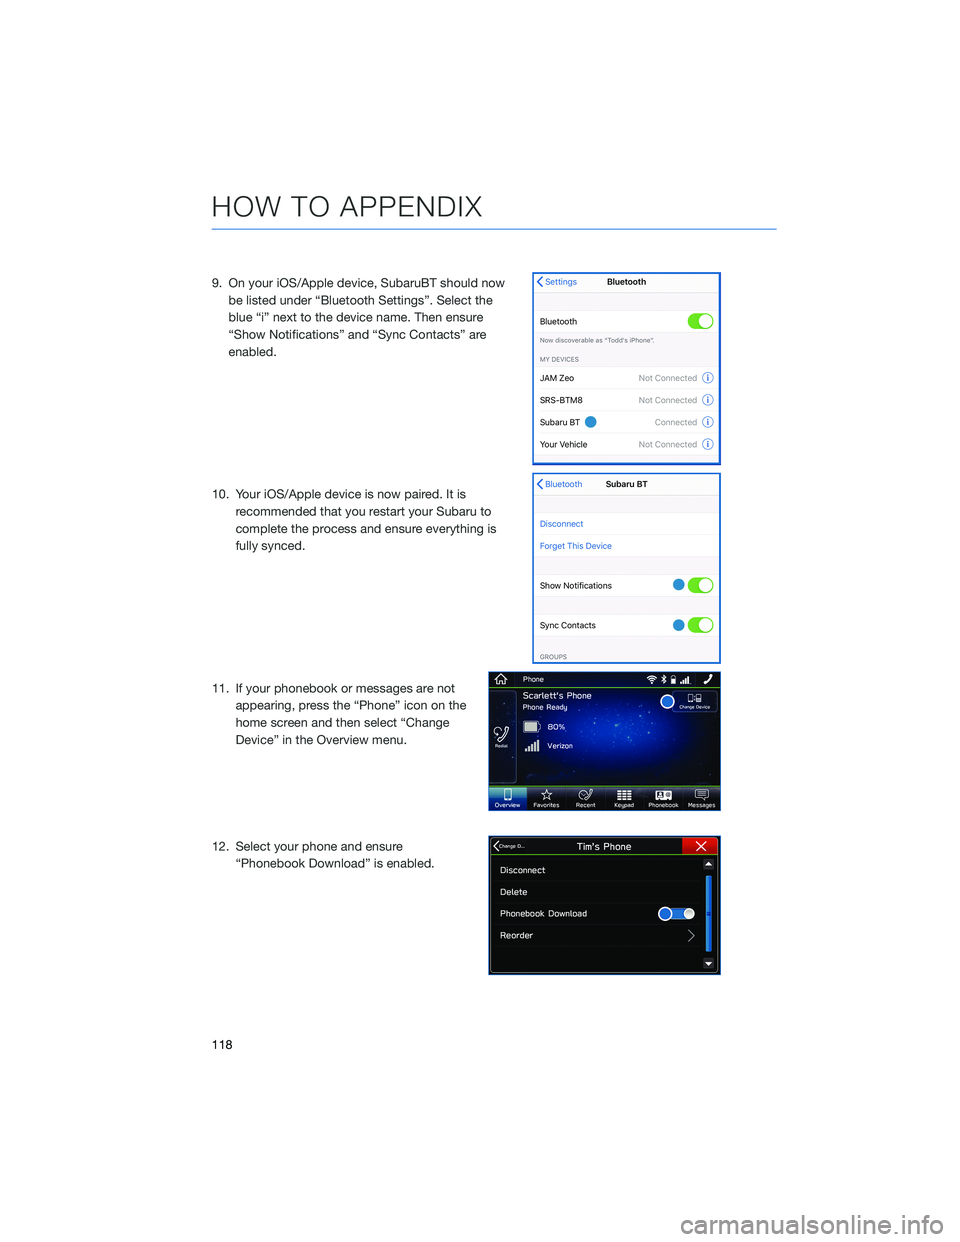
9. On your iOS/Apple device, SubaruBT should now
be listed under “Bluetooth Settings”. Select the
blue “i” next to the device name. Then ensure
“Show Notifications” and “Sync Contacts” are
enabled.
10. Your iOS/Apple device is now paired. It is
recommended that you restart your Subaru to
complete the process and ensure everything is
fully synced.
11. If your phonebook or messages are not
appearing, press the “Phone” icon on the
home screen and then select “Change
Device” in the Overview menu.
12. Select your phone and ensure
“Phonebook Download” is enabled.
HOW TO APPENDIX
118
Page 127 of 148
MAPS(if equipped)
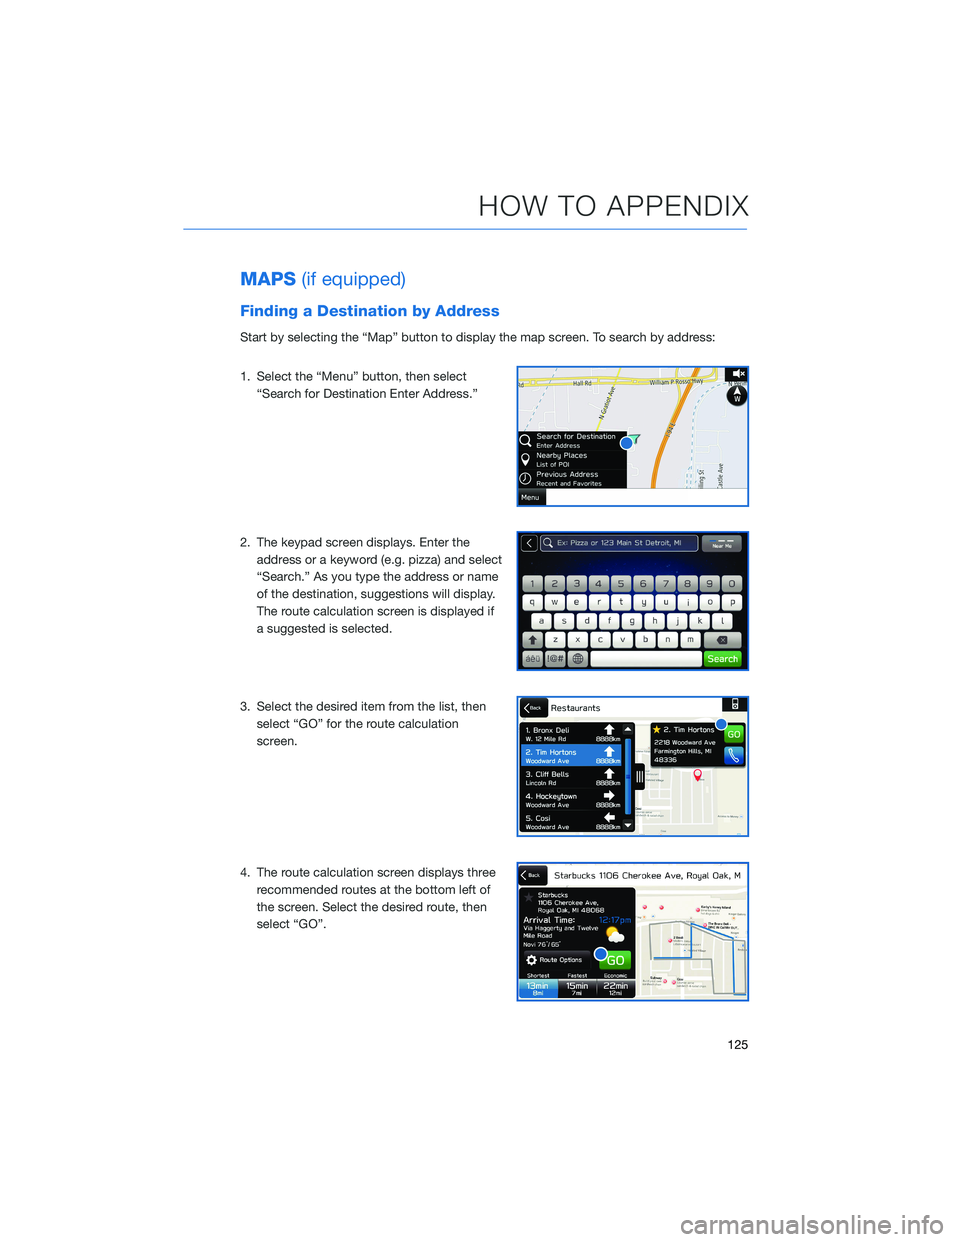
Finding a Destination by Address
Start by selecting the “Map” button to display the map screen. To search by address:
1. Select the “Menu” button, then select
“Search for Destination Enter Address.”
2. The keypad screen displays. Enter the
address or a keyword (e.g. pizza) and select
“Search.” As you type the address or name
of the destination, suggestions will display.
The route calculation screen is displayed if
a suggested is selected.
3. Select the desired item from the list, then
select “GO” for the route calculation
screen.
4. The route calculation screen displays three
recommended routes at the bottom left of
the screen. Select the desired route, then
select “GO”.
HOW TO APPENDIX
125
Page 128 of 148
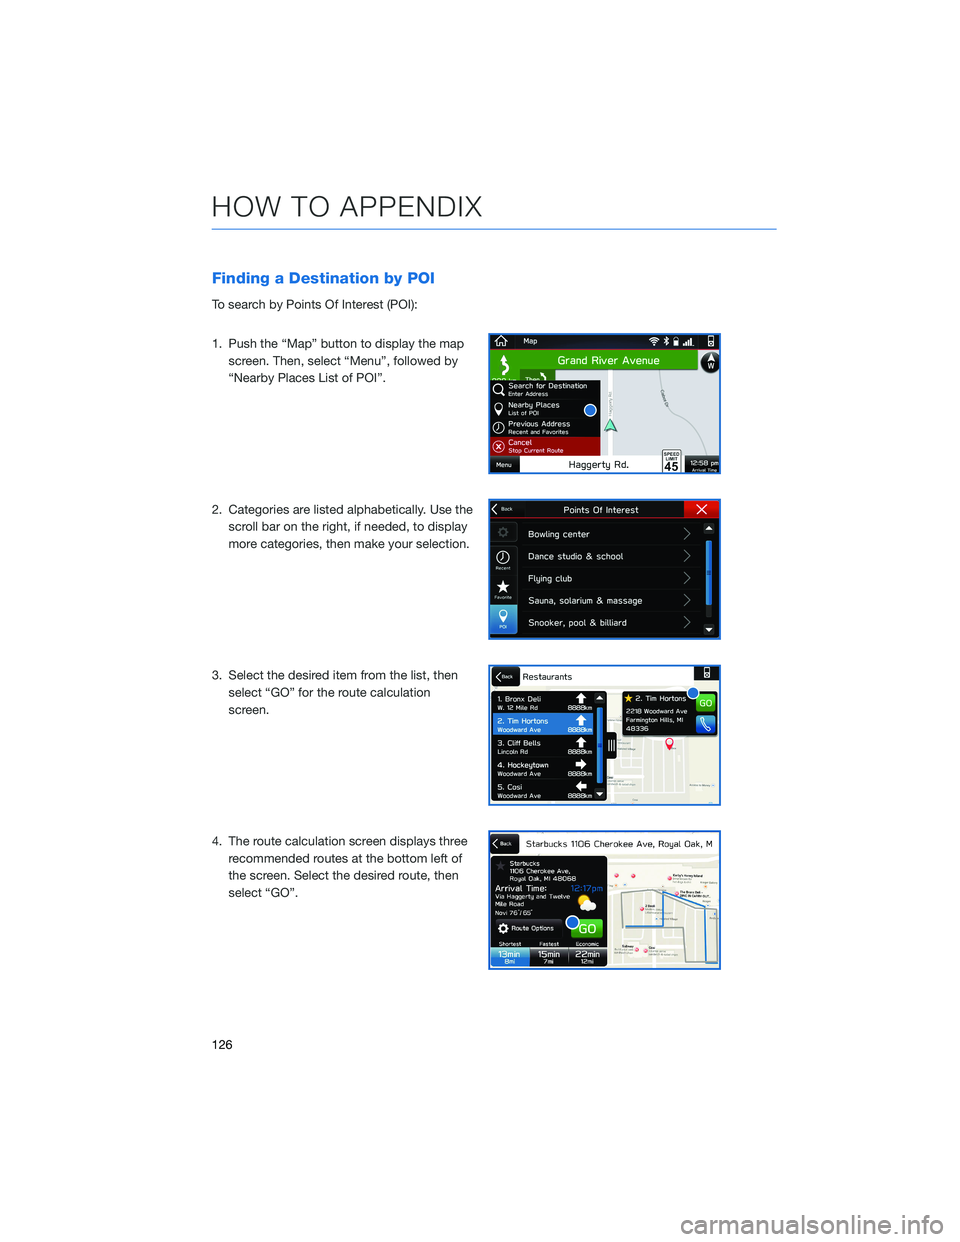
Finding a Destination by POI
To search by Points Of Interest (POI):
1. Push the “Map” button to display the map
screen. Then, select “Menu”, followed by
“Nearby Places List of POI”.
2. Categories are listed alphabetically. Use the
scroll bar on the right, if needed, to display
more categories, then make your selection.
3. Select the desired item from the list, then
select “GO” for the route calculation
screen.
4. The route calculation screen displays three
recommended routes at the bottom left of
the screen. Select the desired route, then
select “GO”.
HOW TO APPENDIX
126