Page 30 SUBARU ASCENT 2022 Getting Started Guide
[x] Cancel search | Manufacturer: SUBARU, Model Year: 2022, Model line: ASCENT, Model: SUBARU ASCENT 2022Pages: 148, PDF Size: 40.03 MB
Page 7 of 148
IN CASE OF EMERGENCY
SUBARU STARLINK®Safety and Security(subscription required)
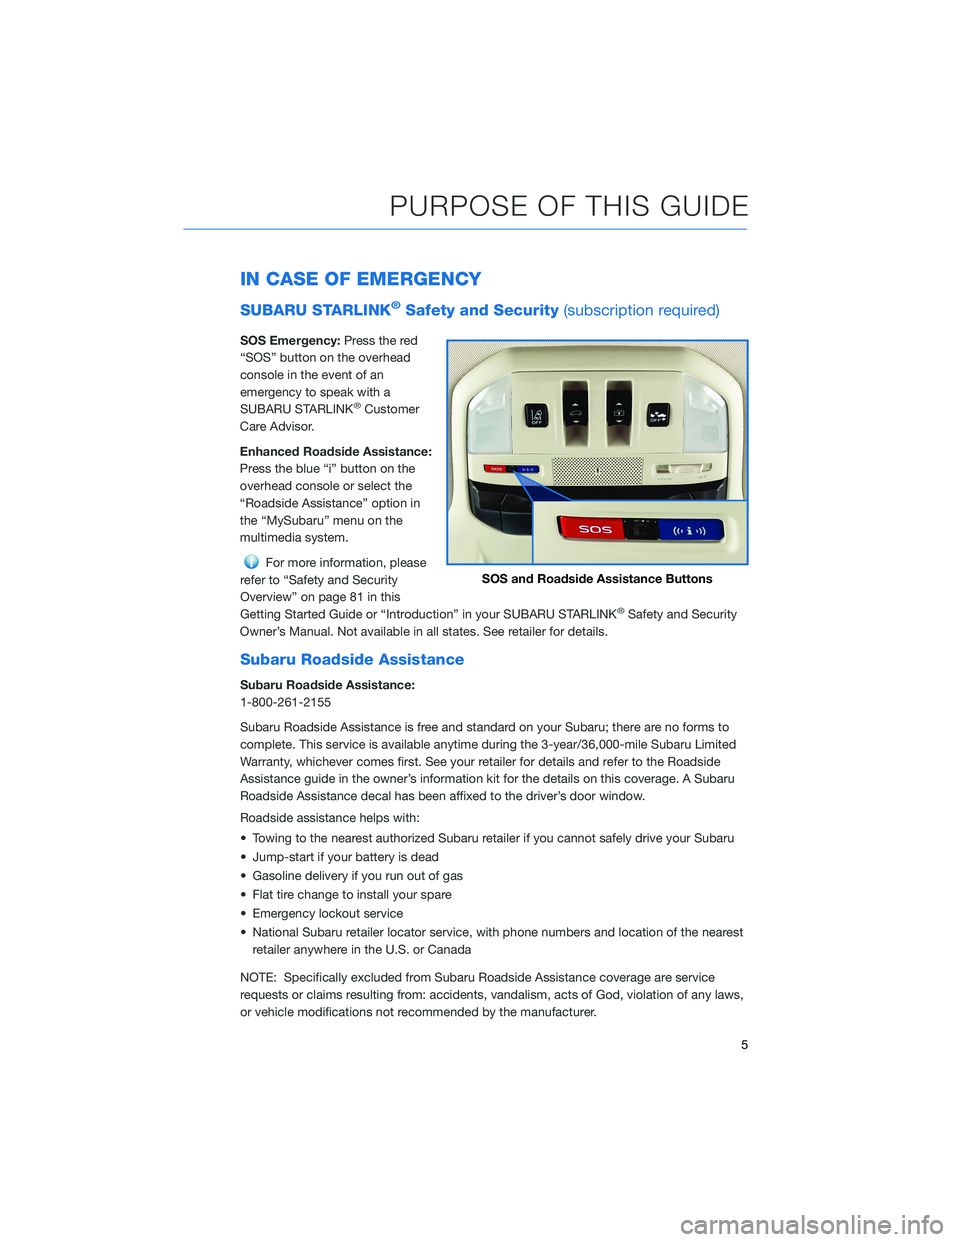
SOS Emergency:Press the red
“SOS” button on the overhead
console in the event of an
emergency to speak with a
SUBARU STARLINK
®Customer
Care Advisor.
Enhanced Roadside Assistance:
Press the blue “i” button on the
overhead console or select the
“Roadside Assistance” option in
the “MySubaru” menu on the
multimedia system.
For more information, please
refer to “Safety and Security
Overview” on page 81 in this
Getting Started Guide or “Introduction” in your SUBARU STARLINK
®Safety and Security
Owner’s Manual. Not available in all states. See retailer for details.
Subaru Roadside Assistance
Subaru Roadside Assistance:
1-800-261-2155
Subaru Roadside Assistance is free and standard on your Subaru; there are no forms to
complete. This service is available anytime during the 3-year/36,000-mile Subaru Limited
Warranty, whichever comes first. See your retailer for details and refer to the Roadside
Assistance guide in the owner’s information kit for the details on this coverage. A Subaru
Roadside Assistance decal has been affixed to the driver’s door window.
Roadside assistance helps with:
• Towing to the nearest authorized Subaru retailer if you cannot safely drive your Subaru
• Jump-start if your battery is dead
• Gasoline delivery if you run out of gas
• Flat tire change to install your spare
• Emergency lockout service
• National Subaru retailer locator service, with phone numbers and location of the nearest
retailer anywhere in the U.S. or Canada
NOTE: Specifically excluded from Subaru Roadside Assistance coverage are service
requests or claims resulting from: accidents, vandalism, acts of God, violation of any laws,
or vehicle modifications not recommended by the manufacturer.
SOS and Roadside Assistance Buttons
PURPOSE OF THIS GUIDE
5
Page 15 of 148
Power Rear Gate Lock
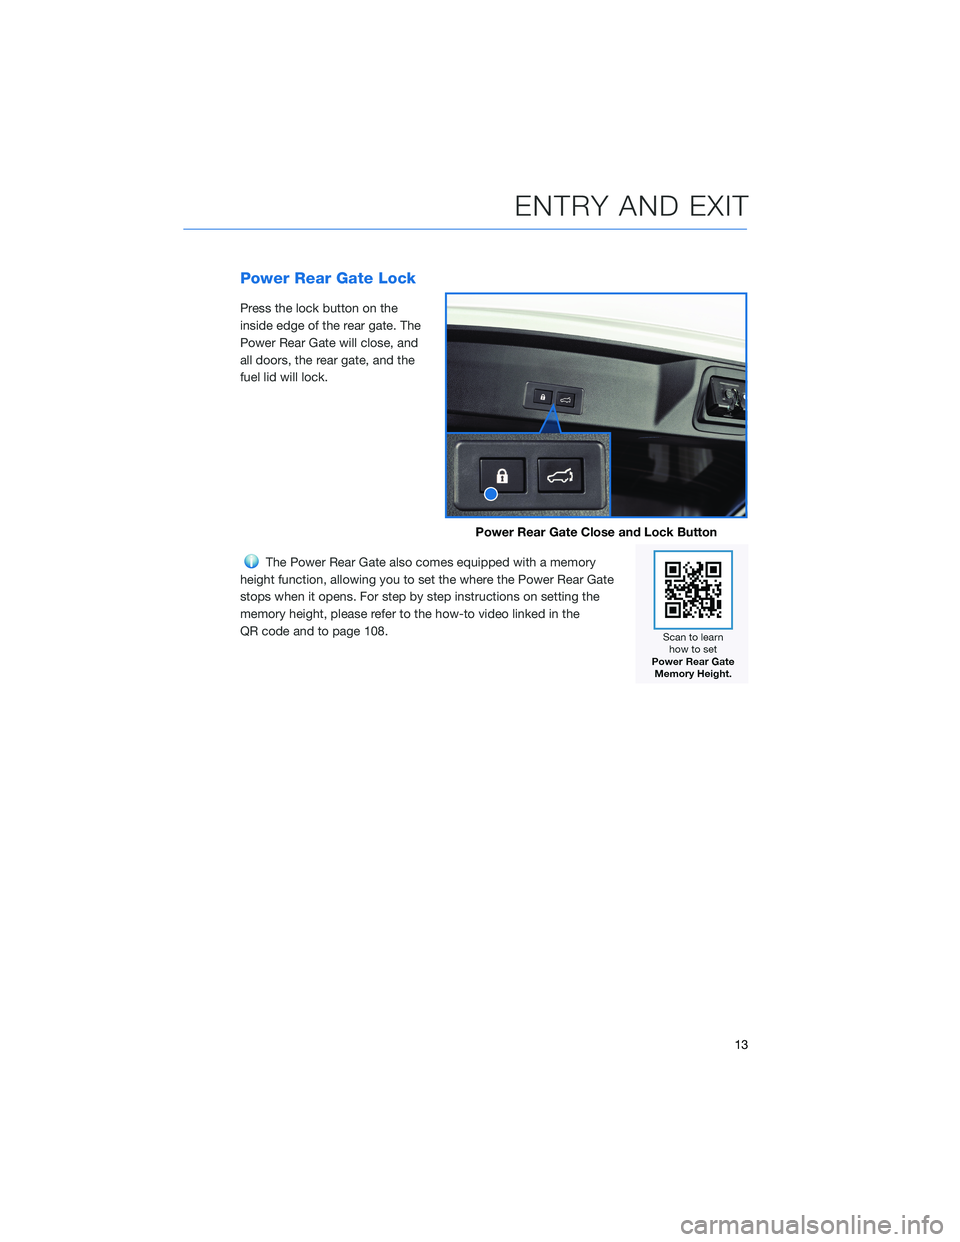
Press the lock button on the
inside edge of the rear gate. The
Power Rear Gate will close, and
all doors, the rear gate, and the
fuel lid will lock.
The Power Rear Gate also comes equipped with a memory
height function, allowing you to set the where the Power Rear Gate
stops when it opens. For step by step instructions on setting the
memory height, please refer to the how-to video linked in the
QR code and to page 108.
Power Rear Gate Close and Lock Button
ENTRY AND EXIT
13
Page 20 of 148
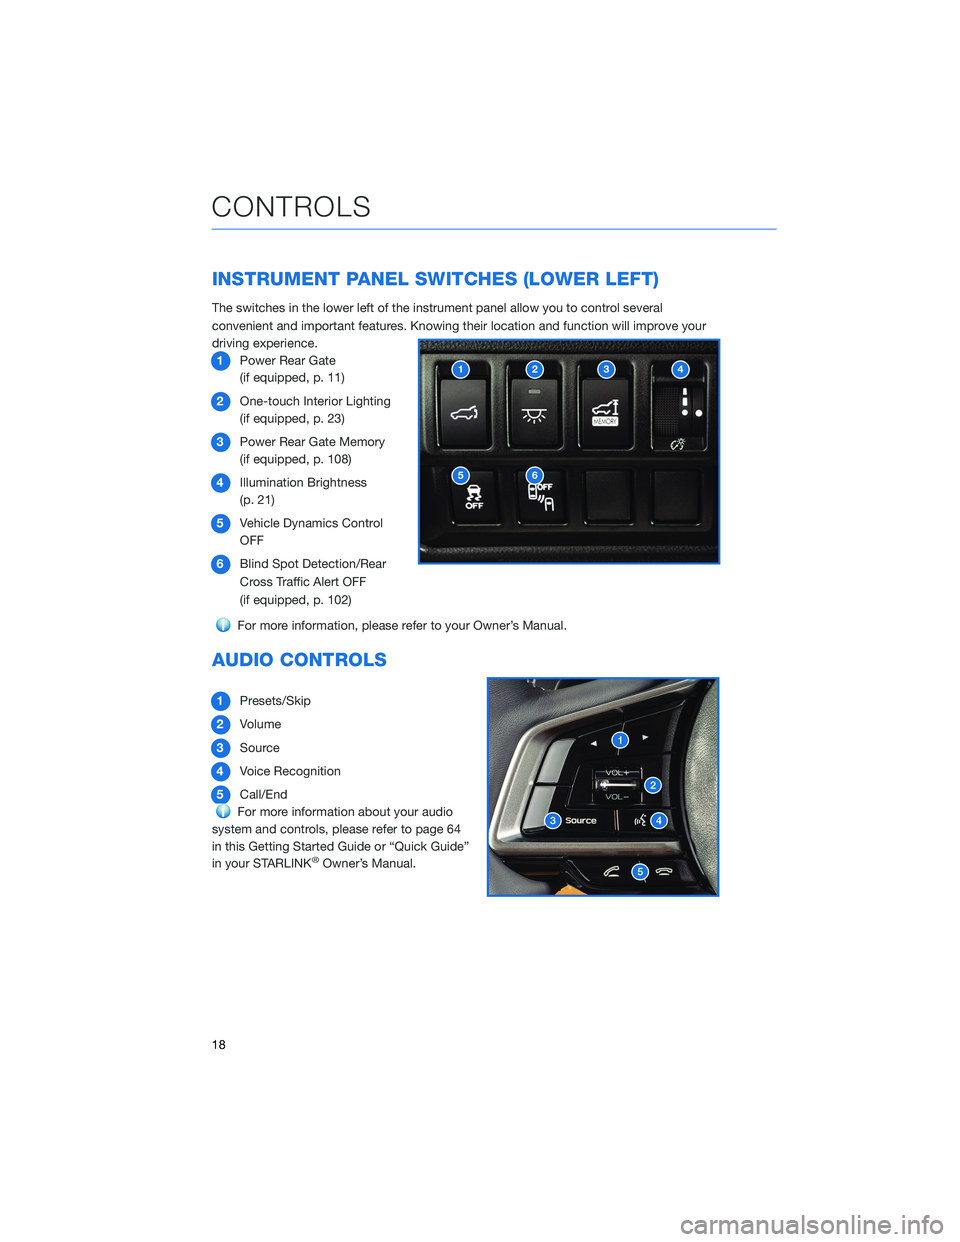
INSTRUMENT PANEL SWITCHES (LOWER LEFT)
The switches in the lower left of the instrument panel allow you to control several
convenient and important features. Knowing their location and function will improve your
driving experience.
1Power Rear Gate
(if equipped, p. 11)
2One-touch Interior Lighting
(if equipped, p. 23)
3Power Rear Gate Memory
(if equipped, p. 108)
4Illumination Brightness
(p. 21)
5Vehicle Dynamics Control
OFF
6Blind Spot Detection/Rear
Cross Traffic Alert OFF
(if equipped, p. 102)
For more information, please refer to your Owner’s Manual.
AUDIO CONTROLS
1Presets/Skip
2Volume
3Source
4Voice Recognition
5Call/End
For more information about your audio
system and controls, please refer to page 64
in this Getting Started Guide or “Quick Guide”
in your STARLINK
®Owner’s Manual.
12
56
34
CONTROLS
18
Page 21 of 148
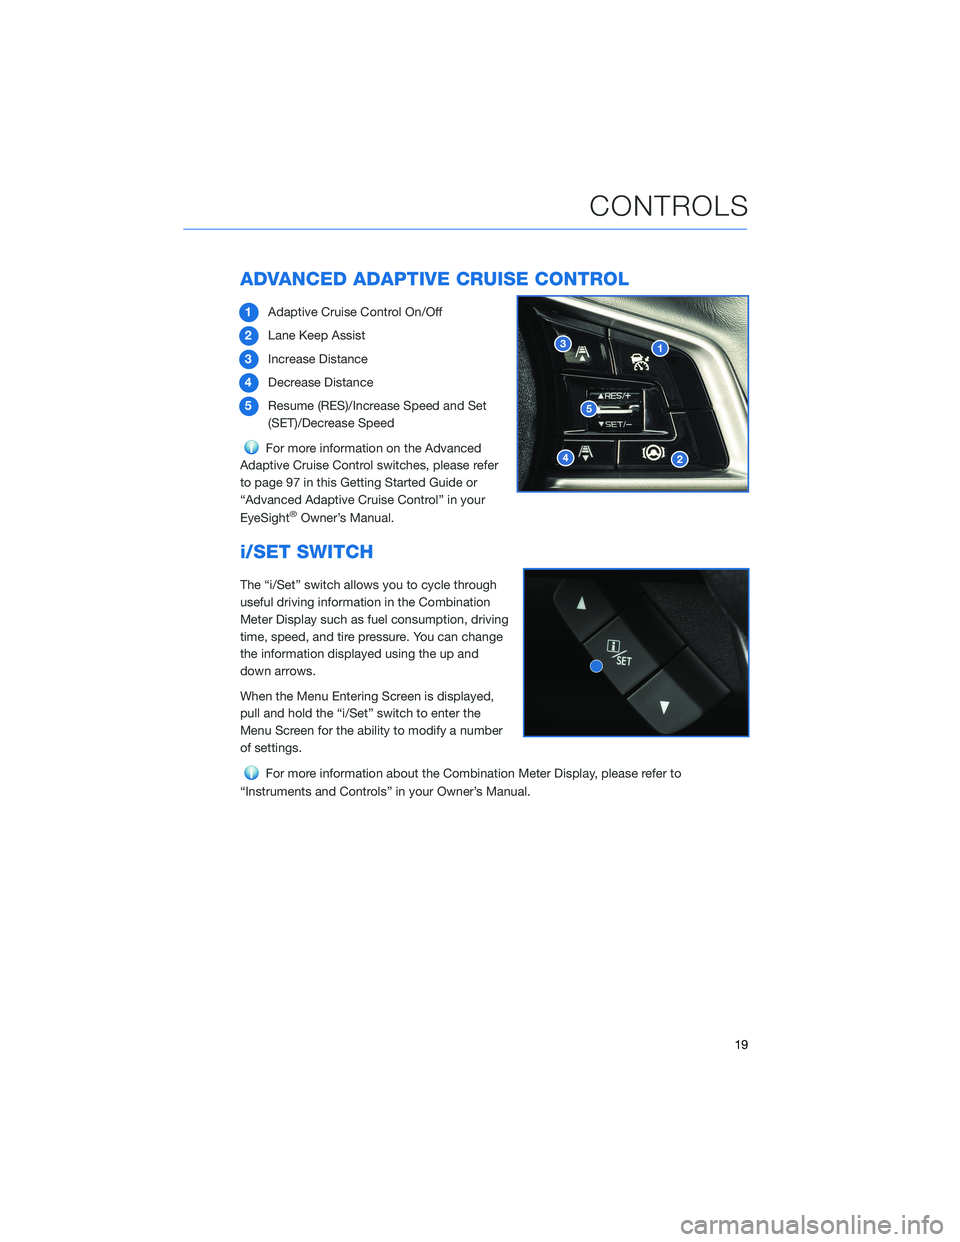
ADVANCED ADAPTIVE CRUISE CONTROL
1Adaptive Cruise Control On/Off
2Lane Keep Assist
3Increase Distance
4Decrease Distance
5Resume (RES)/Increase Speed and Set
(SET)/Decrease Speed
For more information on the Advanced
Adaptive Cruise Control switches, please refer
to page 97 in this Getting Started Guide or
“Advanced Adaptive Cruise Control” in your
EyeSight
®Owner’s Manual.
i/SET SWITCH
The “i/Set” switch allows you to cycle through
useful driving information in the Combination
Meter Display such as fuel consumption, driving
time, speed, and tire pressure. You can change
the information displayed using the up and
down arrows.
When the Menu Entering Screen is displayed,
pull and hold the “i/Set” switch to enter the
Menu Screen for the ability to modify a number
of settings.
For more information about the Combination Meter Display, please refer to
“Instruments and Controls” in your Owner’s Manual.
CONTROLS
19
Page 26 of 148
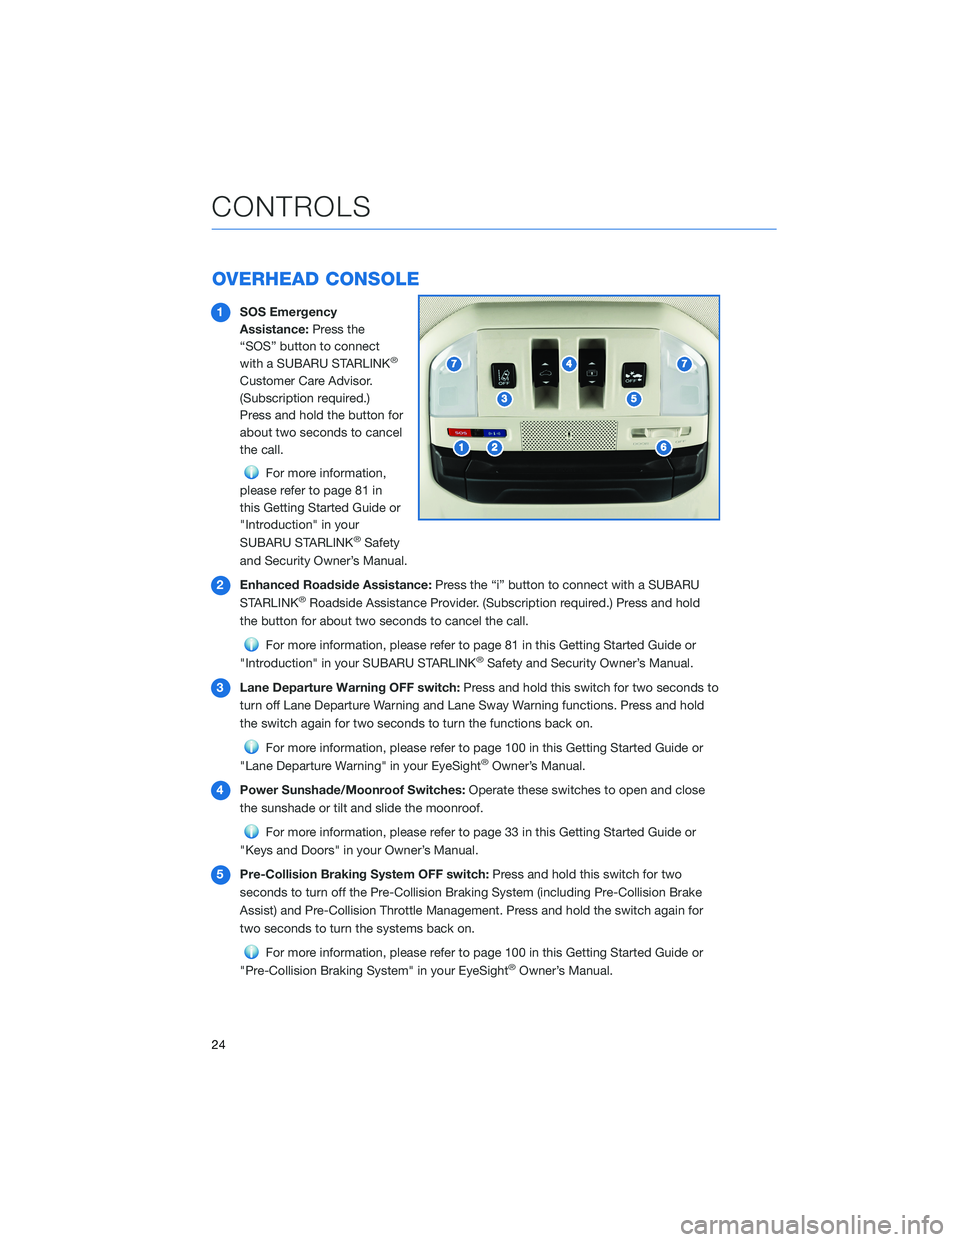
OVERHEAD CONSOLE
1SOS Emergency
Assistance:Press the
“SOS” button to connect
with a SUBARU STARLINK
®
Customer Care Advisor.
(Subscription required.)
Press and hold the button for
about two seconds to cancel
the call.
For more information,
please refer to page 81 in
this Getting Started Guide or
"Introduction" in your
SUBARU STARLINK
®Safety
and Security Owner’s Manual.
2Enhanced Roadside Assistance:Press the “i” button to connect with a SUBARU
STARLINK
®Roadside Assistance Provider. (Subscription required.) Press and hold
the button for about two seconds to cancel the call.
For more information, please refer to page 81 in this Getting Started Guide or
"Introduction" in your SUBARU STARLINK®Safety and Security Owner’s Manual.
3Lane Departure Warning OFF switch:Press and hold this switch for two seconds to
turn off Lane Departure Warning and Lane Sway Warning functions. Press and hold
the switch again for two seconds to turn the functions back on.
For more information, please refer to page 100 in this Getting Started Guide or
"Lane Departure Warning" in your EyeSight®Owner’s Manual.
4Power Sunshade/Moonroof Switches:Operate these switches to open and close
the sunshade or tilt and slide the moonroof.
For more information, please refer to page 33 in this Getting Started Guide or
"Keys and Doors" in your Owner’s Manual.
5Pre-Collision Braking System OFF switch:Press and hold this switch for two
seconds to turn off the Pre-Collision Braking System (including Pre-Collision Brake
Assist) and Pre-Collision Throttle Management. Press and hold the switch again for
two seconds to turn the systems back on.
For more information, please refer to page 100 in this Getting Started Guide or
"Pre-Collision Braking System" in your EyeSight®Owner’s Manual.
CONTROLS
24
Page 30 of 148
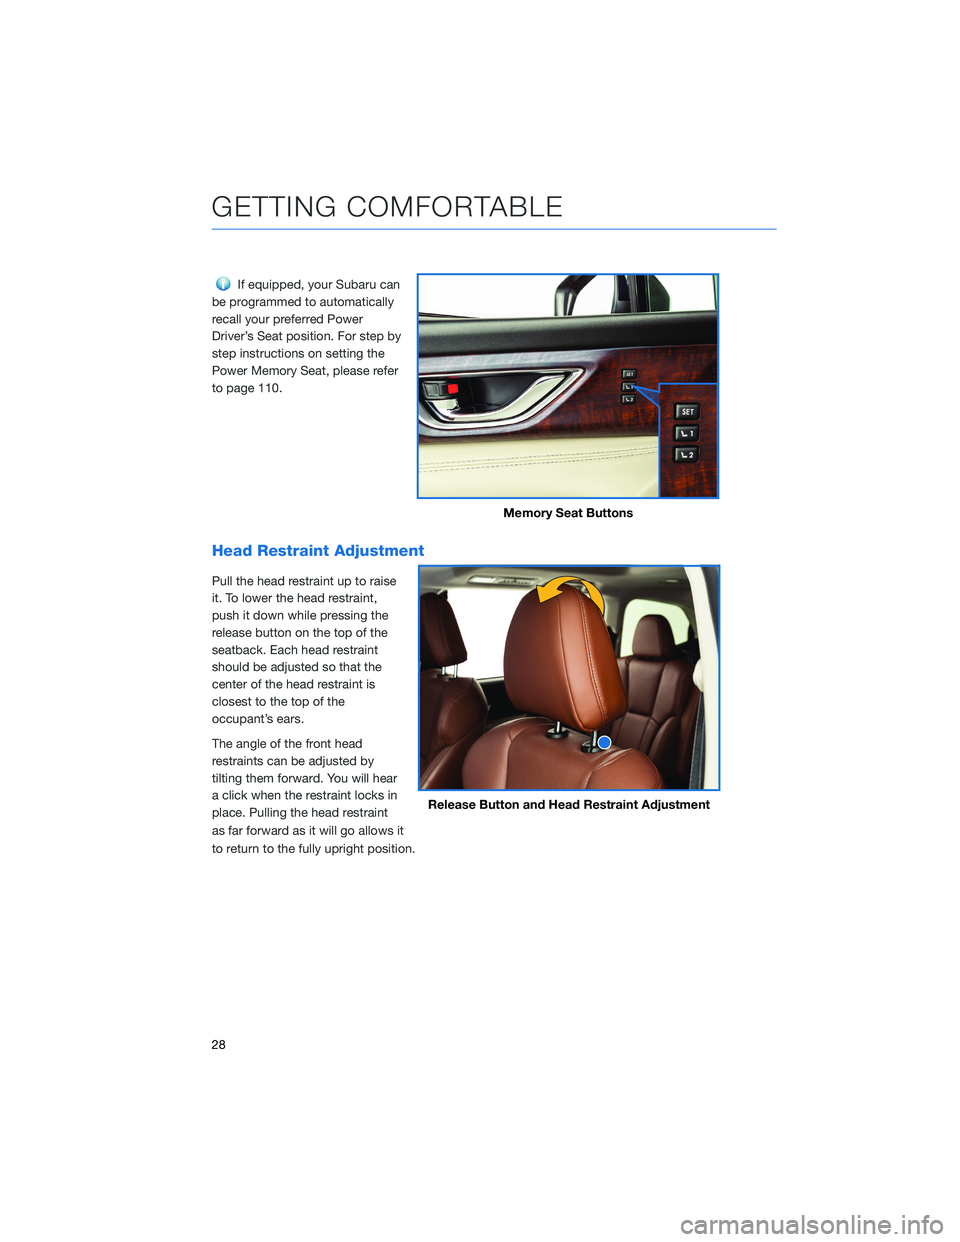
If equipped, your Subaru can
be programmed to automatically
recall your preferred Power
Driver’s Seat position. For step by
step instructions on setting the
Power Memory Seat, please refer
to page 110.
Head Restraint Adjustment
Pull the head restraint up to raise
it. To lower the head restraint,
push it down while pressing the
release button on the top of the
seatback. Each head restraint
should be adjusted so that the
center of the head restraint is
closest to the top of the
occupant’s ears.
The angle of the front head
restraints can be adjusted by
tilting them forward. You will hear
a click when the restraint locks in
place. Pulling the head restraint
as far forward as it will go allows it
to return to the fully upright position.
Memory Seat Buttons
Release Button and Head Restraint Adjustment
GETTING COMFORTABLE
28
Page 42 of 148
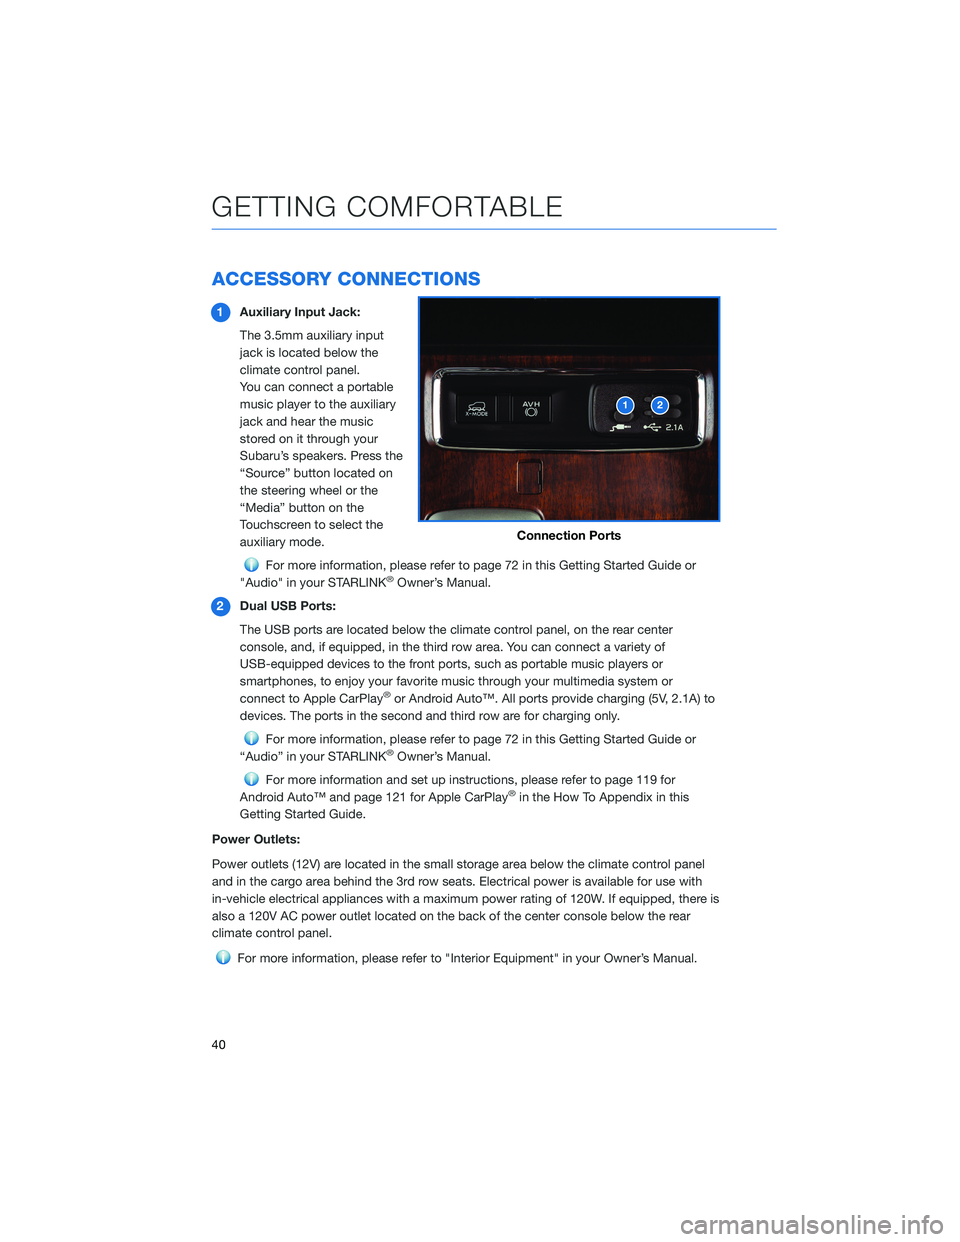
ACCESSORY CONNECTIONS
1Auxiliary Input Jack:
The 3.5mm auxiliary input
jack is located below the
climate control panel.
You can connect a portable
music player to the auxiliary
jack and hear the music
stored on it through your
Subaru’s speakers. Press the
“Source” button located on
the steering wheel or the
“Media” button on the
Touchscreen to select the
auxiliary mode.
For more information, please refer to page 72 in this Getting Started Guide or
"Audio" in your STARLINK®Owner’s Manual.
2Dual USB Ports:
The USB ports are located below the climate control panel, on the rear center
console, and, if equipped, in the third row area. You can connect a variety of
USB-equipped devices to the front ports, such as portable music players or
smartphones, to enjoy your favorite music through your multimedia system or
connect to Apple CarPlay
®or Android Auto™. All ports provide charging (5V, 2.1A) to
devices. The ports in the second and third row are for charging only.
For more information, please refer to page 72 in this Getting Started Guide or
“Audio” in your STARLINK®Owner’s Manual.
For more information and set up instructions, please refer to page 119 for
Android Auto™ and page 121 for Apple CarPlay®in the How To Appendix in this
Getting Started Guide.
Power Outlets:
Power outlets (12V) are located in the small storage area below the climate control panel
and in the cargo area behind the 3rd row seats. Electrical power is available for use with
in-vehicle electrical appliances with a maximum power rating of 120W. If equipped, there is
also a 120V AC power outlet located on the back of the center console below the rear
climate control panel.
For more information, please refer to "Interior Equipment" in your Owner’s Manual.
Connection Ports
GETTING COMFORTABLE
40
Page 59 of 148
NEW VEHICLE BREAK-IN
The performance and long life of your Subaru are dependent on how you handle and care
for your Subaru while it is new.
Follow these instructions during the first 1,000 miles:
• Do not race the engine.
• Do not allow the engine speed to exceed 4,000 rpm except in an emergency.
• Do not drive at one consistent engine or vehicle speed for a long time, either fast or
slow.
• Avoid starting suddenly and rapid acceleration, except in an emergency.
• Avoid hard braking, except in an emergency.
ENGINE OIL
Use 0W-20 synthetic, with one of the following specifications:
• API classification SN with the words “RESOURCE CONSERVING”, SN PLUS with the
words “RESOURCE CONSERVING”, or SP with the words “RESOURCE CONSERVING”.
• ILSAC GF-5 or GF-6A, which can be identified with the ILSAC certification mark
(Starburst mark).
ENGINE OIL CAPACITY
4.8 US quarts (during oil and filter change).
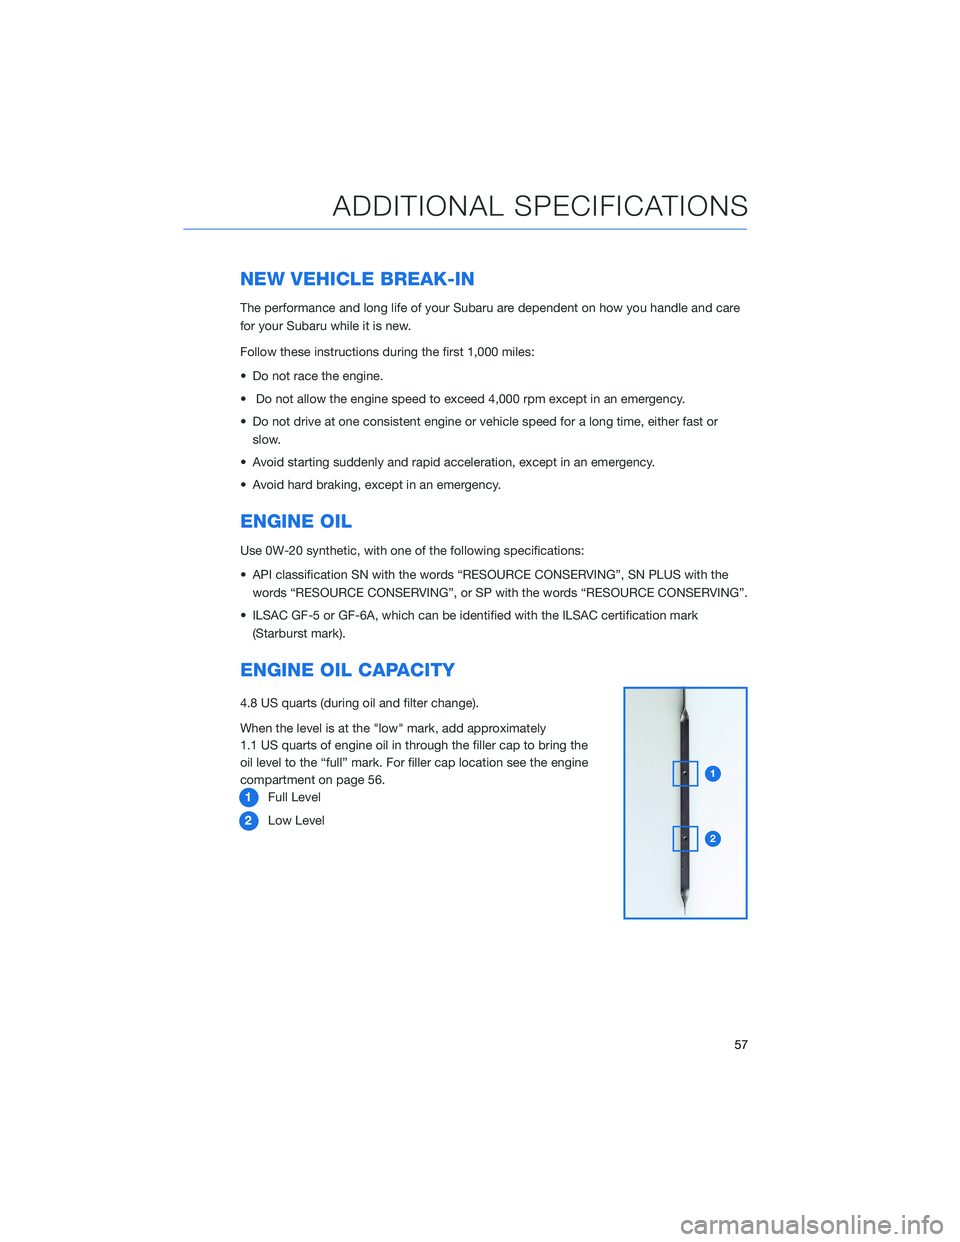
When the level is at the "low" mark, add approximately
1.1 US quarts of engine oil in through the filler cap to bring the
oil level to the “full” mark. For filler cap location see the engine
compartment on page 56.
1Full Level
2Low Level
ADDITIONAL SPECIFICATIONS
57
Page 60 of 148
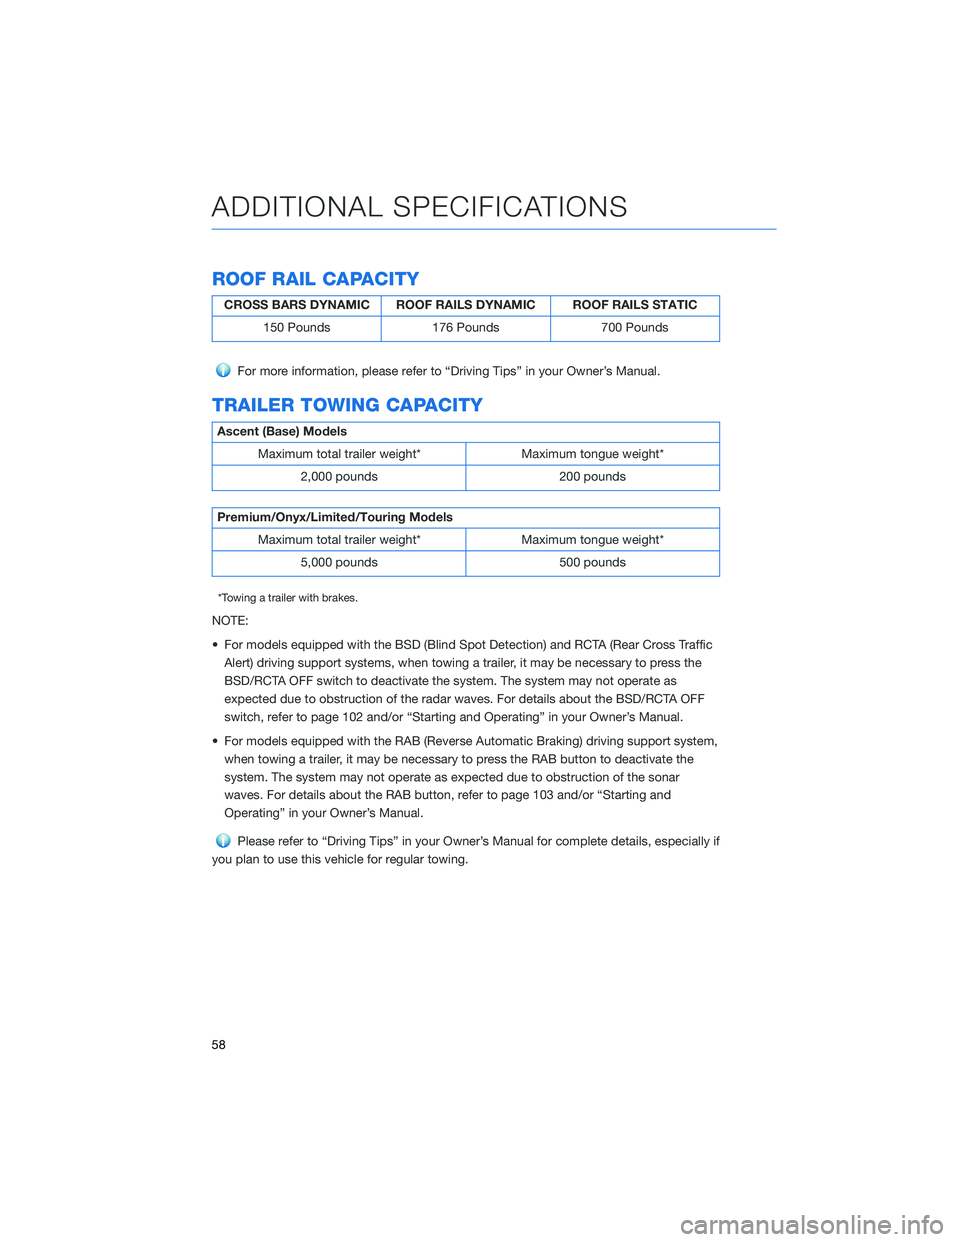
ROOF RAIL CAPACITY
CROSS BARS DYNAMIC ROOF RAILS DYNAMIC ROOF RAILS STATIC
150 Pounds 176 Pounds 700 Pounds
For more information, please refer to “Driving Tips” in your Owner’s Manual.
TRAILER TOWING CAPACITY
Ascent (Base) Models
Maximum total trailer weight* Maximum tongue weight*
2,000 pounds 200 pounds
Premium/Onyx/Limited/Touring Models
Maximum total trailer weight* Maximum tongue weight*
5,000 pounds 500 pounds
*Towing a trailer with brakes.
NOTE:
• For models equipped with the BSD (Blind Spot Detection) and RCTA (Rear Cross Traffic
Alert) driving support systems, when towing a trailer, it may be necessary to press the
BSD/RCTA OFF switch to deactivate the system. The system may not operate as
expected due to obstruction of the radar waves. For details about the BSD/RCTA OFF
switch, refer to page 102 and/or “Starting and Operating” in your Owner’s Manual.
• For models equipped with the RAB (Reverse Automatic Braking) driving support system,
when towing a trailer, it may be necessary to press the RAB button to deactivate the
system. The system may not operate as expected due to obstruction of the sonar
waves. For details about the RAB button, refer to page 103 and/or “Starting and
Operating” in your Owner’s Manual.
Please refer to “Driving Tips” in your Owner’s Manual for complete details, especially if
you plan to use this vehicle for regular towing.
ADDITIONAL SPECIFICATIONS
58
Page 72 of 148
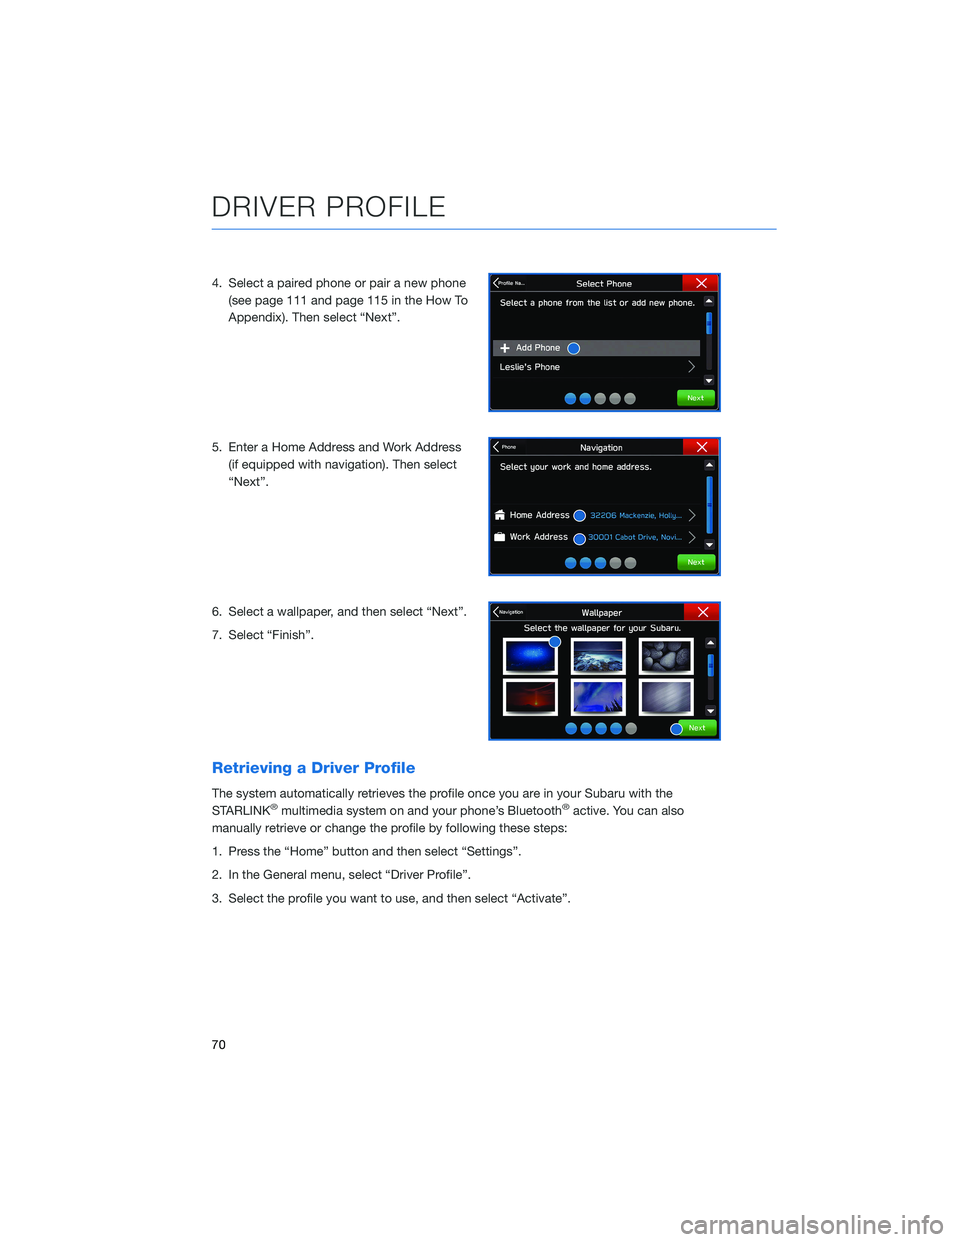
4. Select a paired phone or pair a new phone
(see page 111 and page 115 in the How To
Appendix). Then select “Next”.
5. Enter a Home Address and Work Address
(if equipped with navigation). Then select
“Next”.
6. Select a wallpaper, and then select “Next”.
7. Select “Finish”.
Retrieving a Driver Profile
The system automatically retrieves the profile once you are in your Subaru with the
STARLINK®multimedia system on and your phone’s Bluetooth®active. You can also
manually retrieve or change the profile by following these steps:
1. Press the “Home” button and then select “Settings”.
2. In the General menu, select “Driver Profile”.
3. Select the profile you want to use, and then select “Activate”.
DRIVER PROFILE
70