check SUBARU ASCENT 2022 Getting Started Guide
[x] Cancel search | Manufacturer: SUBARU, Model Year: 2022, Model line: ASCENT, Model: SUBARU ASCENT 2022Pages: 148, PDF Size: 40.03 MB
Page 49 of 148
FUEL FILLER LID
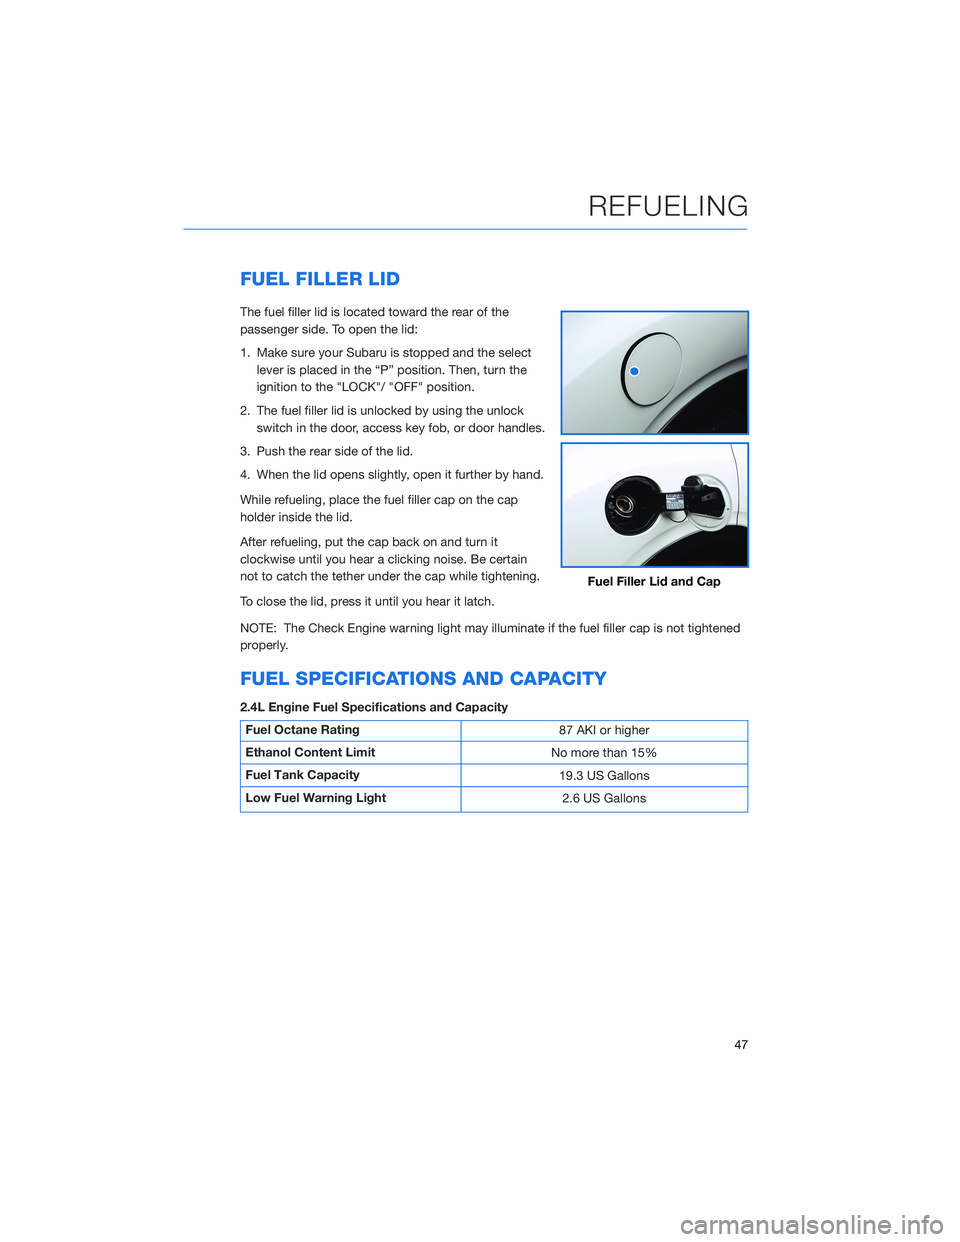
The fuel filler lid is located toward the rear of the
passenger side. To open the lid:
1. Make sure your Subaru is stopped and the select
lever is placed in the “P” position. Then, turn the
ignition to the "LOCK"/ "OFF" position.
2. The fuel filler lid is unlocked by using the unlock
switch in the door, access key fob, or door handles.
3. Push the rear side of the lid.
4. When the lid opens slightly, open it further by hand.
While refueling, place the fuel filler cap on the cap
holder inside the lid.
After refueling, put the cap back on and turn it
clockwise until you hear a clicking noise. Be certain
not to catch the tether under the cap while tightening.
To close the lid, press it until you hear it latch.
NOTE: The Check Engine warning light may illuminate if the fuel filler cap is not tightened
properly.
FUEL SPECIFICATIONS AND CAPACITY
2.4L Engine Fuel Specifications and Capacity
Fuel Octane Rating
87 AKI or higher
Ethanol Content Limit
No more than 15%
Fuel Tank Capacity
19.3 US Gallons
Low Fuel Warning Light
2.6 US Gallons
Fuel Filler Lid and Cap
REFUELING
47
Page 70 of 148
ADDING SHORTCUTS
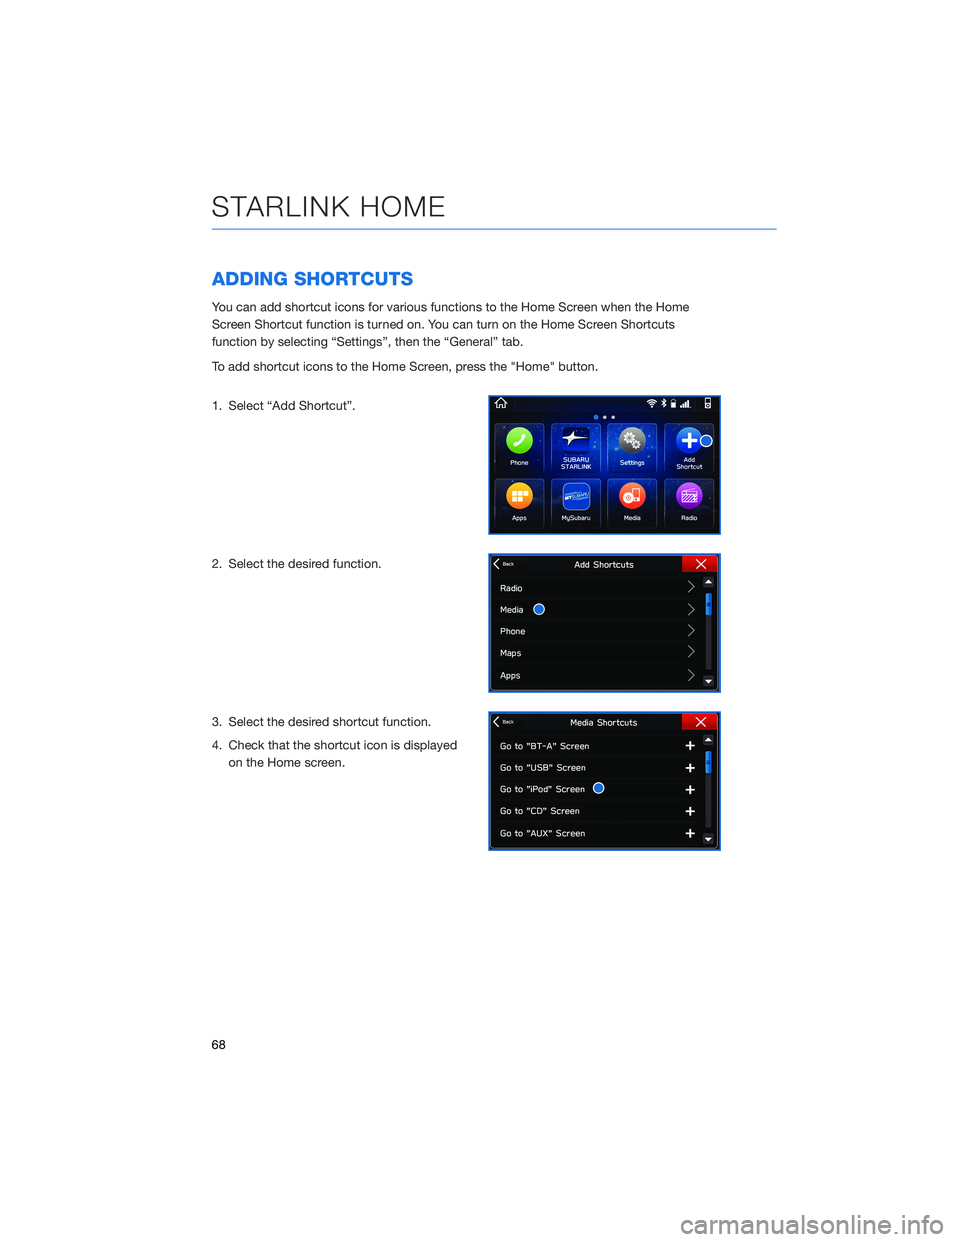
You can add shortcut icons for various functions to the Home Screen when the Home
Screen Shortcut function is turned on. You can turn on the Home Screen Shortcuts
function by selecting “Settings”, then the “General” tab.
To add shortcut icons to the Home Screen, press the "Home" button.
1. Select “Add Shortcut”.
2. Select the desired function.
3. Select the desired shortcut function.
4. Check that the shortcut icon is displayed
on the Home screen.
STARLINK HOME
68
Page 77 of 148
TEXT MESSAGES
Received messages can be forwarded from
the connected Bluetooth®phone, enabling
checking and replying using the system.
To use this function, it is necessary to set the
phonebook download function to ON.
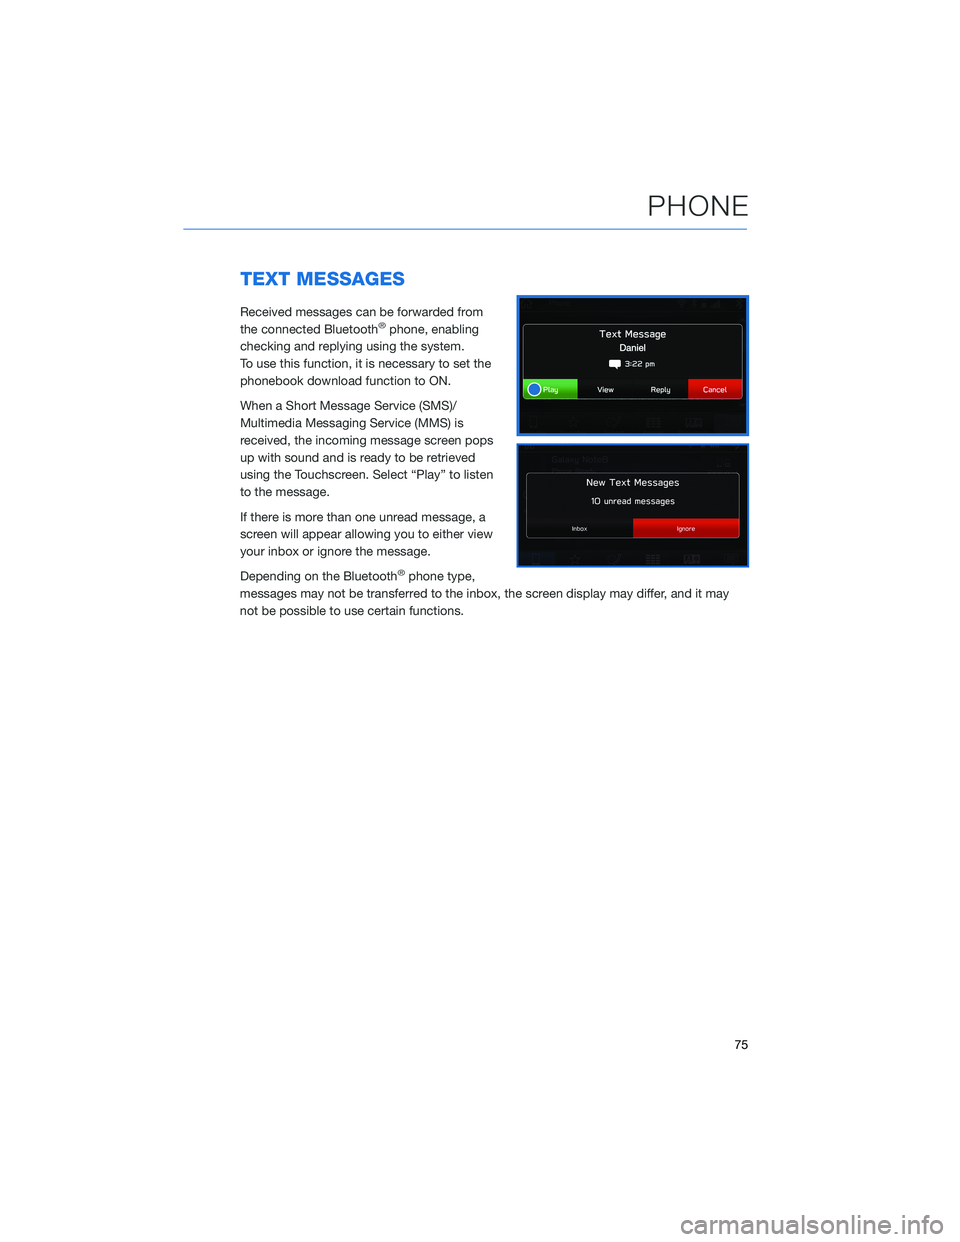
When a Short Message Service (SMS)/
Multimedia Messaging Service (MMS) is
received, the incoming message screen pops
up with sound and is ready to be retrieved
using the Touchscreen. Select “Play” to listen
to the message.
If there is more than one unread message, a
screen will appear allowing you to either view
your inbox or ignore the message.
Depending on the Bluetooth
®phone type,
messages may not be transferred to the inbox, the screen display may differ, and it may
not be possible to use certain functions.
PHONE
75
Page 79 of 148
Android Auto™
Android Auto can be used to view maps, play music,
and place calls by connecting your Android device to
the system. You can also run supported applications.
To use the Android Auto application, connect your
Android device to the USB port.
For details on services or operations, visit the
Android Auto sites:www.android.com/auto/or
www.support.google.com/androidauto/
For more information on connecting your phone,
please refer to page 119 in this Getting Started Guide.
Apple CarPlay®
Apple CarPlay can be used to view maps, play music, and place
calls by connecting your iPhone to the system. You can also run
supported applications. To use the Apple CarPlay application,
connect your iPhone to the USB port.
For more information on connecting your iPhone, please refer
to page 121 in this Getting Started Guide.
For details on services or operations, check the Apple CarPlay site:
www.apple.com/ios/carplay/
SiriusXM®Travel Link
SiriusXM®U.S. satellite and data services
are available only in the 48 states of the
contiguous USA and DC.
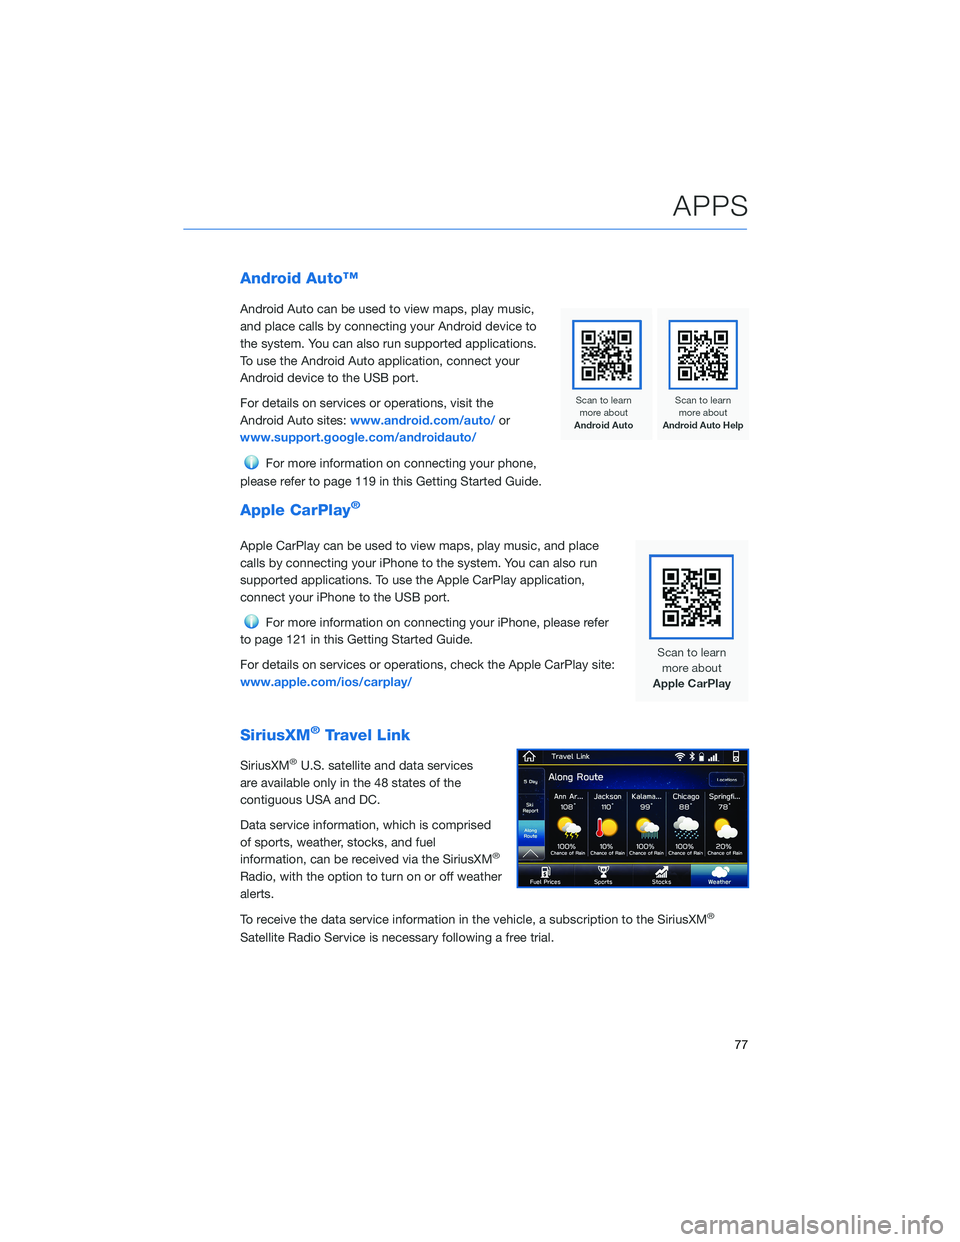
Data service information, which is comprised
of sports, weather, stocks, and fuel
information, can be received via the SiriusXM
®
Radio, with the option to turn on or off weather
alerts.
To receive the data service information in the vehicle, a subscription to the SiriusXM
®
Satellite Radio Service is necessary following a free trial.
APPS
77
Page 88 of 148
MAPS/NAVIGATION
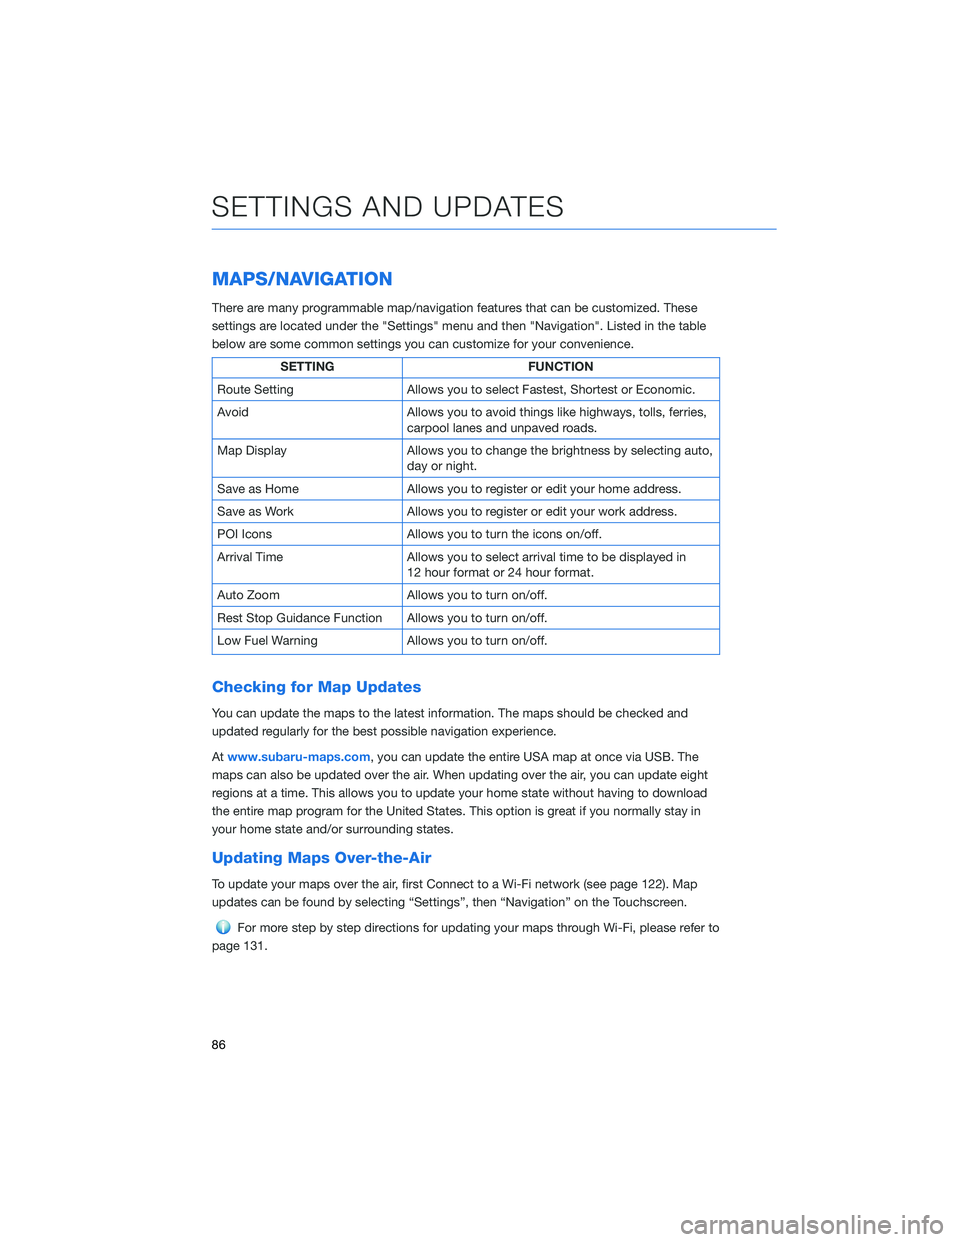
There are many programmable map/navigation features that can be customized. These
settings are located under the "Settings" menu and then "Navigation". Listed in the table
below are some common settings you can customize for your convenience.
SETTING FUNCTION
Route Setting Allows you to select Fastest, Shortest or Economic.
Avoid Allows you to avoid things like highways, tolls, ferries,
carpool lanes and unpaved roads.
Map Display Allows you to change the brightness by selecting auto,
day or night.
Save as Home Allows you to register or edit your home address.
Save as Work Allows you to register or edit your work address.
POI Icons Allows you to turn the icons on/off.
Arrival Time Allows you to select arrival time to be displayed in
12 hour format or 24 hour format.
Auto Zoom Allows you to turn on/off.
Rest Stop Guidance Function Allows you to turn on/off.
Low Fuel Warning Allows you to turn on/off.
Checking for Map Updates
You can update the maps to the latest information. The maps should be checked and
updated regularly for the best possible navigation experience.
Atwww.subaru-maps.com, you can update the entire USA map at once via USB. The
maps can also be updated over the air. When updating over the air, you can update eight
regions at a time. This allows you to update your home state without having to download
the entire map program for the United States. This option is great if you normally stay in
your home state and/or surrounding states.
Updating Maps Over-the-Air
To update your maps over the air, first Connect to a Wi-Fi network (see page 122). Map
updates can be found by selecting “Settings”, then “Navigation” on the Touchscreen.
For more step by step directions for updating your maps through Wi-Fi, please refer to
page 131.
SETTINGS AND UPDATES
86
Page 90 of 148
Manually
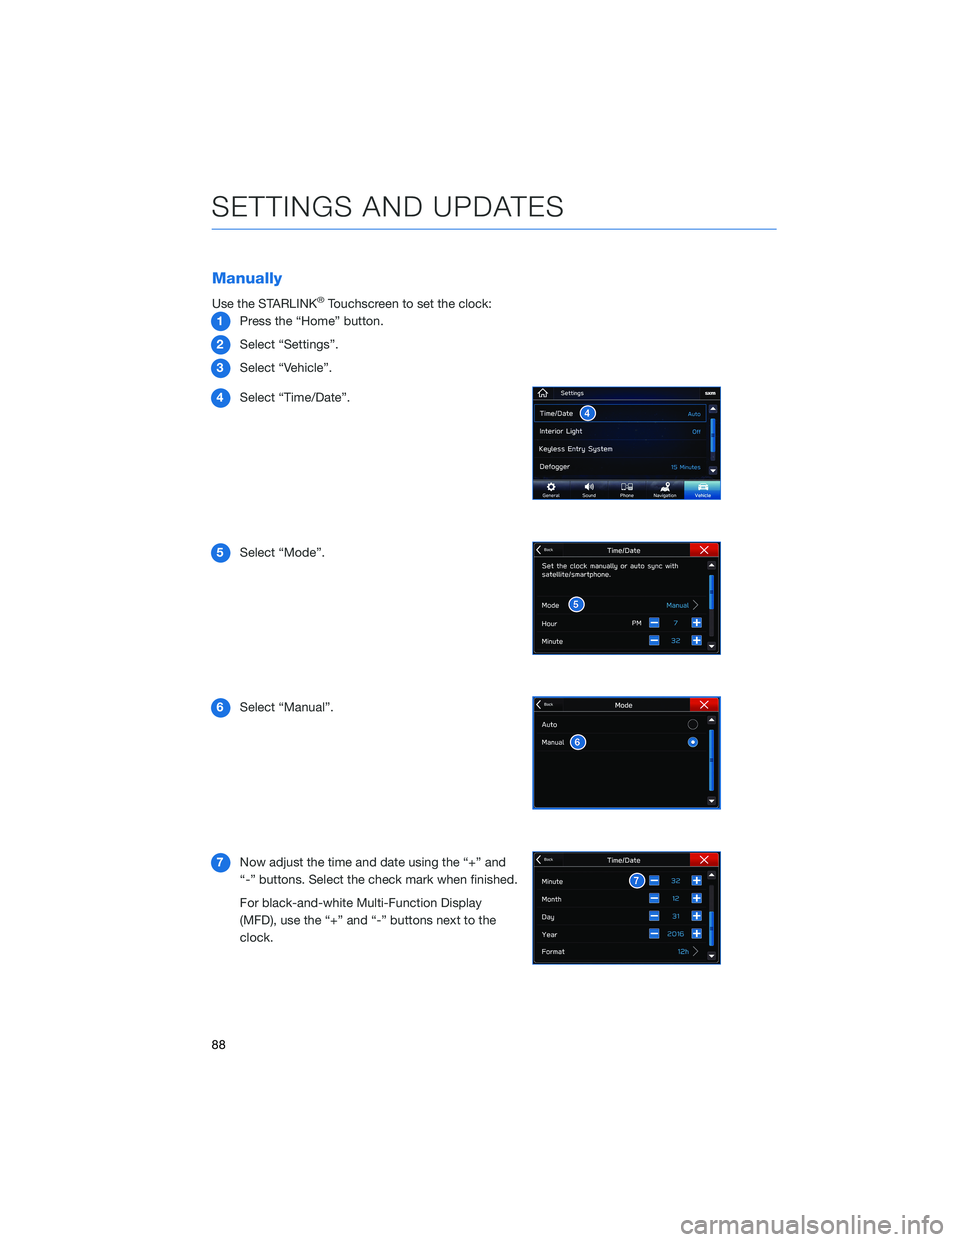
Use the STARLINK®Touchscreen to set the clock:
1Press the “Home” button.
2Select “Settings”.
3Select “Vehicle”.
4Select “Time/Date”.
5Select “Mode”.
6Select “Manual”.
7Now adjust the time and date using the “+” and
“-” buttons. Select the check mark when finished.
For black-and-white Multi-Function Display
(MFD), use the “+” and “-” buttons next to the
clock.
SETTINGS AND UPDATES
88
Page 104 of 148
BLIND SPOT DETECTION (BSD) / REAR CROSS
TRAFFIC ALERT (RCTA)(if equipped)
This system uses radar sensors mounted behind the rear bumper on the left and right
sides that warn you if another vehicle is sensed in your blind spots. These functions
provide additional awareness when changing lanes or driving in reverse.
Blind Spot Detection (BSD)
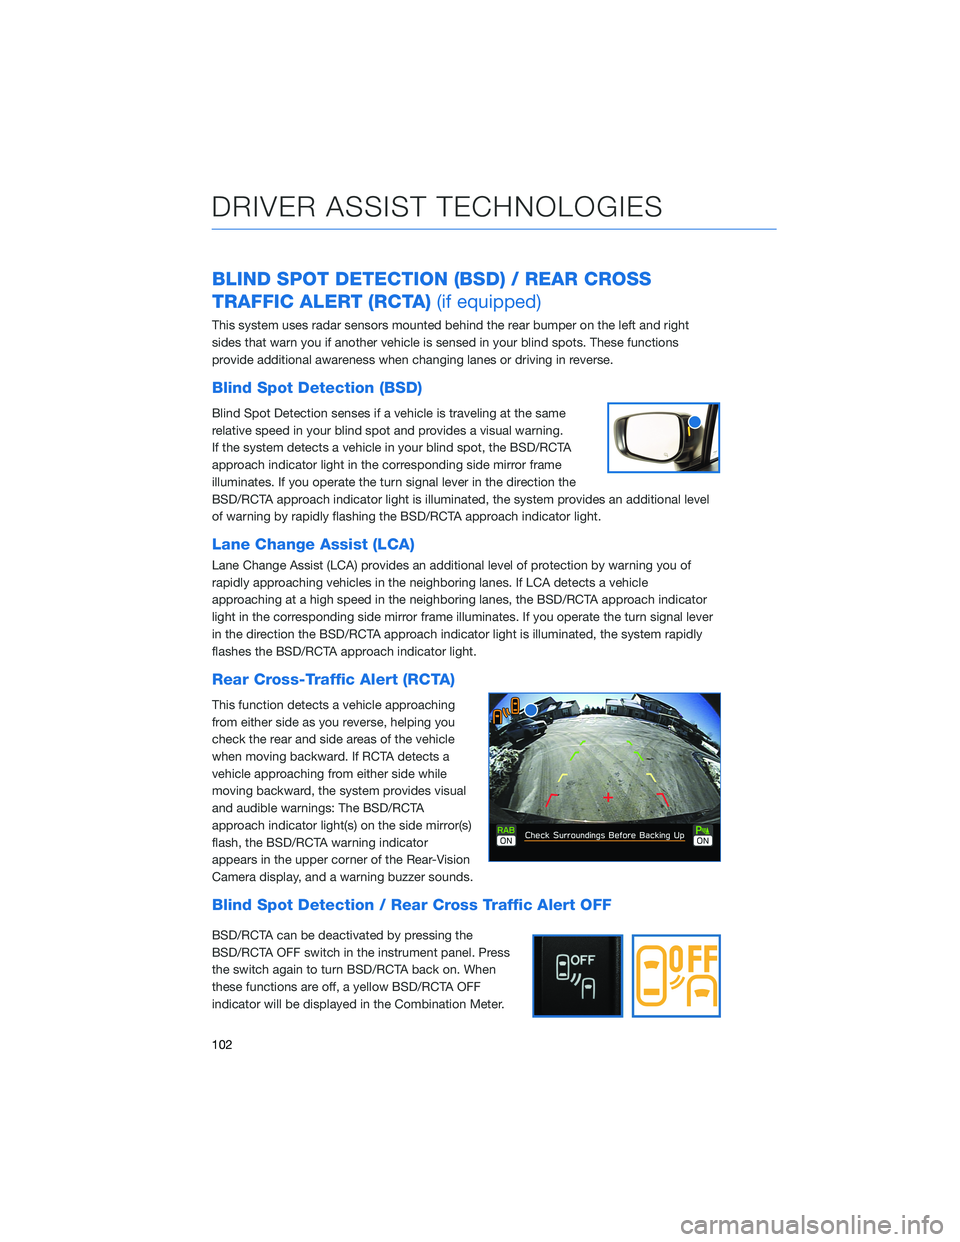
Blind Spot Detection senses if a vehicle is traveling at the same
relative speed in your blind spot and provides a visual warning.
If the system detects a vehicle in your blind spot, the BSD/RCTA
approach indicator light in the corresponding side mirror frame
illuminates. If you operate the turn signal lever in the direction the
BSD/RCTA approach indicator light is illuminated, the system provides an additional level
of warning by rapidly flashing the BSD/RCTA approach indicator light.
Lane Change Assist (LCA)
Lane Change Assist (LCA) provides an additional level of protection by warning you of
rapidly approaching vehicles in the neighboring lanes. If LCA detects a vehicle
approaching at a high speed in the neighboring lanes, the BSD/RCTA approach indicator
light in the corresponding side mirror frame illuminates. If you operate the turn signal lever
in the direction the BSD/RCTA approach indicator light is illuminated, the system rapidly
flashes the BSD/RCTA approach indicator light.
Rear Cross-Traffic Alert (RCTA)
This function detects a vehicle approaching
from either side as you reverse, helping you
check the rear and side areas of the vehicle
when moving backward. If RCTA detects a
vehicle approaching from either side while
moving backward, the system provides visual
and audible warnings: The BSD/RCTA
approach indicator light(s) on the side mirror(s)
flash, the BSD/RCTA warning indicator
appears in the upper corner of the Rear-Vision
Camera display, and a warning buzzer sounds.
Blind Spot Detection / Rear Cross Traffic Alert OFF
BSD/RCTA can be deactivated by pressing the
BSD/RCTA OFF switch in the instrument panel. Press
the switch again to turn BSD/RCTA back on. When
these functions are off, a yellow BSD/RCTA OFF
indicator will be displayed in the Combination Meter.
DRIVER ASSIST TECHNOLOGIES
102
Page 125 of 148
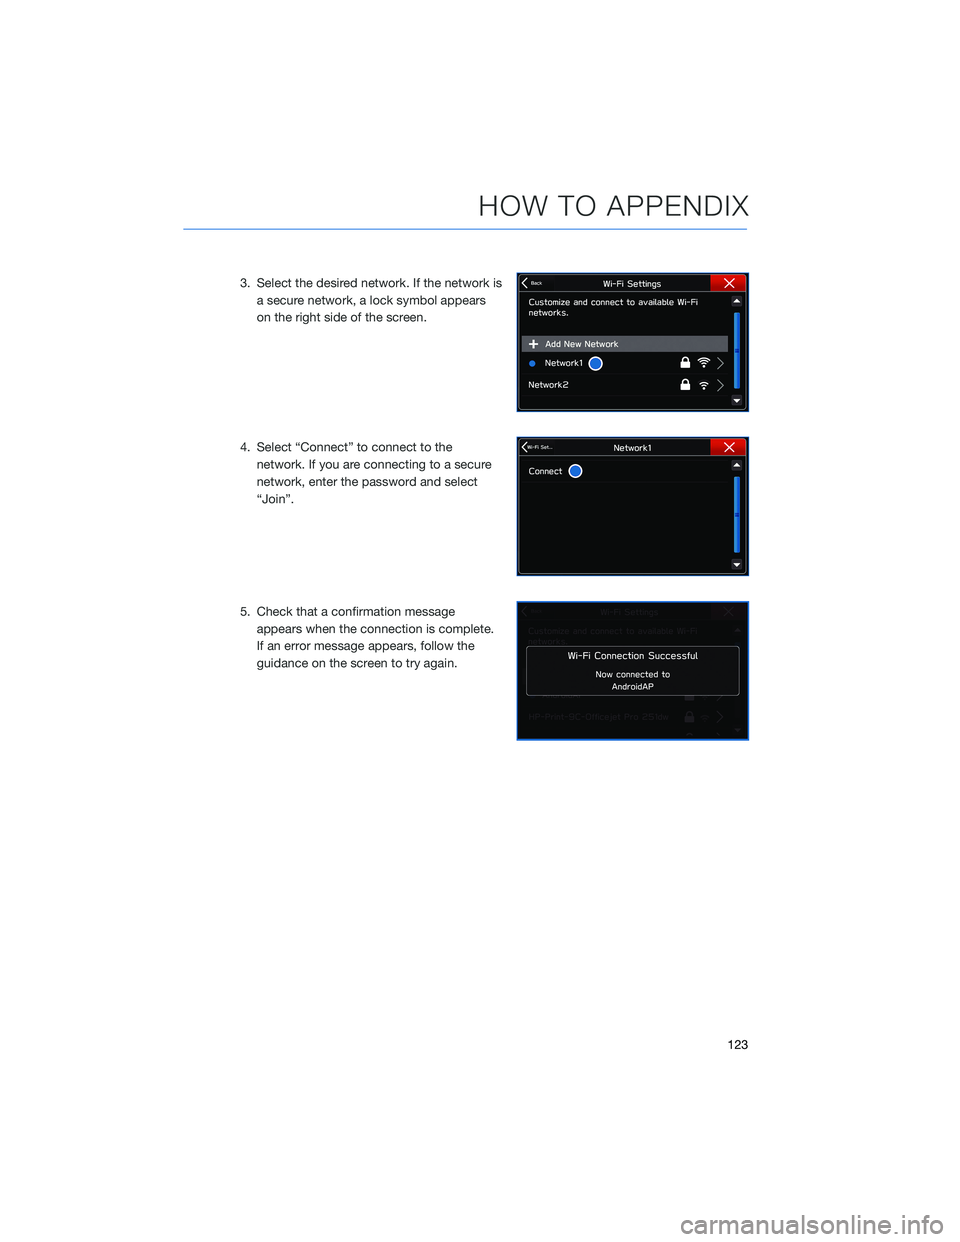
3. Select the desired network. If the network is
a secure network, a lock symbol appears
on the right side of the screen.
4. Select “Connect” to connect to the
network. If you are connecting to a secure
network, enter the password and select
“Join”.
5. Check that a confirmation message
appears when the connection is complete.
If an error message appears, follow the
guidance on the screen to try again.
HOW TO APPENDIX
123
Page 129 of 148
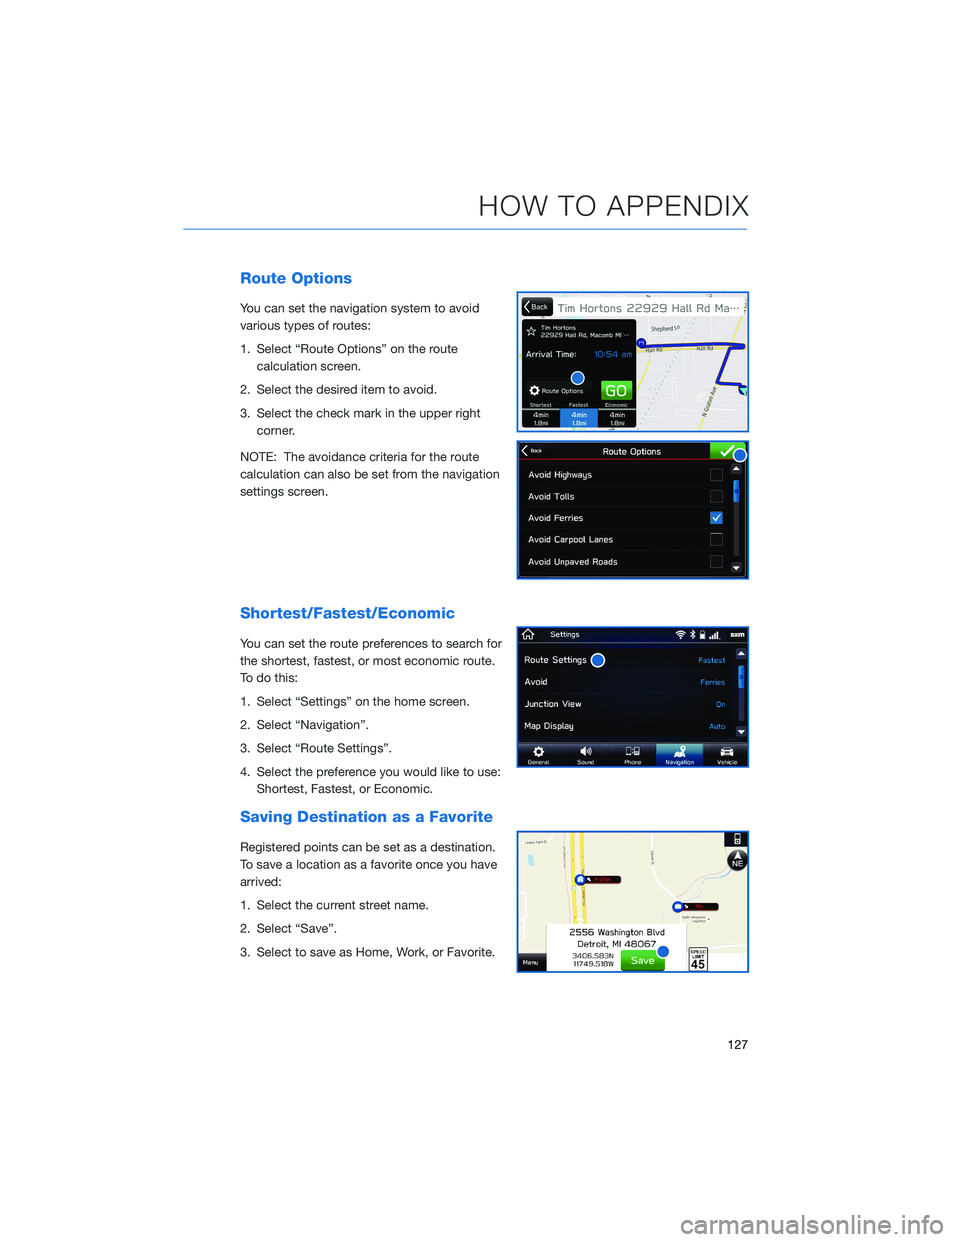
Route Options
You can set the navigation system to avoid
various types of routes:
1. Select “Route Options” on the route
calculation screen.
2. Select the desired item to avoid.
3. Select the check mark in the upper right
corner.
NOTE: The avoidance criteria for the route
calculation can also be set from the navigation
settings screen.
Shortest/Fastest/Economic
You can set the route preferences to search for
the shortest, fastest, or most economic route.
To do this:
1. Select “Settings” on the home screen.
2. Select “Navigation”.
3. Select “Route Settings”.
4. Select the preference you would like to use:
Shortest, Fastest, or Economic.
Saving Destination as a Favorite
Registered points can be set as a destination.
To save a location as a favorite once you have
arrived:
1. Select the current street name.
2. Select “Save”.
3. Select to save as Home, Work, or Favorite.
HOW TO APPENDIX
127
Page 134 of 148
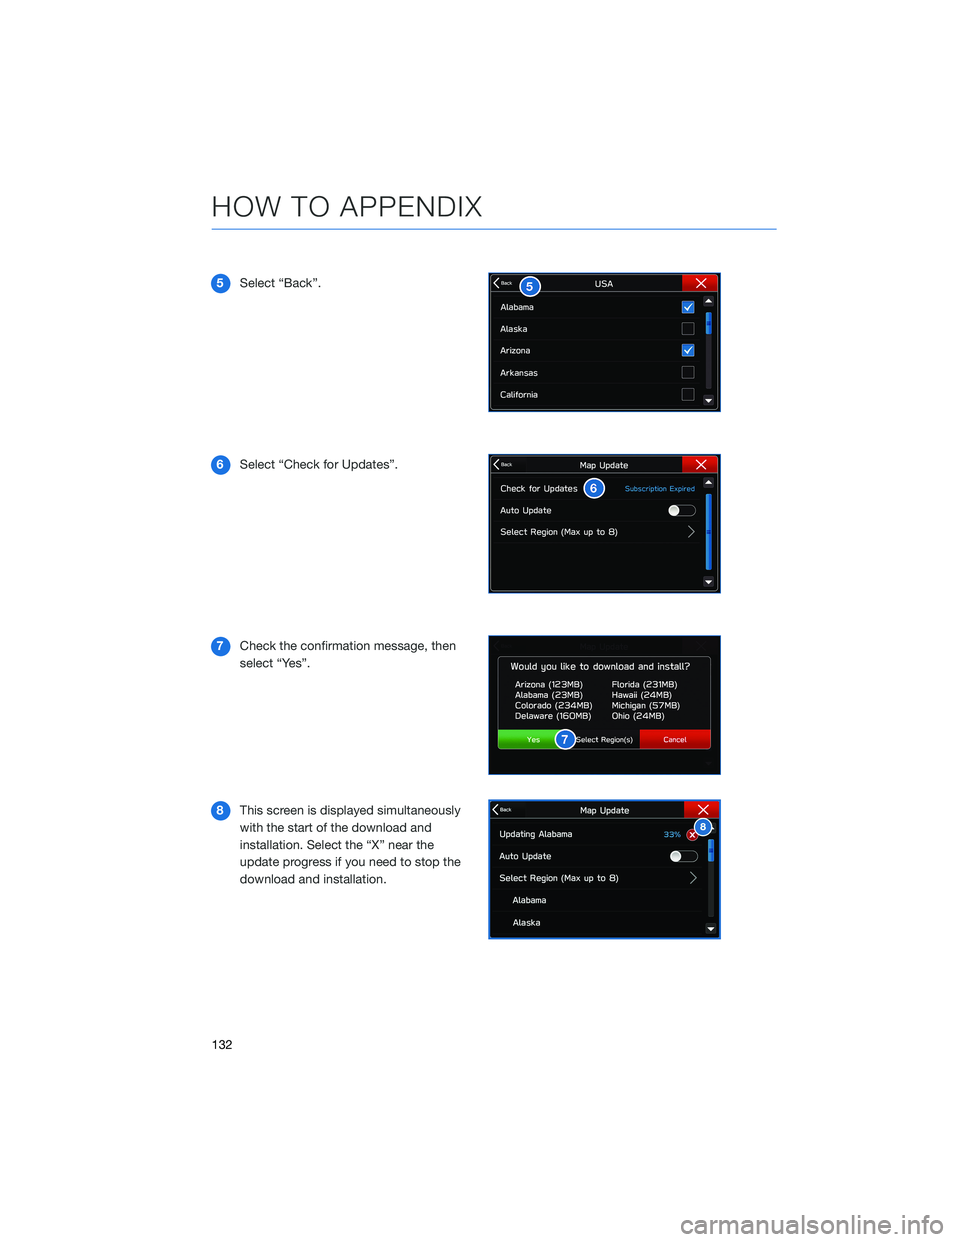
5Select “Back”.
6Select “Check for Updates”.
7Check the confirmation message, then
select “Yes”.
8This screen is displayed simultaneously
with the start of the download and
installation. Select the “X” near the
update progress if you need to stop the
download and installation.
HOW TO APPENDIX
132