windshield SUBARU ASCENT 2022 Getting Started Guide
[x] Cancel search | Manufacturer: SUBARU, Model Year: 2022, Model line: ASCENT, Model: SUBARU ASCENT 2022Pages: 148, PDF Size: 40.03 MB
Page 3 of 148
PURPOSE OF THIS GUIDE
WELCOME................. 4
IMPORTANT SAFETY
INFORMATION.............. 4
OWNER’S RESOURCES....... 4
IN CASE OF EMERGENCY..... 5
TOWING YOUR ALL-WHEEL
DRIVE SUBARU............. 6
ENTRY AND EXIT
KEYLESS ENTRY............ 7
KEYLESS ACCESS WITH
PUSH BUTTON START....... 9
POWER REAR GATE (PRG)....11
INSTRUMENT PANEL........14
GAUGES AND WARNING
LIGHTS
COMBINATION METER.......16
WARNING AND INDICATOR
LIGHTS....................17
CONTROLS
INSTRUMENT PANEL
SWITCHES (LOWER LEFT).....18
AUDIO CONTROLS...........18
ADVANCED ADAPTIVE
CRUISE CONTROL..........19
i/SET SWITCH...............19
VIEW/ENTER SWITCH........20LIGHT CONTROLS...........20
TURN SIGNALS.............21
WINDSHIELD WIPERS........22
REAR WINDOW WIPER.......23
ONE-TOUCH INTERIOR
LIGHTING..................23
OVERHEAD CONSOLE........24
GETTING COMFORTABLE
SEATING...................26
TILT AND TELESCOPIC
STEERING COLUMN.........29
POWER EXTERIOR MIRRORS . . 30
REAR VIEW MIRROR.........31
CABIN VIEW MIRROR.........32
POWER WINDOWS..........32
POWER MOONROOF........33
CLIMATE CONTROL..........34
ACCESSORY CONNECTIONS . . 40
OPERATING THE VEHICLE
IGNITION SWITCH...........41
PUSH-BUTTON IGNITION
SWITCH...................41
STARTING THE VEHICLE......41
DRIVING THE VEHICLE.......42
ELECTRONIC PARKING
BRAKE (EPB)...............43
X-MODE
®..................45
TURNING OFF THE VEHICLE...46
TABLE OF CONTENTS
Page 5 of 148
DRIVER ASSIST
TECHNOLOGIES
REAR-VISION CAMERA......101
FRONT VIEW MONITOR.....101
BLIND SPOT DETECTION (BSD) /
REAR CROSS TRAFFIC ALERT
(RCTA)...................102
HIGH BEAM ASSIST (HBA)...103
STEERING RESPONSIVE
HEADLIGHTS (SRH).........103
REVERSE AUTOMATIC
BRAKING (RAB)............103
CARE AND LIMITATIONS
STEREO CAMERA
PRECAUTIONS.............104
WINDSHIELD GLASS AND
DASHBOARD..............104
FRONT VIEW
ASCENT..................105
EYESIGHT DISCLAIMER
EYESIGHT®DISCLAIMER....106
HOW TO APPENDIX
HOW TO OVERVIEW.........107
MEMORY HEIGHT..........108
MEMORY DRIVER’S SEAT....110
BLUETOOTH
®PAIRING......111
ANDROID AUTO™..........119
APPLE CARPLAY
®..........121
WI-FI.....................122
MAPS....................125
FIRMWARE AND SOFTWARE
UPDATES.................133
INDEX.....................134
TABLE OF CONTENTS
3
Page 17 of 148
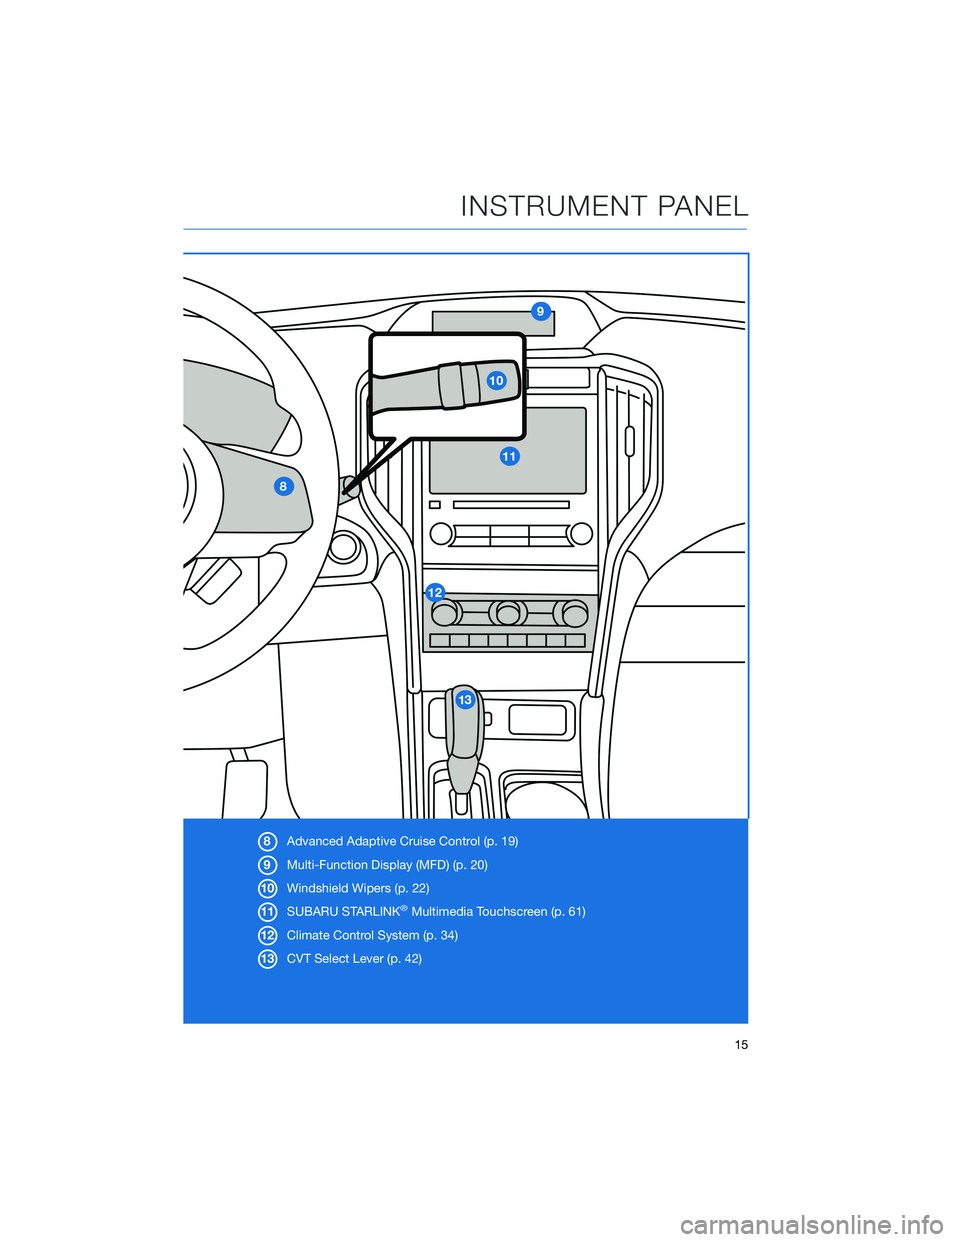
8Advanced Adaptive Cruise Control (p. 19)
9Multi-Function Display (MFD) (p. 20)
10Windshield Wipers (p. 22)
11SUBARU STARLINK
®Multimedia Touchscreen (p. 61)
12Climate Control System (p. 34)
13CVT Select Lever (p. 42)
INSTRUMENT PANEL
15
Page 22 of 148
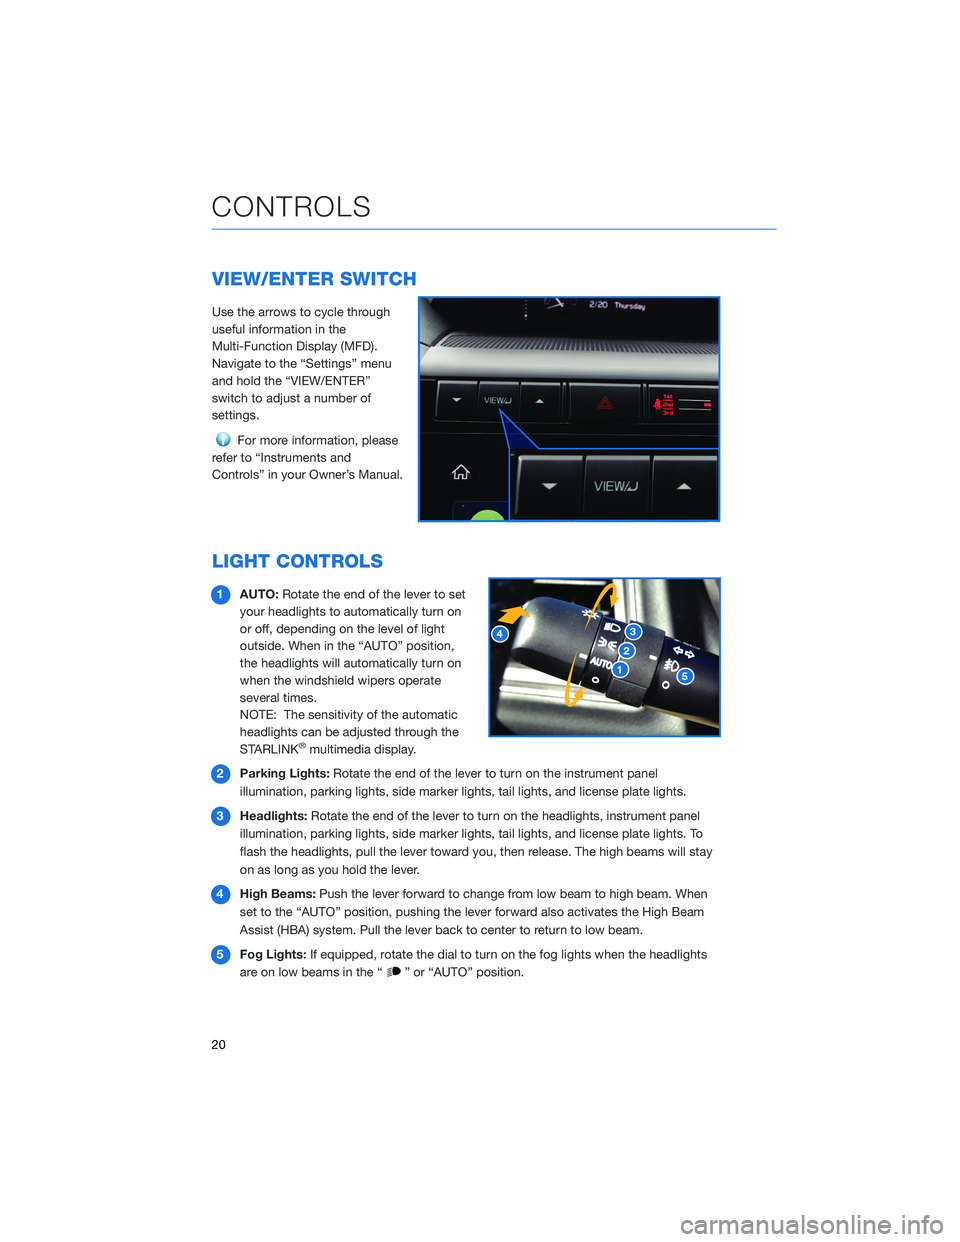
VIEW/ENTER SWITCH
Use the arrows to cycle through
useful information in the
Multi-Function Display (MFD).
Navigate to the “Settings” menu
and hold the “VIEW/ENTER”
switch to adjust a number of
settings.
For more information, please
refer to “Instruments and
Controls” in your Owner’s Manual.
LIGHT CONTROLS
1AUTO:Rotate the end of the lever to set
your headlights to automatically turn on
or off, depending on the level of light
outside. When in the “AUTO” position,
the headlights will automatically turn on
when the windshield wipers operate
several times.
NOTE: The sensitivity of the automatic
headlights can be adjusted through the
STARLINK
®multimedia display.
2Parking Lights:Rotate the end of the lever to turn on the instrument panel
illumination, parking lights, side marker lights, tail lights, and license plate lights.
3Headlights:Rotate the end of the lever to turn on the headlights, instrument panel
illumination, parking lights, side marker lights, tail lights, and license plate lights. To
flash the headlights, pull the lever toward you, then release. The high beams will stay
on as long as you hold the lever.
4High Beams:Push the lever forward to change from low beam to high beam. When
set to the “AUTO” position, pushing the lever forward also activates the High Beam
Assist (HBA) system. Pull the lever back to center to return to low beam.
5Fog Lights:If equipped, rotate the dial to turn on the fog lights when the headlights
are on low beams in the “
” or “AUTO” position.
CONTROLS
20
Page 24 of 148
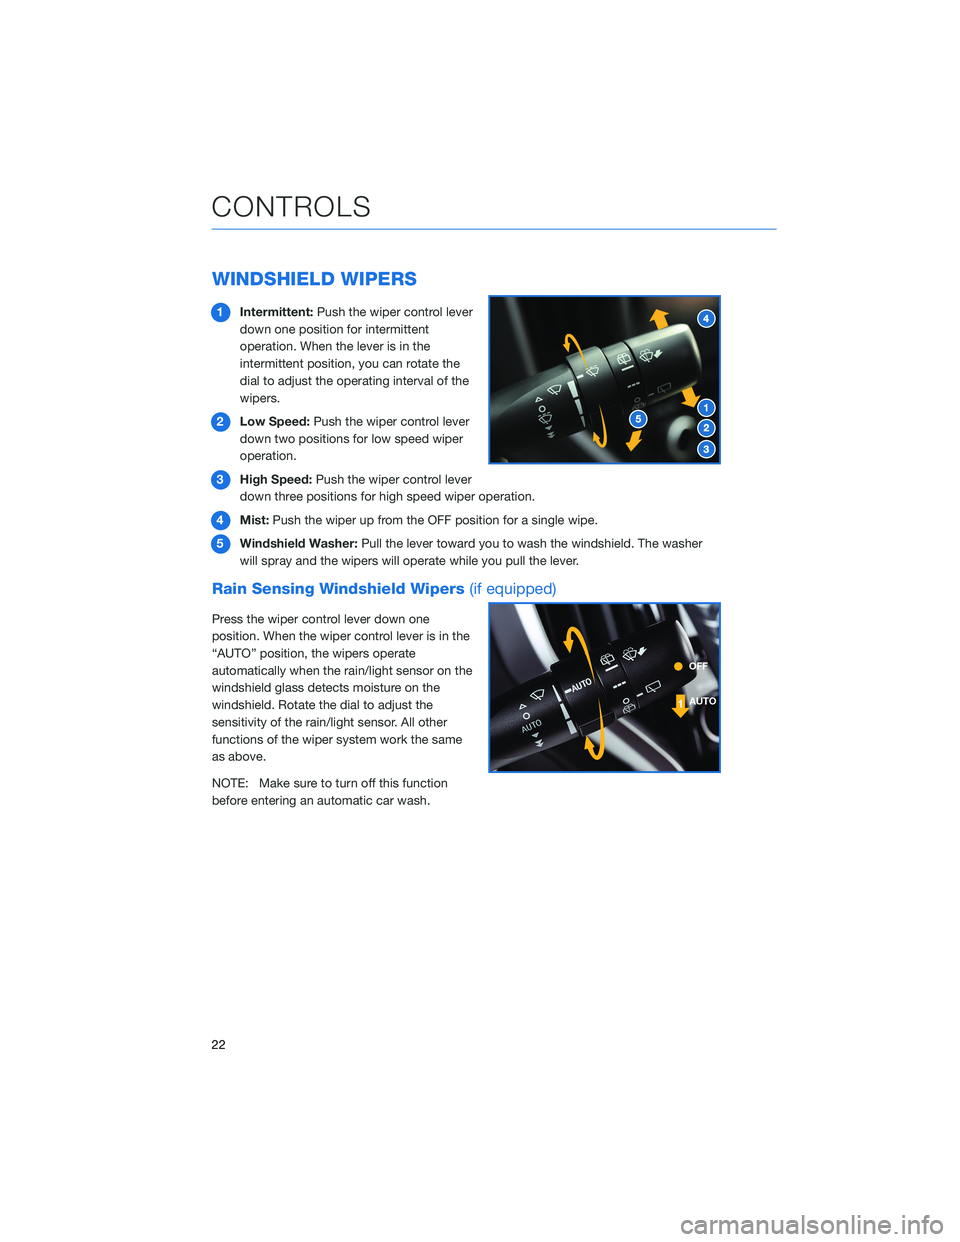
WINDSHIELD WIPERS
1Intermittent:Push the wiper control lever
down one position for intermittent
operation. When the lever is in the
intermittent position, you can rotate the
dial to adjust the operating interval of the
wipers.
2Low Speed:Push the wiper control lever
down two positions for low speed wiper
operation.
3High Speed:Push the wiper control lever
down three positions for high speed wiper operation.
4Mist:Push the wiper up from the OFF position for a single wipe.
5Windshield Washer:Pull the lever toward you to wash the windshield. The washer
will spray and the wipers will operate while you pull the lever.
Rain Sensing Windshield Wipers(if equipped)
Press the wiper control lever down one
position. When the wiper control lever is in the
“AUTO” position, the wipers operate
automatically when the rain/light sensor on the
windshield glass detects moisture on the
windshield. Rotate the dial to adjust the
sensitivity of the rain/light sensor. All other
functions of the wiper system work the same
as above.
NOTE: Make sure to turn off this function
before entering an automatic car wash.
CONTROLS
22
Page 37 of 148
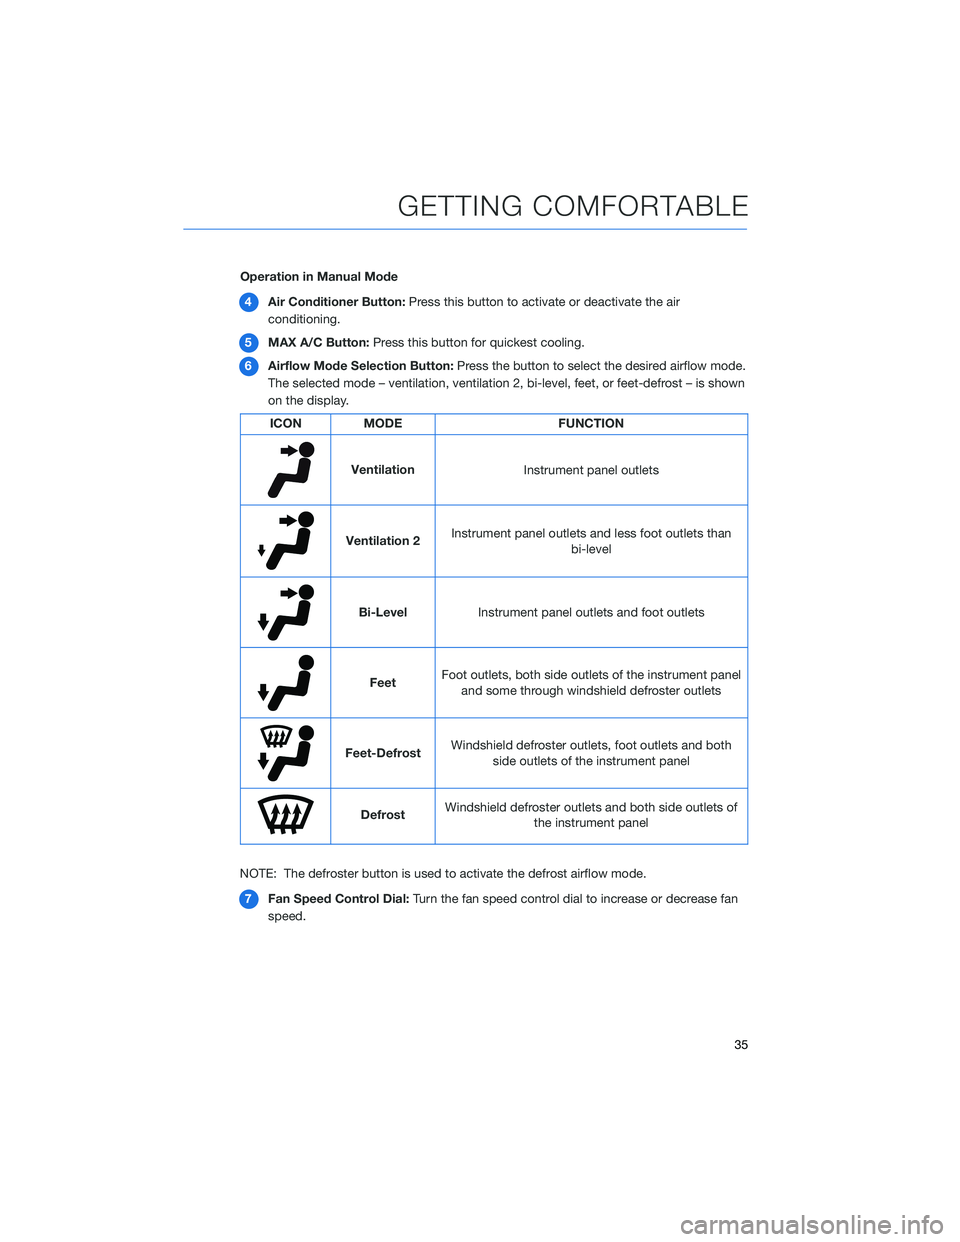
Operation in Manual Mode
4Air Conditioner Button:Press this button to activate or deactivate the air
conditioning.
5MAX A/C Button:Press this button for quickest cooling.
6Airflow Mode Selection Button:Press the button to select the desired airflow mode.
The selected mode – ventilation, ventilation 2, bi-level, feet, or feet-defrost – is shown
on the display.
ICON MODE FUNCTION
Ventilation
Instrument panel outlets
Ventilation 2Instrument panel outlets and less foot outlets than
bi-level
Bi-Level
Instrument panel outlets and foot outlets
FeetFoot outlets, both side outlets of the instrument panel
and some through windshield defroster outlets
Feet-DefrostWindshield defroster outlets, foot outlets and both
side outlets of the instrument panel
DefrostWindshield defroster outlets and both side outlets of
the instrument panel
NOTE: The defroster button is used to activate the defrost airflow mode.
7Fan Speed Control Dial:Turn the fan speed control dial to increase or decrease fan
speed.
GETTING COMFORTABLE
35
Page 38 of 148
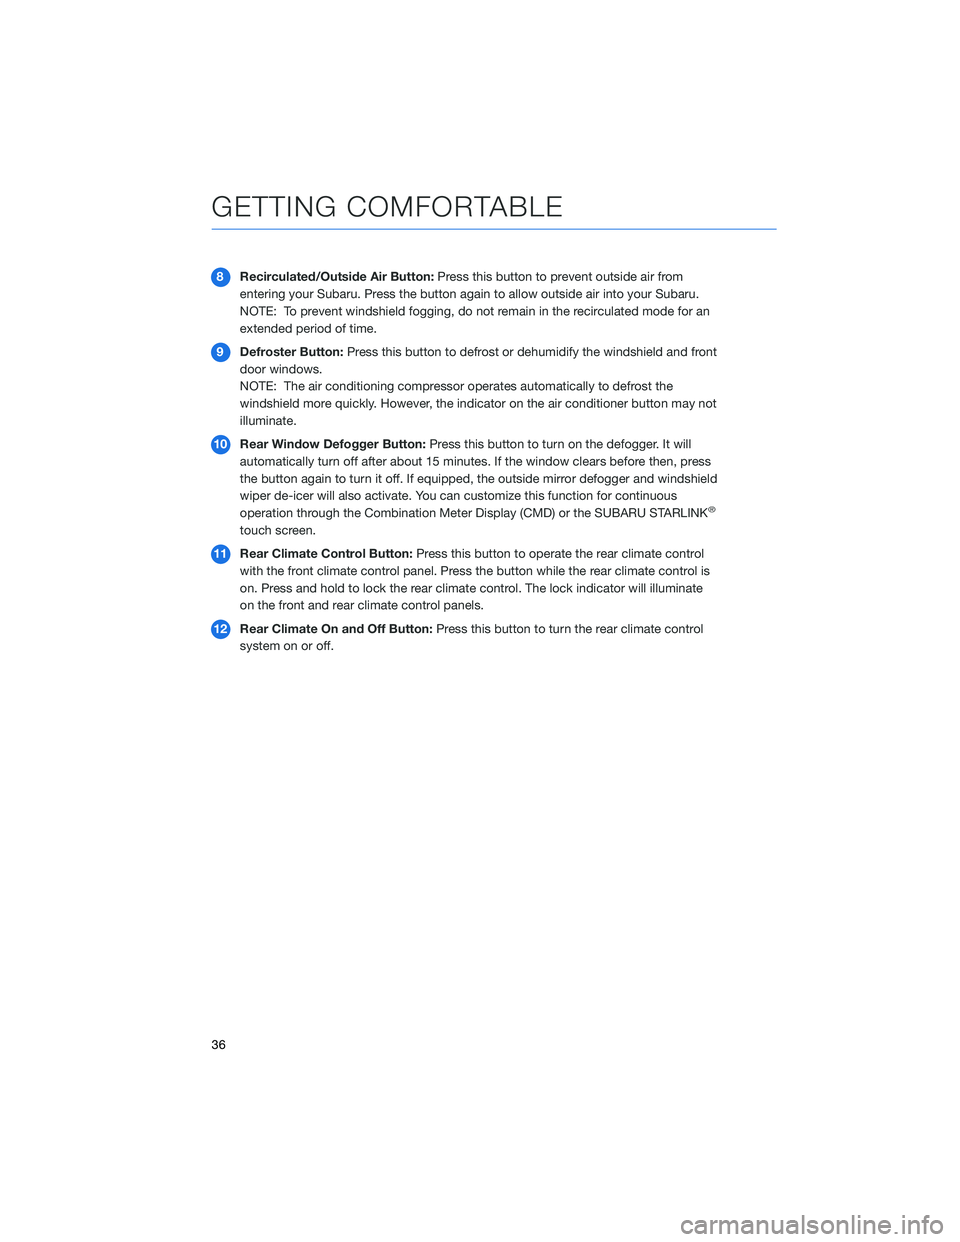
8Recirculated/Outside Air Button:Press this button to prevent outside air from
entering your Subaru. Press the button again to allow outside air into your Subaru.
NOTE: To prevent windshield fogging, do not remain in the recirculated mode for an
extended period of time.
9Defroster Button:Press this button to defrost or dehumidify the windshield and front
door windows.
NOTE: The air conditioning compressor operates automatically to defrost the
windshield more quickly. However, the indicator on the air conditioner button may not
illuminate.
10Rear Window Defogger Button:Press this button to turn on the defogger. It will
automatically turn off after about 15 minutes. If the window clears before then, press
the button again to turn it off. If equipped, the outside mirror defogger and windshield
wiper de-icer will also activate. You can customize this function for continuous
operation through the Combination Meter Display (CMD) or the SUBARU STARLINK
®
touch screen.
11Rear Climate Control Button:Press this button to operate the rear climate control
with the front climate control panel. Press the button while the rear climate control is
on. Press and hold to lock the rear climate control. The lock indicator will illuminate
on the front and rear climate control panels.
12Rear Climate On and Off Button:Press this button to turn the rear climate control
system on or off.
GETTING COMFORTABLE
36
Page 58 of 148
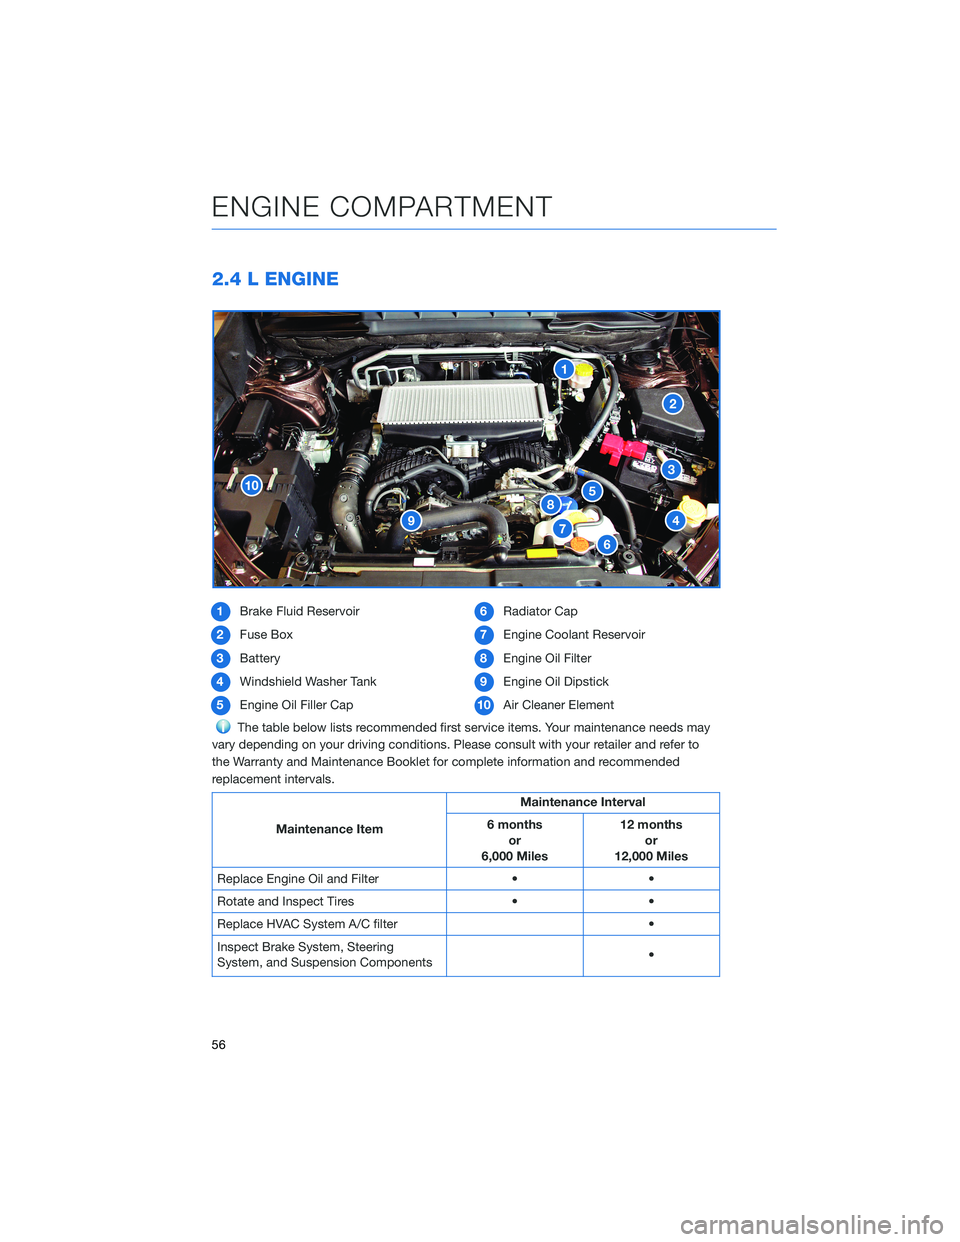
2.4 L ENGINE
1Brake Fluid Reservoir
2Fuse Box
3Battery
4Windshield Washer Tank
5Engine Oil Filler Cap6Radiator Cap
7Engine Coolant Reservoir
8Engine Oil Filter
9Engine Oil Dipstick
10Air Cleaner Element
The table below lists recommended first service items. Your maintenance needs may
vary depending on your driving conditions. Please consult with your retailer and refer to
the Warranty and Maintenance Booklet for complete information and recommended
replacement intervals.
Maintenance ItemMaintenance Interval
6 months
or
6,000 Miles12 months
or
12,000 Miles
Replace Engine Oil and Filter • •
Rotate and Inspect Tires • •
Replace HVAC System A/C filter •
Inspect Brake System, Steering
System, and Suspension Components•
ENGINE COMPARTMENT
56
Page 93 of 148
OPERATION
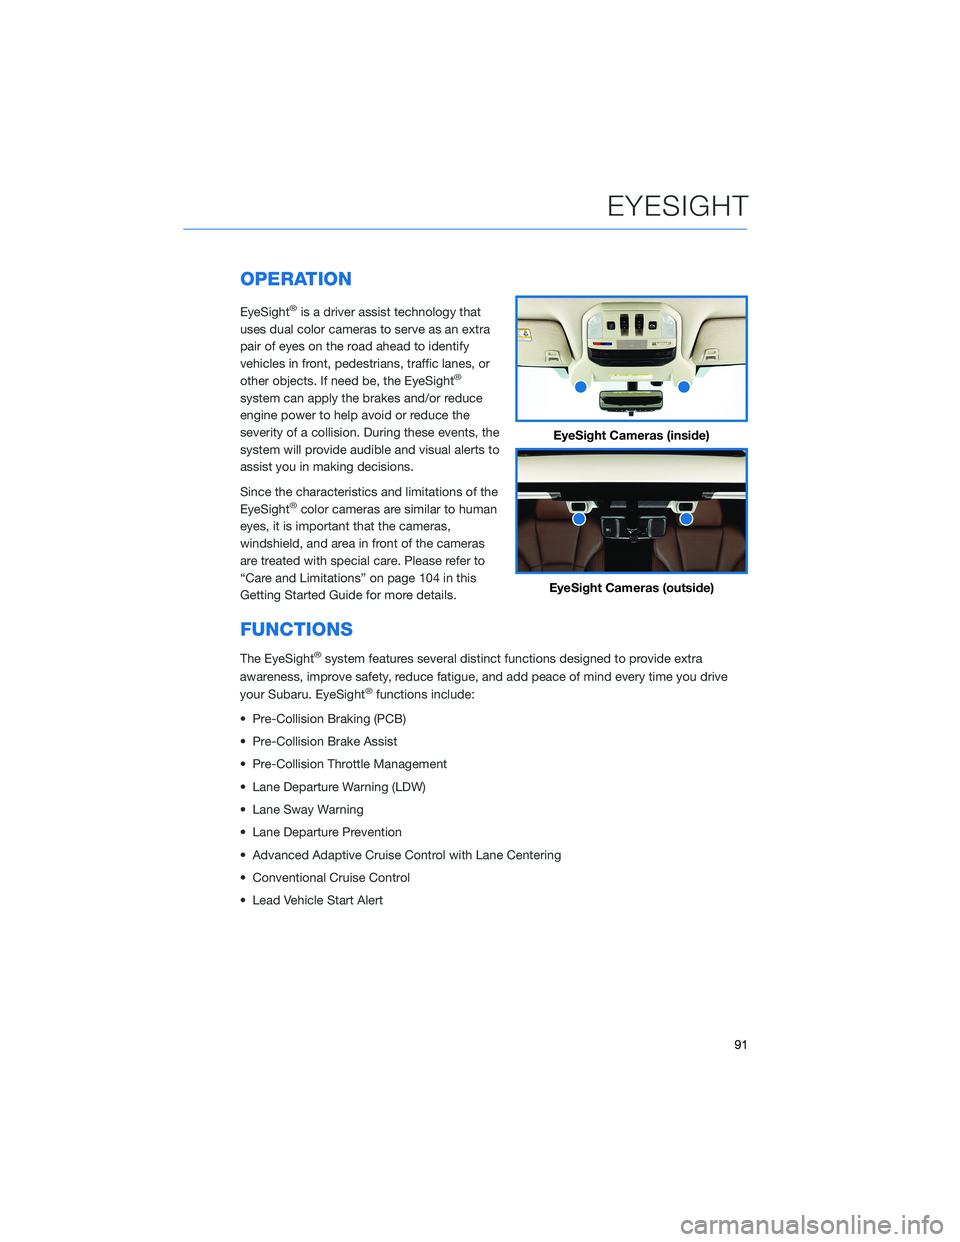
EyeSight®is a driver assist technology that
uses dual color cameras to serve as an extra
pair of eyes on the road ahead to identify
vehicles in front, pedestrians, traffic lanes, or
other objects. If need be, the EyeSight
®
system can apply the brakes and/or reduce
engine power to help avoid or reduce the
severity of a collision. During these events, the
system will provide audible and visual alerts to
assist you in making decisions.
Since the characteristics and limitations of the
EyeSight
®color cameras are similar to human
eyes, it is important that the cameras,
windshield, and area in front of the cameras
are treated with special care. Please refer to
“Care and Limitations” on page 104 in this
Getting Started Guide for more details.
FUNCTIONS
The EyeSight®system features several distinct functions designed to provide extra
awareness, improve safety, reduce fatigue, and add peace of mind every time you drive
your Subaru. EyeSight
®functions include:
• Pre-Collision Braking (PCB)
• Pre-Collision Brake Assist
• Pre-Collision Throttle Management
• Lane Departure Warning (LDW)
• Lane Sway Warning
• Lane Departure Prevention
• Advanced Adaptive Cruise Control with Lane Centering
• Conventional Cruise Control
• Lead Vehicle Start Alert
EyeSight Cameras (inside)
EyeSight Cameras (outside)
EYESIGHT
91
Page 101 of 148
EYESIGHT®ASSIST MONITOR (EAM)
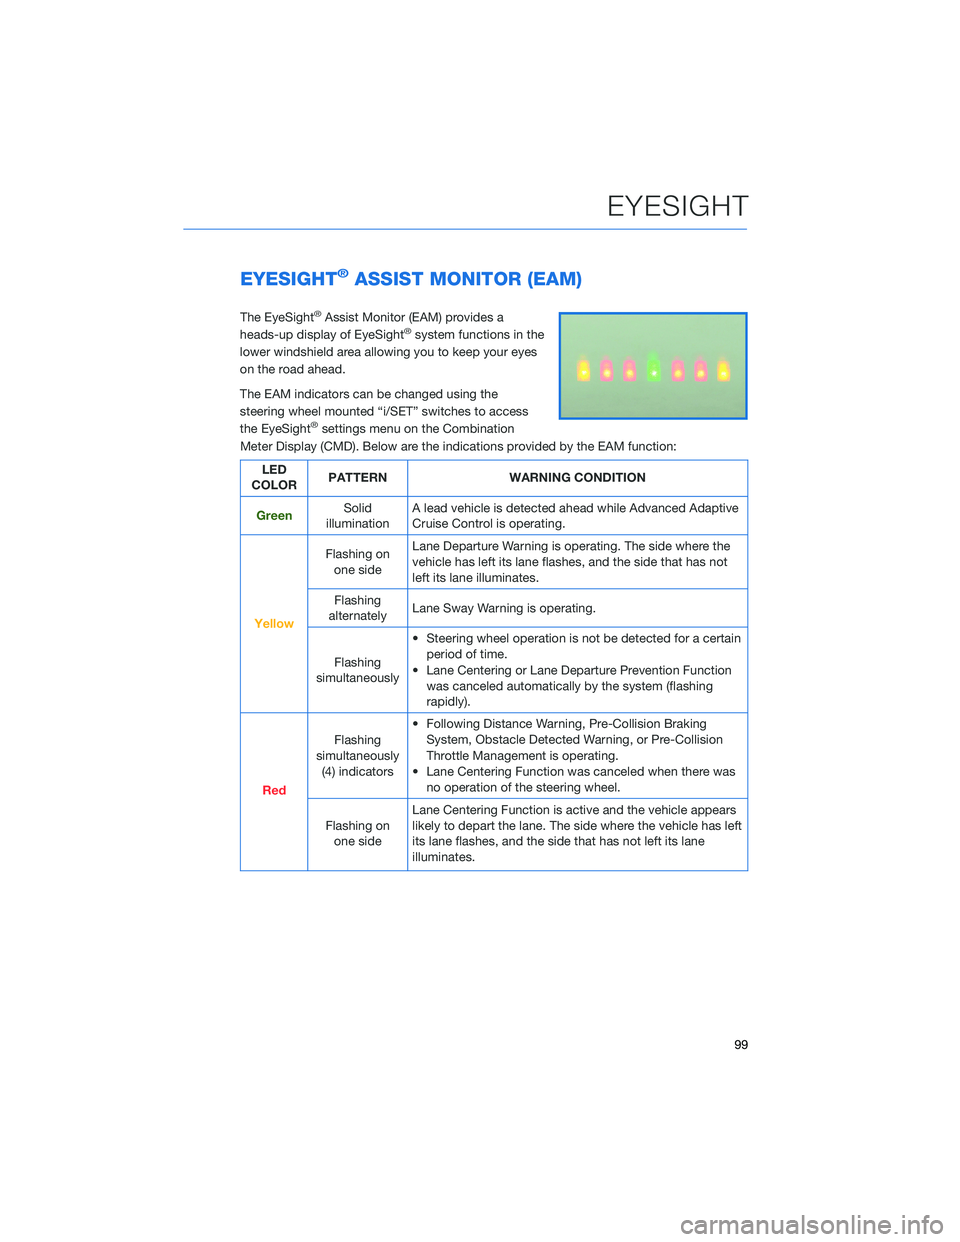
The EyeSight®Assist Monitor (EAM) provides a
heads-up display of EyeSight®system functions in the
lower windshield area allowing you to keep your eyes
on the road ahead.
The EAM indicators can be changed using the
steering wheel mounted “i/SET” switches to access
the EyeSight
®settings menu on the Combination
Meter Display (CMD). Below are the indications provided by the EAM function:
LED
COLORPATTERN WARNING CONDITION
GreenSolid
illuminationA lead vehicle is detected ahead while Advanced Adaptive
Cruise Control is operating.
Yellow
Flashing on
one sideLane Departure Warning is operating. The side where the
vehicle has left its lane flashes, and the side that has not
left its lane illuminates.
Flashing
alternatelyLane Sway Warning is operating.
Flashing
simultaneously• Steering wheel operation is not be detected for a certain
period of time.
• Lane Centering or Lane Departure Prevention Function
was canceled automatically by the system (flashing
rapidly).
Red
Flashing
simultaneously
(4) indicators• Following Distance Warning, Pre-Collision Braking
System, Obstacle Detected Warning, or Pre-Collision
Throttle Management is operating.
• Lane Centering Function was canceled when there was
no operation of the steering wheel.
Flashing on
one sideLane Centering Function is active and the vehicle appears
likely to depart the lane. The side where the vehicle has left
its lane flashes, and the side that has not left its lane
illuminates.
EYESIGHT
99