light SUBARU BRZ 2017 1.G Navigation Manual
[x] Cancel search | Manufacturer: SUBARU, Model Year: 2017, Model line: BRZ, Model: SUBARU BRZ 2017 1.GPages: 334, PDF Size: 10.36 MB
Page 11 of 334
Introduction 9
Before Use
•Always replace fuses with fuses of the same specified
capacity (amperage). Using a fuse with a higher capacity
than the specification may result in a fire.
•If a foreign object or water enters the unit, smoke or a
strange odor may be emitted. If such an abnormality occurs,
stop using the unit immediately and contact your SUBARU
dealer. An accident, fire or electric shock may result if you
continue to use the unit under these conditions.
•In a thunderstorm, do not touch the antenna line or the unit.
Lightning may cause an electric shock.
•Do not park or stop in prohibited areas to use the unit.
•If direct sunlight shines into the vehicle, light may reflect off
the product. Be very careful while driving.
•Never use headphones or earphones while driving. Driving
while not being able to hear sounds from outside the vehicle
may result in a traffic accident.
CAUTION
•Although the unit can be used when the ignition switch is
set to either ON or ACC, to protect the battery, start the
engine before using the unit.
•Do not use the unit anywhere other than in a vehicle. Doing
so may result in an electric shock or other injury.
•While driving, keep the volume low enough for you to hear
outside sounds. Driving while not being able to hear sounds
from outside the vehicle may result in an accident.
•Be careful of the volume when turning on the power. If a
loud noise is emitted suddenly when you turn on the power,
it may damage your hearing.
•Do not apply a strong force to the display. Doing so may
result in a malfunction.
•Do not put your fingers or hands into the disc slot or SD
memory card slot. Doing so may result in an injury.
•Do not touch the hot parts of the unit. The hot parts may
burn you.
•Do not use while there is an abnormality such as sound
breakup or distortion. Doing so may result in a fire.
•Using the unit during extremely high or low temperature
may result in mistaken operation or a malfunction. In
particular, the temperature inside the vehicle can often rise
to a high level during the summer. Cool the vehicle, for
example by opening a window, before using the unit.
•Be careful if metal or water enters the unit, or the unit is
exposed to a strong impact, because it may result in a
malfunction.
•The touch buttons on the display screen may not operate
correctly if condensation forms inside them. If this happens,
do not attempt to operate the switches until the
condensation has disappeared.
Page 15 of 334
Introduction 13
Before Use
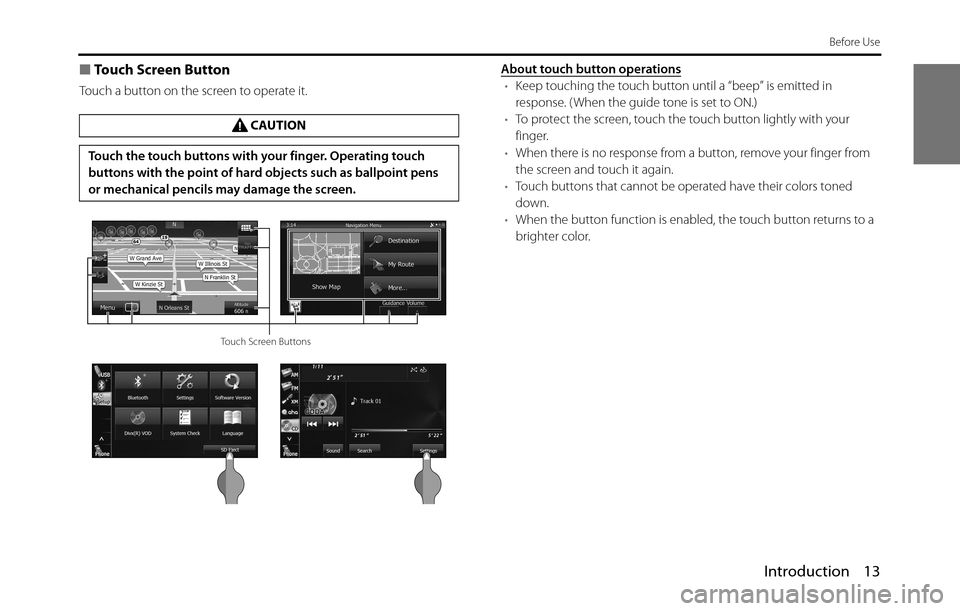
■Touch Screen Button
Touch a button on the screen to operate it.About touch button operations•Keep touching the touch button until a “beep” is emitted in
response. ( When the guide tone is set to ON.)
•To protect the screen, touch the touch button lightly with your
finger.
•When there is no response from a button, remove your finger from
the screen and touch it again.
•Touch buttons that cannot be operated have their colors toned
down.
•When the button function is enabled, the touch button returns to a
brighter color. CAUTION
Touch the touch buttons with your finger. Operating touch
buttons with the point of hard objects such as ballpoint pens
or mechanical pencils may damage the screen.
Touch Screen Buttons
Page 21 of 334
Introduction 19
Before Use
•Leaving the USB memory for a long time in a place exposed to direct sunlight
may result in deformation or discoloration due to the high temperature, or
cause a malfunction. In such cases, Fuji Heavy Industries will not give any
compensation. When you are not using the USB memory, keep it in a place
away from direct sunlight. Further, when leaving the vehicle, do not keep the
USB memory inside.
•When the audio source is USB, do not disconnect the USB memory. Doing so
may damage the data in the USB memory. Before disconnecting the USB
memory, turn the ignition switch to the Off position or switch the audio
source to a source other than USB, and then disconnect it.About the Unit Modes
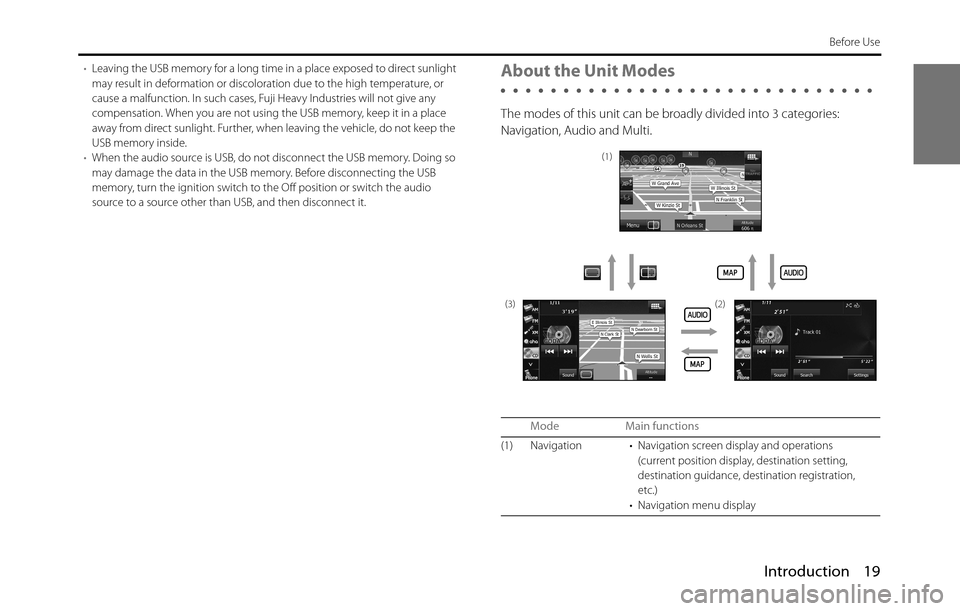
The modes of this unit can be broadly divided into 3 categories:
Navigation, Audio and Multi.
Mode Main functions
(1) Navigation • Navigation screen display and operations
(current position display, destination setting,
destination guidance, destination registration,
etc.)
• Navigation menu display
(1)
(3) (2)
Page 30 of 334
28 Introduction
Before Use
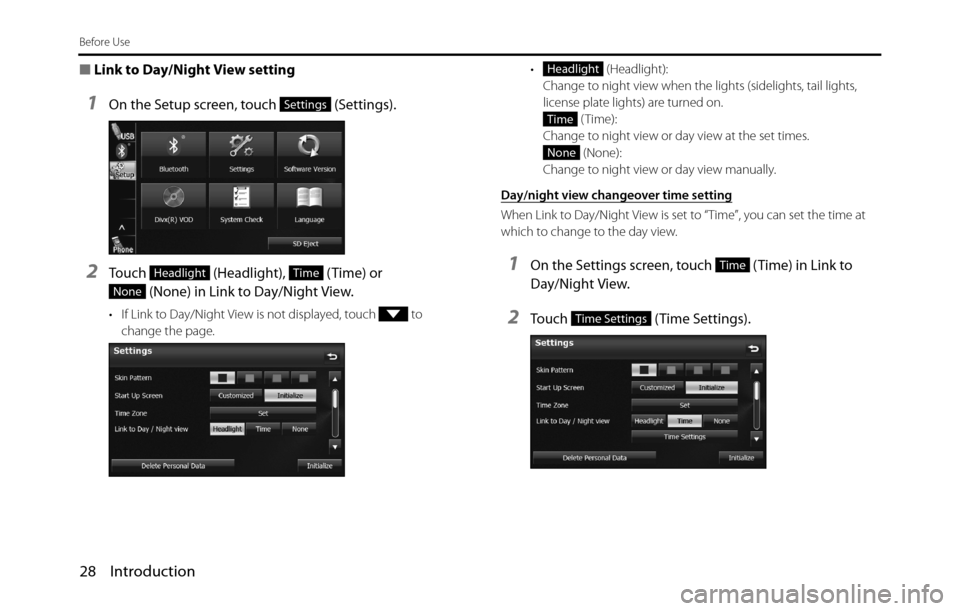
■Link to Day/Night View setting
1On the Setup screen, touch (Settings).
2Touch (Headlight), (Time) or
(None) in Link to Day/Night View.
• If Link to Day/Night View is not displayed, touch to
change the page.• (Headlight):
Change to night view when the lights (sidelights, tail lights,
license plate lights) are turned on.
(Time):
Change to night view or day view at the set times.
(None):
Change to night view or day view manually.
Day/night view changeover time setting
When Link to Day/Night View is set to “Time”, you can set the time at
which to change to the day view.
1On the Settings screen, touch (Time) in Link to
Day/Night View.
2Touch (Time Settings).
Settings
HeadlightTime
None
Headlight
Time
None
Time
Time Settings
Page 39 of 334
Introduction 37
Before Use
Screen Adjustment and Setting
When Link to Day/Night View on the Settings screen is set to
“Headlight” (See Page 28.), day view or night view is selected based on
whether the lights (sidelights, tail lights, license plate light) are on or off,
to make it easier to view the screen. When “Time” is set (See Page 28.),
the view changes at the set time.
Also, when set to “None” (See Page 29.), you can manually switch to a
day view or a night view screen at any time.
Displaying the picture quality adjustment
screen
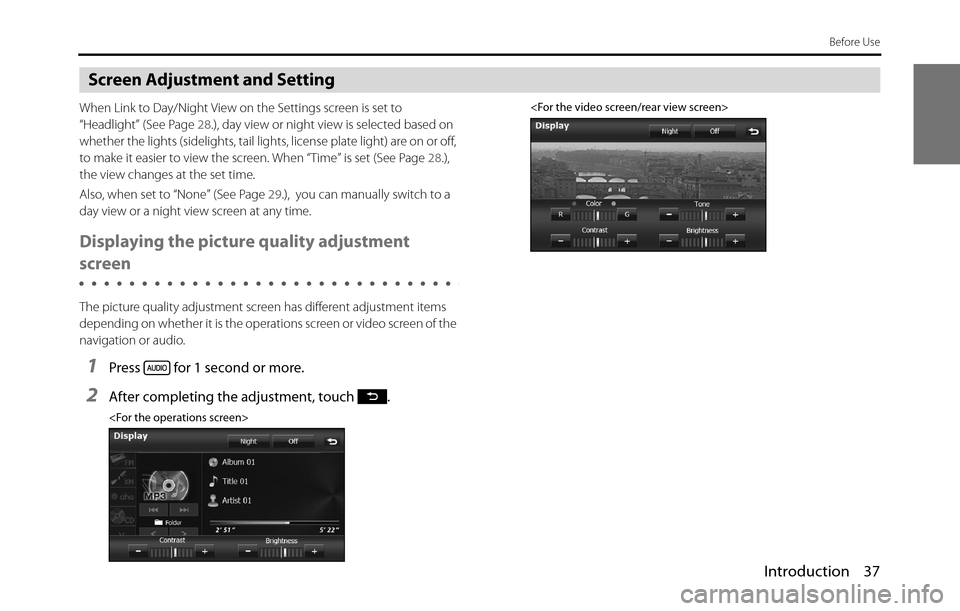
The picture quality adjustment screen has different adjustment items
depending on whether it is the operations screen or video screen of the
navigation or audio.
1Press for 1 second or more.
2After completing the adjustment, touch .
Page 40 of 334
38 Introduction
Before Use
■Changing to the night view or day view
1Touch (Night) ( (Day)) if the day (night) view is
displayed on the image quality adjustment screen.
• The view changes between night view and day view each time
you touch the screen.
NOTE
When Link to Day/Night View is set to “None” on the Settings screen,
(Night) or (Day) are not displayed on the picture quality adjustment
screen.
■Closing the screen
1On the picture quality adjustment screen, touch
(Off ).
• To display the screen again, press or .
■Adjusting the picture quality
You can independently adjust the day view and night view.
1Display the day view or night view.
• For details on changing the view, see “Changing to the night
view or day view” on Page
38.
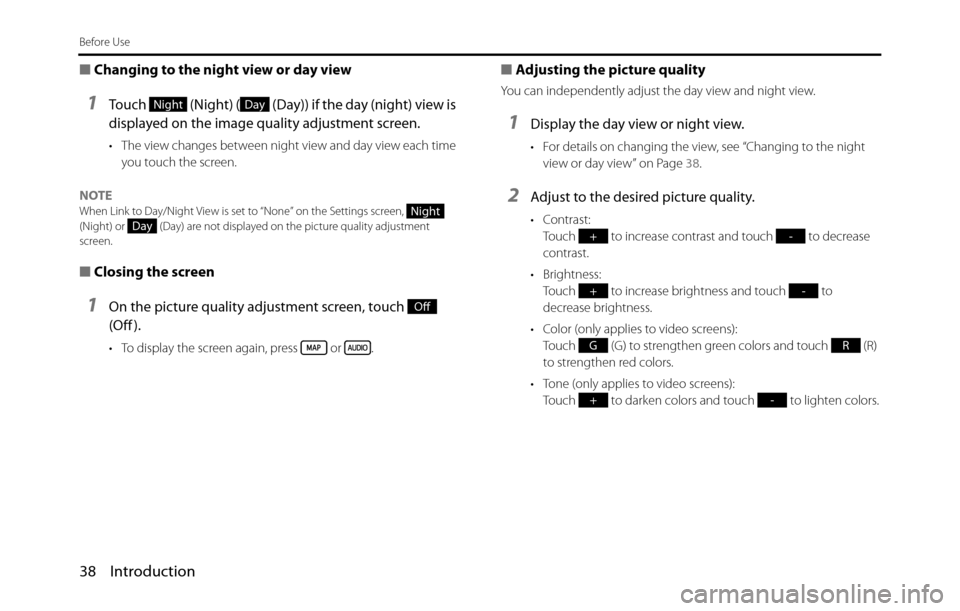
2Adjust to the desired picture quality.
• Contrast:
Touch to increase contrast and touch to decrease
contrast.
• Brightness:
Touch to increase brightness and touch to
decrease brightness.
• Color (only applies to video screens):
Touch (G) to strengthen green colors and touch (R)
to strengthen red colors.
• Tone (only applies to video screens):
Touch to darken colors and touch to lighten colors.
NightDay
NightDay
Off
+-
+-
GR
+-
Page 41 of 334
Introduction 39
Before Use
Precautions for Using Bluetooth Devices
Be careful of the following when using Bluetooth devices.
WA R N I N G
•To ensure safety, the driver should not operate Bluetooth-
connected phones while driving.
•Do not make calls on a cell phone while driving. If you
receive a call on your phone, calmly stop the vehicle in a safe
place and then answer the call. If you must answer the call,
use the handsfree function to inform the caller that you will
call back later. Then, stop the vehicle in a safe place and call
back.
•Buttons on the touch screen that cannot be used have their
colors toned down.
Operating the navigation system while driving could cause
your attention to be distracted from the current traffic
conditions. This could result in a severe or fatal accident.
Follow the descriptions of all operations and the instructions
for safety given in this manual without fail.
•When using a cell phone in a vehicle, be sure to observe the
local laws and regulations.
CAUTION
•Do not leave a Bluetooth-connected phone inside the vehicle.
(Direct sunlight may cause the vehicle interior to rise to a very
high temperature.)
•When using a Bluetooth-connected phone, keep away from
devices inside the vehicle. If you get too close to a device
inside the vehicle, the sound or connection quality may drop.
•The frequency band used by these devices is the same band
that is used by microwave ovens, wireless devices used in
factory production lines for identifying moving objects
(license required), special low output wireless devices (license
not required), amateur radios (license required), and other
industrial, scientific and medical devices. (The 3 types of
wireless devices above are hereafter called “other wireless
devices”.) When using a Bluetooth-connected phone, check
whether “other wireless devices” are used nearby. If the
Bluetooth-connected phone causes harmful radio wave
interference in “other wireless devices”, immediately move the
phone to a different location to stop the wireless interference.
The frequency band used by Bluetooth-connected phones is
the 2.4 GHz band. T
he FH-SS modulation scheme is used. The
estimated distance in which interference may occur is less than
10 m. The band used by Bluetooth-connected phones is the full
band, which helps avoid interference with the band used by
devices that identify moving objects.
Page 92 of 334
90 Navigation
Read First
Most of these icons can be understood intuitively. The following table
shows the most frequently displayed route events. The symbol design is
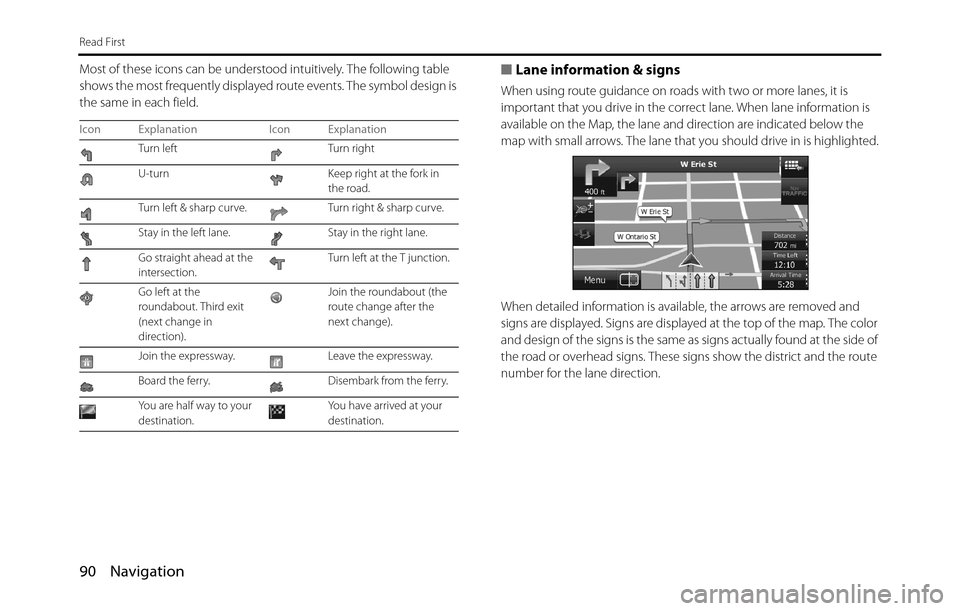
the same in each field.■Lane information & signs
When using route guidance on roads with two or more lanes, it is
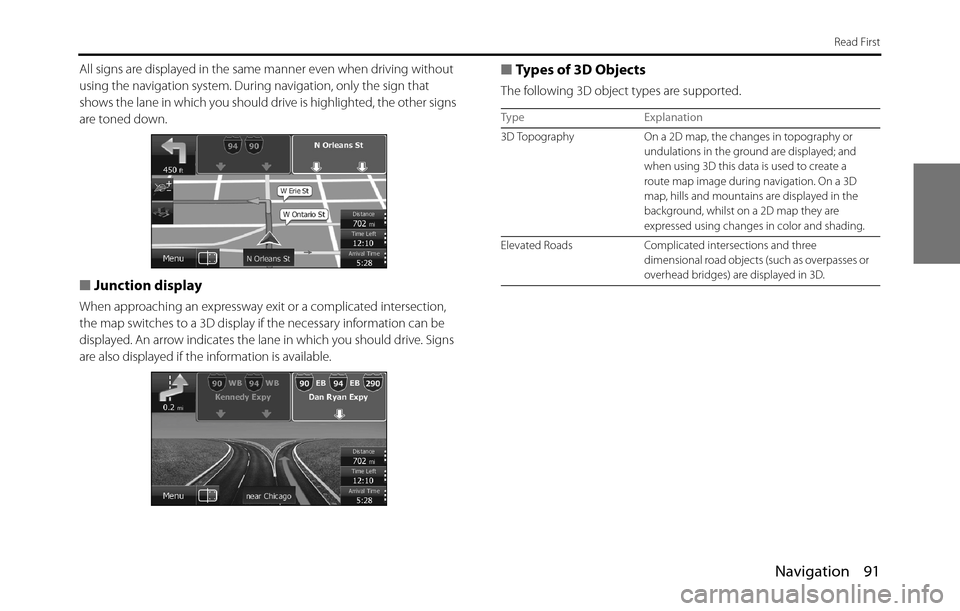
important that you drive in the correct lane. When lane information is
available on the Map, the lane and direction are indicated below the
map with small arrows. The lane that you should drive in is highlighted.
When detailed information is available, the arrows are removed and
signs are displayed. Signs are displayed at the top of the map. The color
and design of the signs is the same as signs actually found at the side of
the road or overhead signs. These signs show the district and the route
number for the lane direction.
Icon Explanation Icon Explanation
Turn left Turn right
U-turn Keep right at the fork in
the road.
Turn left & sharp curve. Turn right & sharp curve.
Stay in the left lane. Stay in the right lane.
Go straight ahead at the
intersection.Turn left at the T junction.
Go left at the
roundabout. Third exit
(next change in
direction).Join the roundabout (the
route change after the
next change).
Join the expressway. Leave the expressway.
Board the ferry. Disembark from the ferry.
You are half way to your
destination.You have arrived at your
destination.
Page 93 of 334
Navigation 91
Read First
All signs are displayed in the same manner even when driving without
using the navigation system. During navigation, only the sign that
shows the lane in which you should drive is highlighted, the other signs
are toned down.
■Junction display
When approaching an expressway exit or a complicated intersection,
the map switches to a 3D display if the necessary information can be
displayed. An arrow indicates the lane in which you should drive. Signs
are also displayed if the information is available.
■Types of 3D Objects
The following 3D object types are supported.
Type Explanation
3D Topography On a 2D map, the changes in topography or
undulations in the ground are displayed; and
when using 3D this data is used to create a
route map image during navigation. On a 3D
map, hills and mountains are displayed in the
background, whilst on a 2D map they are
expressed using changes in color and shading.
Elevated Roads Complicated intersections and three
dimensional road objects (such as overpasses or
overhead bridges) are displayed in 3D.
Page 152 of 334
150 Navigation
Reference Data
The following pages explain the software's various features and menu screens.
Feature
Smart Zoom
Smart zoom offers a large improvement over standard zoom functions.
•While driving the route: When approaching an intersection, the
screen is enlarged and the viewpoint raised so that you can easily
see which way to drive at the next intersection. After navigating the
intersection, the screen is reduced and the angle lowered to check
the road in front.
•When driving without route navigation: The screen is enlarged as
you slow down and reduced as you speed up.
Switching between Day and Night Screens
For the Map screen and menu screen, the colors differ between day and
night.
•During daytime, the screen's colors are the same as those of a
printed map, and the menu is brighter.
•At night, the screen uses dark colors for large objects and reduces
the overall brightness of the screen.
The screen's color scheme differs between day and night. When Link to
Day/Night View on the Settings screen is set to “Headlight” (See Page
28.), day view or night view is selected based on whether the lights
(sidelights, tail lights, license plate light) are on or off, to make it easier to
view the screen. When “Time” is set (See Page 28.), the view changes at
the set time. Also, when set to “None” (See Page 29.), you can manually
switch to a day view or a night view screen at any time.