parking brake SUBARU BRZ 2023 Owners Manual
[x] Cancel search | Manufacturer: SUBARU, Model Year: 2023, Model line: BRZ, Model: SUBARU BRZ 2023Pages: 432, PDF Size: 16.56 MB
Page 23 of 432
Interior
17
Illustrated Index
– CONTINUED –
1
2
4
6
5
3
9
10 8
7
002015
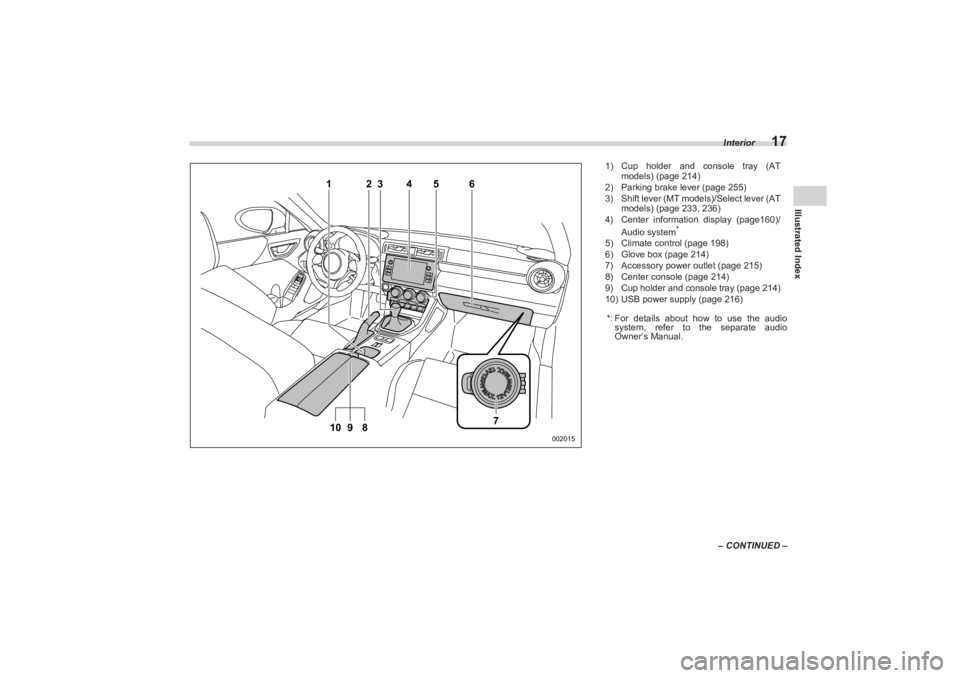
1) Cup holder and console tray (AT
models) (page 214)
2) Parking brake lever (page 255)
3) Shift lever (MT models)/Select lever (AT
models) (page 233, 236)
4) Center information display (page160)/
Audio system
*
5) Climate control (page 198)
6) Glove box (page 214)
7) Accessory power outlet (page 215)
8) Center console (page 214)
9) Cup holder and console tray (page 214)
10) USB power supply (page 216)
*: For details about how to use the audio
system, refer to the separate audio
Owner’s Manual.
BRZ_U.book 17 ページ 2022年3月29日 火曜日 午後3時59分
Page 137 of 432
Warning and Indicator Lights
131
Instruments and Controls3
– CONTINUED –
NOTEWhen the control dial is turned fully
upward, the illumination brightness
becomes the maximum and the auto-
matic dimming function does not work
at all.
The brightness setting is not
canceled even when the ignition switch
is turned to th e “OFF” position.■Auto Dimmer Cancel Func -
tionWhen the ambient light is bright, the illumi-
nation brightness is set to the maximum
regardless of the position of the control
dial. In this case, you cannot adjust the
illumination brightness by using the
control dial. When the ambient light is
dark, you can dim the illumination bright-
ness as described above.
The operational/non-operational setting
and sensitivity of the auto dimmer cancel
function can be changed by your
SUBARU dealer. Contact your SUBARU
dealer for details.
3-6. Warning and Indicator LightsSeveral of the warning and indicator lights
illuminate momentarily and then go out
when the ignition switch is initially turned
to the “ON” position. This permits
checking the operation of the bulbs.
Apply the parking brake and turn the igni-
tion switch to the “ON” position. For the
system check, the following lights illumi-
nate and turn off after several seconds or
after the engine has started:
: Seatbelt warning light (The seatbelt
warning light turns off only when the
driver fastens the seatbelt.)
: Front passenger’s seatbelt warning
light (The seatbelt warning light turns
off only when the front seat passenger
fastens the seatbelt.)
: Rear passenger’s seatbelt warning
light (The seatbelt warning light turns
off only when the rear seat
passenger fastens the seatbelt.)
: SRS airbag system warning light
: Front passenger’s frontal airbag ON
indicator light
: Front passenger’s frontal airbag OFF
indicator light
/ : CHECK ENGINE warning light/ Malfunction indicator light : Coolant temperature high warning
light (red)
: Charge warning light : Oil pressure warning light
/ :ABS warning light
: Vehicle Stability Control (VSC)
warning light/Vehicle Stability
Control (VSC) operation indicator
light
: Vehicle Stability Control (VSC) OFF
indicator light
: TRAC OFF indicator light / :Brake system warning light (red)
:Power steering warning light
: Low tire pressure warning light (if
equipped)
: Low fuel warning light :Master warning light
If any lights fail to i lluminate, it indicates a
burned-out bulb or a malfunction of the
corresponding system.
Consult your authorized SUBARU dealer
for repair.
■ Seatbelt Warning Light
and ChimeYour vehicle is equipped with a seatbelt
warning device at the driver’s and
passenger’s seats, as required by current
safety standards.
BRZ_U.book 131 ページ 2022年3月29日 火曜日 午後3時59分
Page 146 of 432
Warning and Indicator Lights
140■ABS Warning LightThe ABS warning light illuminates
together with the brake system warning
light if the EBD system malfunctions. For
further details of the EBD system malfunc- tion warning, refe
r to "Brake System
Warning Light" P140.
NOTEIf the warning light behavior is as
described in the following conditions,
the ABS may be considered normal.
The warning light illuminates right
after the engine is started but turns off
immediately, remaining off.
The warning light remains illumi-
nated after the engine has been
started, but it turns off while driving.
The warning light illuminates during
driving, but it turns off immediately and
remains off.
When driving with an insufficient battery
voltage such as when the engine is jump
started, the ABS warn ing light may illumi-
nate. This is due to the low battery voltage
and does not indicate a malfunction.
When the battery becomes fully charged,
the light will turn off.
■ Brake System
Warning LightThis light has the following functions.
▼ Parking brake warning
The light illuminates with the parking
brake applied while the ignition switch is in
the “ACC” or “ON” position. It turns off
when the parking brake is fully released.
▼ Brake fluid level warningThis light illuminates when the brake fluid
level has dropped to near the “MIN” level
of the brake fluid reservoir with the ignition
switch in the “ON” position and with the
parking brake fully released.
CAUTION
If any of the following conditions
occur, we recommend that you
have the ABS (Anti-Lock Brake
System) repaired at the first avail-
able opportunity by your
SUBARU dealer.
- The warning light does not
illuminate when the ignition
switch is turned to the “ON”
position.- The warning light illuminates
when the ignition switch is
turned to the “ON” position,
but it does no t turn off even
after starting the vehicle.- The warning light illuminates
during driving.
When the warning light is on (and
brake system warning light is off),
the ABS function shuts down;
however, the conventional brake
system continues to operate
normally.
WARNING
Driving with the brake system
warning light on is dangerous.
This indicates your brake system
may not be working properly. If
the light remains illuminated,
have the brakes inspected by a
SUBARU dealer immediately. If at all in doubt about whether the
brakes are operating properly, do
not drive the vehicle. Have your
vehicle towed to the nearest
SUBARU dealer for repair.
BRZ_U.book 140 ページ 2022年3月29日 火曜日 午後3時59分
Page 147 of 432
Warning and Indicator Lights
141
Instruments and Controls3
– CONTINUED –
If the brake system warning light should
illuminate while driving (with the parking
brake fully released and with the ignition
switch positioned in “ON”), it could be an
indication of leaking of brake fluid or worn
brake pads. If this occurs, immediately
stop the vehicle at the nearest safe place
and check the brake fluid level. If the fluid
level is below the “MIN” mark in the reser-
voir, do not drive the vehicle. Have the
vehicle towed to the nearest SUBARU
dealer for repair.▼ Electronic Brake Force Distribution
(EBD) system warning
If the warning light remains on even
though the parking brake is released, the
brake fluid level may be low or there could
be a problem with the EBD system. Park
the vehicle in a safe place immediately
and contact a SUBARU dealer.
▼ Vacuum pressure system warning
The brake system warning light will illumi-
nate when the vacuum pressure sensor is
malfunctioning or brake booster pressure
is decreasing. If the light continues to illu-
minate for several minutes after starting
the engine, there may be a malfunction in
the vacuum system. In this case, drive the
vehicle carefully and have the system
inspected by a SUBARU dealer.
■ Low Fuel Warning LightThe low fuel warning light illuminates
when the tank is nearly empty approxi-
mately 1.8 US gal (7.0 liters, or 1.5 Imp
gal). It only operates when the ignition
switch is in the “ON” position.■ Door Open IndicatorWhen any of the doors or the trunk lid is
not fully closed, the door open indicator
appears. This function is effective even if
the ignition switch is in the “OFF” or “ACC”
position.
The open door is indicated by the corre-
sponding part of the door open indicator.
Always make sure this indicator does not
appear before you start to drive.■ Power Steering
Warning LightWhile the engine is running, a warning
light illuminates and a buzzer sounds if a malfunction is detected in the electric
power steering system.
NOTEIf the steering wheel is operated in the
following ways, the power steering
control system may temporarily limit
the power assist in order to prevent
the system components, such as the
control computer and drive motor,
from overheating.
The steering wheel is operated
frequently and turned sharply while the
vehicle is maneuvered at extremely low
speeds, such as while frequently
turning the steering wheel during
parallel parking.
The steering wheel remains in the
fully turned position for a long period
of time.
At this time, there will be more resis-
tance when steering. However this is
not a malfunction. Normal steering
CAUTION
Promptly put fuel in the tank when-
ever the low fuel warning light illu-
minates. Engine misfires as a result
of an empty tank could cause dam-
age to the engine.
CAUTION
When the power steering warning
light is illuminated, there may be
more resistance when the steering
wheel is operated. Drive carefully to
the nearest SUBARU dealer and
have the vehicle inspected immedi-
ately.
BRZ_U.book 141 ページ 2022年3月29日 火曜日 午後3時59分
Page 180 of 432
Light Control Switch
1743-10. Light Control SwitchThe light control switch operates when the
push-button ignition switch is in the “ACC”
or “ON” position.
Regardless of the pos ition of the light
control switch, the illuminated lights are
turned off when the push-button ignition
switch is turned off.NOTEThe light control switch can be oper-
ated (except auto on/off headlights),
even the push-button ignition switch
is turned off.
If the driver’s door is opened while the
headlights are illuminated under such conditions, a chirp sound will inform
the driver that the lights are illumi-
nated.
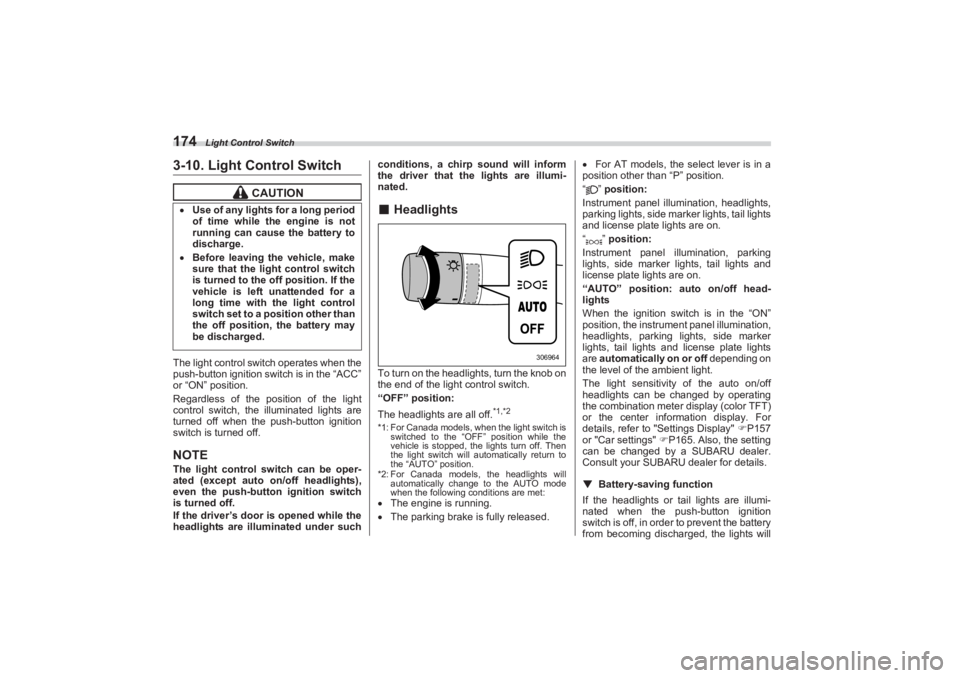
■ HeadlightsTo turn on the headlights, turn the knob on
the end of the light control switch.
“OFF” position:
The headlights are all off.
*1,*2
*1: For Canada models, when the light switch is
switched to the “OFF” position while the
vehicle is stopped, the lights turn off. Then
the light switch will automatically return to
the “AUTO” position.
*2: For Canada models, the headlights will automatically change to the AUTO mode
when the following conditions are met: The engine is running.
The parking brake is fully released.
For AT models, the select lever is in a
position other than “P” position.
“” position:
Instrument panel illumination, headlights,
parking lights, side marker lights, tail lights
and license plate lights are on.
“” position:
Instrument panel illumination, parking
lights, side marker lights, tail lights and
license plate lights are on.
“AUTO” position: auto on/off head-
lights
When the ignition switch is in the “ON”
position, the instrum ent panel illumination,
headlights, parking lights, side marker
lights, tail lights and license plate lights
are automatically on or off depending on
the level of the ambient light.
The light sensitivity of the auto on/off
headlights can be changed by operating
the combination meter display (color TFT)
or the center information display. For
details, refer to "Settings Display" P157
or "Car settings" P165. Also, the setting
can be changed by a SUBARU dealer.
Consult your SUBARU dealer for details.
▼ Battery-saving function
If the headlights or tail lights are illumi-
nated when the push-button ignition
switch is off, in order to prevent the battery
from becoming discharg ed, the lights will
CAUTION
Use of any lights for a long period
of time while the engine is not
running can cause the battery to
discharge. Before leaving the vehicle, make
sure that the light control switch
is turned to the off position. If the
vehicle is left unattended for a
long time with the light control
switch set to a position other than
the off position, the battery may
be discharged.
306964
BRZ_U.book 174 ページ 2022年3月29日 火曜日 午後3時59分
Page 186 of 432
Steering Responsive Headlight (SRH) (If Equipped)
180■Daytime Running Light
SystemThe daytime running lights will automati-
cally illuminate when the following condi-
tions are fulfilled.
The engine is running.
The parking brake is fully released.
The light control switch is in the
“AUTO”, “ ” or “OFF” position.
For AT models, the select lever is in a
position other than the “P” position.NOTE When the light switch is in the “ ”
position, the instrument panel illumina-
tion, side marker lights, tail lights and
license plate lights are also illumi-
nated.
While the headlight switch is in the
“AUTO” position and the headlights
turn on automatically, the daytime
running light is deactivated.
When the turn signal indicators are
flashing, the daytime running light on
the side that the turn signals are
flashing will turn off.
3-11. Steering Responsive
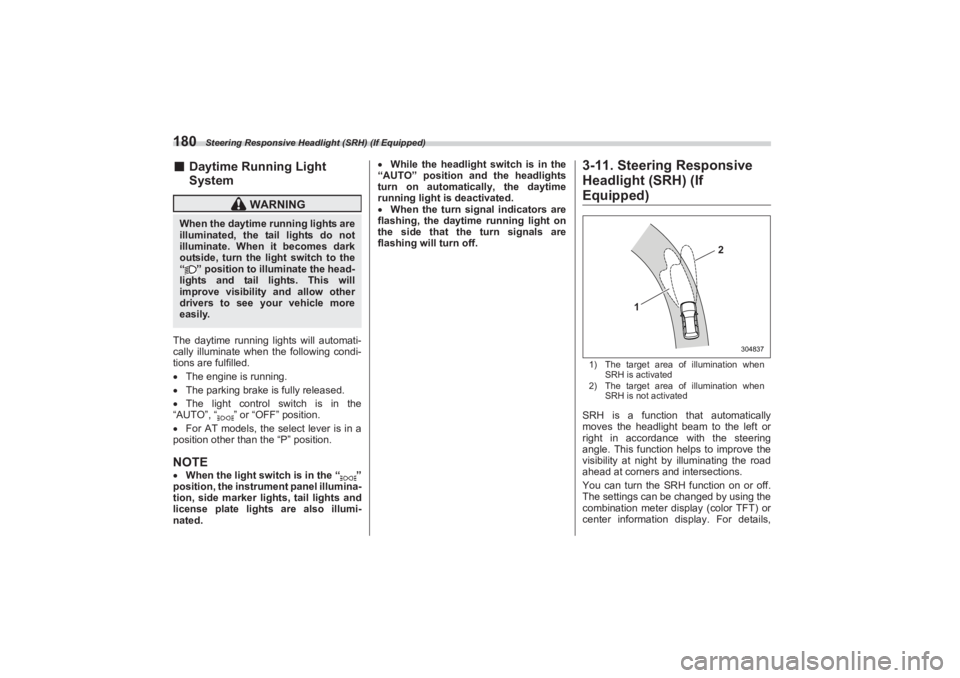
Headlight (SRH) (If Equipped)1) The target area of illumination when
SRH is activated
2) The target area of illumination when
SRH is not activatedSRH is a function that automatically
moves the headlight beam to the left or
right in accordance with the steering
angle. This function helps to improve the
visibility at night by illuminating the road
ahead at corners and intersections.
You can turn the SRH function on or off.
The settings can be changed by using the
combination meter display (color TFT) or
center information display. For details,
WARNING
When the daytime running lights are
illuminated, the tail lights do not
illuminate. When it becomes dark
outside, turn the li ght switch to the
“ ” position to illuminate the head-
lights and tail lights. This will
improve visibility and allow other
drivers to see your vehicle more
easily.
1
2
304837
BRZ_U.book 180 ページ 2022年3月29日 火曜日 午後3時59分
Page 228 of 432
Starting and Operating
Changing the ID code set ............................................ 255
7-16. Parking Your Vehicle ........................................255
Parking Brake ............................................................... 255
Parking Tips.................................................................. 256
7-17. Hill Start Assist System ....................................257
To Activate/Deactivate the Hill Start Assist
System ........................................................................ 258
Hill Start Assist Indicator Light................................... 259
7-18. Cruise Control (Models without the
EyeSight system) ..............................................260
To Set Cruise Control .................................................. 260
To Temporarily Cancel the Cr uise Control ................ 261
To Turn Off the Cruise Control ................................... 262
To Change the Cruising Speed ................................... 262
Cruise Control Indicator Light .................................... 263
7-19. Rear View Camera .............................................263
How to Use the Rear View Camera ............................. 264
Viewing Range on the Screen ..................................... 265
Help Lines ..................................................................... 266
7-20. BSD/RCTA (If Equipped)...................................268
System Features .......................................................... 268 System Operation......................................................... 270
BSD/RCTA Approach Indi
cator Light/Warning
Buzzer ......................................................................... 271
BSD/RCTA OFF Indicator ............................................ 273
BSD/RCTA Warning Indicator ..................................... 274
To Turn On/Off the BSD/RCTA .................................... 274
Certification for the BSD/RCTA................................... 274
Handling of Radar Sensors ......................................... 276
7-21. Reverse Automatic Braking (RAB) System
(If Equipped) ..................................................... 277
Reverse Automatic Braking (RAB) System
Overview ..................................................................... 278
Operating Conditions................................................... 279
Sonar Audible Alarm .................................................... 282
Automatic Braking Operation ..................................... 284
Canceling the Reverse Au tomatic Braking (RAB)
System Operation ...................................................... 285
Reverse Automatic Braking (RAB) System
ON/OFF Setting .......................................................... 286
RAB Warning Indicator ................................................ 286
Handling of the Sonar Sensors ................................... 286
BRZ_U.book 222 ページ 2022年3月29日 火曜日 午後3時59分
Page 237 of 432
Starting and Stopping Engine
231
Starting and Operating7
– CONTINUED –
After the engine starts, the engine
speed will be kept high.
Do not shift the select lever (AT
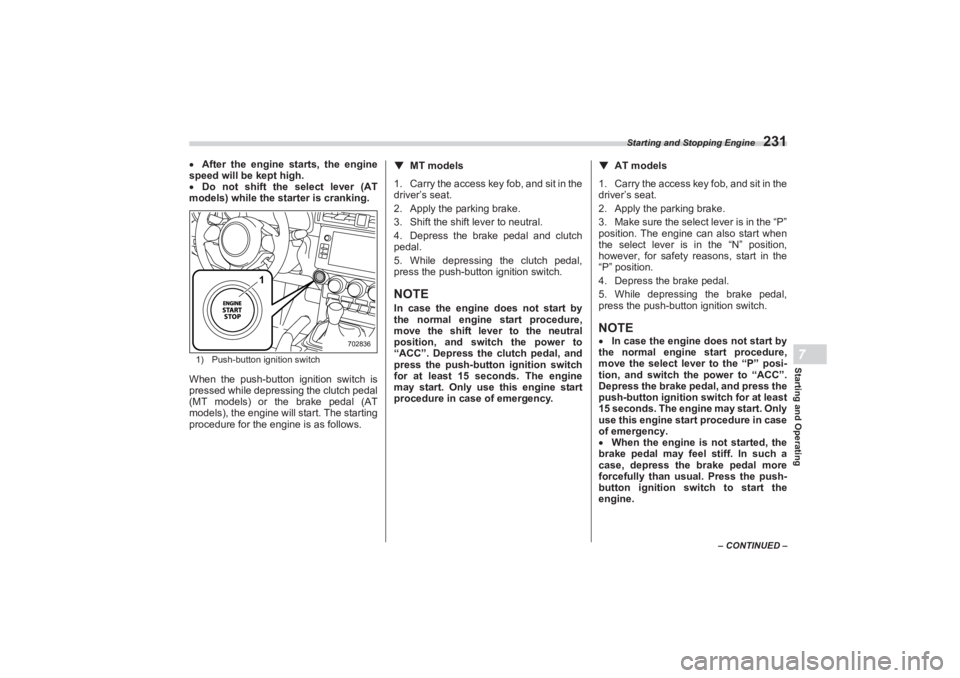
models) while the starter is cranking.1) Push-button ignition switchWhen the push-button ignition switch is
pressed while depressing the clutch pedal
(MT models) or the brake pedal (AT
models), the engine will start. The starting
procedure for the engine is as follows.
▼ MT models
1. Carry the access key fob, and sit in the
driver’s seat.
2. Apply the parking brake.
3. Shift the shift lever to neutral.
4. Depress the brake pedal and clutch
pedal.
5. While depressing the clutch pedal,
press the push-button ignition switch.NOTEIn case the engine does not start by
the normal engine start procedure,
move the shift lever to the neutral
position, and switch the power to
“ACC”. Depress the clutch pedal, and
press the push-butto n ignition switch
for at least 15 seconds. The engine
may start. Only use this engine start
procedure in case of emergency. ▼
AT models
1. Carry the access key fob, and sit in the
driver’s seat.
2. Apply the parking brake.
3. Make sure the select lever is in the “P”
position. The engine can also start when
the select lever is in the “N” position,
however, for safety reasons, start in the
“P” position.
4. Depress the brake pedal.
5. While depressing the brake pedal,
press the push-button ignition switch.NOTE In case the engine does not start by
the normal engine start procedure,
move the select lever to the “P” posi-
tion, and switch th e power to “ACC”.
Depress the brake pedal, and press the
push-button ignition switch for at least
15 seconds. The engine may start. Only
use this engine start procedure in case
of emergency.
When the engine is not started, the
brake pedal may feel stiff. In such a
case, depress the brake pedal more
forcefully than usual. Press the push-
button ignition switch to start the
engine.
1
702836
BRZ_U.book 231 ページ 2022年3月29日 火曜日 午後3時59分
Page 242 of 432
Automatic Transmission
236NOTEWhen the engine coolant tempera-
ture is still low, the transmission will
shift at higher engine speeds than
when the coolant temperature is suffi-
ciently high in order to shorten the
warm-up time and improve driveability.
The gearshift timing will automatically shift to the normal
timing after the
engine has warmed up.
Immediately after transmission fluid
is replaced, you may feel that the trans-
mission operation is somewhat
unusual. This results from invalidation
of data which the on-board computer
has collected and stored in memory to
allow the transmission to shift at the
most appropriate times for the current
condition of your vehicle. Optimized
shifting will be restored as the vehicle
continues to be driven for a while.
Place the shift boot to the original
position after it is lifted. If the shift lever
is operated with the shift boot in the
rolled up position, the shift boot may
have tension and it may disturb the
shift lever operation.
When the vehicle is idling at high
rpm in order to warm up, and the
vehicle is on a slippery road, the trans-
mission may automatically shift to 2nd
gear for stopping and starting off.
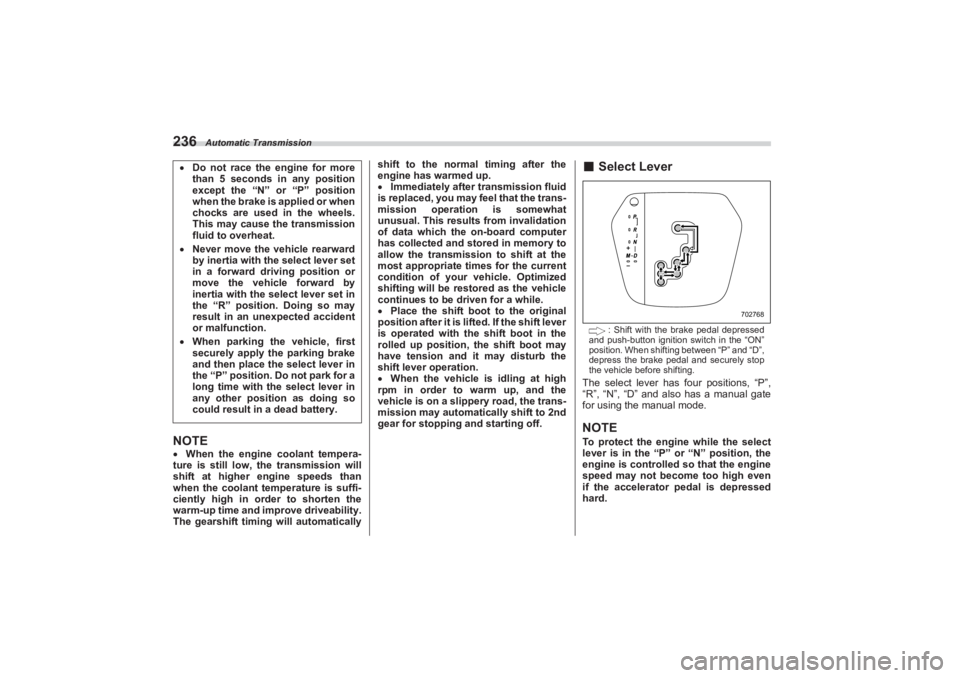
■ Select Lever
: Shift with the brake pedal depressed
and push-button ignition switch in the “ON”
position. When shifting between “P” and “D”,
depress the brake pedal and securely stop
the vehicle before shifting.
The select lever has four positions, “P”,
“R”, “N”, “D” and also has a manual gate
for using the manual mode.NOTETo protect the engine while the select
lever is in the “P” or “N” position, the
engine is controlled so that the engine
speed may not become too high even
if the accelerator pedal is depressed
hard.
Do not race the engine for more
than 5 seconds in any position
except the “N” or “P” position
when the brake is applied or when
chocks are used in the wheels.
This may cause the transmission
fluid to overheat. Never move the vehicle rearward
by inertia with the select lever set
in a forward driving position or
move the vehicle forward by
inertia with the select lever set in
the “R” position. Doing so may
result in an unexpected accident
or malfunction. When parking the vehicle, first
securely apply the parking brake
and then place the select lever in
the “P” position. Do not park for a
long time with the select lever in
any other position as doing so
could result in a dead battery.
702768
BRZ_U.book 236 ページ 2022年3月29日 火曜日 午後3時59分
Page 243 of 432
Automatic Transmission
237
Starting and Operating7
– CONTINUED –
▼P (Park)
This position is for parking the vehicle and
starting the engine. In this position, the
transmission is mechanically locked to
prevent the vehicle from rolling freely.
When you park the vehicle, first apply the
parking brake, then shift into the “P” posi-
tion. Do not hold the vehicle with only the
mechanical friction of the transmission.
To shift the select lever from the “P” to any
other position, you should depress the
brake pedal fully then move the select
lever. This prevents the vehicle from
lurching when it is started.
▼ R (Reverse)
This position is for backing the vehicle. To
shift from the “N” to “R” position, stop the
vehicle completely th en move the lever to
the “R” position.
▼ N (Neutral)
This position is for restarting a stalled
engine. In this position, the transmission is
neutral, meaning that the wheels and
transmission are not locked. Therefore,
the vehicle will roll freely, even on the
slightest incline unless the parking brake
or foot brake is applied. ▼
D (Drive)
This position is for normal driving. The
transmission shifts automatically into a
suitable gear according to the vehicle
speed and the acceleration you require.
Also, while driving up and down a hill, the
transmission assists and controls the
driving performance and engine braking
while corresponding to the road grade.
When more acceleration is required in “D”
position, depress the accelerator pedal
fully to the floor and hold that position. The
transmission will auto matically downshift.
When you release the pedal, the transmis-
sion will return to the original gear posi-
tion.
To use the manual mode, move the lever
from this position into the manual gate.
If one of the shift paddles behind the
steering wheel is operated while driving in
the “D” position, the transmission will
temporarily switch to the manual mode. In
this mode, you can shift into any gear position using the shift paddles. For
details about the manual mode, refer to
"Selection of Manual Mode" P239.
Once the vehicle speed stabilizes, the
transmission will switch from the manual
mode back to the “D” position for normal
driving.
▽ While climbing a grade
When driving up a hill, undesired upshift is
prevented from taking place when the
accelerator is releas ed. This minimizes
the chance of subsequent downshifting to
a lower gear when accelerating again.
This prevents repeated upshifting and
downshifting resulting in a smoother oper-
ation of the vehicle.
NOTEThe transmission may downshift,
depending on the way the accelerator
pedal is depressed to accelerate the
vehicle again.■ Adaptive ControlIn order to realize smoother driving while
driving in “D” position, an appropriate gear
is automatically selected by limiting
upshifting and performing downshifting
operations according to driver operations
and driving conditions.
WARNING
Do not drive the vehicle with the
select lever in the “N” (neutral)
position. Engine braking has no
effect in this co ndition and the risk
of an accident is consequently
increased.
BRZ_U.book 237 ページ 2022年3月29日 火曜日 午後3時59分