fuel cap SUBARU CROSSTREK 2018 Owners Manual
[x] Cancel search | Manufacturer: SUBARU, Model Year: 2018, Model line: CROSSTREK, Model: SUBARU CROSSTREK 2018Pages: 474, PDF Size: 20.76 MB
Page 16 of 474
(15,1)
北米Model "A1320BE-C" EDITED: 2017/ 10/ 10
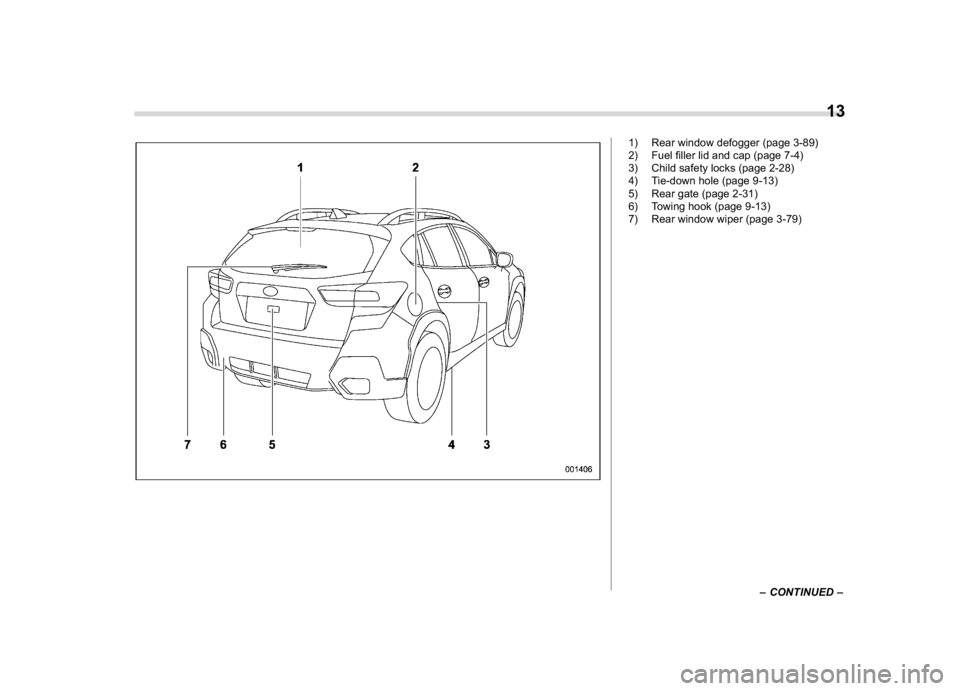
1) Rear window defogger (page 3-89)
2) Fuel filler lid and cap (page 7-4)
3) Child safety locks (page 2-28)
4) Tie-down hole (page 9-13)
5) Rear gate (page 2-31)
6) Towing hook (page 9-13)
7) Rear window wiper (page 3-79)
–CONTINUED–
13
0
Page 149 of 474
(154,1)
北米Model "A1320BE-C" EDITED: 2017/ 10/ 10
serious damage, which may not be
covered by your vehicle’s warranty.
If this light illuminates steadily or blinks
while the engine is running, it may indicate
that there is at least one problem or
potential problem somewhere in the emis-
sion control system.
!If the light illuminates steadily
If the light illuminates steadily while driving
or does not turn off after the engine starts,
an emission control system malfunction
has been detected.
You should have your vehicle checked by
an authorized SUBARU dealer immedi-
ately.NOTEThis light also illuminates when the fuel
filler cap is not tightened until it clicks.
If you have recently refueled your vehicle,
the cause of the CHECK ENGINE warning
light/malfunction indicator light illuminating
could be a loose or missing fuel filler cap.
Remove the cap and retighten it until it
clicks. Make sure nothing is interfering with
the sealing of the cap. Tightening the cap
will not make the CHECK ENGINE warn-
ing light turn off immediately. It may take
several driving trips. If the light does not
turn off, take your vehicle to your author-ized SUBARU dealer immediately.
!If the light is blinking
If the light is blinking while driving, an
engine misfire condition has been de-
tected which may damage the emission
control system.
To prevent serious damage to the emis-
sion control system, you should do the
following.
.Reduce vehicle speed.
.Avoid hard acceleration.
.Avoid steep uphill grades.
.Reduce the amount of cargo, if possi-
ble.
.Stop towing a trailer as soon as
possible.
The CHECK ENGINE warning light may
stop blinking and illuminate steadily after
several driving trips. You should have your
vehicle checked by an authorized
SUBARU dealer immediately.
&Coolant temperature
low indicator light/Cool-
ant temperature high
warning light
CAUTION
.After turning the ignition switch
to the“ON”position, if this
indicator light/warning light be-
haves in any of the following
ways, the electrical system may
be malfunctioning. Contact your
SUBARU dealer immediately for
an inspection.
–It remains blinking in RED.
–It remains illuminated in RED
for more than 2 seconds.
–It remains blinking in RED and
BLUE alternately.
.While driving, if this indicator
light/warning light behaves in
any of the following ways, take
the specified appropriate mea-
sure listed below.
–Blinking or illuminated in
RED:
Safely stop the vehicle as
soon as possible, and refer to
the emergency steps to take in
the case of engine overheat-
Instruments and controls/Warning and indicator
3-16
Page 258 of 474
(267,1)
北米Model "A1320BE-C" EDITED: 2017/ 10/ 10
Fuel..........................................................................7-3
Fuel requirements.................................................. 7-3
Fuel filler lid and cap............................................. 7-4
State emission testing (U.S.only).........................7-7
Preparing to drive...................................................7-8
Starting and stopping the engine
(models without push-button startsystem)...... 7-9
Starting engine...................................................... 7-9
Stopping the engine.............................................. 7-11
Starting and stopping engine
(models with push-button startsystem).......... 7-11
Safety precautions................................................ 7-11
Operating range for push-button start system....... 7-11
Starting engine..................................................... 7-11
Stopping engine....................................................7-13
When access key fob does not operate properly ... 7-14
Remote engine start system(dealer option)...... 7-14
Remote engine starter transceiver (fob) .................7-15
Alternate operation method for models with
“keyless access with push-button start
system”..............................................................7-18
Entering the vehicle while it is running via
remote start........................................................7-18
Entering the vehicle following remote engine
start shutdown....................................................7-19
Pre-heating or pre-cooling the interior of
the vehicle..........................................................7-19
Remote transmitter program
(Remote engine starter transceiver).....................7-19
System maintenance.............................................7-19
Certification for remote engine starter...................7-21
Manual transmission............................................7-21
Shifting speeds....................................................7-22
Driving tips...........................................................7-23
Continuously variable transmission...................7-24
Continuously variable transmission features.........7-24
Select lever..........................................................7-25
Selection of manual mode (if equipped)................7-26
Selection of“L”(if equipped) ................................7-28
Shift lock function................................................7-28
Driving tips...........................................................7-30
Power steering......................................................7-30
Power steering warning light ................................7-30
Power steering system features............................7-30
Braking..................................................................7-31
Braking tips..........................................................7-31
Brake system.......................................................7-31
Disc brake pad wear warning indicators................7-32
ABS (Anti-lock BrakeSystem).............................7-33
ABS self-check.....................................................7-33
ABS warning light.................................................7-33
Electronic Brake Force Distribution (EBD)
system................................................................7-34
Steps to take if EBD system malfunctions .............7-34
Vehicle Dynamics Controlsystem......................7-35
Safety precautions................................................7-35
System features....................................................7-36
Vehicle Dynamics Control system monitor ............7-37
Vehicle Dynamics Control OFF switch...................7-37
X-mode (if equipped)............................................7-38
To activate/deactivate the X-mode.........................7-39
Starting and operating
7
Page 261 of 474
(270,1)
北米Model "A1320BE-C" EDITED: 2017/ 10/ 10
agents to your fuel tank.
Many gasolines are now blended with
materials called oxygenates. Use of these
fuels can also help keep the air cleaner.
Oxygenated blend fuels, such as ethanol
(ethyl or grain alcohol) may be used in your
vehicle, but should contain no more than
10% ethanol for the proper operation of
your SUBARU.
Do not use any gasoline that contains
more than 10% ethanol, including from any
pump labeled E15, E30, E50 or E85 (which
are only some examples of fuel containing
more than 10% ethanol).
In addition, some gasoline suppliers are
now producing reformulated gasolines,
which are designed to reduce vehicle
emissions. SUBARU approves the use of
reformulated gasoline.
If you are not sure what the fuel contains,
you should ask your service station op-
erators if their gasolines contain deter-
gents and oxygenates and if they have
been reformulated to reduce vehicle emis-
sions.
As additional guidance, only use fuels
suited for your vehicle as explained in the
following description.
.Fuel should be unleaded and have anoctane rating no lower than that specified
in this manual.
.Methanol (methyl or wood alcohol) is
sometimes mixed with unleaded gasoline.
Methanol can be used in your vehicle
ONLYif it does not exceed 5% of the fuel
mixtureANDif it is accompanied by
sufficient quantities of the proper cosol-
vents and corrosion inhibitors required to
prevent damage to the fuel system. Do not
use fuel containing methanolEXCEPT
under these conditions.
.If undesirable driveability problems are
experienced and you suspect they may be
fuel related, try a different brand of gaso-
line before seeking service at your
SUBARU dealer.
.Fuel system damage or driveability
problems which result from the use of
improper fuel are not covered under the
SUBARU Limited Warranty.
CAUTION
Do not let fuel spill on the exterior
surfaces of the vehicle. Because fuel
may damage the paint, be sure to
wipe off any spilled fuel quickly.
Paint damage caused by spilled fuel
is not covered under the SUBARU
Limited Warranty.
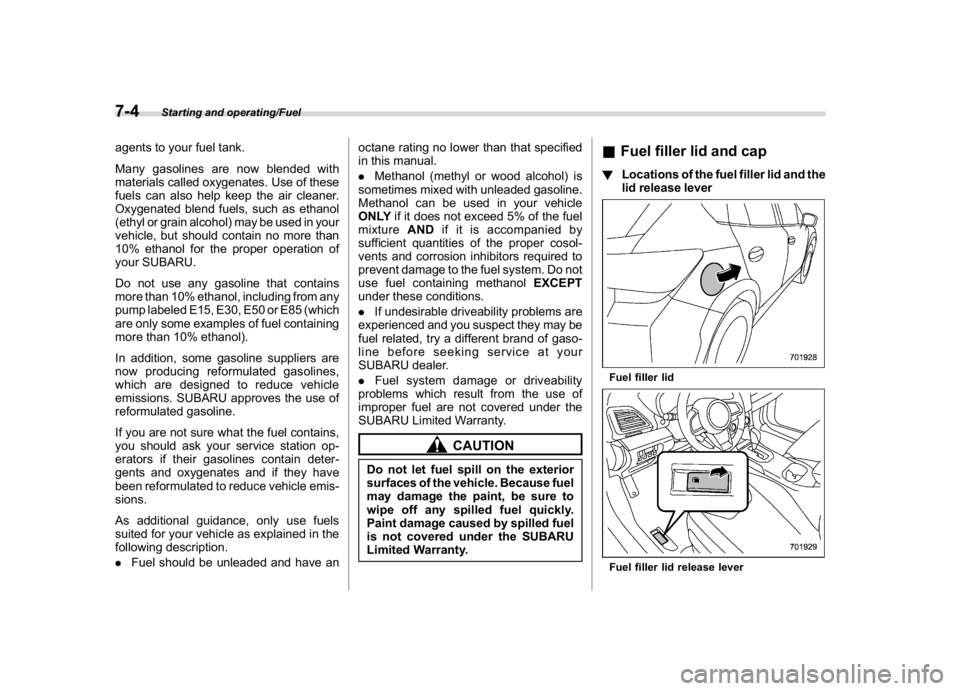
&Fuel filler lid and cap!Locations of the fuel filler lid and the
lid release leverFuel filler lidFuel filler lid release lever
Starting and operating/Fuel
7-4
Page 262 of 474
(271,1)
北米Model "A1320BE-C" EDITED: 2017/ 10/ 10
!Refueling
Only one person should be involved in
refueling. Do not allow others to approach
the area of the vehicle near the fuel filler
pipe while refueling is in progress.
Be sure to observe any other precautions
that are posted at the service station.
1. Stop the vehicle and turn the ignition
switch to the“LOCK”/“OFF”position and
turn off all the other electrical components.
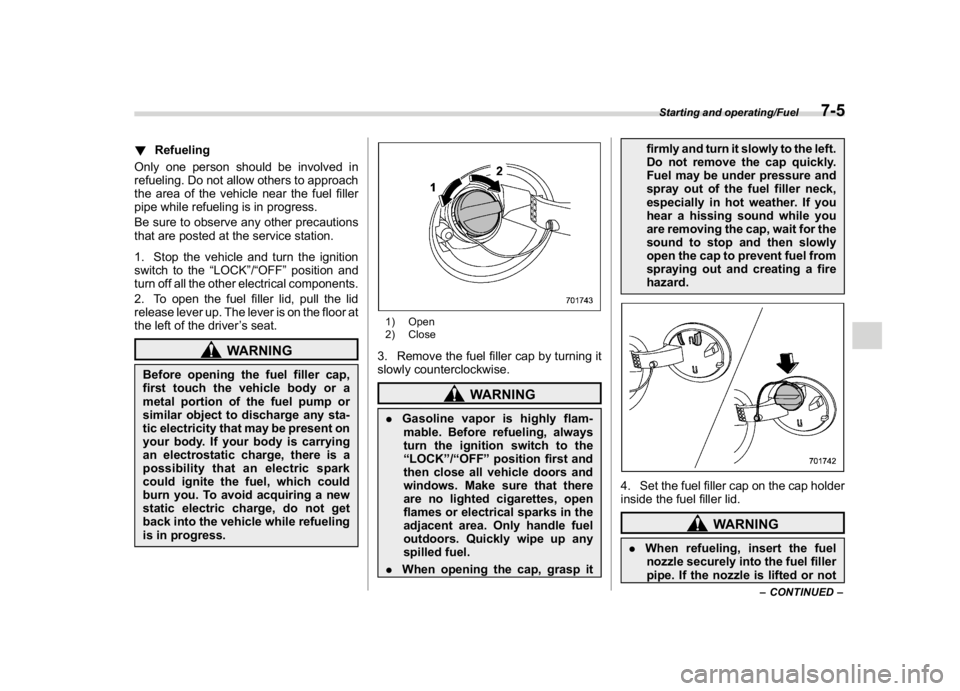
2. To open the fuel filler lid, pull the lid
release lever up. The lever is on the floor at
the left of the driver’s seat.
WARNING
Before opening the fuel filler cap,
first touch the vehicle body or a
metal portion of the fuel pump or
similar object to discharge any sta-
tic electricity that may be present on
your body. If your body is carrying
an electrostatic charge, there is a
possibility that an electric spark
could ignite the fuel, which could
burn you. To avoid acquiring a new
static electric charge, do not get
back into the vehicle while refueling
is in progress.
1) Open
2) Close3. Remove the fuel filler cap by turning it
slowly counterclockwise.
WARNING
.Gasoline vapor is highly flam-
mable. Before refueling, always
turn the ignition switch to the
“LOCK”/“OFF”position first and
then close all vehicle doors and
windows. Make sure that there
are no lighted cigarettes, open
flames or electrical sparks in the
adjacent area. Only handle fuel
outdoors. Quickly wipe up any
spilled fuel.
.When opening the cap, grasp itfirmly and turn it slowly to the left.
Do not remove the cap quickly.
Fuel may be under pressure and
spray out of the fuel filler neck,
especially in hot weather. If you
hear a hissing sound while you
are removing the cap, wait for the
sound to stop and then slowly
open the cap to prevent fuel from
spraying out and creating a fire
hazard.
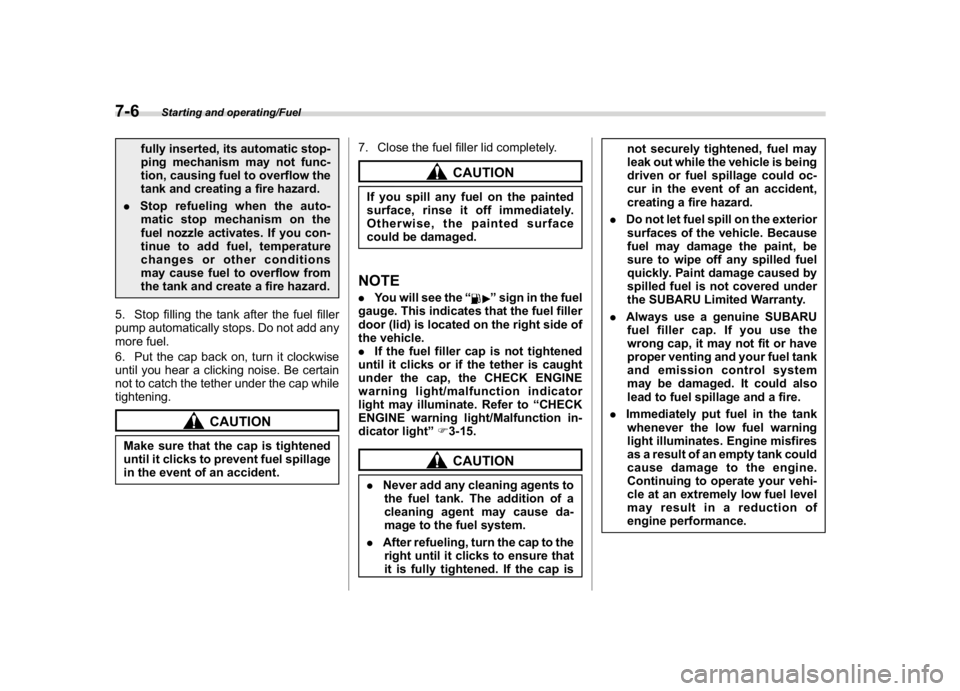
4. Set the fuel filler cap on the cap holder
inside the fuel filler lid.
WARNING
.When refueling, insert the fuel
nozzle securely into the fuel filler
pipe. If the nozzle is lifted or not
–CONTINUED–
Starting and operating/Fuel
7-5
7
Page 263 of 474
(272,1)
北米Model "A1320BE-C" EDITED: 2017/ 10/ 10
fully inserted, its automatic stop-
ping mechanism may not func-
tion, causing fuel to overflow the
tank and creating a fire hazard.
.Stoprefuelingwhentheauto-
matic stop mechanism on the
fuel nozzle activates. If you con-
tinue to add fuel, temperature
changes or other conditions
may cause fuel to overflow from
the tank and create a fire hazard.
5. Stop filling the tank after the fuel filler
pump automatically stops. Do not add any
more fuel.
6. Put the cap back on, turn it clockwise
until you hear a clicking noise. Be certain
not to catch the tether under the cap while
tightening.
CAUTION
Make sure that the cap is tightened
until it clicks to prevent fuel spillage
in the event of an accident.7. Close the fuel filler lid completely.
CAUTION
If you spill any fuel on the painted
surface, rinse it off immediately.
Otherwise, the painted surface
could be damaged.NOTE.You will see the“
”sign in the fuel
gauge. This indicates that the fuel filler
door (lid) is located on the right side of
the vehicle.
.If the fuel filler cap is not tightened
until it clicks or if the tether is caught
under the cap, the CHECK ENGINE
warning light/malfunction indicator
light may illuminate. Refer to“CHECK
ENGINE warning light/Malfunction in-
dicator light”F3-15.
CAUTION
.Never add any cleaning agents to
the fuel tank. The addition of a
cleaning agent may cause da-
mage to the fuel system.
.After refueling, turn the cap to the
right until it clicks to ensure that
it is fully tightened. If the cap isnot securely tightened, fuel may
leak out while the vehicle is being
driven or fuel spillage could oc-
cur in the event of an accident,
creating a fire hazard.
.Do not let fuel spill on the exterior
surfaces of the vehicle. Because
fuel may damage the paint, be
sure to wipe off any spilled fuel
quickly. Paint damage caused by
spilled fuel is not covered under
the SUBARU Limited Warranty.
.Always use a genuine SUBARU
fuel filler cap. If you use the
wrong cap, it may not fit or have
proper venting and your fuel tank
and emission control system
may be damaged. It could also
lead to fuel spillage and a fire.
.Immediately put fuel in the tank
whenever the low fuel warning
light illuminates. Engine misfires
as a result of an empty tank could
cause damage to the engine.
Continuing to operate your vehi-
cle at an extremely low fuel level
may result in a reduction of
engine performance.
Starting and operating/Fuel
7-6
Page 328 of 474
(339,1)
北米Model "A1320BE-C" EDITED: 2017/ 10/ 10
New vehicle break-in driving–the first 1,000
miles (1,600 km)...................................................8-2
Fuel economy hints................................................8-2
Engine exhaust gas (carbonmonoxide)............... 8-2
Catalytic converter..................................................8-3
Periodic inspections...............................................8-4
Driving in foreigncountries...................................8-4
Driving tips for AWD models.................................8-4
Off road driving.......................................................8-6
Before driving........................................................ 8-6
During driving........................................................ 8-6
After driving........................................................... 8-7
Winter driving..........................................................8-7
Operation during cold weather............................... 8-7
Driving on snowy and icy roads............................. 8-9
Corrosion protection.............................................8-10
Snow tires............................................................8-10Tire chains........................................................... 8-11
Rocking the vehicle.............................................. 8-11
Loading your vehicle.............................................8-11
Vehicle capacity weight........................................8-12
GVWR and GAWR (Gross Vehicle Weight
Rating and Gross Axle Weight Rating)...............8-13
Roof rail...............................................................8-13
Trailer hitch (dealeroption).................................8-14
Connecting a trailer..............................................8-15
If not towing a trailer............................................8-16
Trailer towing........................................................8-16
Warranties and maintenance.................................8-17
Maximum load limits.............................................8-17
Trailer Hitches......................................................8-20
When you do not tow a trailer ...............................8-21
Connecting a trailer..............................................8-21
Trailer towing tips.................................................8-22
Driving tips
8
Page 336 of 474
(347,1)
北米Model "A1320BE-C" EDITED: 2017/ 10/ 10
icing may develop on the brake
system, which could cause poor
braking action. Check for snow or
ice buildup on the suspension,
disc brakes and brake hoses
underneath the vehicle. If there
is caked snow or ice, remove it,
being careful not to damage the
disc brakes and brake hoses and
ABS harness.
When parking for long periods in cold
weather, you should observe the following
tips.
1. For MT models, place the shift lever in
the“1”or“R”position. For CVT models,
place the select lever in the“P”position.
2. Use tire stops under the tires to prevent
the vehicle from moving.
!Refueling in cold weather
To help prevent moisture from forming in
the fuel system and the risk of its freezing,
use of an antifreeze additive in the fuel
tank is recommended during cold weather.
Use only additives that are specifically
designed for this purpose. When an anti-
freeze additive is used, its effect lasts
longer if the tank is refilled whenever the
fuel level reaches half empty.
If your SUBARU is not going to be used foran extended period, it is best to have the
fuel tank filled to capacity.
&Driving on snowy and icy
roadsTo prevent skidding and slipping, avoid
sudden braking, abrupt acceleration, high-
speed driving, and sharp turning when
driving on snowy or icy roads.
Always maintain ample distance between
your vehicle and the vehicle ahead of you
to avoid the need for sudden braking.
To supplement the foot brake, use the
engine brake effectively to control the
vehicle speed. (Shift into a lower gear
when necessary.)
Avoid shifting down abruptly. Such beha-
vior can cause the wheels to lock, possibly
leading to loss of vehicle control.
An anti-lock brake system (ABS) en-
hances your vehicle’s braking perfor-
mance on snowy and icy roads. For
information on braking on slippery sur-
faces, refer to“ABS (Anti-lock Brake
System)”F7-33 and“Vehicle Dynamics
Control system”F7-35.
WARNING
For models with cruise control:
Do not use the cruise control on
slippery roads such as snowy or icyroads. This may cause loss of vehi-
cle control.
CAUTION
Avoid prolonged continuous driving
in snowstorms. Snow will enter the
engine’s intake system and may
hinder the airflow, which could re-
sult in engine shutdown or even
breakdown.
!Wiper operation when snowing
Before driving in cold weather, make sure
the wiper blade rubbers are not frozen to
the windshield or rear window.
If the wiper blade rubbers are frozen to the
windshield or rear window, perform the
following procedure.
.To thaw the windshield wiper blade
rubbers, use the defroster with the airflow
selection in“
”and the temperature set
for maximum warmth until the wiper blade
rubbers are completely thawed. Refer to
“Climate control”F4-1.
.If your vehicle is equipped with a wiper
deicer, use it. It is helpful to thaw the
windshield wiper blade rubbers. Refer to
“Defogger and deicer”F3-89.
.To thaw the rear wiper blade rubbers,
–CONTINUED–
Driving tips/Winter driving
8-9
8
Page 339 of 474
(350,1)
北米Model "A1320BE-C" EDITED: 2017/ 10/ 10
WARNING
.When you carry something inside
the vehicle, secure it whenever
you can to prevent it from being
thrown around inside the vehicle
during sudden stops, sharp turns
or in an accident.
.Do not pile heavy loads on the
roof. These loads raise the vehi-
cle’s center of gravity and make it
more prone to tip over.
.Secure lengthy items properly to
prevent them from shooting for-
ward and causing serious injury
during a sudden stop.
.Never exceed the maximum load
limit. If you do, some parts on
your vehicle can break, or it can
change the way your vehicle
handles. This could result in loss
of control and cause personal
injury. Also, overloading can
shorten the life of your vehicle.
.Do not place anything on the
extended cargo area cover. Such
items could tumble forward in the
event of a sudden stop or a
collision. This could cause ser-
ious injury.
CAUTION
Do not carry spray cans, containers
with flammable or corrosive liquids
or any other dangerous items inside
the vehicle.NOTEFor better fuel economy, do not carry
unneeded cargo.&Vehicle capacity weight
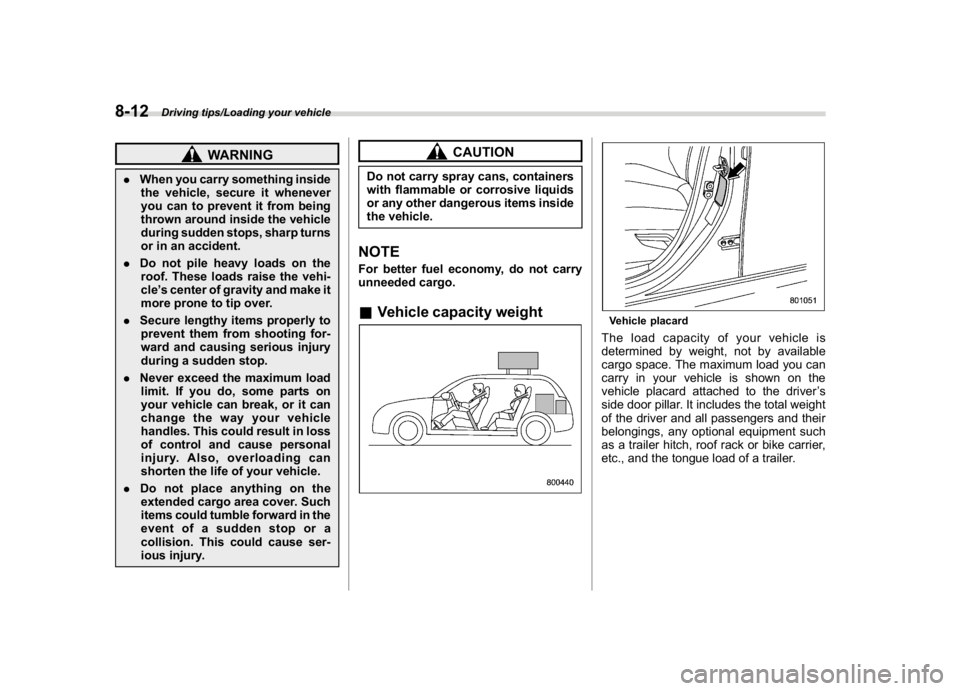
Vehicle placardThe load capacity of your vehicle is
determined by weight, not by available
cargo space. The maximum load you can
carry in your vehicle is shown on the
vehicle placard attached to the driver’s
side door pillar. It includes the total weight
of the driver and all passengers and their
belongings, any optional equipment such
as a trailer hitch, roof rack or bike carrier,
etc., and the tongue load of a trailer.
Driving tips/Loading your vehicle
8-12
Page 340 of 474
(351,1)
北米Model "A1320BE-C" EDITED: 2017/ 10/ 10
&GVWR and GAWR (Gross Ve-
hicle Weight Rating and
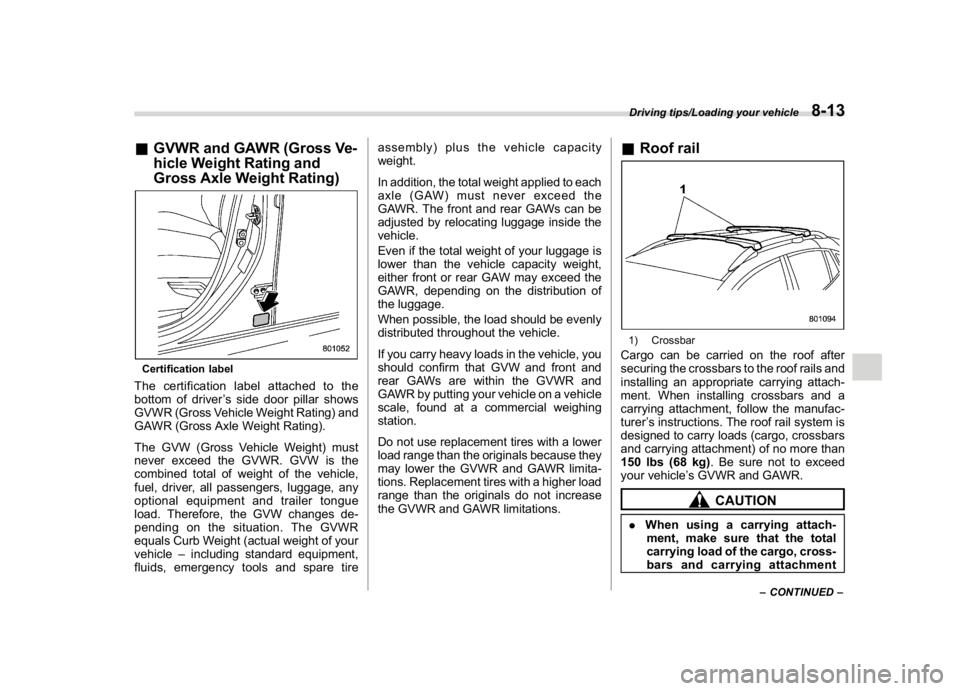
Gross Axle Weight Rating)Certification labelThe certification label attached to the
bottom of driver’s side door pillar shows
GVWR (Gross Vehicle Weight Rating) and
GAWR (Gross Axle Weight Rating).
The GVW (Gross Vehicle Weight) must
never exceed the GVWR. GVW is the
combined total of weight of the vehicle,
fuel, driver, all passengers, luggage, any
optional equipment and trailer tongue
load. Therefore, the GVW changes de-
pending on the situation. The GVWR
equals Curb Weight (actual weight of your
vehicle–including standard equipment,
fluids, emergency tools and spare tireassembly) plus the vehicle capacity
weight.
In addition, the total weight applied to each
axle (GAW) must never exceed the
GAWR. The front and rear GAWs can be
adjusted by relocating luggage inside the
vehicle.
Even if the total weight of your luggage is
lower than the vehicle capacity weight,
either front or rear GAW may exceed the
GAWR, depending on the distribution of
the luggage.
When possible, the load should be evenly
distributed throughout the vehicle.
If you carry heavy loads in the vehicle, you
should confirm that GVW and front and
rear GAWs are within the GVWR and
GAWR by putting your vehicle on a vehicle
scale, found at a commercial weighing
station.
Do not use replacement tires with a lower
load range than the originals because they
may lower the GVWR and GAWR limita-
tions. Replacement tires with a higher load
range than the originals do not increase
the GVWR and GAWR limitations.
&Roof rail1) CrossbarCargo can be carried on the roof after
securing the crossbars to the roof rails and
installing an appropriate carrying attach-
ment. When installing crossbars and a
carrying attachment, follow the manufac-
turer’s instructions. The roof rail system is
designed to carry loads (cargo, crossbars
and carrying attachment) of no more than
150 lbs (68 kg). Be sure not to exceed
your vehicle’s GVWR and GAWR.
CAUTION
.When using a carrying attach-
ment, make sure that the total
carrying load of the cargo, cross-
barsandcarryingattachment
–CONTINUED–
Driving tips/Loading your vehicle
8-13
8