SUBARU CROSSTREK 2018 Quick Guide
Manufacturer: SUBARU, Model Year: 2018, Model line: CROSSTREK, Model: SUBARU CROSSTREK 2018Pages: 33, PDF Size: 3.06 MB
Page 11 of 33
9
Gauges
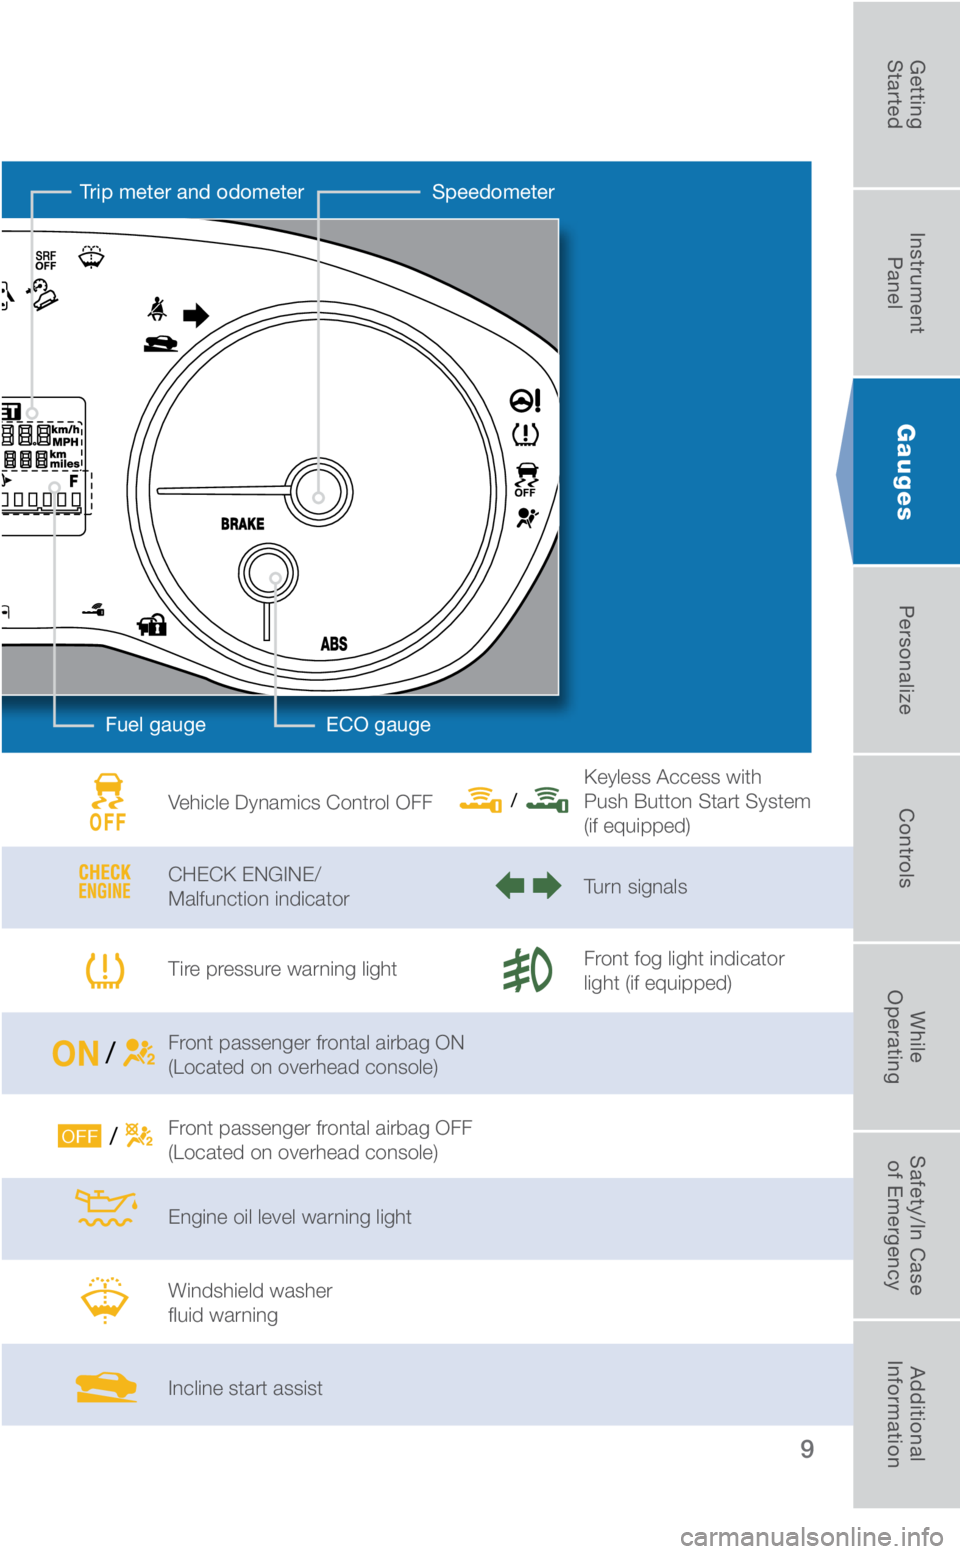
Vehicle Dynamics Control OFF
CHECK ENGINE/
Malfunction indicator
Tire pressure warning light
Front passenger frontal airbag ON
(Located on overhead console)
Front passenger frontal airbag OFF
(Located on overhead console)
Engine oil level warning light
Windshield washer
fluid warning
Incline start assistKeyless Access with
Push Button Start System
(if equipped)
Turn signals
Front fog light indicator
light (if equipped)
Fuel gauge
Speedometer
Trip meter and odometer
ECO gauge
3053393_18b_Crosstrek_QG_071917.indd 97/19/17 3:55 PM
Getting
Started Instrument
Panel Gauges
Personalize ControlsWhile
Operating Safety/In Case
of Emergency Additional
Information
Page 12 of 33

10
Seatbelt warning
Front passenger
seatbelt warning
SRS airbag system
Security indicator light
Door open
Charge warning
Oil pressure warning
Power steering warningBrake system
Hot coolant temperature/
Cold coolant temperature
High beam indicator light
AT OIL TEMP
(Automatic Transmission)
ABS warning
Low fuel
All-Wheel Drive
(Automatic Transmission)
Vehicle Dynamics Control/
Vehicle Dynamics
Control operation
Gauges - Vehicles with EyeSight
Immediate Attention
Caution
Informational
Tachometer Combination meter display
Select lever/Gear position indicator
3053393_18b_Crosstrek_QG_071917.indd 107/19/17 3:55 PM
Page 13 of 33
11
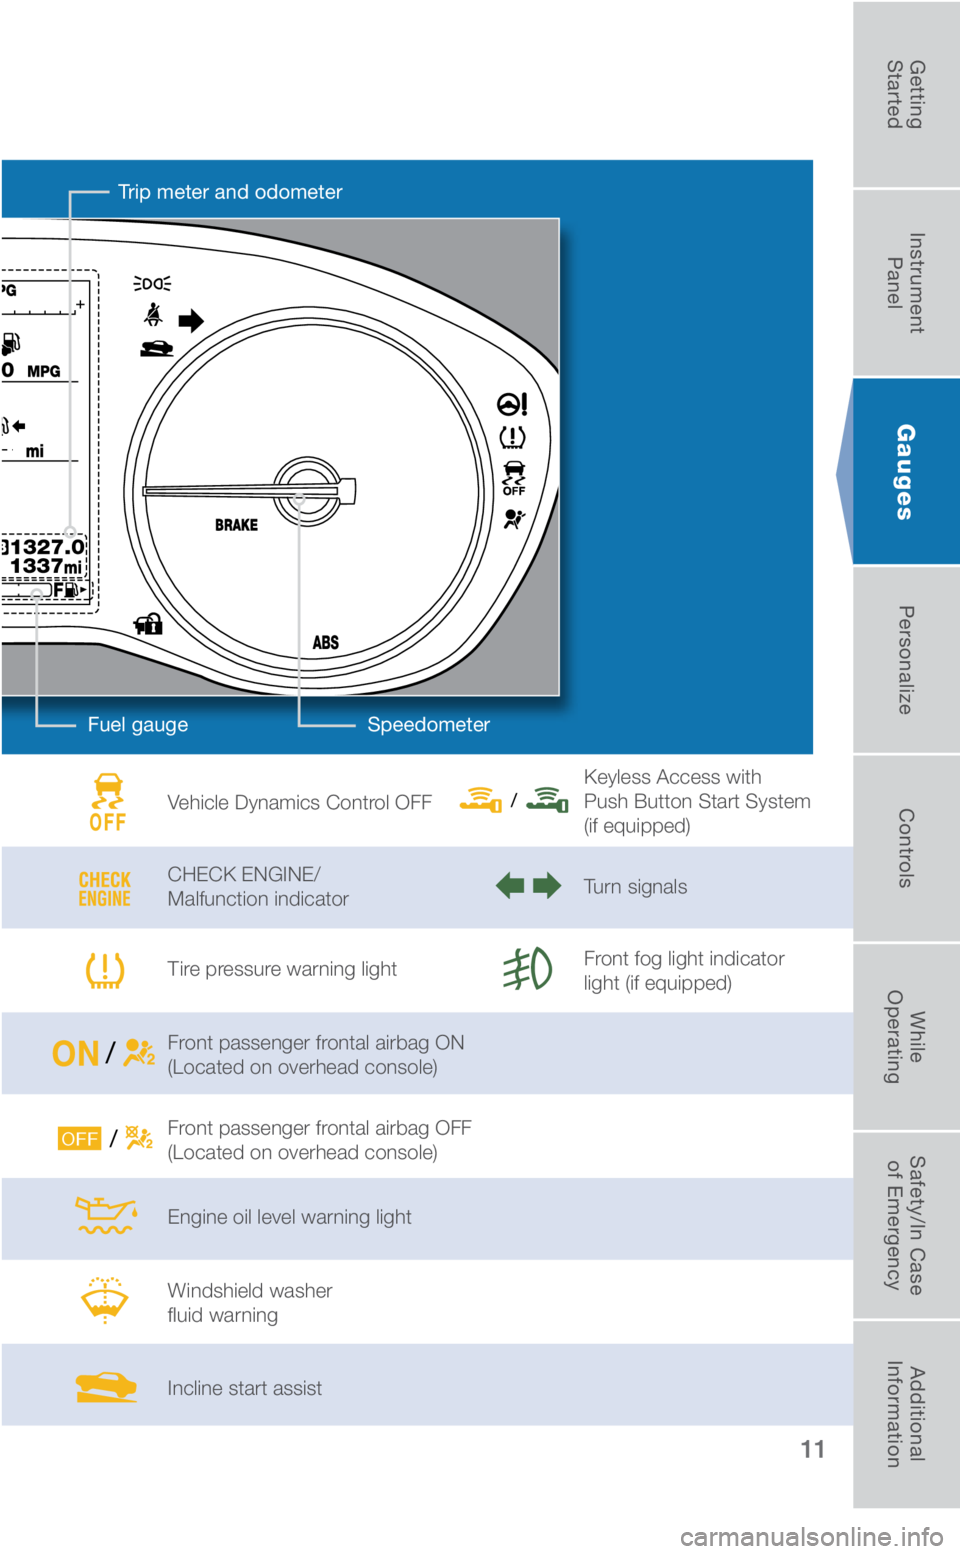
Vehicle Dynamics Control OFF
CHECK ENGINE/
Malfunction indicator
Tire pressure warning light
Front passenger frontal airbag ON
(Located on overhead console)
Front passenger frontal airbag OFF
(Located on overhead console)
Engine oil level warning light
Windshield washer
fluid warning
Incline start assistKeyless Access with
Push Button Start System
(if equipped)
Turn signals
Front fog light indicator
light (if equipped)
Gauges
Fuel gauge Speedometer
Trip meter and odometer
3053393_18b_Crosstrek_QG_071917.indd 117/19/17 3:55 PM
Getting
Started Instrument
Panel Gauges
Personalize ControlsWhile
Operating Safety/In Case
of Emergency Additional
Information
Page 14 of 33
12
Personalize
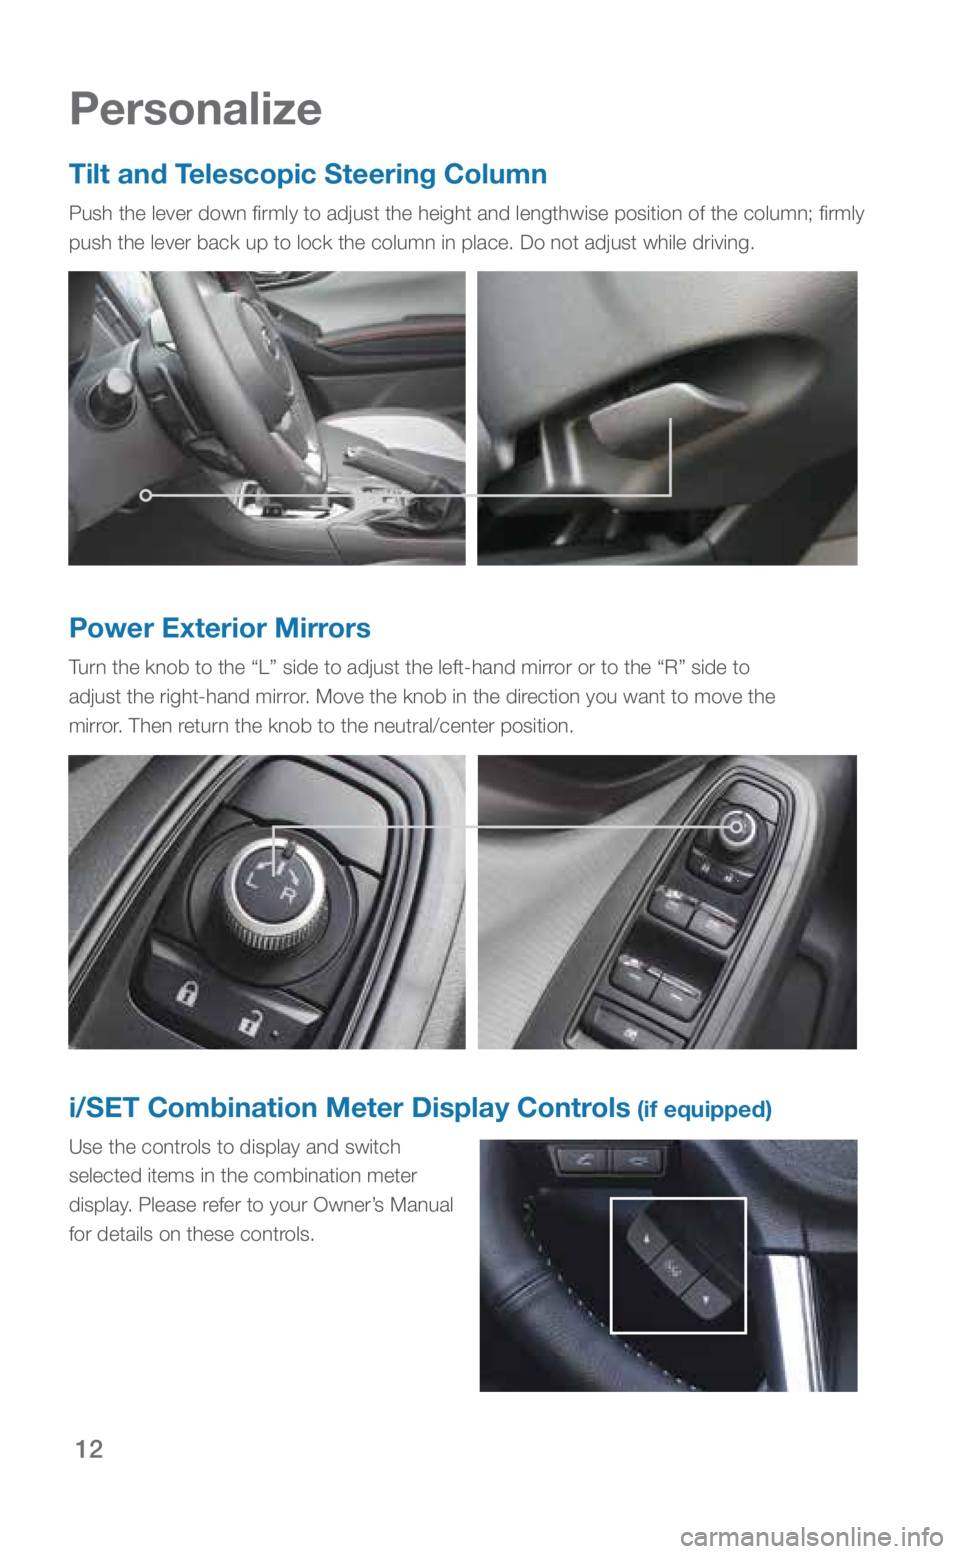
Tilt and Telescopic Steering Column
Push the lever down firmly to adjust the height and lengthwise positio\
n of the column; firmly
push the lever back up to lock the column in place. Do not adjust while \
driving.
Power Exterior Mirrors
Turn the knob to the “L” side to adjust the left-hand mirror or to the “R” side to
adjust the right-hand mirror. Move the knob in the direction you want to move the
mirror. Then return the knob to the neutral/center position.
i/SET Combination Meter Display Controls (if equipped)
Use the controls to display and switch
selected items in the combination meter
display. Please refer to your Owner’s Manual
for details on these controls.
3053393_18b_Crosstrek_QG_071917.indd 127/19/17 3:55 PM
Page 15 of 33
13
Personalize
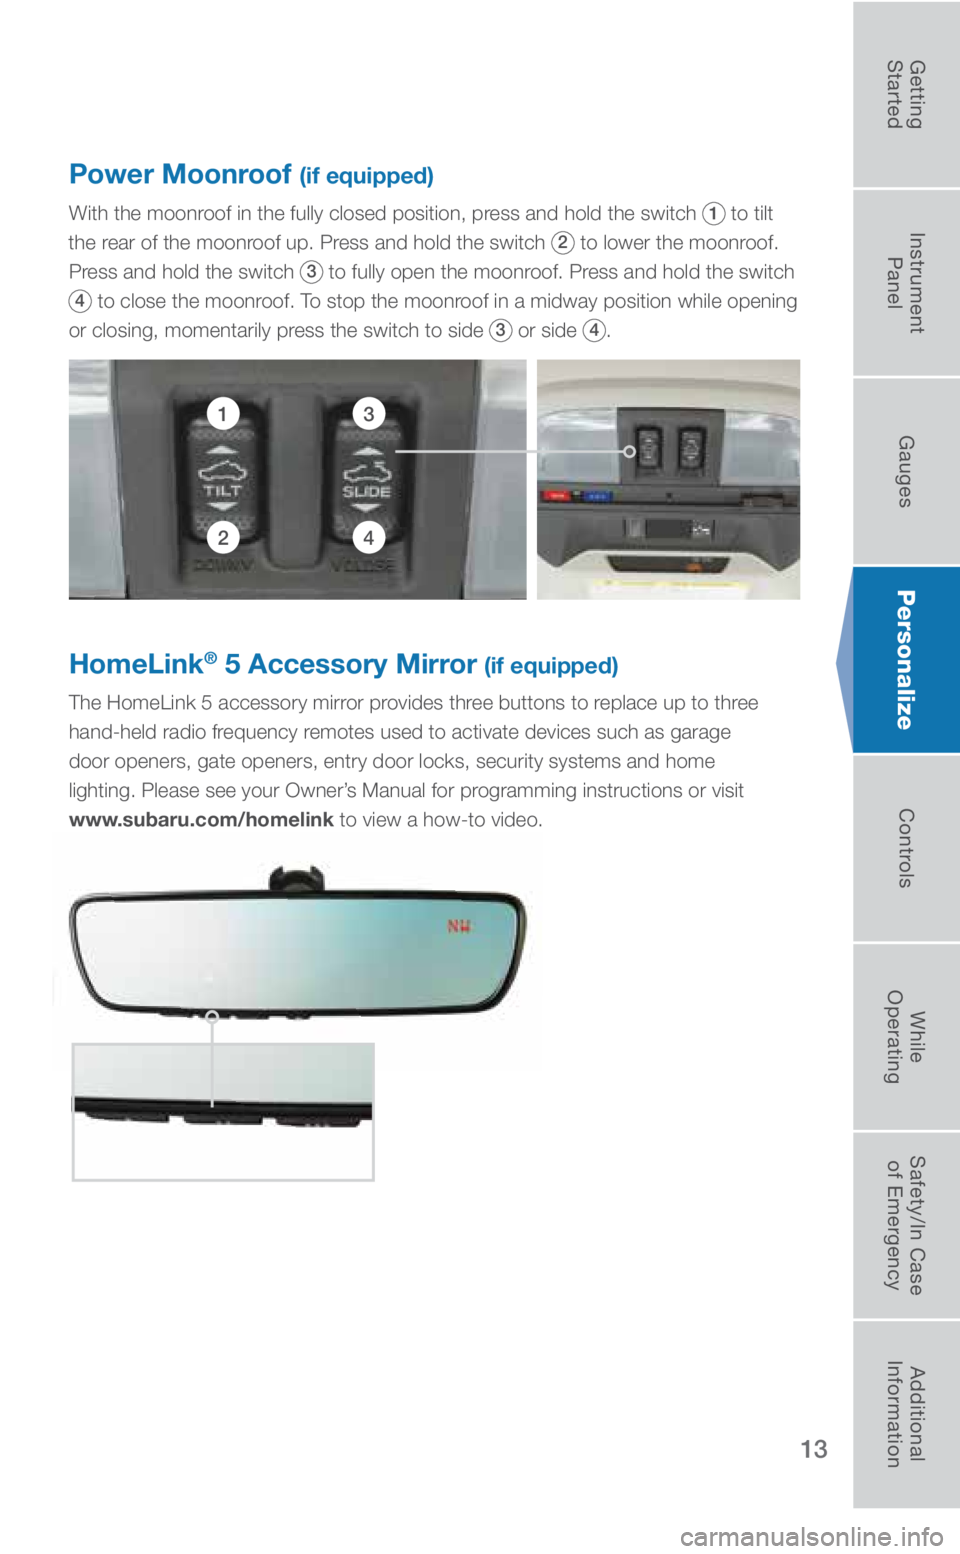
HomeLink® 5 Accessory Mirror (if equipped)
The HomeLink 5 accessory mirror provides three buttons to replace up to three
hand-held radio frequency remotes used to activate devices such as garage
door openers, gate openers, entry door locks, security systems and home \
lighting. Please see your Owner’s Manual for programming instructions or visit
www.subaru.com/homelink to view a how-to video.
Power Moonroof (if equipped)
With the moonroof in the fully closed position, press and hold the switch 1 to tilt
the rear of the moonroof up. Press and hold the switch
2 to lower the moonroof.
Press and hold the switch
3 to fully open the moonroof. Press and hold the switch
4 to close the moonroof. To stop the moonroof in a midway position while opening
or closing, momentarily press the switch to side
3 or side 4.
13
24
3053393_18b_Crosstrek_QG_071917.indd 137/19/17 3:55 PM
Getting
Started Instrument
Panel Gauges
Personalize ControlsWhile
Operating Safety/In Case
of Emergency Additional
Information
Page 16 of 33
14
Controls
Light Controls
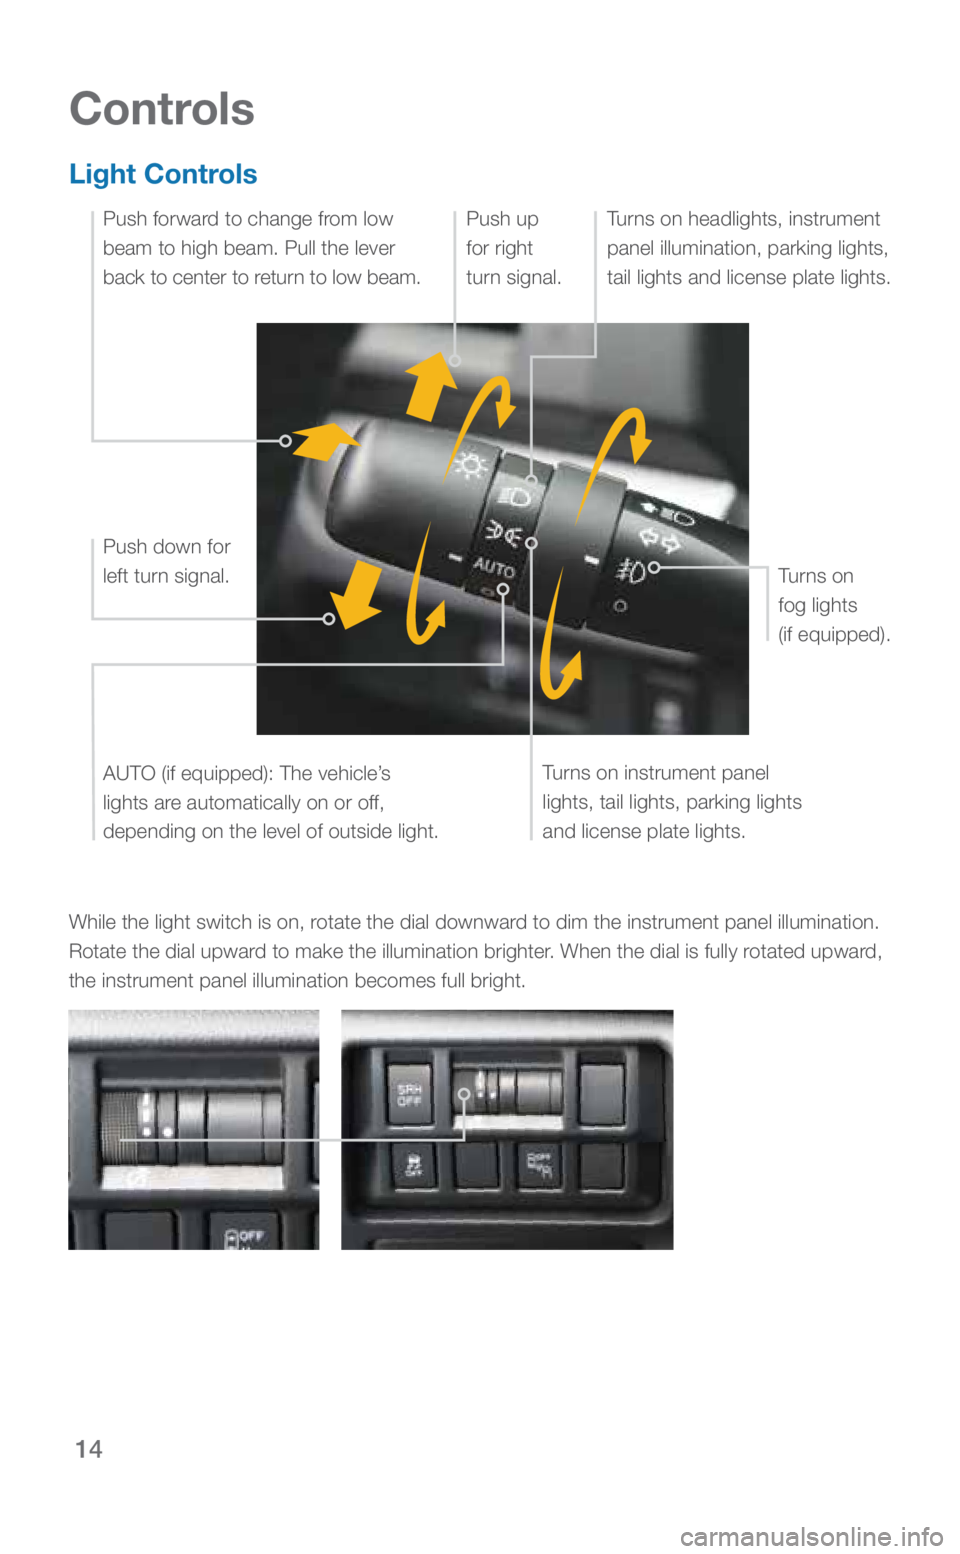
While the light switch is on, rotate the dial downward to dim the instrument panel illumination.
Rotate the dial upward to make the illumination brighter. When the dial is fully rotated upward,
the instrument panel illumination becomes full bright.
Turns on instrument panel
lights, tail lights, parking lights
and license plate lights.Turns on headlights, instrument
panel illumination, parking lights,
tail lights and license plate lights.
Turns on
fog lights
(if equipped).
Push up
for right
turn signal.
Push down for
left turn signal.AUTO (if equipped): The vehicle’s
lights are automatically on or off,
depending on the level of outside light.
Push forward to change from low
beam to high beam. Pull the lever
back to center to return to low beam.
3053393_18b_Crosstrek_QG_071917.indd 147/19/17 3:55 PM
Page 17 of 33
15
Windshield Wipers
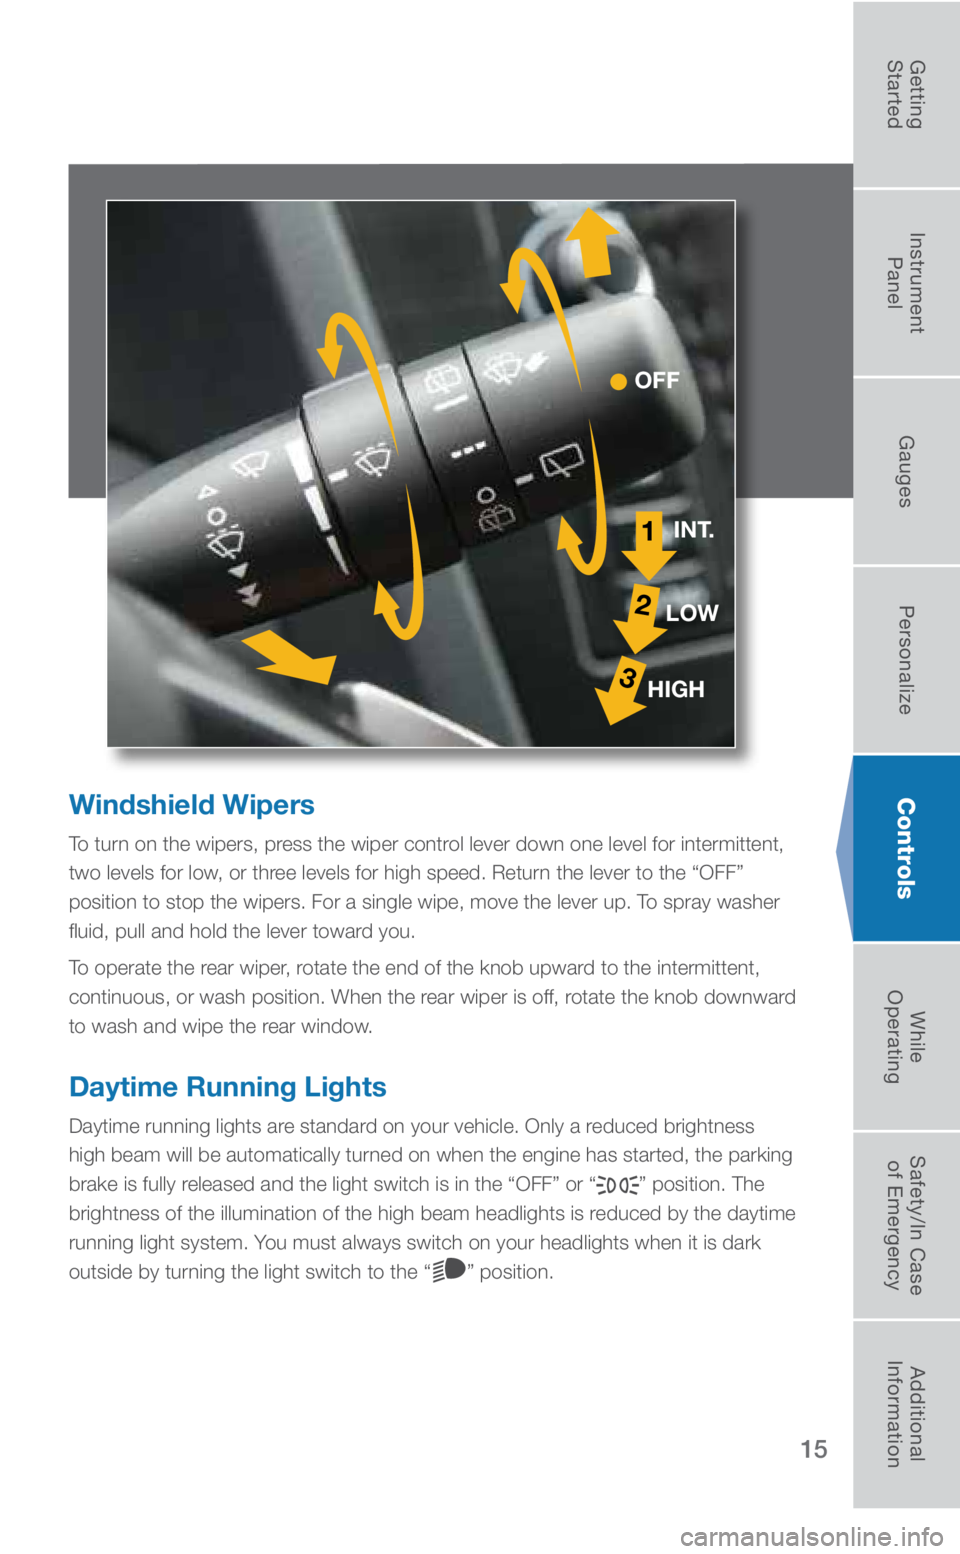
To turn on the wipers, press the wiper control lever down one level for intermittent,
two levels for low, or three levels for high speed. Return the lever to the “OFF”
position to stop the wipers. For a single wipe, move the lever up. To spray washer
fluid, pull and hold the lever toward you.
To operate the rear wiper, rotate the end of the knob upward to the intermittent,
continuous, or wash position. When the rear wiper is off, rotate the knob downward
to wash and wipe the rear window.
Daytime Running Lights
Daytime running lights are standard on your vehicle. Only a reduced brightness
high beam will be automatically turned on when the engine has started, the parking
brake is fully released and the light switch is in the “OFF” or “
” position. The
brightness of the illumination of the high beam headlights is reduced by the daytime
running light system. You must always switch on your headlights when it is dark
outside by turning the light switch to the “
” position.
1
2
3
INT.
LOW
HIGH
OFF
Controls
3053393_18b_Crosstrek_QG_071917.indd 157/19/17 3:55 PM
Getting
Started Instrument
Panel Gauges
Personalize ControlsWhile
Operating Safety/In Case
of Emergency Additional
Information
Page 18 of 33
16
Controls
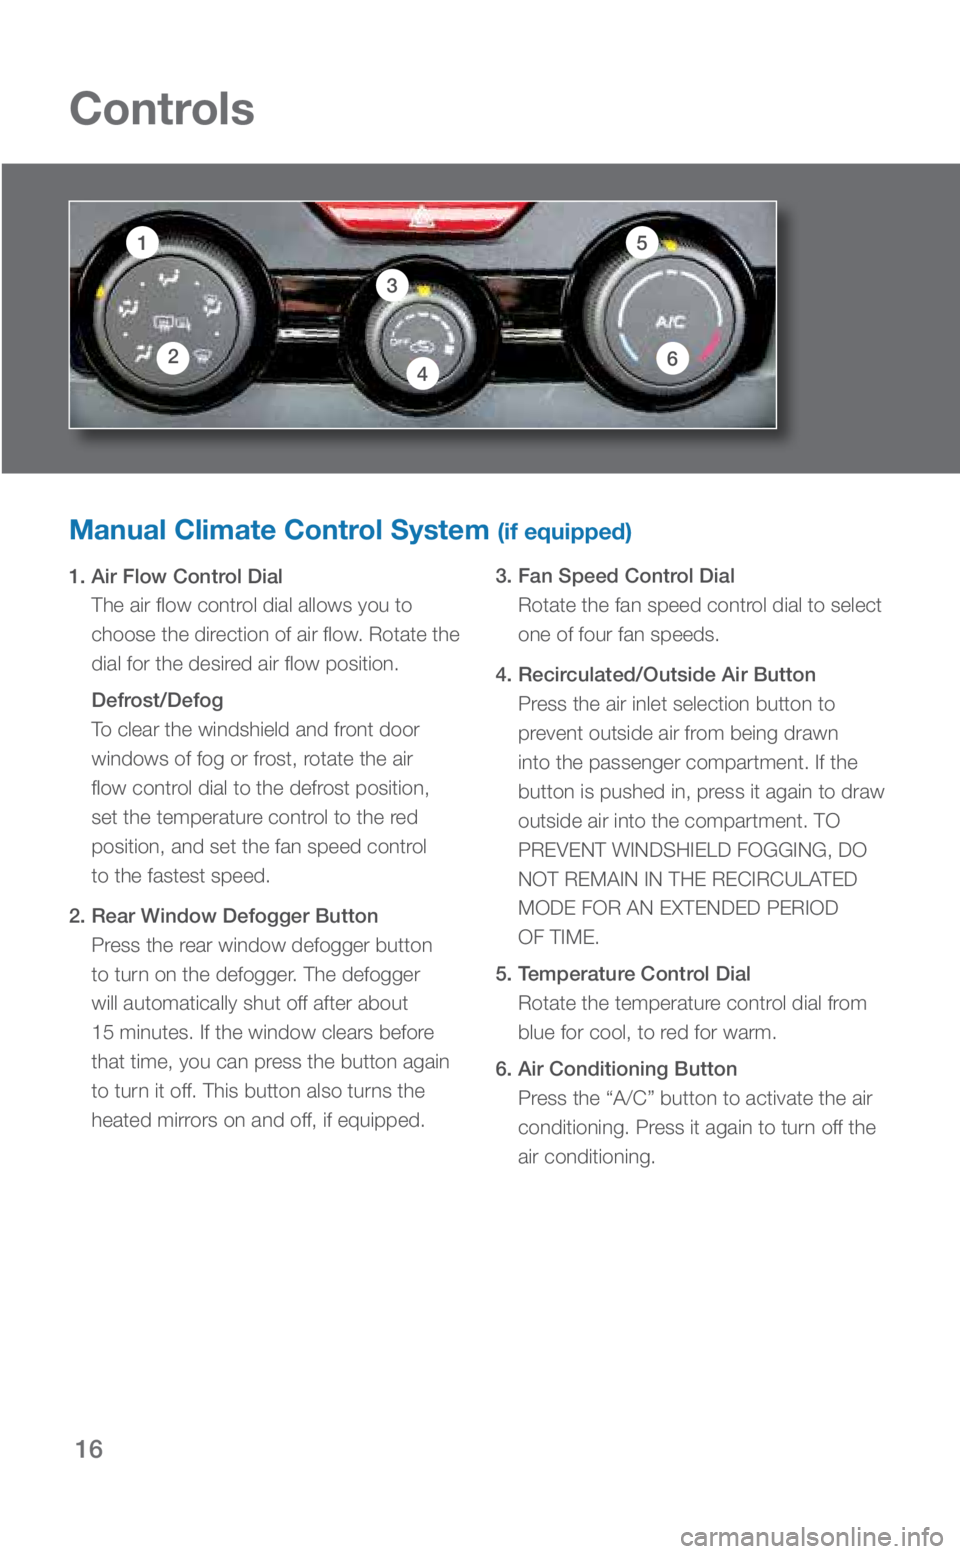
Manual Climate Control System (if equipped)
1. Air Flow Control Dial The air flow control dial allows you to
choose the direction of air flow. Rotate the
dial for the desired air flow position.
Defrost/Defog
To clear the windshield and front door
windows of fog or frost, rotate the air
flow control dial to the defrost position,
set the temperature control to the red
position, and set the fan speed control
to the fastest speed.
2. Rear Window Defogger Button Press the rear window defogger button
to turn on the defogger. The defogger
will automatically shut off after about
15 minutes. If the window clears before
that time, you can press the button again
to turn it off. This button also turns the
heated mirrors on and off, if equipped. 3. Fan Speed Control Dial
Rotate the fan speed control dial to select
one of four fan speeds.
4. Recirculated/Outside Air Button Press the air inlet selection button to
prevent outside air from being drawn
into the passenger compartment. If the
button is pushed in, press it again to draw
outside air into the compartment. TO
PREVENT WINDSHIELD FOGGING, DO
NOT REMAIN IN THE RECIRCULATED
MODE FOR AN EXTENDED PERIOD
OF TIME.
5. Temperature Control Dial Rotate the temperature control dial from
blue for cool, to red for warm.
6. Air Conditioning Button Press the “A/C” button to activate the air
conditioning. Press it again to turn off the
air conditioning.
3
51
246
3053393_18b_Crosstrek_QG_071917.indd 167/19/17 3:55 PM
Page 19 of 33
17
Controls
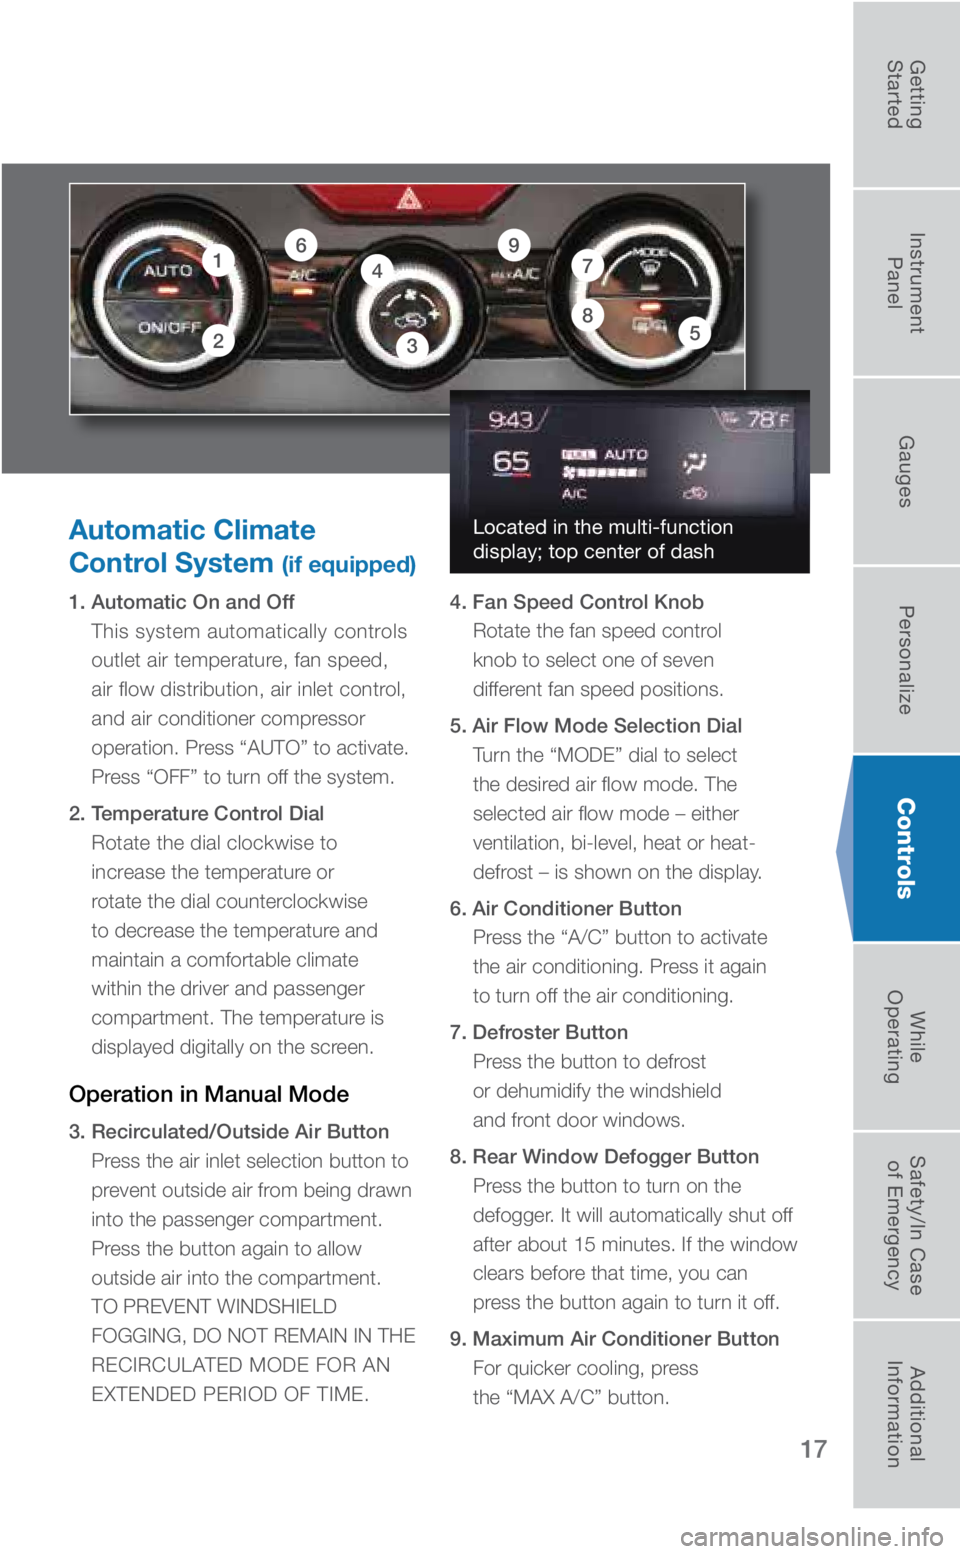
Automatic Climate
Control System
(if equipped)
1. Automatic On and Off This system automatically controls
outlet air temperature, fan speed,
air flow distribution, air inlet control,
and air conditioner compressor
operation. Press “AUTO” to activate.
Press “OFF” to turn off the system.
2. Temperature Control Dial Rotate the dial clockwise to
increase the temperature or
rotate the dial counterclockwise
to decrease the temperature and
maintain a comfortable climate
within the driver and passenger
compartment. The temperature is
displayed digitally on the screen.
Operation in Manual Mode
3. Recirculated/Outside Air Button Press the air inlet selection button to
prevent outside air from being drawn
into the passenger compartment.
Press the button again to allow
outside air into the compartment.
TO PREVENT WINDSHIELD
FOGGING, DO NOT REMAIN IN THE
RECIRCULATED MODE FOR AN
EXTENDED PERIOD OF TIME. 4. Fan Speed Control Knob
Rotate the fan speed control
knob to select one of seven
different fan speed positions.
5. Air Flow Mode Selection Dial Turn the “MODE” dial to select
the desired air flow mode. The
selected air flow mode – either
ventilation, bi-level, heat or heat-
defrost – is shown on the display.
6. Air Conditioner Button Press the “A/C” button to activate
the air conditioning. Press it again
to turn off the air conditioning.
7. Defroster Button Press the button to defrost
or dehumidify the windshield
and front door windows.
8. Rear Window Defogger Button Press the button to turn on the
defogger. It will automatically shut off
after about 15 minutes. If the window
clears before that time, you can
press the button again to turn it off.
9. Maximum Air Conditioner Button
For quicker cooling, press
the “MAX A/C” button.
1
3
4
582
796
Located in the multi-function
display; top center of dash
3053393_18b_Crosstrek_QG_071917.indd 177/19/17 3:55 PM
Getting
Started Instrument
Panel Gauges
Personalize ControlsWhile
Operating Safety/In Case
of Emergency Additional
Information
Page 20 of 33

18
Controls
Steering Wheel Audio Controls (if equipped)
Controls
Talk switch; please refer to
the “Bluetooth audio” section
in your Owner’s Manual.
Press the button to select
the desired audio mode –
FM, AM, SAT, CD, AUX, MEDIA. With any of the radio modes
selected, press the left or
right arrow button to skip
through your presets. In CD
mode, press the buttons to
skip forward or back a track.
Push the switch
up (+) to increase
volume or down (–)
to decrease volume.
USB Port
The USB port is located in the front of the center console.
You can connect a portable music player to the USB
port and hear the music stored on it through the vehicle
speakers. Press the “SOURCE” button located on the
audio system repeatedly until the USB mode is selected.
Auxiliary Input Jack
The 3.5mm auxiliary input jack is located in the
front of the center console. You can connect a
portable music player to the auxiliary jack and
hear the music stored on it through the vehicle
speakers. Press the “SOURCE” button located on
the audio system to select the auxiliary mode.
3053393_18b_Crosstrek_QG_071917.indd 187/19/17 3:55 PM