SUBARU CROSSTREK 2022 Getting Started Guide
CROSSTREK 2022
SUBARU
SUBARU
https://www.carmanualsonline.info/img/17/40409/w960_40409-0.png
SUBARU CROSSTREK 2022 Getting Started Guide
Trending: android auto, roof, lights, fuel type, key, maintenance schedule, keyless entry
Page 11 of 132
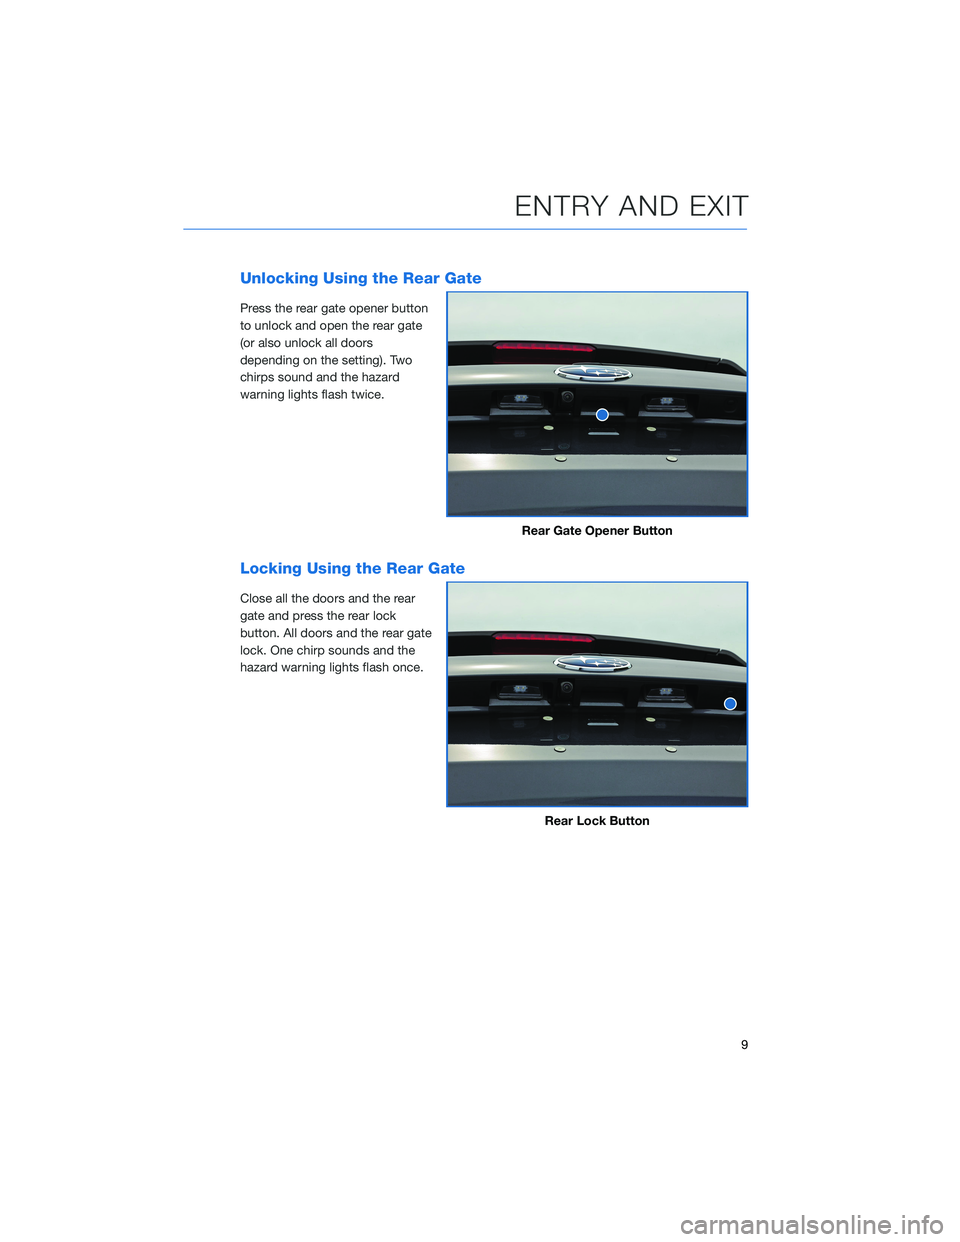
Unlocking Using the Rear Gate
Press the rear gate opener button
to unlock and open the rear gate
(or also unlock all doors
depending on the setting). Two
chirps sound and the hazard
warning lights flash twice.
Locking Using the Rear Gate
Close all the doors and the rear
gate and press the rear lock
button. All doors and the rear gate
lock. One chirp sounds and the
hazard warning lights flash once.
Rear Gate Opener Button
Rear Lock Button
ENTRY AND EXIT
9
Page 12 of 132
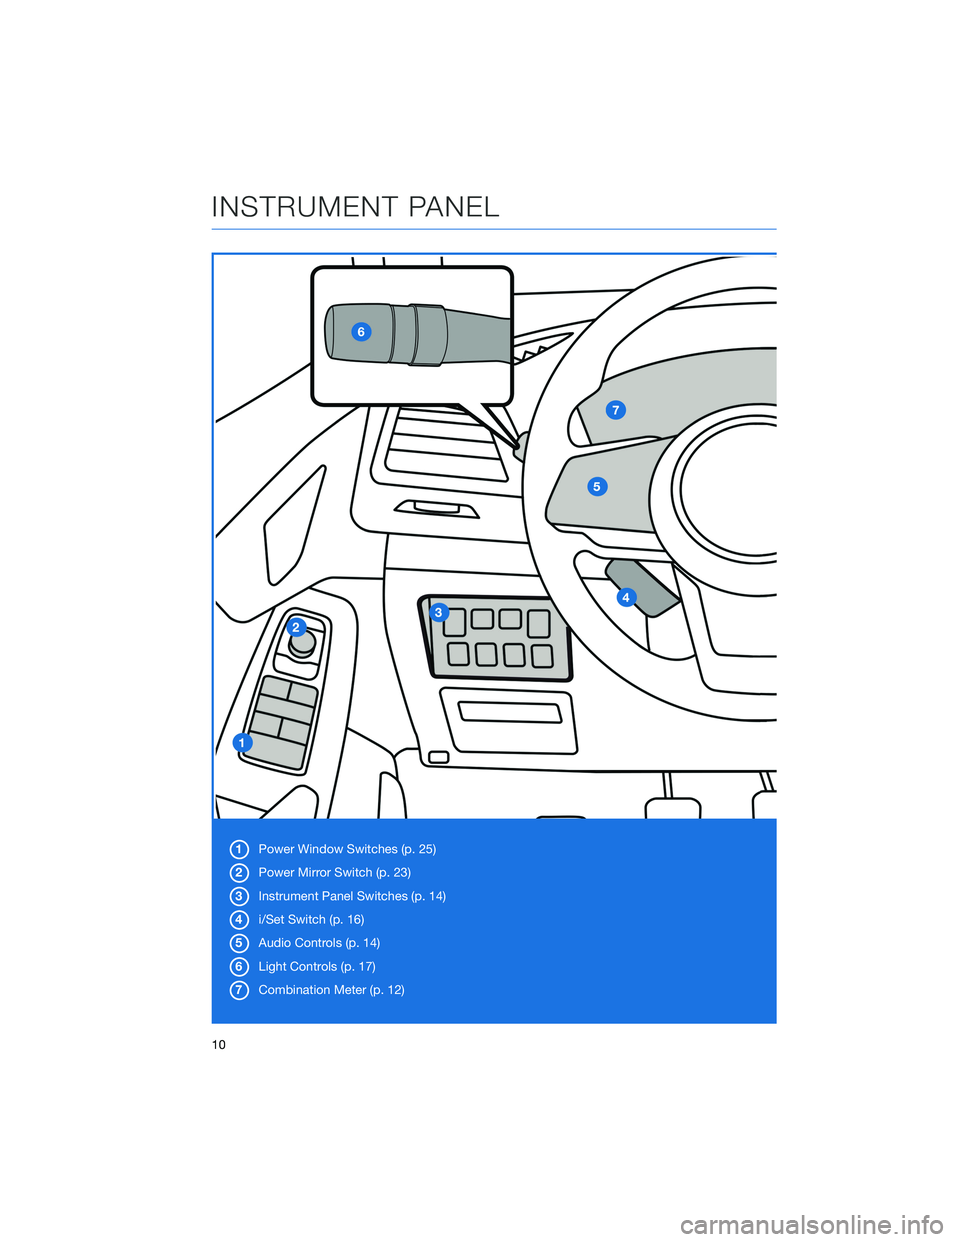
1Power Window Switches (p. 25)
2Power Mirror Switch (p. 23)
3Instrument Panel Switches (p. 14)
4i/Set Switch (p. 16)
5Audio Controls (p. 14)
6Light Controls (p. 17)
7Combination Meter (p. 12)
INSTRUMENT PANEL
10
Page 13 of 132
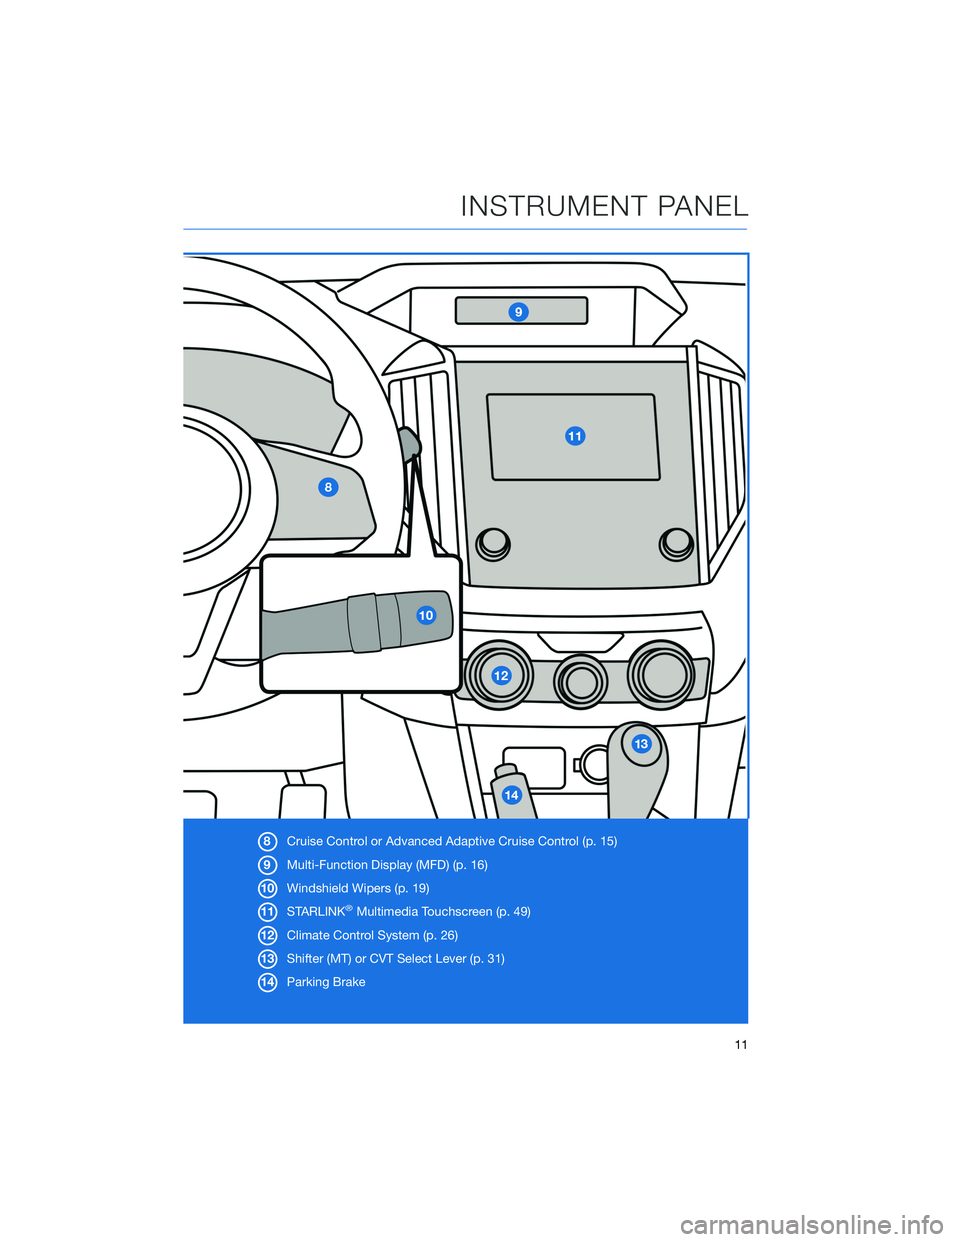
8Cruise Control or Advanced Adaptive Cruise Control (p. 15)
9Multi-Function Display (MFD) (p. 16)
10Windshield Wipers (p. 19)
11STARLINK
®Multimedia Touchscreen (p. 49)
12Climate Control System (p. 26)
13Shifter (MT) or CVT Select Lever (p. 31)
14Parking Brake
INSTRUMENT PANEL
11
Page 14 of 132
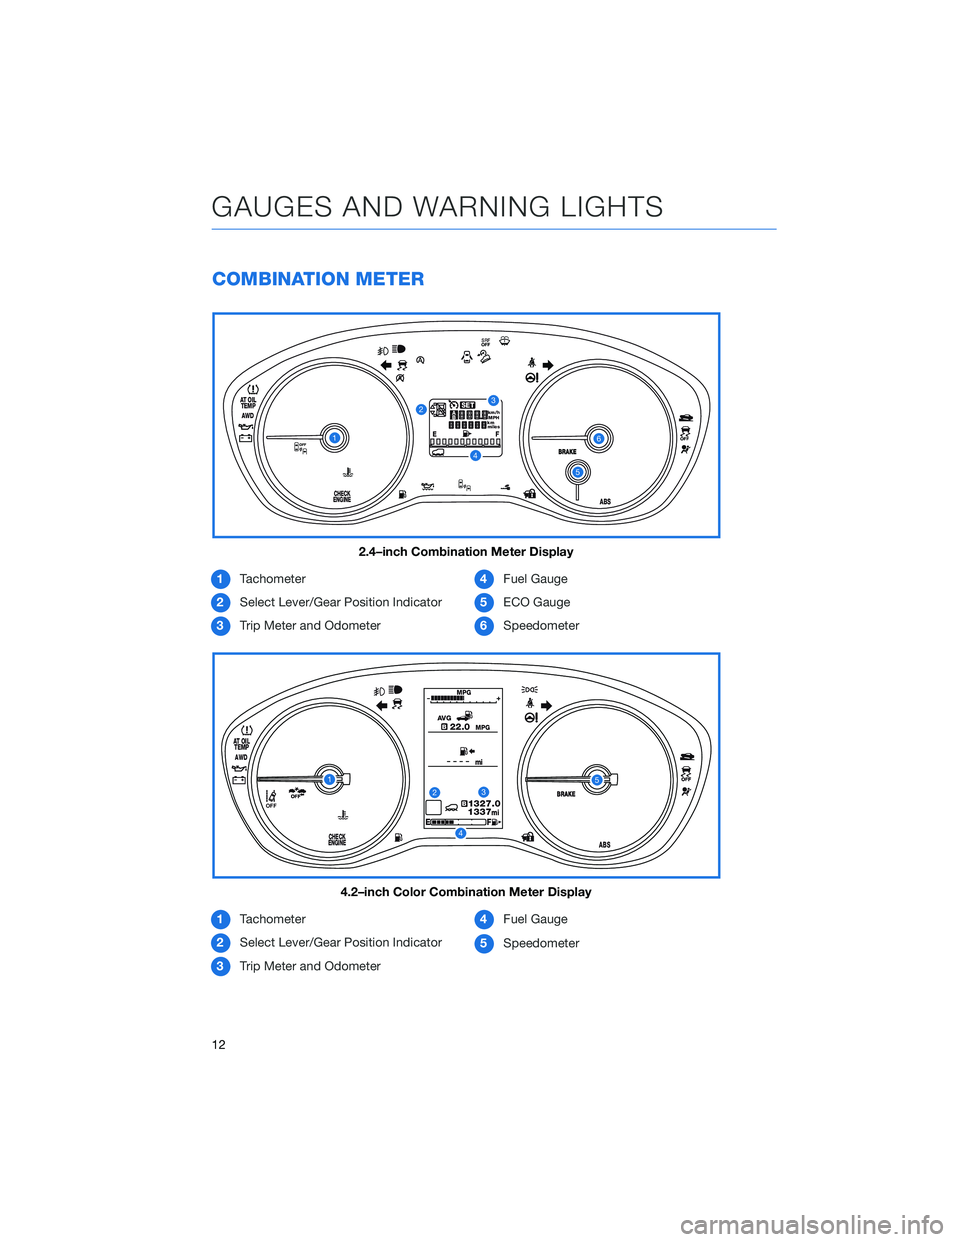
COMBINATION METER
1Tachometer
2Select Lever/Gear Position Indicator
3Trip Meter and Odometer4Fuel Gauge
5ECO Gauge
6Speedometer
1Tachometer
2Select Lever/Gear Position Indicator
3Trip Meter and Odometer4Fuel Gauge
5Speedometer
E
ASET
SRF
B
Fkm
miles MPH km/h
ABS
AWD
AT OIL
TEMP
CHECK
ENGINE
1
23
4
5
6
A
A
2.4–inch Combination Meter Display
ABS
AWD
AT OIL
TEMP
CHECK
ENGINEEFmi mi
MPG MPGAVG
13371327.0
22.0
B
B
OFF
123
4
5
4.2–inch Color Combination Meter Display
GAUGES AND WARNING LIGHTS
12
Page 15 of 132
WARNING AND INDICATOR LIGHTS
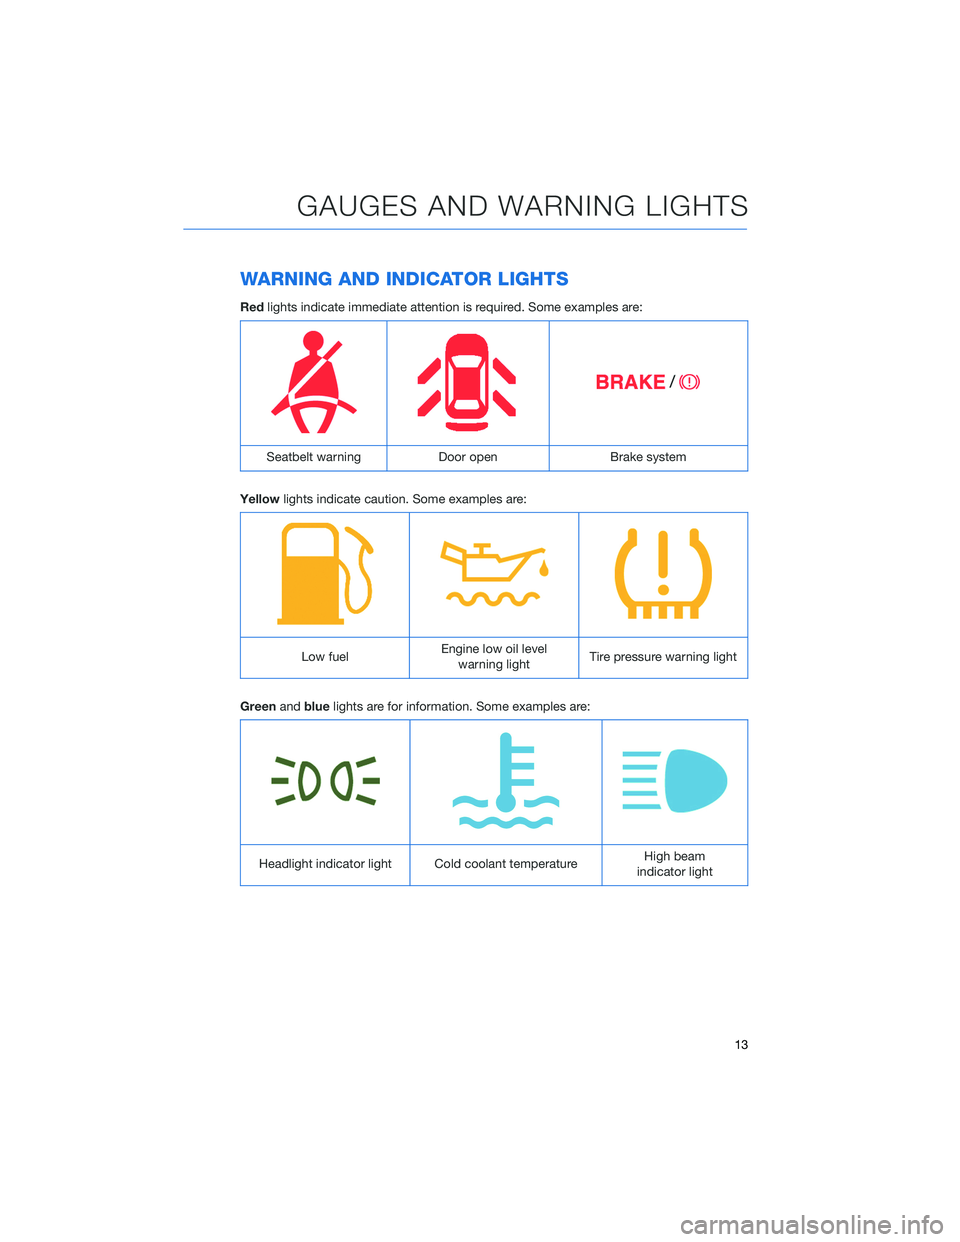
Redlights indicate immediate attention is required. Some examples are:
Seatbelt warning Door open Brake system
Yellowlights indicate caution. Some examples are:
Low fuelEngine low oil level
warning lightTire pressure warning light
Greenandbluelights are for information. Some examples are:
Headlight indicator light Cold coolant temperatureHigh beam
indicator light
GAUGES AND WARNING LIGHTS
13
Page 16 of 132
INSTRUMENT PANEL SWITCHES (LOWER LEFT)
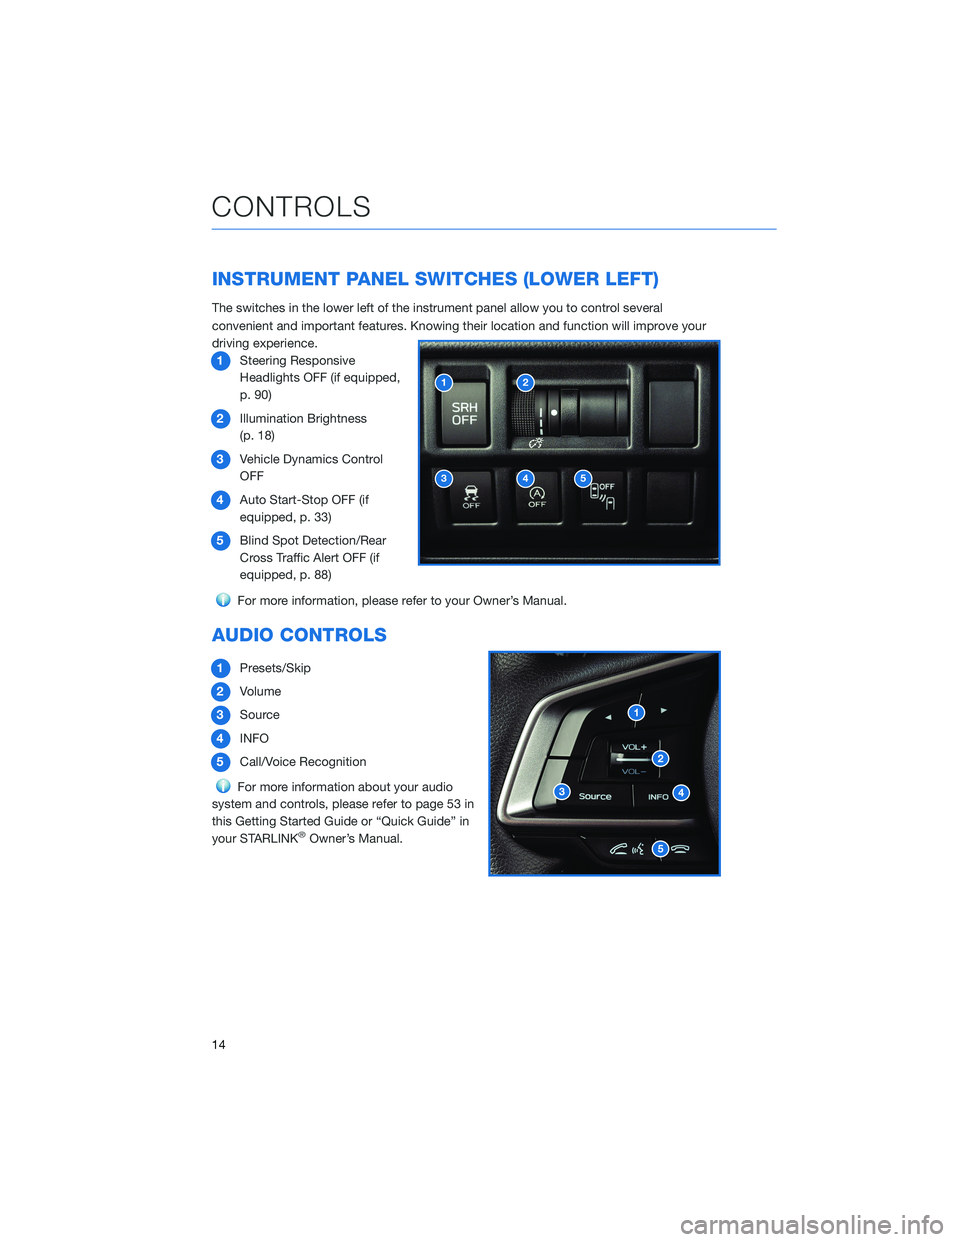
The switches in the lower left of the instrument panel allow you to control several
convenient and important features. Knowing their location and function will improve your
driving experience.
1Steering Responsive
Headlights OFF (if equipped,
p. 90)
2Illumination Brightness
(p. 18)
3Vehicle Dynamics Control
OFF
4Auto Start-Stop OFF (if
equipped, p. 33)
5Blind Spot Detection/Rear
Cross Traffic Alert OFF (if
equipped, p. 88)
For more information, please refer to your Owner’s Manual.
AUDIO CONTROLS
1Presets/Skip
2Volume
3Source
4INFO
5Call/Voice Recognition
For more information about your audio
system and controls, please refer to page 53 in
this Getting Started Guide or “Quick Guide” in
your STARLINK
®Owner’s Manual.
CONTROLS
14
Page 17 of 132
CRUISE CONTROL
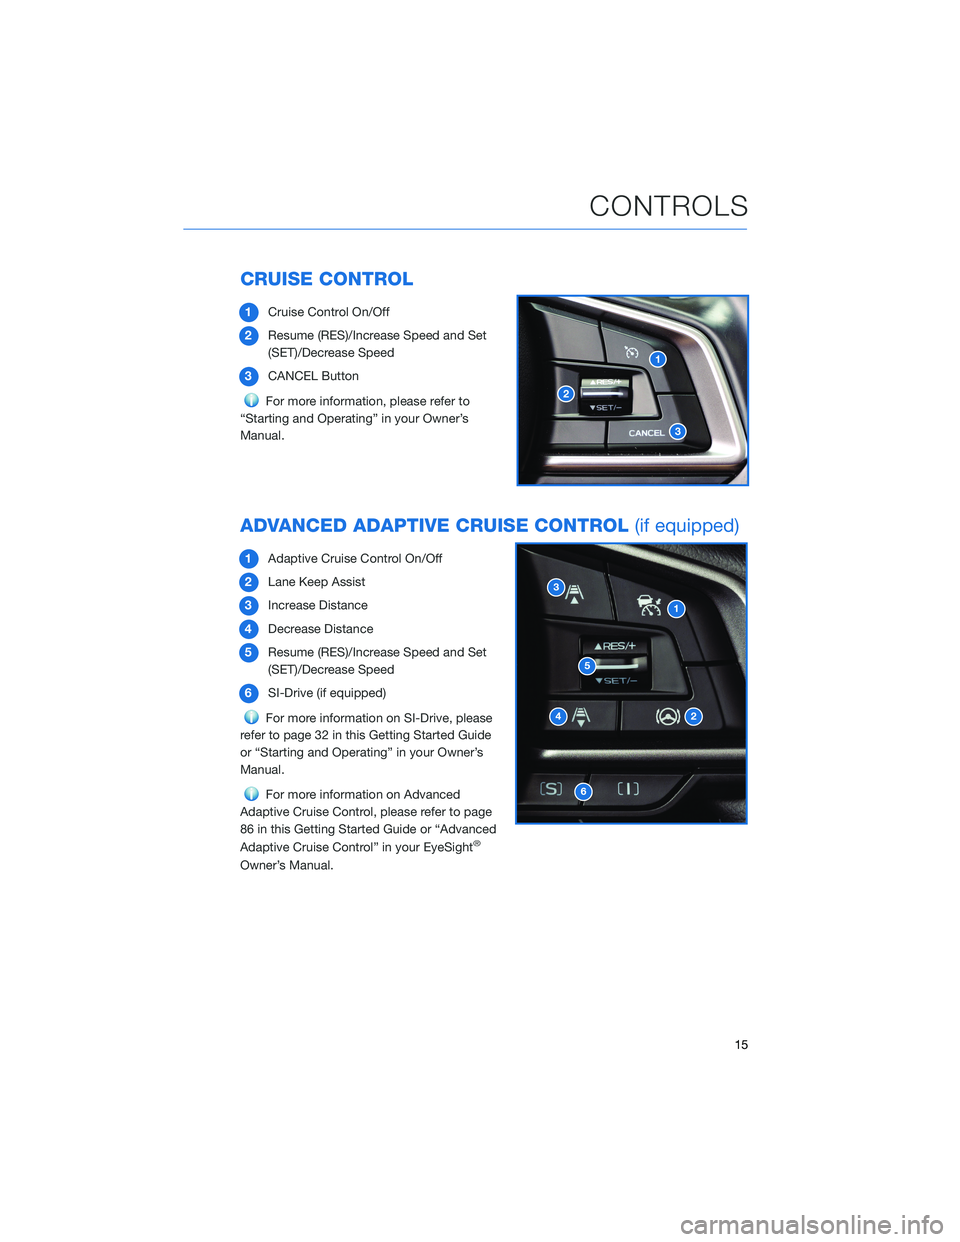
1Cruise Control On/Off
2Resume (RES)/Increase Speed and Set
(SET)/Decrease Speed
3CANCEL Button
For more information, please refer to
“Starting and Operating” in your Owner’s
Manual.
ADVANCED ADAPTIVE CRUISE CONTROL(if equipped)
1Adaptive Cruise Control On/Off
2Lane Keep Assist
3Increase Distance
4Decrease Distance
5Resume (RES)/Increase Speed and Set
(SET)/Decrease Speed
6SI-Drive (if equipped)
For more information on SI-Drive, please
refer to page 32 in this Getting Started Guide
or “Starting and Operating” in your Owner’s
Manual.
For more information on Advanced
Adaptive Cruise Control, please refer to page
86 in this Getting Started Guide or “Advanced
Adaptive Cruise Control” in your EyeSight
®
Owner’s Manual.
CONTROLS
15
Page 18 of 132
i/SET SWITCH
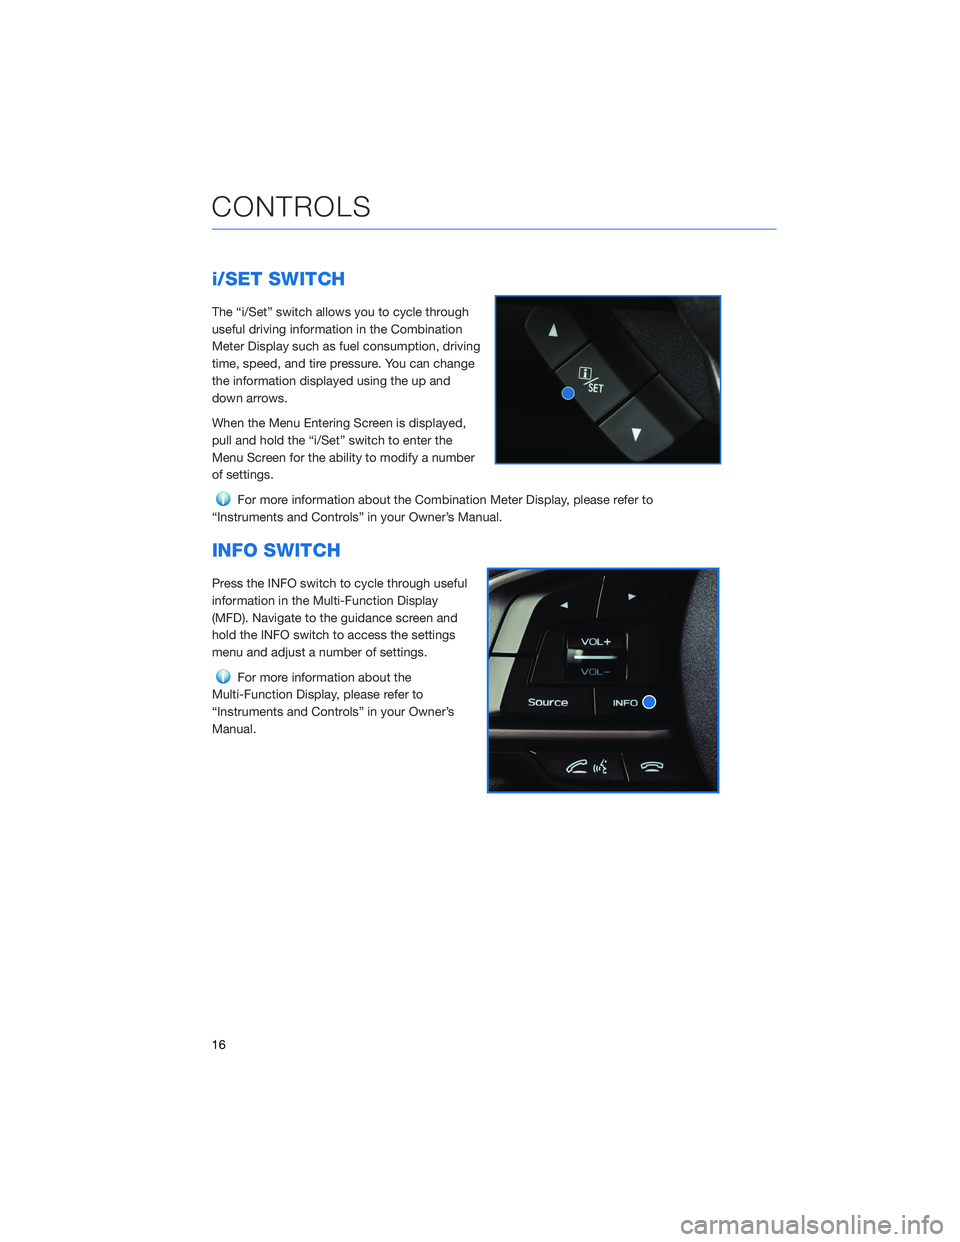
The “i/Set” switch allows you to cycle through
useful driving information in the Combination
Meter Display such as fuel consumption, driving
time, speed, and tire pressure. You can change
the information displayed using the up and
down arrows.
When the Menu Entering Screen is displayed,
pull and hold the “i/Set” switch to enter the
Menu Screen for the ability to modify a number
of settings.
For more information about the Combination Meter Display, please refer to
“Instruments and Controls” in your Owner’s Manual.
INFO SWITCH
Press the INFO switch to cycle through useful
information in the Multi-Function Display
(MFD). Navigate to the guidance screen and
hold the INFO switch to access the settings
menu and adjust a number of settings.
For more information about the
Multi-Function Display, please refer to
“Instruments and Controls” in your Owner’s
Manual.
CONTROLS
16
Page 19 of 132
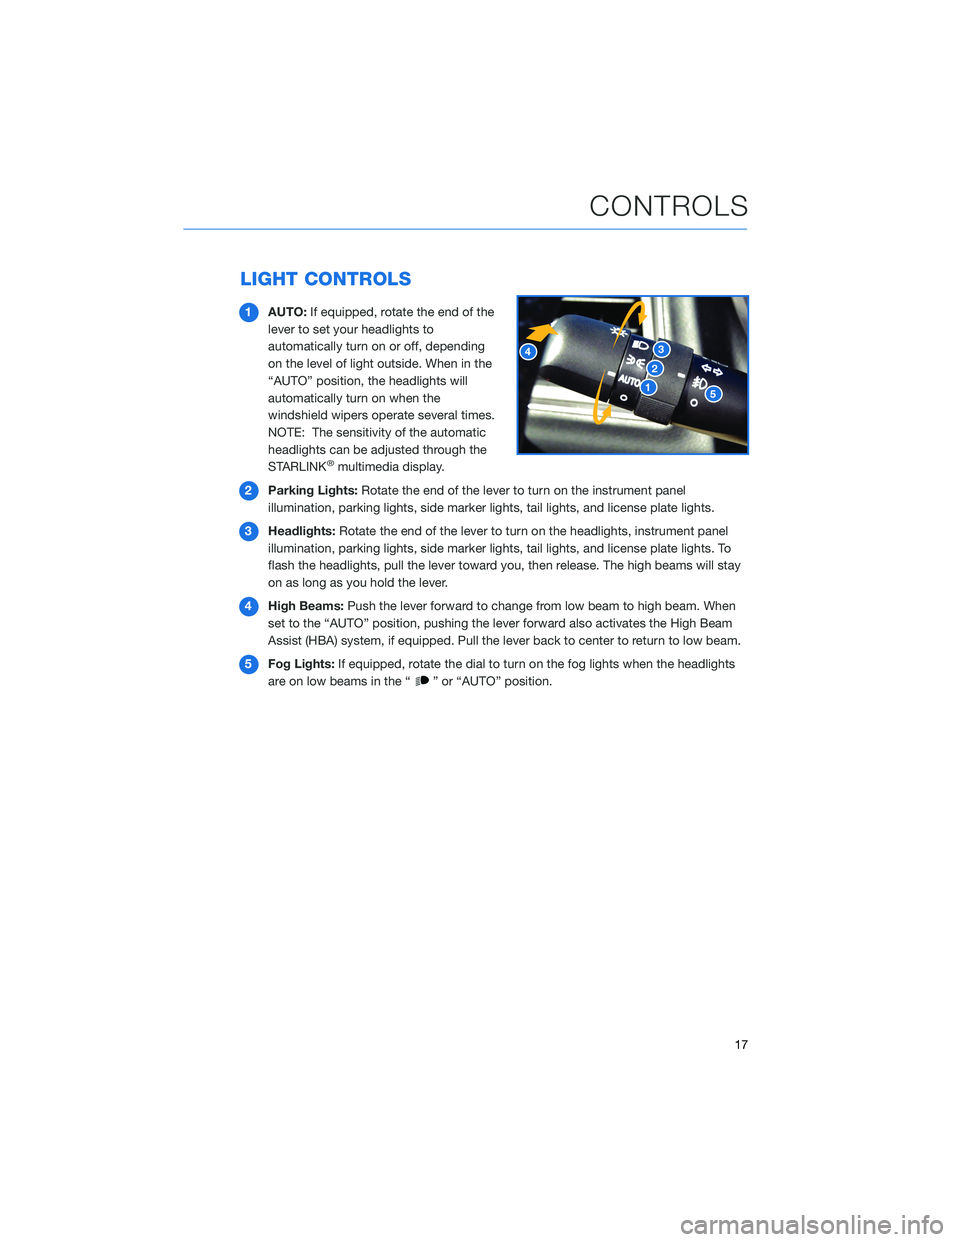
LIGHT CONTROLS
1AUTO:If equipped, rotate the end of the
lever to set your headlights to
automatically turn on or off, depending
on the level of light outside. When in the
“AUTO” position, the headlights will
automatically turn on when the
windshield wipers operate several times.
NOTE: The sensitivity of the automatic
headlights can be adjusted through the
STARLINK
®multimedia display.
2Parking Lights:Rotate the end of the lever to turn on the instrument panel
illumination, parking lights, side marker lights, tail lights, and license plate lights.
3Headlights:Rotate the end of the lever to turn on the headlights, instrument panel
illumination, parking lights, side marker lights, tail lights, and license plate lights. To
flash the headlights, pull the lever toward you, then release. The high beams will stay
on as long as you hold the lever.
4High Beams:Push the lever forward to change from low beam to high beam. When
set to the “AUTO” position, pushing the lever forward also activates the High Beam
Assist (HBA) system, if equipped. Pull the lever back to center to return to low beam.
5Fog Lights:If equipped, rotate the dial to turn on the fog lights when the headlights
are on low beams in the “
” or “AUTO” position.
CONTROLS
17
Page 20 of 132
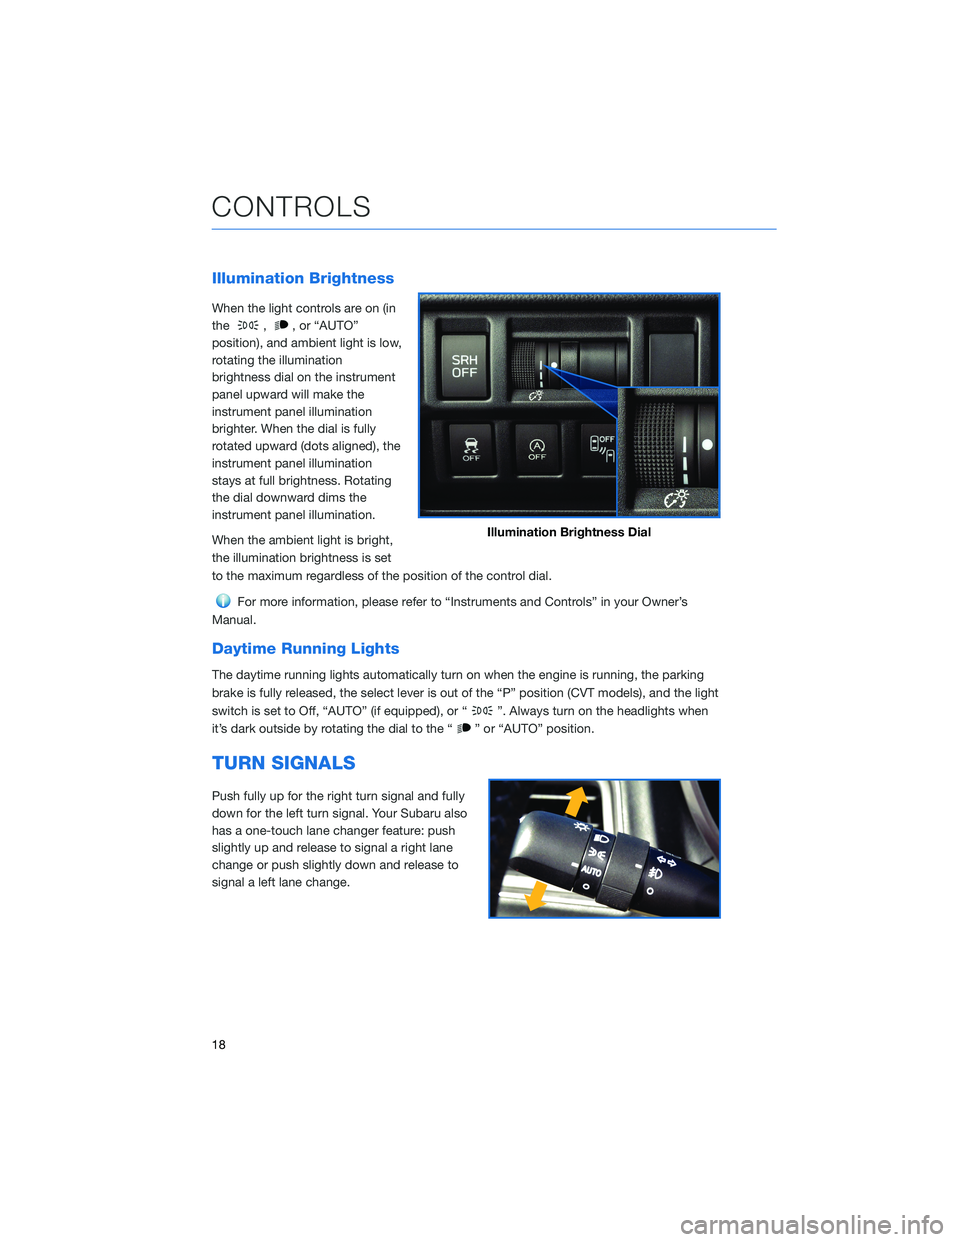
Illumination Brightness
When the light controls are on (in
the
,, or “AUTO”
position), and ambient light is low,
rotating the illumination
brightness dial on the instrument
panel upward will make the
instrument panel illumination
brighter. When the dial is fully
rotated upward (dots aligned), the
instrument panel illumination
stays at full brightness. Rotating
the dial downward dims the
instrument panel illumination.
When the ambient light is bright,
the illumination brightness is set
to the maximum regardless of the position of the control dial.
For more information, please refer to “Instruments and Controls” in your Owner’s
Manual.
Daytime Running Lights
The daytime running lights automatically turn on when the engine is running, the parking
brake is fully released, the select lever is out of the “P” position (CVT models), and the light
switch is set to Off, “AUTO” (if equipped), or “
”. Always turn on the headlights when
it’s dark outside by rotating the dial to the “
” or “AUTO” position.
TURN SIGNALS
Push fully up for the right turn signal and fully
down for the left turn signal. Your Subaru also
has a one-touch lane changer feature: push
slightly up and release to signal a right lane
change or push slightly down and release to
signal a left lane change.
Illumination Brightness Dial
CONTROLS
18
Trending: dashboard, Cruise, charging, settings and update, radiator, towing, fuse box
