display SUBARU CROSSTREK 2022 Getting Started Guide
[x] Cancel search | Manufacturer: SUBARU, Model Year: 2022, Model line: CROSSTREK, Model: SUBARU CROSSTREK 2022Pages: 132, PDF Size: 33.54 MB
Page 94 of 132
STEREO CAMERA PRECAUTIONS
Your EyeSight®stereo cameras are precision components that must be kept free from
obstruction and contamination, such as fingerprints or cleaning solutions. When the
system detects that the stereo camera lenses are impaired, a malfunction indicator will be
displayed and EyeSight
®functions will not be available.
When you are in the vicinity of the EyeSight
®stereo cameras, always observe the following
precautions:
• Do not touch or attempt to clean the EyeSight
®camera lenses inside the vehicle. Extra
caution should be used when cleaning the inside of the windshield. Over-spray from
cleaning solutions may impair or even damage the camera lenses. Please inform others
who may attempt to clean the windshield, such as car wash staff, of this precaution.
• Electronic Toll Collection devices, such as EZPass
TM, must be installed in an area that
does not obstruct the stereo cameras' field of vision. See "Prohibited Area" on page 93.
• Adjust the rearview mirror so it does not obstruct the stereo cameras' field of vision.
• Do not install any interior rearview mirror accessories, such as a wide-type mirror or
hanging objects. Only approved Genuine SUBARU accessories may be installed.
For more detailed information, please refer to your EyeSight
®Owner’s Manual.
WINDSHIELD GLASS AND DASHBOARD
Since the characteristics and limitations of the EyeSight®stereo cameras are similar to
human eyes, it is important that the area in front of the cameras be kept free from dirt,
scratches, cracks, fogging, or accessories mounted to the windshield, hood or dashboard.
Visual impairments or reflections can affect EyeSight
®system performance. Extra caution
should be taken when cleaning the windshield to prevent over-spray from cleaning
solutions.
The image in the following section outlines those areas that must be kept clean and free
from obstruction. Please refer to the Owner’s Manual for a complete listing of limitations.
CARE AND LIMITATIONS
92
Page 98 of 132
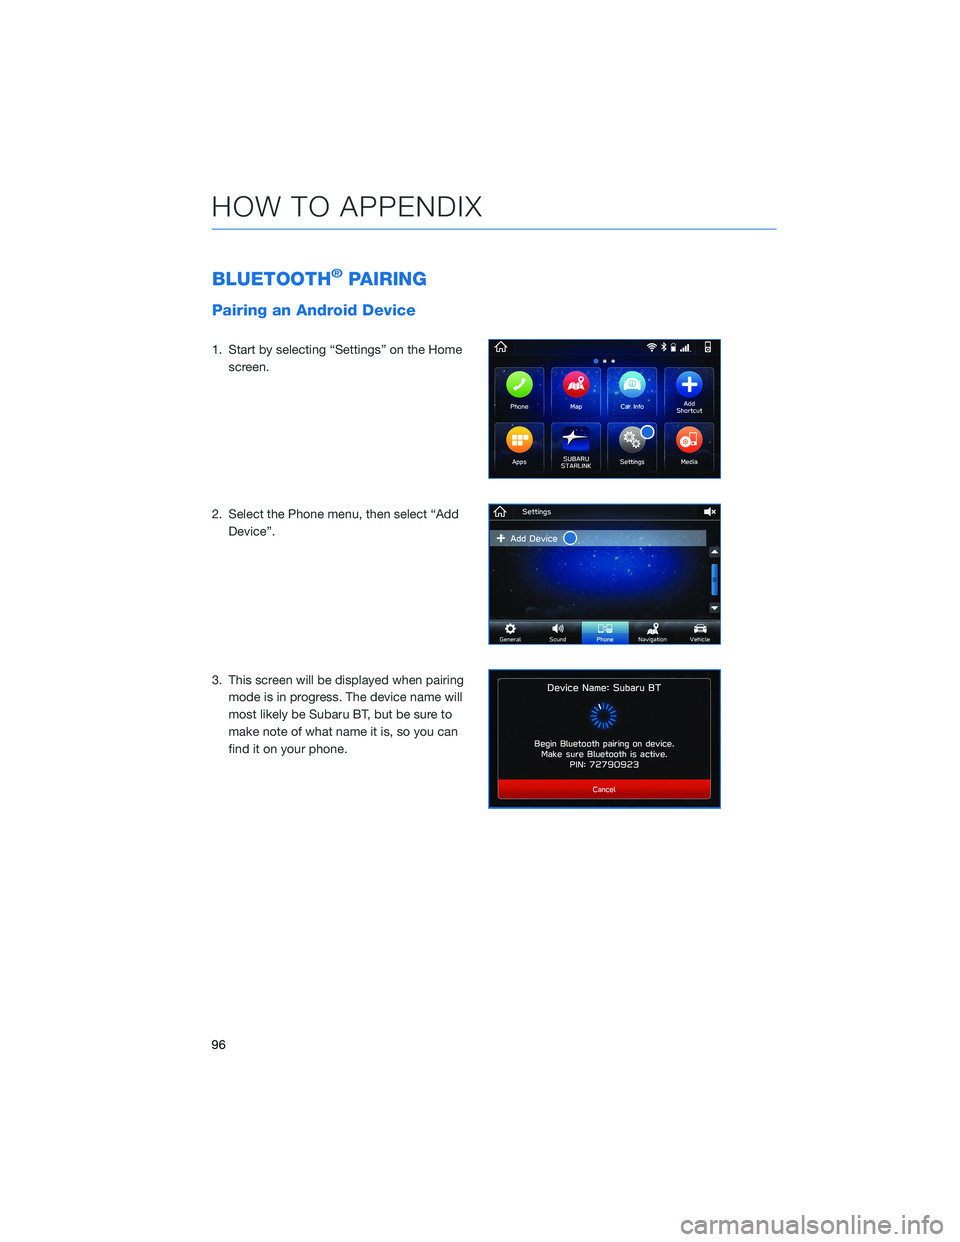
BLUETOOTH®PAIRING
Pairing an Android Device
1. Start by selecting “Settings” on the Home
screen.
2. Select the Phone menu, then select “Add
Device”.
3. This screen will be displayed when pairing
mode is in progress. The device name will
most likely be Subaru BT, but be sure to
make note of what name it is, so you can
find it on your phone.
HOW TO APPENDIX
96
Page 102 of 132
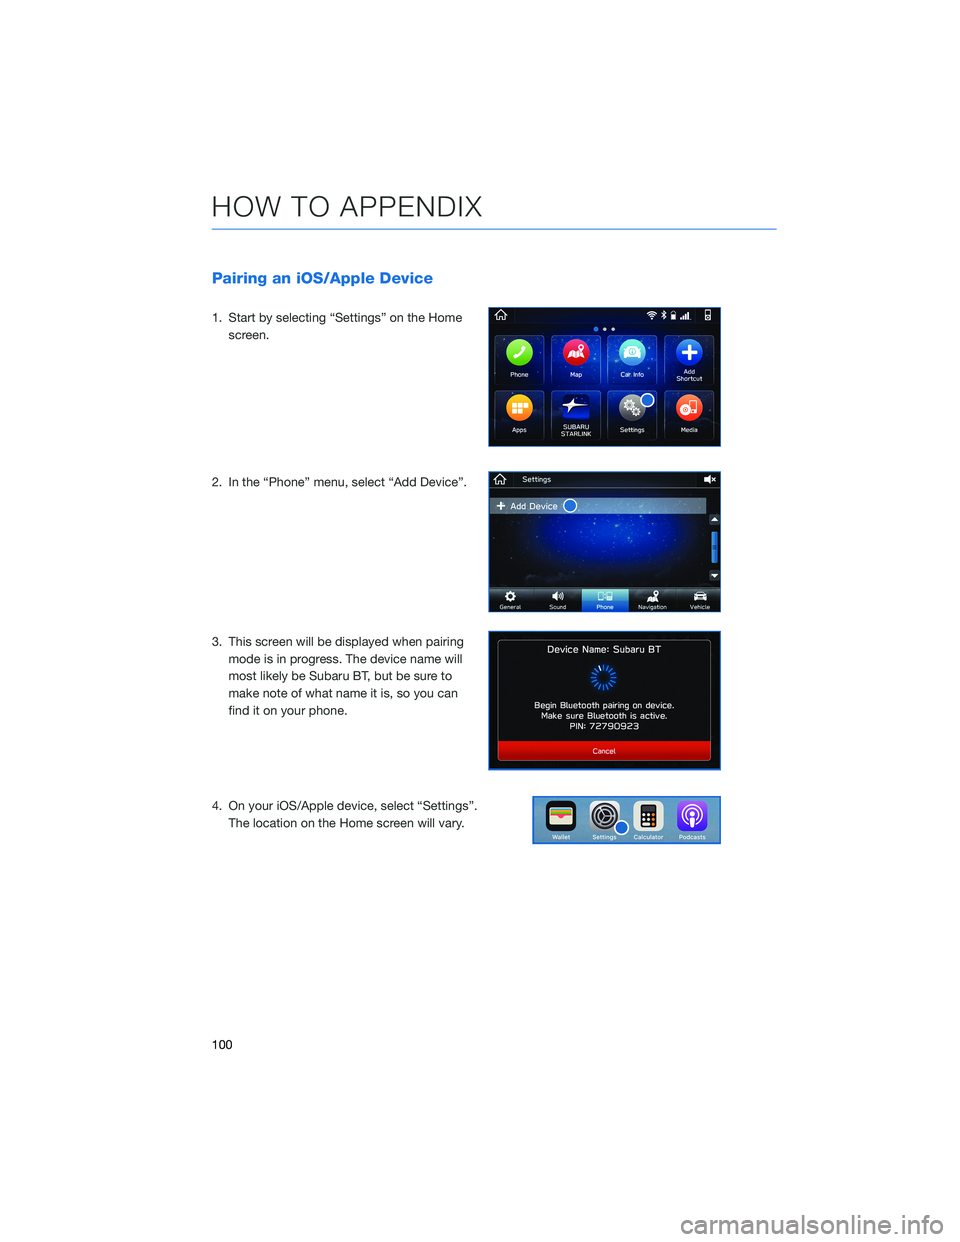
Pairing an iOS/Apple Device
1. Start by selecting “Settings” on the Home
screen.
2. In the “Phone” menu, select “Add Device”.
3. This screen will be displayed when pairing
mode is in progress. The device name will
most likely be Subaru BT, but be sure to
make note of what name it is, so you can
find it on your phone.
4. On your iOS/Apple device, select “Settings”.
The location on the Home screen will vary.
HOW TO APPENDIX
100
Page 110 of 132
Compatible Models
For a list of all the Apple phones that are compatible with Apple
CarPlay, visit:www.apple.com/ios/carplay/
WI-FI
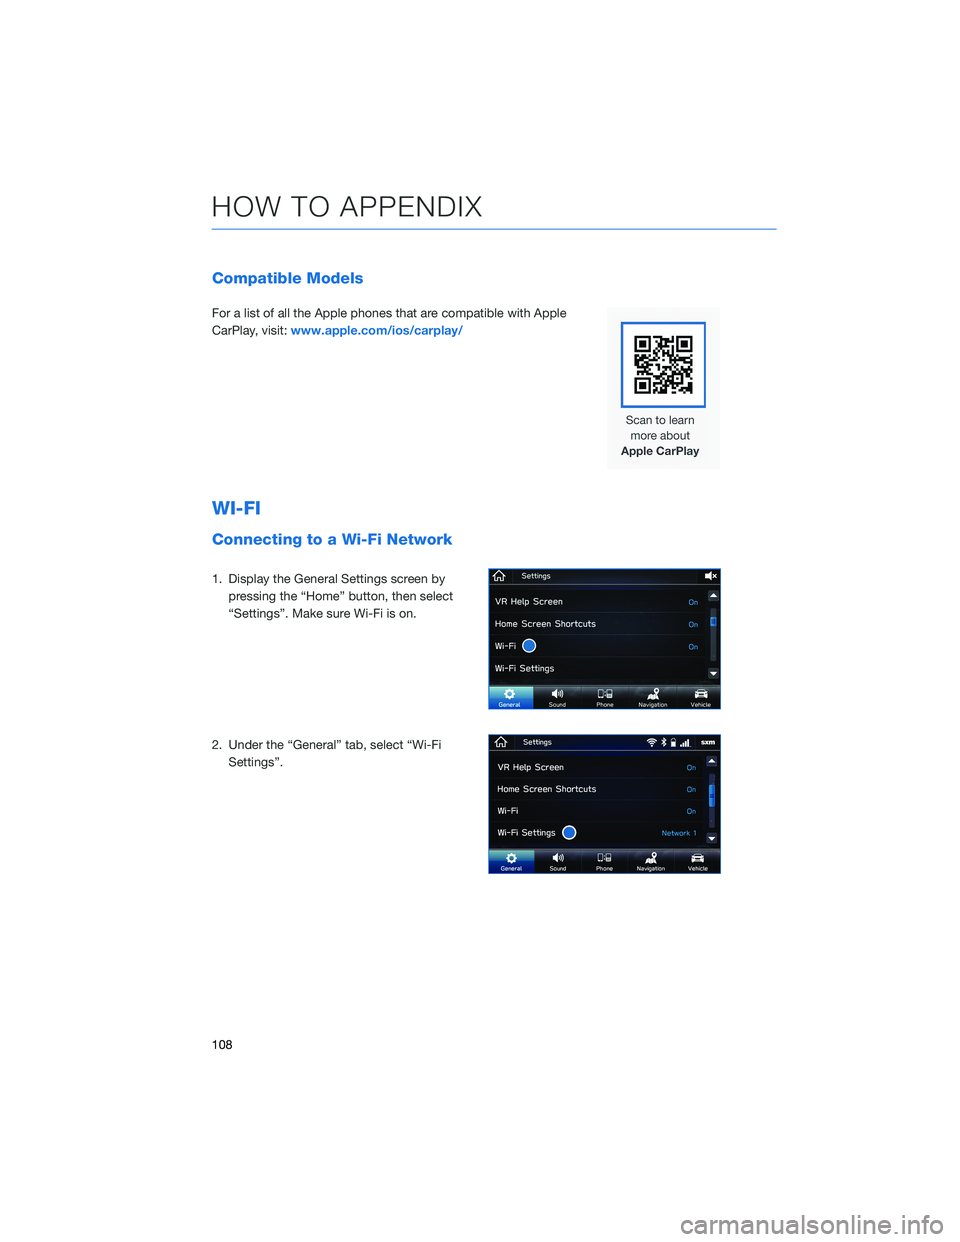
Connecting to a Wi-Fi Network
1. Display the General Settings screen by
pressing the “Home” button, then select
“Settings”. Make sure Wi-Fi is on.
2. Under the “General” tab, select “Wi-Fi
Settings”.
HOW TO APPENDIX
108
Page 113 of 132
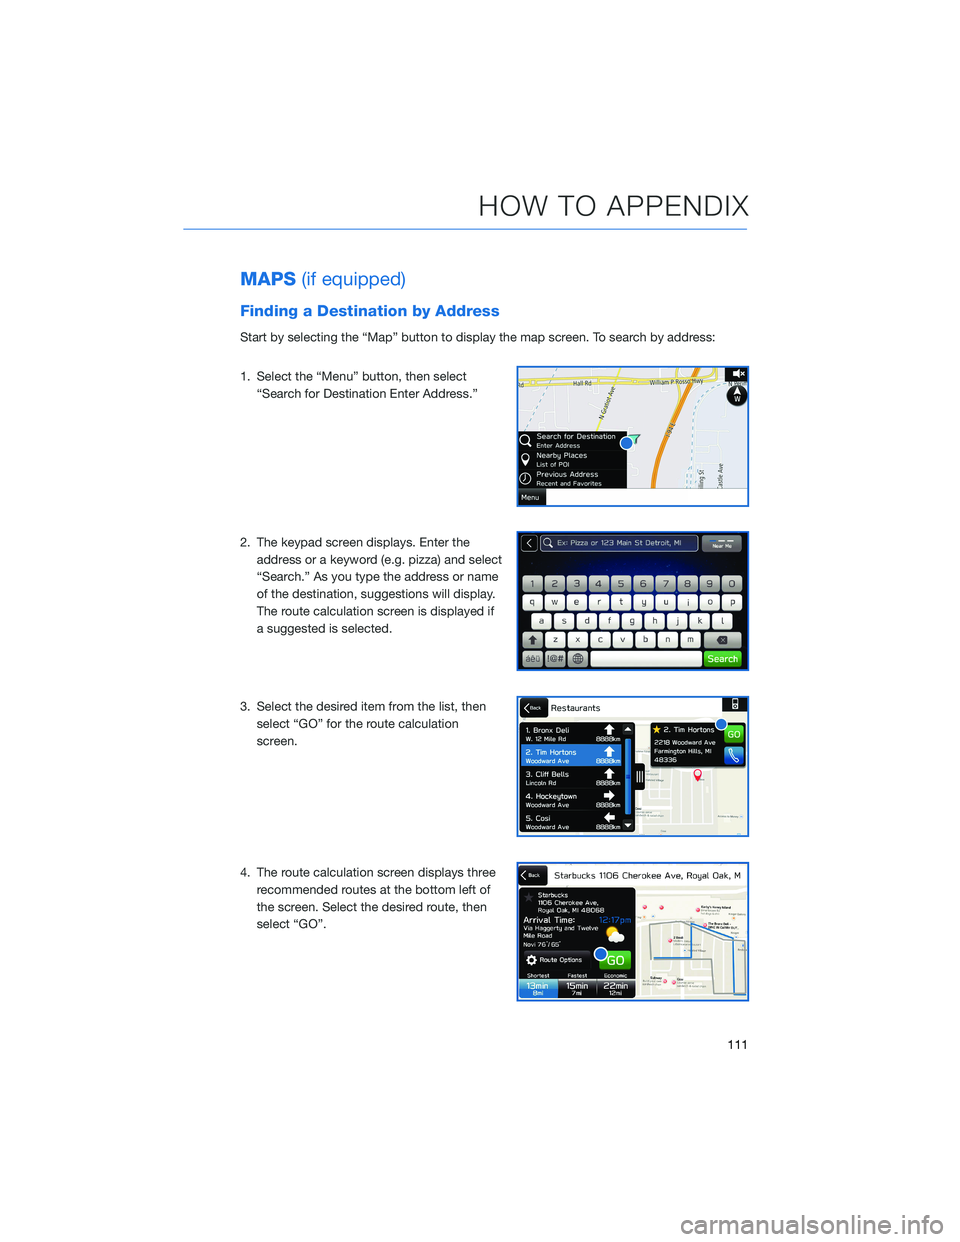
MAPS(if equipped)
Finding a Destination by Address
Start by selecting the “Map” button to display the map screen. To search by address:
1. Select the “Menu” button, then select
“Search for Destination Enter Address.”
2. The keypad screen displays. Enter the
address or a keyword (e.g. pizza) and select
“Search.” As you type the address or name
of the destination, suggestions will display.
The route calculation screen is displayed if
a suggested is selected.
3. Select the desired item from the list, then
select “GO” for the route calculation
screen.
4. The route calculation screen displays three
recommended routes at the bottom left of
the screen. Select the desired route, then
select “GO”.
HOW TO APPENDIX
111
Page 114 of 132
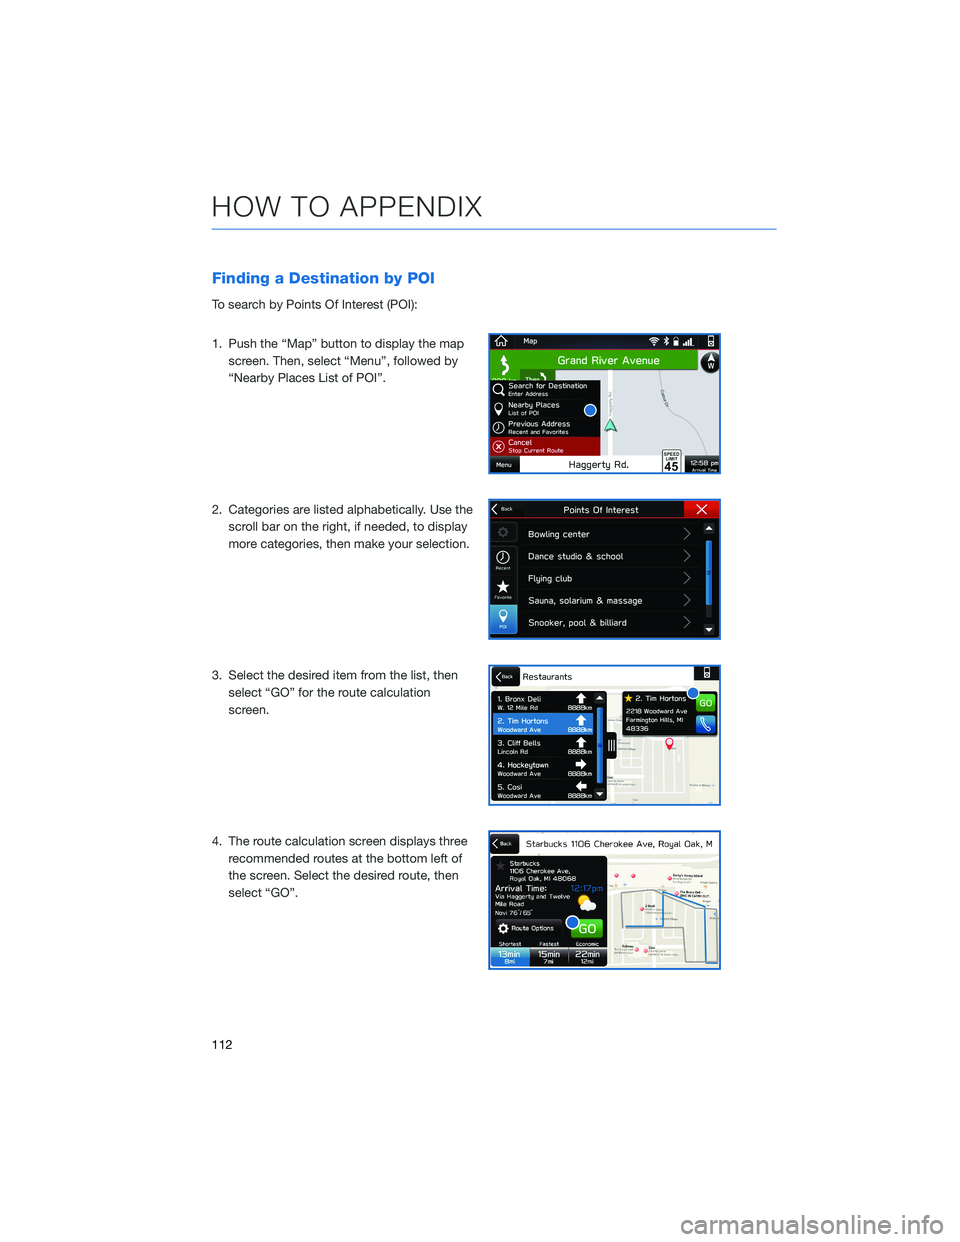
Finding a Destination by POI
To search by Points Of Interest (POI):
1. Push the “Map” button to display the map
screen. Then, select “Menu”, followed by
“Nearby Places List of POI”.
2. Categories are listed alphabetically. Use the
scroll bar on the right, if needed, to display
more categories, then make your selection.
3. Select the desired item from the list, then
select “GO” for the route calculation
screen.
4. The route calculation screen displays three
recommended routes at the bottom left of
the screen. Select the desired route, then
select “GO”.
HOW TO APPENDIX
112
Page 117 of 132
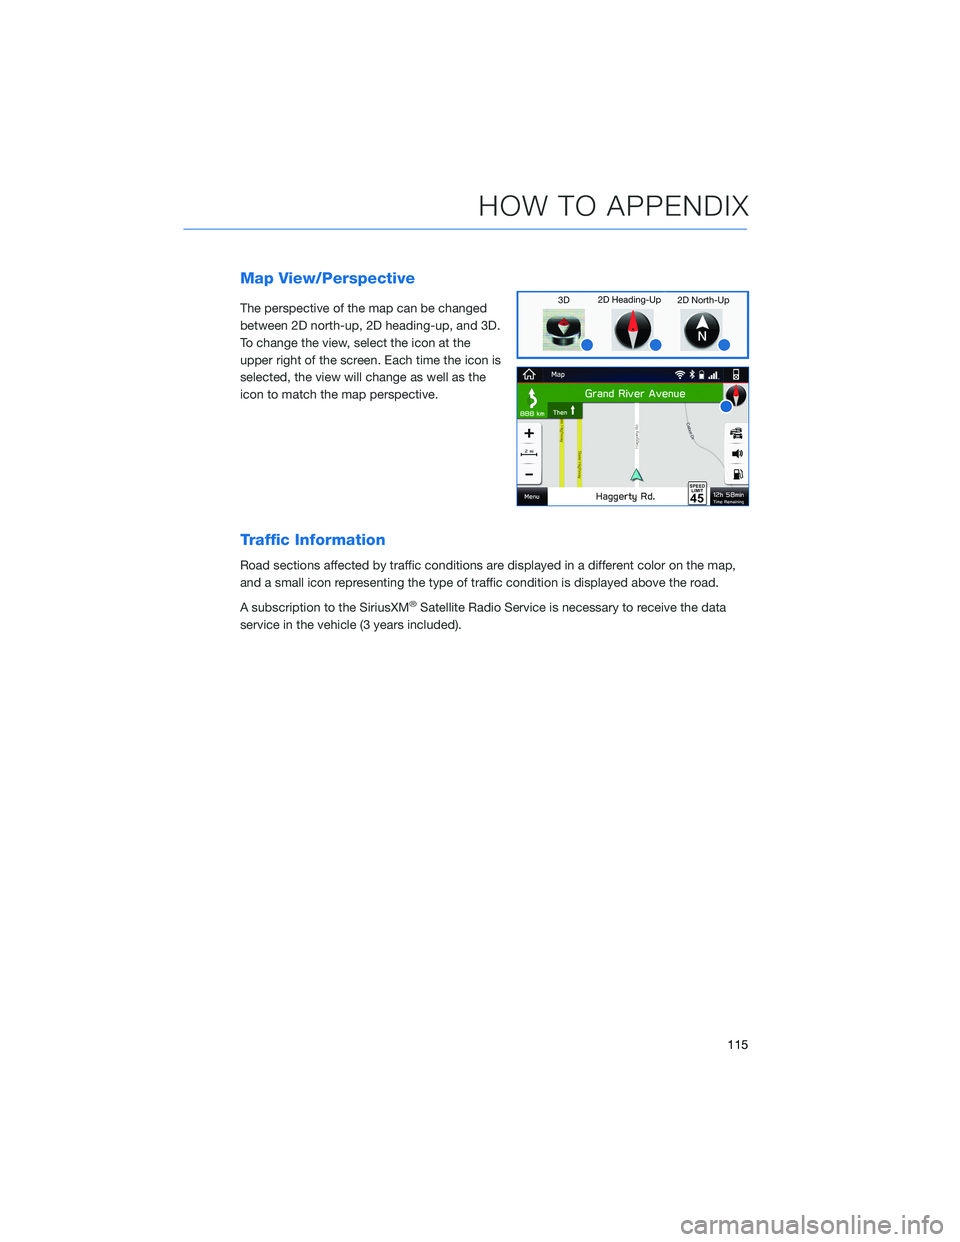
Map View/Perspective
The perspective of the map can be changed
between 2D north-up, 2D heading-up, and 3D.
To change the view, select the icon at the
upper right of the screen. Each time the icon is
selected, the view will change as well as the
icon to match the map perspective.
Traffic Information
Road sections affected by traffic conditions are displayed in a different color on the map,
and a small icon representing the type of traffic condition is displayed above the road.
A subscription to the SiriusXM
®Satellite Radio Service is necessary to receive the data
service in the vehicle (3 years included).
HOW TO APPENDIX
115
Page 118 of 132
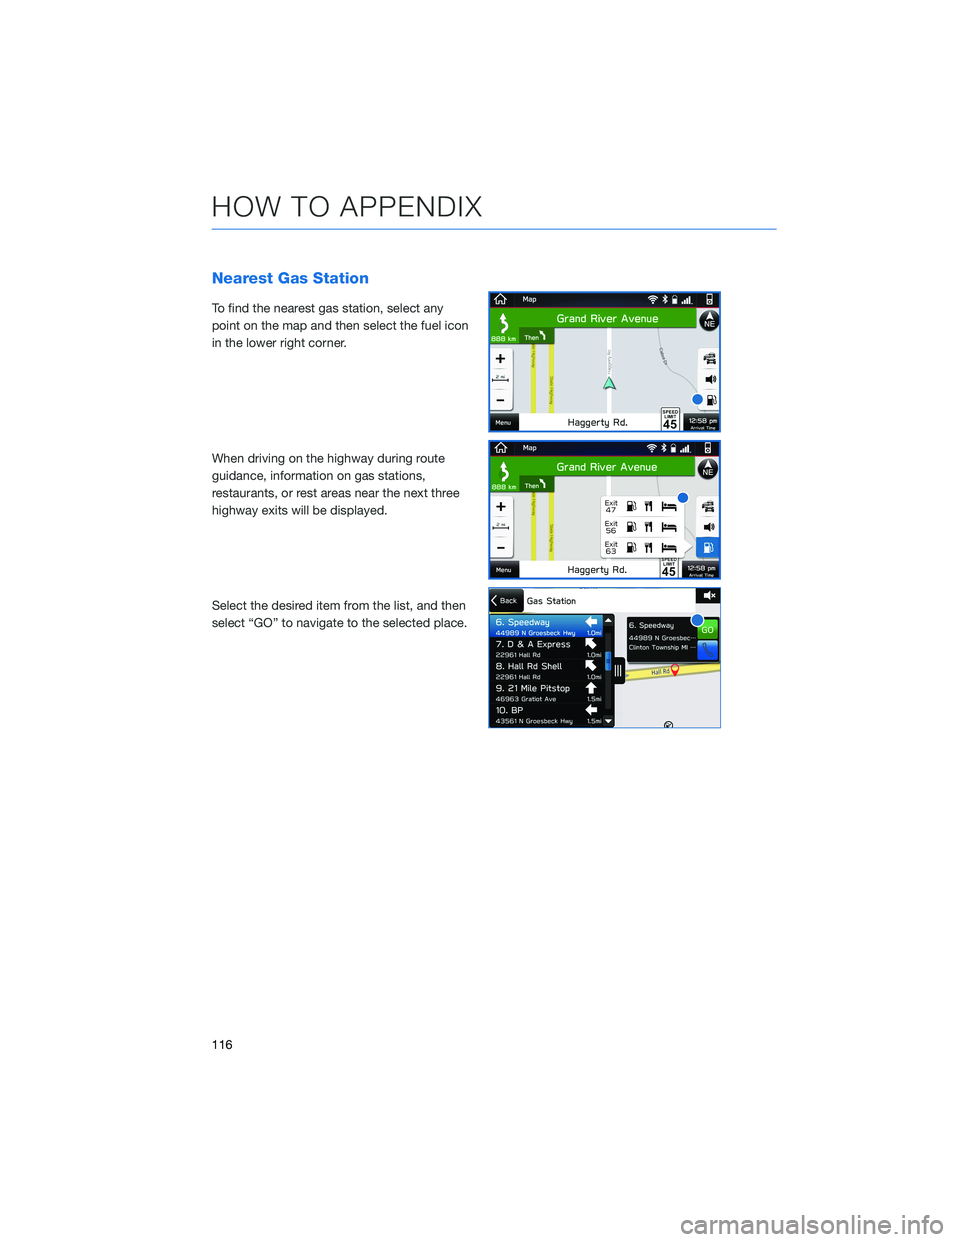
Nearest Gas Station
To find the nearest gas station, select any
point on the map and then select the fuel icon
in the lower right corner.
When driving on the highway during route
guidance, information on gas stations,
restaurants, or rest areas near the next three
highway exits will be displayed.
Select the desired item from the list, and then
select “GO” to navigate to the selected place.
HOW TO APPENDIX
116
Page 119 of 132
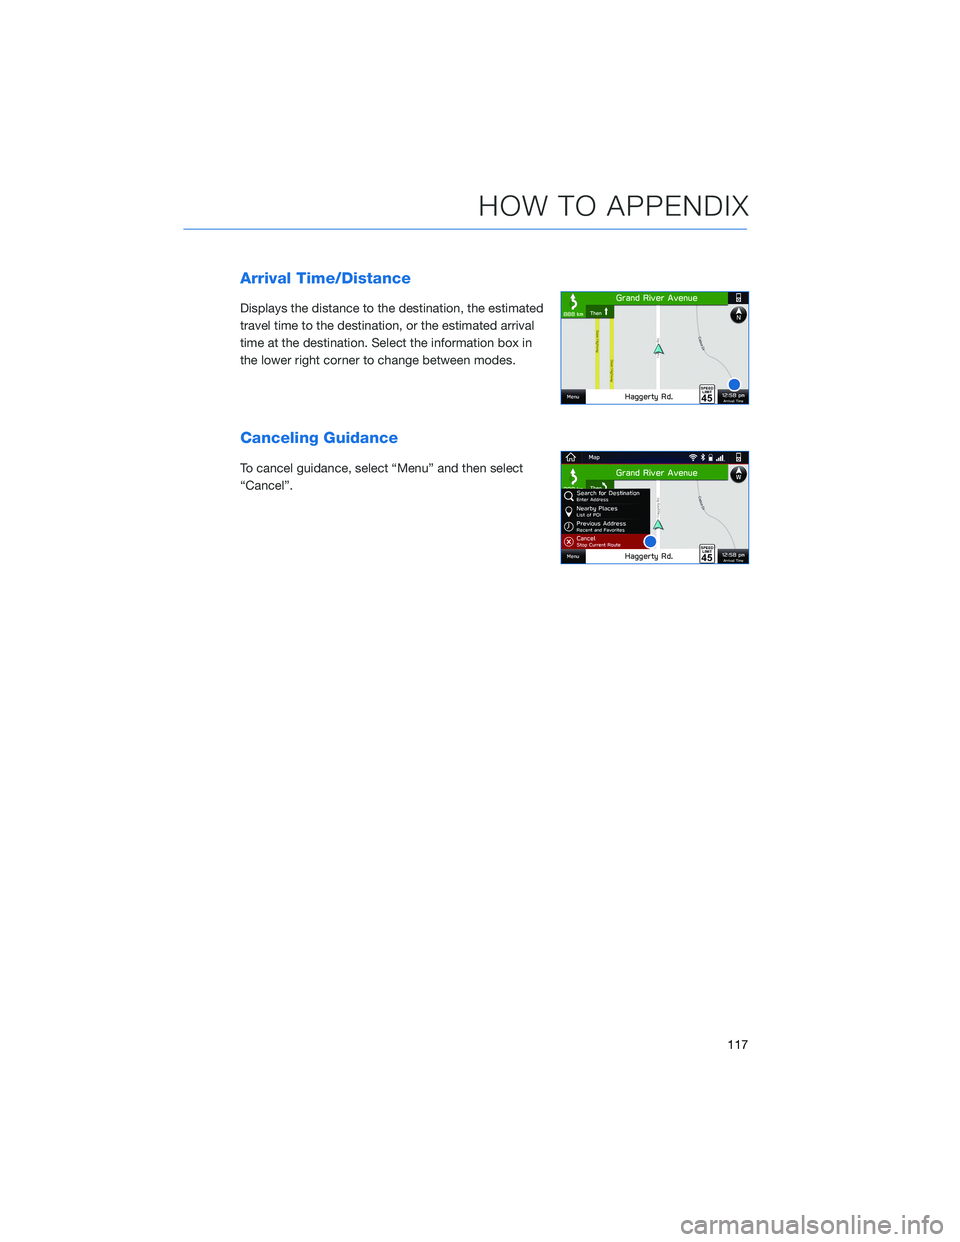
Arrival Time/Distance
Displays the distance to the destination, the estimated
travel time to the destination, or the estimated arrival
time at the destination. Select the information box in
the lower right corner to change between modes.
Canceling Guidance
To cancel guidance, select “Menu” and then select
“Cancel”.
HOW TO APPENDIX
117
Page 121 of 132
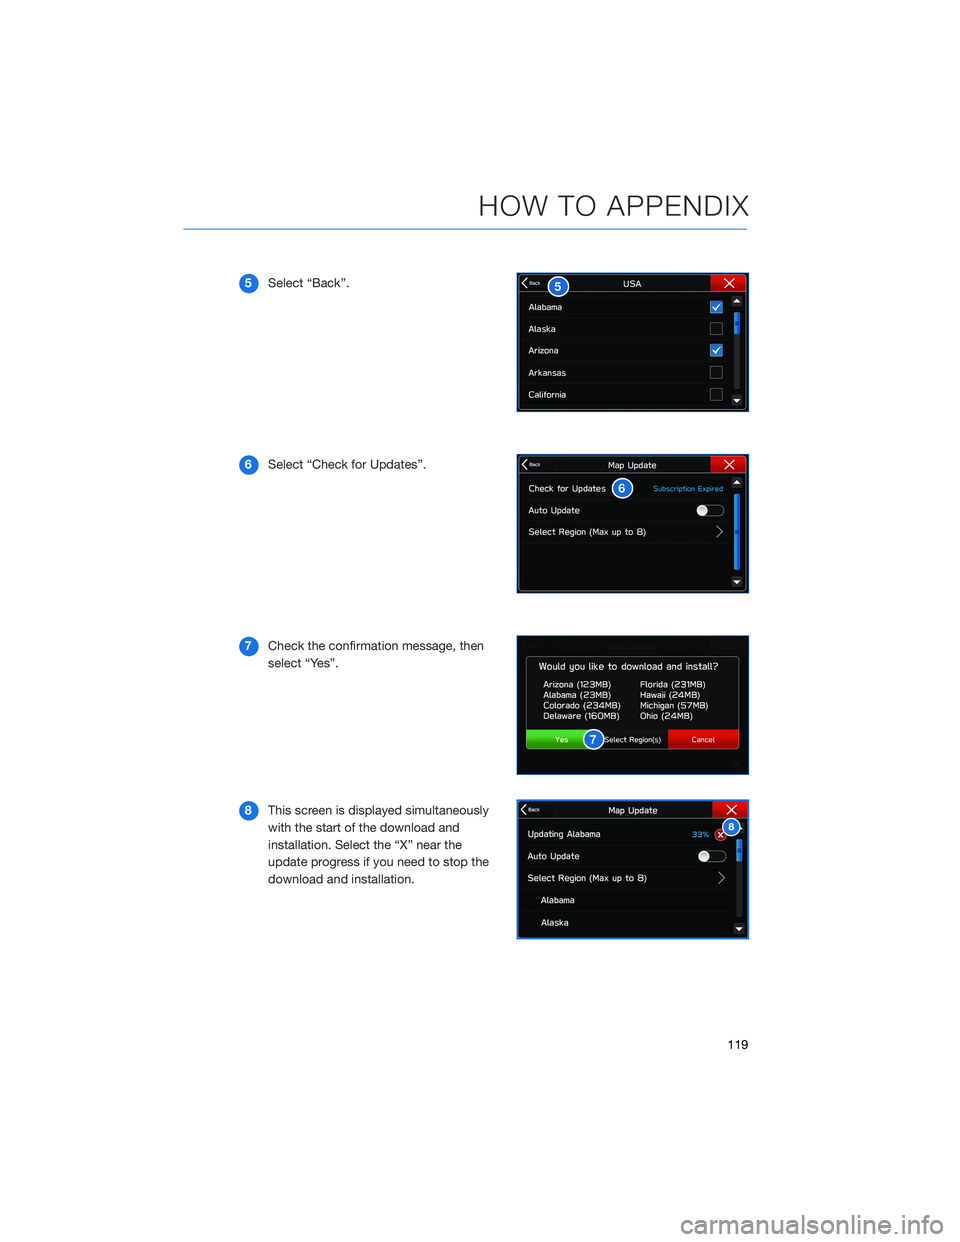
5Select “Back”.
6Select “Check for Updates”.
7Check the confirmation message, then
select “Yes”.
8This screen is displayed simultaneously
with the start of the download and
installation. Select the “X” near the
update progress if you need to stop the
download and installation.
HOW TO APPENDIX
119