buttons SUBARU CROSSTREK 2022 Getting Started Guide
[x] Cancel search | Manufacturer: SUBARU, Model Year: 2022, Model line: CROSSTREK, Model: SUBARU CROSSTREK 2022Pages: 132, PDF Size: 33.54 MB
Page 4 of 132
PASSENGER/CARGO AREAS
FOLDING THE REAR SEATS...39
CHILD SAFETY LOCKS.......39
LATCH/ANCHOR............40
REAR SEAT REMINDER.......41
CARGO COVER.............41
SPARE TIRE AND JACK.......42
ENGINE COMPARTMENT
HOOD PROP................43
2.0L OR 2.5L ENGINE.........44
ADDITIONAL SPECIFICATIONS
NEW VEHICLE BREAK-IN......45
ENGINE OIL................45
ENGINE OIL CAPACITY.......45
ROOF RAIL CAPACITY.......46
TRAILER TOWING CAPACITY . . 46
TIRE PRESSURE MONITORING
SYSTEM (TPMS).............47
STARLINK OVERVIEW
OVERVIEW OF YOUR MULTIMEDIA
SYSTEM...................49
BUTTONS..................50
TOUCHSCREEN.............52
STEERING WHEEL CONTROLS . . 53
VOICE RECOGNITION........54
STARLINK HOME
HOME SCREEN ICONS.......56
REARRANGING ICONS.......56
ADDING SHORTCUTS........57
DRIVER PROFILE
CREATING A DRIVER
PROFILE...................58
MULTIMEDIA
RADIO.....................60
MEDIA.....................61
PHONE
PAIRING A PHONE...........62
MAKING A CALL.............62
RECEIVING A CALL..........63
TEXT MESSAGES............64
APPS
SUBARU STARLINK®IN-VEHICLE
APPS......................65SUBARU STARLINK
®MOBILE
APP.......................67
MYSUBARU................68
MAPS (if equipped)
MAPS OVERVIEW............69
CREATING HOME AND WORK
PROFILES..................69
STARLINK SAFETY AND
SECURITY
SAFETY AND SECURITY
OVERVIEW.................70
ENROLLMENT..............71
MYSUBARU INTEGRATION....71
SUBARU STARLINK
®WI-FI
HOTSPOT..................72
SETTINGS AND UPDATES
SETTINGS AND UPDATES
OVERVIEW.................73
SOUND....................74
PHONE....................74
MAPS/NAVIGATION..........75
CLOCK....................76
EYESIGHT
EYESIGHT®OVERVIEW.......79
OPERATION................79
FUNCTIONS................80
STEERING WHEEL
CONTROLS.................86
LANE DEPARTURE WARNING AND
PRE-COLLISION BRAKING
SYSTEM OFF SWITCHES......87
DRIVER ASSIST
TECHNOLOGIES
REAR-VISION CAMERA.......88
BLIND SPOT DETECTION (BSD) /
REAR CROSS TRAFFIC ALERT
(RCTA)....................88
HIGH BEAM ASSIST (HBA)....90
STEERING RESPONSIVE
HEADLIGHTS (SRH)..........90
REVERSE AUTOMATIC BRAKING
(RAB).....................90
TABLE OF CONTENTS
2
Page 7 of 132
IN CASE OF EMERGENCY
SUBARU STARLINK®Safety and Security(subscription required)
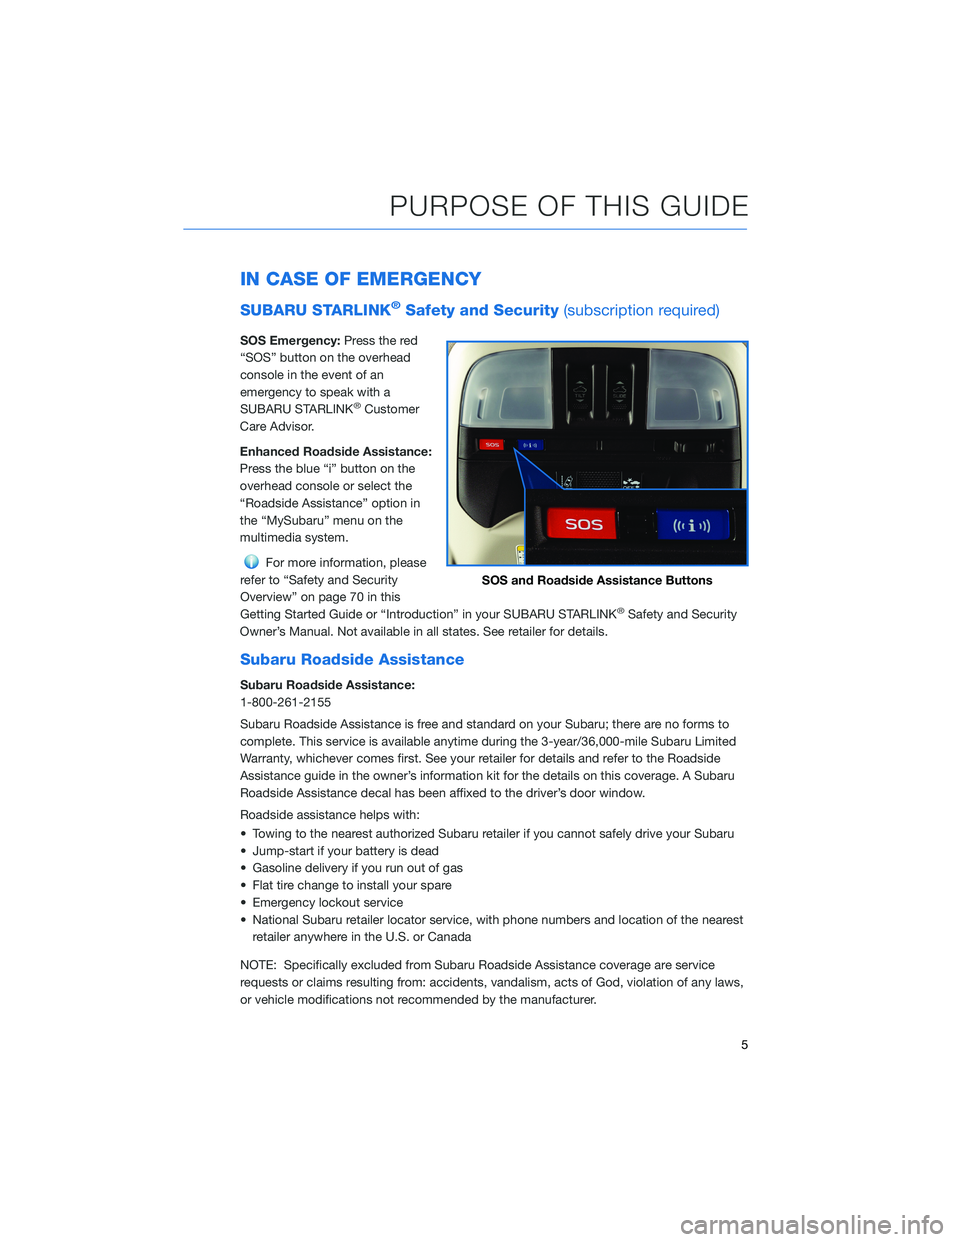
SOS Emergency:Press the red
“SOS” button on the overhead
console in the event of an
emergency to speak with a
SUBARU STARLINK
®Customer
Care Advisor.
Enhanced Roadside Assistance:
Press the blue “i” button on the
overhead console or select the
“Roadside Assistance” option in
the “MySubaru” menu on the
multimedia system.
For more information, please
refer to “Safety and Security
Overview” on page 70 in this
Getting Started Guide or “Introduction” in your SUBARU STARLINK
®Safety and Security
Owner’s Manual. Not available in all states. See retailer for details.
Subaru Roadside Assistance
Subaru Roadside Assistance:
1-800-261-2155
Subaru Roadside Assistance is free and standard on your Subaru; there are no forms to
complete. This service is available anytime during the 3-year/36,000-mile Subaru Limited
Warranty, whichever comes first. See your retailer for details and refer to the Roadside
Assistance guide in the owner’s information kit for the details on this coverage. A Subaru
Roadside Assistance decal has been affixed to the driver’s door window.
Roadside assistance helps with:
• Towing to the nearest authorized Subaru retailer if you cannot safely drive your Subaru
• Jump-start if your battery is dead
• Gasoline delivery if you run out of gas
• Flat tire change to install your spare
• Emergency lockout service
• National Subaru retailer locator service, with phone numbers and location of the nearest
retailer anywhere in the U.S. or Canada
NOTE: Specifically excluded from Subaru Roadside Assistance coverage are service
requests or claims resulting from: accidents, vandalism, acts of God, violation of any laws,
or vehicle modifications not recommended by the manufacturer.
SOS and Roadside Assistance Buttons
PURPOSE OF THIS GUIDE
5
Page 26 of 132
REAR VIEW MIRROR
Auto-dimming Mirror(if equipped)
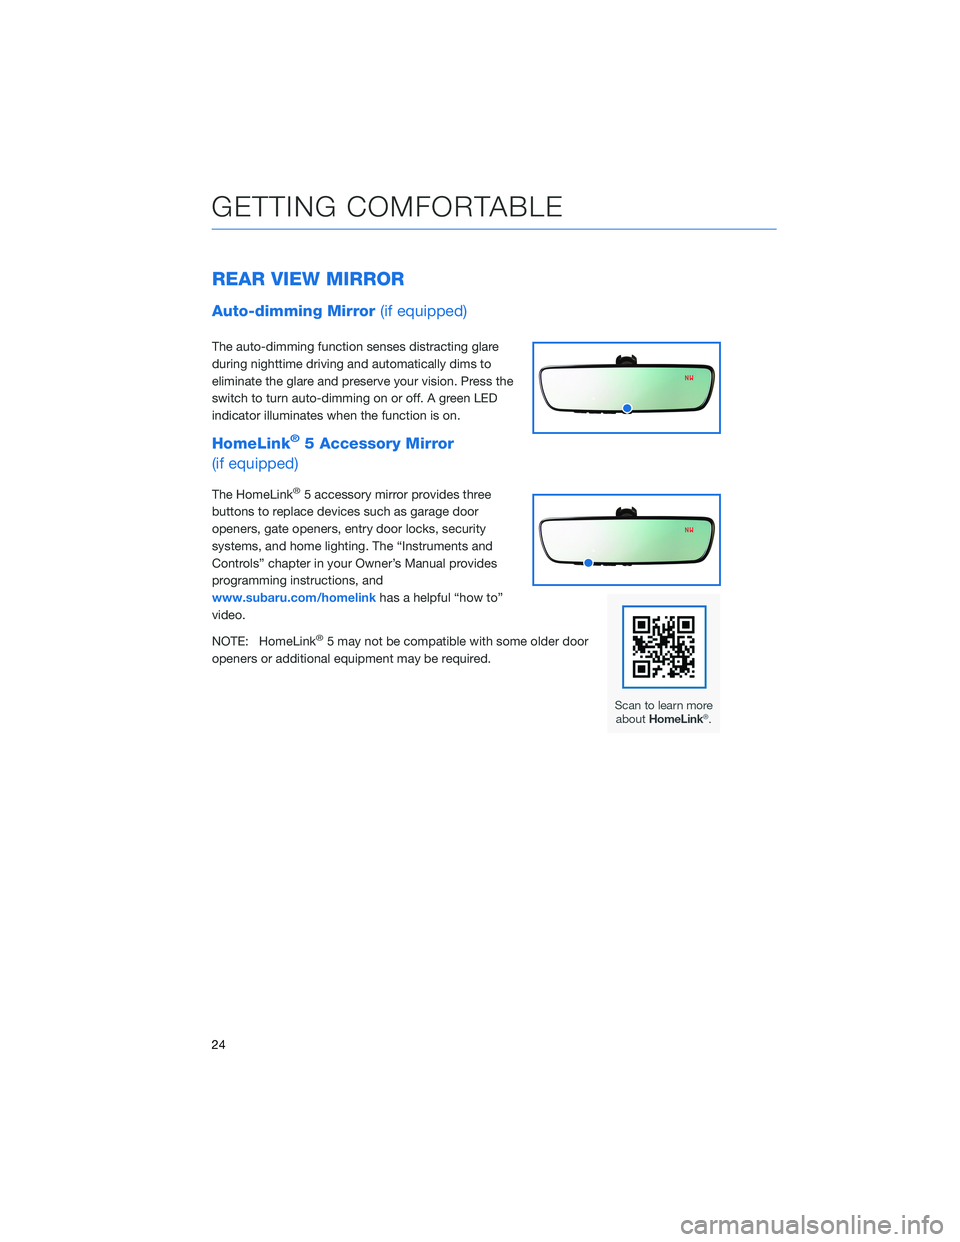
The auto-dimming function senses distracting glare
during nighttime driving and automatically dims to
eliminate the glare and preserve your vision. Press the
switch to turn auto-dimming on or off. A green LED
indicator illuminates when the function is on.
HomeLink®5 Accessory Mirror
(if equipped)
The HomeLink®5 accessory mirror provides three
buttons to replace devices such as garage door
openers, gate openers, entry door locks, security
systems, and home lighting. The “Instruments and
Controls” chapter in your Owner’s Manual provides
programming instructions, and
www.subaru.com/homelinkhas a helpful “how to”
video.
NOTE: HomeLink
®5 may not be compatible with some older door
openers or additional equipment may be required.
GETTING COMFORTABLE
24
Page 28 of 132
CLIMATE CONTROL
Automatic Climate Control
Set your desired temperature and let the system automatically make the adjustments for
you. At any time, you can manually take control of the climate settings.
Operation in Automatic Mode
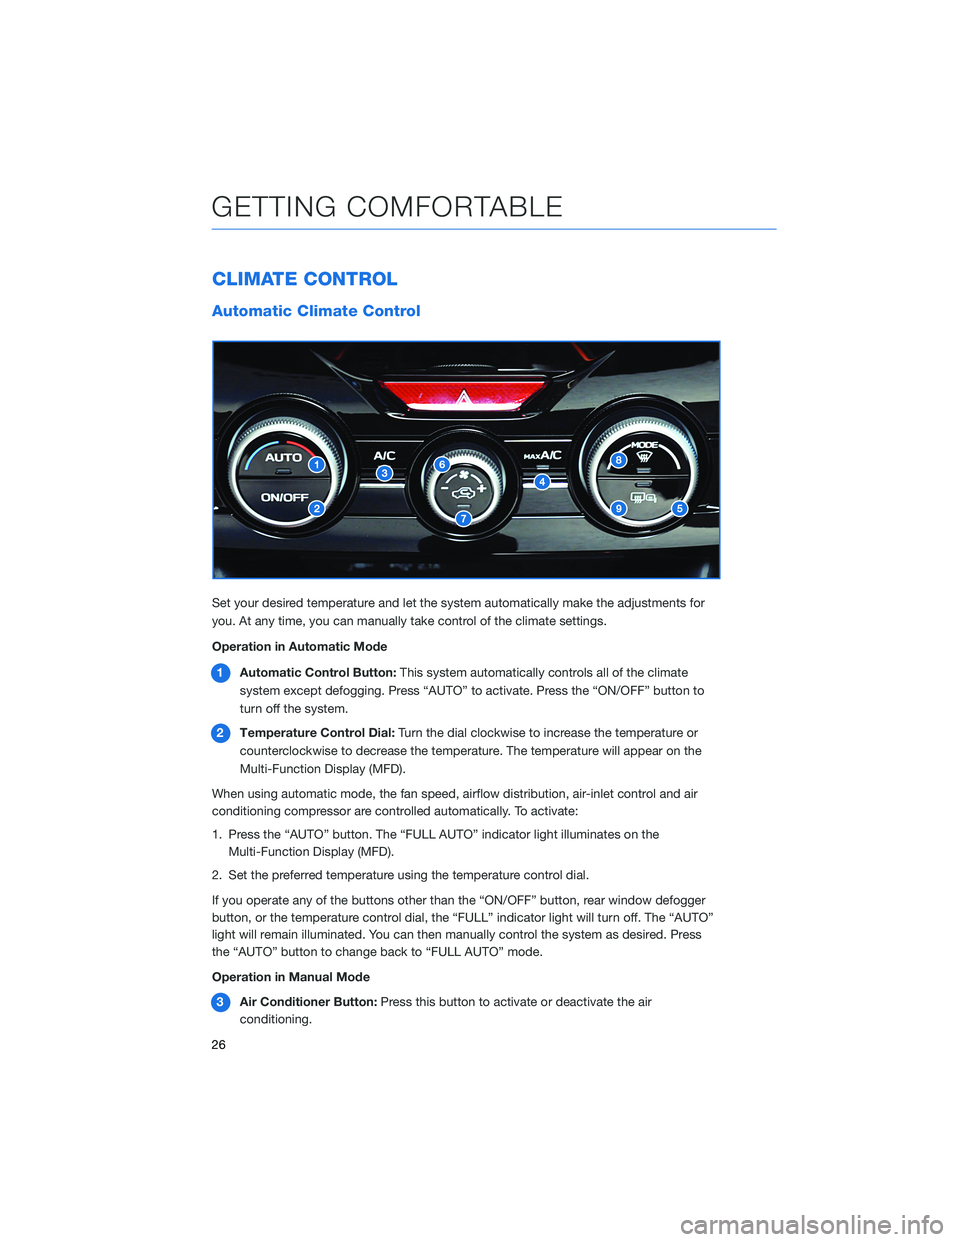
1Automatic Control Button:This system automatically controls all of the climate
system except defogging. Press “AUTO” to activate. Press the “ON/OFF” button to
turn off the system.
2Temperature Control Dial:Turn the dial clockwise to increase the temperature or
counterclockwise to decrease the temperature. The temperature will appear on the
Multi-Function Display (MFD).
When using automatic mode, the fan speed, airflow distribution, air-inlet control and air
conditioning compressor are controlled automatically. To activate:
1. Press the “AUTO” button. The “FULL AUTO” indicator light illuminates on the
Multi-Function Display (MFD).
2. Set the preferred temperature using the temperature control dial.
If you operate any of the buttons other than the “ON/OFF” button, rear window defogger
button, or the temperature control dial, the “FULL” indicator light will turn off. The “AUTO”
light will remain illuminated. You can then manually control the system as desired. Press
the “AUTO” button to change back to “FULL AUTO” mode.
Operation in Manual Mode
3Air Conditioner Button:Press this button to activate or deactivate the air
conditioning.
GETTING COMFORTABLE
26
Page 52 of 132
BUTTONS
Radio Functions
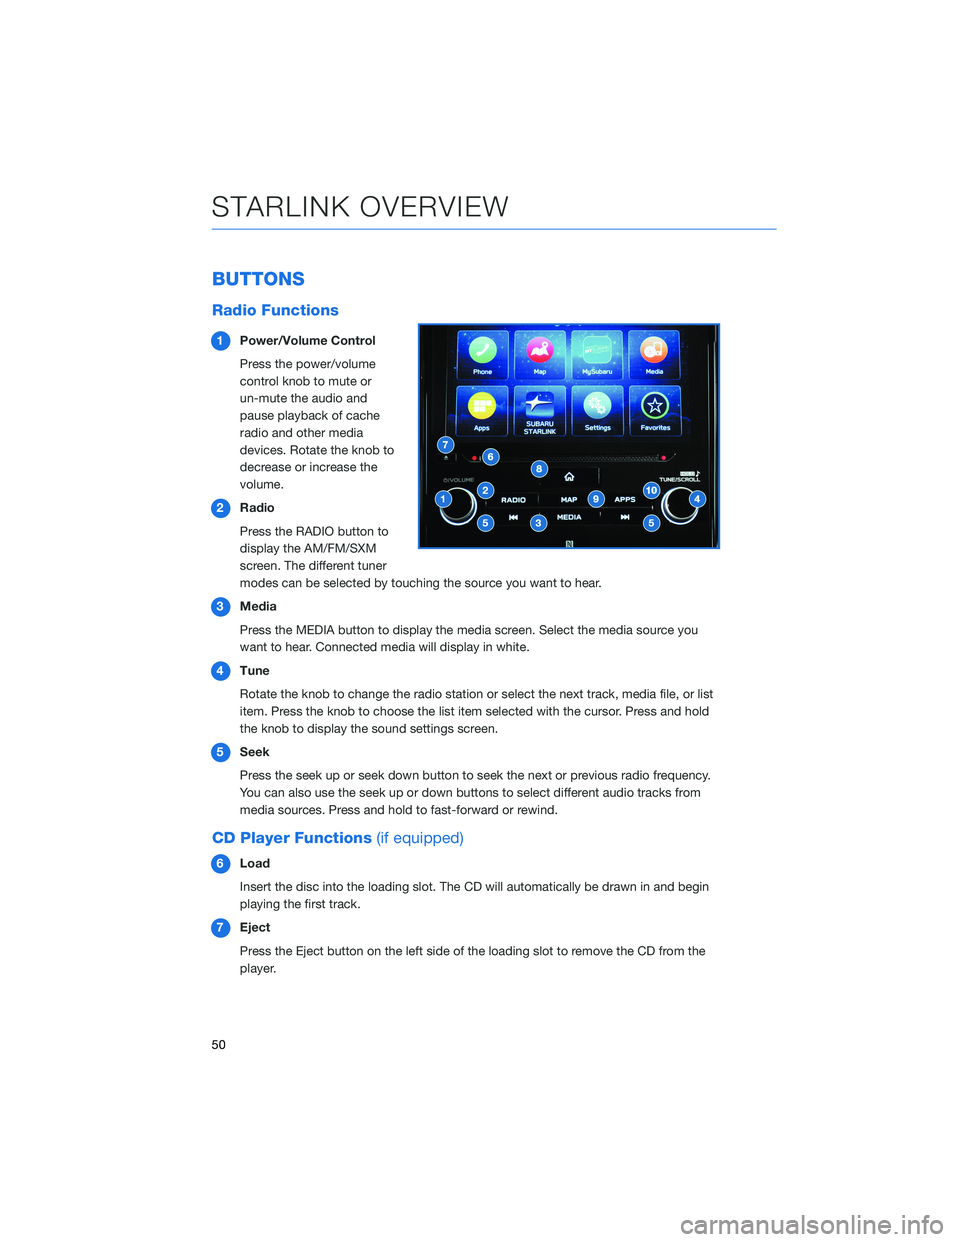
1Power/Volume Control
Press the power/volume
control knob to mute or
un-mute the audio and
pause playback of cache
radio and other media
devices. Rotate the knob to
decrease or increase the
volume.
2Radio
Press the RADIO button to
display the AM/FM/SXM
screen. The different tuner
modes can be selected by touching the source you want to hear.
3Media
Press the MEDIA button to display the media screen. Select the media source you
want to hear. Connected media will display in white.
4Tune
Rotate the knob to change the radio station or select the next track, media file, or list
item. Press the knob to choose the list item selected with the cursor. Press and hold
the knob to display the sound settings screen.
5Seek
Press the seek up or seek down button to seek the next or previous radio frequency.
You can also use the seek up or down buttons to select different audio tracks from
media sources. Press and hold to fast-forward or rewind.
CD Player Functions(if equipped)
6Load
Insert the disc into the loading slot. The CD will automatically be drawn in and begin
playing the first track.
7Eject
Press the Eject button on the left side of the loading slot to remove the CD from the
player.
STARLINK OVERVIEW
50
Page 72 of 132
SAFETY AND SECURITY OVERVIEW
STARLINK®Safety and Security services* are designed to help in your time of need. These
include Advanced Automatic Collision Notification, SOS Emergency Assistance, Enhanced
Roadside Assistance, Stolen Vehicle Recovery, the added convenience of Remote Engine
Start with Climate Control, and so much more.
With the SUBARU STARLINK
®system integrated into your vehicle, advanced safety and
security technology is just a button press away. The SUBARU STARLINK®experience
includes in-vehicle call center support, maintenance and diagnostic alerts as well as
remote services that keep you connected to your Subaru vehicle.
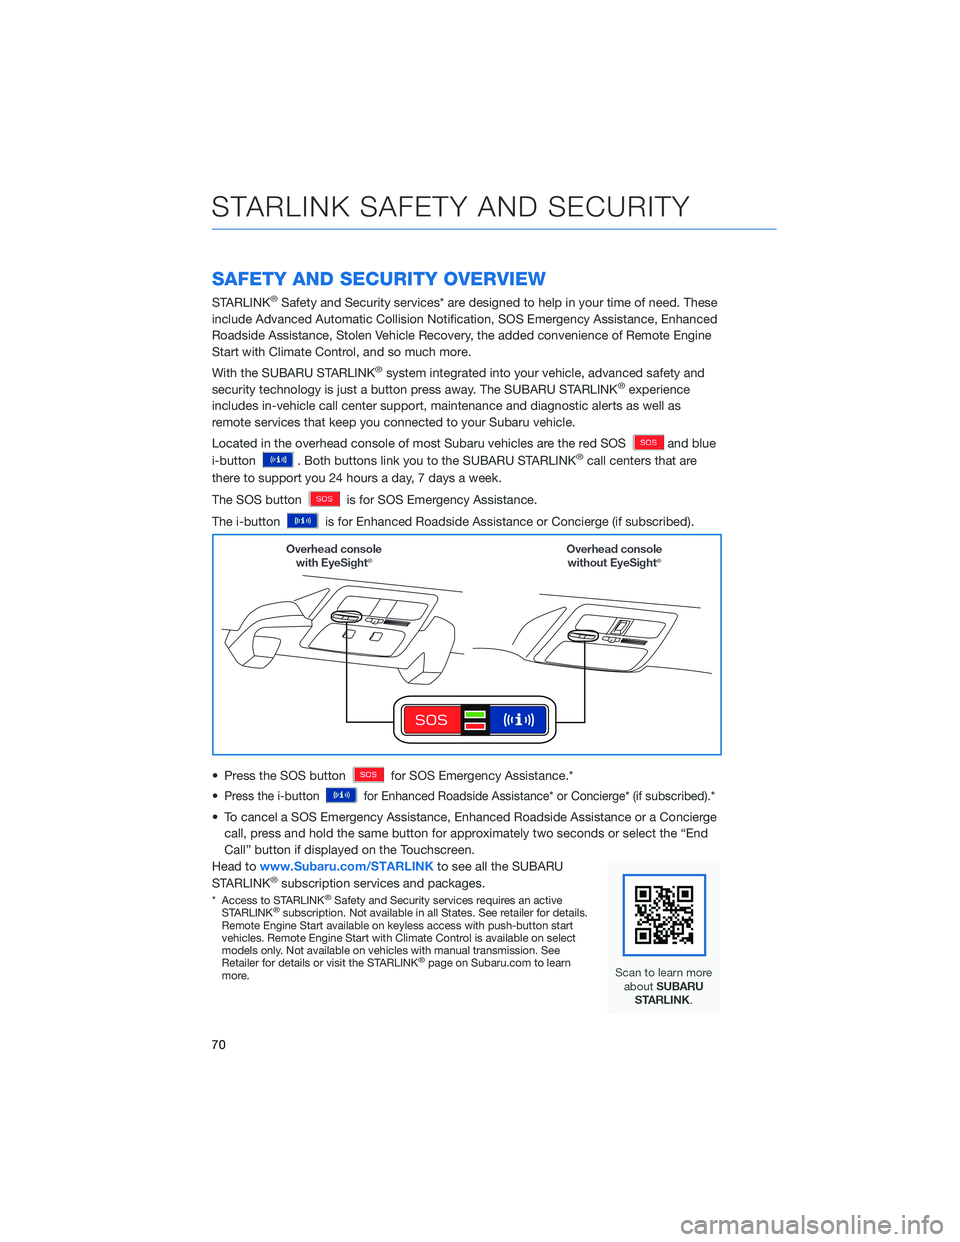
Located in the overhead console of most Subaru vehicles are the red SOS
and blue
i-button
. Both buttons link you to the SUBARU STARLINK®call centers that are
there to support you 24 hours a day, 7 days a week.
The SOS button
is for SOS Emergency Assistance.
The i-button
is for Enhanced Roadside Assistance or Concierge (if subscribed).
• Press the SOS button
for SOS Emergency Assistance.*
•
Press the i-buttonfor Enhanced Roadside Assistance* or Concierge* (if subscribed).*
• To cancel a SOS Emergency Assistance, Enhanced Roadside Assistance or a Concierge
call, press and hold the same button for approximately two seconds or select the “End
Call” button if displayed on the Touchscreen.
Head towww.Subaru.com/STARLINKto see all the SUBARU
STARLINK
®subscription services and packages.
* Access to STARLINK®Safety and Security services requires an active
STARLINK®subscription. Not available in all States. See retailer for details.
Remote Engine Start available on keyless access with push-button start
vehicles. Remote Engine Start with Climate Control is available on select
models only. Not available on vehicles with manual transmission. See
Retailer for details or visit the STARLINK
®page on Subaru.com to learn
more.
STARLINK SAFETY AND SECURITY
70
Page 79 of 132
Manually
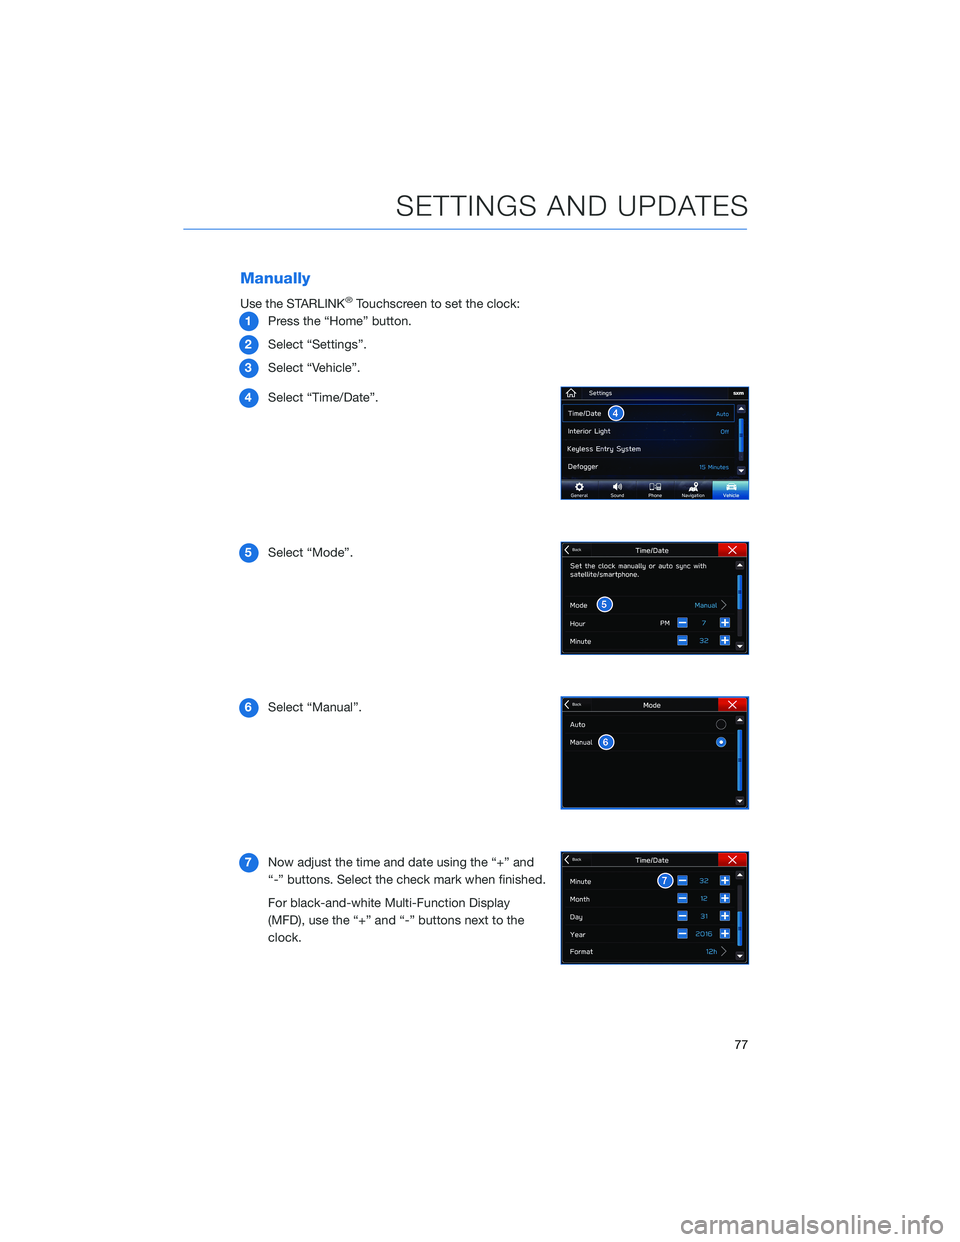
Use the STARLINK®Touchscreen to set the clock:
1Press the “Home” button.
2Select “Settings”.
3Select “Vehicle”.
4Select “Time/Date”.
5Select “Mode”.
6Select “Manual”.
7Now adjust the time and date using the “+” and
“-” buttons. Select the check mark when finished.
For black-and-white Multi-Function Display
(MFD), use the “+” and “-” buttons next to the
clock.
SETTINGS AND UPDATES
77
Page 85 of 132
Advanced Adaptive Cruise Control with Lane Centering
Advanced Adaptive Cruise Control is a driving support system intended to reduce the
burden on you when driving on an expressway (including during congestion and when
driving at high speed). Advanced Adaptive Cruise Control and Lane Centering work
together to assist you by automatically controlling the accelerator, brake, and steering.
Advanced Adaptive Cruise Control
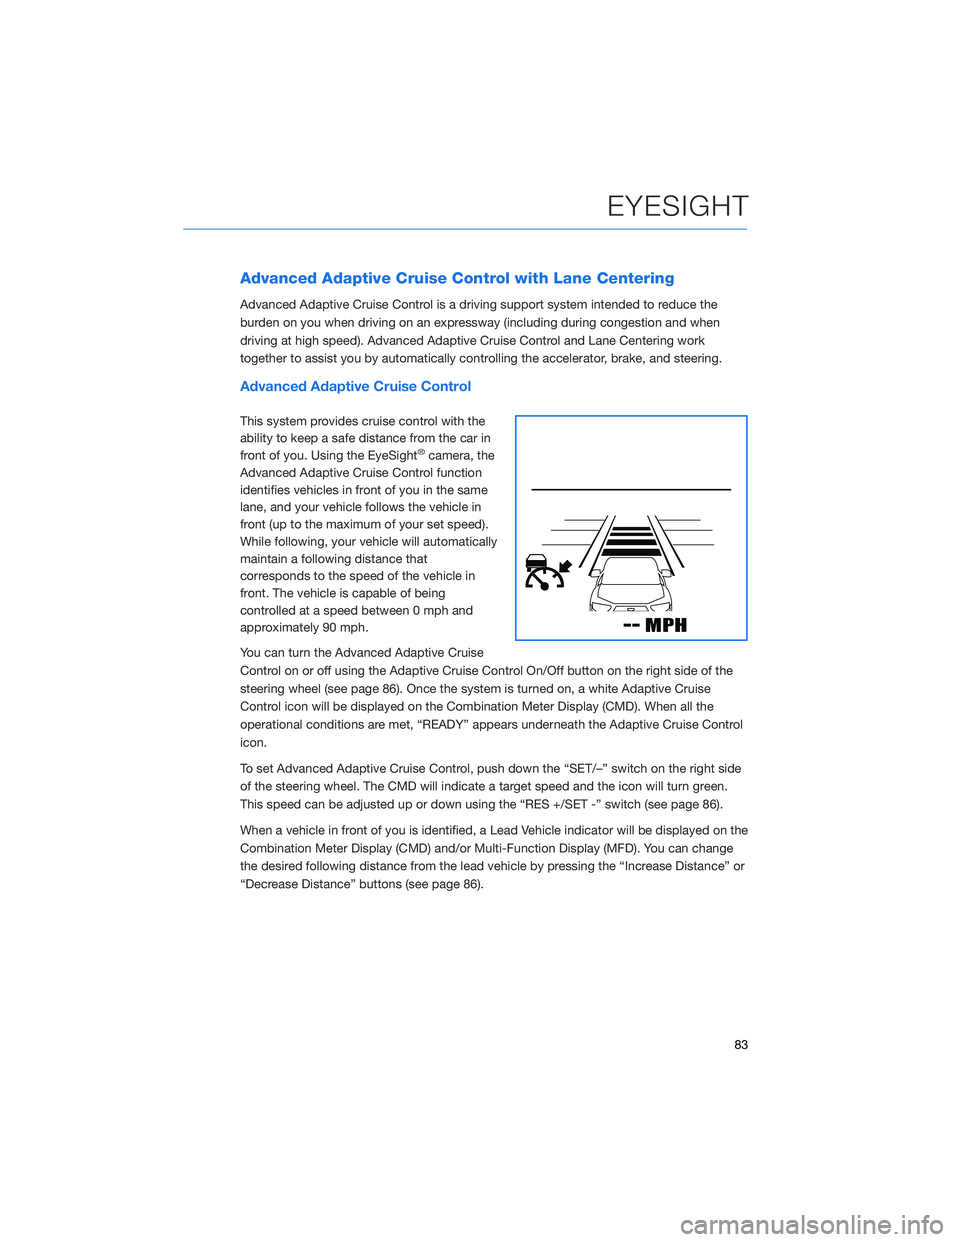
This system provides cruise control with the
ability to keep a safe distance from the car in
front of you. Using the EyeSight
®camera, the
Advanced Adaptive Cruise Control function
identifies vehicles in front of you in the same
lane, and your vehicle follows the vehicle in
front (up to the maximum of your set speed).
While following, your vehicle will automatically
maintain a following distance that
corresponds to the speed of the vehicle in
front. The vehicle is capable of being
controlled at a speed between 0 mph and
approximately 90 mph.
You can turn the Advanced Adaptive Cruise
Control on or off using the Adaptive Cruise Control On/Off button on the right side of the
steering wheel (see page 86). Once the system is turned on, a white Adaptive Cruise
Control icon will be displayed on the Combination Meter Display (CMD). When all the
operational conditions are met, “READY” appears underneath the Adaptive Cruise Control
icon.
To set Advanced Adaptive Cruise Control, push down the “SET/–” switch on the right side
of the steering wheel. The CMD will indicate a target speed and the icon will turn green.
This speed can be adjusted up or down using the “RES +/SET -” switch (see page 86).
When a vehicle in front of you is identified, a Lead Vehicle indicator will be displayed on the
Combination Meter Display (CMD) and/or Multi-Function Display (MFD). You can change
the desired following distance from the lead vehicle by pressing the “Increase Distance” or
“Decrease Distance” buttons (see page 86).
EYESIGHT
83
Page 93 of 132
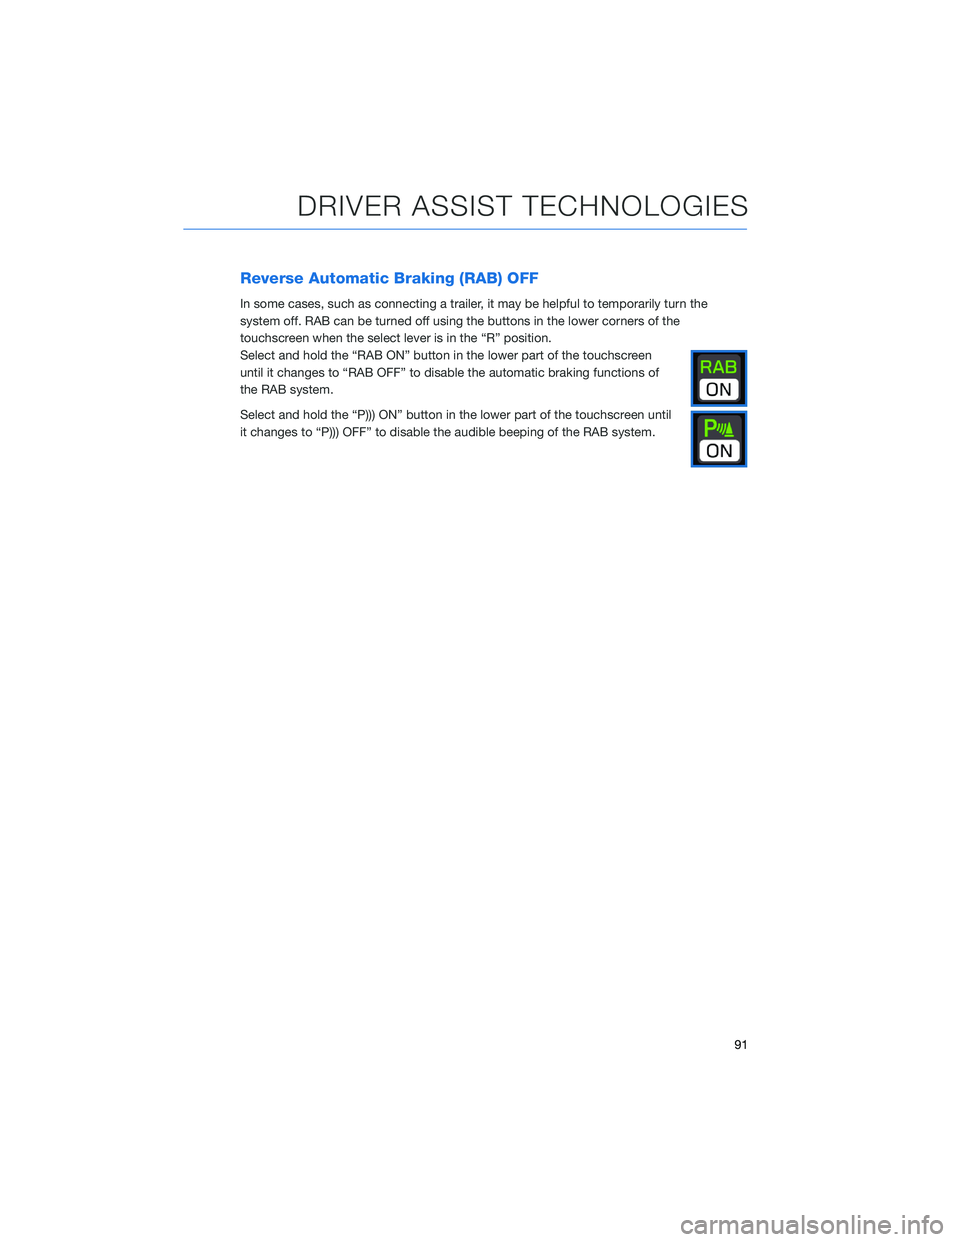
Reverse Automatic Braking (RAB) OFF
In some cases, such as connecting a trailer, it may be helpful to temporarily turn the
system off. RAB can be turned off using the buttons in the lower corners of the
touchscreen when the select lever is in the “R” position.
Select and hold the “RAB ON” button in the lower part of the touchscreen
until it changes to “RAB OFF” to disable the automatic braking functions of
the RAB system.
Select and hold the “P))) ON” button in the lower part of the touchscreen until
it changes to “P))) OFF” to disable the audible beeping of the RAB system.
DRIVER ASSIST TECHNOLOGIES
91
Page 116 of 132
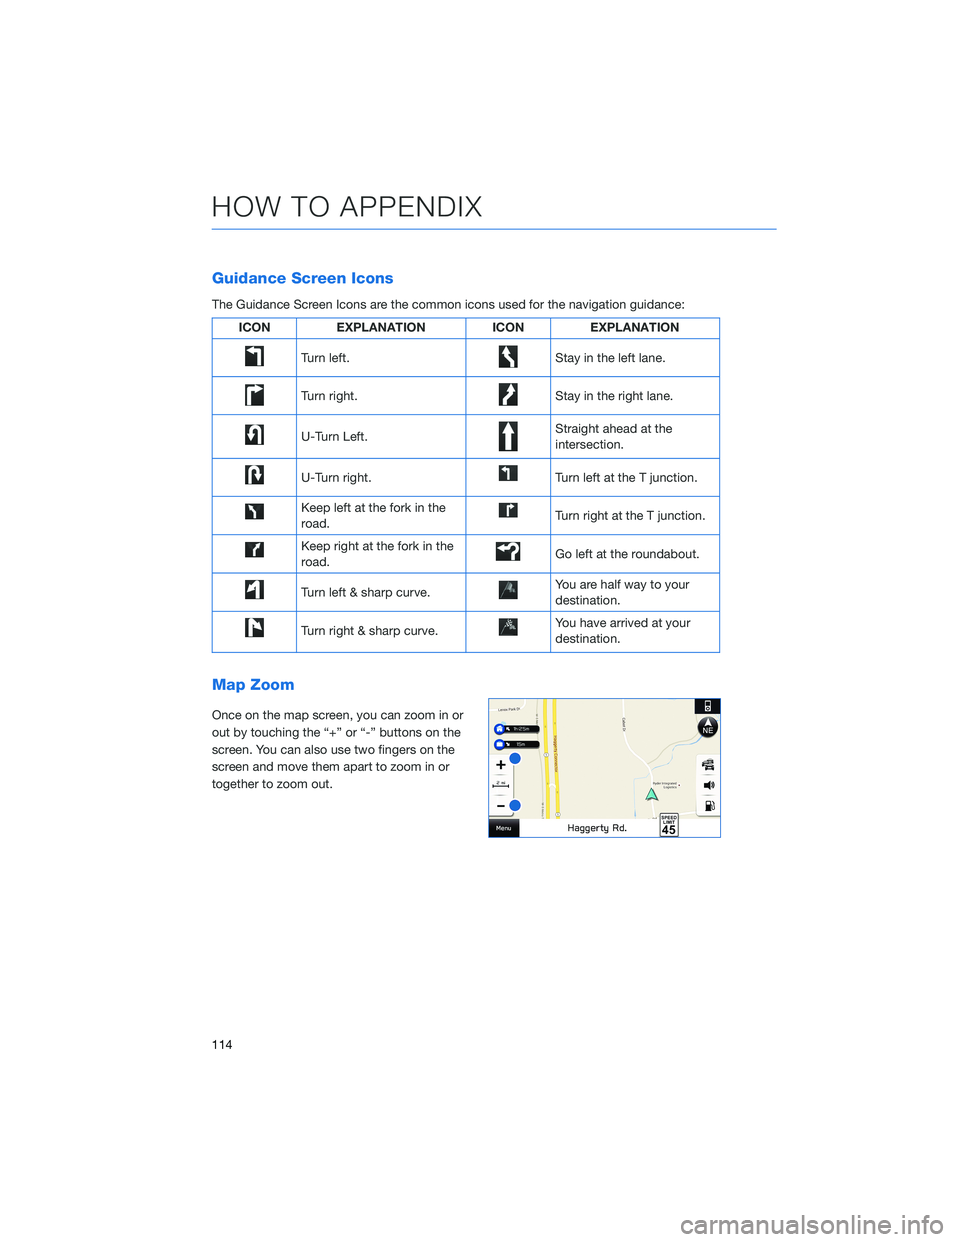
Guidance Screen Icons
The Guidance Screen Icons are the common icons used for the navigation guidance:
ICON EXPLANATION ICON EXPLANATION
Turn left.Stay in the left lane.
Turn right.Stay in the right lane.
U-Turn Left.Straight ahead at the
intersection.
U-Turn right.Turn left at the T junction.
Keep left at the fork in the
road.Turn right at the T junction.
Keep right at the fork in the
road.Go left at the roundabout.
Turn left & sharp curve.You are half way to your
destination.
Turn right & sharp curve.You have arrived at your
destination.
Map Zoom
Once on the map screen, you can zoom in or
out by touching the “+” or “-” buttons on the
screen. You can also use two fingers on the
screen and move them apart to zoom in or
together to zoom out.
HOW TO APPENDIX
114