change wheel SUBARU CROSSTREK 2022 Getting Started Guide
[x] Cancel search | Manufacturer: SUBARU, Model Year: 2022, Model line: CROSSTREK, Model: SUBARU CROSSTREK 2022Pages: 132, PDF Size: 33.54 MB
Page 33 of 132
DRIVING THE VEHICLE
6-Speed Manual Transmission
The manual transmission is a fully synchronised 6-forward and 1-reverse speed
transmission. To shift into reverse gear, raise and hold the slider ring, shift to the “R”
position, and release the slider ring. Only pull the slider ring up when shifting into reverse
gear.
Automatic Transmission Shift Mode
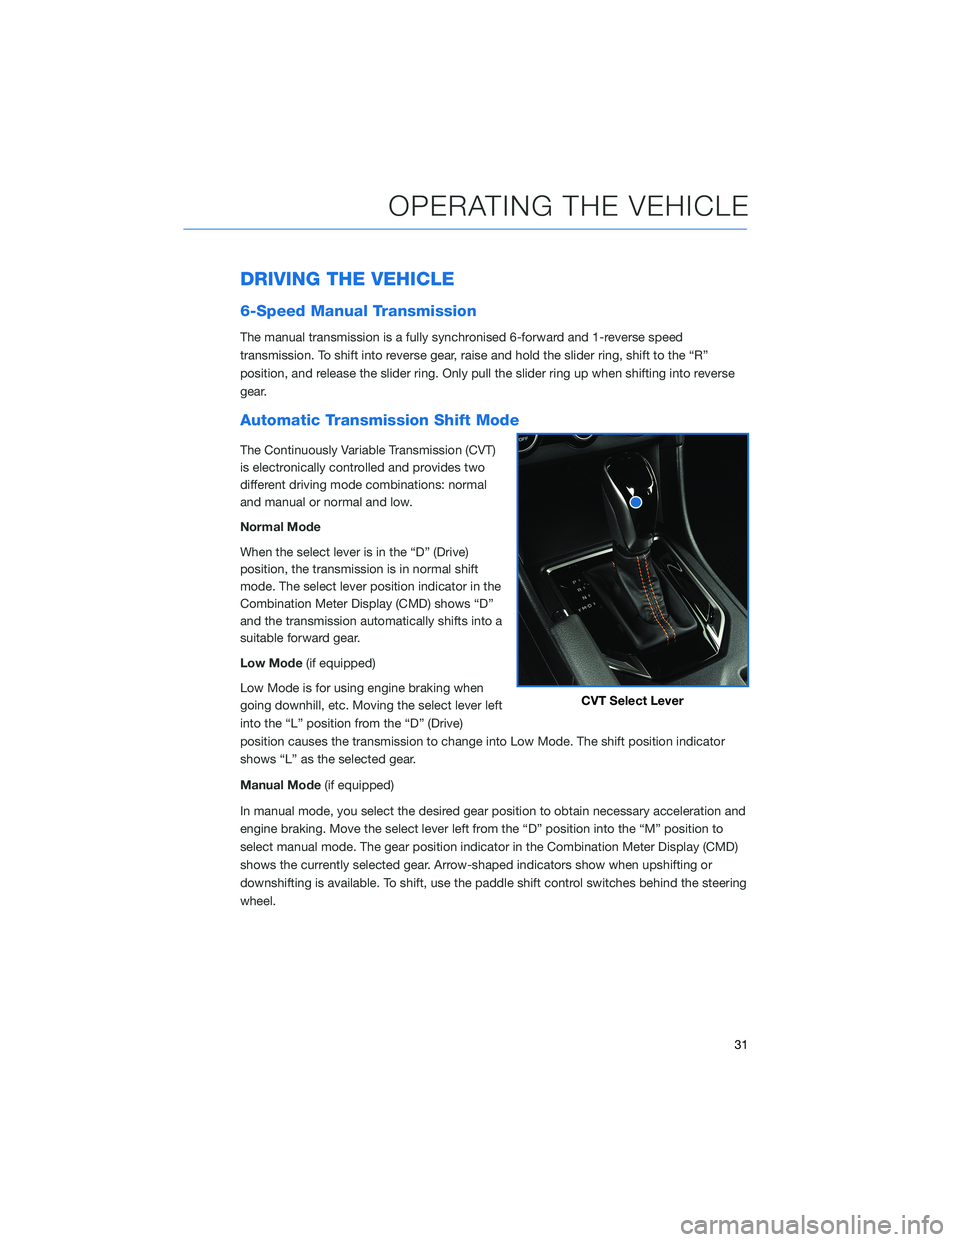
The Continuously Variable Transmission (CVT)
is electronically controlled and provides two
different driving mode combinations: normal
and manual or normal and low.
Normal Mode
When the select lever is in the “D” (Drive)
position, the transmission is in normal shift
mode. The select lever position indicator in the
Combination Meter Display (CMD) shows “D”
and the transmission automatically shifts into a
suitable forward gear.
Low Mode(if equipped)
Low Mode is for using engine braking when
going downhill, etc. Moving the select lever left
into the “L” position from the “D” (Drive)
position causes the transmission to change into Low Mode. The shift position indicator
shows “L” as the selected gear.
Manual Mode(if equipped)
In manual mode, you select the desired gear position to obtain necessary acceleration and
engine braking. Move the select lever left from the “D” position into the “M” position to
select manual mode. The gear position indicator in the Combination Meter Display (CMD)
shows the currently selected gear. Arrow-shaped indicators show when upshifting or
downshifting is available. To shift, use the paddle shift control switches behind the steering
wheel.
CVT Select Lever
OPERATING THE VEHICLE
31
Page 55 of 132
STEERING WHEEL CONTROLS
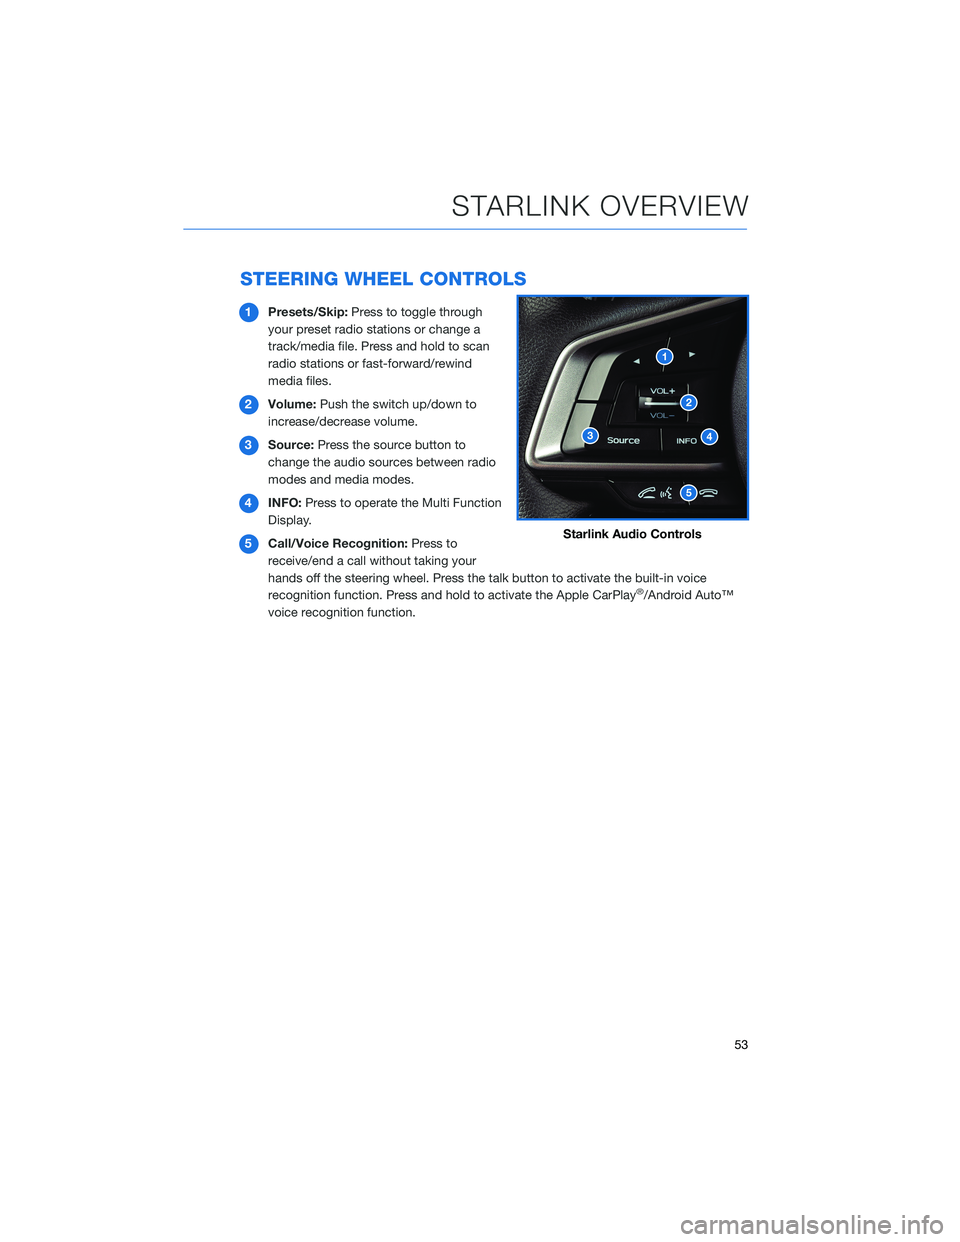
1Presets/Skip:Press to toggle through
your preset radio stations or change a
track/media file. Press and hold to scan
radio stations or fast-forward/rewind
media files.
2Volume:Push the switch up/down to
increase/decrease volume.
3Source:Press the source button to
change the audio sources between radio
modes and media modes.
4INFO:Press to operate the Multi Function
Display.
5Call/Voice Recognition:Press to
receive/end a call without taking your
hands off the steering wheel. Press the talk button to activate the built-in voice
recognition function. Press and hold to activate the Apple CarPlay
®/Android Auto™
voice recognition function.
Starlink Audio Controls
STARLINK OVERVIEW
53
Page 76 of 132
SOUND
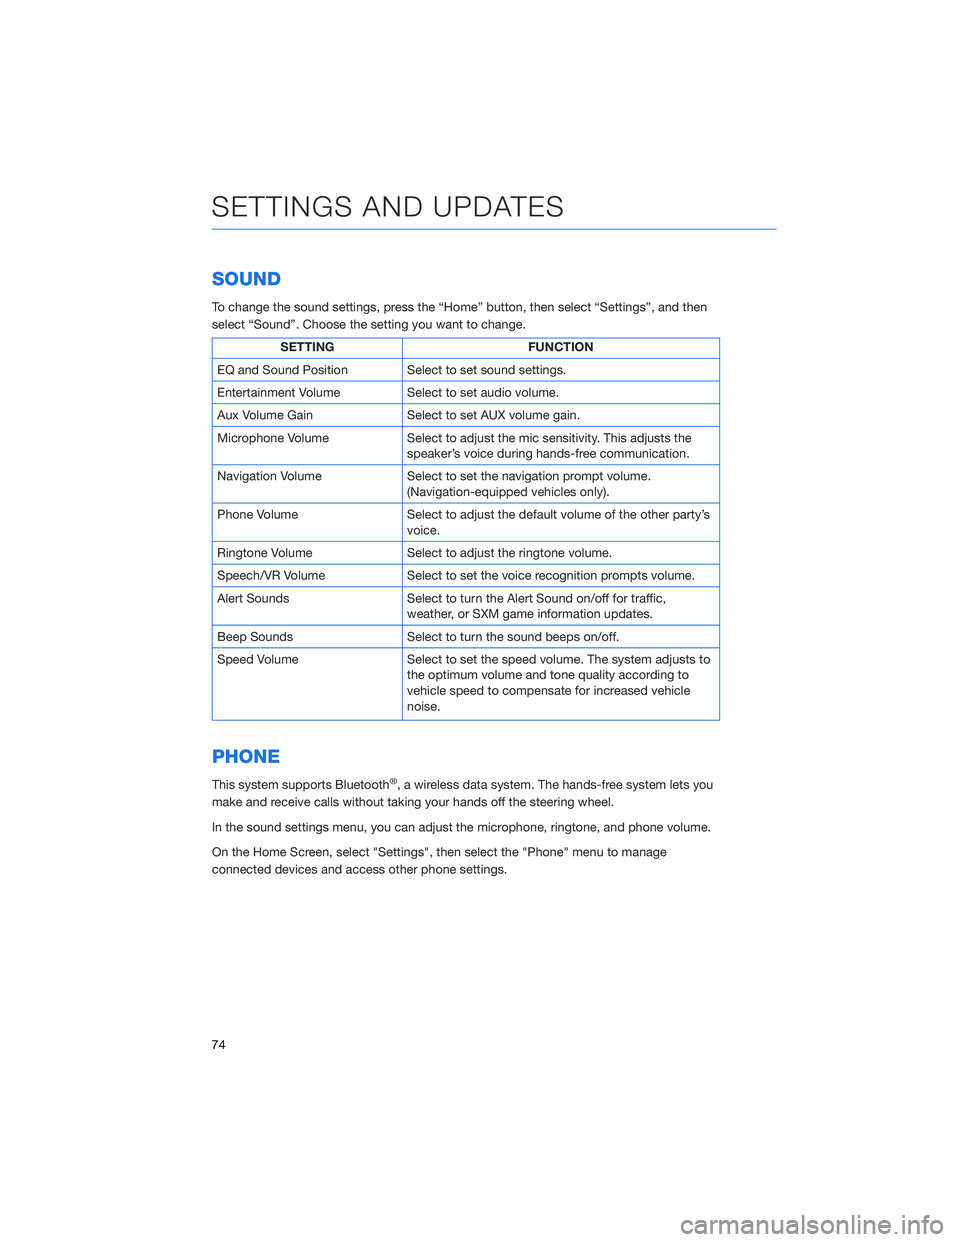
To change the sound settings, press the “Home” button, then select “Settings”, and then
select “Sound”. Choose the setting you want to change.
SETTING FUNCTION
EQ and Sound Position Select to set sound settings.
Entertainment Volume Select to set audio volume.
Aux Volume Gain Select to set AUX volume gain.
Microphone Volume Select to adjust the mic sensitivity. This adjusts the
speaker’s voice during hands-free communication.
Navigation Volume Select to set the navigation prompt volume.
(Navigation-equipped vehicles only).
Phone Volume Select to adjust the default volume of the other party’s
voice.
Ringtone Volume Select to adjust the ringtone volume.
Speech/VR Volume Select to set the voice recognition prompts volume.
Alert Sounds Select to turn the Alert Sound on/off for traffic,
weather, or SXM game information updates.
Beep Sounds Select to turn the sound beeps on/off.
Speed Volume Select to set the speed volume. The system adjusts to
the optimum volume and tone quality according to
vehicle speed to compensate for increased vehicle
noise.
PHONE
This system supports Bluetooth®, a wireless data system. The hands-free system lets you
make and receive calls without taking your hands off the steering wheel.
In the sound settings menu, you can adjust the microphone, ringtone, and phone volume.
On the Home Screen, select "Settings", then select the "Phone" menu to manage
connected devices and access other phone settings.
SETTINGS AND UPDATES
74
Page 84 of 132
Lane Sway Warning
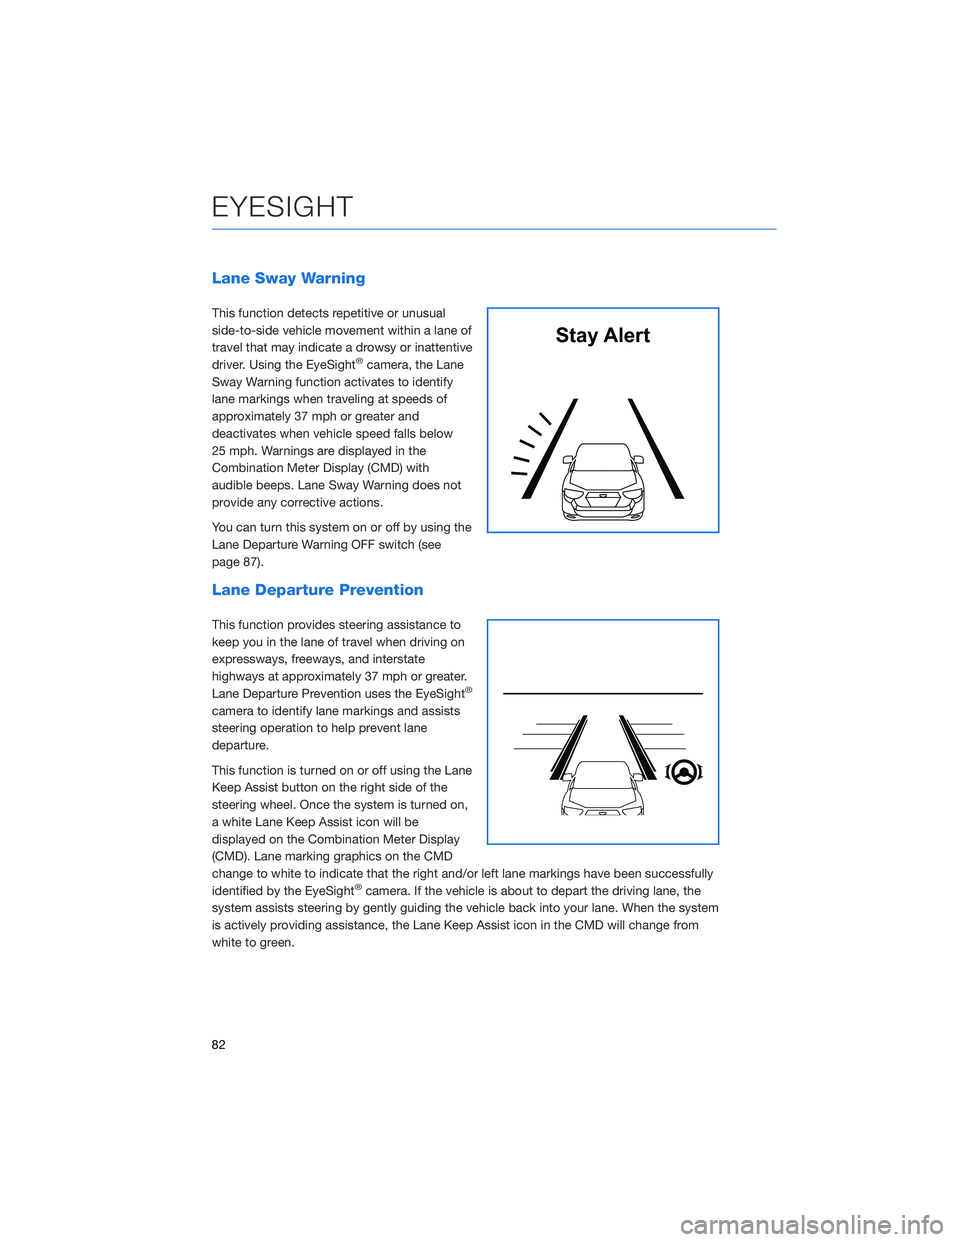
This function detects repetitive or unusual
side-to-side vehicle movement within a lane of
travel that may indicate a drowsy or inattentive
driver. Using the EyeSight
®camera, the Lane
Sway Warning function activates to identify
lane markings when traveling at speeds of
approximately 37 mph or greater and
deactivates when vehicle speed falls below
25 mph. Warnings are displayed in the
Combination Meter Display (CMD) with
audible beeps. Lane Sway Warning does not
provide any corrective actions.
You can turn this system on or off by using the
Lane Departure Warning OFF switch (see
page 87).
Lane Departure Prevention
This function provides steering assistance to
keep you in the lane of travel when driving on
expressways, freeways, and interstate
highways at approximately 37 mph or greater.
Lane Departure Prevention uses the EyeSight
®
camera to identify lane markings and assists
steering operation to help prevent lane
departure.
This function is turned on or off using the Lane
Keep Assist button on the right side of the
steering wheel. Once the system is turned on,
a white Lane Keep Assist icon will be
displayed on the Combination Meter Display
(CMD). Lane marking graphics on the CMD
change to white to indicate that the right and/or left lane markings have been successfully
identified by the EyeSight
®camera. If the vehicle is about to depart the driving lane, the
system assists steering by gently guiding the vehicle back into your lane. When the system
is actively providing assistance, the Lane Keep Assist icon in the CMD will change from
white to green.
Stay Alert
EYESIGHT
82
Page 85 of 132
Advanced Adaptive Cruise Control with Lane Centering
Advanced Adaptive Cruise Control is a driving support system intended to reduce the
burden on you when driving on an expressway (including during congestion and when
driving at high speed). Advanced Adaptive Cruise Control and Lane Centering work
together to assist you by automatically controlling the accelerator, brake, and steering.
Advanced Adaptive Cruise Control
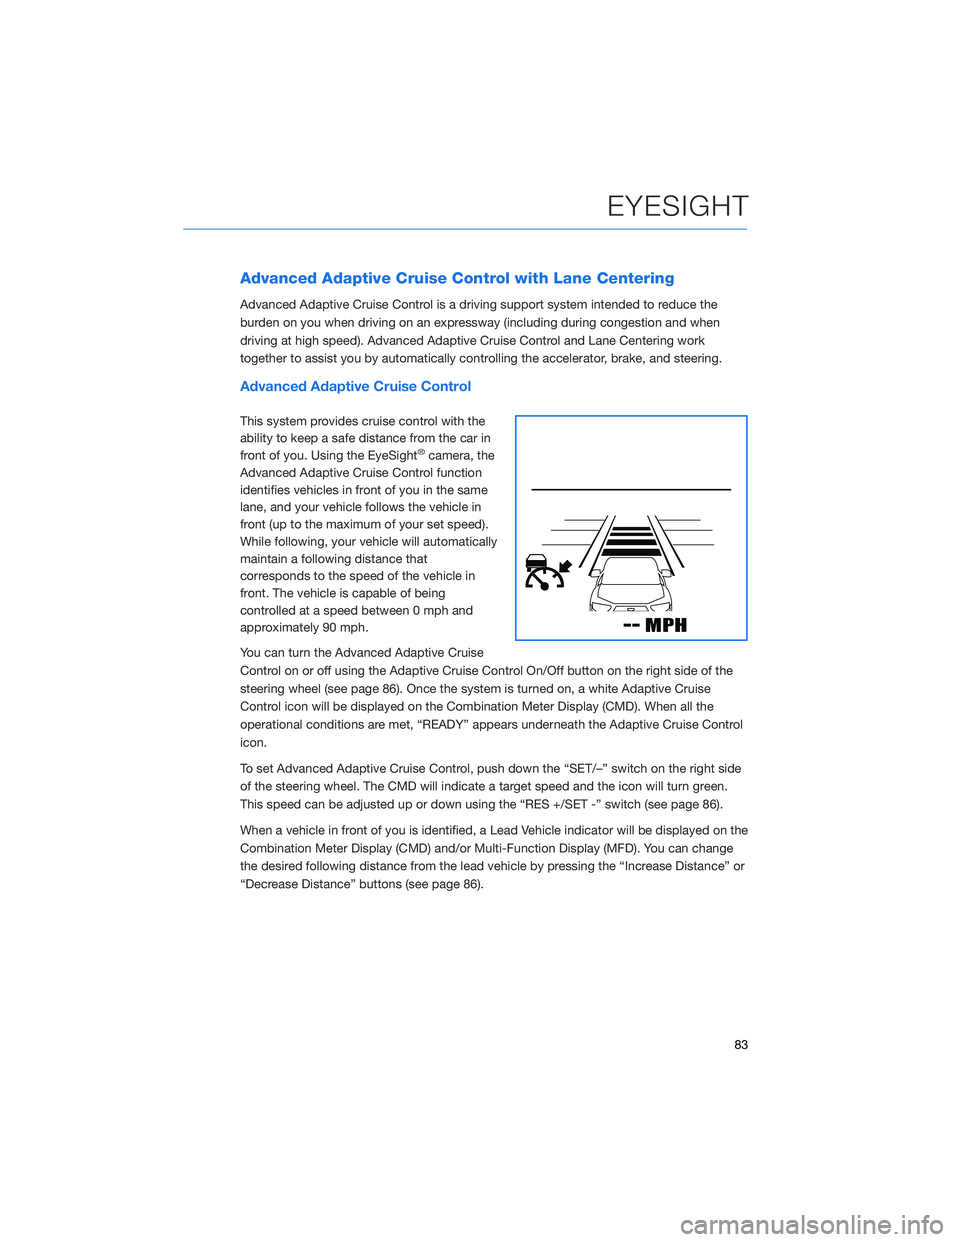
This system provides cruise control with the
ability to keep a safe distance from the car in
front of you. Using the EyeSight
®camera, the
Advanced Adaptive Cruise Control function
identifies vehicles in front of you in the same
lane, and your vehicle follows the vehicle in
front (up to the maximum of your set speed).
While following, your vehicle will automatically
maintain a following distance that
corresponds to the speed of the vehicle in
front. The vehicle is capable of being
controlled at a speed between 0 mph and
approximately 90 mph.
You can turn the Advanced Adaptive Cruise
Control on or off using the Adaptive Cruise Control On/Off button on the right side of the
steering wheel (see page 86). Once the system is turned on, a white Adaptive Cruise
Control icon will be displayed on the Combination Meter Display (CMD). When all the
operational conditions are met, “READY” appears underneath the Adaptive Cruise Control
icon.
To set Advanced Adaptive Cruise Control, push down the “SET/–” switch on the right side
of the steering wheel. The CMD will indicate a target speed and the icon will turn green.
This speed can be adjusted up or down using the “RES +/SET -” switch (see page 86).
When a vehicle in front of you is identified, a Lead Vehicle indicator will be displayed on the
Combination Meter Display (CMD) and/or Multi-Function Display (MFD). You can change
the desired following distance from the lead vehicle by pressing the “Increase Distance” or
“Decrease Distance” buttons (see page 86).
EYESIGHT
83
Page 86 of 132
Lane Centering
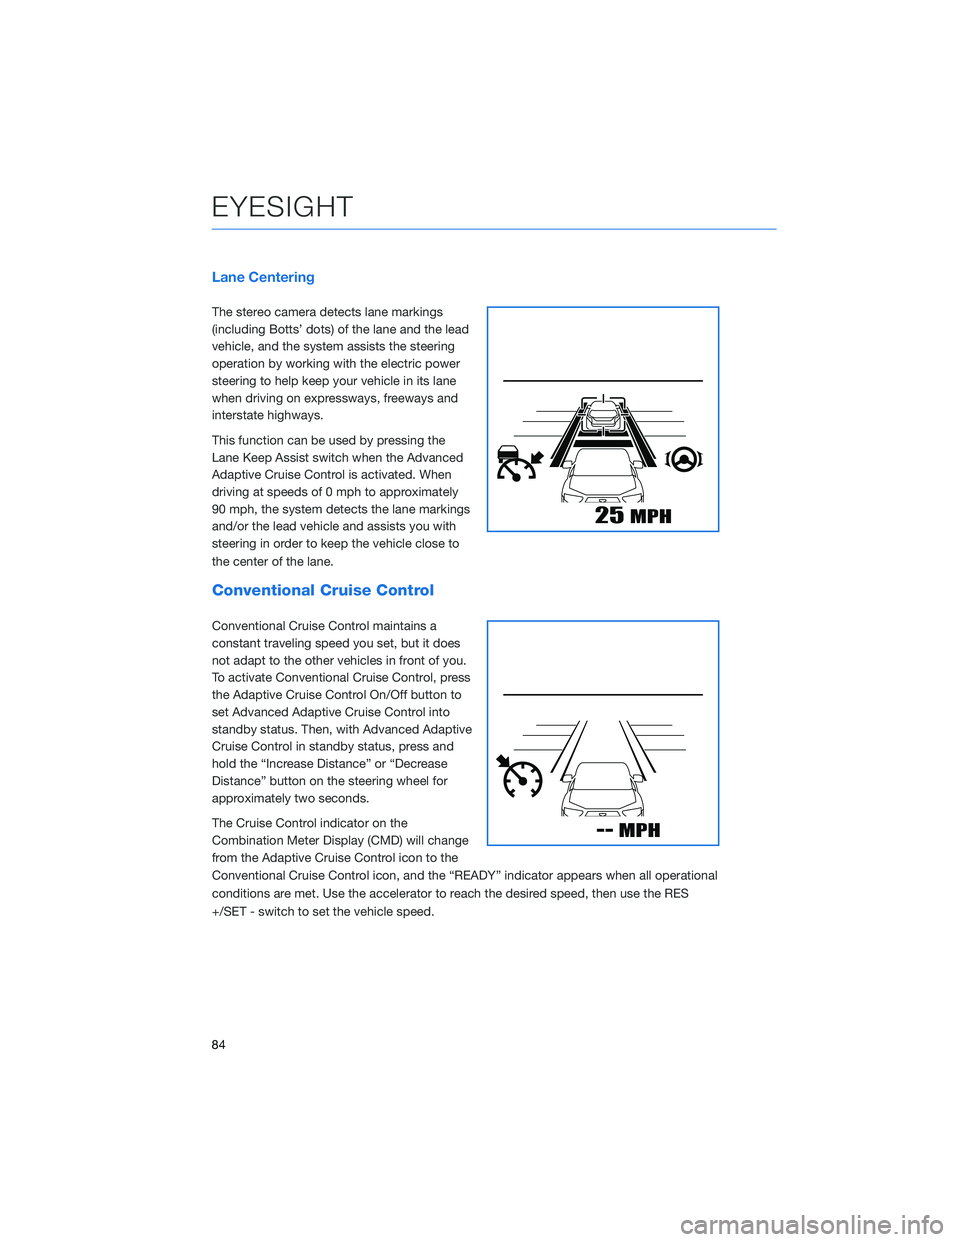
The stereo camera detects lane markings
(including Botts’ dots) of the lane and the lead
vehicle, and the system assists the steering
operation by working with the electric power
steering to help keep your vehicle in its lane
when driving on expressways, freeways and
interstate highways.
This function can be used by pressing the
Lane Keep Assist switch when the Advanced
Adaptive Cruise Control is activated. When
driving at speeds of 0 mph to approximately
90 mph, the system detects the lane markings
and/or the lead vehicle and assists you with
steering in order to keep the vehicle close to
the center of the lane.
Conventional Cruise Control
Conventional Cruise Control maintains a
constant traveling speed you set, but it does
not adapt to the other vehicles in front of you.
To activate Conventional Cruise Control, press
the Adaptive Cruise Control On/Off button to
set Advanced Adaptive Cruise Control into
standby status. Then, with Advanced Adaptive
Cruise Control in standby status, press and
hold the “Increase Distance” or “Decrease
Distance” button on the steering wheel for
approximately two seconds.
The Cruise Control indicator on the
Combination Meter Display (CMD) will change
from the Adaptive Cruise Control icon to the
Conventional Cruise Control icon, and the “READY” indicator appears when all operational
conditions are met. Use the accelerator to reach the desired speed, then use the RES
+/SET - switch to set the vehicle speed.
EYESIGHT
84
Page 87 of 132
Lead Vehicle Start Alert
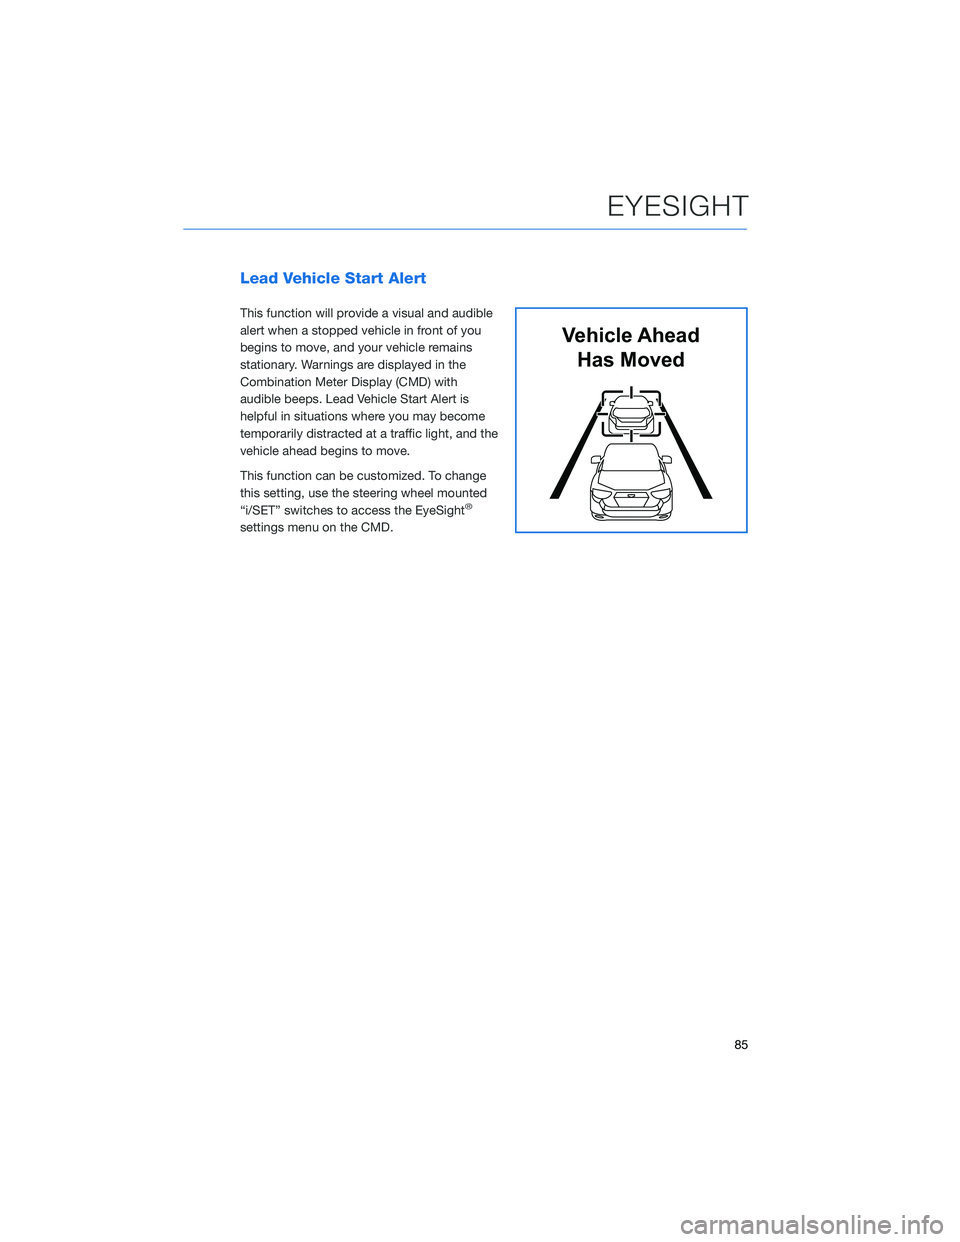
This function will provide a visual and audible
alert when a stopped vehicle in front of you
begins to move, and your vehicle remains
stationary. Warnings are displayed in the
Combination Meter Display (CMD) with
audible beeps. Lead Vehicle Start Alert is
helpful in situations where you may become
temporarily distracted at a traffic light, and the
vehicle ahead begins to move.
This function can be customized. To change
this setting, use the steering wheel mounted
“i/SET” switches to access the EyeSight
®
settings menu on the CMD.
Vehicle Ahead
Has Moved
EYESIGHT
85
Page 88 of 132
STEERING WHEEL CONTROLS
Advanced Adaptive Cruise Control
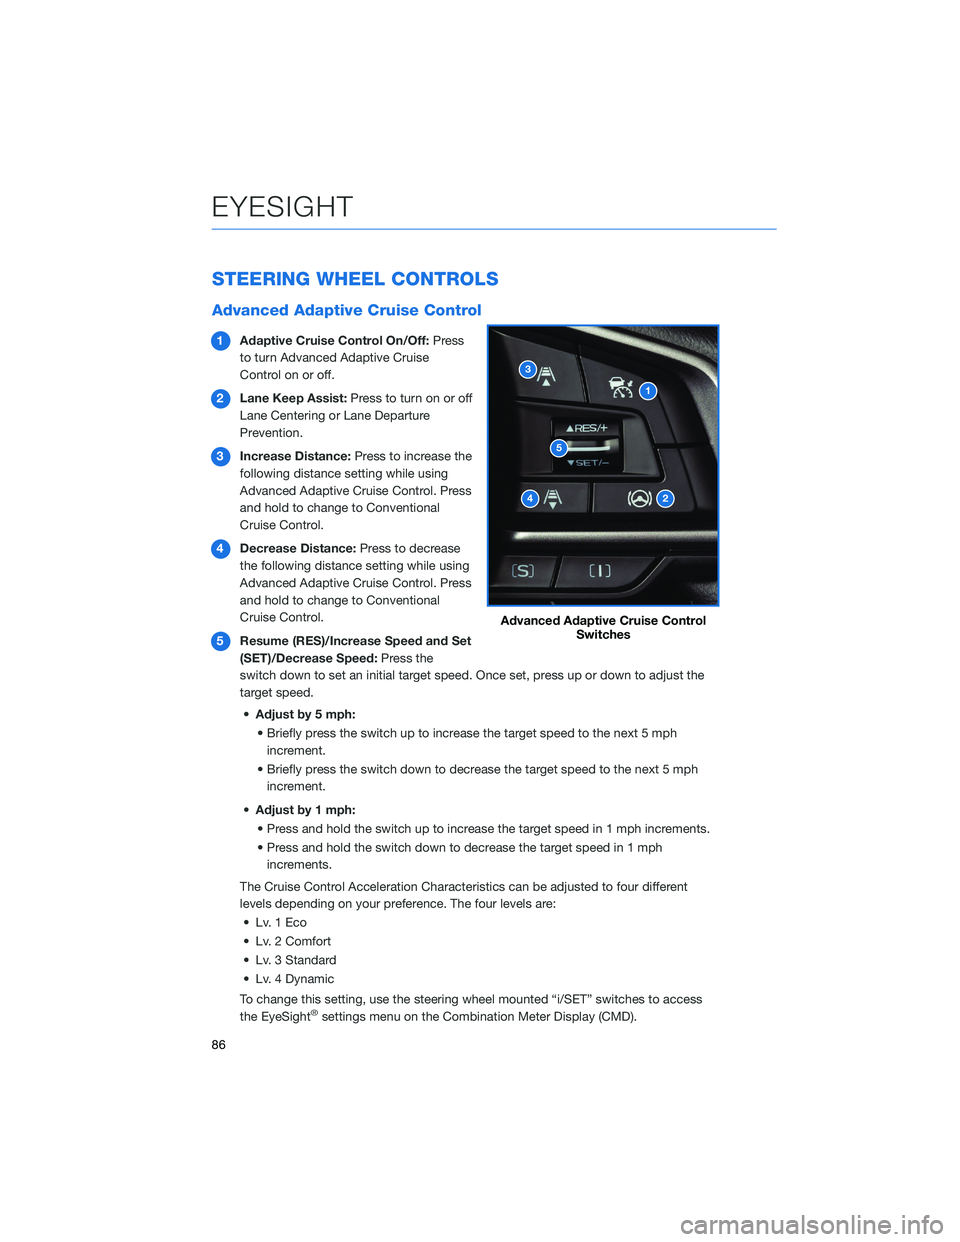
1Adaptive Cruise Control On/Off:Press
to turn Advanced Adaptive Cruise
Control on or off.
2Lane Keep Assist:Press to turn on or off
Lane Centering or Lane Departure
Prevention.
3Increase Distance:Press to increase the
following distance setting while using
Advanced Adaptive Cruise Control. Press
and hold to change to Conventional
Cruise Control.
4Decrease Distance:Press to decrease
the following distance setting while using
Advanced Adaptive Cruise Control. Press
and hold to change to Conventional
Cruise Control.
5Resume (RES)/Increase Speed and Set
(SET)/Decrease Speed:Press the
switch down to set an initial target speed. Once set, press up or down to adjust the
target speed.
•Adjust by 5 mph:
• Briefly press the switch up to increase the target speed to the next 5 mph
increment.
• Briefly press the switch down to decrease the target speed to the next 5 mph
increment.
•Adjust by 1 mph:
• Press and hold the switch up to increase the target speed in 1 mph increments.
• Press and hold the switch down to decrease the target speed in 1 mph
increments.
The Cruise Control Acceleration Characteristics can be adjusted to four different
levels depending on your preference. The four levels are:
• Lv. 1 Eco
• Lv. 2 Comfort
• Lv. 3 Standard
• Lv. 4 Dynamic
To change this setting, use the steering wheel mounted “i/SET” switches to access
the EyeSight
®settings menu on the Combination Meter Display (CMD).
Advanced Adaptive Cruise Control
Switches
EYESIGHT
86
Page 90 of 132
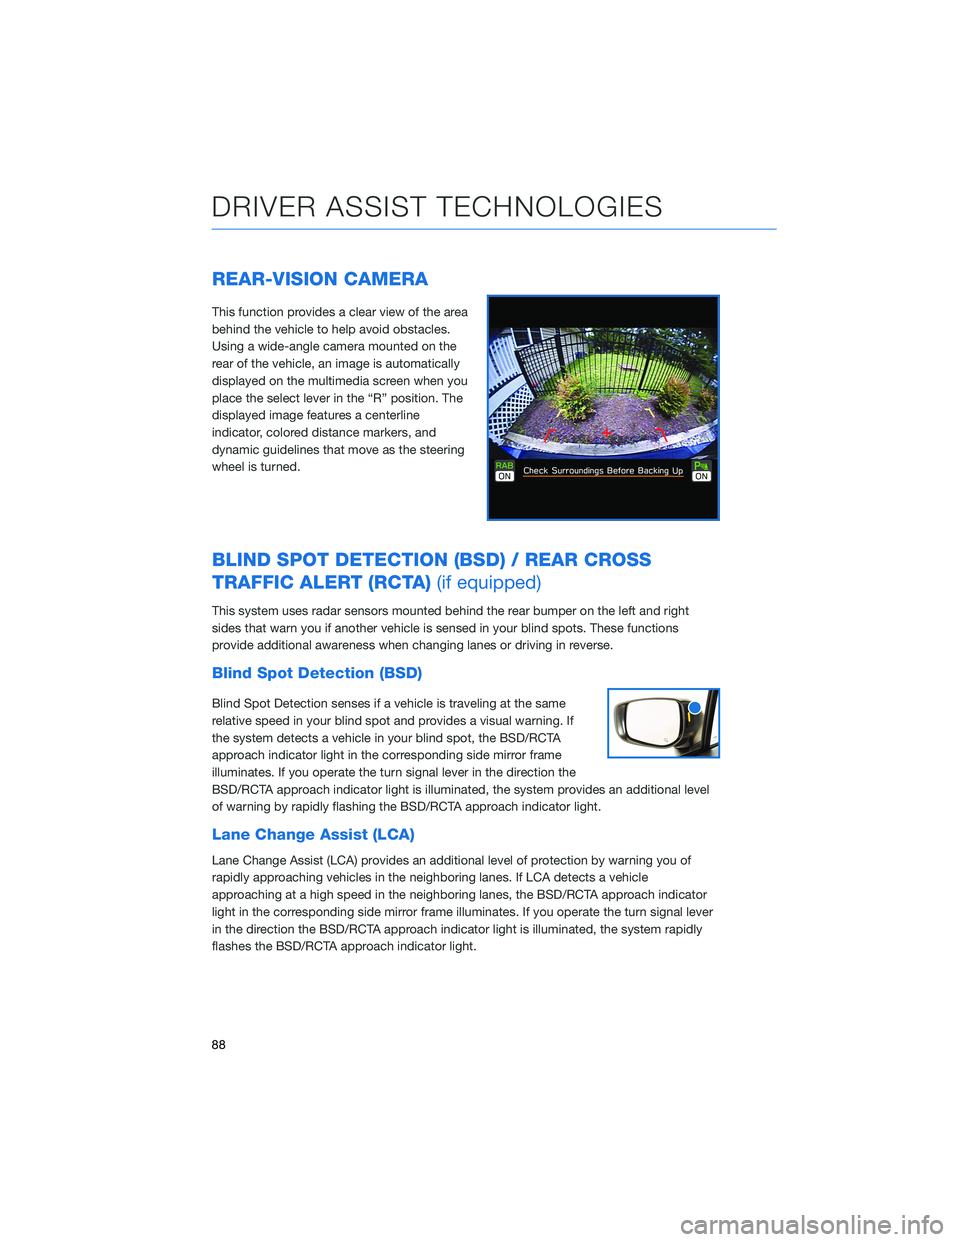
REAR-VISION CAMERA
This function provides a clear view of the area
behind the vehicle to help avoid obstacles.
Using a wide-angle camera mounted on the
rear of the vehicle, an image is automatically
displayed on the multimedia screen when you
place the select lever in the “R” position. The
displayed image features a centerline
indicator, colored distance markers, and
dynamic guidelines that move as the steering
wheel is turned.
BLIND SPOT DETECTION (BSD) / REAR CROSS
TRAFFIC ALERT (RCTA)(if equipped)
This system uses radar sensors mounted behind the rear bumper on the left and right
sides that warn you if another vehicle is sensed in your blind spots. These functions
provide additional awareness when changing lanes or driving in reverse.
Blind Spot Detection (BSD)
Blind Spot Detection senses if a vehicle is traveling at the same
relative speed in your blind spot and provides a visual warning. If
the system detects a vehicle in your blind spot, the BSD/RCTA
approach indicator light in the corresponding side mirror frame
illuminates. If you operate the turn signal lever in the direction the
BSD/RCTA approach indicator light is illuminated, the system provides an additional level
of warning by rapidly flashing the BSD/RCTA approach indicator light.
Lane Change Assist (LCA)
Lane Change Assist (LCA) provides an additional level of protection by warning you of
rapidly approaching vehicles in the neighboring lanes. If LCA detects a vehicle
approaching at a high speed in the neighboring lanes, the BSD/RCTA approach indicator
light in the corresponding side mirror frame illuminates. If you operate the turn signal lever
in the direction the BSD/RCTA approach indicator light is illuminated, the system rapidly
flashes the BSD/RCTA approach indicator light.
DRIVER ASSIST TECHNOLOGIES
88