ignition SUBARU CROSSTREK 2022 Getting Started Guide
[x] Cancel search | Manufacturer: SUBARU, Model Year: 2022, Model line: CROSSTREK, Model: SUBARU CROSSTREK 2022Pages: 132, PDF Size: 33.54 MB
Page 3 of 132
PURPOSE OF THIS GUIDE
WELCOME................. 4
IMPORTANT SAFETY
INFORMATION.............. 4
OWNER’S RESOURCES....... 4
IN CASE OF EMERGENCY..... 5
TOWING YOUR ALL-WHEEL
DRIVE SUBARU............. 6
ENTRY AND EXIT
KEYLESS ENTRY............ 7
KEYLESS ACCESS WITH PUSH
BUTTON START............. 8
INSTRUMENT PANEL........10
GAUGES AND WARNING
LIGHTS
COMBINATION METER.......12
WARNING AND INDICATOR
LIGHTS....................13
CONTROLS
INSTRUMENT PANEL SWITCHES
(LOWER LEFT)..............14
AUDIO CONTROLS...........14
CRUISE CONTROL..........15
ADVANCED ADAPTIVE CRUISE
CONTROL.................15
i/SET SWITCH...............16
INFO SWITCH...............16
LIGHT CONTROLS...........17TURN SIGNALS.............18
WINDSHIELD WIPERS........19
REAR WINDOW WIPER.......19
OVERHEAD CONSOLE........20
GETTING COMFORTABLE
SEATING...................21
TILT AND TELESCOPIC STEERING
COLUMN...................23
POWER EXTERIOR MIRRORS . . 23
REAR VIEW MIRROR.........24
POWER WINDOWS..........25
POWER MOONROOF........25
CLIMATE CONTROL..........26
ACCESSORY CONNECTIONS . . 29
OPERATING THE VEHICLE
IGNITION SWITCH...........30
PUSH-BUTTON IGNITION
SWITCH...................30
STARTING THE VEHICLE......30
DRIVING THE VEHICLE.......31
AUTO START–STOP.........33
X-MODE
®..................35
TURNING OFF THE VEHICLE...37
REFUELING
FUEL FILLER LID............38
FUEL SPECIFICATIONS AND
CAPACITY..................38
TABLE OF CONTENTS
Page 9 of 132
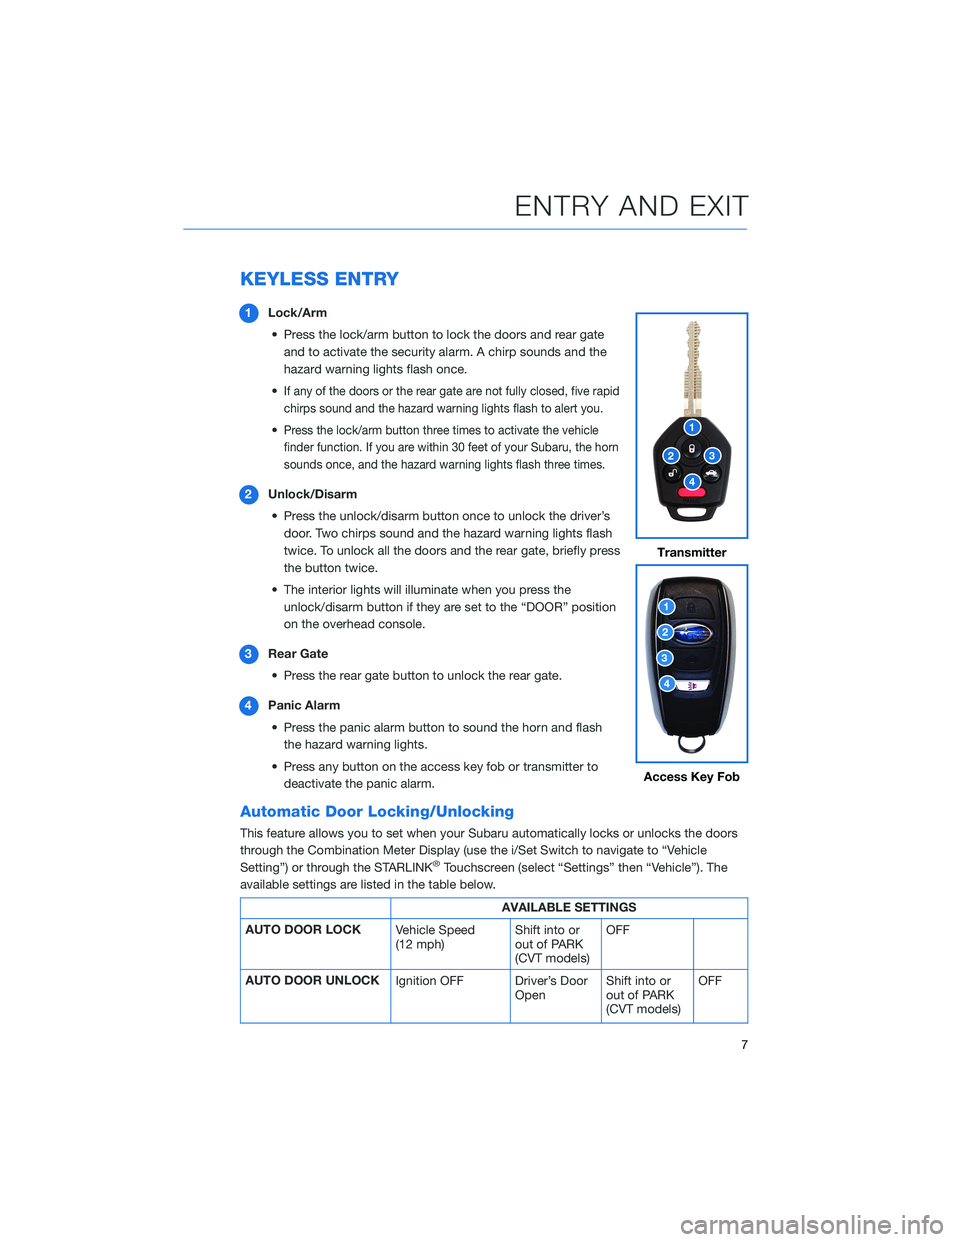
KEYLESS ENTRY
1Lock/Arm
• Press the lock/arm button to lock the doors and rear gate
and to activate the security alarm. A chirp sounds and the
hazard warning lights flash once.
•
If any of the doors or the rear gate are not fully closed, five rapid
chirps sound and the hazard warning lights flash to alert you.
•Press the lock/arm button three times to activate the vehicle
finder function. If you are within 30 feet of your Subaru, the horn
sounds once, and the hazard warning lights flash three times.
2Unlock/Disarm
• Press the unlock/disarm button once to unlock the driver’s
door. Two chirps sound and the hazard warning lights flash
twice. To unlock all the doors and the rear gate, briefly press
the button twice.
• The interior lights will illuminate when you press the
unlock/disarm button if they are set to the “DOOR” position
on the overhead console.
3Rear Gate
• Press the rear gate button to unlock the rear gate.
4Panic Alarm
• Press the panic alarm button to sound the horn and flash
the hazard warning lights.
• Press any button on the access key fob or transmitter to
deactivate the panic alarm.
Automatic Door Locking/Unlocking
This feature allows you to set when your Subaru automatically locks or unlocks the doors
through the Combination Meter Display (use the i/Set Switch to navigate to “Vehicle
Setting”) or through the STARLINK
®Touchscreen (select “Settings” then “Vehicle”). The
available settings are listed in the table below.
AVAILABLE SETTINGS
AUTO DOOR LOCK
Vehicle Speed
(12 mph)Shift into or
out of PARK
(CVT models)OFF
AUTO DOOR UNLOCK
Ignition OFF Driver’s Door
OpenShift into or
out of PARK
(CVT models)OFF
Transmitter
Access Key Fob
ENTRY AND EXIT
7
Page 22 of 132
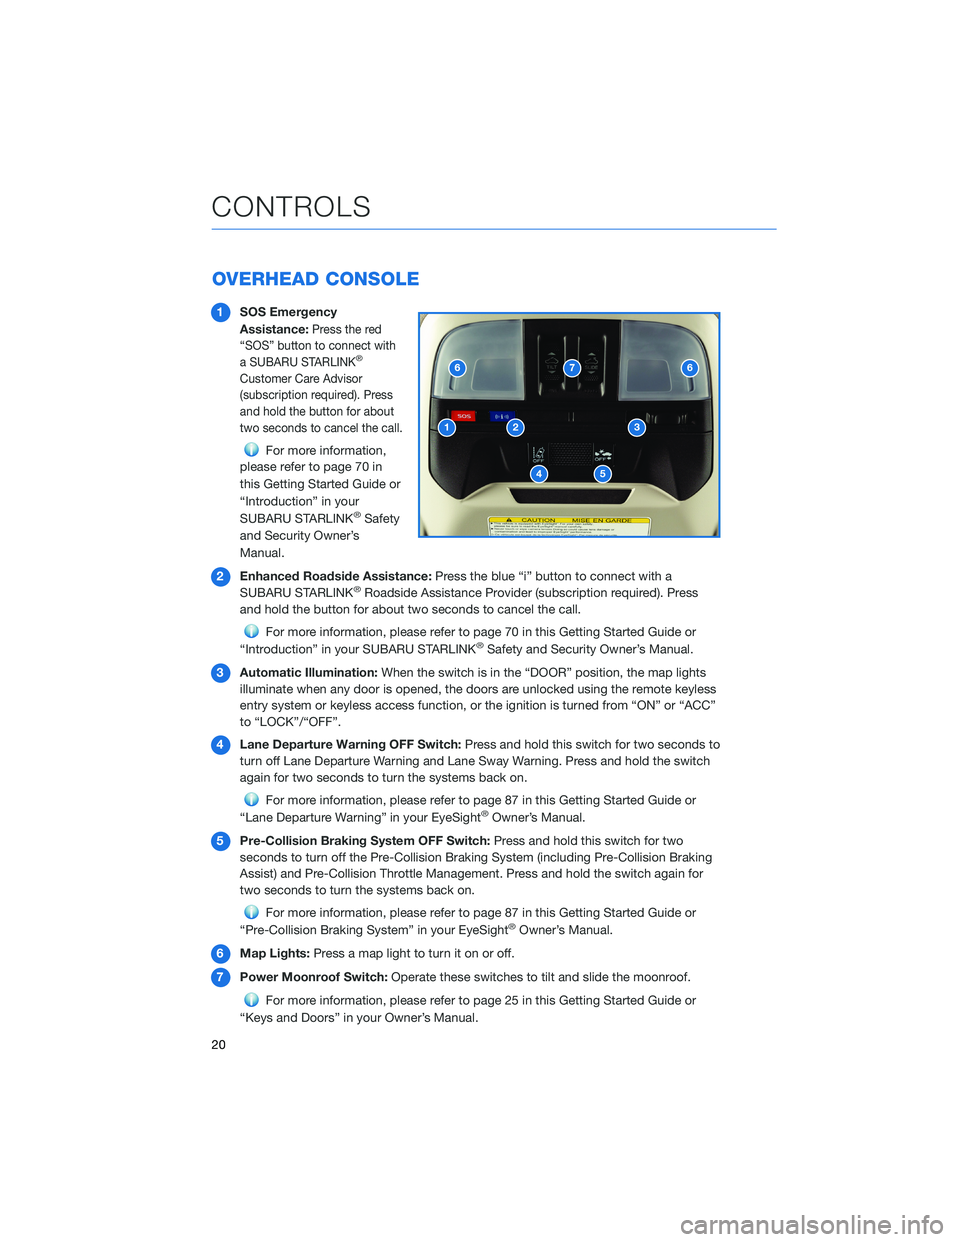
OVERHEAD CONSOLE
1SOS Emergency
Assistance:
Press the red
“SOS” button to connect with
a SUBARU STARLINK
®
Customer Care Advisor
(subscription required). Press
and hold the button for about
two seconds to cancel the call.
For more information,
please refer to page 70 in
this Getting Started Guide or
“Introduction” in your
SUBARU STARLINK
®Safety
and Security Owner’s
Manual.
2Enhanced Roadside Assistance:Press the blue “i” button to connect with a
SUBARU STARLINK
®Roadside Assistance Provider (subscription required). Press
and hold the button for about two seconds to cancel the call.
For more information, please refer to page 70 in this Getting Started Guide or
“Introduction” in your SUBARU STARLINK®Safety and Security Owner’s Manual.
3Automatic Illumination:When the switch is in the “DOOR” position, the map lights
illuminate when any door is opened, the doors are unlocked using the remote keyless
entry system or keyless access function, or the ignition is turned from “ON” or “ACC”
to “LOCK”/“OFF”.
4Lane Departure Warning OFF Switch:Press and hold this switch for two seconds to
turn off Lane Departure Warning and Lane Sway Warning. Press and hold the switch
again for two seconds to turn the systems back on.
For more information, please refer to page 87 in this Getting Started Guide or
“Lane Departure Warning” in your EyeSight®Owner’s Manual.
5Pre-Collision Braking System OFF Switch:Press and hold this switch for two
seconds to turn off the Pre-Collision Braking System (including Pre-Collision Braking
Assist) and Pre-Collision Throttle Management. Press and hold the switch again for
two seconds to turn the systems back on.
For more information, please refer to page 87 in this Getting Started Guide or
“Pre-Collision Braking System” in your EyeSight®Owner’s Manual.
6Map Lights:Press a map light to turn it on or off.
7Power Moonroof Switch:Operate these switches to tilt and slide the moonroof.
For more information, please refer to page 25 in this Getting Started Guide or
“Keys and Doors” in your Owner’s Manual.
CONTROLS
20
Page 25 of 132
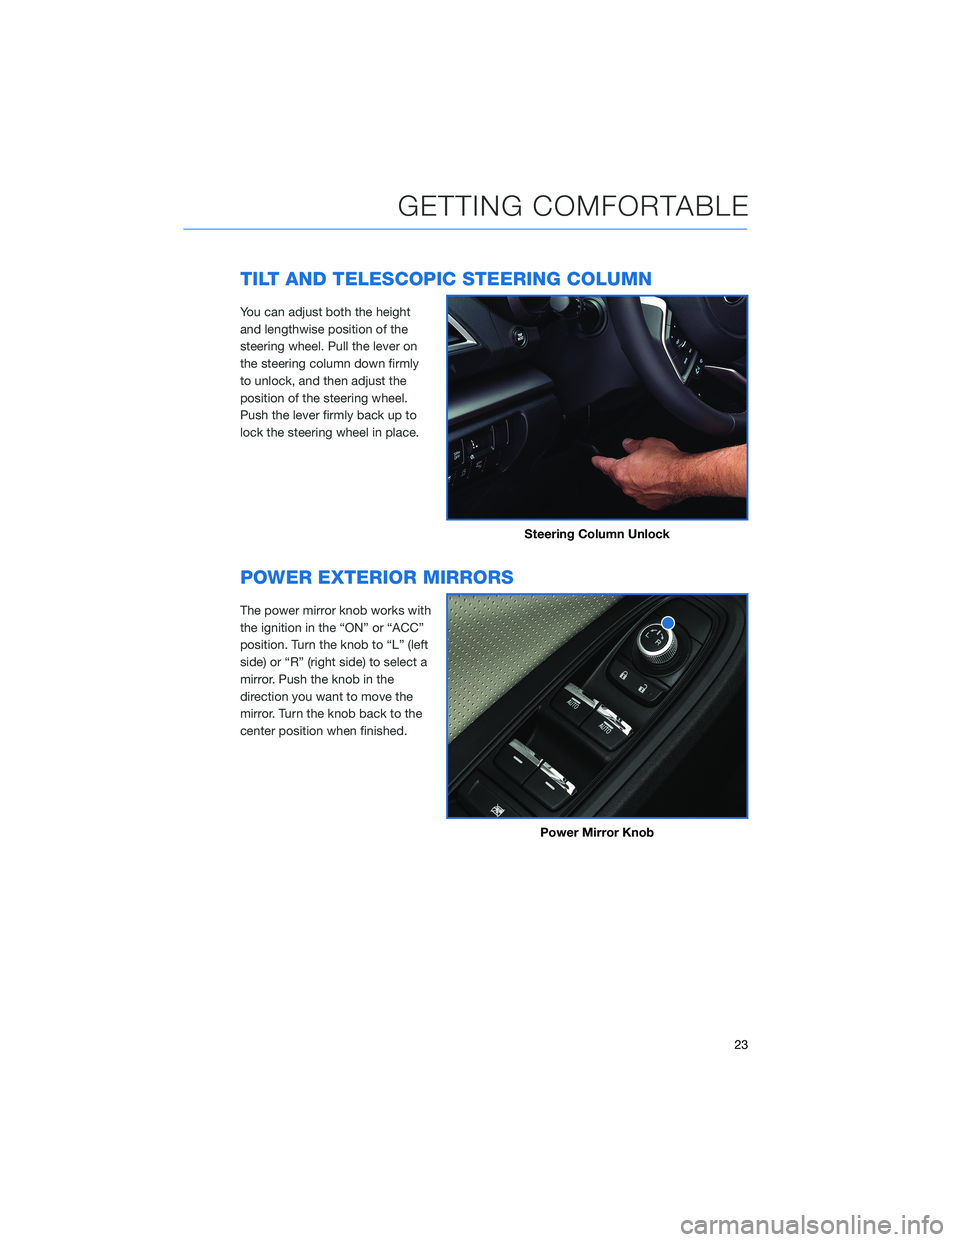
TILT AND TELESCOPIC STEERING COLUMN
You can adjust both the height
and lengthwise position of the
steering wheel. Pull the lever on
the steering column down firmly
to unlock, and then adjust the
position of the steering wheel.
Push the lever firmly back up to
lock the steering wheel in place.
POWER EXTERIOR MIRRORS
The power mirror knob works with
the ignition in the “ON” or “ACC”
position. Turn the knob to “L” (left
side) or “R” (right side) to select a
mirror. Push the knob in the
direction you want to move the
mirror. Turn the knob back to the
center position when finished.
Steering Column Unlock
Power Mirror Knob
GETTING COMFORTABLE
23
Page 27 of 132

POWER WINDOWS
To open or close a window,
partially press down or pull up
and hold the corresponding
switch. The front windows have a
one-touch auto up/down function.
Fully press down or pull up and
release to automatically open or
close a one-touch window.
POWER MOONROOF(if equipped)
With the ignition in the “ON” position, you can tilt and slide the moonroof.
Tilting the Moonroof
1Opening:Press, briefly hold,
and release to automatically
tilt the moonroof.
2Closing:Press and hold the
switch to lower the
moonroof.
Sliding the Moonroof
3Opening:Press, briefly hold,
and release the switch to
open the moonroof. To
pause the moonroof halfway,
press either side of the
switch.
4Closing:Press, briefly hold, and release the switch to close the moonroof. To pause
the moonroof halfway, press either side of the switch.
Power Window Switches
Power Moonroof Switches
GETTING COMFORTABLE
25
Page 32 of 132
IGNITION SWITCH
The ignition switch has four positions:
LOCK:You can only insert or remove the key in this position.
ACC (Accessory):Provides power to the audio system and accessory power outlets.
ON:All electrical systems are available. The key returns to this position after starting the
engine.
START:Turn the key to this position to start the engine.
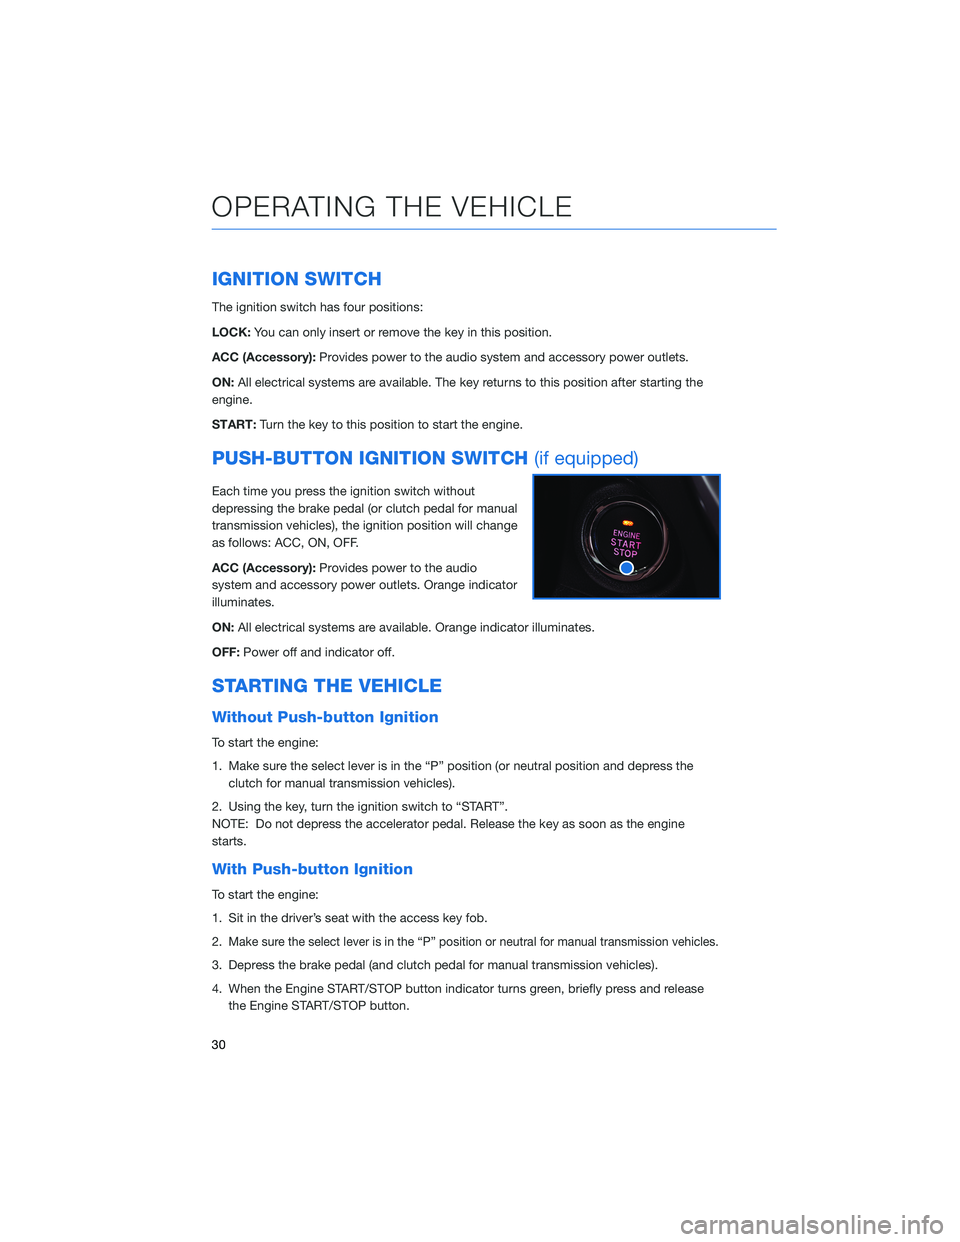
PUSH-BUTTON IGNITION SWITCH(if equipped)
Each time you press the ignition switch without
depressing the brake pedal (or clutch pedal for manual
transmission vehicles), the ignition position will change
as follows: ACC, ON, OFF.
ACC (Accessory):Provides power to the audio
system and accessory power outlets. Orange indicator
illuminates.
ON:All electrical systems are available. Orange indicator illuminates.
OFF:Power off and indicator off.
STARTING THE VEHICLE
Without Push-button Ignition
To start the engine:
1. Make sure the select lever is in the “P” position (or neutral position and depress the
clutch for manual transmission vehicles).
2. Using the key, turn the ignition switch to “START”.
NOTE: Do not depress the accelerator pedal. Release the key as soon as the engine
starts.
With Push-button Ignition
To start the engine:
1. Sit in the driver’s seat with the access key fob.
2.
Make sure the select lever is in the “P” position or neutral for manual transmission vehicles.
3. Depress the brake pedal (and clutch pedal for manual transmission vehicles).
4. When the Engine START/STOP button indicator turns green, briefly press and release
the Engine START/STOP button.
OPERATING THE VEHICLE
30
Page 36 of 132
System Operation
So that it can be used safely and comfortably, the Auto Start-Stop system is designed to
constantly monitor vehicle conditions, the environment inside and outside the vehicle, as
well as driver operations, in order to control stopping and restarting the engine.
After the vehicle has been completely stopped by depressing the brake pedal
with the select lever in the “D” position, the engine will be automatically
stopped and the green indicator will illuminate in the combination meter.
If you release the brake pedal with the select lever kept in the “D” position, the
engine will be automatically restarted. The indicator light will turn off when the system
restarts the engine.
There are several operating conditions for this system to operate as intended.
For more information, please refer to “Starting and Operating” in your Owner’s
Manual.
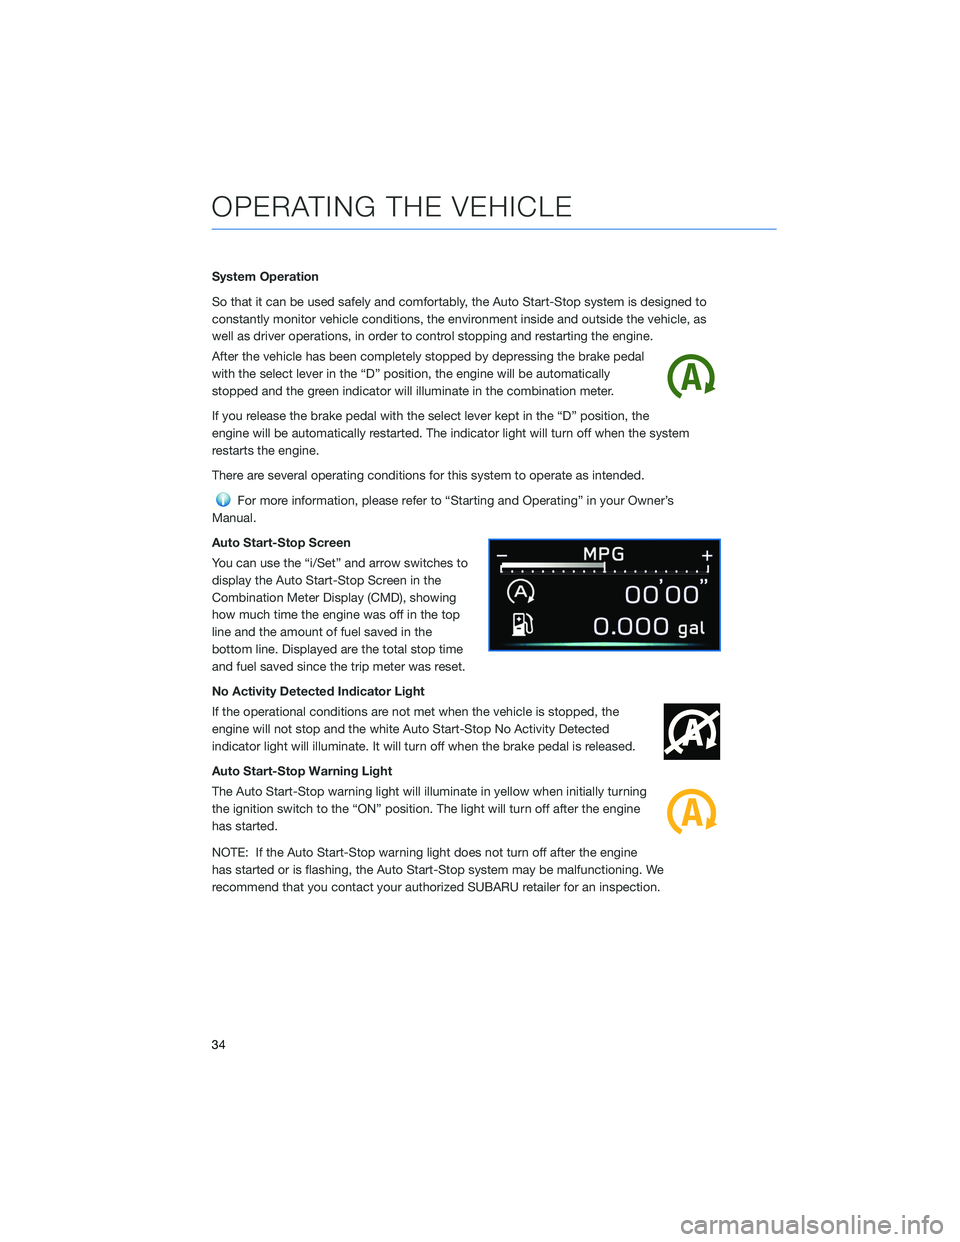
Auto Start-Stop Screen
You can use the “i/Set” and arrow switches to
display the Auto Start-Stop Screen in the
Combination Meter Display (CMD), showing
how much time the engine was off in the top
line and the amount of fuel saved in the
bottom line. Displayed are the total stop time
and fuel saved since the trip meter was reset.
No Activity Detected Indicator Light
If the operational conditions are not met when the vehicle is stopped, the
engine will not stop and the white Auto Start-Stop No Activity Detected
indicator light will illuminate. It will turn off when the brake pedal is released.
Auto Start-Stop Warning Light
The Auto Start-Stop warning light will illuminate in yellow when initially turning
the ignition switch to the “ON” position. The light will turn off after the engine
has started.
NOTE: If the Auto Start-Stop warning light does not turn off after the engine
has started or is flashing, the Auto Start-Stop system may be malfunctioning. We
recommend that you contact your authorized SUBARU retailer for an inspection.
OPERATING THE VEHICLE
34
Page 39 of 132
Hill Descent Control (HDC)
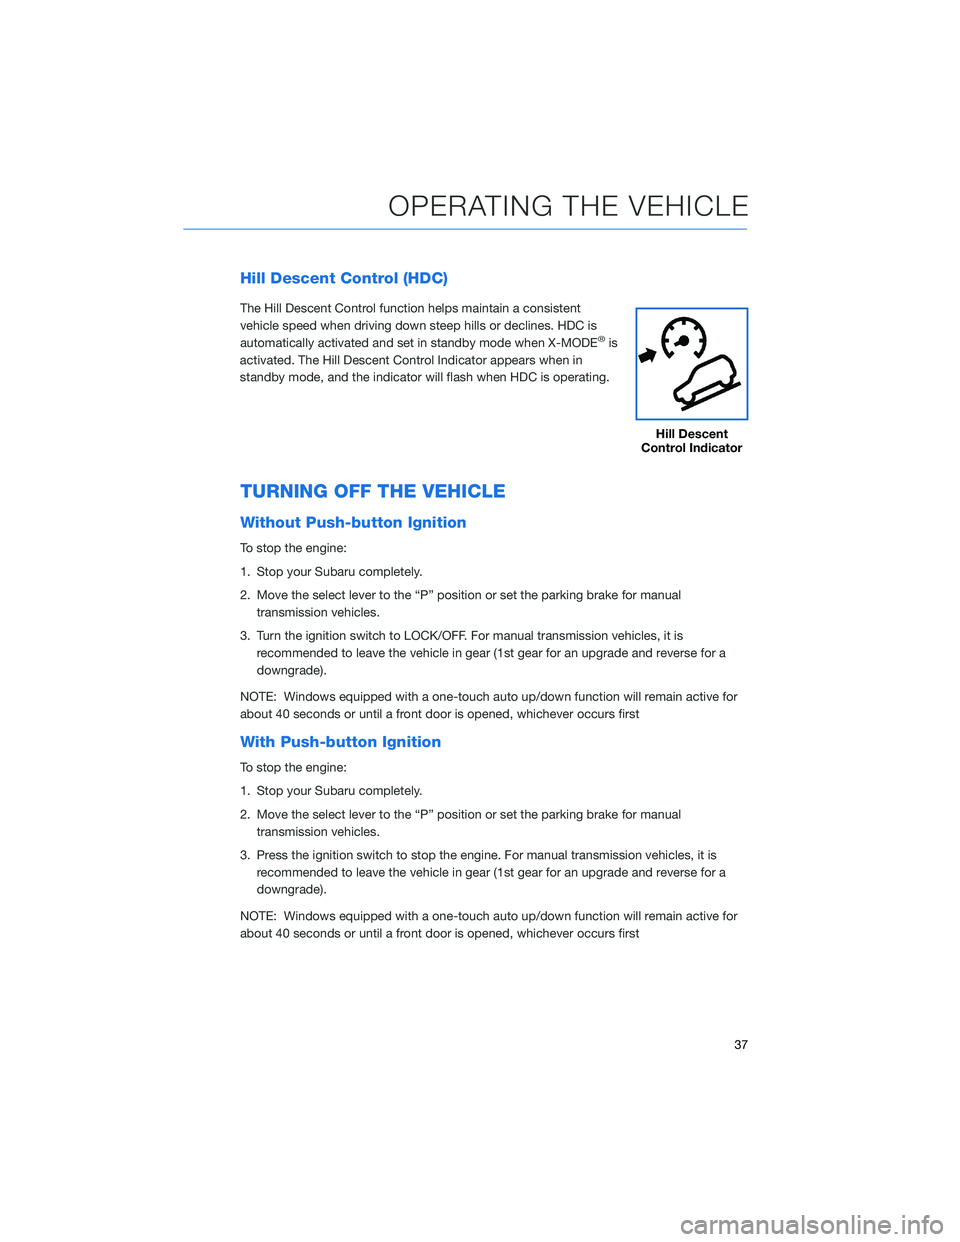
The Hill Descent Control function helps maintain a consistent
vehicle speed when driving down steep hills or declines. HDC is
automatically activated and set in standby mode when X-MODE
®is
activated. The Hill Descent Control Indicator appears when in
standby mode, and the indicator will flash when HDC is operating.
TURNING OFF THE VEHICLE
Without Push-button Ignition
To stop the engine:
1. Stop your Subaru completely.
2. Move the select lever to the “P” position or set the parking brake for manual
transmission vehicles.
3. Turn the ignition switch to LOCK/OFF. For manual transmission vehicles, it is
recommended to leave the vehicle in gear (1st gear for an upgrade and reverse for a
downgrade).
NOTE: Windows equipped with a one-touch auto up/down function will remain active for
about 40 seconds or until a front door is opened, whichever occurs first
With Push-button Ignition
To stop the engine:
1. Stop your Subaru completely.
2. Move the select lever to the “P” position or set the parking brake for manual
transmission vehicles.
3. Press the ignition switch to stop the engine. For manual transmission vehicles, it is
recommended to leave the vehicle in gear (1st gear for an upgrade and reverse for a
downgrade).
NOTE: Windows equipped with a one-touch auto up/down function will remain active for
about 40 seconds or until a front door is opened, whichever occurs first
Hill Descent
Control Indicator
OPERATING THE VEHICLE
37
Page 43 of 132
REAR SEAT REMINDER(if equipped)
The Rear Seat Reminder system assists you in
preventing a child or pet from being left in your
Subaru, prompting you to confirm the
presence of passengers and cargo in the rear
seats. The system monitors the opening and
closing of the rear doors. It does not physically
sense the presence of a child or pet.
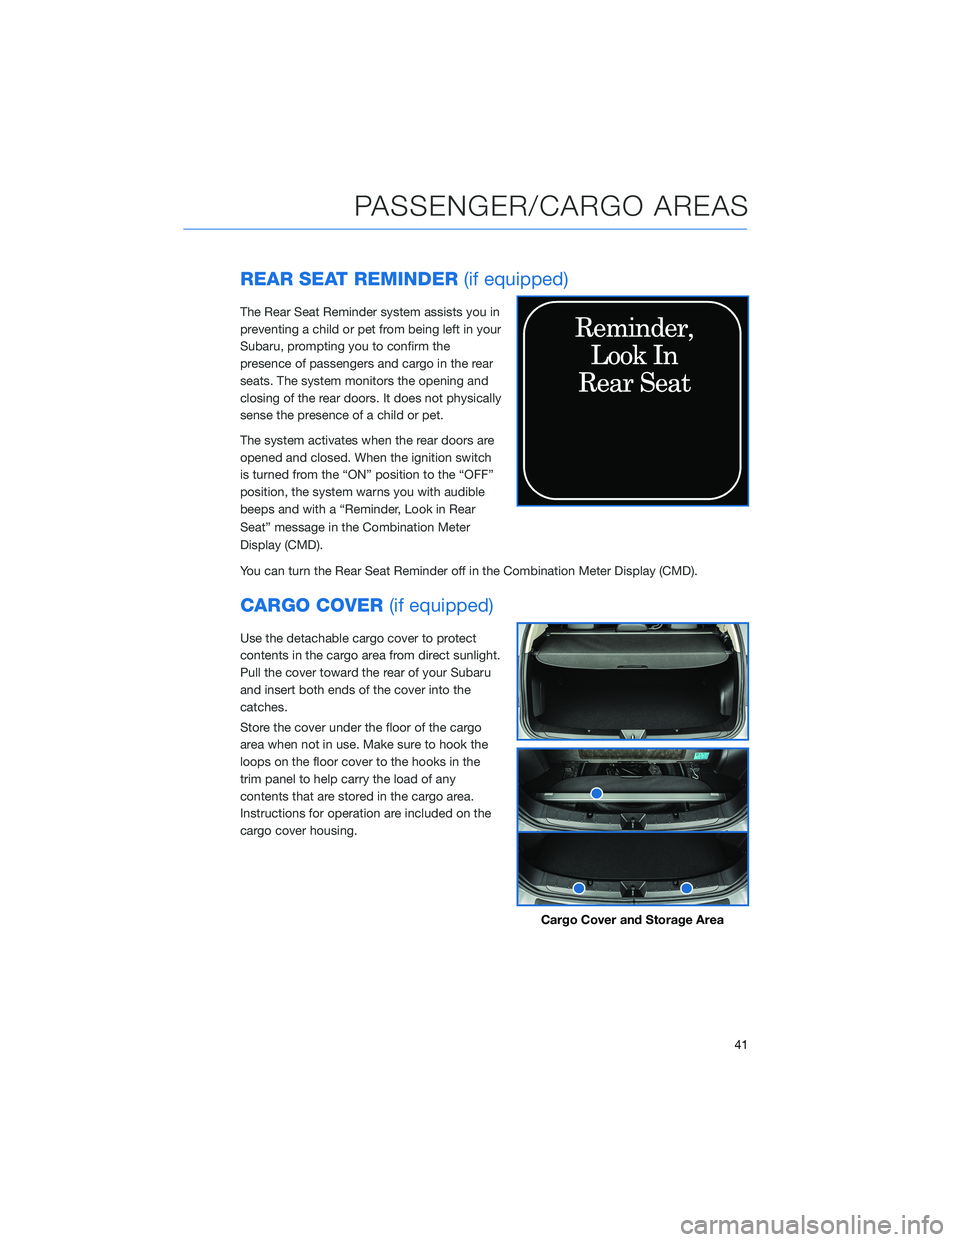
The system activates when the rear doors are
opened and closed. When the ignition switch
is turned from the “ON” position to the “OFF”
position, the system warns you with audible
beeps and with a “Reminder, Look in Rear
Seat” message in the Combination Meter
Display (CMD).
You can turn the Rear Seat Reminder off in the Combination Meter Display (CMD).
CARGO COVER(if equipped)
Use the detachable cargo cover to protect
contents in the cargo area from direct sunlight.
Pull the cover toward the rear of your Subaru
and insert both ends of the cover into the
catches.
Store the cover under the floor of the cargo
area when not in use. Make sure to hook the
loops on the floor cover to the hooks in the
trim panel to help carry the load of any
contents that are stored in the cargo area.
Instructions for operation are included on the
cargo cover housing.
Cargo Cover and Storage Area
PASSENGER/CARGO AREAS
41
Page 53 of 132
Other Functions
8Home
Displays the Home screen apps. The Home screen allows you to customize which
apps appear and rearrange the icons in a personalized order.
9Map(if equipped)
Displays the map and navigation features available on the screen.
10Apps
Displays the installed apps that are available on your vehicle.
Controlling the Volume
Adjusting the Volume:Turn the volume knob to adjust the volume. The volume stays at
the level you set after an ignition cycle.
Muting the Volume:You can mute the audio system by pressing the volume knob once,
and un-mute the audio by pressing the knob again. It will un-mute automatically after an
ignition cycle.
Turning the System Off:To turn the system off, press and hold the volume knob for about
three seconds. The system remains off after an ignition cycle. Press the volume knob again
to turn the system back on.
STARLINK OVERVIEW
51