brakes SUBARU FORESTER 2010 SH / 3.G User Guide
[x] Cancel search | Manufacturer: SUBARU, Model Year: 2010, Model line: FORESTER, Model: SUBARU FORESTER 2010 SH / 3.GPages: 402, PDF Size: 14.36 MB
Page 271 of 402
8-16Driving tips
Trailer hitch (dealer option)
WARNING
. Never exceed the maximum
weight specified for the trailer
hitch. Exceeding the maximum
weight could cause an accident
resulting in serious personal in-
juries. Permissible trailer weight
changes depending on the situa-
tion. For possible recommenda-
tions and limitations, refer to“ Trailer towing ”F 8-18.
. Trailer brakes are required when
the towing load exceeds 1,000
lbs (453 kg). Be sure your trailer
has safety chains and that each
chain will hold the trailer ’s max-
imum gross weight. Towing trai-
lers without safety chains could
create a traffic safety hazard if
the trailer separates from the
hitch due to coupling damage or
hitch ball damage.
. Be sure to check the hitch pin
and safety pin for positive lock-
ing placement before towing a
trailer. If the ball mount comes off
the hitch receiver, the trailer
could get loose and create a traffic safety hazard.
. Use only the ball mount supplied
with this hitch. Use the hitch only
as a weight carrying hitch. Do not
use with any type of weight
distributing hitch.
. The standard bumper beam must
be installed after you remove the
trailer hitch. Consult a SUBARU
dealer for purchase of a standard
bumper beam if you do not have
the original.
. Safety performance is decreased
and there is increased risk of
injury to passengers in the case
of an accident if the trailer hitch
or a standard bumper beam is
not installed. One of them must
always be installed on the vehi-cle.
. If a trailer hitch is installed, it is
not possible to install the rear
towing hook.
When you tow a trailer, refer to “Trailer
towing ”F 8-18.
& Connecting a trailer
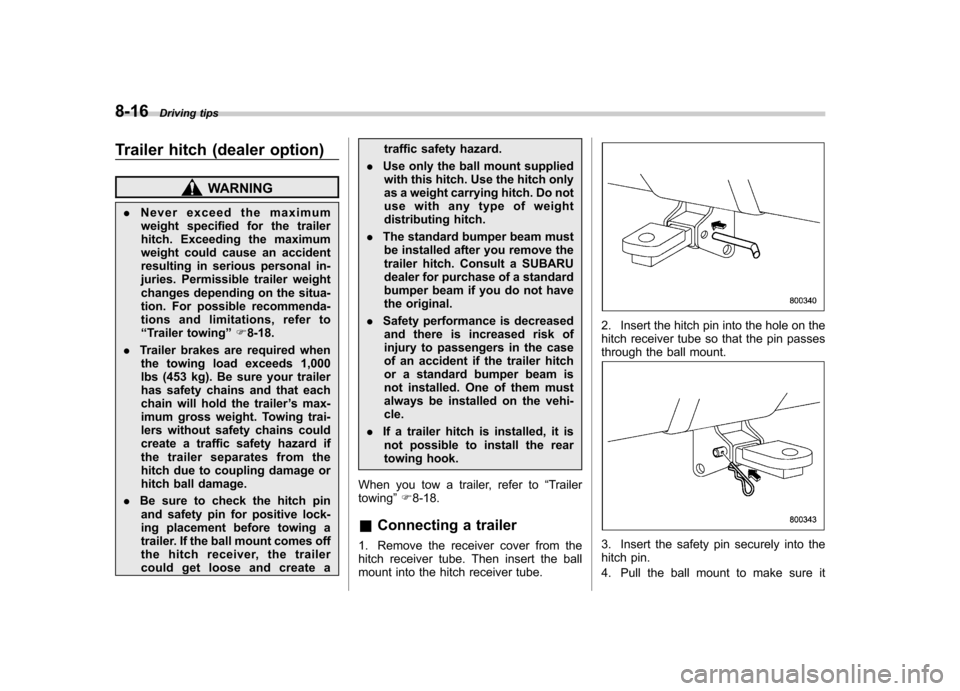
1. Remove the receiver cover from the
hitch receiver tube. Then insert the ball
mount into the hitch receiver tube.
2. Insert the hitch pin into the hole on the
hitch receiver tube so that the pin passes
through the ball mount.
3. Insert the safety pin securely into the
hitch pin.
4. Pull the ball mount to make sure it
Page 273 of 402
8-18Driving tips
Trailer towing
Your vehicle is designed and intended to
be used primarily as a passenger-carrying
vehicle. Towing a trailer puts additional
loads on your vehicle ’s engine, drivetrain,
brakes, tires and suspension and has an
adverse effect on fuel economy.
If you do decide to tow a trailer, your safety
and satisfaction depend upon proper use
of correct equipment and cautious opera-
tion of your vehicle. Seek the advice of
your SUBARU dealer to assist you in
purchasing a hitch and other necessary
towing equipment appropriate for your
vehicle. In addition, be sure to follow the
instructions on correct installation and use
provided by the trailer and other towing
equipment manufacturers.
SUBARU assumes no responsibility for
injuries or vehicle damage that result from
trailer towing equipment, or from any
errors or omissions in the instructions
accompanying such equipment or for your
failure to follow the proper instructions.
& Warranties and maintenance
SUBARU warranties do not apply to
vehicle damage or malfunction caused
by trailer towing. If you use your vehicle to
tow a trailer, more frequent maintenance
will be required due to the additional load. (Refer to
“Maintenance schedule under
severe driving conditions ”in the “Warranty
and Maintenance Booklet ”.)
Under no circumstances should a trailer
be towed with a new vehicle or a vehicle
with any new powertrain component (en-
gine, transmission, differential, wheel
bearings, etc.) for the first 1,000 miles
(1,600 km) of driving.
& Maximum load limits
WARNING
Never exceed the maximum load
limits explained in the following.
Exceeding the maximum load limits
could cause personal injury and/or
vehicle damage.
CAUTION
. Adequate size trailer brakes are
required when the trailer and its
cargo exceed 1,000 lbs (453 kg)
total weight.
. Before towing a trailer, check the
trailer total weight, GVW, GAWs
and tongue load. Make sure the
load and its distribution in your
vehicle and trailer are accepta- ble.
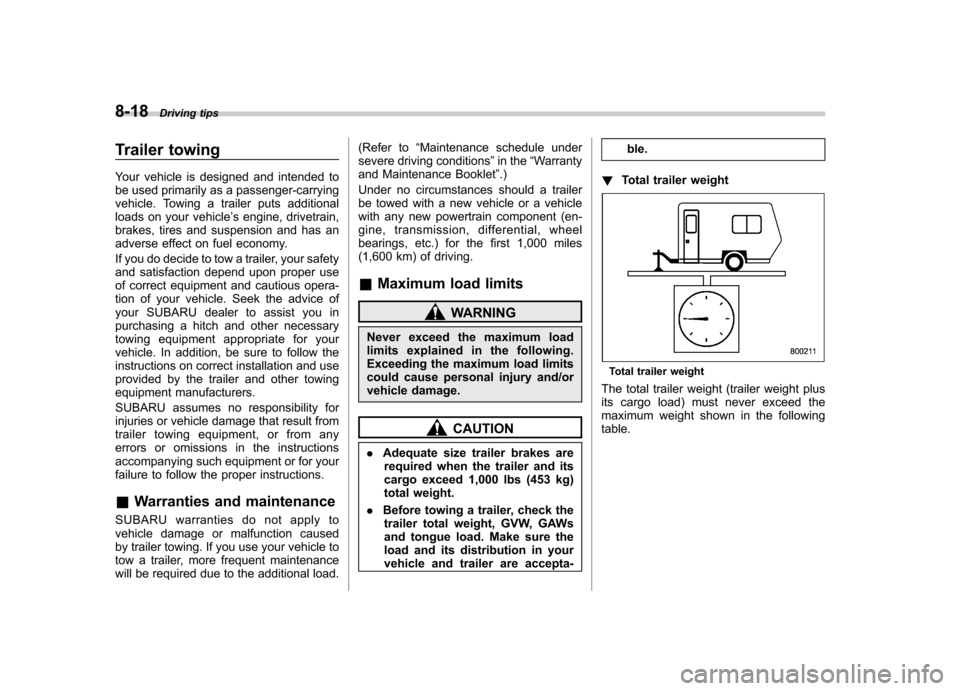
! Total trailer weight
Total trailer weight
The total trailer weight (trailer weight plus
its cargo load) must never exceed the
maximum weight shown in the followingtable.
Page 274 of 402
Model ConditionsMaximum
total trailer
weight
MT models When towing a
trailer without brakes. 1,000 lbs
(453 kg)
When towing a
trailer with brakes. 2,400 lbs
(1,087 kg)
AT models When towing a
trailer without brakes. 1,000 lbs
(453 kg)
When towing a
trailer with brakes. 2,400 lbs
(1,087 kg)
When towing a
trailer on a long
uphill grade con-
tinuously for over
5 miles (8 km) with
an outside tem-
perature of 104 8F
(40 8C) or above. 1,000 lbs
(453 kg) !
Gross Vehicle Weight (GVW) and
Gross Vehicle Weight Rating(GVWR)
Gross Vehicle Weight
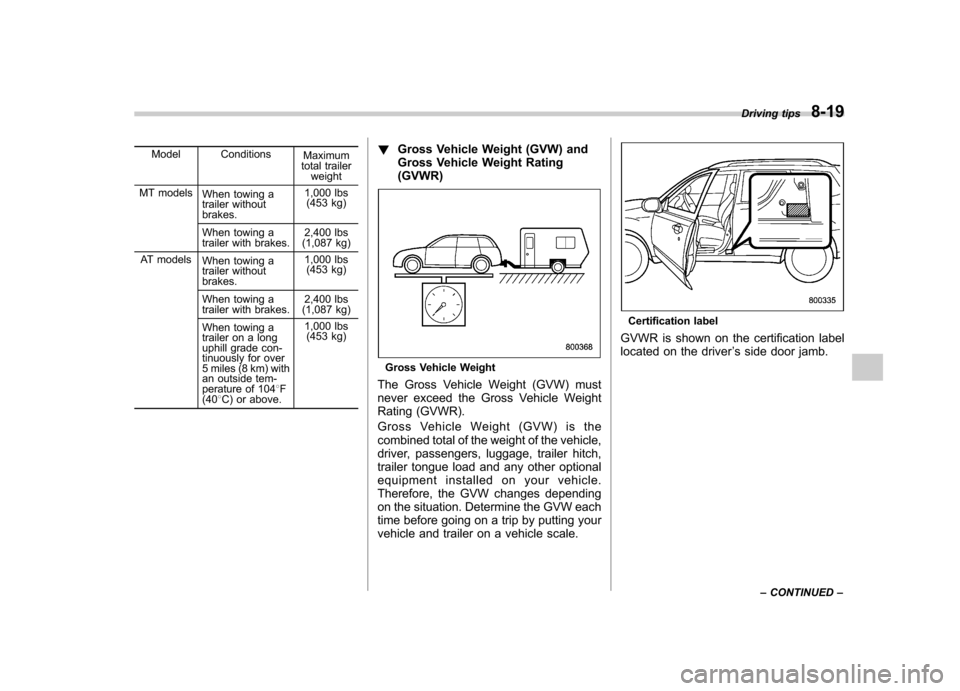
The Gross Vehicle Weight (GVW) must
never exceed the Gross Vehicle Weight
Rating (GVWR).
Gross Vehicle Weight (GVW) is the
combined total of the weight of the vehicle,
driver, passengers, luggage, trailer hitch,
trailer tongue load and any other optional
equipment installed on your vehicle.
Therefore, the GVW changes depending
on the situation. Determine the GVW each
time before going on a trip by putting your
vehicle and trailer on a vehicle scale.
Certification label
GVWR is shown on the certification label
located on the driver ’s side door jamb. Driving tips
8-19
– CONTINUED –
Page 277 of 402
8-22Driving tips
&Connecting a trailer
! Trailer brakes
WARNING
. Adequate size trailer brakes are
required when the trailer and its
cargo exceed 1,000 lbs (453 kg)
total weight.
. Do not directly connect your
trailer ’s hydraulic brake system
to the hydraulic brake system in
your vehicle. Direct connection
would cause the vehicle ’s brake
performance to deteriorate and
could lead to an accident.
If your trailer ’s total weight (trailer weight
plus its cargo weight) exceeds 1,000 lbs
(453 kg), the trailer is required to be
equipped with its own brake system.
Electric brakes or surge brakes are
recommended, and must be installed
properly. Check that your trailer ’s brakes
conform with Federal, state/province and/
or other applicable regulations. YourSUBARU ’s brake system is not designed
to be tapped into the trailer ’s hydraulic
brake system. Please ask your SUBARU
dealer and professional trailer supplier for
more information about the trailer ’s brake
system. !
Trailer safety chains
WARNING
Always use safety chains between
your vehicle and the trailer. Towing a
trailer without safety chains could
create a traffic safety hazard if the
trailer separates from the hitch due
to coupling damage or hitch balldamage.
In case the trailer hitch connector or hitch
ball should break or become discon-
nected, the trailer could get loose and
create a traffic safety hazard.
For safety, always connect the towing
vehicle and trailer with trailer safety
chains. Pass the chains crossing each
other under the trailer tongue to prevent
the trailer from dropping onto the ground
in case the trailer tongue should discon-
nect from the hitch ball. Allow sufficient
slack in the chains taking tight-turn situa-
tions into account; however, be careful not
to let them drag on the ground.
For more information about the safety
chain connection, refer to the instructions
for your hitch and trailer. !
Side mirrors
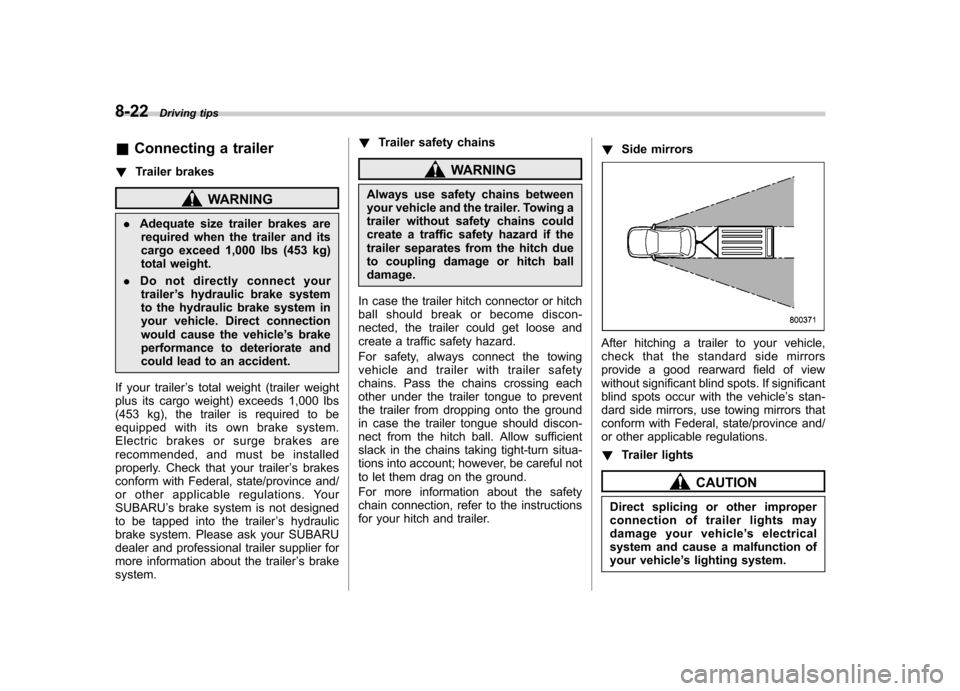
After hitching a trailer to your vehicle,
check that the standard side mirrors
provide a good rearward field of view
without significant blind spots. If significant
blind spots occur with the vehicle ’s stan-
dard side mirrors, use towing mirrors that
conform with Federal, state/province and/
or other applicable regulations. ! Trailer lights
CAUTION
Direct splicing or other improper
connection of trailer lights may
damage your vehicle ’s electrical
system and cause a malfunction of
your vehicle ’s lighting system.
Page 279 of 402
8-24Driving tips
nificant blind spot.
. Sufficient time should be taken to learn
the “feel ”of the vehicle/trailer combination
before starting out on a trip. In an area free
of traffic, practice turning, stopping and
backing up. ! Driving with a trailer
. You should allow for considerably more
stopping distance when towing a trailer.
Avoid sudden braking because it may
result in skidding or jackknifing and loss ofcontrol. . Avoid abrupt starts and sudden accel-
erations. If your vehicle has a manual
transmission, always start out in first gear
and release the clutch at moderate enginerevolution. . Avoid uneven steering, sharp turns and
rapid lane changes.. Slow down before turning. Make a
longer than normal turning radius because
the trailer wheels will be closer than the
vehicle wheels to the inside of the turn. In
a tight turn, the trailer could hit yourvehicle. . Crosswinds will adversely affect the
handling of your vehicle and trailer, caus-
ing sway. Crosswinds can be due to
weather conditions or the passing of large
trucks or buses. If swaying occurs, firmly
grip the steering wheel and slow down immediately but gradually. .
When passing other vehicles, consid-
erable distance is required because of the
added weight and length caused by
attaching the trailer to your vehicle.
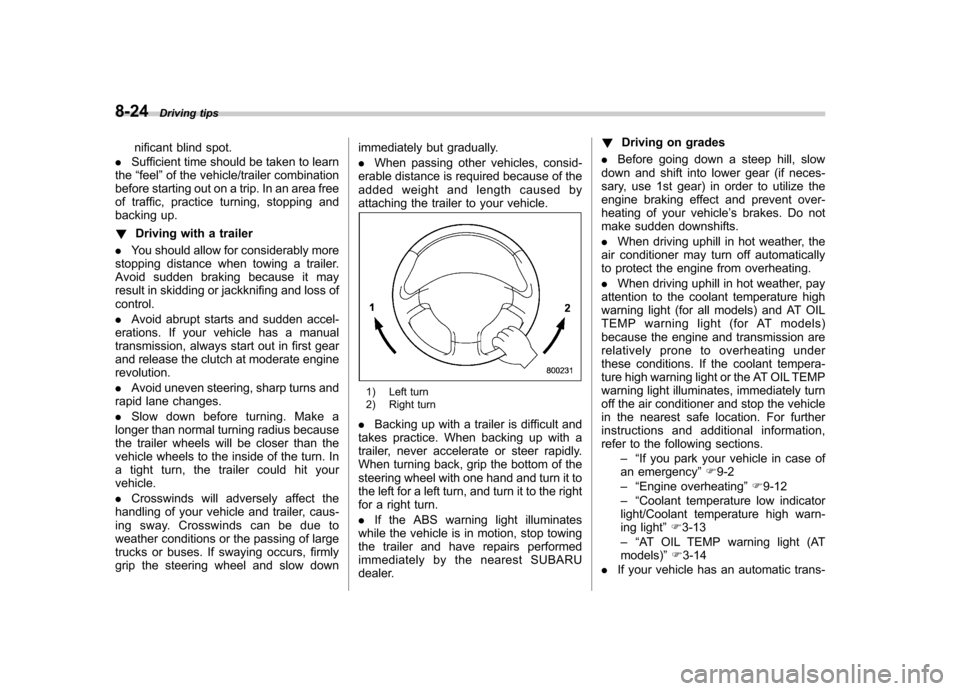
1) Left turn
2) Right turn
. Backing up with a trailer is difficult and
takes practice. When backing up with a
trailer, never accelerate or steer rapidly.
When turning back, grip the bottom of the
steering wheel with one hand and turn it to
the left for a left turn, and turn it to the right
for a right turn. . If the ABS warning light illuminates
while the vehicle is in motion, stop towing
the trailer and have repairs performed
immediately by the nearest SUBARU
dealer. !
Driving on grades
. Before going down a steep hill, slow
down and shift into lower gear (if neces-
sary, use 1st gear) in order to utilize the
engine braking effect and prevent over-
heating of your vehicle ’s brakes. Do not
make sudden downshifts. . When driving uphill in hot weather, the
air conditioner may turn off automatically
to protect the engine from overheating. . When driving uphill in hot weather, pay
attention to the coolant temperature high
warning light (for all models) and AT OIL
TEMP warning light (for AT models)
because the engine and transmission are
relatively prone to overheating under
these conditions. If the coolant tempera-
ture high warning light or the AT OIL TEMP
warning light illuminates, immediately turn
off the air conditioner and stop the vehicle
in the nearest safe location. For further
instructions and additional information,
refer to the following sections.
–“If you park your vehicle in case of
an emergency ”F 9-2
–“ Engine overheating ”F 9-12
–“ Coolant temperature low indicator
light/Coolant temperature high warn-
ing light ”F 3-13
–“ AT OIL TEMP warning light (AT
models) ”F 3-14
. If your vehicle has an automatic trans-
Page 280 of 402
mission, avoid using the accelerator pedal
to stay stationary on an uphill slope
instead of using the parking brake or foot
brake. That may cause the transmission
fluid to overheat. .If your vehicle has an automatic trans-
mission, place the select lever as follows.
Uphill slopes: “D ”position
Downhill slopes: A low-speed gear posi-
tion to use engine braking ! Parking on a grade
Always block the wheels under both
vehicle and trailer when parking. Apply
the parking brake firmly. You should not
park on a hill or slope. But if parking on a
hill or slope cannot be avoided, you
should take the following steps.
1. Apply the brakes and hold the pedal down.
2. Have someone place wheel blocks
under both the vehicle and trailer wheels.
3. When the wheel blocks are in place,
release the regular brakes slowly until the
blocks absorb the load.
4. Apply the regular brakes and then
apply the parking brake; slowly release
the regular brakes.
5. Shift into 1st or reverse gear (manual
transmission models) or the “P ” position
(automatic transmission models) and shut
off the engine. Driving tips
8-25
Page 301 of 402
10-2Appearance care
Exterior care &Washing
CAUTION
. When washing the vehicle, the
brakes may get wet. As a result,
the brake stopping distance will
be longer. To dry the brakes,
drive the vehicle at a safe speed
while lightly pressing the brake
pedal to heat up the brakes.
. Do not wash the engine compart-
ment and area adjacent to it. If
water enters the engine air in-
take, electrical parts or the power
steering fluid reservoir, it will
cause engine trouble or faulty
power steering respectively.
. Since your vehicle is equipped
with a rear wiper, automatic car-
wash brushes could become
tangled around it, damaging the
wiper arm and other compo-
nents. Ask the automatic car-
wash operator not to let the
brushes touch the wiper arm or
to fix the wiper arm on the rear
window glass with adhesive tape
before operating the machine. NOTE
When having your vehicle washed in
an automatic car wash, make sure
beforehand that the car wash is of
suitable type.
The best way to preserve your vehicle
’s
beauty is frequent washing. Wash the
vehicle at least once a month to avoid
contamination by road grime.
Wash dirt off with a wet sponge and plenty
of lukewarm or cold water. Do not wash
the vehicle with hot water and in direct sunlight.
Salt, chemicals, insects, tar, soot, tree
sap, and bird droppings should be washed
off by using a light detergent, as required.
If you use a light detergent, make certain
that it is a neutral detergent. Do not use
strong soap or chemical detergents. All
cleaning agents should be promptly
flushed from the surface and not allowed
to dry there. Rinse the vehicle thoroughly
with plenty of lukewarm water. Wipe the
remaining water off with a chamois or softcloth. ! Washing the underbody
Chemicals, salts and gravel used for
deicing road surfaces are extremely cor-
rosive, accelerating the corrosion of un-
derbody components, such as the exhaust system, fuel and brake lines, brake
cables, floor pan and fenders, and sus-pension.
Thoroughly flush the underbody and in-
side of the fenders with lukewarm or cold
water at frequent intervals to reduce the
harmful effects of such agents.
Mud and sand adhering to the underbody
components may accelerate their corro-sion.
After driving off-road or on muddy or
sandy roads, wash the mud and sand off
the underbody. Carefully flush the suspen-
sion and axle parts, as they are particu-
larly prone to mud and sand buildup. Do
not use a sharp-edged tool to remove
caked mud. NOTE
Be careful not to damage brake hoses,
sensor harnesses, and other parts
when washing suspension compo-nents. !
Using a warm water washer
. Keep a good distance of 12 in (30 cm)
or more between the washer nozzle and
the vehicle. . Do not wash the same area continu-
ously.. If a stain will not come out easily, wash
Page 378 of 402
&Glossary of tire terminology
. Accessory weight
The combined weight (in excess of
those standard items which may be
replaced) of automatic transmis-
sion, power steering, power brakes,
power windows, power seats, radio,
and heater, to the extent that these
items are available as factory-in-
stalled equipment (whether in-
stalled or not). . Bead
The part of the tire that is made of
steel wires, wrapped or reinforced
by ply cords and that is shaped to fit
the rim. . Bead separation
A breakdown of the bond between
components in the bead. . Bias ply tire
A pneumatic tire in which the ply
cords that extend to the beads are
laid at alternate angles substantially
less than 90 degrees to the center-
line of the tread. . Carcass
The tire structure, except tread and sidewall rubber which, when in-
flated, bears the load.
. Chunking
The breaking away of pieces of the
tread or sidewall.. Cold tire pressure
The pressure in a tire that has been
driven less than 1 mile or has been
standing for three hours or more.. Cord
The strands forming the plies in the tire. . Cord separation
The parting of cords from adjacent
rubber compounds.. Cracking
Any parting within the tread, side-
wall, or inner liner of the tire
extending to cord material. . Curb weight
The weight of a motor vehicle with
standard equipment including the
maximum capacity of fuel, oil and
coolant, and if so equipped, air
conditioning and additional weight
optional engine. .
Extra load tire
A tire designed to operate at higher
loads and higher inflation pressure
than the corresponding standardtire. . Groove
The space between two adjacent
tread ribs.. Innerliner
The layer(s) forming the inside sur-
face of a tubeless tire that contains
the inflating medium within the tire. . Innerliner separation
The parting of the innerliner from
cord material in the carcass.. Intended outboard sidewall
(1) The sidewall that contains a
whitewall, bears white lettering
or bears manufacturer, brand,
and/or model name molding that
is higher or deeper than the
same molding on the other side-
wall of the tire, or (2) The outward facing sidewall
of an asymmetrical tire that has
a particular side that must al-
ways face outward when mount-
Consumer information and Reporting safety defects
13-7
– CONTINUED –
Page 380 of 402
sory weight, including heavy duty
brakes, ride levelers, roof rack,
heavy duty battery, and special trim. .Radial ply tire
A pneumatic tire in which the ply
cords that extend to the beads are
laid at substantially 90 degrees to
the centerline of the tread. . Recommended inflation pres-
sure
The cold inflation pressure recom-
mended by a vehicle manufacturer. . Reinforced tire
A tire designed to operate at higher
loads and at higher inflation pres-
sures than the corresponding stan-
dard tire. . Rim
A metal support for a tire or a tire
and tube assembly upon which the
tire beads are seated. . Rim diameter
Nominal diameter of the bead seat. . Rim size designation
Rim diameter and width. .
Rim type designation
The industry of manufacturer ’s des-
ignation for a rim by style or code. . Rim width
Nominal distance between rim flanges. . Section width
The linear distance between the
exteriors of the sidewalls of an
inflated tire, excluding elevations
due to labeling, decoration, or
protective bands. . Sidewall
That portion of a tire between the
tread and bead.. Sidewall separation
The parting of the rubber com-
pound from the cord material in
the sidewall.. Test rim
The rim on which a tire is fitted for
testing, and it may be any rim listed
as appropriate for use with that tire.. Tread
That portion of a tire that comes
into contact with the road. .
Tread rib
A tread section running circumfer-
entially around a tire. . Tread separation
Pulling away of the tread from the
tire carcass. . Treadwear indicators (TWI)
The projections within the principal
grooves designed to give a visual
indication of the degrees of wear of
the tread. . Vehicle capacity weight
The rated cargo and luggage load
plus 150 lbs (68 kg) times thevehicle ’s designated seating capa-
city. . Vehicle maximum load on the
tire
Load on an individual tire that is
determined by distributing to each
axle its share of the maximum
loaded vehicle weight and dividing
by two. . Vehicle normal load on the tire
Load on an individual tire that is
determined by distributing to each
axle its share of the curb weight,
Consumer information and Reporting safety defects
13-9
– CONTINUED –
Page 385 of 402
13-14Consumer information and Reporting safety defects
occupants to three), and a child
restraint system weighing 11 lbs (5
kg) is installed in the vehicle for the
child to use, the calculations are asfollows. 1. Calculate the total weight.
2.Calculate the available load ca-
pacity.
3. The total weight now exceeds
the capacity weight by 32 lbs (15
kg), so the cargo weight must be
reduced by 32 lbs (15 kg) or more. & Determining compatibility of
tire and vehicle load capaci- ties
The sum of four tires ’maximum
load ratings must exceed the max-
imum loaded vehicle weight( “ GVWR ”). In addition, sum of the
maximum load ratings of two front
tires and of two rear tires must
exceed each axle ’smaximum
loaded capacity ( “GAWR ”). Original
equipment tires are designed to
fulfill those conditions.
The maximum loaded vehicle
weight is referred to Gross Vehicle
Weight Rating (GVWR). And each axle ’s maximum loaded capacity is
referred to Gross Axle Weight Rat-
ing (GAWR). The GVWR and eachaxle ’s GAWR are shown on the
vehicle certification label affixed to
the driver ’s door. The GVWR and front and rear
GAWRs are determined by not only
the maximum load rating of tires but
also loaded capacities of the vehi-cle
’s suspension, axles and other
parts of the body.
Therefore, this means that the
vehicle cannot necessarily be
loaded up to the tire ’s maximum
load rating on the tire sidewall.
& Adverse safety conse-
quences of overloading on
handling and stopping and
on tires
Overloading could affect vehicle
handling, stopping distance, and
vehicle and tire performance in the
following ways. This could lead to
an accident and possibly result in
severe personal injury. . Vehicle stability will deteriorate.
. Heavy and/or high-mounted
loads could increase the risk of
rollover. . Stopping distance will increase.
. Brakes could overheat and fail.