horn SUBARU FORESTER 2011 SH / 3.G Owners Manual
[x] Cancel search | Manufacturer: SUBARU, Model Year: 2011, Model line: FORESTER, Model: SUBARU FORESTER 2011 SH / 3.GPages: 446, PDF Size: 15.93 MB
Page 7 of 446

4
Mark Name
Hazard warning flasher
Engine hood
Seat heater
Child restraint top tether an- chorages
Child restraint lower an- chorages
Horn
Wiper intermittent
Windshield washer
Windshield wiper mist (for
single wipe)
Rear window wiper
Rear window washerMark Name
Lights
Tail lights, license plate light
and instrument panel illumi- nation
Headlights
Turn signal
Illumination brightness
Fan speed
Instrument panel outlets
Instrument panel outlets and
foot outlets
Foot outlets
Windshield defroster and foot outlets
Windshield defrosterMark Name
Rear window defogger/Out-
side mirror defogger
Air recirculation
Engine oil
Washer
Door lock (Transmitter)
Door unlock (Transmitter)
Rear gate (Transmitter)
Page 19 of 446

16 &Instrument panel
1) Door locks (page 2-4)
2) Outside mirror switch (page 3-44)
3) Illumination brightness control
(page 3-32)
4) Light control lever (page 3-29)
5) Combination meter (page 3-6)
6) Wiper control lever (page 3-33)
7) Hazard warning flasher switch (page 3-5)
8) Audio (page 5-1)
9) Shift lever (MT) (page 7-13)/ Select lever (AT) (page 7-15)
10) Climate control (page 4-1)
11) Cruise control (page 7-32)
12) Horn (page 3-47)
13) SRS airbag (page 1-33)
14) Tilt/telescopic steering (page 3-47)
15) Hands-free switches (page 5-43)
16) Audio control buttons (page 5-38)
17) Fuse box (page 11-45)
18) Vehicle Dynamics Control OFF switch (page 7-27)
19) Hood lock release knob (page 11-5)
20) Power windows (page 2-20)
Page 25 of 446

22
Function settings
A SUBARU dealer can change the settings of the functions shown in the following table to meet your personal requirements. Contact
the nearest SUBARU dealer for details. If your vehicle is equipped with the genuine SUBARU navigation system, the settings for some
of these functions can be changed using the navigation monitor. For details, please refer to the Owner’s Manual supplement for the
navigation system.
Item Function Possible settings Default setting Page
Alarm system Alarm system Operation/Non-operation Operation 2-15 Monitoring start delay time (after closure
of doors) 0 second/30 seconds 30 seconds 2-17
Impact sensor operation (only models
with shock sensors [dealer option]) Operation/Non-operation Non-operation 2-19
Passive arming Operation/Non-operation Non-operation 2-18
Dome light/map lights illumination ON/OFF OFF 2-15
Remote keyless entry sys- tem Hazard warning flasher Operation/Non-operation Operation 2-7
Audible signal Operation/Non-operation Operation 2-10
Key lock-in prevention Key lock-in prevention Operation/Non-operation Operation 2-7
Remote engine start system
(dealer option) Horn chirp confirmation ON/OFF ON 7-11
Defogger and deicer system
for models with the automatic
climate control system Rear window defogger, outside mirror
defogger and windshield wiper deicer
Operation for 15 minutes/
Continuous operationOperation for 15 minutes 3-45
Map light/Dome light Operation of map light/dome light OFF delay timer OFF/Short/Normal/Long Long 6-2/
6-3
Battery drainage prevention function Battery drainage prevention function* Operation/Non-operation Operation 2-5
Seatbelt warning Sounds a chime while driving Operation/Non-operation Operation 3-13
*: The setting can only be changed at a SUBARU dealer.
Page 89 of 446

2-4Keys and doors
use with one vehicle.
Door locks &Locking and unlocking from
the outside
NOTE
If you unlock the driver ’s door with a
key and open the door while the alarm
system is armed, the alarm system is
triggered and the vehicle ’shorn
sounds. In this case, perform any of
the following operations: . Press any button on the remote
transmitter. . Insert the key into the ignition
switch and turn the ignition switch tothe “ON ”position.
For details about the alarm system,
refer to “Alarm system ”F 2-15.
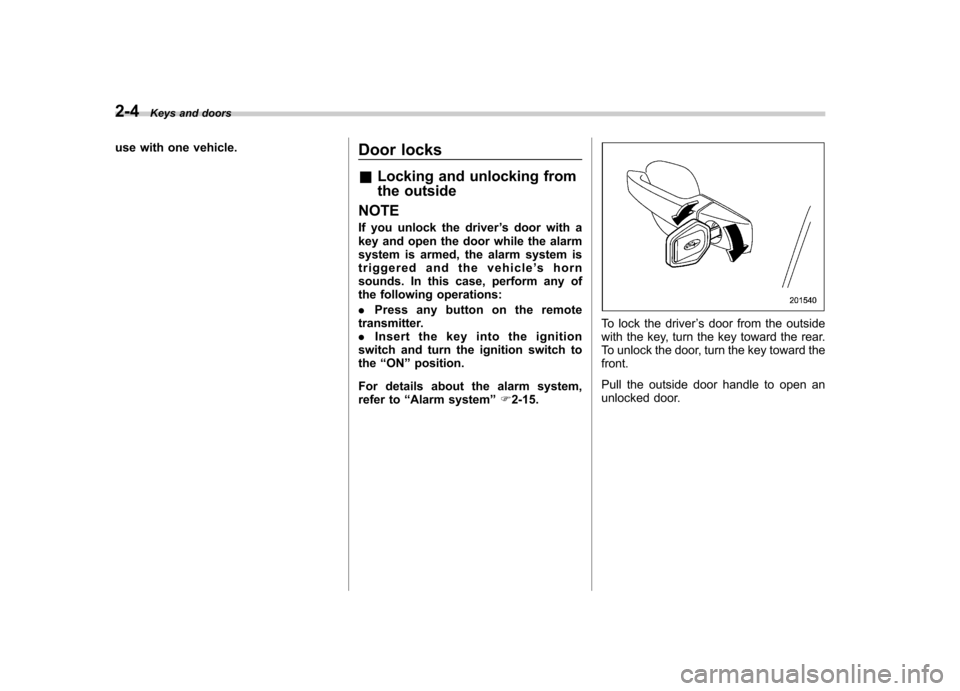
To lock the driver ’s door from the outside
with the key, turn the key toward the rear.
To unlock the door, turn the key toward thefront.
Pull the outside door handle to open an
unlocked door.
Page 94 of 446

&Unlocking the doors
Press the “”button to unlock the driver ’s
door. An electronic chirp will sound twice
and the turn signal lights will flash twice.
To unlock all doors and the rear gate,
briefly press the “
”button a second time
within 5 seconds. NOTE
If the interval between the first and
second presses of the “
”button (for
unlocking of all of the doors and the
rear gate) is extremely short, the sys-
tem may not respond. &
Unlocking the rear gate
Pressing the “”button unlocks the rear
gate.
An electronic chirp will sound twice and
the turn signal lights will flash twice. & Illuminated entry
The interior (dome) light and the map light
will illuminate when the “
”button is
pressed. These lights stay illuminated for
approximately 30 seconds if any of the
doors or the rear gate is not opened.
If the “
”button is pressed before 30
seconds have elapsed, these lights will
turn off. The lights must be set to the
DOOR position in order for this function
to operate.
A SUBARU dealer can change the illumi- nation period setting of the interior light in
accordance with your preference. Contact
the nearest SUBARU dealer for details. &
Vehicle finder function
Use this function to find your vehicle
parked among many vehicles in a large
parking lot. Provided you are within 30 feet
(10 meters) of the vehicle, pressing the “
”
button three times in a 5-second period
will cause your vehicle ’s horn to sound
once and its turn signal lights to flash threetimes. NOTE
If the interval between presses is too
short when you press the “
”button
three times, the system may not re-
spond to the signals from the remote
transmitter. Keys and doors
2-9
– CONTINUED –
Page 95 of 446

2-10Keys and doors
&Sounding a panic alarm
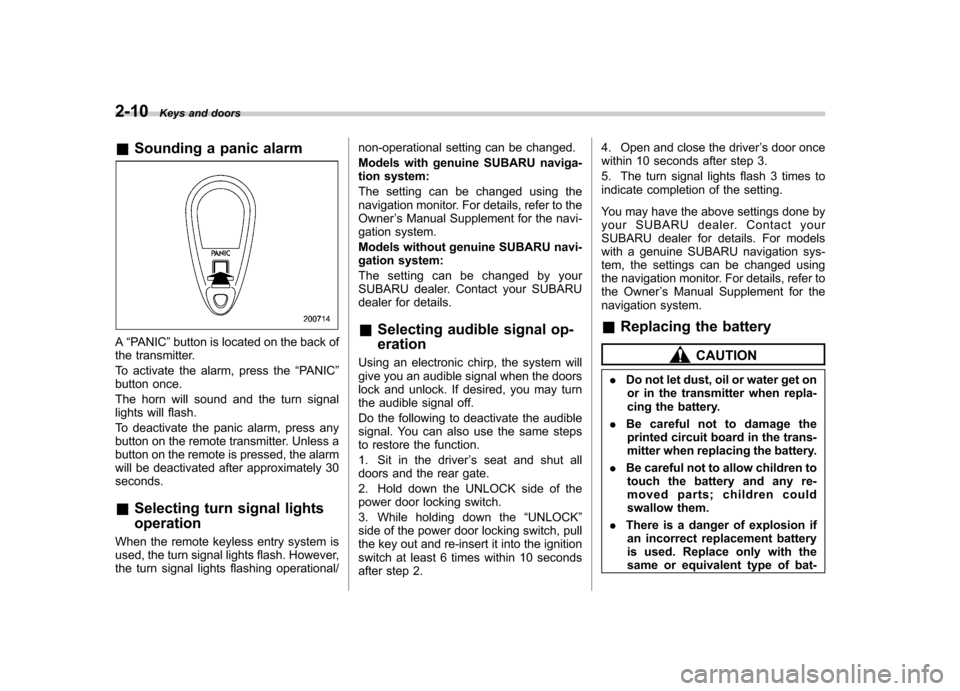
A“PANIC ”button is located on the back of
the transmitter.
To activate the alarm, press the “PANIC ”
button once.
The horn will sound and the turn signal
lights will flash.
To deactivate the panic alarm, press any
button on the remote transmitter. Unless a
button on the remote is pressed, the alarm
will be deactivated after approximately 30seconds. & Selecting turn signal lights operation
When the remote keyless entry system is
used, the turn signal lights flash. However,
the turn signal lights flashing operational/ non-operational setting can be changed.
Models with genuine SUBARU naviga-
tion system:
The setting can be changed using the
navigation monitor. For details, refer to theOwner
’s Manual Supplement for the navi-
gation system.
Models without genuine SUBARU navi-
gation system:
The setting can be changed by your
SUBARU dealer. Contact your SUBARU
dealer for details.
& Selecting audible signal op- eration
Using an electronic chirp, the system will
give you an audible signal when the doors
lock and unlock. If desired, you may turn
the audible signal off.
Do the following to deactivate the audible
signal. You can also use the same steps
to restore the function.
1. Sit in the driver ’s seat and shut all
doors and the rear gate.
2. Hold down the UNLOCK side of the
power door locking switch.
3. While holding down the “UNLOCK ”
side of the power door locking switch, pull
the key out and re-insert it into the ignition
switch at least 6 times within 10 seconds
after step 2. 4. Open and close the driver
’s door once
within 10 seconds after step 3.
5. The turn signal lights flash 3 times to
indicate completion of the setting.
You may have the above settings done by
your SUBARU dealer. Contact your
SUBARU dealer for details. For models
with a genuine SUBARU navigation sys-
tem, the settings can be changed using
the navigation monitor. For details, refer to
the Owner ’s Manual Supplement for the
navigation system.
& Replacing the battery
CAUTION
. Do not let dust, oil or water get on
or in the transmitter when repla-
cing the battery.
. Be careful not to damage the
printed circuit board in the trans-
mitter when replacing the battery.
. Be careful not to allow children to
touch the battery and any re-
moved parts; children could
swallow them.
. There is a danger of explosion if
an incorrect replacement battery
is used. Replace only with the
same or equivalent type of bat-
Page 100 of 446

Alarm system
The alarm system helps to protect your
vehicle and valuables from theft. The horn
sounds and the turn signal lights flash if
someone attempts to break into your
vehicle. The starter motor is also inter-
rupted to prevent starting the vehicle
without a key.
The system can be armed and disarmed
with the remote transmitter.
The system does not operate when the
key is inserted into the ignition switch.
Your vehicle’s alarm system has been set
for activation at the time of shipment from
the factory. You can set the system for
deactivation yourself or have it done by
your SUBARU dealer. & System operation
The alarm system will give the following
alarms when triggered. . The vehicle ’s horn will sound for 30
seconds.. The turn signal lights will flash for 30
seconds.
If any of the doors or the rear gate remains
open after the 30-second period, the horn
will continue to sound for a maximum of 3
minutes. If the door or the rear gate is closed while the horn is sounding, the
horn will stop sounding with a delay of up
to 30 seconds.
The alarm is triggered by: .
Opening any of the doors or the rear
gate. Physical impact to the vehicle, such as
forced entry (only vehicles with shock
sensors (dealer option))
NOTE
The alarm system can be set to trigger
the illumination of the following interiorlights. . Dome light (illuminates only when
the dome light switch is in the “DOOR ”
position) . Map lights (illuminate only when the
door interlock switch is in the “DOOR ”
position)
The notifications regarding the dome
light and the map lights are deactivated
as the factory setting. A SUBARU
dealer can activate the system. Contact
your SUBARU dealer for details. &
Activating and deactivating
the alarm system
To change the setting of your vehicle ’s
alarm system for activation or deactiva-
tion, do the following.
1. Disarm the alarm system. Refer to “ Disarming the system ”F 2-17.
2. Sit in the driver ’s seat and shut all
doors and the rear gate.
3. Turn the ignition switch to the “ON ”
position.
4. Hold down the UNLOCK side of the driver ’s power door locking switch, open
the driver ’s door within the following 1
second, and wait 10 seconds without
releasing the switch. The setting will then
be changed as follows.
If the system was previously activated:
The odometer/trip meter screen displays “ AL oF ”and the horn sounds twice,
indicating that the system is now deacti-vated.
If the system was previously deacti- vated:
The odometer/trip meter screen displays “ AL on ”and the horn sounds once,
indicating that the system is now acti-vated. Keys and doors
2-15
– CONTINUED –
Page 104 of 446

!Disarming the system
To disarm the system, briefly press the “
” button on the transmitter.
& Tripped sensor identification
The security indicator light flashes when
the alarm system has been triggered.
Also, the number of flashes indicates the
location of unauthorized intrusion or the
severity of impact on the vehicle.
When the ignition switch is turned to the “ ON ”position, the indicator light will light
for 1 second and then flash as follows. . When a door or rear gate was opened:
5 times. When the ignition switch was turned to
the “ON ”position: 3 times
. When a strong impact or multiple
impacts were sensed: twice (only vehicles
with shock sensors (dealer option)) . When a light impact was sensed: once
(only vehicles with shock sensors (dealer option))
NOTE
Any of the above indicator light flash-
ings will recur each time the ignition
switch is turned to the “ON ”position.
Rearming the alarm system cancels theflashing. &
Shock sensors (dealer op- tion)
The shock sensors trigger the alarm
system when they sense impacts applied
to the vehicle and when any of their
electric wires are cut. The alarm system
causes the horn to sound and the turn
signal lights to flash for a short time when
the sensed impact is weak, but it warns of
a strong impact or multiple impacts by
sounding the horn and flashing the turn
signal lights, both lasting approximately 30seconds.
If you desire, your SUBARU dealer can
connect them and set them for activation
or deactivation. NOTE . The shock sensors are not always
able to sense impacts caused by break-
ing in, and cannot sense an impact that
does not cause vibration (such as
breaking the glass using a rescuehammer).. The shock sensors may sense vi-
bration as indicated in the following
examples and trigger the alarm system.
Select the settings of the alarm system
and shock sensors appropriately de-
pending on where you usually park
your vehicle. Examples:
Vibration from a construction site
Vibration in a multistory car park
Vibration from trains
. You can have the sensitivity of the
shock sensors adjusted to your pre-
ference by your SUBARU dealer. Keys and doors
2-19
Page 113 of 446

Instruments and controlsInformation display ............................................ 3-26
Outside temperature indicator ............................ 3-27
Current fuel consumption (if equipped) ............... 3-28
Average fuel consumption .................................. 3-28
To turn off fuel consumption indicator display ............................................................. 3-28
Light control switch ........................................... 3-29
Headlights. ......................................................... 3-30
High/low beam change (dimmer) ......................... 3-30
Headlight flasher ................................................ 3-30
Daytime running light system (if equipped) ... ...... 3-31
Automatic headlight beam leveler (models with HID headlights) ................................................ 3-31
Turn signal lever ................................................ 3-31 Illumination brightness control
......................... 3-32
Front fog light switch (if equipped) .................. 3-32
Wiper and washer .............................................. 3-33
Windshield wiper and washer switches .............. 3-34
Rear window wiper and washer switch ............... 3-36
Mirrors ................................................................ 3-36
Inside mirror ...................................................... 3-36
Auto-dimming mirror/compass (if equipped) ....... 3-37
Auto-dimming mirror/compass with HomeLink
®(if equipped) .................................................... 3-38
Outside mirrors ................................................. 3-44
Defogger and deicer .......................................... 3-45
Tilt/telescopic steering wheel ........................... 3-47
Horn .................................................................... 3-47
Page 158 of 446

Tilt/telescopic steering wheel
WARNING
. Do not adjust the steering wheel
tilt/telescopic position while driv-
ing. This may cause loss of
vehicle control and result in
personal injury.
. If the lever cannot be raised to
the fixed position, adjust the
steering wheel again. It is dan-
gerous to drive without locking
the steering wheel. This may
cause loss of vehicle control
and result in personal injury.
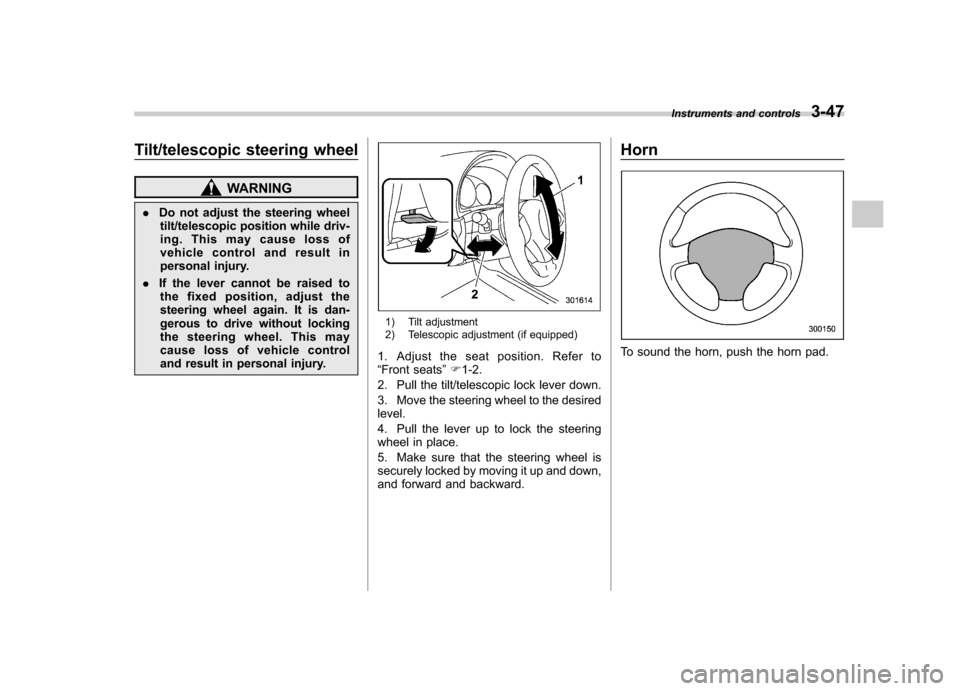
1) Tilt adjustment
2) Telescopic adjustment (if equipped)
1. Adjust the seat position. Refer to “ Front seats ”F 1-2.
2. Pull the tilt/telescopic lock lever down.
3. Move the steering wheel to the desired level.
4. Pull the lever up to lock the steering
wheel in place.
5. Make sure that the steering wheel is
securely locked by moving it up and down,
and forward and backward. Horn
To sound the horn, push the horn pad.
Instruments and controls
3-47