buttons SUBARU FORESTER 2014 SJ / 4.G Navigation Manual
[x] Cancel search | Manufacturer: SUBARU, Model Year: 2014, Model line: FORESTER, Model: SUBARU FORESTER 2014 SJ / 4.GPages: 106, PDF Size: 12.48 MB
Page 61 of 106

Navigation 135
Navigation
Displaying the Entire Route on the Map
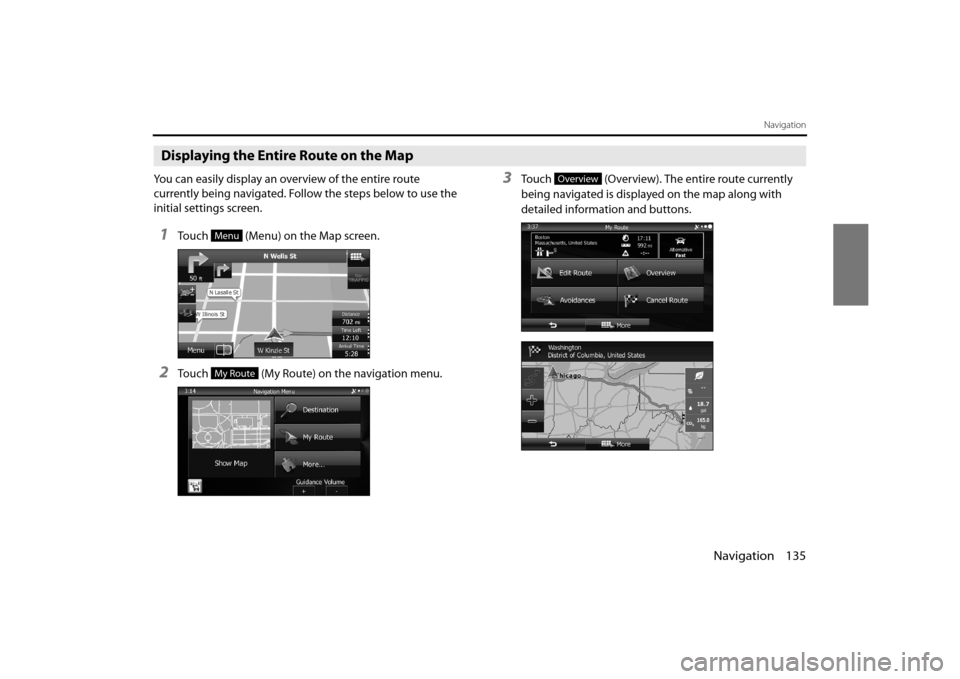
You can easily display an overview of the entire route
currently being navigated. Follow the steps below to use the
initial settings screen.
1Touch (Menu) on the Map screen.
2Touch (My Route) on the navigation menu.
3Touch (Overview). The entire route currently
being navigated is displayed on the map along with
detailed information and buttons.
Menu
My Route
Overview
Page 64 of 106

138 Navigation
Navigation
Changing the Route
When navigation has already begun, you can change the
route being navigated by using one of the following
methods. The methods are explained in the following section.
Selecting a new destination after the route has
been set: new route, waypoint, and final
destination
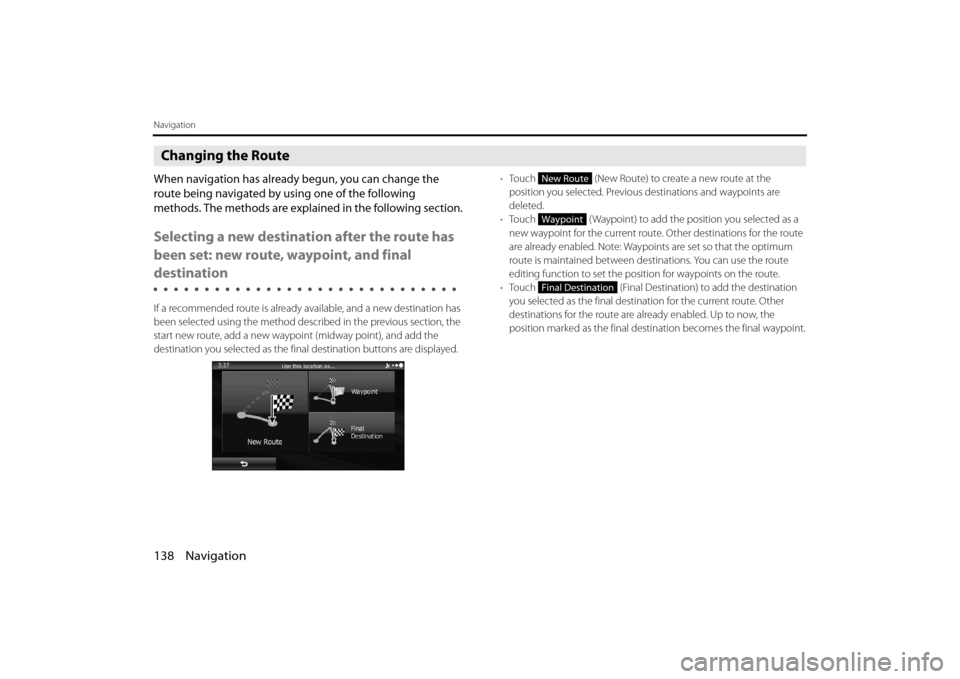
If a recommended route is already available, and a new destination has
been selected using the method described in the previous section, the
start new route, add a new waypoi nt (midway point), and add the
destination you selected as the fina l destination buttons are displayed. •
Touch (New Route) to create a new route at the
position you selected. Previous destinations and waypoints are
deleted.
• Touch ( Waypoint) to add the position you selected as a
new waypoint for the current route. Other destinations for the route
are already enabled. Note: Waypoi nts are set so that the optimum
route is maintained between dest inations. You can use the route
editing function to set the posi tion for waypoints on the route.
• Touch (Final Destination) to add the destination
you selected as the final destinat ion for the current route. Other
destinations for the route are already enabled. Up to now, the
position marked as the final dest ination becomes the final waypoint.
New Route
Waypoint
Final Destination
Page 73 of 106

Navigation 147
Navigation
Displaying a Simulation of the Route
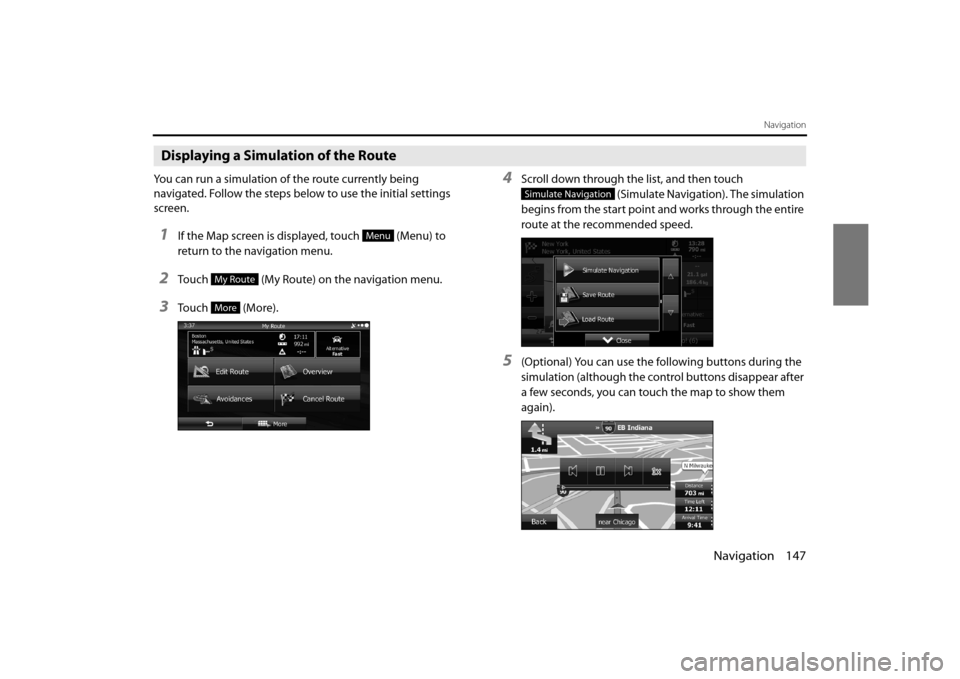
You can run a simulation of the route currently being
navigated. Follow the steps below to use the initial settings
screen.
1If the Map screen is displayed, touch (Menu) to
return to the navigation menu.
2Touch (My Route) on the navigation menu.
3Touch (More).
4Scroll down through the list, and then touch (Simulate Navigation). The simulation
begins from the start point and works through the entire
route at the recommended speed.
5(Optional) You can use the following buttons during the
simulation (although the control buttons disappear after
a few seconds, you can touch the map to show them
again).
Menu
My Route
More
Simulate Navigation
Page 83 of 106

Navigation 157
Reference Data
Sound and Warnings
Performs volume adjustment or changes the voice guidance language.
Also enables various warnings and warning settings.
• (Volume):
Touch this button to adjust various volumes in the application. The
type and buttons for various differ ent volumes is displayed on a new
screen. See the following items for more details.
• (Voice Language):
This button displays the current language for voice guidance. Touch
this button to select a new lang uage/narrator from the available
languages and list of narrators. When you touch an item from the list,
a sample of the audio is played back. Touch after selecting a
new voice language.
• (TTS Pro):
Touch this button to select the frequency of voice information, as
well as turning on or off various voice information such as
information on traffic conditions. •
(Verbosity Level):
You can select the Verbosity Level from “Minimal”, “Compact”, or
“Verbose”.
• ( Voice Recognition):
Touch this button to turn on or off talk back voice recognition results,
or change the voice recognition method.
• (Alert Point Settings):
Displays driver warning informatio n on the map. Touch this button
to turn these warnings on or off, and set how far from the danger the
warning should be generated. You can make individual settings for
each type of warning.
• ( Warning Sign Alerts):
Displays driver warning informatio n on the map. Touch this button
to turn these warnings on or off, and set how far from the danger the
warning should be generated. You can make individual settings for
each type of warning.
You can adjust the volume for the following voice categories. • Guidance:
Changes the volume for the guidance voice (when guiding using a
narrator).
• Alert Beeps:
Changes the volume for audio warnings (the beep).
Adjustment buttons for each audio classification: • Volume slider:
Adjusts the volume of the associated audio.
CAUTION
Be sure to set the volume of the audio at an appropriate level.
Improper volume setting may re sult in hearing damage or a
traffic accident.
Volume
Voice Language
TTS Pro
Verbosity Level
Voice Recognition
Alert Point Settings
Warning Sign Alerts