Brakes SUBARU FORESTER 2017 SJ / 4.G User Guide
[x] Cancel search | Manufacturer: SUBARU, Model Year: 2017, Model line: FORESTER, Model: SUBARU FORESTER 2017 SJ / 4.GPages: 634, PDF Size: 11.77 MB
Page 470 of 634
data to any other third party except
under the following conditions.– The vehicle owner has given his/
her consent.
– The disclosure/provision is
based on a court order or other
legally enforceable request.
– Data that has been modified so
that the user and vehicle cannot be
identified is provided to a research
institution for statistical processing
or similar purposes.
& Reverse Automatic Braking
System overview
The system detects objects using sonar
sensors installed in the rear bumper. If the
system determines a possible collision
with an object in the reversing direction,
automatic deceleration will be activated.
Also, beeping sounds will activate. If the
vehicle is further reversed, automatic hard
braking will be applied and a continuous
beeping sound will activate. !
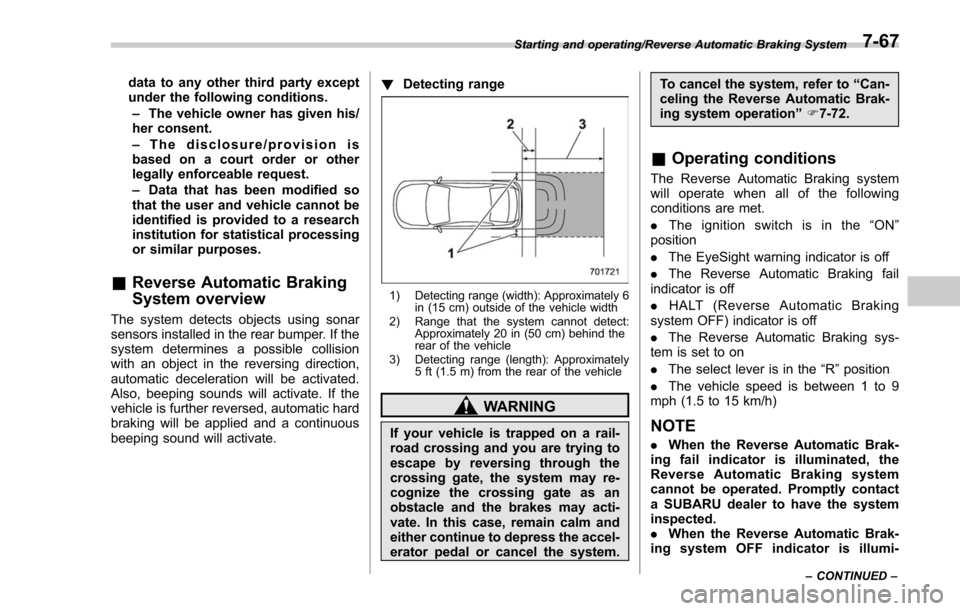
Detecting range
1) Detecting range (width): Approximately 6
in (15 cm) outside of the vehicle width
2) Range that the system cannot detect: Approximately 20 in (50 cm) behind the
rear of the vehicle
3) Detecting range (length): Approximately 5 ft (1.5 m) from the rear of the vehicle
WARNING
If your vehicle is trapped on a rail-
road crossing and you are trying to
escape by reversing through the
crossing gate, the system may re-
cognize the crossing gate as an
obstacle and the brakes may acti-
vate. In this case, remain calm and
either continue to depress the accel-
erator pedal or cancel the system. To cancel the system, refer to
“Can-
celing the Reverse Automatic Brak-
ing system operation ”F 7-72.
& Operating conditions
The Reverse Automatic Braking system
will operate when all of the following
conditions are met.
. The ignition switch is in the “ON ”
position
. The EyeSight warning indicator is off
. The Reverse Automatic Braking fail
indicator is off
. HALT (Reverse Automatic Braking
system OFF) indicator is off
. The Reverse Automatic Braking sys-
tem is set to on
. The select lever is in the “R ”position
. The vehicle speed is between 1 to 9
mph (1.5 to 15 km/h)
NOTE
. When the Reverse Automatic Brak-
ing fail indicator is illuminated, the
Reverse Automatic Braking system
cannot be operated. Promptly contact
a SUBARU dealer to have the system
inspected.
. When the Reverse Automatic Brak-
ing system OFF indicator is illumi-
Starting and operating/Reverse Automatic Braking System
–CONTINUED –7-67
Page 484 of 634
common sense precautions such as those
in the following list should be taken.
.Make certain that you and all of your
passengers are wearing seatbelts.
. Carry some emergency equipment,
such as a towing rope or chain, a shovel,
wheel blocks, first aid kit and cell phone or
citizens band radio.
. Drive carefully. Do not take unneces-
sary risks by driving in dangerous areas or
over rough terrain.
. Slow down and employ extra caution at
all times. When driving off-road, you will
not have the benefit of marked traffic
lanes, banked curves, traffic signs and
the like.
. Do not drive across steep slopes.
Instead, drive either straight up or straight
down the slopes. A vehicle can much
more easily tip over sideways than it can
end over end. Avoid driving straight up or
down slopes that are too steep.
. Avoid sharp turning maneuvers, espe-
cially at higher speeds.
. Do not grip the inside or spokes of the
steering wheel. A bad bump could jerk the
wheel and injure your hands. Instead drive
with your fingers and thumbs on the
outside of the rim.
. If driving through water, such as when
crossing shallow streams, first check the depth of the water and the bottom of the
stream bed for firmness and ensure that
the bed of the stream is flat. Drive slowly
and cross the stream without stopping.
The water should be shallow enough that
it does not reach the vehicle’
s under-
carriage. Water entering the engine air
intake or the exhaust pipe or water
splashing onto electrical parts may da-
mage your vehicle and may cause it to
stall. Never attempt to drive through
rushing water; regardless of its depth, it
can wash away the ground from under
your tires, resulting in possible loss of
traction and even vehicle rollover.
. Always check your brakes for effec-
tiveness immediately after driving in sand,
mud or water. Do this by driving slowly
and stepping on the brake pedal. Repeat
that process several times to dry out the
brake discs and brake pads.
. Do not drive or park over or near
flammable materials such as dry grass or
fallen leaves, as they may burn easily. The
exhaust system is very hot while the
engine is running and right after engine
stops. This could create a fire hazard.
. After driving through tall grass, mud,
rocks, sand, rivers, etc., check that there
is no grass, bush, paper, rags, stones,
sand, etc. adhering to or trapped on the
underbody. Clear off any such matter from the underbody. If the vehicle is used with
these materials trapped or adhering to the
underbody, a mechanical breakdown or
fire could occur.
.
Secure all cargo carried inside the
vehicle and make certain that it is not
piled higher than the seatbacks. During
sudden stops or jolts, unsecured cargo
could be thrown around in the vehicle and
cause injury. Do not pile heavy loads on
the roof. Those loads raise the vehicle’ s
center of gravity and make it more prone
to tip over.
. If you must rock the vehicle to free it
from sand or mud, depress the accelerator
pedal slightly and move the shift lever/
select lever back and forth between “1”/
“D ”and “R”repeatedly. Do not race the
engine. For the best possible traction,
avoid spinning the wheels when trying to
free the vehicle.
. When the road surface is extremely
slippery, you can obtain better traction by
starting the vehicle with the transmission
in 2nd than 1st. For CVT models with
manual mode, refer to “Selection of
manual mode ”F 7-27.
. Never equip your vehicle with tires
larger than those specified in this manual.
. Wash the vehicle’ s underbody after off-
road driving. Suspension components are
particularly prone to dirt buildup, so they
Driving tips/On –road and off –road driving
–CONTINUED –8-7
Page 486 of 634
side temperature. If the concen-
tration is inappropriate, sprayed
washer fluid may freeze on the
windshield and obstruct your
view, and the fluid may freeze in
the reservoir tank.
. State or local regulations on
volatile organic compounds may
restrict the use of methanol, a
common windshield washer anti-
freeze additive. Washer fluids
containing non-methanol anti-
freeze agents should be used
only if they provide cold weather
protection without damaging
your vehicle ’s paint, wiper blades
or washer system.
! Before driving your vehicle
Before entering the vehicle, remove any
snow or ice from your shoes because that
could make the pedals slippery and
driving dangerous.
While warming up the vehicle before
driving, check that the accelerator pedal,
brake pedal, and all other controls operate
smoothly.
Clear away ice and snow that has
accumulated under the fenders to avoid
making steering difficult. During severe winter driving, stop when and where it is
safe to do so and check under the fenders
periodically.
!
Parking in cold weather
Do not use the parking brake when
parking for long periods in cold weather
since it could freeze in that position.
Instead, you should observe the following
tips.
1. Place the shift lever in “1”or “R”for MT
models, or the select lever in “P”for CVT
models.
2. Use tire stops under the tires to
prevent the vehicle from moving.
When the vehicle is parked in snow or
when it snows, raise the wiper blades off
the glass to prevent damage to them.
When the vehicle has been left parked
after use on roads heavily covered with
snow, or has been left parked during a
snowstorm, icing may develop on the
brake system, which could cause poor
braking action. Check for snow or ice
buildup on the suspension, disc brakes
and brake hoses underneath the vehicle.
If there is caked snow or ice, remove it,
being careful not to damage the disc
brakes and brake hoses and ABS har-
ness.WARNING
Snow can trap dangerous exhaust
gases under your vehicle. Keep
snow clear of the exhaust pipe and
from around your vehicle if you park
the vehicle in snow with the engine
running.
! Refueling in cold weather
To help prevent moisture from forming in
the fuel system and the risk of its freezing,
use of an antifreeze additive in the fuel
tank is recommended during cold weather.
Use only additives that are specifically
designed for this purpose. When an
antifreeze additive is used, its effect lasts
longer if the tank is refilled whenever the
fuel level reaches half empty.
If your SUBARU is not going to be used
for an extended period, it is best to have
the fuel tank filled to capacity.
! Opening rear gate (models with
power rear gate)
CAUTION
Before operating the power rear
gate, check that there is no frost or
snow between the power rear gate
and the vehicle body. If you notice
Driving tips/Winter driving
–CONTINUED –8-9
Page 493 of 634
Driving tips/Trailer hitch (dealer option)
!Installing carrying attachments on
the crossbars
When installing any carrying attachment
such as a bike carrier, ski carrier, kayak
carrier, cargo basket, etc. on the cross-
bars, follow the manufacturer ’s instruc-
tions and make sure that the attachment is
securely fixed to the crossbars. Use only
attachments designed specifically for the
crossbars. A set of the crossbars is
designed to carry loads (cargo and attach-
ment) of not more than 165 lbs (75 kg).
Before operating the vehicle, make sure
that the cargo is properly secured on the
attachment.
NOTE
Remember that the vehicle ’s center of
gravity is altered with the weight of the
load on the roof, thus affecting the
driving characteristics.
Drive carefully. Avoid rapid starts, hard
cornering and abrupt stops. Crosswind
effects will be increased. !
Removal and installation of the
crossbars
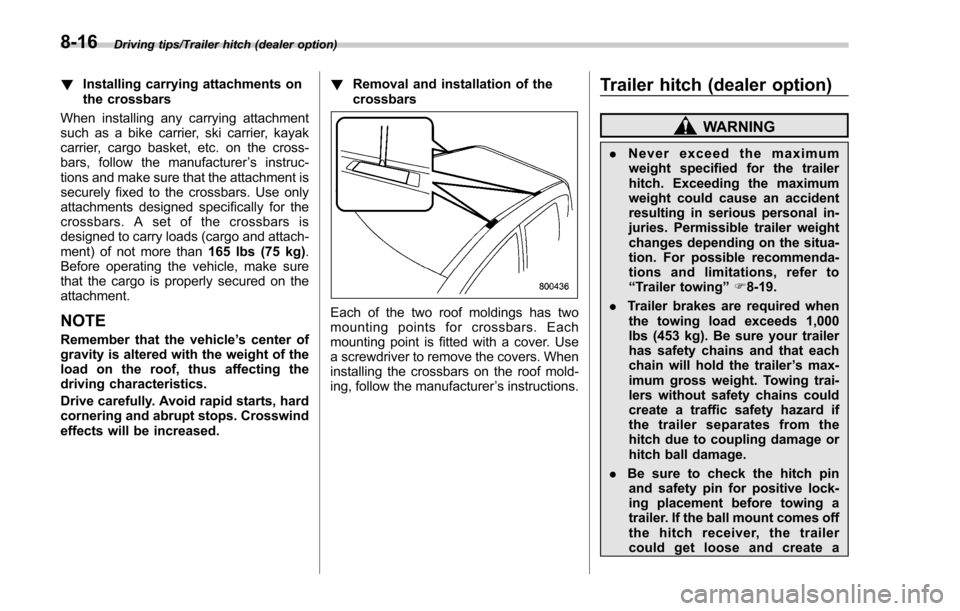
Each of the two roof moldings has two
mounting points for crossbars. Each
mounting point is fitted with a cover. Use
a screwdriver to remove the covers. When
installing the crossbars on the roof mold-
ing, follow the manufacturer ’s instructions.
Trailer hitch (dealer option)
WARNING
. Never exceed the maximum
weight specified for the trailer
hitch. Exceeding the maximum
weight could cause an accident
resulting in serious personal in-
juries. Permissible trailer weight
changes depending on the situa-
tion. For possible recommenda-
tions and limitations, refer to
“ Trailer towing” F8-19.
. Trailer brakes are required when
the towing load exceeds 1,000
lbs (453 kg). Be sure your trailer
has safety chains and that each
chain will hold the trailer ’s max-
imum gross weight. Towing trai-
lers without safety chains could
create a traffic safety hazard if
the trailer separates from the
hitch due to coupling damage or
hitch ball damage.
. Be sure to check the hitch pin
and safety pin for positive lock-
ing placement before towing a
trailer. If the ball mount comes off
the hitch receiver, the trailer
could get loose and create a
8-16
Page 496 of 634
Trailer towing
Your vehicle is designed and intended to
be used primarily as a passenger-carrying
vehicle. Towing a trailer puts additional
loads on your vehicle’s engine, drivetrain,
brakes, tires and suspension and has an
adverse effect on fuel economy.
If you do decide to tow a trailer, your safety
and satisfaction depend upon proper use
of correct equipment and cautious opera-
tion of your vehicle. Seek the advice of
your SUBARU dealer to assist you in
purchasing a hitch and other necessary
towing equipment appropriate for your
vehicle. Do not use towing equipment
other than genuine SUBARU towing
equipment. In addition, be sure to follow
the instructions on correct installation and
use provided by SUBARU.
SUBARU assumes no responsibility for
injuries or vehicle damage that result from
trailer towing equipment, or from any
errors or omissions in the instructions
accompanying such equipment or for your
failure to follow the proper instructions.
Regularly check that the hitch mounting
bolts and nuts are tightened securely.
& Warranties and maintenance
SUBARU warranties do not apply to
vehicle damage or malfunction caused
by trailer towing. If you use your vehicle to
tow a trailer, more frequent maintenance
will be required due to the additional load.
(Refer to “Maintenance schedule under
severe driving conditions ”in the “Warranty
and Maintenance Booklet ”.)
Under no circumstances should a trailer
be towed with a new vehicle or a vehicle
with any new powertrain component (en-
gine, transmission, differential, wheel
bearings, etc.) for the first 1,000 miles
(1,600 km) of driving.
& Maximum load limits
WARNING
Never exceed the maximum load
limits explained in the following.
Exceeding the maximum load limits
could cause personal injury and/or
vehicle damage.
CAUTION
. Adequate size trailer brakes are
required when the trailer and its
cargo exceed 1,000 lbs (453 kg) total weight.
. Before towing a trailer, check the
trailer total weight, GVW, GAWs
and tongue load. Make sure the
load and its distribution in your
vehicle and trailer are accepta-
ble.
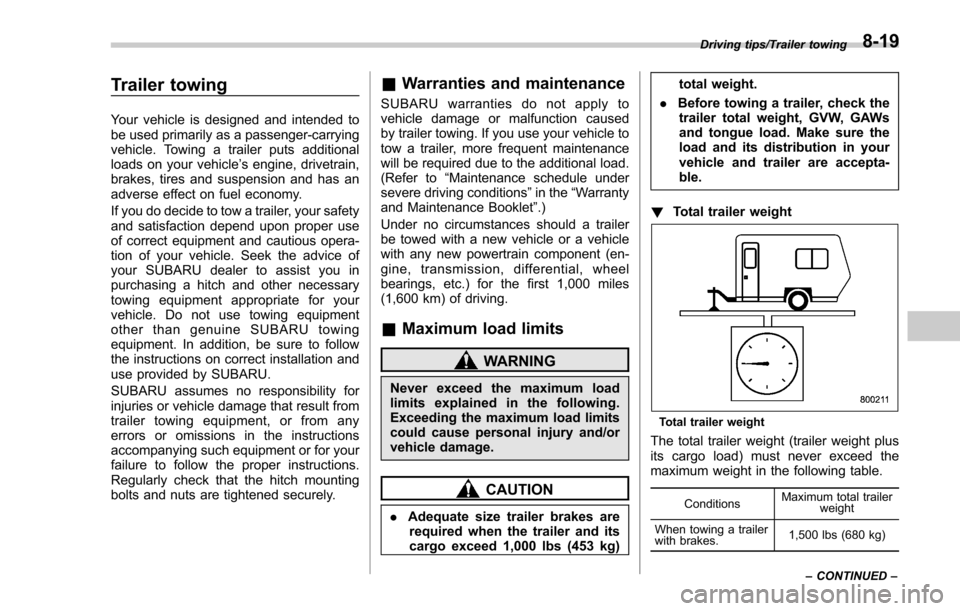
! Total trailer weight
Total trailer weight
The total trailer weight (trailer weight plus
its cargo load) must never exceed the
maximum weight in the following table.
Conditions Maximum total trailer
weight
When towing a trailer
with brakes. 1,500 lbs (680 kg)
Driving tips/Trailer towing
–CONTINUED –
8-19
Page 499 of 634
Driving tips/Trailer towing
the rear axle of the towing vehicle.
This may cause the rear wheels to
skid, especially during braking or
when vehicle speed is reduced dur-
ing cornering, resulting in over-
steer, spin out and/or jackknifing.
&Trailer hitches
WARNING
Never drill the frame or under-body
of your vehicle to install a commer-
cial trailer hitch. If you do, danger-
ous exhaust gas, water or mud may
enter the passenger compartment
through the drilled hole. Exhaust
gas contains carbon monoxide, a
colorless and odorless gas which is
dangerous, or even lethal, if inhaled.
Also, drilling the frame or under-
body of your vehicle could cause
deterioration of strength of your
vehicle and cause corrosion around
the drilled hole.
CAUTION
. Do not modify the vehicle ex-
haust system, brake system, or
other systems when installing a hitch or other trailer towing
equipment.
. Do not use axle-mounted hitches
as they can cause damage to the
axle housing, wheel bearings,
wheels or tires.
Do not use a trailer hitch other than a
genuine SUBARU trailer hitch. A genuine
SUBARU hitch is available from your
SUBARU dealer.
& Connecting a trailer
! Trailer brakes
WARNING
.Adequate size trailer brakes are
required when the trailer and its
cargo exceed 1,000 lbs (453 kg)
total weight.
. Do not directly connect your
trailer ’s hydraulic brake system
to the hydraulic brake system in
your vehicle. Direct connection
would cause the vehicle ’s brake
performance to deteriorate and
could lead to an accident.
If your trailer ’s total weight (trailer weight
plus its cargo weight) exceeds 1,000 lbs (453 kg), the trailer is required to be
equipped with its own brake system.
Electric brakes or surge brakes are
recommended, and must be installed
properly. Check that your trailer
’s brakes
conform with Federal, state/province and/
or other applicable regulations. Your
SUBARU ’s brake system is not designed
to be tapped into the trailer ’s hydraulic
brake system. Please ask your SUBARU
dealer and professional trailer supplier for
more information about the trailer ’s brake
system.
! Trailer safety chains
WARNING
Always use safety chains between
your vehicle and the trailer. Towing
trailer without safety chains could
create a traffic safety hazard if the
trailer separates from the hitch due
to coupling damage or hitch ball
damage.
In case the trailer hitch connector or hitch
ball should break or become discon-
nected, the trailer could get loose and
create a traffic safety hazard.
For safety, always connect the towing
vehicle and trailer with trailer safety
chains. Two chains should be used in
8-22
Page 502 of 634
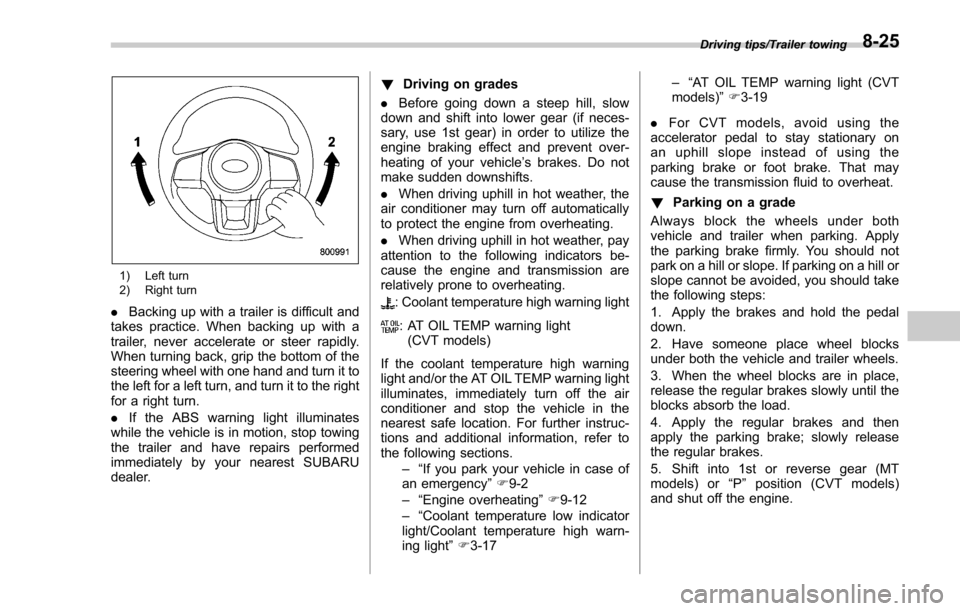
1) Left turn
2) Right turn
.Backing up with a trailer is difficult and
takes practice. When backing up with a
trailer, never accelerate or steer rapidly.
When turning back, grip the bottom of the
steering wheel with one hand and turn it to
the left for a left turn, and turn it to the right
for a right turn.
. If the ABS warning light illuminates
while the vehicle is in motion, stop towing
the trailer and have repairs performed
immediately by your nearest SUBARU
dealer. !
Driving on grades
. Before going down a steep hill, slow
down and shift into lower gear (if neces-
sary, use 1st gear) in order to utilize the
engine braking effect and prevent over-
heating of your vehicle’ s brakes. Do not
make sudden downshifts.
. When driving uphill in hot weather, the
air conditioner may turn off automatically
to protect the engine from overheating.
. When driving uphill in hot weather, pay
attention to the following indicators be-
cause the engine and transmission are
relatively prone to overheating.: Coolant temperature high warning light
: AT OIL TEMP warning light (CVT models)
If the coolant temperature high warning
light and/or the AT OIL TEMP warning light
illuminates, immediately turn off the air
conditioner and stop the vehicle in the
nearest safe location. For further instruc-
tions and additional information, refer to
the following sections. –“If you park your vehicle in case of
an emergency ”F 9-2
–“ Engine overheating ”F 9-12
–“ Coolant temperature low indicator
light/Coolant temperature high warn-
ing light ”F 3-17 –“
AT OIL TEMP warning light (CVT
models) ”F 3-19
. For CVT models, avoid using the
accelerator pedal to stay stationary on
an uphill slope instead of using the
parking brake or foot brake. That may
cause the transmission fluid to overheat.
! Parking on a grade
Always block the wheels under both
vehicle and trailer when parking. Apply
the parking brake firmly. You should not
park on a hill or slope. If parking on a hill or
slope cannot be avoided, you should take
the following steps:
1. Apply the brakes and hold the pedal
down.
2. Have someone place wheel blocks
under both the vehicle and trailer wheels.
3. When the wheel blocks are in place,
release the regular brakes slowly until the
blocks absorb the load.
4. Apply the regular brakes and then
apply the parking brake; slowly release
the regular brakes.
5. Shift into 1st or reverse gear (MT
models) or “P ” position (CVT models)
and shut off the engine.
Driving tips/Trailer towing8-25
Page 527 of 634
Appearance care/Exterior care
Exterior care
&Washing
CAUTION
. When washing the vehicle, the
brakes may get wet. As a result,
the brake stopping distance will
be longer. To dry the brakes,
drive the vehicle at a safe speed
while lightly depressing the
brake pedal to heat up the
brakes.
. Do not wash the engine compart-
ment and area adjacent to it. If
water enters the engine air intake
or electrical parts, it will cause
engine trouble or a malfunction
of electrical equipment.
. When washing the inner fenders,
underbody, bumpers and pro-
truding objects such as exhaust
pipes and exhaust finishers, be
careful to avoid contact with any
sharp ends in order to prevent
injures.
. Do not use any organic solvents
when washing the surface of the
bulb assembly cover. However, if
a detergent with organic solvents
is used to wash the cover sur- face, completely rinse off the
detergent with water. Otherwise,
the cover surface may be da-
maged.
. Since your vehicle is equipped
with a rear wiper, automatic car-
wash brushes could become
tangled around it, damaging the
wiper arm and other compo-
nents. Ask the automatic car-
wash operator not to let the
brushes touch the wiper arm or
to fix the wiper arm on the rear
window glass with adhesive tape
before operating the machine.
NOTE
When having your vehicle washed in
an automatic car wash, make sure
beforehand that the car wash is of
suitable type.
The best way to preserve your vehicle’ s
beauty is frequent washing. Wash the
vehicle at least once a month to avoid
contamination by road grime.
Wash dirt off with a wet sponge and plenty
of lukewarm or cold water. Do not wash
the vehicle with hot water and in direct
sunlight.
Salt, chemicals, insects, tar, soot, tree sap, and bird droppings should be washed
off by using a light detergent, as required.
If you use a light detergent, make certain
that it is a neutral detergent. Do not use
strong soap or chemical detergents. All
cleaning agents should be promptly rinsed
off the surface and not allowed to dry
there. Rinse the vehicle thoroughly with
plenty of lukewarm water. Wipe the
remaining water off with a chamois or soft
cloth. Wear rubber gloves and use a hand
brush when washing down underbody,
inner fenders and suspension to remove
mud and dirt effectively.
!
Washing the underbody
Chemicals, salts and gravel used for
deicing road surfaces are extremely cor-
rosive, accelerating the corrosion of un-
derbody components, such as the exhaust
system, fuel and brake lines, brake
cables, floor pan and fenders, and sus-
pension.
Thoroughly flush the underbody and in-
side of the fenders with lukewarm or cold
water at frequent intervals to reduce the
harmful effects of such agents.
Mud and sand adhering to the underbody
components may accelerate their corro-
sion.
After driving off-road or on muddy or
sandy roads, wash the mud and sand off
10-2
Page 553 of 634
Maintenance and service/Replacement of brake pad and lining
Replacement of brake pad
and lining
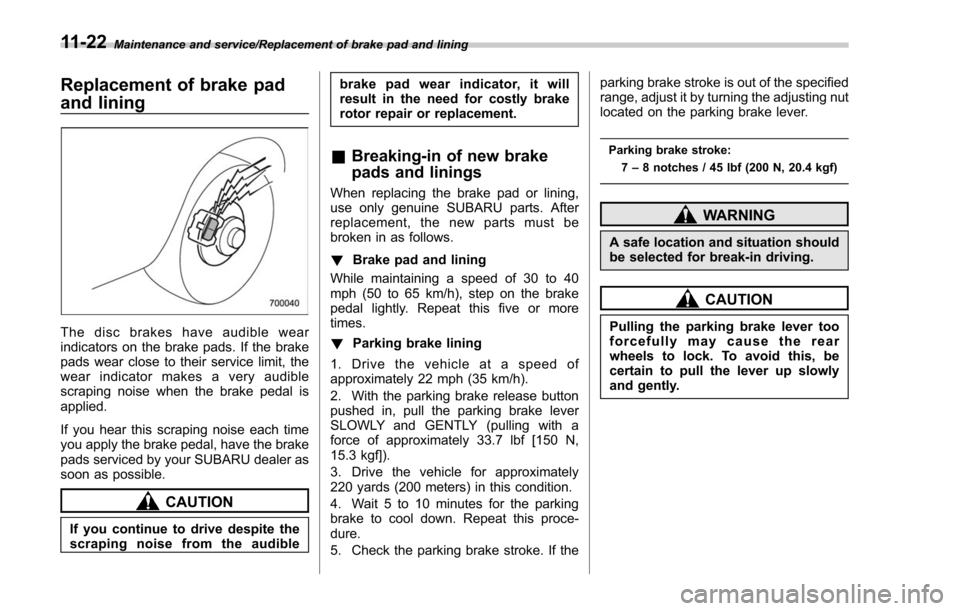
The disc brakes have audible wear
indicators on the brake pads. If the brake
pads wear close to their service limit, the
wear indicator makes a very audible
scraping noise when the brake pedal is
applied.
If you hear this scraping noise each time
you apply the brake pedal, have the brake
pads serviced by your SUBARU dealer as
soon as possible.
CAUTION
If you continue to drive despite the
scraping noise from the audiblebrake pad wear indicator, it will
result in the need for costly brake
rotor repair or replacement.
&
Breaking-in of new brake
pads and linings
When replacing the brake pad or lining,
use only genuine SUBARU parts. After
replacement, the new parts must be
broken in as follows.
! Brake pad and lining
While maintaining a speed of 30 to 40
mph (50 to 65 km/h), step on the brake
pedal lightly. Repeat this five or more
times.
! Parking brake lining
1. Drive the vehicle at a speed of
approximately 22 mph (35 km/h).
2. With the parking brake release button
pushed in, pull the parking brake lever
SLOWLY and GENTLY (pulling with a
force of approximately 33.7 lbf [150 N,
15.3 kgf]).
3. Drive the vehicle for approximately
220 yards (200 meters) in this condition.
4. Wait 5 to 10 minutes for the parking
brake to cool down. Repeat this proce-
dure.
5. Check the parking brake stroke. If the parking brake stroke is out of the specified
range, adjust it by turning the adjusting nut
located on the parking brake lever.
Parking brake stroke:
7–8 notches / 45 lbf (200 N, 20.4 kgf)
WARNING
A safe location and situation should
be selected for break-in driving.
CAUTION
Pulling the parking brake lever too
forcefully may cause the rear
wheels to lock. To avoid this, be
certain to pull the lever up slowly
and gently.
11-22
Page 604 of 634
crease in temperature could cause
tread separation, and failure of the
tire(s). Possible resulting loss of
vehicle control could lead to an
accident.
!Measuring and adjusting air
pressure to achieve proper in-
flation
Check and, if necessary, adjust the
pressure of each tire (including the
spare) at least once a month and
before any long journey. Check the
tire pressures when the tires are
cold. Use a pressure gauge to
adjust the tire pressures to the
specific values. Driving even a
short distance warms up the tires
and increases the tire pressures.
Also, the tire pressures are affected
by the outside temperature. It is
best to check tire pressure out-
doors before driving the vehicle.
When a tire becomes warm, the air
inside it expands, causing the tire
pressure to increase. Be careful not
to mistakenly release air from a
warm tire to reduce its pressure.
&Glossary of tire terminology
.Accessory weight
The combined weight (in excess of
those standard items which may be
replaced) of automatic transmis-
sion, power steering, power brakes,
power windows, power seats, radio,
and heater, to the extent that these
items are available as factory-in-
stalled equipment (whether in-
stalled or not).
.Bead
The part of the tire that is made of
steel wires, wrapped or reinforced
by ply cords and that is shaped to fit
the rim.
.Bead separation
A breakdown of the bond between
components in the bead.
.Bias ply tire
A pneumatic tire in which the ply
cords that extend to the beads are
laid at alternate angles substantially
less than 90 degrees to the center-
line of the tread.
.Carcass
The tire structure, except tread and sidewall rubber which, when in-
flated, bears the load.
.Chunking
The breaking away of pieces of the
tread or sidewall.
.Cold tire pressure
The pressure in a tire that has been
driven less than 1 mile or has been
standing for three hours or more.
.Cord
The strands forming the plies in the
tire.
.Cord separation
The parting of cords from adjacent
rubber compounds.
.Cracking
Any parting within the tread, side-
wall, or inner liner of the tire
extending to cord material.
.Curb weight
The weight of a motor vehicle with
standard equipment including the
maximum capacity of fuel, oil and
coolant, and if so equipped, air
conditioning and additional weight
optional engine.
Consumer information and Reporting safety defects/Tire information
–CONTINUED –13-5